

NuVoice Software Manual 2
Acknowledgements
Copyright/Trademark Information
© 2012-2016 Prentke Romich Company. All rights reserved. Under copyright laws this document may not be copied, in whole or in part, without the written consent
of the Prentke Romich Company.
Accent, Language Activity Monitor (LAM), Memory Transfer Interface (MTI), NuEye, NuPoint, NuVoice, and WordCore are trademarks of Prentke Romich Company.
NuEye is a product developed by PRC in collaboration with SMI GmbH.
MINSPEAK
®
, PIXON
®
, SEMANTIC COMPACTION
®
, and UNITY
®
are trademarks under license from Semantic Compaction Systems, Inc. in the United States and/or other
countries and are © 1988-2016 Semantic Compaction Systems, Inc., all rights reserved.
PCS Symbols are a product of Mayer-Johnson.
Clarity Symbols are a product of Liberator, Ltd.
Fonix-DECtalk Text-to-Speech software is a copyright of Fonix Corporation; all rights reserved.
RealSpeak Text-to-Speech is a trademark of Nuance Communications, Inc.
AT&T Natural Voices is a trademark of AT&T Corporation.
Acapela speech technologies licensed from the Acapela Group®.
Tracker is a trademark of Madentec, Inc.
Bluetooth Wireless Technology is a registered trademark. The Bluetooth word mark and logos are owned by the Bluetooth SIG, Inc. and any use of such marks by
PRC is under license. Other trademarks and trade names are those of their respective owners.
WordQ is a trademark of Bloorview MacMillan Children's Centre
15444-Mv1.8 – 02/19/2016
Electronic Interference Information
This device complies with Part 15 of the FCC Rules. Operation is subject to two conditions: (1) this device may not cause harmful interference, and (2) this device
must accept any interference received, including interference that may cause undesired operation.
Warning! Changes or modifications to this product which are not authorized by Prentke Romich Company could exceed FCC limits and negate your authority to use
this product.
This equipment has been tested and found to comply with the limits for a Class B digital device, pursuant to Part 15 of the FCC Rules. These limits are designed to
provide reasonable protection against harmful interference in a residential installation. This equipment generates, uses and can radiate radio frequency energy
and, if not installed and used in accordance with the instructions, may cause harmful interference to radio communications. However, there is no guarantee that
interference will not occur in a particular installation. You can determine whether this product is causing interference in your radio or television by turning this
product off. If the interference stops, it was probably caused by this product or one of its accessories. You can attempt to correct the interference by using one or
more of the following measures:
• Turn the television or radio antenna until the interference stops.
• Move this product to one side or the other of the television or radio.
• Move this product farther away form the television or radio.
• Plug this product into an outlet that is on a different circuit from the television or radio; that is, this product should be controlled by different circuit
breakers/fuses from the television or radio.
• If necessary, contact a Prentke Romich Company service technician for assistance.
This Class B digital apparatus meets all requirements of the Canadian Interference-Causing Equipment Regulations. Cet appareil numérique de la classe B respect
toutes les exigences du Règlement sur le matériel brouiller du Canada.

15444-Mv1.8
Warnings
This device is not intended to be an emergency call device or sole communication aid.
When operating this device in a medical environment, do not use with any product that is not medically approved. Follow all rules for appropriate cell phone and
wireless device use.
Any mounts used should be fitted by a qualified person. Failure to install the mounting system according to the manufacturer’s instructions may result in an injury
to the user. Be certain that the user’s view is not obstructed by the mounting.
Implantable Medical Devices
A minimum separation of six (6) inches should be maintained between a handheld wireless mobile device and an implantable medical device, such as a pacemaker
or implantable cardioverter defibrillator, to avoid potential interference with the device.
Persons who have such devices:
• Should ALWAYS keep the mobile device more than six (6) inches from their implantable medical device when the mobile device is turned on;
• Should not carry the mobile device in a breast pocket;
• Should turn the mobile device OFF immediately if there is any reason to suspect that interference is taking place;
• Should read and follow the directions from the manufacturer of your implantable medical device. If you have any questions about using your wireless mobile
device with an implantable medical device, consult your health car provider.

NuVoice Software Manual 4
End User Licensing Agreement
You have acquired a PRC device which includes software licensed by PRC from Microsoft Licensing Inc. or its affiliates ("MS"). Those installed software products of
MS origin, as well as associated media, printed materials and “online” or electronic documentation (software) are protected by international intellectual property
laws and treaties.
IF YOU DO NOT AGREE TO THIS END USER LICENSE AGREEMENT (EULA), DO NOT USE THE DEVICE OR COPY THE SOFTWARE. INSTEAD, PROMPTLY CONTACT
PRENTKE ROMICH COMPANY FOR INSTRUCTIONS ON RETURN OF THE UNUSED DEVICE(S) FOR A REFUND. ANY USE OF THE SOFTWARE, INCLUDING BUT NOT
LIMITED TO USE ON THE DEVICE, WILL CONSTITUTE YOUR AGREEMENT TO THIS EULA (OR RATIFICATION OF ANY PREVIOUS CONSENT).
GRANT OF SOFTWARE LICENSE.
This EULA grants you the following license:
• You may use the SOFTWARE only on your PRC device.
• NOT FAULT TOLERANT. THE SOFTWARE IS NOT FAULT TOLERANT. PRC HAS INDEPENDENTLY DETERMINED HOW TO USE THE SOFTWARE AND MS HAS RELIED
UPON PRC TO CONDUCT SUFFICIENT TESTING TO DETERMINE THAT THE SOFTWARE IS SUITABLE FOR SUCH USE.
• NO WARRANTIES FOR THE SOFTWARE. THE SOFTWARE is provided "AS IS" and with all faults. THE ENTIRE RISK AS TO SATISFACTORY QUALITY,
PERFORMANCE, ACCURACY, AND EFFORT (INCLUDING LACK OF NEGLIGENCE) IS WITH YOU. ALSO THERE IS NO WARRANTY AGAINST INTERFERENCE WITH
YOUR ENJOYMENT OF THE SOFTWARE OR AGAINST INFRINGEMENT. IF YOU HAVE RECEIVED ANY WARRANTIES REGARDING THE DEVICE OR SOFTWARE, THOSE
WARRANTIES DO NOT ORIGINATE FROM, AND ARE NOT BINDING ON, MS.
• Note on Java Support. The SOFTWARE may contain support for programs written in Java. Java technology is not fault tolerant and is not designed,
manufactured, or intended for use or resale as online control equipment in hazardous environments requiring fail-safe performance, such as in the operation of
nuclear facilities, aircraft navigation or communication systems, air traffic control, direct life support machines, or weapons systems, in which the failure of Java
technology could lead directly to death, personal injury or severe physical or environmental damage. Sun Microsystems, Inc. has contractually obligated MS to
make this disclaimer.
• No Liability for Certain damages. EXCEPT AS PROHIBITED BY LAW, MS SHALL HAVE NO LIABILITY FOR ANY INDIRECT, SPECIAL CONSEQUENTIAL OR INCIDENTAL
DAMAGES ARISING FROM OR IN CONNECTION WITH THE USE OR PERFORMANCE OF THE SOFTWARE. THIS LIMITATION SHALL APPLY EVEN IF ANY REMEDY
FAILS OF ITS ESSENTIAL PURPOSE. IN NO EVENT SHALL MS BE LIABLE FOR ANY AMOUNT IN EXCESS OF U.S. TWO HUNDRED FIFTY DOLLARS (U.S. $250.00).
• Limitations on Reverse Engineering, Decompilation and Disassembly. You may not reverse engineer, decompile, or disassemble the SOFTWARE, except and only
to the extent that such activity is expressly permitted by applicable law notwithstanding this limitation.
• SOFTWARE TRANSFER ALLOWED BUT WITH RESTRICTIONS. You may permanently transfer rights under this EULA only as part of a permanent sale or transfer of
the Device, and only if the recipient agrees to this EULA. If the SOFTWARE is an upgrade, any transfer must also include all prior versions of SOFTWARE.
• EXPORT RESTRICTIONS. You acknowledge that SOFTWARE is subject to U.S. export jurisdiction. You agree to comply with all applicable international and national
laws that apply to the SOFTWARE, including U.S. Export Administration Regulations, as well as end-user, end-use and destination restrictions issued by U.S. and
other governments. For additional information see http://www.microsoft.com/exporting/
.

NuVoice Software Manual 5
Contents
Acknowledgements ............................................................................................................ 2
End User Licensing Agreement ........................................................................................... 4
Display Areas .................................................................................................................. 13
Text Display Area .............................................................................................................. 13
Icon or Word Prediction Area ........................................................................................... 13
Status Area – Classic Skin .................................................................................................. 13
Status Area – Skin 1/Skin 2 ............................................................................................... 14
Vocabularies .................................................................................................................... 16
The Toolbox ..................................................................................................................... 17
To Go to the Toolbox ........................................................................................................ 17
The Tools Menu ................................................................................................................ 18
The Help Key ..................................................................................................................... 18
Single Function Keys...................................................................................................... 19
Speech On/Off .................................................................................................................. 19
Speaker Volume ................................................................................................................ 19
Clear Display ..................................................................................................................... 19
OK (Toolbox) ..................................................................................................................... 19
Special Single Function Keys ........................................................................................ 20
Go To Home ...................................................................................................................... 20
Go To Spell ........................................................................................................................ 20
Alert Signal ........................................................................................................................ 20
The Alarm Tool .................................................................................................................. 20
Auditory Prompts Menu ................................................................................................. 21
Auditory Prompts Off/On ................................................................................................. 21
Using a Label or Content for a Prompt ............................................................................. 21
Use Earphone Off/On ....................................................................................................... 22
Volume (Auditory Prompts Menu) ................................................................................... 23
Category Prompt ............................................................................................................... 23
Erasing Prompts ................................................................................................................ 23
User Area Menu ............................................................................................................... 25
Switch User Area ............................................................................................................... 25
Spelling Keyboard: QWERTY/User Defined ....................................................................... 26
Storing Keyboard: QWERTY/User Defined ........................................................................ 26
Modify User Keys .............................................................................................................. 26
Rename User Area ............................................................................................................ 27
Replace User Area ............................................................................................................. 27
Copy a User Area .............................................................................................................. 27
Copy Pages/Activities........................................................................................................ 28
Change All Occurrences of an Icon ................................................................................... 28
Templates ......................................................................................................................... 28
Expand a User Area or Page .............................................................................................. 29
Change Communication Language ................................................................................... 30
Change Home Location ..................................................................................................... 30

NuVoice Software Manual 6
Copy All Abbreviation Expansions .................................................................................... 30
Copy All Sequences Beginning with Selected Icon............................................................ 30
Erase All Sequences Beginning with Selected Icon ........................................................... 30
Restart Resumes at … ....................................................................................................... 30
Change Number of Toolbox Locations .............................................................................. 31
Define Custom Keyguard .................................................................................................. 31
Clock Menu ...................................................................................................................... 32
Pronunciation Dictionary ............................................................................................... 33
Managing Pronunciations for a Voice ............................................................................... 33
Manage Pronunciations Menu Options ............................................................................ 33
Add Pronunciation ..................................................................................................... 33
Page Up/Page Down/Arrows ..................................................................................... 34
Find Word .................................................................................................................. 34
Edit Pronunciation ..................................................................................................... 34
Delete Pronunciation ................................................................................................. 34
Test Pronunciation ..................................................................................................... 34
Advanced Options (Pronunciations) .......................................................................... 34
Feedback Menu ............................................................................................................... 35
Earphone Volume ............................................................................................................. 35
Backlight Intensity ............................................................................................................ 35
Activation Beep and Scan Beep ........................................................................................ 35
Mid-Sequence Categories ................................................................................................. 36
First Categories ................................................................................................................. 36
Embellished Icon: On/Off ................................................................................................. 36
Icon Message Labels: Top or Bottom ................................................................................ 36
Show Selections By: Icon or Icon Name ............................................................................ 36
Spell One Word ................................................................................................................. 36
Auto Spell .......................................................................................................................... 36
Speak When Spelling ........................................................................................................ 36
Bass and Treble (Feedback Menu) .................................................................................... 37
Text Size ............................................................................................................................ 37
Raspberries On/Off ........................................................................................................... 37
External Speaker: On/Off .................................................................................................. 37
Icon Prediction: Grey/White/Blank/Off ............................................................................ 37
Icon Tutor On-the-Fly ........................................................................................................ 37
Icon Tutor View Delay ....................................................................................................... 37
Icon Tutor View Count ...................................................................................................... 37
Background and Text Colors ............................................................................................. 37
Bluetooth Speaker Menu (Feedback Menu) ..................................................................... 38
Skin Options ...................................................................................................................... 38
Text Area Options ............................................................................................................. 39
File Organizer Menu ........................................................................................................ 40
Copy a Vocabulary File ...................................................................................................... 40
Move a Vocabulary File..................................................................................................... 41
Delete a Vocabulary File ................................................................................................... 41
Maintenance Menu .......................................................................................................... 42
Disable Toolbox ................................................................................................................ 42
Power Management ......................................................................................................... 44
Hardware Diagnostics ....................................................................................................... 44
System Information Box ................................................................................................... 44
Erase All Vocabulary ......................................................................................................... 45

NuVoice Software Manual 7
Reset to Factory Defaults .................................................................................................. 45
Enable Icon Set Menu ....................................................................................................... 45
Error Reporting ................................................................................................................. 45
Battery Menu .................................................................................................................... 45
Enter a New Feature Code ................................................................................................ 46
Updating NuVoice ............................................................................................................. 46
English / Español ............................................................................................................... 48
Change Product Configuration ......................................................................................... 48
Notebook Menu ............................................................................................................... 48
The Notebook Workspace ................................................................................................ 48
New Notebook .................................................................................................................. 49
Notebook Text/Background Color .................................................................................... 49
Close a Notebook .............................................................................................................. 49
Save Notebook .................................................................................................................. 49
Open a Notebook .............................................................................................................. 49
Delete a Notebook ............................................................................................................ 50
Rename a Notebook ......................................................................................................... 50
Save a Notebook ............................................................................................................... 50
Load a Notebook ............................................................................................................... 50
Lock a Notebook ............................................................................................................... 51
Copy a Notebook from One Area to Another ................................................................... 51
Review Vocabulary Menu ............................................................................................... 51
Review .............................................................................................................................. 52
Expanded Vocabulary Search ........................................................................................... 52
Review to Display (Review Vocabulary Menu) ................................................................. 52
Review to Display & Speaker (Review Vocabulary Menu) ................................................ 52
Review to File (Review Vocabulary Menu) ....................................................................... 52
Data Logging On/Off ......................................................................................................... 52
Data Analysis ..................................................................................................................... 53
Save Data Log to File ......................................................................................................... 54
Clear Data Log - 0 Bytes .................................................................................................... 55
Icon Tutor Options ............................................................................................................ 55
Access Method Menu ..................................................................................................... 56
Choose Different Access Method ..................................................................................... 56
Touch Method .................................................................................................................. 56
1-Switch Scanning Methods ............................................................................................. 56
2-Switch Scanning Methods ............................................................................................. 57
Highlight Settings (1-Switch/2-Switch) ............................................................................. 58
Set Custom Switch Times (1-Switch/2-Switch) ................................................................. 59
Modify Scan Patterns (1-Switch/2-Switch) ....................................................................... 59
Connect Freedom Switch® / Disconnect ALL Freedom Switch® ....................................... 61
NuPoint/Joystick Method ................................................................................................. 62
NuPoint/Mouse/USB Joystick Method ............................................................................. 62
Eyegaze Method ............................................................................................................... 62
Pause/Resume (Eyegaze) .................................................................................................. 62
Calibrate Now ................................................................................................................... 63
Eyegaze Positioning .......................................................................................................... 63
Eye Track Status ................................................................................................................ 63
Track Status Box ................................................................................................................ 63
Track Status Size ............................................................................................................... 63
Manage Eyegaze Profiles .................................................................................................. 64
Customize Eyegaze Settings .............................................................................................. 64
Copy Current Settings to All Areas .................................................................................... 65

NuVoice Software Manual 8
Calibration Settings ........................................................................................................... 66
Tracking Settings ............................................................................................................... 68
Reset Eyegaze Settings to Default .................................................................................... 68
Shared Access Options ...................................................................................................... 69
Settings Menu .................................................................................................................. 73
Save Your Settings ............................................................................................................ 73
Store the "Use Settings" Keys in Your Vocabulary ............................................................ 74
Speech Menu ................................................................................................................... 74
Select a Voice for Synthesized Speech .............................................................................. 74
Change Voice ............................................................................................................. 75
Test Speech ................................................................................................................ 75
Speech Rate ............................................................................................................... 75
Average Pitch ............................................................................................................. 75
Pitch Range ................................................................................................................ 75
Bass (Speech Menu) .................................................................................................. 75
Treble (Speech Menu) ............................................................................................... 75
Add Pronunciation (Speech Menu) ............................................................................ 75
Manage Pronunciations (Speech Menu) ................................................................... 75
Auditory Prompt Voice ..................................................................................................... 75
Change Voice (Auditory Prompt Voice) ..................................................................... 75
Test Speech (Auditory Prompt Voice) ........................................................................ 76
Speech Rate (Auditory Prompt Voice) ....................................................................... 76
Average Pitch (Auditory Prompt Voice) ..................................................................... 76
Pitch Range (Auditory Prompt Voice) ........................................................................ 76
Bass (Auditory Prompt Voice) .................................................................................... 76
Treble (Auditory Prompt Voice) ................................................................................. 76
Add Pronunciation (Auditory Prompt Voice) ............................................................. 76
Manage Pronunciations (Auditory Prompt Voice) ..................................................... 76
Transfer Memory Menu .................................................................................................. 77
Memory Transfer using a USB Flash Drive ........................................................................ 77
Save an Area or Device Contents ...................................................................................... 78
Load an Area or Device Contents...................................................................................... 78
Import Icons or Scenes ..................................................................................................... 79
Load Icons from MTI File................................................................................................... 80
Save Pages and Activities (Transfer Memory Menu) ........................................................ 80
Load Pages and Activities .................................................................................................. 81
Save/Load Contacts .......................................................................................................... 82
Vocabulary Builder Menu ............................................................................................... 83
Word Prediction Menu .................................................................................................... 84
Word Prediction On/Off ................................................................................................... 84
Dictionary .......................................................................................................................... 84
Predict in Minspeak .......................................................................................................... 85
Add a Word ....................................................................................................................... 85
Delete a Word ................................................................................................................... 85
Selection Area ................................................................................................................... 85
Letter Case ........................................................................................................................ 86
Word Prediction Window ................................................................................................. 86
Word Prediction Keys ....................................................................................................... 86
Color ................................................................................................................................. 86
Increase a Word's Frequency Value.................................................................................. 86
Review to Display (Word Prediction Menu) ..................................................................... 86

NuVoice Software Manual 9
Review to File (Word Prediction Menu) ........................................................................... 86
Load Default PRC Dictionary ............................................................................................. 87
Abbreviation Expansion Menu .......................................................................................... 87
Camera Menu ................................................................................................................... 88
The Built-In Camera(s) ...................................................................................................... 89
Using the Camera Menu ................................................................................................... 89
Text Editing Keys ............................................................................................................ 91
Scroll Keys ......................................................................................................................... 91
Ext. Chars (Extended Characters) ..................................................................................... 91
Home ................................................................................................................................ 91
End .................................................................................................................................... 91
Arrow Keys ........................................................................................................................ 91
Edit Mode ......................................................................................................................... 92
Page Up ............................................................................................................................. 92
Page Down ........................................................................................................................ 92
Delete Character ............................................................................................................... 92
Block Mark ........................................................................................................................ 92
Edit Menu ......................................................................................................................... 92
Basic Storing ................................................................................................................... 94
Recorded and Synthesized Speech ................................................................................... 94
Store a Recorded Message: Basic Steps ........................................................................... 95
Erase a Recorded Message ............................................................................................... 96
Store a Synthesized Speech Message: Basic Steps ........................................................... 96
Edit a Synthesized Speech Message ................................................................................. 97
Erase a Synthesized Speech Message ............................................................................... 97
About Storing and Assigning Tools ................................................................................... 98
Store a Tool: Basic Steps .................................................................................................. 98
Replace the Tools in the Tools Menu ................................................................................ 99
About NuVoice Macros ..................................................................................................... 99
Create and Store NuVoice Macros .................................................................................. 100
Erase a NuVoice Macro ................................................................................................... 100
Page Menus ................................................................................................................... 101
About Creating and Modifying Pages ............................................................................. 101
Create Page and Modify Page Menu Options ................................................................. 102
Create Page: Start-Up ..................................................................................................... 102
Modify Page: Start-Up .................................................................................................... 102
Create Page/Modify Page Storing Options ..................................................................... 103
Type of Message (Page) .................................................................................................. 103
Spell Message or Define Key Function (Page) ................................................................. 103
Change Label (Page)........................................................................................................ 103
Change Icon (Page) ......................................................................................................... 103
Change Key Color (Page) ................................................................................................. 103
Hide/Show Keys .............................................................................................................. 104
Copy this Assignment to ................................................................................................. 104
Copy Pages ...................................................................................................................... 105
Swap Page Keys .............................................................................................................. 105
Store Category Prompt ................................................................................................... 105
Clear Key Contents .......................................................................................................... 105
Modify Scan Pattern ....................................................................................................... 106
Change Visual Scene ....................................................................................................... 106
Create a Scene Page ....................................................................................................... 106
Add Links to other Pages on a Scene Page ..................................................................... 107

NuVoice Software Manual 10
Rename Page .................................................................................................................. 107
Choose a Custom Key Size .............................................................................................. 108
Choose Next Key to Define ............................................................................................. 108
OK/Cancel ....................................................................................................................... 108
The Page Menu ............................................................................................................... 108
Delete Page ..................................................................................................................... 108
Store Text Area Tool ....................................................................................................... 109
Quick Steps for Linking Pages ......................................................................................... 109
Color ............................................................................................................................... 110
Advanced Color Options ................................................................................................. 110
Create a Custom Color .................................................................................................... 112
Bluetooth Cell Phone .................................................................................................... 112
About Bluetooth Cell Phones .......................................................................................... 112
Pair and Configure your Bluetooth Cell Phone ............................................................... 113
Configuration Menu Options .......................................................................................... 113
Bluetooth Icons Visible in Status Display Area ............................................................... 114
Using the Dial Pad ........................................................................................................... 115
To Make a Call ................................................................................................................. 116
To Answer a Call.............................................................................................................. 116
Add Contacts ................................................................................................................... 116
Add an Incoming Number ............................................................................................... 117
Saving Your Contacts List ................................................................................................ 117
Using the Phone Directory Page ..................................................................................... 117
Store a Phone Number in the Directory ......................................................................... 117
Send a Text Message ...................................................................................................... 118
Read a Text Message ...................................................................................................... 118
Auto-Delete TXT Messages ............................................................................................. 118
Listen-to-Calls-With ........................................................................................................ 119
Using a Microphone to Speak ......................................................................................... 119
Adjusting Caller and Listener Volume ............................................................................. 119
Unity ............................................................................................................................... 120
About Core Vocabulary and Activity Row Vocabulary .................................................... 120
Icon Prediction ................................................................................................................ 121
Unity – Word Prediction ............................................................................................... 122
Core Vocabulary and Word Prediction ........................................................................... 122
Spell and Select Words ................................................................................................... 123
Unity – Add a Word to the Word Prediction Dictionary ................................................. 124
Unity – Core Keys in the Toolbox ................................................................................ 125
Store a Recorded Core Message ..................................................................................... 125
Erase a Recorded Core Message ..................................................................................... 125
Store a Synthesized Speech Message ............................................................................. 126
Erase a Core Synthesized Speech Message .................................................................... 126
Assign Core Keys ............................................................................................................. 126
Erase the Tool and Restore the Original Icon ................................................................. 127
Store a Tool Under an Icon Sequence ............................................................................. 127
Store a NuVoice Macro under an Icon Sequence ........................................................... 128
Assign a NuVoice Macro to a Core Key ........................................................................... 129
Erase NuVoice Macros .................................................................................................... 129
Swap Core Keys ............................................................................................................... 130
Hide Core Vocabulary Keys ............................................................................................. 130

NuVoice Software Manual 11
Link a Core Icon Sequence to a Page .............................................................................. 131
Unity – Pages ................................................................................................................. 132
Store a Single Page Under an Icon Sequence ................................................................. 132
Unity – Activities ........................................................................................................... 133
Activity Row .................................................................................................................... 133
Set Activity Template ...................................................................................................... 133
Create a New Activity ..................................................................................................... 134
Dynamic Activities........................................................................................................... 135
Erase a Dynamic Activity Link ......................................................................................... 136
Deleting Dynamically Linked Sequences ......................................................................... 136
Review All Dynamic Activities ......................................................................................... 136
Modify an Existing Activity .............................................................................................. 137
Modify Main Activity Options ......................................................................................... 137
Modify Item Within the Activity Options ........................................................................ 138
Link an Activity to a Page or to another Activity ............................................................. 140
Link a Page to an Activity ................................................................................................ 140
Assign Activity Keys ......................................................................................................... 141
Store a Tool in an Activity ............................................................................................... 141
Unity – Icon Tutor .......................................................................................................... 142
Unity – Icon-Tutor-on-the-Fly ......................................................................................... 142
Unity – Icon Tutor View Delay ........................................................................................ 142
Unity – Icon Tutor View Count ........................................................................................ 142
Search Icon Tutor ............................................................................................................ 142
Tutor Auto-Update and Update Icon Tutor .................................................................... 143
Icon Tutor Advanced Settings ......................................................................................... 143
Icon Tutor Key in the Activity Row .................................................................................. 143
Unity – Vocabulary Builder Menu ................................................................................ 143
About the Vocabulary Builder Menu .............................................................................. 143
Using the Vocabulary Builder Menu ............................................................................... 144
Vocabulary Builder Menu Options .................................................................................. 144
Vocabulary Builder Advanced Options ........................................................................... 145
About Sequence Sets ...................................................................................................... 147
Create a Sequence Set ............................................................................................. 147
Example: Create a Sequence Set ............................................................................. 148
Word Lists ....................................................................................................................... 151
Using Word Lists ............................................................................................................. 151
Import New Word List .................................................................................................... 153
Unity – Vocabulary Masking on the Fly .......................................................................... 153
About Vocabulary Masking on the Fly ............................................................................ 153
Using Vocabulary Masking on the Fly ............................................................................. 154
Using the Mask Keys in the Status Display Area ...................................................... 154
Example: Using Vocabulary Masking on the Fly ...................................................... 155
Essence .......................................................................................................................... 158
Choose a Key Size ........................................................................................................... 158
The Directory Page.......................................................................................................... 160
Choose an Access Method .............................................................................................. 160
Save Your Settings (Essence) .......................................................................................... 161
Choose a Voice ................................................................................................................ 161
Essence – Word Prediction ............................................................................................. 162

NuVoice Software Manual 12
Essence – Add a Word to the Word Prediction Dictionary ............................................. 162
Essence – Feedback Menu .............................................................................................. 163
Essence – Auditory Prompt Menu .................................................................................. 165
Essence – User Area Menu ............................................................................................. 165
Appendices .................................................................................................................... 166
Unity – Modify Scan Pattern ........................................................................................... 166
Modify Scan Patterns Menu ........................................................................................... 167
Other Scan Pattern Menu Options ................................................................................. 167
Unity – Mid-Sequence Category ..................................................................................... 169
Essence – Modify Scan Pattern ....................................................................................... 170
Other Options for Modifying a Scan ............................................................................... 172
Pagelets........................................................................................................................... 173
Insertable Tools List (IT) .................................................................................................. 174
The Joystick Adapter ....................................................................................................... 184
RealSpeak Speech Tips .................................................................................................... 185
American English Phonemes ................................................................................... 185
British English Phonemes ........................................................................................ 187
Australian English Phonemes .................................................................................. 189
Additional RealSpeak Speech Tips ........................................................................... 191
DECtalk Speech Tips ........................................................................................................ 193
Words with Alternate Pronunciations ..................................................................... 193
Abbreviations Recognized by DECtalk Speech ......................................................... 194
English Vowel Phonemes ......................................................................................... 197
English Consonant Phonemes ................................................................................. 198
How DECtalk Speech Handles Numbers .................................................................. 199
Troubleshooting .............................................................................................................. 200
Index ............................................................................................................................... 201
Display Areas 13
Display Areas
Your device has three main display areas besides the touchscreen: the text display area, the icon or word
prediction display area, and the status display area. By default, the display areas appear in Classic skin. If you want
to change the skin to a more “modern” appearance, select Feedback Menu, select Skin Options, and use the
arrows to change the Display Skin setting from Classic to Skin 1 or Skin 2.
To restore the original skin setting, select Feedback Menu, select Skin Options, and change the Display Skin setting
from Skin 1 or Skin 2 to Classic.
Text Display Area
Icon/Word Prediction Area Status Display Area
Text Display Area
This is where you will see messages you have retrieved, text that you have typed, or any system directions that
may be associated with the work you are doing. If you touch the text display area, your device will speak any text
that is visible.
Icon or Word Prediction Area
If you are using a Unity
®
vocabulary, any icons you select will appear in this area. When word prediction is turned
on and you are using a spelling keyboard or page, you will see predicted words in this area.
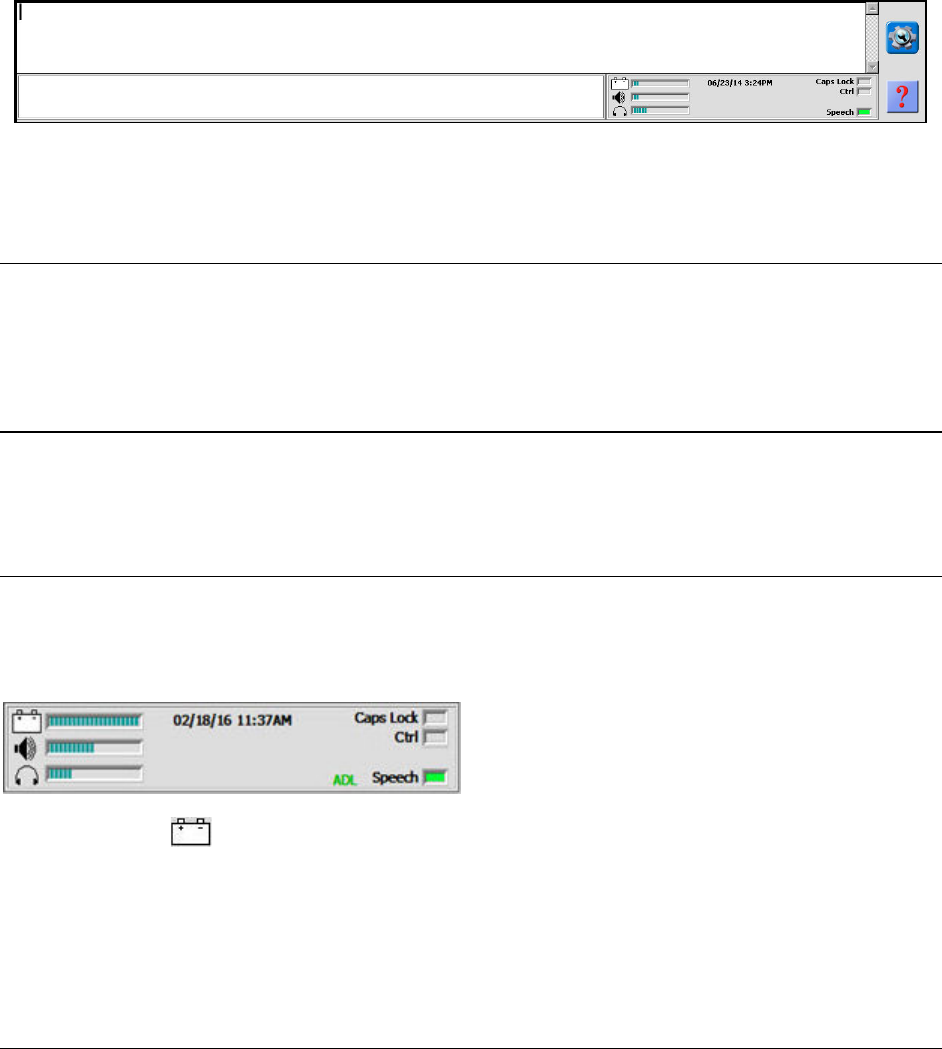
Status Area – Classic Skin
The status area provides information about your device.
Note: If you want to change the skin, select Feedback Menu, select Skin Options, and change the Display Skin
setting from Classic to Skin 1 or Skin 2.
Classic – Battery
Full Battery Mostly green lines in the bar graph
Low Battery
Only red and yellow lines in the bar graph. You cannot store when the battery is low.
Plug in the charger.
Dead Battery
Red lines will fill up the bar graph and you will hear a warning beep that your device is
going to shut down. If you do not plug in the charger, your device will eventually shut
down and you will not be able to use it until you charge the batteries.

Display Areas 14
Classic – Speaker Volume
Low Volume Only a few lines in the bar graphs
Full Volume Lines fill the bar graphs.
Classic – Headphone Volume
Low Headphone Volume Only a few lines in the bar graphs
Full Headphone Volume Lines fill the bar graphs.
Classic – Date and Time
Go to the Toolbox, select Clock Menu, and set the date and time.
Classic – Caps Lock
When you select the Caps or Caps Lock key on your spelling keyboard, the Caps Lock indicator in the status
area will light. All the letters you type will be in capitals.
Classic – Speech
When this indicator is illuminated, Speech is turned on. Your device will speak anything that appears in the
text display area. To toggle Speech on or off, select the Speech On/Off key in the Toolbox.
Classic – ADL Icon
When you see the ADL icon, Automatic Data Logging (ADL) is turned on in the Review Vocabulary Menu,
enabling data logging.
Status Area – Skin 1/Skin 2
The status area provides information about your device.
Note: If you want to change the skin, select Feedback Menu, select Skin Options, and change the Display Skin
setting from Skin 1 or Skin 2 to Classic.
Skin 1/Skin 2 – Headphone Volume
Low Headphone Volume Only a few lines showing.
Medium Headphone Volume Lines about half-way up the display.
Full Headphone Volume Lines fill up the graphic display area.
Skin 1/Skin 2 – Speaker Volume
Low Only a few lines showing. An example is the headphone graphic above.
Medium Lines about half-way up the display. An example is the Speaker Volume graphic above.
Full Lines fill up the graphic display area. An example is the Battery graphic above.

Display Areas 15
Skin 1/Skin 2 – Battery Status
The status area will display blue lines and a plug. The plug indicates the battery charger is plugged in and, since
the lines fill the battery icon, the batteries are full.
If the charger is not plugged in, the lines will be red and yellow. If they are low on the indicator, you will hear a
warning beep. Plug in your charger. You cannot store when the batteries are low. If the batteries get too low
you will hear the warning tone several times and your device will shut down. You will not be able to use it until
you plug in the charger.
Skin 1/Skin 2 – Date and Time
Go to the Toolbox, select Clock Menu, and set the date and time. The name of the vocabulary you are
currently using appears under the date and time. Your device displays this automatically.
Skin 1/Skin 2 – Lowercase letter “a”
The following icons are visible when you are using your spelling keyboard or page.
lowercase “a” Indicates that the Shift key is turned off.
Shift
When Shift is turned on, you will see a capital “A” that flashes until you select a letter. Then you
will see the lowercase “a” again.
Caps Lock When Caps Lock is turned on, you will see a steady capital “A”.
Shift/Caps Lock
If you select Shift while Caps Lock is turned on, a lowercase “a” will flash until you select a
letter.
Skin 1/Skin 2 – Speech Bubble
When you see the Speech bubble, Speech is turned on. Your device will speak anything that appears in the
text display area. To toggle Speech on or off, select the Speech On/Off key in the Toolbox.
Skin 1/Skin 2 – ADL Icon
When you see the ADL icon, Automatic Data Logging (ADL) is turned on in the Review Vocabulary Menu,
enabling data logging.

Vocabularies 16
Vocabularies
When you purchased your PRC communication device you also selected one or more language systems to use with
it, such as Unity®, Essence™, WordPower™, or CoreScanner™. Within each language system there are many built-in
vocabularies to choose from which are pre-populated with commonly used words, phrases, and sentences. Use
your vocabulary to communicate. Here’s a sample Unity Vocabulary page.
The Toolbox 17
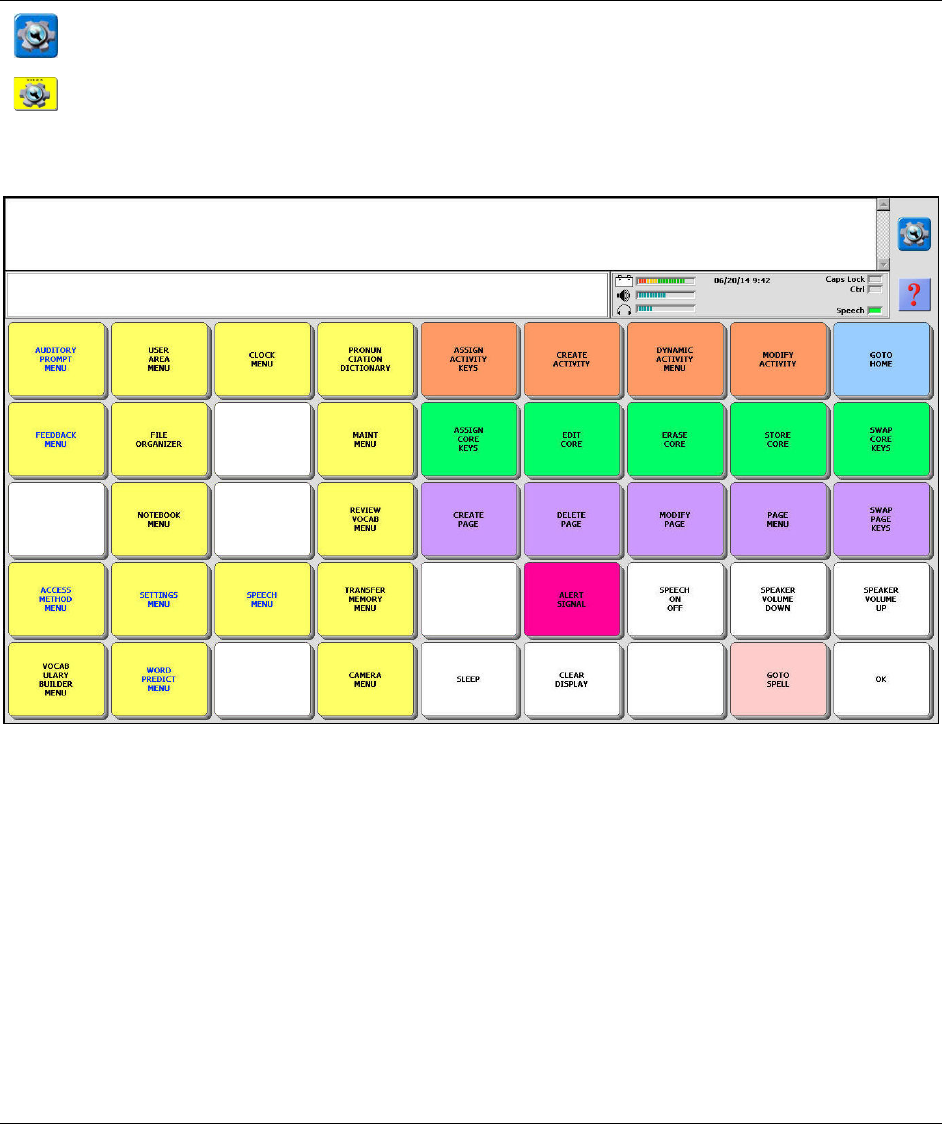
The Toolbox
The Toolbox contains all the menus and system tools you need to configure your device so it fits your specific
needs. Menus in your Toolbox allow you to store your own messages, modify the vocabulary you are using, set up
an access method and, in general, make your device look and work the way you want it to. All Toolbox menus and
tools are described in this manual. Depending on your device and/or the vocabulary you are using, certain menus
and tools may not be available in your Toolbox.
To Go to the Toolbox
1. Select the Tools key to the right of the text display area. The Tools menu slides out from the left
side of your screen.
2. Then select the Toolbox key from the Tools menu.
Hint: You can also select the Tools key twice to open the Toolbox. Alternatively, you can press the Tools key on
the front of your device twice to open the Toolbox. Press it once to display the Tools menu.
The Toolbox keys are grouped by color according to the type of function they perform.
Yellow System menus
White Single function keys
Magenta, Pink, Blue Special function keys (no menu)
Purple Page menus
Orange Activity menus; these keys are available only with Unity vocabularies
Green Core menus; these keys are available only with Unity vocabularies

The Toolbox 18
The Tools Menu
When you select the Tools key, the Tools menu slides out from the left side of your screen.
These keys can be modified. This means you can assign any tool you want to any of the keys. A few of the most
often used tools have been pre-assigned at the factory. Selecting a key here means that you do not need to open
the Toolbox to select it. They are shortcut keys.
Toolbox Key
The Toolbox key opens the Toolbox. (You can also select the Tools key twice to go directly to the
Toolbox.)
Toolbox Pull-Down Menu Key
When you select the Toolbox pull-down menu key, the Toolbox pull-down menu opens. The
menu contains shortcuts to some of the Toolbox menus and options. You can disable the pull-
down menu by going to the Toolbox, selecting Maint Menu, and selecting Disable Toolbox.
Under Pulldown Menu Button, select Disable. The pull-down menu will be of most benefit to
support staff and the AAC team.
To modify or replace a Tools Menu key:
If you discover that you would rather have a different tool or tools assigned to any of these keys
or if you want a completely different key, you can change or delete a pre-assigned tool and store
the one you want. See Modify User Keys or Replace the Tools in the Tools Menu
.
The Help Key
The Help key is located to the right of the status display. When you want information about a key
or menu, select the Help key and then select the key you want. If you are in an open menu in the
Toolbox, you can select Help, and then select the option you want information about. To find
information by using the table of contents, index, or search function, select the Help key twice.
Tools menu example with user-
assigned keys

Single Function Keys 19
Single Function Keys
Speech On/Off
In the Toolbox, select the Speech On/Off key to toggle Speech on or off. Check the status display. When Speech is
on, the green indicator next to Speech is lit and your device will speak any text in the text display area.
Speaker Volume
To prevent possible hearing damage, do not listen to earphones at high volume levels for long periods.
Find the white Speaker Volume Up and Speaker Volume Down keys in the Toolbox.
Select the Speaker Volume Down key. Look at the status display area. As you select the Speaker Volume Down
key, the lines in the graph next to the picture of a speaker disappear. The fewer lines there are in the graph, the
lower the volume of the speaker.
Now select the Speaker Volume Up key. The lines return to fill up the graph.
You can test the volume by touching on the text display area. Your device will speak any text that is in the text
display area and you can adjust the volume to your preference.
Use the Feedback menu to do the following:
• Turn an External Speaker on or off.
• Adjust the volume for headphones by using Earphone Volume arrows.
• Change the Scan Beep or Activation Beep volume.
Clear Display
Select this key to clear all text from the text display area.
OK (Toolbox)
When you select this key in the Toolbox, your device will return you to the location you were at before you
entered the Toolbox.

Special Single Function Keys 20
Special Single Function Keys
Go To Home
Depending on the vocabulary you are using, this key will take you to your Core or to your Home Spelling keyboard.
Go To Spell
Depending on the vocabulary you are using, this key will take you to the spelling page or to your spelling keyboard.
Alert Signal
There will probably be times when you will need to get someone's attention for assistance. The Alert Signal tool is
just for this purpose. When you select Alert Signal, your device plays a series of tones that are designed to get
someone's attention. The beeps are not like any other beeps the device makes when it is in regular use. The tones
do not signify “emergency”, but they do indicate a need for assistance.
Important! The Alert Signal tool is designed to bring assistance and should only be used for that purpose.
Overusing Alert Signal reduces the importance of the beeps to those who hear them.
The Alarm Tool
Your device also has an Alarm tool. The alarm is loud, disruptive, and startling and is designed to bring you immediate
help. It is not pre-stored on any pages, but is an insertable tool that can be added to a key on a page. If you plan to
store the alarm on any pages, take care to place it where it cannot be easily activated by accident.
Important! Because the alarm is designed to bring you help immediately, it should be used only in emergencies
and should never be used as a joke.

Auditory Prompts Menu 21
Auditory Prompts Menu
Auditory prompts can help you learn the locations of keys in your vocabulary. Depending on the kind of prompt
you select, you can select a key and hear the name of the key, the message the key contains, or the category of the
row or column the key is in. Go to the Toolbox and select Auditory Prompt Menu.
Auditory Prompts Off/On
When auditory prompts are turned on, your device speaks the label of any key you select. You must press and hold a
key to hear the auditory prompt. If you are scanning, activate your switch to hear the prompt. To retrieve a
message, select the key or activate your switch again after you have heard the prompt.
Using a Label or Content for a Prompt
You can use a prompt’s label or content (message) for a prompt. When the content is too long to use as a prompt,
you can use a marker to limit the content used by the prompt.
Prompts By
Use the Prompts By option to select a prompt’s label or content (message) to use for a prompt.
Label
This is the label (or name) that has been assigned to a specific key. If you changed a label
during the storing process, the prompt will be whatever you changed the label to.
Content
This option tells your device to speak whatever message is stored with a particular key. If
no message is stored, the key label is spoken.

Auditory Prompts Menu 22
Using a Prompt Marker with a Content Prompt
Sometimes the contents of a message may be too long to be a helpful prompt. For example, the message may be a
song, in which case you would not want the content prompt to be the singing of the whole song. To avoid this,
when you assign a content prompt to a long message, do the following:
1. Use Edit Core, Modify Page, or Modify Activity in the Toolbox.
2. Select the key or sequence that contains the message.
3. Select the Spell message key.
4. Move the cursor to the end of the message.
5. Select Insert Tool.
6. Select the Prompt Marker tool.
7. Type the prompt you want to use, such as the name of the song. Your device will speak only the text that
follows the Prompt Marker. The prompt will not be displayed.
Use Earphone Off/On
You can hear prompts through the device's speaker. You can also plug stereo headphones into the headphone jack on
your device. Use Earphone allows you, but not others, to hear the prompts. If you are using headphones, turn Use
Earphone on. If you want to use both headphones and a speaker at the same time, you must have a headphone Y
adapter. This type of adapter is available at most electronic stores. Use a 3.5 mm stereo splitter adapter. When Use
Earphone is turned on, the Bluetooth Speaker Menu key is displayed.
Bluetooth Speaker Menu (Auditory Prompts Menu)
The Bluetooth Speaker Menu allows you to pair (connect) your device with Bluetooth speakers, disconnect pairing, or
turn the Bluetooth beep on or off. When you select Bluetooth Speaker Menu, the following options are displayed.
Paired Devices (Bluetooth Speaker Menu)
This key will show you the Bluetooth speakers you have been paired to, up to a maximum of 16 devices. If you
disconnect from a speaker and then later decide you want to use it again, you can select this key and select the
speaker you want from the menu. The device will re-connect to the speaker automatically.
Pair to Speaker (Bluetooth Speaker Menu)
To pair your device with a Bluetooth speaker:
1. With the Bluetooth Speaker Menu open, turn your speaker on and hold down the "pair" button on your
speaker.
2. In the Bluetooth Speaker Menu, select the Pair with Speaker key.
3. When the connecting light on your speaker begins to flash, release the "pair" button.
4. You may see a "Please Wait" box on your screen. In a few seconds you will see the name of your Bluetooth
speaker in the Bluetooth Status box in the menu. You are now paired with your speaker.
Disconnect (Bluetooth Speaker Menu)
Select this key when you want to disconnect from your Bluetooth speaker.
Bluetooth Beep Output (Bluetooth Speaker Menu)
When this option is turned on, a listener will be able to hear the beeps that occur as you make selections on your
device. When this option is turned off, no beeps will be heard as you make selections.

Auditory Prompts Menu 23
Volume (Auditory Prompts Menu)
To prevent possible hearing damage, do not listen to earphones at high volume levels for long periods.
Use the arrow keys to increase or decrease the volume of auditory prompts through the device speakers or
earphones.
Category Prompt
Important! Category prompts are used only if you are scanning.
Category prompts should help you locate where you are on the keyboard; for example, "Row 1 Column 1" or "Row
3 Column E". In some cases you may have a number of similar messages stored in one row or column. In this case,
you might want the prompt to say something like, "Row 1, School".
You can also store a Block Prompt that tells you what the block of keys are that you are scanning.
Category prompts always go with the first key in a row or a column. If the key you selected for a category prompt is
appropriate, Store a Category Prompt appears in the menu.
You can use the Assign Core Keys menu to create category prompts for Core vocabulary keys. Use the Modify Activity
and Modify Page menus to assign Category Prompts to activity rows or pages.
Erasing Prompts
To Erase a Category Prompt
1. In the Toolbox, select Assign Core Keys, Modify Page, or Modify Activity.
2. If you are modifying a page or activity, select that page or activity and then select the key that has the prompt
you want to erase. If you are in your Core, select the key that contains the prompt you want to erase.
3. Select Store Category Prompt.
4. Select the type of prompt you created.
5. Select Clear Display.
6. Select OK.
To Erase a Label Prompt
1. In the Toolbox, select Assign Core Keys, Modify Page, or Modify Activity.
2. If you are modifying a page or activity, select the page or activity that contains the key that has the prompt
you want to erase. If you are in your Core, select the key that has the prompt you want to erase.
3. Select the Rename Icon key or Change Label.
4. Select Clear Display from your spelling keyboard to erase the name of the label. The current name disappears
from the text display area. If you do not want to add a different label to the icon, select OK.
Note: If you want a new label, type the label text and then select OK.

Auditory Prompts Menu 24
To Erase a Content Prompt
Important! When you delete a Content Prompt, you are deleting the message that was stored under that icon
sequence.
1. In the Toolbox, select Assign Core Keys, Modify Page, or Modify Activity.
2. If you are modifying a page or activity, select the page or activity that contains the key that has the prompt
you want to erase. If you are in your Core, select the key that has the prompt you want to erase.
3. Select Spell Message and then select Clear Display from your spelling keyboard to erase the message.
4. Select OK.

User Area Menu 25
User Area Menu
Your device has six different user areas. Some or all of these areas will contain different pre-stored vocabularies.
The user area you select will contain the vocabulary you want to use. It will also remember the access method you
are using, the synthesized voice you have selected, and some settings you make in some of the Toolbox menus.
A user area is like your home base. If more than one person is using the device, each person can have his or her
own area. A single user can load different vocabularies into different areas and use them in specific situations.
Each area can have its own access method.
When you first use your device, you can select a user area, number of keys, and a keyboard from the Set-Up
Wizard or Exploration Wizard. After that, you will use the User Area Menu to switch between vocabularies.
When you open the User Area Menu, the area and vocabulary you are currently using are displayed in the text
display area. Go to the Toolbox and select User Area Menu.
Switch User Area
Switch User Area allows you to easily switch from one user area to another. You will see a list of all the user areas
with the vocabularies and key sizes that are stored with them. When you are first learning about your device, this
is a good option to use to try out different vocabularies and key sizes.
When you select this option, you will see a list of the available vocabularies. When you select a vocabulary, your
device will make the switch and return you to the first screen of the User Area Menu. You can select OK to exit the
menu, or you can continue to choose other options.

User Area Menu 26
Spelling Keyboard: QWERTY/User Defined
Spelling Keyboard defines your spelling page. Depending on the vocabulary you are using, your spelling keyboard
may be your Home page, or you will select it from your Home or Core page whenever you want to spell words.
If you select Go to Spell in the Toolbox, you will see the default QWERTY spelling page. If you select the spelling
keyboard (often labeled as the ABC key) you will see a spelling page that has been designed to go with the
vocabulary you are using.
User Defined allows you to replace the default keyboard with a keyboard of your choice. When you select User
Defined, a yellow message box will tell you what the current spelling page is and ask if you want to change it. If you
select Yes, a menu of pages will include some different spelling pages. Select the spelling page you want.
Storing Keyboard: QWERTY/User Defined
When you are storing messages in one of the storing menus, you are taken to a page with a QWERTY keyboard
where you are asked to spell the message you want to store. If you do not want to use the QWERTY keyboard,
Storing Keyboard allows you to change this keyboard.
For Storing Keyboard, select User Defined. A yellow message box will tell you what the current storing keyboard is
and ask if you want to change it. Answer Yes to change it. A menu of pages will include some different keyboards.
Select the keyboard you want for your storing keyboard.
Modify User Keys
This menu allows you to store a different tool on a key in the Tools menu.
1. Select Modify User Keys. The keys from the Tools menu are displayed.
2. Select the key you want to change or select a blank key to define.
3. Select Enter Assignment to open your storing keyboard.
4. Select the Delete Character key on your storing keyboard to delete the current key assignment.
5. Select the Insert Tool key on your storing keyboard.
6. Select the tool you want. The tools are listed alphabetically. Use More Items and Previous Items to find the
key you want. Select OK when you are finished.
7. Change the icon, label, and/or key color if you want.
8. Change the key size, if you want by selecting Choose a Custom Key Size and then selecting the number of rows
and columns.
9. Select either Hide or Show under Hide/Show this Key.
10. Select OK to save your work and exit the menu.
Note: If you make a mistake, select Clear Key Contents and start over.

User Area Menu 27
Rename User Area
The default name for your user area is the name of the vocabulary you are using. Rename User Area allows you to
change the name.
1. Select Rename User Area. The six user areas will be listed.
2. Select the user area you want to rename.
3. Enter the new name you want to use.
4. Select OK.
Replace User Area
Important! When you replace the vocabulary in your user area with a different one, your device clears the user
area and then places the new vocabulary in it. Any custom vocabulary (messages and words that you have added
to your current vocabulary) will be lost if you replace your user area.
Note: If you want to save your vocabulary, perform a Memory Transfer before replacing the area.
Follow these steps only if you want to completely replace one vocabulary on your device with another.
1. Go to the Toolbox and select User Area Menu.
2. Select Replace User Area. Then select the vocabulary you want to replace.
3. Select the vocabulary type Pre-defined Vocabularies.
4. If you have a language choice, select your language.
5. Select the vocabulary category. Then select the specific vocabulary you want.
6. Select Yes in the yellow message box to continue.
7. On the keyboard page, type replace and select OK.
8. A yellow message box will ask “Switch to this User Area now?”
• To switch to the new vocabulary immediately, select Yes.
• To remain in your current vocabulary, select No. When you are ready to switch to the new vocabulary,
select Switch User Area from the User Area Menu and select the new vocabulary.
9. Select the OK button twice to return to the vocabulary screen.
Copy a User Area
You can copy a user area and place it in another area. Both areas would have the same vocabulary, but each area
could have its own access method. One area might be set up for school situations and another for when the user is
at home. Select the area you want to copy from and then select the area you want to copy to. If you change your
mind, select the Cancel key.

User Area Menu 28
Copy Pages/Activities
You can copy pages or activities in one user area to another user area. Select Copy Pages/Activities and select one
of the four choices displayed: Copy Selected Activities, Copy All Activities, Copy Selected Pages, or Copy All Pages.
Copy Selected Pages
1. If you want to copy only certain pages, select Copy Selected Pages.
2. Select the user area where you want the pages to be copied to.
3. Select the pages you want to copy. The page(s) you select will turn gray. Continue to select specific keys until
you have selected all you want.
4. Select OK when you are finished.
5. Answer Yes to continue copying or No to cancel.
Copy All Pages
1. If you want to copy all the pages in a user area, select Copy All Pages.
2. Select the user area where you want to copy the pages to.
3. Answer Yes to continue the copying or No to cancel.
If you copy activities instead of pages, follow the same basic instructions. However, you may need to adjust
the activities in the activity row if you expanded into an area. They may not be in the position you are used to
due to the size of the new area, especially if they were locked. To fill in (compress) blank keys in activities,
select Rearrange Activity Keys from the Modify Activities menu. Select Yes for Fill in Empty Keys.
Note: If you copy pages, you may need to make similar adjustments.
Change All Occurrences of an Icon
Change All Occurrences of an Icon allows you to change the icon on a key so that the new icon is used wherever
that key might occur. Your device will change the icon automatically. When you select this key you are asked to
select the icon you want to change. Then select the icon you want to change to. A yellow message box will ask if
you want to continue with the change. Select Yes to continue or No to cancel. Your device changes the icon and
tells you how many occurrences of the icon were changed.
Templates
Each default vocabulary in your device has a template you can work from when creating a page (or an activity). It is
generally labeled by the number of keys in your vocabulary, such as 60 TEMPLATE or 84 TEMPLATE.
Templates contain a few essential keys placed where they always appear on the regular vocabulary screen. These
might be the Home key, the More key, the Back key, etc. If you do not want to use the default template, you can
select any page created previously to use as a template.
The current template will always be the default template for your user area, unless you have changed the template
to something else. On most default templates some keys have already been defined for you. All the other keys on
the template are blank.
When you select Templates, you will see Set Page Template. Depending on your vocabulary, you may also see Set
Activity Template.
Set Page Template
1. Select Set Page Template. A yellow message box will tell you what the current template is and ask if you want
to change it.
2. If you want to use a different template, select Yes.

User Area Menu 29
3. A screen will list all the pages for the user area you are using.
4. Select any page to use as a template.
5. Select OK. The page you select becomes your default page template.
Set Activity Template
1. Select Set Activity Template. A yellow message box will tell you what the current template is and ask if you
want to change it.
2. If you want to use a different template, select Yes.
3. A screen will list all the activities for the user area you are using.
4. Select any activity to use as a template.
5. Select OK. The activity you select becomes your default page template.
Expand a User Area or Page
Perhaps you have become extremely good at using a particular vocabulary. Now you would like to move up to a
vocabulary with more keys on it, yet you don't want to lose the keys you are used to. Expand User Area or Page in
the User Area Menu allows you to place a smaller vocabulary into a larger one.
1. From the User Area Menu, select Expand User Area or Page
2. Select Expand User Area or Expand a Page.
Expand User Area
1. Select the user area you want to expand. This will probably be your current user area.
2. Select the number of key locations (grid size) you want to expand to.
3. Select OK.
4. A yellow message box will ask if you want to expand all pages to XX locations. If you want every page (and
activity) in your vocabulary to be expanded, select Yes. Select No if you only want the Core or Home page
expanded.
5. A message will tell you when the expansion is complete.
6. Select OK. The next time you go to your Home or Core page it will be expanded. If you expanded all pages and
activities, all will be expanded. Now you will only have to assign the blank keys.
Note: If, after you have expanded an area, you decide you do not want the expansion, you can return to your
original user area by selecting Replace User Area in the User Area Menu.
Expand a Page
Expand a Page only expands one page. Everything else in your user area will remain unchanged.
1. Select Expand a Page. A list of all the pages in your user area is displayed.
2. Select the page you want to expand.
3. If you want a page from a different area, switch to that area first, and then select Expand User Area or Page.
Select the page you want.
4. Select the size to expand to and select OK. The page you selected is expanded.

User Area Menu 30
Change Communication Language
Select the language you want to use for communication.
Note: If Change Communication Language is greyed out, no other languages are available.
Change Home Location
Change Home Location allows you to change where you go when you select the Home key. The default Home
location for your vocabulary is listed in parentheses on the key.
To Change to a Different Location
1. Select the Change Home Location key. A yellow message box will ask if you want the default location to be the
Home location.
2. Select No.
3. A list of all the pages in your user area will be displayed.
4. Select the page you want to use for your new Home location.
Note: You can change back to the default Home location at any time by selecting Change Home Location again
and selecting Yes in the yellow message box.
Copy All Abbreviation Expansions
Abbreviation expansions are part of word prediction and belong to a specific user area. If you switch to a new user
area and you want the abbreviation expansions from your old area to be part of the new area, select Copy All
Abbreviation Expansions.
Copy All Sequences Beginning with Selected Icon
Copy All Sequences allows you to copy all sequences beginning with the same icon or icon sequence and store
them under another sequence. For example, you might copy all sequences that begin with APPLE (or APPLE plus
another icon) and store them under JUICE (or JUICE plus another icon). Now you can access all the APPLE messages
under APPLE or JUICE.
Erase All Sequences Beginning with Selected Icon
Erase All Sequences allows you to go back and erase the original sequences once you have copied them. For example, if
you copied all sequences that begin with APPLE (or APPLE plus another icon) and stored them under JUICE (or JUICE plus
another icon), you can erase the original sequences under APPLE (or APPLE plus another icon). If you erase the original
sequences, you will only be able to access those messages by selecting JUICE (or JUICE plus another icon).
Restart Resumes at …
Use Restart Resumes at to determine whether the system will start up from the Home location or the page you
left off at when the device was shut down.

User Area Menu 31
Change Number of Toolbox Locations
Change Number of Toolbox Locations allows you to change the number of keys in the Toolbox by changing the
Toolbox grid size. Use the arrows to increase or decrease the grid size. Available numbers are 45, 60, 84, and 144.
The default is 45. When you increase the number, rows and columns of keys are added to the bottom and right
side of the Toolbox.
Define Custom Keyguard
Define Custom Keyguard allows you to design a unique keyguard with a number of locations you specify. When
you select the key, the following prompt is displayed: “To order 45, 60, 84, or 144 location keyguard, select NO and
contact PRC at 800-262-1933. Define a custom keyguard?” To set up a customized keyguard, select Yes. A menu
allows you to specify the number of rows and columns you want the keyguard to contain.
Number of Rows (Custom Keyguard)
Use the arrows to select a number between 1 and 9.
Number of Columns (Custom Keyguard)
Use the arrows to select a number between 1 and 16.

Clock Menu 32
Clock Menu
The Clock Menu sets your device’s internal clock. The time is displayed in the status area of your display. Go to the
Toolbox and select Clock Menu. When you finish setting the date and time, select OK to save your settings and exit
the menu. Select Cancel only if you want to exit the menu without saving your changes.
Year (Clock)
Use the arrow keys to set the correct year.
Month (Clock)
Use the arrow keys to set the correct month.
Date (Clock)
Use the arrow keys to set the correct date.
Date Format (Clock)
Use the arrow keys to switch the date format between MM/DD/YY and DD/MM/YY.
Hours (Clock)
Use the arrow keys to set the correct hour.
Minutes (Clock)
Use the arrow keys to set the correct minute.
Seconds (Clock)
Use the arrow keys to set the correct second.
Time Format (Clock)
Use the arrow keys to switch the time format between 12 hour and 24 hour.

Pronunciation Dictionary 33
Pronunciation Dictionary
The Pronunciation dictionary is used to correct speech pronunciations for words your device does not know how to
pronounce correctly. Your device will correctly pronounce most of the words that you will use, but it may run into
trouble with proper nouns like the names of cities and people's names. When you add a word to the speech
dictionary you are teaching your device to pronounce it correctly.
You can review all words that are in the dictionary. A review can help you decide to modify words that are not
pronounced correctly and delete words that you no longer need in the dictionary.
The Pronunciation dictionary is separate from the Word Prediction dictionary. To open the pronunciation
dictionary, go to the Toolbox and select Pronunciation Dictionary.
Managing Pronunciations for a Voice
When you select Pronunciation Dictionary from the Toolbox, the following question will appear: “Manage
Pronunciations for MAIN or PROMPT voice?” If you select Main Voice, the Manage Pronunciations menu will be
displayed for the voice currently selected for use in most areas of the application. If you select Prompt Voice, the
Manage Pronunciations menu will be displayed for the currently selected prompt voice.
Manage Pronunciations Menu Options
The Manage Pronunciations menu options allow you to add, modify, delete, and test pronunciations for a voice.
Advanced options allow you to copy, load, delete, and review all the pronunciations for the voice.
Add Pronunciation
Add Pronunciation allows you to add the pronunciation of a word for the currently selected voice. When you select
this option, the keyboard opens. Enter the correct spelling of the word and select OK. Then enter the
pronunciation of the word and select OK.

Pronunciation Dictionary 34
Page Up/Page Down/Arrows
Use the up and down arrow keys to move through the list of pronunciations one word at a time. Use the Page Up
and Page Down keys to move through the list more quickly by groups of words.
Find Word
Use the Find Word key to quickly find a specific word in the list of pronunciations. When you select this option, the
keyboard opens. Enter the word (or a few letters of the word) and select OK.
Edit Pronunciation
Modify the pronunciation of a word for the currently selected voice. Select the word from the list and then choose
Edit Pronunciation. The keyboard displays the current pronunciation. Enter your changes and select OK. Use Test
Pronunciation to hear how the word sounds. You may need to modify certain words several times to get the
pronunciation right.
Delete Pronunciation
This option allows you to remove a pronunciation from the currently selected voice. Select the word from the list,
select Delete Pronunciation, and choose Yes to confirm.
Test Pronunciation
Use Test Pronunciation to hear how a word sounds. Select the word from the list and select Test Pronunciation. If
the word is not pronounced correctly, use Edit Pronunciation to correct it.
Advanced Options (Pronunciations)
Advanced Options allow you to copy, load, delete, and review all pronunciations for a voice.
Copy Pronunciations to Another Voice
This option allows you to copy the current list of pronunciations to another voice. When you select this option, a
list of available voices is displayed. Select the voice to which you want to copy the pronunciations.
Load Default Pronunciations (All Voices)
This option allows you to load the default pronunciations for all available voices.
Delete All Pronunciations (This Voice)
This option allows you to delete the entire list of pronunciations for the currently selected voice.
Review to File (Pronunciations)
This option allows you to view the pronunciations for the currently selected voice to a file. When you select the
option, you can use a preset folder or select a different one.

Feedback Menu 35
Feedback Menu
The Feedback Menu options give you information about what your device is doing and sometimes about what you
are doing on the device. Some of the menu options you may never use; some you will set to your liking and leave
them that way; and some you may change from time to time. Available options vary according to the vocabulary you
are using. Go to the Toolbox and select Feedback Menu.
Earphone Volume
To prevent possible hearing damage, do not listen to earphones at high volume levels for long periods.
When you have earphones plugged into your device, use Earphone Volume to increase or decrease the volume.
Backlight Intensity
Use the up and down arrow keys to change the backlight intensity. The intensity of the backlight changes as you
change the setting so that you can see the difference on your device. The highest intensity is 6; the lowest is 0; the
default is 3. The higher the backlight intensity, the more energy it will draw from your device’s batteries. To help
conserve battery power, you can tell your device to dim and/or turn the backlight off after a set number of
minutes if you are not using your device.
Activation Beep and Scan Beep
To prevent possible hearing damage, do not listen to earphones at high volume levels for long periods.
By default, these beeps are turned on. Use the Up arrow key to increase the volume or use the Down arrow key to
decrease the volume. If you do not want to hear a beep when you select a key or scan to a key, keep using the
Down arrow key until Off is displayed.

Feedback Menu 36
Mid-Sequence Categories
When Mid-Sequence Categories is turned on, First Categories is displayed, allowing you to label keys within a sequence.
First Categories
First Categories is only displayed when Mid-Sequence Categories is turned on. You will see category names at the
top of the keys on your vocabulary before you make your first selection.
Embellished Icon: On/Off
An embellished icon is one that has been partially changed from the original Unity icon. If you have modified (or
embellished) the final icon in any sequence, you can choose to have the embellished icon displayed in your
vocabulary instead of the original icon.
Icon Message Labels: Top or Bottom
Icon Messages Label refers to the label assigned to a key in your vocabulary. Top means the label on your icon will
be at the top of the key. Bottom means the label on your icon will be at the bottom of the key.
Show Selections By: Icon or Icon Name
If you select Icon, the picture of any icon you select from your vocabulary will be displayed in the icon display area
of your device. If you select Icon Name, the default name of any icon you select from your vocabulary will be
displayed in the icon display area along with the icon.
Spell One Word
When Spell One Word is turned on: When you are using your spelling keyboard and decide that you want to return
to your vocabulary, you can type any word on your spelling keyboard, select the Space key after the word, and
your device will automatically return you to your vocabulary.
Note: Spell One Word does not work with word prediction.
Auto Spell
When Auto Spell is turned on and you select an empty sequence in your Core, your device automatically switches
to your spelling keyboard. It also displays the spelling characters that the icons you selected represent. You can
type a completed word. Go to your vocabulary when you have finished spelling.
Note: If Spell One Word is also turned on, you can select a space to return to your vocabulary automatically.
Speak When Spelling
Letters
Your device will speak each letter you enter on your spelling keyboard.
Words
Your device will speak each whole word you enter on your spelling keyboard.
Letters and Words
You device will speak each letter in a word and then speak the whole word as
you enter them on your spelling keyboard.

Feedback Menu 37
Bass and Treble (Feedback Menu)
Bass and Treble allow you to adjust the bass and treble settings for sound.
Text Size
Text Size allows you to change the size of the text in the text display area. You can choose from Largest, Large,
Medium, Small, and Smallest.
Raspberries On/Off
Raspberries controls the error beep. You will hear it if you try to do something your device does not allow you to
do. By default, this option is turned off.
External Speaker: On/Off
If you have amplified stereo speakers plugged into your device, turn External Speaker on.
Icon Prediction: Grey/White/Blank/Off
Icon Prediction is available only with Unity vocabularies.
Icon Tutor On-the-Fly
Icon Tutor On-the-Fly is available only with Unity vocabularies.
Icon Tutor View Delay
Icon Tutor View Delay is available only with Unity vocabularies.
Icon Tutor View Count
Icon Tutor View Count is available only with Unity vocabularies.
Background and Text Colors
When you select Background and Text Colors, three keys are displayed: Workspace Background and Text Colors,
Notebook Background and Text Color, and Marked Text Background and Text Colors. For example, for your regular
work you may have a white text display area with black text (default). When you are in a notebook, you might choose
a green background area with yellow text. You may choose red for the color you use when you highlight words.
Workspace Background and Text Colors
This option allows you to choose custom colors for your workspace (the text display area when you are not in a
notebook).
Notebook Background and Text Color
This option allows you to choose custom colors for your notebooks.
Marked Text Background and Text Colors
This option allows you to choose custom colors for highlighted text.

Feedback Menu 38
Bluetooth Speaker Menu (Feedback Menu)
The Bluetooth Speaker Menu allows you to pair (connect) your device with Bluetooth speakers, disconnect pairing, or
turn the Bluetooth beep on or off. When you select Bluetooth Speaker Menu, the following options are displayed.
Paired Devices (Bluetooth Speaker Menu)
This key will show you the Bluetooth speakers you have been paired to, up to a maximum of 16 devices. If you
disconnect from a speaker and then later decide you want to use it again, you can select this key and select the
speaker you want from the menu. The device will re-connect to the speaker automatically.
Pair to Speaker (Bluetooth Speaker Menu)
To pair your device with a Bluetooth speaker:
1. With the Bluetooth Speaker Menu open, turn your speaker on and hold down the "pair" button on your
speaker.
2. In the Bluetooth Speaker Menu, select the Pair with Speaker key.
3. When the connecting light on your speaker begins to flash, release the "pair" button.
4. You may see a "Please Wait" box on your screen. In a few seconds you will see the name of your Bluetooth
speaker in the Bluetooth Status box in the menu. You are now paired with your speaker.
Disconnect (Bluetooth Speaker Menu)
Select this key when you want to disconnect from your Bluetooth speaker.
Bluetooth Beep Output (Bluetooth Speaker Menu)
When this option is turned on, a listener will be able to hear the beeps that occur as you make selections on your
device. When this option is turned off, no beeps will be heard as you make selections.
Skin Options
The “skin” is the way your display looks—the vocabulary pages, menus, message boxes, etc. When you select Skin
Options, the following options are displayed.
Display Skin
Choices are Classic, Skin 1, and Skin 2. The default is Classic. Use the arrow keys to switch between skins.
Key Visual Feedback
When Key Visual Feedback is turned on, a key’s colors are briefly inverted when you select it. For example, when
you select a key that has black text on a white background, the text turns white and the background turns black.
Key Padding
Key Padding sets the amount of space around and between keys. To add space, use the arrow keys to select a
padding value between 1 and 20.
Key Shading
When Skin 1 or Skin 2 is selected, you can control the 3-D effect of keys. To set the 3D effect, use the arrows under
Key Shading to change the percentage.
Activity Background Color
If you want to customize the background color of the activity keys, select Activity Background Color to open the
color screen. Then select the color you want.

Feedback Menu 39
Main Background
If you want to customize the background color of the Core vocabulary keys, Toolbox keys, and Tools menu, select
Custom under Main Background to open the color screen. Then select the color you want. If you decide to return
to the default color, select Skin Default.
Menu Background
When Skin 1 or Skin 2 is selected, you can customize the background color of menus. Select Custom under Menu
Background to open the color screen. Then select the color you want. If you decide to return to the default color,
select Skin Default.
Menu Parameter Background
When Skin 1 or Skin 2 is selected, you can customize the background color of menu parameters.
Select Custom under Menu Parameter Background to open the color screen. Then select the color you want. If you
decide to return to the default color, select Skin Default.
Message Box Background
When Skin 1 or Skin 2 is selected, you can customize the background color of message boxes. Select Custom under
Message Box Background to open the color screen. Then select the color you want. If you decide to return to the
default color, select Skin Default.
Status Area Background
When Skin 1 or Skin 2 is selected, you can customize the background color of the status area. Select Custom under
Status Area Background to open the Color screen. Then select the color you want. If you decide to return to the
default color, select Skin Default.
Copy these settings to all areas (Skin Options)
Selecting this key allows you to copy your skin changes to all the user areas in your device.
Text Area Options
When you receive your device from the factory, it is set up so that it speaks whatever text is displayed in the text
display area. When you select Text Area Options, two options are displayed: Change Text Area Function and Speak
Recorded Messages.
Change Text Area Function
Selecting this option takes you to your spelling keyboard. The tool «SPEAK DISPLAY», appears in the text display area.
You can change the tool by selecting Insert Tool and then selecting the tool or tools you want. For example, you might
want your device to speak everything on the display and then clear the display. To do this you would do the following:
1. Select Delete Character to delete «SPEAK DISPLAY».
2. Select Insert Tool.
3. Select the tool «SPEAK ALL».
4. Select Insert Tool again.
5. Select the tool «CLEAR DISPLAY».
6. Select OK to save your work and exit.
Note: If you decide not to change anything, select the Cancel key to exit without saving any work.

File Organizer Menu 40
Speak Recorded Messages
If you want recorded messages that appear in the text display area to be spoken, turn Speak Recorded Messages on.
File Organizer Menu
The File Organizer menu allows you to copy and move vocabulary files from one memory device to another or
move vocabulary files between folders on the same device. You can also delete vocabulary files. Go to the Toolbox
and select File Organizer. Three options are displayed: Copy File, Move File, and Delete File.
Copy a Vocabulary File
To copy a vocabulary file from one memory device another so that it is available on both devices:
1. Insert your USB flash drive into your device.
2. Go to the Toolbox and select File Organizer.
3. Select Copy File.
4. Select the memory device that has the file you want to copy.
5. Select the files to copy. You can open any folder and select files from the folder.
6. When you finish selecting files, select OK.
7. Select the destination for the files (i.e., the other storage device).
8. If you have a folder on the destination memory device that you want to store the files in, select it, then select
OK. Otherwise, just select OK.
9. Select Yes in the yellow message box if you want to continue. Or select No to stop.
10. The files will be copied. Depending on the number and size of files, this could take a few minutes. The files will
be on both memory devices.

File Organizer Menu 41
Move a Vocabulary File
To move a vocabulary file from one memory device to another:
1. Insert your USB flash drive into your device.
2. Go to the Toolbox and select File Organizer.
3. Select Move File.
4. Select the memory device that has the file you want to move.
5. Select the files to move. You can open any folder and select files from the folder.
6. When you finish selecting files, select OK.
7. Select the destination for the files (i.e., the other storage device).
8. If you have a folder on the destination memory device that you want to store the files in, select it, then select
OK. Otherwise, just select OK.
9. Select Yes in the yellow message box if you want to continue. Or select No to stop.
10. The files will be transferred. Depending on the number and size of files, this could take a few minutes. The files
will no longer be on the original memory device.
Delete a Vocabulary File
To remove a vocabulary file from a memory device:
1. Insert your USB flash drive into your device.
2. Go to the Toolbox and select File Organizer.
3. Select Delete Files.
4. Select the memory device that has the files you want to delete.
5. Select the files to delete. You can open any folder and select files from the folder.
6. When you finish selecting files, select OK. The files will be erased from the memory device you selected.

Maintenance Menu 42
Maintenance Menu
The Maintenance Menu contains options related mostly to your device system. You will not use these options
frequently, but may need to set one or two of them now and then to customize your device or check on and fix a
system problem you may be having. Available options vary according to the device you are using. Go the Toolbox
and select Maint Menu.
Disable Toolbox
When you disable the Toolbox, you can still use your vocabulary to speak, but the use of the Tools key is severely
limited. As long as the system remains disabled, you cannot go from Core or your Home page to the Toolbox
without entering your password. Only certain keys in the Tools menu and the Toolbox will work. If you also disable
the Tools key, you cannot access Toolbox menus to change settings.
Note: To change settings while the Toolbox is disabled, see Create Toolbox Disable Override
on page 43.
When you select Disable Toolbox, the following options are displayed: Toolbox, Tools Key, Change Toolbox Disable
Password, Create Toolbox Disable Override, On-Screen Tools Key, Help Button, and Pulldown Menu Button.
Toolbox: Enable/Disable
The default is Enable.
The first time you set Toolbox to Disable:
1. Set Toolbox to Disable. You will be prompted to create a password.
2. Type the password you want to use and select OK.
3. Select the Tools key.
4. From the Tools menu, select the Toolbox key. You will be able to use some of the tools and menus in the
Toolbox, but not all of them.
5. Select Maint Menu, select Disable Toolbox, and turn Toolbox Disable off. This puts your device back into
normal use mode.

Maintenance Menu 43
Tools Key: Enable/Disable
The Tools Key options are only available when you have disabled the Toolbox. When the Tools key is disabled, you
cannot access the Toolbox or use the Toolbox menus. The default is Enable.
Note: All devices have an on-screen Tools key. Some devices may also have a Tools key on the front of the device.
When you disable the Tools key, both the on-screen Tools key and the Tools key on the front of the device are
disabled.
Change Toolbox Disable Password
The first time you disable the Toolbox, you create a password. If you want to change your password, select Change
Toolbox Disable Password, spell a new password, and select OK. As long as the Toolbox remains disabled, you
cannot go from Core or your Home page to the Toolbox without entering your password.
Create Toolbox Disable Override
Once you have created a Toolbox Disable Override, you can use it to modify settings while the Toolbox and Tools
key are disabled. You will need a USB flash drive and your device Toolbox and Tools key must be enabled.
1. Insert the USB flash drive into one of the USB ports on your device.
2. Go to the Toolbox and select Maint Menu.
3. Select Disable Toolbox.
4. Select Create Toolbox Disable Override.
5. When the override is completed you will see a yellow message box telling you the override was successfully
created on Removable Drive x (whatever the drive is on your device). Select OK.
6. Remove the USB flash drive and label it so you will remember that it contains your Toolbox Disable Override.
Now when you want to modify settings while the Toolbox is disabled, insert this flash drive into your device and
begin to use the device as you normally do.
On-Screen Tools Key
On-Screen Tools Key is only available when you also have a Tools key on your device. The default is Enable. This
option allows you to disable the on-screen Tools key located to the right of the text display area on your device.
Help Button
The default is Enable. This option allows you to disable the Help button located to the right of the status area.
Pulldown Menu Button
The default is Enable. This option allows you to disable the pull-down menu located in the Tools menu without
having to disable the Tools key.

Maintenance Menu 44
Power Management
Options are available for managing device power settings. Default configurations for the power button vary for
different devices.
I/O Function
The options are Sleep, Hibernate, Shutdown, and Disable. The options operate as follows when selected.
Sleep
When Sleep is selected, your device will go to sleep when you press the power button. Press the button
again to “wake” the device. In Sleep mode, the device uses only a small amount of battery energy and
will come back up more quickly than after a shutdown. The device will also return you to where you
were before it went to sleep. Select this mode if you won’t be using the device for a relatively short
amount of time (less than an hour, for example). Sleep is the default setting.
Hibernate
When Hibernate is selected, your device will hibernate when you press the power button. Press the
button again to “wake” the device. In Hibernate mode, the device virtually shuts down, thus saving
even more battery energy than Sleep mode. The device will take longer to come back up than it would
in Sleep mode, but it will come up faster than after a shutdown. The device will also return you to
where you were before it went to sleep. Select this mode if you won’t be using the device for a
prolonged amount of time (more than a few hours, for example).
Shutdown
When Shutdown is selected, your device will shut down completely when you press the power button. In
this state, your device uses almost no battery energy. It also will take your device longer to come back up
when you turn it back on.
Disable
When you select Disable, the power button is disabled. If you select this option, once you turn your
device on, it will not turn off again. This option does not save battery energy.
Shutdown
The Shutdown key allows you to completely shut down your device. When you select this key, a yellow prompt box
asks “Are you sure?” Select Yes only if you want to shut down your device completely.
Restart
The Restart key provides a way to restart your device. You should rarely have to use this option.
Auto Backlight Off
Auto Backlight Off allows you turn the device’s backlight off or set an amount of time for the backlight to turn off
automatically. If you select Off, the backlight will never be on. Selecting Off or a low number of minutes helps
conserve battery power.
Auto Sleep
Auto Sleep will put your device to sleep automatically after the amount of time you set passes. If you set Auto
Sleep to Off, your device will never go to sleep.
Hardware Diagnostics
If you have problems with your device and call the PRC Service Department, you may be asked to check some
items in this menu. Generally you should not need to use Hardware Diagnostics. If for some reason you cannot get
to Phone Configuration from your Phone page or activity, you can select Phone Configuration from Hardware
Diagnostics as an alternative way to configure your cell phone.
System Information Box
Use the System Information box to check for information bout your device’s system. You can find system version
information, whether data logging is turned on or off, how much synthesized memory you have left, etc. You may
need to give the information in the System Information box to a service representative if you call in with a problem.

Maintenance Menu 45
Erase All Vocabulary
If you select Erase All Vocabulary, the system erases all its memory and resets itself to blank user areas. You must
go to the User Area Menu and re-load original vocabulary into each area. If you only want to return your device to
its original state, select Reset to Factory Defaults.
Reset to Factory Defaults
If you want to return your NuVoice to its original state, select Reset to Factory Defaults. All of your user areas will
be reset exactly the way they were when you received the device from PRC. If you want to keep your vocabulary
changes or eyegaze calibration, perform a memory transfer before you select Reset to Factory Defaults. See the
Transfer Memory Menu for information on memory transfers.
Enable Icon Set Menu
Enable Icon Set Menu shows you the different icon sets that are available in your device. Icon sets are an option
that you purchase. When you purchase a device with Unity, Essence, or WordPower, the correct icon set is part of
your purchase. The icons will be turned on and ready to use when you receive your device. If you decide to
purchase an icon set later, call the PRC Sales Department. You will receive a key code. When you select the new
icon set from the menu you will be asked to enter the key code before you can turn the icon set on and use it.
Error Reporting
Your device reports any system errors that occur by describing the error in a red box on your display screen. You
will also see a box on your display that asks you to write down what happened and report it to PRC. You are given
instructions for continuing.
Battery Menu
Battery Menu displays the status of your batteries and allows you to put your device in Shipping Mode. You may
be asked for battery information should you need to call the PRC Service Department about your batteries.
Controller Information
This section shows if a charger is present and the current charge level.
Battery Information
Your device can have 4 possible batteries. Batteries 1 and 2 are under the battery doors in the back of your device.
These run the NuVoice system software. Battery 3 is an extra external battery that you purchase separately from
PRC. Battery 4 is an internal battery in the tablet. Select the Previous Battery and Next Battery buttons to check
on the state of your batteries.
Enter Shipping Mode
If you ever need to ship your device somewhere, or if you are not going to use it for a lengthy period of time,
always put the device in Shipping Mode. This will conserve your batteries and prevent accidental activations
during transit that could harm your device. When you select Enter Shipping Mode, a yellow message box will ask if
you want to enter Shipping Mode now. To enter Shipping Mode, select Yes. Or select No to cancel. If you answer
Yes, unplug the battery charger. A yellow message box will also remind you to unplug the charger. Once the
charger is unplugged, your device will enter Shipping Mode.
Low Battery Volume
When the device batteries are low, a warning tone will sound alerting you to plug in the charger. Use the Low
Battery Volume arrow keys to raise or lower the volume of this tone.

Maintenance Menu 46
Enter a New Feature Code
To use any optional features that you did not purchase at the time you ordered your device, such as an additional
vocabulary or the integrated feature pack, you must call the PRC Sales Department (800-262-1933) to purchase the
feature.
1. Select Enter New Feature Code. A yellow message box will tell you that the Feature Code can be loaded from
a file or typed in and ask if you want to load the new code from a file.
2. Since you do not have a feature code yet, select No. Your spelling page will be displayed. Notice the code in
the text display area.
3. Call the PRC number shown in the display.
• Tell them you want to enable a new feature and give them the code you see in your display.
• PRC will give you the feature code you need to enable the feature you want. You can have them give it to
you over the phone so you can write it down or e-mail it as a file you can download, or you can ask them
to type it into an e-mail where you can copy and paste it into the text display area.
4. When you receive the code, go to the Toolbox, select Maint Menu, select Enter a New Feature Code, and
supply the code you received from PRC.
Updating NuVoice
The Software Update Menu allows you to manage NuVoice software updates. When NuVoice software updates are
available, they are placed on the PRC website as downloadable files. The easiest way to download these files is
through a wireless connection.
Set up a Wireless Connection
You can set up your device for a Wi-Fi connection. PRC is not responsible for the setup of your Wi-Fi network. You
must have access to a local Wi-Fi network. In the Accent, Wi-Fi is always turned on.
Note: If you have a dedicated device, a Wi-Fi connection will allow you to update your NuVoice software via the
Internet, but will not provide access to the Internet or an Internet browser.
1. Go to the Toolbox and select Maint Menu.
2. Select Hardware Diagnostics.
3. Select Network Setup.
4. Select Connect or disconnect from the Network Setup menu.
5. Select the network you want to connect to. You may need to enter a password.
6. Select Connect and follow the on-screen directions.
7. Exit from all menus.

Maintenance Menu 47
Update via a Wireless Connection
To perform this type of update, your device must be connected to a Wi-Fi network.
Note: If you have a dedicated device, a Wi-Fi connection will allow you to update your NuVoice software via the
Internet, but will not provide access to the Internet or an Internet browser.
Some updates take longer than others. You won’t know how long the update will take, so we recommend that you
plan downloads for when you will not need to use your device and can keep an eye on the download progress. You
are given several chances to stop before the download actually begins.
1. Verify that you have a wireless connection.
2. Go to the Toolbox and select Maint Menu.
3. Select Software Update Menu.
4. Select Internet Update.
5. A yellow message box will inform you that some updates can take a long time and ask if you want to continue.
Select Yes (or No to quit).
6. If there is an update for your device, another yellow message box will ask if you want to download and install
it. Select Yes (or No to quit).
7. Another yellow message box will ask if you want to continue and install the update. Select Yes (or No to quit).
8. You will see a screen that shows you all the files that will be downloaded. The screen will disappear when the
update is finished.
9. Select OK to exit from the Maintenance Menu.
Update via a USB Flash Drive
Some updates take longer than others. You won’t know how long the update will take, so we recommend that you
plan downloads for when you will not need to use your device and can keep an eye on the download progress. You
are given several chances to stop before the download actually begins.
1. Insert your USB flash drive into the computer to which you will download the software update.
2. Go to the PRC website www.prentrom.com
.
3. Select Support.
4. Under “Downloads”, select Software Updates.
5. Select the small box to the left of your device name.
6. Select the software update you want to download to your computer's desktop.
7. Turn on your device and plug in the battery charger.
8. Copy the downloaded software update from your computer desktop to your USB flash drive.
9. Remove the USB flash drive from your computer and insert it into your device.
10. On the device, select Maint Menu from the Toolbox.
11. Select Software Update Menu.
12. Select USB Update. The update process will begin.
13. When the update process is finished, remove the USB flash drive from your device.
14. Once your device is running the new software, you can unplug the battery charger.

Notebook Menu 48
English / Español
Use this key to set the device setup language to either English or Spanish.
Change Product Configuration
Use Change Product Configuration to switch between configurations quickly. When you select Change Product
Configuration, the vocabularies loaded on your device are listed. The currently configured vocabulary shows
“(Current Configuration)” under its name. When you select one of the other vocabularies, a yellow message box
will ask “Are you sure you want to erase everything?”
• If you want to change the current configuration, select Yes.
• If you want to keep the current configuration, select No.
Notebook Menu
Use notebooks when you are going to create large amounts of text. Notebooks are ideal for storing speeches and
reports, keeping a journal, etc. Notebooks are unique to a user area. A notebook in one user area cannot be
accessed from another user area. Notebooks are a different color. When you are in a notebook, the text display
area changes color. This is to remind you that you are in a notebook. Notebooks can take up a lot of memory. If
you find your device is running out of memory, look at your notebooks to see if you can delete any.
To get started with notebooks, go to the Toolbox and select Notebook Menu.
The Notebook Workspace
When you are working in a notebook and you fill the text display area, notice that the top line of text disappears
from the screen so you can see the bottom line of text. This is called "scrolling". Any text that scrolls off the display
goes into the notebook workspace. The workspace will keep all of your text until it is full. Then it won't allow you
to add any more text to that Notebook. The notebook workspace can hold approximately 30,000 text characters. If
you select Save Notebook or shut your device off, the notebook will be saved.

Notebook Menu 49
Editing or Erasing the Contents of the Notebook Workspace
You can edit or erase the Notebook workspace by editing or erasing the Notebook's contents. To retrieve text that
has scrolled into the workspace, use the arrow keys to move the cursor up on the display. Text that is in the
workspace will begin to appear on your display. When you see the text that you want to edit, stop moving into the
workspace and begin editing by using the Edit Menu and Edit Mode keys.
Note: Clear Display does not work in a notebook.
New Notebook
A new notebook is a notebook that has never been used before. It has no text and no title. When you select New
Notebook you are asked to spell a name for your notebook. Spell the name and select OK to exit. Notice that the
text display area is now a different color. This tells you that you are using an open notebook.
Notebook Text/Background Color
When you select Notebook Background and Text Color, you can change the color of the notebook background
and/or the notebook text. Background Color and Text Color are options under “Text/Background”, located at the
bottom of the color screen next to the color chart.
Note: If you change colors, we recommend that you always select notebook colors that are different from your
regular text display area colors.
Close a Notebook
When you finish with a notebook, close it by selecting Close Notebook in the Notebook Menu. If you have not
saved your notebook or have made changes to it without saving them, your device will ask you if you want to save
the notebook before closing. Answer Yes to save it or No to close it without saving any new text you may have
entered. When you close your notebook, the display area goes from the notebook color to white. This reminds you
that you are no longer using your notebook.
You may find yourself trying to do something on your device that you do all the time but suddenly it won’t work.
Check to see if you have a notebook open. If you do, close the notebook. You should now be able to use your
device as always.
Save Notebook
When you are using a notebook, you will want to save your work regularly. Save Notebook allows you to save the
notebook. You can select Save Notebook any time a notebook is open. In some vocabularies, Save Notebook is a
key on your notebook page; on other vocabularies you must select Save Notebook from the Notebook menu in the
Toolbox. Your device saves your notebook and then returns you to it automatically.
Open a Notebook
If you want to open a particular notebook, select Open Notebook in the Notebook Menu. When you select Open
Notebook, a list of all your notebooks is displayed. Select the notebook you want to open.
Note: You may find yourself trying to do something on your device that you do all the time but suddenly it won’t
work. Check to see if you have a notebook open. If you do, close the notebook. You should now be able to use your
device as always.

Notebook Menu 50
Delete a Notebook
Notebooks take up a lot of memory space. Deleting notebooks that you no longer need helps to free up memory
and keep your notebook list manageable.
1. Select Delete Notebook to open a list of your notebooks.
2. Select the notebook you want to delete.
3. Select OK.
4. You will see a reminder that you are going to delete a notebook. If you want to continue, select Yes. If you
decide not to delete the notebook, select No.
5. If you answered
Yes, the notebook is automatically deleted and will no longer be an option in the Open
Notebook list.
Rename a Notebook
You may decide to rename a notebook at some time. Perhaps it contains a format you like or information that you
can re-use for another project. Rename Notebook allows you to do this.
1. Select Rename Notebook to open a list of your notebooks.
2. Select the notebook you want to rename.
3. Delete the old name and type the new name.
4. Select OK. The notebook is now renamed.
Save a Notebook
1. If you are saving to a USB flash drive, insert it into your device.
2. Select Save Notebook to Disk.
3. Select the notebook you want to save.
4. Instructions tell you where your notebook will be saved. This will usually be your removable media drive. If
this is OK, select OK Use this folder. If you want to select a different folder to save it to, select Choose
different folder.
5. If you want to change the name of the notebook, you can do it here. Select OK. The notebook is saved as a .txt file.
Load a Notebook
1. If you are loading from a USB flash drive, insert it into your device.
2. Open (or browse to) the folder that contains the notebook you want to load.
Note: Your notebooks are .txt files.
3. Select the notebook to load.
4. If you want to keep the notebook name, select OK. If you want to change the notebook name, type a new
name and then select OK.
5. Your notebook is loaded. You can open it by selecting Open Notebook.

Review Vocabulary Menu 51
Lock a Notebook
You can lock a notebook so that other people can look at it but not write in it or change anything that is already
written. To lock a Notebook:
1. Make sure the notebook you want to lock is already open.
2. Select Lock Notebook until Locked appears in the yellow box.
3. Select OK.
If later you open a notebook and discover that you can't write in it, open the Notebook Menu and check to see if
the notebook is locked. If it is, select Unlocked, then return to your open notebook.
Copy a Notebook from One Area to Another
Copy Notebook allows you to copy a Notebook from one area to another area:
1. Select Copy Notebook.
2. Select the notebook you want to copy.
3. Select the area where you want the notebook copy to go.
4. Select OK to exit.
Review Vocabulary Menu
The Review Vocabulary Menu allows you to review the vocabulary you have stored in your device. A vocabulary
review does not review words in the dictionary.
To display the Review Vocabulary Menu, go the Toolbox and select Review Vocab Menu.

Review Vocabulary Menu 52
Review
Use Review to determine whether the review includes all vocabulary or only vocabulary in activities, Core, or pages.
Expanded Vocabulary Search
When you select Expanded Vocabulary Search, you can type a word or phrase and NuVoice will search to see if that
word or phrase is stored. If it finds the word or phrase, it will list where the word or phrase is stored. To make a
search, type the word or phrases and select OK.
The word or phrase must be stored on a key. Your device will not search notebooks, reminders, or the Speech or
Word Prediction dictionaries. For example, if you enter the word "hi", your device will find and list where it is
stored. If you have "Hi, Joe", "Hi, Carol", "Hi, Group" stored on keys, you must type "Hi, Joe" into your search.
You can also search for stand-alone phrases. For example, let’s say "Come back" is stored in a number of places.
You can enter “Come back” as your search and your device will show you where to find it. However, if "Come back"
is part of a larger sentence, your device will not find it. You must type the entire sentence, not just the phrase.
Review to Display (Review Vocabulary Menu)
Review to Display allows you to review vocabulary on your device display.
Review to Display & Speaker (Review Vocabulary Menu)
Review to Display & Speaker allows you to review vocabulary on your device display and hear it spoken through
your device speakers.
Review to File (Review Vocabulary Menu)
When you select Review to File, the screen shows the pre-set (default) folder in which the review will be saved.
OK Use Pre-Set Folder (Review Vocabulary Menu)
If you want to save the vocabulary review in the pre-set folder, select OK Use pre-set folder.
Choose Different Folder (Review Vocabulary Menu)
If you want to save the review in a different folder, select Choose different folder. This option also allows you to
save a vocabulary review to a USB flash drive.
Data Logging On/Off
Data logging refers to the Language Activity Monitoring (LAM) capabilities of your device. A clinician or teacher can
use these capabilities to analyze individuals' language activities. This can be helpful for clinical intervention,
outcomes measurement, and research. Data Logging must be turned on for the device to record any language
activity data.
1. Go to the Toolbox and select Clock Menu.
2. Verify that the year, month, and date are correct.
3. Go to the Review Vocabulary Menu and turn Data Logging on.

Review Vocabulary Menu 53
Data Analysis
Data Analysis allows you perform either a Web-based analysis using the Realize Language™ website or a manual
data analysis.
Realize Language Account
To conduct a Web-based data analysis using your Realize Language account, do the following:
1. In the Review Vocabulary Menu, select Data Analysis and then select Realize Language Account. The
keyboard will be displayed, prompting you to enter your account email address and password.
2. Enter your account email address and select OK.
3. Enter your account password and select OK.
4. NuVoice will connect you to the server and display the Realize Language Account menu.
Create Person
Use the Create Person key to set up a user for whom you want to collect, upload, and analyze data.
1. In the Realize Language Account menu, select Create Person.
2. Enter the device user’s name and select OK.
3. A key with the person’s name will be displayed on the Realize Language Account screen.
4. Select the person’s key. Data collected on your device will be uploaded to this person.
5. Create additional persons as needed.
Creating Multiple Persons: When you create multiple persons, selecting a person’s key will make that person
active, meaning that data will be collected and uploaded for that person.
Changing the Person: When one person is active and you select a different person’s key, the following
message will appear: “Changing the person will result in the log being cleared; upload current log to previous
person first?” To upload data collected for the previous person, select Yes. After the data is uploaded, the
selected person will become active. If you select No, data collected for the previous person will be lost.
Sync Data Log Now
When you want to upload collected data for a person to the Realize Language server immediately, select Sync Data
Log Now. When the data has been uploaded, “Upload Successful!” will appear. Select OK to close the message.
Sync Automatically
If you want collected data to be uploaded to the Realize Language server automatically at regular intervals, turn
Sync Automatically on.
Change Credentials
The Change Credentials key allows you to change your Realize Language account email address and password.
Save Data Log to File
To analyze data manually, do the following:
1. Select Save Data Log to File. A screen will show the folder in which the data will be saved.
2. Select OK to use that folder or select Choose Different Folder.
3. When the keyboard is displayed, enter a name for the data and select OK. A message will confirm where the
data will be saved.

Review Vocabulary Menu 54
Save Data Log to File
Once you have accumulated some language data, you need to save it to your USB flash drive.
1. Insert the USB flash drive.
2. In the device, go to the Toolbox, select Review Vocab Menu, select Review to File, select Choose Different
Folder, and select the Removable Media folder.
3. If you are asked to select a folder to save the logged data in, select one or create one and select OK.
4. Spell a name for this data and select OK. A yellow message box will tell you that the data is saved. Select OK.
5. When the log is saved, remove the USB flash drive from your device.
6. Return to the Review Vocabulary Menu and select Clear Data Log. This erases the data you just saved.
Note: If you want to accumulate more data, make sure Data Logging is turned on.
7. Insert your USB flash drive into your computer and copy or move the data logging file to your computer.
An Example of a Data Log
### CAUTION ###
The following data represents personal communication.
Please respect privacy accordingly.
Automatic Data Logging NuVoice
Version 2.04 2016-01-22
Prentke Romich Company
*[YY-MM-DD=16-02-18]*
09:47:15 SEM "like "
09:47:22 SEM "read "
09:47:24 SEM "put "
09:47:28 SEM "please "
09:47:39 SEM "I "
09:47:41 SEM "eat "
09:47:48 SEM "I "
09:47:49 SEM "feel "
09:47:58 ACT "happy "
09:48:15 SEM "you "
09:48:17 SEM "feel "
09:48:18 ACT "happy "
09:48:22 SEM "I "
09:48:23 SEM "want "
09:48:24 SEM "drink "
09:48:27 ACT "water "
09:48:44 SEM "you "
09:48:45 SEM "go "
09:48:47 ACT "outside. "
09:49:05 SEM "my "
09:49:07 SEM " "
09:49:16 PAG "Maria "
An Example of CTL Information
01:52:01 CTL "Switch User Area from Unity 45 Full to Unity 84 Single Hit"
01:52:14 CTL "Switch User Area from Unity 84 Single Hit to Unity 45 Full"

Review Vocabulary Menu 55
About the Logged Data
When you look at the data log, the first thing you see is the year, month, and date of this particular log. The next
item you notice is the time stamp. Time is presented in a 24-hour format. Following the time Stamp is the source
of language event. Source codes are in capital letters. The following source codes are currently valid:
Code Description
ACT Activity Row
CTL Control – supplies information on non-language key activations a person makes
PAG Page
SEM Semantic Compaction – Minspeak
®
and Unity
SPE Spelling
WPR Word Prediction
DWP Derivative from Word Prediction
Any characters spaced more than 0.2 seconds apart are considered separate language events.
In the first data log example, you can see that the device user formed sentences and used pages and activities. In
the second example, the user changed vocabularies. These were not language events, so you will see the CTL
source code; but from them you can see that the user knows how to change vocabularies.
For additional information on Language Activity Monitoring (LAM) and data logging, go to
http://aacinstitute.org/language-sample-collection-in-aac/
Clear Data Log - 0 Bytes
You can tell if there is data to be analyzed by looking at the Clear Data Log key. If a number is displayed on the key
(for example, 8808 Bytes), data is available to be analyzed. To clear the log, select Clear Data Log to display the
prompt “Delete all logged data”. Select Yes only if you want to clear the data log completely.
If there is no number on the key, you will need to turn Data Logging on and have the person generate some data.
You will save the language data to your USB flash drive. You can then download the data log file from the USB flash
drive onto your computer and save it as a word processing document.
Icon Tutor Options
The Icon Tutor options are available only with Unity vocabularies.

Access Method Menu 56
Access Method Menu
An access method is the method you use to control your device—touch, switch, NuPoint™ (headpointing), joystick,
or eyegaze. Select an access method and then customize that method for your personal use by selecting the
options you want.
To display the Access Method Menu, go to the Toolbox and select Access Method Menu.
Choose Different Access Method
Choose Different Access Method allows you to select Touch, 1 Switch, 2 Switch, NuPoint/Joystick, or Eyegaze for
your access method.
Note: For explanations of menu options that are common to multiple access methods, see Shared Access Options
.
Touch Method
When Touch is selected, you touch keys on the screen to select them. Refer to the hardware manual for your
device for important information about your touchscreen.
1-Switch Scanning Methods
Use a single switch to scan to any key on the screen. Choose to scan by rows and columns or by columns and rows.
Plug a single switch (or a dual switch using only the SELECT side) into either the switch A or switch B jack on your
device. You can also use a Bluetooth switch for 1-switch scanning. See the directions that came with your
Bluetooth switch. When you select 1-Switch as an access method, you will see a screen that contains a number of
ways to scan with one switch. If you are unsure how you want to use the 1 Switch method, we highly recommend
that you try out the different 1-switch techniques to find the one that suits you best. Below are brief descriptions of
the techniques.

Access Method Menu 57
Auto Scan
Your device scans the keyboard automatically.
Hold Scan
You must press and hold your switch to scan the keyboard.
Step Scan
You must activate your switch each time you want to move to a new position on the keyboard.
Linear Scan
Linear Scan allows you to step through the keys in your vocabulary moving from left to right across the rows or
from top to bottom down each column. You must activate your switch to move the scan.
Row/Column
The scan highlights each row of keys beginning with the top row and moving down the screen. When the row that
contains the key you want is highlighted, activate your switch. The scan will highlight the separate columns in the
row you selected, moving from left to right across the screen. When the key you want is highlighted, activate your
switch. The device beeps when your key is accepted.
Column/Row
The scan highlights the columns first instead of the rows, moving from left to right across the screen. When the scan
reaches the column that contains the key you want, activate your switch. The scan begins to highlight each key in that
row. When the key you want is highlighted, activate your switch. The device beeps when your key is accepted.
Quarter Row/Column; Quarter Column/Row
The scan divides the vocabulary page into quarters. When the scan reaches the quarter you want, activate your
switch. The rows or columns in that quarter are scanned. Select the row or column you want. Individual keys are
then scanned. Select the key you want. You can select Auto, Hold, or Step to scan.
Note: For explanations of the remaining menu options, see Shared Access Options
.
2-Switch Scanning Methods
Dual or 2-switch scanning uses a dual switch or two single switches to scan left, right, up, and down to any key on
the keyboard. Plug two single switches or a dual switch into either the switch A and/or switch B jacks on your
device. You can also use a Bluetooth switch for 2-switch scanning. See the directions that came with your
Bluetooth switch.
Auto Scan Directed
Your device automatically scans the keyboard. Change directions by activating your switch.
Hold Scan Directed
You must press and hold your switch to scan the keyboard. Change directions by releasing and then pressing and
holding your switch.
Step Scan
You must activate your switch each time you want to move to a new position on the keyboard.
Linear Scan
Linear Scan allows you to step through the keys in your vocabulary moving from left to right across the rows or
from top to bottom down each column. You must activate your switch to move the scan.

Access Method Menu 58
Row/Column
The scan highlights each row of keys beginning with the top row and moving down the screen. When the row that
contains the key you want is highlighted, activate your switch. The scan will highlight the separate columns in the
row you selected, moving from left to right across the screen. When the key you want is highlighted, activate your
switch. The device beeps when your key is accepted.
Column/Row
The scan highlights the columns first instead of the rows, moving from left to right across the screen. When the scan
reaches the column that contains the key you want, activate your switch. The scan begins to highlight each key in that
row. When the key you want is highlighted, activate your switch. The device beeps when your key is accepted.
Quarter Row/Column; Quarter Column/Row
The scan divides the vocabulary page into quarters. When the scan reaches the quarter you want, activate your
switch. The rows or columns in that quarter are scanned. Select the row or column you want. Individual keys are
then scanned. Select the key you want. You can select Auto, Hold, or Step to scan and you select to have an extra
hit at the end of your selections.
Note: For explanations of the remaining menu options, see Shared Access Options
.
Highlight Settings (1-Switch/2-Switch)
The Highlight Settings option is available for both the 1-Switch and 2-Switch scanning methods. This option
provides visual feedback when a key is activated. Feedback is displayed by highlighting the key with a colored
outline or colored fill. When you select the Highlight Settings key, the Highlight Settings Menu opens. The Highlight
Settings Menu displays the options Highlight Style, Outline Width, Outline Color, and Fill Color. It also provides a
preview of how a key will look with a particular style of highlight applied to it.
Highlight Style
Highlight Style allows you to select the style of visual feedback applied to a key. Use the arrow keys to choose one
of the available selections: Outline, Invert, Outline and Invert, Fill, or Outline and Fill.
Option Description Example
Outline
The key is outlined in the selected Outline Color and width of the selected
Outline Width. Fill Color is not available when this option is selected.
Invert
The key’s colors are inverted. For example, white appears as black. Outline
Color and Fill Color are not available when this option is selected.
Outline and
Invert
The key is outlined in the selected Outline Color and width of the selected
Outline Width and is also inverted. Fill Color is not available when this option is
selected.
Fill
The key is filled with the selected Fill Color. Outline Color is not available when
this option is selected.
Outline and
Fill
The key is outlined in the selected Outline Color and width of the selected
Outline With and is also filled with the selected Fill Color.
Outline Width
Outline Width allows you to select the thickness of the outline when you select one of the outline options. Use the
arrow keys to choose one of the available selections: Very Thin, Thin, Medium, Thick, or Very Thick.

Access Method Menu 59
Outline Color
Outline Color allows you to select the color of the outline when you select one of the outline options. Selecting the
Outline Color key opens the Highlight Outline Color menu. From the menu, select a color area in the large box and
then use the color bar and arrows to the left of the box to “fine tune” the color. You can also adjust hue,
saturation, and luminosity and save the color.
Fill Color
Fill Color allows you to select the color of the key fill when you select one of the fill options. Selecting the fill Color
key opens the Highlight Fill Color menu. From the menu, select a color area in the large box and then use the color
bar and arrows to the left and right of the box to “fine tune” the color. You can also adjust hue, saturation, and
luminosity and save the color.
Set Custom Switch Times (1-Switch/2-Switch)
Set Custom Switch Times allows you to set custom values for acceptance time and release time for up to five
switches. To set custom times for a switch, do the following:
1. Select Set Custom Switch Times. The Set Custom Switch Times menu is displayed.
2. Turn Use Custom Times on.
3. Select the Select Switch key.
4. Select the switch you want to set.
5. Set the acceptance and release times.
6. Select OK.
Modify Scan Patterns (1-Switch/2-Switch)
When you select Modify Scan Patterns, the Modify Scan Patterns menu displays four keys: Modify Home Scan
Pattern, Modify Page Scan Pattern, Modify Default Scan Pattern, and Use Default Scan Pattern Everywhere.
Modify Home Scan Pattern
When you select this key, the Modify Home Scan Pattern menu allows you to modify the scan pattern set up for
your home page.
Modify Page Scan Pattern
When you select this key, a list of pages is displayed. Select the page for which you want to modify the scan
pattern.
Modify Default Scan Pattern
When you select this key, the Modify Default Scan Pattern menu allows you to modify the default scan pattern.
Use Default Scan Pattern Everywhere
Use key only if you want to delete all your current customized scan patterns and replace them with the default scan
pattern. When you select Use Default Scan Pattern Everywhere, a message warns that all custom scan patterns will
be deleted and asks if you want to continue. If you select Yes, you will lose all your customized scan patterns.

Access Method Menu 60
The Modify Scan Pattern Menus
The Modify Home Scan Pattern, Modify Page Scan Pattern, and Modify Default Scan Pattern menus are similar to
the following example:
The top left quarter of the page shows the preview area. When you select Preview at the bottom left, you’ll see a
real-time preview of what the current scan looks like. Just below the preview, the scan pattern list shows each step
in the scan pattern. Use the arrow keys to select a specific step. The menu options to the right of the preview area
and scan pattern list allow you to modify or replace the scan pattern.
Use Default Pattern
If you want to delete your current customized scan pattern and replace it with the default scan pattern, select Use
Default Pattern.
Make New Scan Pattern
Select the top left location and then select the bottom right location for the scan block. The area defined by your
selections will be outlined. Select the text area to return to the Modify Scan Pattern screen. The preview area will
display the outline and the box below the preview area will show the first step in your new scan pattern.
Add Scan Block(s)
Select Add Scan Block(s) to add steps to a scan pattern.
Delete Current Block
If you want to remove a step in a scan pattern, use the arrow keys to select the scan block from the scan pattern
list and then select Delete Current Block.
Move Up/Move Down (1-Switch/2-Switch)
To change the order of steps in a scan pattern, use the arrow keys to select a scan block from the scan pattern list
and then use the Move Up and Move Down keys to move that block up or down in the list.
Treat Block As
Use the Treat Block As option to treat a scan block as either a block or a single key. The difference is based on what
exactly a “block” is. Technically, it is a group of keys that can be scanned as a whole but then scanned, key by key,
within the block. So if you have defined a block, your scan will highlight it as such, but when you hit your switch to
select, the scan will operate as row/column, column/row, or linear within the block, depending on your scan setting.

Access Method Menu 61
The default Block settings means that if you select the block, you can scan within it to specific keys. If you switch to
Single Key, when you select the block, it will act as a large, single key and will do whatever is stored in the top-right
location. This is how you can scan blocks within blocks.
Copy Pattern from Another Page
Use Copy Pattern from Another Page to create a new scan pattern by copying one from another page. This allows
you to use a specific pattern over and over again. When you select this key, a list of pages will be displayed. Select
the page you want to copy the scan from. It will be displayed in the preview area.
Scan Keys/Scan Word Pred. List/Scan Text Area/Scan User Keys
Another way to modify the scan pattern is to set the order in which the keys, text display area, and word
prediction window are scanned. The settings are interdependent. For example, if you changed Scan Keys to
Second, Scan Word Pred. List would change to First.
Using the default settings, the scan will highlight the Core and activity keys first, stepping through each assigned
block; then it will highlight the word prediction window and, if selected, scan through the word list; next it highlights
the text window, which speaks any text if selected. Last, it will scan the user-defined keys if that option is turned on.
Connect Freedom Switch® / Disconnect ALL Freedom Switch®
The Connect Freedom Switch key allows you to connect (pair) one or more Freedom Switches to NuVoice on a
device. You can connect multiple switches. The Disconnect All Freedom Switch key allows you disconnect (unpair)
all Freedom Switches previously connected.
You can also use Freedom Switch along with other access methods. For example, if you are using a NuPoint
module or a joystick, you could connect a Freedom Switch to provide additional access.
To connect a Freedom Switch to NuVoice on a device:
1. In NuVoice, select Access Method Menu.
2. If switch scanning is not already selected, select Choose Different Access Method, select 1 Switch or 2 Switch,
and select a specific switch scanning method.
Note: To use Freedom Switch with another access method, select NuPoint/Joystick and then Joystick Auto
Scan, Joystick Hold Scan, or NuPoint/Mouse/USB Joystick.
3. The Access Method Menu will show the access method you selected.
4. Turn on the Freedom Switch.
5. From the Access Method Menu, select Connect Freedom Switch. The following message will be displayed:
Freedom Switch is ON. Hit the switch to pair it with NuVoice.
6. Within 10 seconds, press the Freedom Switch.
Note: if you do not press the switch within 10 seconds of seeing the message, the switch will not connect to
NuVoice.
7. For each additional switch you want to connect, repeat steps 4 through 6.
To disconnect all Freedom Switches from NuVoice on a device:
If you want to disconnect (unpair) all Freedom Switches from NuVoice on a device, select Disconnect ALL Freedom
Switch.
Important! If multiple switches are connected, you cannot disconnect only one. Selecting the Disconnect ALL
Freedom Switch key disconnects ALL previously connected switches.

Access Method Menu 62
NuPoint/Joystick Method
A NuPoint module or a joystick allows you to scan up, down, right, left, and diagonally. You must have a Y-adapter
for a manual joystick. This plugs into the Switch A and B ports on your device. The other end plugs into your
joystick. This adapter is available from PRC. If you plan to buy an adapter from another source, see
The Joystick
Adapter on page 184 for adapter specifications.
Joystick Auto Scan
Nudge your joystick. Your device will automatically scan your vocabulary beginning in the direction you moved the
joystick.
Joystick Hold Scan
You must hold your switch to scan your vocabulary. Release it to stop the scan.
NuPoint/Mouse/USB Joystick Method
You can plug a NuPoint module, USB mouse, or USB joystick into any of the USB ports on your device. Once the
NuPoint, mouse, or joystick is plugged in, make sure you have selected the NuPoint/Mouse/USB Joystick option in
the Access Method Menu.
Eyegaze Method
Important! See the NuEye
™
User’s Guide for complete information about setting up your eyegaze system.
For explanations of menu options that are common to multiple access types, see Shared Access Options
.
Pause/Resume (Eyegaze)
Use Pause/Resume to stop eyegaze while you make adjustments to the settings, or when you need to look longer
at a screen or menu. When you finish, use Pause/Resume to restart eyegaze. When eyegaze is paused, the Eye
Track Status box is red. When eyegaze is tracking, the Eye Track Status box is green.
To pause eyegaze, use one of the following methods:
Method 1 – Eyegaze option in the Access Method menu.
With Eyegaze selected in the Access Method menu, select Pause/Resume. Gaze at (or select if you are able) the
Pause/Resume option to set or release Pause.
Method 2 – Touch the Track Status Box
When the Track Status box is visible on your display, you can touch it to pause eyegaze. Touch it again to resume
eyegaze. You must touch the box; you cannot gaze at it. If the Track Status box is not visible, go to the Eyegaze
option and turn Eye Track Status on.
Method 3 – Front Panel of Device
Gaze directly at the front panel of your device until Pause or Resume is selected. You will see “Pause” or “Resume”
on your screen.
Method 4 – Disable Pointer Insertable Tool
Assign the insertable tool Disable Pointer to a key. Select the key to set Pause. Select it again to set Resume. See
the Store/Assign Tools chapter in your device Help screens for information about assigning tools to keys.

Access Method Menu 63
Calibrate Now
Select Calibrate Now to start the calibration process. A solid colored screen will appear, followed by a sequence of
stimulus points. Have the person focus on the center of each point with his or her eyes as it moves across the
screen. When the calibration is complete, the system will return to the Eyegaze Access Method Menu and be ready
for use. Default calibration settings will be used unless you change them in Calibration Settings.
To Cancel a Calibration:
If you have a Tools key on your device, press it to cancel a calibration. If your device does not have a Tools key, you
can finish the calibration and then perform another, more accurate, one. You can also stop looking at the display
and wait for the calibration to time out.
Eyegaze Positioning
When you select Eyegaze Positioning, you will see what the eyegaze system and the Track Status box are seeing. This
key will be of most use to the person aligning and setting up the eyegaze system. When positioning is correct, two
very small dots appear near each of the user’s pupils. The Track Status box will show two white circles.
Tracking Status Graphics
When Tracking Status Graphics is turned on, two small white ovals show the positioning of the user’s eyes and
positioning dots appear on the outer edges of the Track Status box to indicate correct or incorrect positioning.
These dots assist in correcting the positioning. When Tracking Status Graphics is turned off, only the two small
ovals appear.
Eye Track Status
When Eye Track Status is turned on, a small Track Status box covers the Help key to the right of the status area on
your device. The Track Status box contains two circles that represent how the system is seeing your eyes. This can
be a useful tool in helping you to see that the system is tracking your eyes correctly.
You can pause the eyegaze system by touching the Track Status box. Touch it again to un-pause the system. If Eye
Track Status is turned on and you are using the eyegaze system, the Track Status box is green. If you pause the
eyegaze system, the Track Status box turns red.
Track Status Box
You can pause and resume the eyegaze system by touching the Track Status box. Touch it again to un-pause the
system. If Eye Track Status is turned on and you are using the eyegaze system, the Track Status box is green. If you
pause the eyegaze system, the Track Status box turns red.
Track Status Size
Track Status Size controls the size of the Track Status box. Select either Small or Large.
If you select: This will happen:
Small
The Track Status box will be displayed in the upper right
corner of the screen, next to the text display area.
Large
The Track Status box will be approximately triple in size
and will be displayed on the left side of the screen.

Access Method Menu 64
Manage Eyegaze Profiles
An eyegaze profile consists of a combination of the eyegaze settings you have selected from the Customize
Eyegaze Settings Menu and the actual data from the calibration you performed. There are also several pre-defined
profiles that you can select from when you first set up your eyegaze system. You can also create and save profiles
of your own.
Load Eyegaze Profile
Load Eyegaze Profile allows you to load a saved profile into a user area (or globally, if that is what was selected as
the Eyegaze Calibration option). You can also load a profile that you saved to a USB flash drive. The flash drive
must be inserted in your device in order to do this.
Save Current Settings and Calibration to a Profile
A calibration profile consists of a combination of your eyegaze settings and actual calibration data. Save Current
Settings and Calibration to a Profile allows you to save a calibration profile to the default Profiles location in your
device or to a USB flash drive. For example, if you started with a pre-defined profile but found you had to
customize the settings so they worked better for you, you can save those new settings and calibration using this
option. Once your profile is saved you can select Load Eyegaze Profile to load the saved profile as one of your
defined profiles.
Therapists or teachers working with multiple clients using one device might want to save the calibration profiles of
their clients. Instead of recalibrating every time they work with a client, they can just load the client’s profile into a
user area (or globally if that was selected as the Eyegaze Calibration option).
Note on Resetting to Defaults: If you need to reset your device to the factory default settings (by selecting Reset to
Factory Defaults from the Maintenance Menu) or reset your eyegaze settings (by selecting Reset Eyegaze Settings
to Default from the Customize Eyegaze Settings Menu) and you want to keep your settings and calibration, you
must save your calibration profile to a USB flash drive before you reset the device. Then use Load Eyegaze Profile
to load it back in.
Delete Eyegaze Profile
Delete Eyegaze Profile allows you to delete any profiles that you no longer use.
Pause/Resume (Eyegaze Profile)
Pause/Resume allows you to pause eyegaze so you can read the options and then resume when you are ready.
Customize Eyegaze Settings
The Customize Eyegaze Settings menu provides options that allow you to customize your eyegaze settings.
Selection Type (Eyegaze Only): Auto/Blink/Switch
Auto
When Auto is selected, a key is selected automatically when the user looks at it. Auto is the default setting. When
you select Auto, Dwell Time is displayed as a supporting option.
Dwell Time
Dwell Time is the amount of time the eyes must focus on a key for the system to recognize a selection. The default
dwell time is .90 seconds. At this setting, when the user focuses on a key for 0.9 seconds, the system selects that
key automatically. Use the Dwell Time arrow keys to adjust the setting to the user’s needs.
Blink
When Blink is selected, the user can blink to make a selection. When you select Blink, Minimum Blink Duration and
Maximum Blink Duration are displayed as supporting options. Use the Duration arrow keys to adjust the settings to
the user’s needs. The system will ignore blinks that are of shorter or longer duration than your settings.

Access Method Menu 65
Minimum Blink Duration (Eyegaze)
Minimum Blink Duration is the minimum amount of time the user’s eyes must be closed during a blink for the
system to recognize a selection. The default minimum setting is .30. We suggest you try using the default before
changing the setting. If you need to change the setting, the minimum duration should be long enough that the
user’s normal blinks do not activate a key.
Maximum Blink Duration (Eyegaze)
Maximum Blink Duration is the maximum amount of time the eyes must be closed during a blink for the system to
recognize a selection. The default maximum setting is .80. We suggest you try using the default before changing
the setting. If you need to change the setting, the maximum duration should be long enough that the user finishes
a blink before the maximum time has accumulated. You do not want to make your maximum duration time so long
that if the user’s head turns away from the screen and then back again, the system sees that as a selection.
Determining a Valid Blink Setting
Switch
Switch allows you plug in and use a switch to make selections. The user uses his or her eyes to move the cursor and
the switch to make selections. To use this method, the user must be able to maintain his or her focus on a target and
activate a switch at the same time. Because this method has no time requirement for focusing on the target, the user
can look at the target for as long as he or she wants and activate the switch when ready to make a selection.
Acceptance Time (Eyegaze)
When you select Switch, Acceptance Time is displayed as a supporting option. Use the Acceptance Time arrow
keys to adjust the setting to the user’s needs. Acceptance time is the amount of time the user must hold on the
switch before the system recognizes a selection. The default setting is .01.
Predictive Selection (Eyegaze)
When Predictive Selection is turned on, selections that do not produce messages are turned off; nothing will
happen. Only selections that contain or are part of actual stored messages will work.
Auto Repeat (Eyegaze)
Auto Repeat lets you choose how fast an item will repeat itself when selected continuously.
Copy Current Settings to All Areas
Copy Current Settings to All Areas copies all your eyegaze settings except the actual calibration to all the user
areas in your device. When you select this option, a yellow message box will ask “Copy current eyegaze settings to
all areas?” Select Yes to use your settings in every area or select No to keep your settings in your current area only.

Access Method Menu 66
Calibration Settings
If you aren’t getting good calibration results using the defaults (out of the box), select Calibration Settings to refine
the system and then try again.
Stimulus Type: Point/Point 2/Cross/Image
A stimulus is the item your eyes focus on as the item moves around the display during calibration. Use the Stimulus
Type options to set the stimulus you want to use. When you select a stimulus, a box to the right of the Select
Background Color and Select Pointer Color keys allows you to see what the stimulus looks like. You can change the
color of point, point2, and cross using Select Pointer Color.
If you select: This will happen:
Point
The point stimulus will be a solid dot of color.
Point 2
The point 2 stimulus will be a solid dot of color with the inverted color in the center.
Cross
The cross stimulus will be a small cross.
Image
You will be able to select an icon or other image to use as a stimulus. When you select Image, you
will see an additional option, Change Image. Use this option if you decide you want a different
image. When you select Change Image, a yellow message box will ask “Use Icon?”
If you select Yes to “Use icon?”, you are taken to the Icon Categories page where you can select the
icon you want to use. The image shows up on your Calibration Settings screen to remind you what
image you have selected.
If you select No to “Use icon?”, your drives and folders will be displayed. You can select any image
you already have stored on your device or you can import an icon stored on a USB flash drive (the
flash drive must be inserted in your device).
Stimulus Size
Increase or decrease the size of the point, cross, or image. The default is 30. Available sizes range from 10 to 400.
For the best calibration results you want the stimulus to be as small as the user’s eyes can easily follow. The
smaller the stimulus, the more accurate the calibration.
Active Eye: Both/Left/Right
Select which of the user’s eyes will be recognized during the calibration process.
• If both of the user’s eyes work normally, select Both.
• If both of the user’s pupils can be seen but one of the user’s eyes is more controlled than the other, select
Both, Use Left or Both, Use Right. Choose the side which is more controlled.
• If one eye is completely obstructed, select Right Only or Left Only.
Stimulus Speed
Change the speed at which the stimulus will move around the display during calibration. Fast is the default.
Available speeds are Very Fast, Fast, Medium, Slow, and Very Slow.
Stimulus Sound
Select a sound to play when a calibration point is completed. Once a sound plays, the stimulus will move to the
next location. Standard Beep is the default. You can also select other sounds that will be previewed when you
select them. If you do not want a stimulus sound, select No.

Access Method Menu 67
Keyboard Step-through
If the user loses attention during the calibration process, Keyboard Step-through allows you to control when the
stimulus advances to the next calibration point. Select either Yes or the default setting of No.
If you select: This will happen:
Yes
You can manually step through each calibration point. Plug in a USB keyboard
and use the keyboard’s spacebar to step through the calibration.
No Calibration will proceed automatically through the calibration points.
Calibration Points
Calibration Points determines the number of stimulus points using during calibration. The available settings are 0,
1, 2, 5, and 9; the default is 5. The more points the user has to follow, the more accurate the calibration will be.
Calibration Area
Calibration Area determines the percentage of the screen used during calibration. The higher the percentage, the
greater the precision of the calibration. At the default calibration area (100%), some if the calibration points will be
at the very edges of the screen and may be difficult for the user to see or focus on. If you find this to be true for
the user, decrease the calibration area. This will move the calibration points in from the edges. Select the down
arrow key to decrease the area in increments of five (95%, 90%, etc.). Keep in mind that reducing the calibration
area decreases precision.
Select Background Color
To change the calibration background color, you can create, preview, and save custom colors. Use a color that best
matches the background color of your communication environment. For example, if you selected black as the
background color in your vocabulary, you should choose a black background when you calibrate.
Select Pointer Color
Change the calibration stimulus color for point, point2, and cross. Options are available to create, preview, and
save custom colors.
Eyegaze Calibration: Global/Per User Area
If you want the calibration to apply to the current user area only, select Per User Area. If multiple users will use the
same device, Per User Area will allow you to create a separate calibration for each user. If you want your
calibration to be used in all six user areas, select Global.
Validate After Calibration
Validation is the process that verifies that the calibration obtained from the user is accurate. The validation process
requires the user to look at four additional stimulus points on the screen. The process also assigns a value to the
accuracy of validation. The lower the number, the more accurate the calibration. When Validate After Calibration
is set to Yes, the validation process will occur immediately after calibration.
Validation Results
Select Text or Graphic to determine whether you view validation information in text or graphic format.
Show Last Validation Results
Displays the results of the most recent calibration.
Validate Now
Validate Now allows you to perform a validation at any time.

Access Method Menu 68
Tracking Settings
The Tracking Settings help to adjust the speed and smoothness of pointer/cursor movements. If you have set up
the eyegaze system and aren’t satisfied with the smoothness of the pointer movements, try changing the settings
using this option.
Smoothing
When you select a number in the Smoothing option, the eyegaze system will continually average the last X number
of eye movement signals it receives. This helps to refine pointer movements. The lower the number of samples the
closer the cursor follows the actual gaze-point. The higher the number of samples the more the cursor lags behind
the actual gaze-point. If the pointer/cursor is very jumpy, increase the number of samples. The higher you increase
this number, the smoother (but slower) the pointer movement will be. Selectable numbers range from 2 to 45.
Filter Method
The available filtering methods for tracking are Stream, Snap, Group, Stream + Snap, and Stream + Group. Stream
is the default.
Fixation Window X/Fixation Window Y
These two options refer to the point at which the user stops looking at the screen in general and begins to fixate
on the area where he or she wants to make a selection.
Think of the fixation area as a window that contains the key the user wants. This window can be either large or
small. Fixation Window X is the horizontal axis and Fixation Window Y is the vertical axis of that window. The
defaults give you a very small window. The smaller the fixation area (or window), the more precise the user’s
movements can be. However, if the user’s gaze is very jittery, a larger window will be needed. If the defaults are not
working, experiment with these two options to see if they help.
Reset Eyegaze Settings to Default
Select Reset Eyegaze Settings to Default only if you want to start over with the default settings.

Access Method Menu 69
Shared Access Options
The following options are used by multiple access types.
Acceptance Time
This is the amount of time it takes for your device to accept a location you have selected and to select the key. The
device beeps when your key is accepted. For example, if you set acceptance time for .50 seconds, you must touch
the key or hold your switch for ½ second before the key will be selected and the device beeps.
Note: If you are using a 1-switch scanning method that includes hold, the acceptance time will begin when you
release your switch.
Release Time
This is the amount of time it takes you to release a key and be able to select another key. For example, if you set
the release time to 1 second, you must wait one second after you stop touching a key or release your switch
before you can select the same key or a new key.
Activate Key When: Pushed or Released
This option determines whether keys are selected when touched or released. Pushed means your device will select
a key when you touch it. Released means your device will select a key when you stop touching it.
Auto Repeat
Auto Repeat lets you choose how fast a key will repeat itself when you hold it down.
Predictive Selection
Predictive Selection generally works best with Unity vocabularies. When Predictive Selection is turned on, keys
that do not produce messages are turned off. If you touch or scan to them, nothing will happen. Only keys that
contain or are part of actual stored messages will work.
Scanning Speed
This is the amount of time it takes for your device to move from one key, row, or column to the next in a scan. The
default scanning speed is one second. This means it takes one second from the time one key is highlighted until the
next key is highlighted.
Activation Delay
Activation Delay gives you a few seconds to change your mind when you have selected a key. This is automatically
set to your Scanning Speed. For example, let's say your scanning speed is set to one second (1.0). You scan to and
select a key, then realize it's not the key you want. You have one second to activate your switch again to "de-
select" the key and then scan to a new key.
Scan Auto Restart
When Scan Auto Restart is turned on, a new scan will automatically start once you have made a key selection. If it
is turned off, you must activate your switch to start a new scan.
Number of Rescans
Select the number of times you want your device to automatically scan your vocabulary. The default is 3 times,
then the scan will stop until you activate a switch to start it again.
Use Screen as Switch
Selecting Use Screen as Switch tells the device to let you use the display screen as a switch. Tap the screen to
make selections. Use Screen as Switch does not work in the Toolbox.

Access Method Menu 70
Bluetooth Switch
See the Bluetooth Switch and adapter mini-manual for complete information. Once you have your access method
options selected, set the Bluetooth switch to the default Switch Mode; plug in an extra switch if you need one;
select Bluetooth Switch from the Access Method menu. Press the Pair button on the Bluetooth switch, then select
the Pair with Switch button on your device screen. You will see a box on your device screen telling you when the
pairing is complete and the device and switch are connected.
Selection Type
Manual means you must activate a separate switch to make a selection. Auto means that when your Acceptance
Time has passed, your device will automatically make your selection for you.
Cancel Time
If you are in the middle of a scan, get distracted, and forget to activate your switch to make a selection, the scan
will stop and the highlighting will disappear after the Cancel Time has passed. If you need a lot of time between
switch activations, you can set the Cancel Time to a very long time before the scan stops.
Pointer Settings
About the Cursor
When the cursor is turned on (default) it works exactly as a mouse cursor does, except that it follows your eye
movements rather than the movements of your hand. The cursor shows you where you are, or where you are
going, on your display screen.
Show Cursor
The cursor on your device is a hand. If you turn the cursor off, you will no longer see the hand. If you have a USB
mouse plugged into your Accent, you will see the hand (cursor) whether Show Cursor is turned on or off.
Cursor Size
Small is the default. You can change it to Medium or Large.
Cursor Color
Use the Cursor Color key to change the color of the hand.
About the Pointer
The Pointer tells you what particular object you are focusing on and selects that object if you dwell on it.
Pointer Color
Change the color of your pointer to whatever you want.
Pointer Type
When you focus your gaze on a key, a circle or square appears over the key to let you know that’s where your
focus is. If you dwell on the key long enough (Acceptance Time), it will be selected. If you select None, you will not
see a pointer and you will have no feedback concerning where your eyes are focused or what you might be
selecting on the screen.
Pointer Size
You can make the circle or square larger or smaller.
Pointer Mode
Pointer Mode determines whether the pointer will change size or remain the same size when selected. Animated
means that the circle or square pointer will shrink while the key is selected. It’s an easy way to tell you have hit
your target. Static means that the circle or square pointer will stay the same size while the key is selected.
Pointer Border
Pointer Border puts a darker border around the perimeter of your circle or square. You can select the thickness of
the border.

Access Method Menu 71
Pointer Transparency
The maximum setting, 90% transparency, means that your circle or square is almost clear. You can barely tell it is
on a key. The minimum setting, 0% transparency, means the pointer is completely opaque. You cannot see through
it to read any text that might be on a key.
Averaging
Averaging helps you to cut down on accidental key activations caused by involuntary head movements. The
number you select tells your device how far you must move out of one key location before a second key is
selected. This generally means that when you cross the centerline between one key and the next key, the first key
will become un-highlighted and the second key will be highlighted.
If you select an averaging number higher than “1”, you are telling the NuPoint signal to “lag behind” any head
movements you make. The higher the number you choose, the further into the next key’s area you must move
before the second key will become highlighted.
Highlight Keys
Highlight Keys tells your device to place a red border around the key that you point to. This may help to make the
selected key easier to see. When you turn Highlight Keys on, the Highlight Settings key becomes active, allowing
you to define how keys are highlighted.
Highlight Settings
Highlight Settings provides visual feedback when a key is activated. Feedback is displayed by highlighting the key
with a colored outline or colored fill. When you select the Highlight Settings key, the Highlight Settings Menu
opens. The Highlight Settings Menu displays the options Highlight Style, Outline Width, Outline Color, and Fill
Color. It also provides a preview of how a key will look with a particular style of highlight applied to it.
Highlight Style: Highlight Style allows you to select the style of visual feedback applied to a key. Use the arrow
keys to choose one of the available options:
If you select: This will happen:
Outline
The key will be outlined in the selected Outline Color and width of the selected
Outline Width. Fill Color is not available when this option is selected.
Invert
The key’s colors will be inverted. For example, white will appear as black. Outline
Color and Fill Color are not available when this option is selected.
Outline and Invert
The key will be outlined in the selected Outline Color and width of the selected
Outline Width and will also be inverted. Fill Color is not available when this option is
selected.
Fill
The key will be filled with the selected Fill Color. Outline Color is not available when
this option is selected.
Outline and Fill
The key will be outlined in the selected Outline Color and width of the selected
Outline With and will also be filled with the selected Fill Color.
Outline Width: Outline Width allows you to select the thickness of the outline when you select one of the
outline options. Use the arrow keys to choose one of the available selections: Very Thin, Thin, Medium, Thick,
or Very Thick.
Outline Color: Outline Color allows you to select the color of the outline when you select one of the outline
options. Selecting the Outline Color key opens the Highlight Outline Color menu. From the menu, select a color
area in the large box and then use the color bar and arrows to the left of the box to “fine tune” the color. You
can also adjust hue, saturation, and luminosity and save the color.
Fill Color: Fill Color allows you to select the color of the key fill when you select one of the fill options.
Selecting the fill Color key opens the Highlight Fill Color menu. From the menu, select a color area in the large
box and then use the color bar and arrows to the left of the box to “fine tune” the color. You can also adjust
hue, saturation, and luminosity and save the color.
Off-Screen Keys Settings
Off-Screen Keys Settings allows you to turn the off-screen keys on or off, set key sizes, and set key colors.

Access Method Menu 72
Off-Screen Pause Key
When Off-Screen Pause Key is turned on, you can pause or resume tracking by gazing just above the top edge
(middle) of the screen. “Paused” or “Active” will be displayed on the screen.
Off-Screen Pause Key Size
Sets the size of the off-screen Pause key. Use the arrow keys to select Thick, Medium, or Thin. You can also select Off.
Off-Screen Tools Key
When Off-Screen Tools Key is turned on, you can select the Tools key by gazing just beyond the left edge of the screen.
Off-Screen Tools Key Size
Sets the size of the off-screen Tools key. Use the arrow keys to select Thick, Medium, or Thin. You can also select Off.
Off-Screen Tools Key Color
Allows you to create a custom color for the off-screen Tools key. Select an area in the large color box to select a
basic color and then use the other options to refine the color. The color bar and arrows to the left of the box adjust
luminosity (brightness). The four arrows to the right of the color box move the cursor in the box in increments of
five. Hue, Saturation, and Luminosity can be controlled through these four arrows or adjusted in increments of one
with the arrows that come with each option. If you create a color that you want to save, select the Save New
Custom Color key. Then select one of the Custom Color keys to store it under.
Right Off-Screen Keys
When Right Off-Screen Keys is turned on, you can access the off-screen keys by gazing just beyond the right edge
of the screen.
Right Off-Screen Key Size
Sets the size of the right off-screen key. Use the arrow keys to select Thick, Medium, or Thin. You can also select Off.
Right Off-Screen Key Color
Allows you to create a custom color for the right off-screen key. Select an area in the large color box to select a
basic color and then use the other options to refine the color. The color bar and arrows to the left of the box adjust
luminosity (brightness). The four arrows to the right of the color box move the cursor in the box in increments of
five. Hue, Saturation, and Luminosity can be controlled through these four arrows or adjusted in increments of one
with the arrows that come with each option. If you create a color that you want to save, select the Save New
Custom Color key. Then select one of the Custom Color keys to store it under.
Bottom Off-Screen Keys
When Bottom Off-Screen Keys is turned on, you can access the off-screen keys by gazing just beyond the bottom
edge of the screen.
Bottom Off-Screen Key Size
Sets the size of the bottom off-screen key. Use the arrow keys to select Thick, Medium, or Thin. You can also select Off.
Bottom Off-Screen Key Color
Allows you to create a custom color for the bottom off-screen key. Select an area in the large color box to select a
basic color and then use the other options to refine the color. The color bar and arrows to the left of the box adjust
luminosity (brightness). The four arrows to the right of the color box move the cursor in the box in increments of
five. Hue, Saturation, and Luminosity can be controlled through these four arrows or adjusted in increments of one
with the arrows that come with each option. If you create a color that you want to save, select the Save New
Custom Color key. Then select one of the Custom Color keys to store it under.
Activate Text Area
This option works with NuPoint/Mouse/Joystick and Eyegaze. When turned on, this option allows you to gaze or
point at the text display area of your device to activate it. If Speech is turned on, your device will speak any text
that is in the text display area.

Settings Menu 73
Settings Menu
The Settings menu allows you to reuse saved groups of settings. To display the Settings Menu, go to the Toolbox
and select Settings Menu.
Save Your Settings
Depending on the vocabulary you are using, you may be asked to select from three previously created Settings
choices as part of a setup wizard. If you want to change any of those choices, or if your vocabulary does not offer
that option, use the Settings Menu.
The Settings Menu allows you to set up to three different groups of settings and then save the settings for each group
under a key or an icon sequence. The settings you select from the Toolbox menus with blue titles can be saved.
For example, you may want to set up more than one access method in an area. Perhaps an individual uses the
Touch method in the morning when he or she is fresh, but likes to use a switch in the afternoon or evening when
he or she begins to tire. You can save the settings for up to three different setups.
To Save Settings:
1. Select the settings you want in the menus listed above.
2. Go to the Toolbox and select Settings Menu.
3. Select a Save Settings key. For example: Save #1 Settings.
4. The question "Are you sure you want to save settings under #1?" is displayed.
5. Select Yes.
6. Select OK.
When you want to use one of your settings, open the Settings Menu and select the Use Settings key that you want.

Speech Menu 74
Store the "Use Settings" Keys in Your Vocabulary
Depending on the vocabulary you are using, pre-stored Use Settings keys may be part of your setup wizard. If they
are not part of a setup wizard, you can copy your Use Settings keys and store them under keys or icon sequences
on your vocabulary. When you do this, you do not need to go to the Toolbox each time you want to change to
different settings. You can also assign your settings to a specific key using one of the Assign Key menus. Use the
Save Settings procedure first.
Hint: You can plug a USB mouse and/or keyboard into the USB ports on your device. When the keyboard is plugged
in, you can use it for storing. You must be in Store Core or Edit Core for the text to appear in your device's text display
area. When the mouse is plugged in, move the cursor to the key you want. Click the mouse to select the key.
Speech Menu
The Speech menu is available for synthesized speech. From it you can choose the voice that you want your device
to use for speaking messages. You can choose a different voice for auditory prompts. Other options allow you to
refine the voice. Go to the Toolbox and select Speech Menu.
Hint: You can listen to a voice by choosing Test Speech and selecting the voice you want. When you decide on the
voice, use the options to modify it and then choose Test Speech again to hear how the modified voice sounds.
Recommendation: We recommend that you try the options with their default settings first. Write the default
settings down before you make any changes. This way you can always return to the original voice.
Select a Voice for Synthesized Speech
Use the Speech Menu options to choose the voice that you want your device to use for speaking messages. Options
are available to change the voice and set the speaking rate, pitch, pitch range, and bass or treble. Settings vary by the
voice you select. Once you set the options, you can test the voice and make changes if necessary.

Speech Menu 75
Change Voice
Select Change Voice and select the voice your device will use to speak everything except auditory prompts.
Remember that this will be the person’s voice. When people hear this voice, even if they can't see the person, they
will know it's him or her.
Test Speech
Any time you change a Speech Menu option, you can select Test Speech to hear the changes you have made.
Speech Rate
How fast or slowly words are spoken. When the rate is too fast, words cannot be easily understood; when it is too
slow, listeners get restless and bored.
Average Pitch
Average Pitch allows you to change how high or low a voice sounds.
Pitch Range
Pitch Range is the amount of variation (or inflection) there is in the voice's pitch during speech. A pitch range of 0
produces a boring monotone; a pitch of 9 produces wildly inflected speech as if you were very afraid or very
excited. A good pitch range is one where words can be easily understood but are also interesting to listen to.
Bass (Speech Menu)
Bass allows you to tweak the quality of the selected voice’s lower register. The default is 6, or mid-range bass.
Treble (Speech Menu)
Treble allows you to tweak the quality of the selected voice’s upper register. The default is 3, or lower-range treble.
Add Pronunciation (Speech Menu)
Add Pronunciation allows you to add the pronunciation of a word for the currently selected voice. When you select
this option, the keyboard opens. Enter the correct spelling of the word and select OK. Then enter the
pronunciation of the word and select OK.
Manage Pronunciations (Speech Menu)
Manage Pronunciations allows you to work with pronunciations for the currently selected voice. All current
pronunciations are listed on this screen. You can add, modify, delete, or test a pronunciation. Advanced options
allow you to copy, load, delete, and review pronunciations. For details, see Manage Pronunciations Menu Options
.
Auditory Prompt Voice
Use the Auditory Prompt Voice menu options to choose the voice that you want your device to use for auditory
prompts only. Options are available to change the voice and set the speaking rate, pitch, pitch range, and bass or
treble. Settings vary by the voice you select. Once you set the options, you can test the voice and make changes if
necessary. If you use auditory prompts, select a voice from this menu that is different from the person’s main voice
to speak the prompts.
Change Voice (Auditory Prompt Voice)
Select Change Voice to select the voice used for auditory prompts only.

Speech Menu 76
Test Speech (Auditory Prompt Voice)
Any time you change a Speech Menu option, you can select Test Speech to hear the changes you have made.
Speech Rate (Auditory Prompt Voice)
How fast or slowly words are spoken. When the rate is too fast, words cannot be easily understood; when it is too
slow, listeners get restless and bored.
Average Pitch (Auditory Prompt Voice)
Average Pitch allows you to change how high or low a voice sounds.
Pitch Range (Auditory Prompt Voice)
Pitch Range is the amount of variation (or inflection) there is in the voice's pitch during speech. A pitch range of 0
produces a boring monotone; a pitch of 9 produces wildly inflected speech as if you were very afraid or very
excited. A good pitch range is one where words can be easily understood but are also interesting to listen to.
Bass (Auditory Prompt Voice)
Bass allows you to tweak the quality of the selected voice’s lower register. The default is 6, or mid-range bass.
Treble (Auditory Prompt Voice)
Treble allows you to tweak the quality of the selected voice’s upper register. The default is 3, or lower-range
treble.
Add Pronunciation (Auditory Prompt Voice)
Add Pronunciation allows you to add the pronunciation of a word for the currently selected voice. When you select
this option, the keyboard opens. Enter the correct spelling of the word and select OK. Then enter the
pronunciation of the word and select OK.
Manage Pronunciations (Auditory Prompt Voice)
Manage Pronunciations allows you to work with pronunciations for the currently selected voice. All current
pronunciations are listed on this screen. You can add, modify, delete, or test a pronunciation. Advanced options
allow you to copy, load, delete, and review pronunciations.
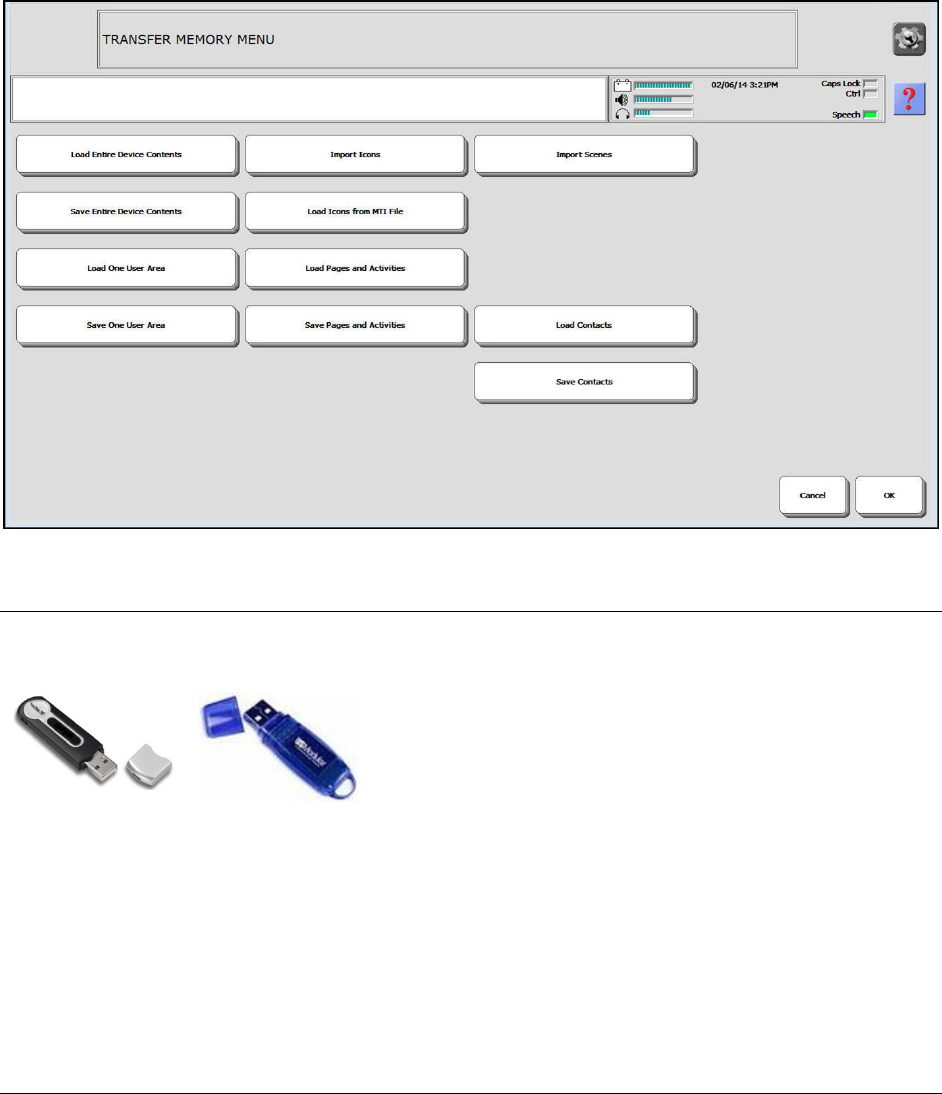
Transfer Memory Menu 77
Transfer Memory Menu
Memory back-ups of your device vocabulary are very important. When you spend time and effort creating or
modifying an area, you do not want to lose your work. Backing up your vocabulary should become a normal part of
maintaining your device. Use the Transfer Memory Menu to save your device's memory; import icons; load icons
from another .mti file; load or save a page; import scenes; or store files in a folder. To display the Transfer Memory
Menu, go to the Toolbox and select Transfer Memory Menu.
Important! For vocabulary backups (saving vocabulary in an area or in the entire device), you must save the
memory to a USB flash drive. You may not save vocabulary backups on your device’s hard drive. Some other
options in the Transfer Memory Menu may be saved to the hard drive.
Memory Transfer using a USB Flash Drive
To load or save your device vocabulary, you must use a USB flash drive. Insert a USB flash drive into a USB port on
your device.
USB Flash Drives
Note: In an emergency, you can back up your device vocabulary on the device’s internal Secure Digital (SD) card.

Transfer Memory Menu 78
Save an Area or Device Contents
"Save" means to back up an area or the entire device onto your USB flash drive.
Save One User Area
1. Insert your USB flash drive into your device.
2. Go to the Toolbox and select Transfer Memory Menu.
3. Select Save One User Area.
4. Select the area you want to save.
5. You will see a message that the memory transfer interface (“.mti”) file will be saved in a folder on your USB flash
drive or whatever removable media you are using. You can use this folder or select a different one on the drive.
6. Type a name for the .mti file. Your device will save the area you selected on your removable media drive.
7. A message will tell you when the transfer is complete.
Save Entire Device Contents
1. Insert your USB flash drive into your device.
2. Go to the Toolbox and select Transfer Memory Menu.
3. Select Save Entire Device Contents.
4. You will see a message that the memory transfer interface (“.mti”) file will be saved in a folder on your USB flash
drive or whatever removable media you are using. You can use this folder or select a different one on the drive.
5. Type a name for the .mti file. Your device will save the content on your removable media drive.
6. A message will tell you when the transfer is complete.
Load an Area or Device Contents
"Loading" means you are transferring an area or the contents of a device saved in an .mti file from your USB flash
drive back into your device.
Note: If you are using a USB flash drive, make sure it is inserted in your device.
Load One User Area
1. Select Load One User Area.
2. Select the area you want to load the file into. A list of all the files on your USB flash drive will be displayed.
3. Select the area .mti file you want.
4. A message will tell you when the transfer is complete.
Load Entire Device Contents
1. Select Load Entire Device Contents.
2. Select the location you want to load to files to. A list of all the files on your USB flash drive will be displayed.
3. Select the device contents .mti file.
4. A message will tell you when the transfer is complete.

Transfer Memory Menu 79
Loading Files onto your Computer
Read the directions that came with your USB flash drive. In some cases you may need to load a driver. Your storage
device directions will tell you.
Import Icons or Scenes
You must have icons or scenes stored on your USB flash drive in order to import them to your device. Your device
will import many graphic formats.
Import Icons
If you want your picture to fit a vocabulary key, select Import as Icon. When you select this option, your device will
save your graphic as both an icon and a scene.
1. Insert your USB flash drive into your device.
Note: When you insert the USB flash drive, you will probably see a message box for "Removable Disk," asking
you what you want to do. Unless you are familiar with this message box and know what you want, we
recommend you do nothing and just close the box or select Cancel.
2. Go to the Toolbox and select Transfer Memory Menu.
3. Select Import Icons. You will see a list of all the icons stored on your USB flash drive.
4. Select each icon you want to import or use Select All.
5. Select OK. You will see the imported icons and several options which are described below.
6. Your device will place the graphic in an Imports category folder automatically. If you also saved the graphic as
a scene, a copy will be saved to the scenes pages on your device.
7. You will see the Transfer Memory Menu. Select OK to exit.
From now on, when you are in a storing menu and select Change Icon, you will see an Imports folder on the
Icon Categories pages. You will find any pictures you have imported in this folder.
Import Scenes
If you want to use your picture for a scene page, select Import as Scene. When you select this option, your device
will save your graphic as both an icon and a scene.
1. Insert your USB flash drive into your device.
Note: When you insert the USB flash drive, you will probably see a message box for "Removable Disk," asking
you what you want to do. Unless you are familiar with this message box and know what you want, we
recommend you do nothing and just close the box or select Cancel.
2. Go to the Toolbox and select Transfer Memory Menu.
3. Select Import Scenes. You will see a list of all the scenes stored on your USB flash drive.
4. Select the scene(s) that you want to import, or use Select All.
5. Select OK. You will see the imported scene(s) and several options which are described below.
6. Your device will place the graphic in an Imports category folder automatically. If you also saved the graphic as
a scene, a copy will be saved to the scenes pages on your device.
7. You will see the Transfer Memory Menu. Select OK to exit. From now on, when you are in a storing menu and
select Change Scene, you will go to the scenes pages where you can select your scene.

Transfer Memory Menu 80
Load Icons from MTI File
Perhaps you know someone who has a PRC communication device with a lot of imported icons on it that you like.
This friend saves her device vocabulary, which includes the imported icons, as an .mti file and e-mails it to you. You
can load the imported icons from the .mti file into your device without loading your friend's vocabulary, too.
1. Save the .mti file from your friend on a USB flash drive.
2. Insert the USB flash drive into your device.
3. Go to the Toolbox and select Transfer Memory Menu.
4. Select Load Icons from MTI File.
5. If you don't see the file you want, select the Up Folder button to choose a different file or folder. Select the
.mti file you want to load.
6. Your device loads the imported icons into the Imports Category folder. When you are in a storing menu and
choose Change Icon, you can select this folder.
Save Pages and Activities (Transfer Memory Menu)
Save a Page
1. Insert your USB flash drive into your device.
2. Go to the Toolbox and select Transfer Memory Menu.
3. Select Save Page and Activities.
4. A list of options will be displayed. Select the option you want.
5. Select the page you want to save.
6. You will see where your page will be saved. Select OK or choose a different folder.
7. Spell a name for the file you are saving. You might want to include "page" in the name to distinguish it from
other .mti files. Your page will be saved as an .mti file.
8. Select OK to exit.
Save an Activity
1. Insert your USB flash drive into your device.
2. Go to the Toolbox and select Transfer Memory Menu.
3. Select Save Page and Activities.
4. A list of options will be displayed. Select the option you want.
5. Select the activity you want to save.
6. You will see where your activity will be saved. Select OK or choose a different folder.
7. Spell a name for the file you are saving. You might want to include "activity" in the name to distinguish it from
other .mti files. Your activity will be saved as an .mti file.
8. Select OK to exit.

Transfer Memory Menu 81
Save Multiple Pages
1. Select each page you want to save individually or choose Select All to select all the pages.
2. Select OK.
3. You will see where your pages will be saved. Select OK or choose a different folder.
4. Spell a name for the file you are saving. You might want to include "pages" in the name to distinguish it from
other .mti files. Your pages will be saved as an .mti file.
5. Select OK to exit.
Save Multiple Activities
1. Select each activity you want to save individually or choose Select All to select all the activities.
2. Select OK.
3. You will see where your activities will be saved. Select OK or choose a different folder.
4. Spell a name for the file you are saving. You might want to include "activities" in the name to distinguish it
from other .mti files. Your activities will be saved as an .mti file.
5. Select OK to exit.
Save Pages and Activities (Menu)
1. Select each page you want to save individually or choose Select All to select all the pages.
2. Select OK.
3. Select each activity you want to save individually or choose Select All to select all the activities.
4. Select OK.
5. You will see where your pages and activities will be saved. Select OK or choose a different folder.
6. Spell a name for the file you are saving. You might want to include "pages” and “activities" in the name to
distinguish it from other .mti files. Your pages and activities will be saved as an .mti file.
7. Select OK to exit.
Load Pages and Activities
If you are using a Unity vocabulary, these instructions work for both pages and activities.
1. Insert your USB flash drive into your device.
2. Go to the Toolbox and select Transfer Memory Menu.
3. Select Load Pages and Activities.
4. A list of files on your USB flash drive will be displayed.
5. Select the item you want to load.
6. The transfer will take place.
7. Select OK to exit.

Transfer Memory Menu 82
Save/Load Contacts
Save all the phone contacts in your device to a USB flash drive.
Save Contacts
1. Insert your USB flash drive into your device.
2. Go to the Toolbox and select Transfer Memory Menu.
3. Select Save Contacts.
4. The "Save" window from your USB flash drive will open. Your phone contacts will be saved as an .mti file. Type
a name for your file so you will remember what it is.
Important! Do not change the .mti
part of the name.
5. Select OK.
6. A yellow message box will tell you when the transfer is complete. Select OK.
7. Select OK to exit the Transfer Memory Menu.
Load Contacts
1. Insert the USB flash drive that has your saved contacts on it into your device.
2. Go to the Toolbox and select Transfer Memory Menu.
3. Select Load Contacts.
4. A yellow message box will warn that if you load contacts, all your current contacts will be erased. If you have
added contacts since your last save, you may not want to load an earlier list. In that case select No. If you want
to continue, select Yes.
5. You will see a list of all the .mti files on your USB flash drive. Select the file you want.
6. A yellow message box will tell you when the transfer is complete. Select OK.
7. Select OK to exit the Transfer Memory Menu.

Vocabulary Builder Menu 83
Vocabulary Builder Menu
The Vocabulary Builder Menu is used only with Unity vocabularies.

Word Prediction Menu 84
Word Prediction Menu
If you are using Unity vocabularies, see the Unity-Word Prediction section beginning with Core Vocabulary and
Word Prediction on page 122 for some Word Prediction examples.
If you are using Essence vocabularies, see the section Essence – Word Prediction on page 162 for some Word
Prediction examples.
Depending on the vocabulary you are using, some of the options described in this section may not be available in your
Word Prediction Menu. To display the Word Prediction Menu, go to the Toolbox and select Word Prediction Menu.
Word Prediction On/Off
Use Word Prediction to turn Word Prediction on or off. You can also turn it on or off using the appropriate key in
your activity row or on your spelling keyboard.
Dictionary
Use Dictionary to allow the PRC and WordQ
™
dictionaries—or both—to work with Word Prediction.
If you select: This will happen:
Combined
Both the PRC and WordQ dictionaries will work together to predict words, and you will be able
to set three display options: Display Recent Words, Use Previous Word, and Suggest Spelling.
Words you used most recently will be predicted first and then the words most likely to follow
the word you typed or selected.
WordQ
You will be able to set two display options: Use Previous Word and Suggest Spelling. By default,
both of these options are turned on.
PRC
You will be able to set one display option: Display Recent Words. Word Prediction will keep track
of and predict all the applicable words that you have used most recently. Once the most recently
used words are displayed, the words will be displayed in the order of most frequently used.

Word Prediction Menu 85
Display Recent Words
Select the number of recently used words that you would like to see on the display. When you begin to spell a
word, your device will display the 5 (or whatever number you have selected) most recently used words that begin
with the letter(s) you have typed. The rest of the words on the display will be the most frequently used words that
begin with the letter(s) you have typed. If you set the number to "0", the words that appear in the Word Prediction
Window will be the words that you use most frequently, but not necessarily the most recently used words.
Use Previous Word
When Use Previous Word is turned on: When you select a predicted word, WordQ will then display the words that
are most likely to follow it. This may save you from having to start typing another word.
When Use Previous Word is turned off: When you select a predicted word, WordQ will not predict another word
until you begin to type what you want.
Suggest Spelling
Turn Suggest Spelling on if you want WordQ to try to predict the word you want when you have misspelled it.
Predict in Minspeak
Use Predict in Minspeak to turn Minspeak word prediction on or off.
Add a Word
For Unity vocabularies, see Unity – Add a Word to the Word Prediction Dictionary.
For Essence vocabularies, see Essence – Add a Word to the Word Prediction Dictionary.
Delete a Word
This key allows you to delete a word from the dictionary.
1. Select Delete a Word.
2. Type the word you want to delete.
3. Select the word in the word prediction window.
4. Select OK. The word will be deleted.
Selection Area
Normal
Predicted words are visible in the area below the regular text display area. You select a word by
pressing on it.
Large
If the Normal area is too small for easy use, select Large. This allows you to select a word by
pressing on it in the word prediction area or by pressing on the space above the word in the text
display area.
Fixed
Fixed indicates that your device is placing your word choices on a fixed grid. You can select
anywhere on the word to activate it.
Persistent
In the Essence vocabulary, Persistent keeps the grid location defined at all times, even when Word
Prediction is turned off.
Note: The Selection Area option becomes inactive if you turn off (hide) the word prediction window.

Word Prediction Menu 86
Letter Case
Letter Case allows you to display predicted words in UPPER CASE or lower case.
Word Prediction Window
Word Prediction Window allows you to turn off (hide) or turn on (display) the word prediction window. When you
turn this option off, the Selection Area option becomes inactive.
Word Prediction Keys
Word Prediction Keys allows you to turn off (hide) or turn on (display) the word prediction keys.
Color
The words in the Word Prediction window can be highlighted in any color. The background area can be a different
color.
In Text/Background, select Background Color or Text Color to open the color screen. Select an area in the large
color box to select a basic color and then use the other options to refine the color. The color bar and arrows to the
left of the box adjust luminosity (brightness). The very top of the color bar is always white and the very bottom of
it is always black. The four arrows to the right of the color box move the cursor in the box in increments of five.
Hue, Saturation, and Luminosity can be controlled through these four arrows or adjusted in increments of one with
the arrows that come with each option.
If you create a color that you want to save, select the Save New Custom Color key. Then select one of the Custom
Color keys to store it under. If you select a Custom Color key where you have already stored a color, the new color
will take the place of the older color.
Increase a Word's Frequency Value
Word Prediction also keeps track of how often a word is used. The more a word is used, the closer it gets to the
front of the predicted words line. If you have a word you use a lot and you don't want to wait for it to appear at
the front of the line, select Increase a Word’s Frequency Value to open the spelling keyboard. Type the word and
click OK. The word you type will move to the front of Word Prediction choices.
Review to Display (Word Prediction Menu)
Review to Display sends the vocabulary to the display screen. When you select this key, your device tells you to
enter the beginning letters of the words you want to review. If you want to review all the words that begin with a
particular letter, type that letter and select OK. If you want to see more specific words, type more letters. If you
want to look at the entire vocabulary, do not type anything. Just select OK.
Review to File (Word Prediction Menu)
Review to File allows you to save the vocabulary review in a file on a USB flash drive or on your device. When you
select Review to File, the screen shows the pre-set (default) folder in which the review will be saved. Select OK
Use pre-set folder or Choose different folder.

Word Prediction Menu 87
Load Default PRC Dictionary
When you receive your device, the default PRC dictionary is already loaded into it. You can add words to, and
delete words from, this dictionary. If you make many changes to the dictionary and then decide you want the
original PRC dictionary loaded back into your device, select Load Default PRC Dictionary.
Note: When you load the original dictionary back into your device, all of the changes you have made to your
current dictionary will be lost.
To save your current PRC dictionary:
Go to the Toolbox, select Transfer Memory Menu, and select Save Entire Device Contents. You cannot make
changes to the WordQ dictionary. Any words you add go into the PRC dictionary.
Abbreviation Expansion Menu
The Word Prediction Menu includes options for expanding abbreviations. Select Abbreviation Expansion Menu.
From the Abbreviation Expansion Menu you can add, delete, and review abbreviations.
Abbreviation Expansion On/Off
When Abbreviation Expansion is turned on, you can you can enter new abbreviations and their corresponding
expanded text.
Add an Abbreviation
Depending on the vocabulary you are using, your key names may be slightly different or unavailable.
1. Select Add an Abbreviation. The text display area will be blank.
2. Enter the letters for your abbreviation. In this example we used "idk".
3. Select OK. The display asks you to "Enter the text to substitute".
4. Enter the word or words for your expanded abbreviation. In this example, we want "idk" to stand for "I don't
know."
5. Select OK. You will return to the Abbreviation Expansion Menu. Now when you enter "idk", your device will
display and speak, "I don't know."
Delete an Abbreviation
To delete an abbreviation and its expansion, do the following:
1. Select the Delete an Abbreviation key.
2. Type the abbreviation you want to delete.
3. Select OK. The abbreviation and its expansion will be deleted.
Delete All Abbreviations
If you select the Delete All Abbreviations key, a yellow message box will ask “Delete all abbreviation expansion
entries?” Select Yes only if you want to delete all of your abbreviations and their expansions. If you decide not to
delete all abbreviations, select No.
Review Abbreviations
You can review abbreviations and their expansions. Perhaps you want to check out the abbreviations that begin
with specific letters or maybe you just want to see a list of all your abbreviations. You can review abbreviations on
your display screen or you can review them on the display screen and also hear them spoken.

Camera Menu 88
Review Method
The review methods Step and Auto determine how you go through pages of abbreviations
If you select: This will happen:
Step You must activate a switch or touch the screen to move from page to page.
Auto
Your device will change pages for you automatically after a pre-set amount
of “looking” time has passed.
Review to Display (Abbreviation Expansion Menu)
Review to Display sends abbreviations to the display screen. When you select this key, your device tells you to
enter the beginning letters of the abbreviations you want to review. If you want to review all the abbreviations
that begin with a particular letter, type that letter and select OK. If you want to see more specific abbreviations,
type more letters. If you want to look at all the abbreviations, do not type anything. Just select OK.
Review to Display & Speaker (Abbreviation Expansion Menu)
Review to Display & Speaker works the same way as Review to Display except that your device will speak the
entries on each page.
Review to File (Abbreviation Expansion Menu)
Review to File allows you to save the abbreviation review in a file on a USB flash drive.
Camera Menu
The Camera Menu allows you to take pictures to use as icons and visual scenes. These icons and scenes help
personalize an individual’s communication. For example, a picture of the individual’s mom could be used as an icon
on a “Mom” key. This would help the individual specify his or her mom, as distinguished from moms in general. To
display the Camera Menu, go to the Toolbox and select Camera Menu.

Camera Menu 89
The Built-In Camera(s)
Depending on your device, you may have one built-in camera, two built-in cameras, or no cameras. If your device
has two built-in cameras, one is usually front-facing (from the front of the device) and one is usually rear-facing
(from the back of the device). For best results with any camera, your device should be upright on its stand,
mounted on a table stand, or mounted on a wheelchair. If your device is lying flat, the camera lens will not be able
to view much.
Using the Camera Menu
Go to the Toolbox and select Camera Menu. The Camera Menu may take a few second longer to open than other
Toolbox menus.
View Finder
When the Camera Menu opens, you will see a picture in the View Finder. This will show whatever the camera lens
is pointing at.
Choose Camera
If your device has more than one camera, use the Choose Camera key to select from a list of cameras available in
your device.
Note: Your device may only have one camera or no camera.
Zoom In
When you select the Zoom In key, you can bring specific objects or areas of the picture into closer focus. Once you
select Zoom In, the Pan keys also become available to use.
Pan
Use the Pan keys to move up, down, and sideways in the picture.
Note: As you zoom-in, you will lose resolution. Eventually the picture will become very grainy.
Zoom Out
Zoom Out allows you to return to the original picture. When you have the picture you want in the View Finder,
select the Take Picture key.
Take Picture
Once you have framed your picture in the View Finder, select Take Picture to capture the image.
Picture Preview
The Picture Preview frame shows you the picture you just took, and the option buttons on the right are active. If
you like the picture you can select Save as Scene, Save as Icon, or Create Visual Scene. If you don't like the picture
you can take another one. The new picture will replace the old one in Picture Preview frame. You can also select
Cancel or OK. Both options will exit the menu without saving any pictures.
Save as Scene
If you select Save as Scene, the "Visual Scene Options" menu will be displayed. You can name your picture; rotate
it left or right; or import it as an Icon if you decide not to use it as a scene. When you are satisfied with the picture,
select OK. The picture is now included in your Visual Scene picture pages. You can find it when you create or
modify a page. Select Change Visual Scene from the Create Page menu or Modify Page menu.
Import as Icon (Camera Menu)
If you want your picture to fit a vocabulary key, select Import as Icon. When you select this option, your device will
save your graphic as both an icon and a scene.

Camera Menu 90
Rotate Left
Rotate the picture to the left.
Rotate Right
Rotate the picture to the right.
Rename Scene
Give the scene a new name.
Save as Icon
If you select Save as Icon, the Icon Options menu will be displayed. You can name your picture and rotate it left or
right. When you are satisfied with the picture, select OK. The new icon is now included in the Imports folder on
your Icon Categories pages. You can find it when you select Change Icon from any storing menu.
Import as Scene (Camera Menu)
If you want to use your picture for a scene page, select Import as Scene. When you select this option, your device
will save your graphic as both an icon and a scene.
Rename Icon
Give the icon a new name.
Maintain Aspect Ratio
“Aspect Ratio” refers to the ratio between the width and height of the picture. Yes maintains the ratio you
currently see; No stretches out the picture. Generally, you will want to set Maintain Aspect Ratio to Yes.
Create Visual Scene
When you select Create Visual Scene, your device will automatically do the following:
• Use the default template for your user area
• Create and name a scene page and add the picture to this new page
• Set the size of the scene
• Open the new scene page so you can start defining keys
• Save your picture automatically in the Change Visual Scene menu pages

Text Editing Keys 91
Text Editing Keys
Text editing keys are the keys on spelling and storing pages. They can be very helpful when you are working with a
lot of text.
Text Editing Keys
Scroll Keys
When Key Mode is turned on, Scroll Keys allows you to scroll through your vocabulary so you can see the entire
page.
Ext. Chars (Extended Characters)
Opens a page with special character keys such as accented letters, symbols, etc.
Home
Moves the cursor to the front of the current line of text.
End
Moves the cursor to the end of the current line of text.
Arrow Keys
Move the cursor in the direction the arrow is pointing—up, down, left, or right. Use the arrows to navigate through
text or through items such as icon categories and activities.

Text Editing Keys 92
Edit Mode
Determines how far the arrow keys move the cursor through text—sentence-by-sentence, word-by-word, or character-
by-character. When you select Edit Mode, “Character Mode”, “Word Mode”, or “Sentence Mode” will appear.
Page Up
Moves the cursor to the top of the current page.
Page Down
Moves the cursor to the bottom of the current page.
Delete Character
Deletes the last text character in the current line of text.
Block Mark
Allows you to highlight text to cut or copy, and then paste.
1. Use the arrow keys to move the cursor to the beginning of the text you want to highlight.
2. Select Block Mark.
3. Use the arrow keys to move the cursor to the end of the text to be highlighted. As you move the cursor, the
text it passes through will be highlighted.
4. When the text is highlighted, select Edit Menu and select the option you want for your highlighted text.
Note: To un-highlight text you are marking, select Block Mark again.
Note: You can use Edit Mode to highlight by words or sentences rather than characters.
Edit Menu
Opens the Edit Menu, which allows you to cut, copy, and paste highlighted text; undo the most recently entered
text; and find and replace text.
Cut, Copy, and Paste, Highlighted Text
1. Highlight the text to be cut or copied.
Note: To learn how to highlight text, see Block Mark
.
2. Select Edit Menu to display the Edit Menu.
3. Select either Cut Text or Copy Text.
Note: When you cut or copy text, you can paste it into its original document or somewhere else. If you do not
paste cut text somewhere, it will eventually be lost. Copied text is not deleted from its original place.
4. To paste the cut or copied text, place your cursor where you want the text to go and select Paste Text from
the Edit Menu.
Note: To clear the most recently entered text, select Undo Text.

Text Editing Keys 93
Find and Replace Text
Select Edit Menu to display the Edit Menu. Select Find and Replace to display the Find and Replace Menu.
Find Direction Search for text forward or backward from your current location
Match Case
If you select Yes, only words that match the case (capitalization) of the text that
you enter will be found.
Confirm Replace If you select Yes, a confirmation prompt will appear before text is replaced.
Find Selecting Find opens the keyboard. Enter the text you want to find and select OK.
Replace
Selecting Replace opens the keyboard. Enter the text you want to find and select
OK. Then enter the text you want to replace and select OK. The first occurrence of
the text you entered will be replaced.
Replace All
Selecting Replace All opens the keyboard. Enter the text you want to find and
select OK. Then enter the text you want to replace and select OK. All occurrences
of the text you entered will be replaced.

Basic Storing 94
Basic Storing
You can add messages, graphics, and system tools to your device by using the storing menus. Depending on the
vocabulary you are using, storing menus are part of the Activity, Core, and Page menus in the Toolbox. The storing
menus look similar to the following:
In the storing menus, the blue keys with the small numbers 1, 2, 3, and 4 in the upper left corners are the basic
keys to use. You do not need to use them in their numbered order.
For information about all the options in the various storing menus, see the chapter about the menu you are using
(for example, pages, activities, Core, etc.). The following pages give you the basic procedures for storing messages
and tools and assigning keys, regardless of the vocabulary you are using.
Recorded and Synthesized Speech
Your device allows you to store messages in two kinds of speech—recorded and synthesized. Each time you store a
message, you can select which kind of speech you want to use.
Recorded Speech
This is speech that someone records into your device, just like recording something into a tape recorder.
Synthesized Speech
This is speech that your device produces from words that are typed into it. Synthesized speech uses the main voice
(or auditory prompt voice) you selected from the Speech Menu in the Toolbox.
A Note about Storing in Core: If you are using a Unity vocabulary, PRC recommends that you do not change your
Core. If you must store something on your Core, store it under an icon sequence rather than a single key.

Basic Storing 95
Store a Recorded Message: Basic Steps
Activities and Core are available in Unity vocabularies only.
Page/Activity Core
1. Go to the page or activity where you want to
add a message.
2. Select the Tools key on the front of the
device, select the Setup key from the menu,
and select the key you want to use.
1. Select Store Core in the Toolbox, or select the Tools
key on the front of the device, then the Setup key
from the menu.
2. Select the icon sequence you want to use for your
message and select OK.
Page/Activity/Core – You are now in the storing menu.
3. For Type of Message, select Recorded Speech. The Record Message, Listen to Recording, and Import Sound
file keys become active.
4. If you want a message to be displayed in the text display area, select Spell Message or Define Key Function,
type the message, and select OK.
5. Select Record Message. Another Record Message key is displayed along with a Microphone Volume key.
6. Press and hold the Record Message key and speak your message. As soon as you finish speaking, release the
Record Message key.
7. Select Listen to Recording. If the message is too loud or too soft, you can select Record Message, change the
microphone volume, and then re-record your message.
8. When you are satisfied with the message, you can select Change Label to add a label that helps you remember
the message.
9. You can select Change Icon to add an icon that helps you remember the message.
10. You can select Next Key to Define and store another message.
11. You can select OK to save your work and exit the menu.
12. You can select any of the other options and continue to work on your current key.
Note: In the storing menus, the blue keys with the small numbers 1, 2, 3, and 4 in the upper left corners are the
basic keys to use. You do not need to use them in their numbered order.

Basic Storing 96
Erase a Recorded Message
To erase a recorded message, simply record over the message that is already there.
Page/Activity
1. Go to the page or activity that has the message you want to erase.
2. Select the Setup key.
3. Select the key that contains the message.
4. Select Record Message and record over the old message.
Note: You can select Clear Key Contents to erase everything that is stored with a key (message, icon, any
tools, etc.).
Core
1. Select Erase Core in the Toolbox.
2. Select the sequence of the message you want to erase.
3. Select OK.
4. A warning box will ask if you are sure you want to erase the sequence. Select Yes to erase or No to keep the
message.
Note: You can also record over the message by selecting Store Core in the Toolbox.
5. Select the sequence you want to record over.
6. Select Recorded Speech for the Type of Message.
7. Select Record Message and make a new recording.
Store a Synthesized Speech Message: Basic Steps
Page/Activity Core
1. Go to the page or activity where you want to
add a message.
2. Select the Tools key on the front of the
device, select the Setup key, and select the
key on the page or activity you want use.
1. Select Store Core in the Toolbox, or select the Tools
key on the front of the device, and then the Setup
key from the menu.
2. Select the icon sequence you want to use for your
message and select OK.
Page/Activity/Core – You are now in the storing menu.
3. For the Type of Message, select Synthesized Speech.
4. Select Spell Message or Define Key Function.
5. Spell your message and then select OK.
6. Select Change Label to add a label that helps you remember the message.
7. Select Change Icon to add an icon that helps you remember the message.
8. Select Next Key to Define and store another message. You can select OK to save your work and exit the menu.
You can select any of the other options and continue to work on your current key.
Note: In the storing menus, the blue keys with the small numbers 1, 2, 3, and 4 in the upper left corners are
the basic keys to use. You do not need to use them in their numbered order.

Basic Storing 97
Edit a Synthesized Speech Message
Page/Activity Core
1. Go to the page or activity where the
message is stored.
2. Select the Tools key on the front of the
device, select the Setup key, and select the
key on the page or activity you want to edit.
1. Select the Tools key twice to go to the Toolbox.
2. Select the Edit Core key and then select the icon
sequence you want to edit.
Page/Activity/Core – You are now in the storing menu.
3. For the Type of Message, select Synthesized Speech.
4. Select Spell Message or Define Key Function.
5. Use the Delete Character, Arrows, and /or Edit Mode keys to edit the message.
6. Touch on the text display area at any time to listen to the message.
7. Select OK.
8. If you want to add a recording, change the label or key color, or change the icon, do it now.
9. When you finish, select OK.
Erase a Synthesized Speech Message
1. For a page or activity, go to the activity or page where the message is stored.
2. Select the Tools key on the front of your device and then select the Setup key from the menu. OR, if the page
you selected has a Setup key stored on it, you can select that.
3. Select the key where the message is stored.
4. Select Delete Character to delete the stored message. OR, select Clear Key Contents.
5. Select OK when you are finished.
Note: If you select Clear Key Contents and then change your mind, immediately select the Undo Clear key.
Note: If you make changes and then decide you want the original key settings back, select Cancel instead of
OK when you exit the menu.

Basic Storing 98
About Storing and Assigning Tools
Tools tell your device to perform some kind of function, such as go to a specific location, turn speech off, or open a
menu. You can assign tools to activity keys and Core keys; you can also store them wherever you are allowed to
store messages.
When you want to assign or store a tool, use the Insert Tool key on the storing keyboard. When you use Insert
Tool, you are telling your device to do two things: (1) to show you the All Tools List and (2) to insert a tool from the
list to the key or icon sequence you have chosen in your vocabulary.
Insert Tool is only active when you are in a storing menu (this includes the Assign Core Keys, Store Core, Create and
Modify Activity, and Create and Modify Page menus). If you try to select Insert Tool when you are not in a storing
menu, nothing will happen. If you are assigning multiple tools and text to an icon sequence or a key, you must
select Insert Tool before each tool that you want to copy.
Store a Tool: Basic Steps
For a Page For an Activity
1. Go to the page you want.
2. Select the Tools key on the front of the
device.
3. Select the Setup key from the menu. OR, if the
page you selected has a Setup key stored on it,
you can select that page. OR, select Modify
Page from the Toolbox, select the page you
want, and then select the key you want.
1. Select the Tools key on the front of the device.
2. Select the Setup key from the menu. OR, if the page
you selected has a Setup key stored on it you can
select that page. OR, select Modify Activity from
the Toolbox, select the activity you want, and then
select the key you want.
3. In your activity row, select the activity where you
want to store a tool. Next, select Modify Item
Within Activity. Then select the key within the
activity where you want to add a tool.
For Pages and Activities
4. Select Spell Message or Define Key Function.
5. On your spelling screen, select Insert Tool.
6. The first page of the All Tools List will be displayed. The tools will be arranged alphabetically. Select More
Items to see more tools.
7. Select the tool you want to add.
8. Select OK. The tool is added.
9. Use Change Icon, Change Label, etc. until you have finished.
10. Select Next Key to Define or OK to exit the menu.

Basic Storing 99
Replace the Tools in the Tools Menu
When you select the Tools key, a menu with various keys in it is displayed. These keys have frequently used tools
pre-assigned to them. If you find that you would rather have different tools in this menu, you can replace the
original tools with the ones you want.
Store a New Tool to a Tools Menu Key
1. Go to the Toolbox and select User Area Menu.
2. Select Modify User Keys. The keys from the Tools menu are displayed.
3. Select the key you want to change.
4. Select Enter Assignment to open your storing keyboard.
5. Select the Delete Character key on your storing keyboard to delete the current key assignment.
6. Select Insert Tool on your storing keyboard.
7. Select the tool you want. The tools are listed alphabetically. Use More Items and Previous Items to find the
key you want. Select OK when you are finished.
8. Change the label, icon, and/or color of the key if you want.
9. Select OK to save your work and exit the menu.
Note: If you make a mistake, select Clear Key Contents and start over.
About NuVoice Macros
A NuVoice macro is a set of instructions that tell your device to do something. When you store more than one tool
in the same place or when you store tools and text together, you are making a macro. NuVoice macros are often
used as shortcuts for tasks that normally require a number of key activations. You can assign macros to keys, or
you can store them under icon sequences if your vocabulary allows sequences. Example of a stored macro:
When you select the Phone Directory key the directions in this macro tell your device to open the Phone Directory
page and to stay on that page SET–PAGE<PHONE DIRECTORY>, and to speak “phone book” PROMPT–
MARKER (if Auditory Prompts are turned on in the Feedback Menu).

Basic Storing 100
Create and Store NuVoice Macros
If you are using Unity, you can also store NuVoice macros under icon sequences or assign them to keys.
1. Go to the page where you want to add a macro to a key.
2. Select the Setup key.
3. Select a blank key.
4. Make sure Type of Message is set to Synthesized Speech.
5. Select Spell Message or Define Key Function.
6. Select the Insert Tool key.
7. Find the tool you want to insert and select it.
8. If you want to add another tool, select Insert Tool and select the second tool.
Note: If you want the device to speak some text, but you do not want to see all the directions for your key in
the text display area of your device screen, select Insert Tool and then select the Prompt Marker tool. This
tells your device to speak whatever follows but not to speak anything that comes before it.
9. Type any text you want the device to speak.
10. Select OK.
11. Change the picture, label, and color on your key if you like.
12. Select OK when you are finished.
Erase a NuVoice Macro
You erase a NuVoice macro the same way you erase a stored message.
1. Go to the page where the macro is stored.
2. Select the Tools key on the front of the device and then select the Setup key. Or, if the page you selected has a
Setup key on it, select that key.
3. Select the key where the macro is stored.
4. Select the Delete Character key to delete the stored macro. OR, you can select the Clear Key Contents key.
5. Select OK when you are finished.
Note: If you select Clear Key Contents and then change your mind, immediately select the Undo Clear key.
Note: If you make changes and then decide you want the original key settings back, select Cancel instead of
OK when you exit the menu.

Page Menus 101
Page Menus
The page menus allow you to create, modify, hide, and delete pages. Access page menus by selecting the
appropriate page key from the Toolbox.
About Creating and Modifying Pages
Pages are created for single topics where you can talk about something for longer than one message. Your device
already has many pages stored in it. You can modify these pages or you can create and modify your own pages.
You can create pages for all keyboard sizes. Each key on the page is selected once.
Perhaps you would like a page that allows you to play a game or read a book or discuss a favorite topic. Each key
on the page can be dedicated to a single move or a single page in a book or your thoughts on a special topic. You
can make a scene page where each key explains part of a picture scene.
You can use a template based on another page you really like. You can copy a page you like and then modify it.
You can create a brand new page.
Once you have created a page, your device places it in the page menu in the Toolbox automatically. You can link
pages with other pages in your device.
When you create a brand new page, you will use the Create Page menu in the Toolbox. To modify or change a
previously created page, use the Modify Page menu or the Setup key.
You can find the Setup key by selecting the Tools key. Select the Setup key from the menu. Depending on your
vocabulary, you may also have a Setup key pre-stored on various pages.

Page Menus 102
Create Page and Modify Page Menu Options
When you create a new page you must name it and select a template, another page, or the number of key
locations you want to use. Once you perform these steps, the Create Page and Modify Page menus are the same.
When you modify a page, you are changing something on a page that has already been created. To create a new
page, you can do either of the following:
• Select Create Page from the Toolbox.
• Create a page on the fly by creating a page link and selecting Create New Page when asked to select the
page to go to.
To modify a previously created page, you can select Modify Page from the Toolbox or you can go to the page
where you want to make changes, select the Tools key on the front of your device, and then select the Setup key
or, if your page already has a Setup key on it, you can select that key.
Create Page: Start-Up
Name Your Page
Spell a name for your page and select OK to exit the spelling keyboard.
Create Page from Template
If you select Create Page from Template, you will see either the default template for your user area or a template
you set up from the User Area Menu.
Copy from an existing page
If you want to copy the format of a previously created page, select Copy from an existing Page and then select the
page you want to copy.
Grid Size
If you do not want to use a template, you can select the number of keys you want in your grid. The fewer the keys
in the grid, the larger the keys will be. Available selections are 4, 8, 15, 24, 32, 45, 60, 84, and 144. When you have
selected a grid size, select OK to see a blank page in the grid size you selected.
Choose a Custom Grid Size
If you want to create a page with a number of keys not available from Grid Size, select Choose a Custom Grid Size.
Two options will be displayed: Number of Rows and Number of Columns.
Number of Rows
Use the arrow keys to select the number of rows of keys you want on the page. Numbers range from 1 to 9.
Number of Columns
Use the arrow keys to select the number of columns of keys you want on the page. Numbers range from 1 to 16.
Modify Page: Start-Up
If you select Modify Page from the Toolbox, the names of all the pages in your device will be listed. Select the page
you want to work on. Alternatively, on your device go to the page you want to work on, select the Tools key on the
front of your device, and then select the Setup key. Or, if the page you selected has a Setup key on it, you can
select that key.

Page Menus 103
Create Page/Modify Page Storing Options
Once you have finished creating a page or going to the page you want to modify, the storing options for Create
Page and Modify Page are the same.
Type of Message (Page)
Synthesized Speech
Your device speaks the messages you type into it.
Recorded Speech
You record messages into your device as you would a tape recorder.
Spell Message or Define Key Function (Page)
If you select Synthesized Speech, type any text that you want your device to speak and then select OK. If you are
recording something, you can select Spell Message or Define Key Function to type any text that you want to have
displayed in the text display area. An example of the key you are working on appears in the middle of the row of
keys in the lower left corner of your screen.
Change Label (Page)
Select this key to change the label on your key. A label can contain up to 32 letters. If you want a blank label, type
two spaces instead of a word.
Change Icon (Page)
Select Change Icon to add or change the picture on your key. You will see the Icon Category pages. Each Category
contains all the icons that pertain to that category. Use More Items and Previous Items to search the categories
and icons. Spell Icon to Find allows you to spell an icon name (or a guess at a name) and let your device search for
a similar icon.
Change Key Color (Page)
Select Change Key Color to change the color of your key.
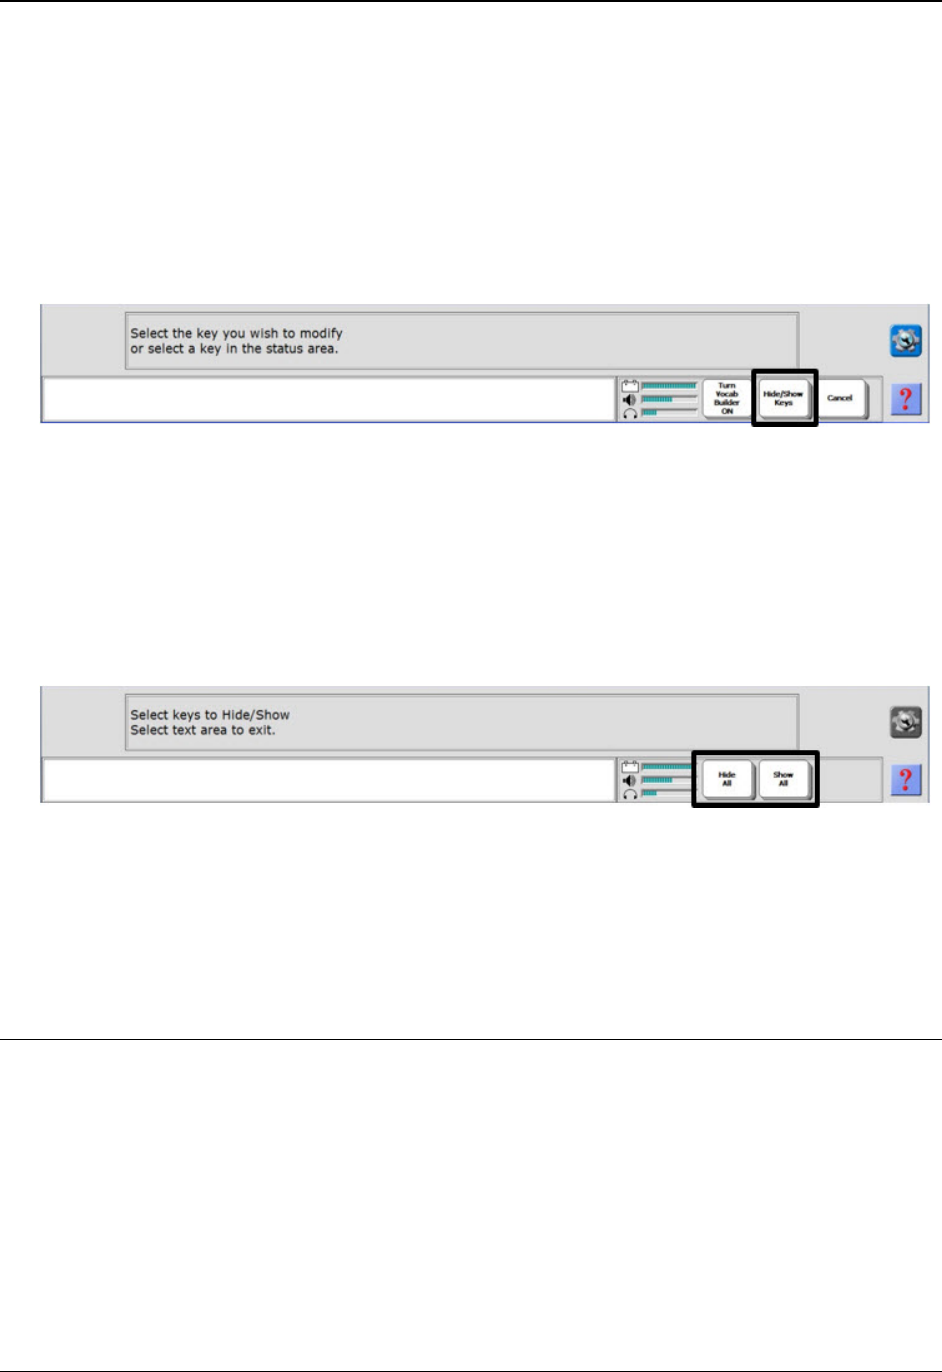
Page Menus 104
Hide/Show Keys
Hide/Show Keys and Hide All are also available in the Create Page menu and Modify Page menu. You may find on
some pages that there are keys you don’t use, or keys that you don’t need or want to use right away. You can hide
any keys you don’t need and turn them back on (or “show” them) later if you want them.
To Hide Keys
1. Go to the page where you want to hide keys.
2. Depending on your vocabulary, select the Setup key if your page has one or select the Tools key on the front
of the device and then select the Setup key from the menu.
3. You will see the Hide/Show Keys key in the status display area.
4. Select the Hide/Show Keys key.
5. Select a key to hide. It will turn grey. Brightly lit keys are not hidden.
6. Hidden keys remain fully functional and will work as usual if you show them again.
7. If you select a key to hide and then change your mind, just select it again to show it.
8. You can use Hide All and Show All to hide all the keys in your vocabulary or to show them all if you hid them
earlier.
9. When you finish hiding keys, touch the text display area to exit Hide/Show mode.
10. On your page, hidden keys will be blank. They will not work if you select them.
To turn the key(s) back on, repeat these steps to show the keys or select the Show All option. Select the text
display area to exit the menu.
Copy this Assignment to
Use this option to copy any key’s assignment and store it on another key. The assignment that is copied is the
assignment for the key you are working on. You can see the key’s assignment in the Spell Message or Define Key
Function display box in the storing menu.
1. Select Copy this assignment to. You will return to the page you are working on.
2. Select the key(s) on which you want to store the assignment.
3. Select the text display area to exit and return to the storing menu.

Page Menus 105
Copy Pages
You can copy some or all of the pages (or activities) in one user area to another user area.
Swap Page Keys
You can move keys around on a page selecting Swap Page Keys in the storing menu or by selecting Swap Page
Keys in the Toolbox and then selecting the page you want. If your vocabulary has a Core, you can move Core keys
by selecting Swap Core Keys key in the Toolbox and going to your Core.
If you use Swap Page Keys or Swap Core from the Toolbox:
1. Select the page to go to, or go to Core if you are using a Unity vocabulary.
2. Select the key you want to start the swap.
3. Select the key you want to swap with.
4. The keys are swapped. You can continue to swap keys.
5. When you are finished, touch the text display area to exit.
If you select Swap Page Keys in the Pages storing menu:
1. Select the key you want to start the swap.
2. Select the key you want to swap with.
3. The keys are swapped. You can continue to swap keys.
4. When you are finished, select the text display area to exit.
Note: If you swap keys by mistake, select the text display area to return to the storing menu or the Toolbox.
Select Swap Page Keys from the menu or the Toolbox and repeat the steps above until you have your keys
placed where you want them.
Store Category Prompt
If the key you have selected is in the first row or the first column of keys, you can add a Category prompt to
identify the key. Store Category Prompt will not be active unless you are working on a key that is appropriate for a
Category prompt.
Clear Key Contents
If You Are Not in a Storing Menu
Go to the page (or activity if your device offers activities) that contains the key you want. Select the Tools key and
then select the Setup key. Now select the key you want to use on your page or activity.
If You Are in a Storing Menu
Select the Clear Key Contents key and select OK when you are finished.
Note: If you clear the key contents and then change your mind, immediately select the Undo Clear key.
Note: If you make changes and then decide you want the original key settings back, select Cancel instead of OK
when you exit the menu.

Page Menus 106
Modify Scan Pattern
Modify Scan Pattern allows you to make changes to the default scan pattern. You can select the Preview key from
the Modify Page Scan Pattern menu to see the scan move as you create it. You may want to use Modify Scan
Pattern for selected pages, especially with scenes.
Change Visual Scene
Change Visual Scene is best used by the therapy team. You must be using the Touch access method. A scene page
is a special page you make that has a picture superimposed over the keys on the page. You create keys that tell
about the picture or various items in the picture. You create and work with scenes much the same way you do with
any other page. Your device already has many scene pictures stored in it that you can choose. You can also import
your own pictures to use. Selecting Import Scenes in the Transfer Memory Menu allows you to import a scene to
your device.
Create a Scene Page
A scene is a special page you can make that has a picture superimposed on the keys on the page. You create and
work with scenes much the same way as you do with any other page.
Import Your Own Scenes
You can import your own pictures so they will be available for you to use.
1. Save your pictures to your USB flash drive.
2. Insert the USB flash drive into one of the USB ports on the device.
3. Go to the Toolbox and select Transfer Memory Menu.
4. Select Import Scenes.
Create a Scene Page
1. Go to the Toolbox and select Create Page.
2. Spell a name for your page and select OK.
3. Do one of the following:
• To create a page or scene similar to one you already have, select Copy from another Page.
• To start with a blank page (no keys defined), select the Grid Size you want to use.
• To work from a page that has the regular page keys already defined, select Create Page from Template.
The default template is the appropriate one for your user area and key size.
• To use a different template, go to the Toolbox, select User Area Menu, and select Templates.
4. Select Create Page from Template.
5. Select any key on the page.
6. Select Change Visual Scene. The Visual Scene Settings page is displayed.
7. Select Choose Scene. It may take a few seconds for the scenes pages to appear.
Note: You can also import scenes here from your USB flash drive. Select Import Scenes instead of Choose
Scene.

Page Menus 107
8. All of the pre-stored scenes as well as any scenes you have imported will appear on these pages. Use More
Items to scroll through the pages.
9. Select the picture you want to use for your visual scene and select OK.
Note: You can also delete scenes you no long want to use.
10. Notice that the picture covers all the keys in the preview pane. You can choose your own size for the picture so
that it covers only the keys you want it to cover. Select Set Scene Keys.
11. Select the area you want the picture to cover by selecting a top left corner key and a bottom right corner key.
The preview pane shows you how your page will look with the scene on it.
Note: Leave rows around the edges visible so you can insert some messages.
12. You can select Set Scene Keys again to change the scene, you can select Remove Scene, or you can select
Choose Scene to choose a different scene.
13. If you want to be able to see the keys under the graphic, set Transparency to more than 0%.
14. Select OK when you are finished.
15. Select Choose next key to define and begin to set up the keys just as you would on any other page.
You can set up keys that are covered by the scene as well as those that aren’t. You might add messages that
help explain things in the picture or teach new vocabulary about the picture. You might set up a key that takes
you to another page or activity that relates to the scene.
Other things you can do:
• Add a sound effect to a key by either recording a sound or importing a sound file. Change the Type of
Message to Recorded Speech.
• Define a scan just for this page by selecting Modify Scan Pattern.
Add Links to other Pages on a Scene Page
You can put a link to another page on a scene page.
1. Go to the scene page you want to add a link to.
2. Set Type of Message to Synthesized Speech.
3. Select Spell Message or Define Key Function.
4. Select Page Link. A yellow message box will ask if you want the current page or the previous page displayed
after selecting a page.
5. Select the page you want to link to your scene page.
6. Optional: Change the label, icon, color, etc.
7. Select OK when you are finished.
Rename Page
Select Rename Page to give the page a name or rename it. Follow the directions in the text display area.

Page Menus 108
Choose a Custom Key Size
Use this option to set a key size to your specifications.
Number of Rows
Use the arrow keys to select the number of rows you want. Numbers range from 1 to 3.
Number of Columns
Use the arrow keys to select the number of columns you want. Numbers range from 1 to 9.
Choose Next Key to Define
Select Choose Next Key to Define if you want to continue to define keys on your new page.
OK/Cancel
Select OK to exit the menu and save your work. Or select Cancel to exit the menu without saving your work.
The Page Menu
The Page menu contains a list of all the pages in your device. Any time you want to go to a specific page, you can
open the Page menu and select the page you want to go to. Use More Items and Previous Items to step through
the pages in the menu. If you know the name of the page you want or have an idea of what it’s called, you can
select Spell Page to Find. Type the first few letters or the whole name, select OK, and your device will either show
you the page you want or present you with a list of page names you might want.
If you would prefer not to go to the Toolbox every time you want to open a page, you can store the Page menu
under a key.
You can also store a specific page under a key. To do this, you must use Insert Tool and then select the Set Page or
Set Page Temporary tool when you store the sequence. Set Page takes you to your new page and lets you stay
there. Set Page Temporary takes you to the new page, allows you to make one selection on that page, and then
returns you to your original page.
You can also store the Page menu or a single page under an icon sequence if you are using Unity.
Delete Page
To delete an entire page from your device use the Delete Page key in the Toolbox. Once a page has been deleted it
is no longer available in your device.
1. Select Delete Page. The Page menu is displayed.
2. Select the page you want to delete.
3. A warning box asks you if you are sure. Answer Yes to continue.

Page Menus 109
Store Text Area Tool
Your device has a tool that allows you to copy any text in the text display area and paste it straight to a key so you
can reuse it. You do not have to go through the storing procedure to add the text to a key. With Unity, this is an
insertable tool labeled Store Text Area. With Essence, this insertable tool is labeled Save Text and it is already
stored on many pages.
Use Save Text/Store Text Area
1. Type something into your text display area that you want to store.
2. Go to the page, Core, or activity where you stored the Store Text Area tool or there is a Save Text key.
3. Select the Store Text Area or Save Text key or sequence.
4. Select the key where you want to store the text. The text in the text display area is now stored on that key.
Quick Steps for Linking Pages
Add a Link to One Page that will take you to another Page
1. Go to the page where you want to put your link.
2. Select the Setup key from the Tools menu, or your page may already have a Setup key you can select.
3. Select a blank key on the page where you want to put the link.
4. Select Spell Message or Define Key Function.
5. Select Page Link on your spelling keyboard.
6. A yellow message box appears.
• If you select Yes, you will be able to go to your linked page, make one selection on it, and then return
automatically to your original page.
• If you select No, you will be able go to your linked page and stay there.
• If you are unsure which option you want, select Yes.
7. All the pages in your area will be listed. Find and select the page you want to link to.
8. Select OK. You can now select a picture for the key, a label, etc.
9. Select OK when you have finished.

Color 110
Color
When you create or modify a page, change notebook colors, etc. you can create custom colors by varying such
factors as hue, saturation, and luminosity. For example, selecting the Change Key Color key opens the Select Key
Color screen, allowing you to select a color. If you want to use a custom color, select the Advanced Colors key to
display a screen similar to the following:
Advanced Color Options
The following options allow you to create custom colors to apply to keys, notebooks, etc.
Color Coverage
Use the Color Coverage option, when available, to either fill an item with color or apply a colored outline to the
item. This option is not available on all color screens. For example, this option is available when you change key
colors, but not when you change notebook colors.
Text/Background
When available, the Text/Background option appears below the Luminosity option. Use the Text/Background
option to apply color to either the area behind the text or the text itself. This option is not available on all color
screens. For example, this option is available when you change notebook colors, but not when you change key
colors.
Color Selector Arrows
Use the Up and Down arrows to the right of the large color box to change hue. Use the Left and Right arrows to
change saturation. As you use the arrows, the pointer in the large color box moves to the color currently selected.
Use the Up and Down arrows to the left of the color box to adjust the lightness and darkness of the selected color.
As you use the arrows, the pointer between the arrows moves up and down the lightness/darkness scale to show
you the relative lightness or darkness.

Color 111
Hue
Hue changes the basic, undiluted color—red, orange, yellow, green, blue, etc. As you use the Up and Down color
selector arrows, the hue value changes automatically. If you know the specific hue you want, use the Hue arrows
to select the value.
Saturation
Saturation adjusts the brightness of the color. As you use the Left and Right color selector arrows, the saturation
value changes automatically. If you know the specific degree of saturation you want, use the Saturation arrows to
select the value.
Luminosity
As you use the Lightness/Darkness arrows to make the selected color lighter or darker, the Luminosity value
changes automatically. If you know the specific degree of luminosity you want, use the Luminosity arrows to select
the value.
Large Color Box
As you move the color selector arrows or adjust hue, saturation, and luminosity values, the pointer in the large
color box moves to the color currently selected.
Color Preview Box
As you move the color selector arrows or adjust hue, saturation, and luminosity values, the color preview box
displays the color currently selected. This box is not available on all color screens. For example, this box is available
when you change key colors, but not when you change notebook colors.
Workspace Preview
When available, the Workspace Preview box appears below the large color box. As you move the color selector
arrows or adjust hue, saturation, and luminosity values, the Workspace Preview box displays the color currently
selected. This option is only available when you change workspace colors.
Notebook Preview
When available, the Notebook Preview box appears below the large color box. As you move the color selector
arrows or adjust hue, saturation, and luminosity values, the Notebook Preview box displays the color currently
selected. This option is only available when you change notebook colors.
Marked Text Preview
When available, the Marked Text Preview box appears below the large color box. As you move the color selector
arrows or adjust hue, saturation, and luminosity values, the Marked Text Preview box displays the color currently
selected. This option is only available when you change background and text colors for marked text.
Activity Row Background Color Preview
When available, the Activity Row Background Color Preview box appears below the large color box. As you move
the color selector arrows or adjust hue, saturation, and luminosity values, the Activity Row Background Color
Preview box displays the color currently selected. This option is only available when you change an activity row’s
background color.
Save New Custom Color
To save a color you create to apply to other items, select Save New Custom Color and then select Custom Color 1,
Custom Color 2, Custom Color 3, Custom Color 4, Custom Color 5, or Custom Color 6. The background color of the
Custom Color key you select will change to the new color.
Custom Color 1 - 6
To save a color you create to apply to other items, select Save New Custom Color and then select Custom Color 1,
Custom Color 2, Custom Color 3, Custom Color 4, Custom Color 5, or Custom Color 6. The background color of the
Custom Color key you select will change to the new color.
Note: If you select a Custom Color key that already stores a color, the new color will replace the older color.

Bluetooth Cell Phone 112
Create a Custom Color
Use the following basic procedure to create a custom color.
1. Depending on where you are creating the color, select Fill or Outline color coverage or Background Color or
Text Color.
2. Use the Up and Down color selector arrows to the right of the large color box to select the hue you want.
3. Use the Left and Right color selector arrows to the right of the large color box to select the degree of
saturation you want.
4. Use the Up and Down arrows to the left of the color box to adjust the lightness and darkness (luminosity) of
the selected color.
Note: Alternatively, if you know the custom color values you want, select the values from the Hue, Saturation,
and Luminosity options.
5. When the color you want is displayed in the preview box, select Save New Custom Color.
6. Select Custom Color 1, Custom Color 2, Custom Color 3, Custom Color 4, Custom Color 5, or Custom Color 6.
The background color of the Custom Color key you select will change to the new color.
7. Select OK.
Bluetooth Cell Phone
Your device has an internal Bluetooth module that will allow you to pair with Bluetooth devices such as a cell
phone (see below), speaker (see page 38), switch (see pages 56 and 57), or headset (see page 119).
About Bluetooth Cell Phones
Note: You can only pair with one Bluetooth device at a time unless you ordered a second Bluetooth module at the
time you purchased your device.
Note: You must have a Bluetooth cell phone in order to pair with the Bluetooth module.
A list of compatible cell phones is available at several links on the PRC website www.prentrom.com
. This list is
always changing as new phones are added and old ones are discontinued.
Please Read these important notes about using
a Bluetooth cell phone and your device!
With some phones there is the possibility that you will hear static and buzzing from your
device when you make a call. This is not a problem with your device. It is due to your
phone software and PRC cannot fix this.
Not all phones support Bluetooth text messaging, so do not expect that your phone will.
Look for "Text Messaging Supported" in the Bluetooth Status box when you pair your
device and phone. If you do not see this message, text messaging is not supported.
When using a phone, your device and your phone should be within 10 feet of each other
for best results.

Bluetooth Cell Phone 113
Pair and Configure your Bluetooth Cell Phone
1. From your Phone page or activity row, select the Phone Dial Pad key.
2. Select the Phone Configuration key. The Phone Configuration menu will be displayed.
3. On your phone, go to the "Bluetooth" menu. To find this menu you may have to read the manual that came
with your phone.
4. Put your phone in "discoverable" mode.
Note: On your phone, "Discoverable mode" may be labeled "discoverable" or "paired" or "find me" or
something else entirely. Different Bluetooth cell phones call the pair button different things. If you are unsure
which option to select, look at the instructions that came with your cell phone.
5. On your device, select the Pair to Phone key. Your phone will display a message asking you to enter a
passcode.
6. On your phone, enter four zeroes: 0000. You must use this passcode. Then select OK or the button on your
phone that accepts your selections and exits.
When your cell phone is paired with your device you will see “Paired” or “Connected” in the Bluetooth Status box
in the Phone Configuration menu. You will also see Bluetooth cell phone icons in the status display area of your
device.
Configuration Menu Options
Text Messaging (BT Configuration Menu)
If your cell phone supports Bluetooth text messaging, you will see "Text Messaging Supported" in the Bluetooth
Status box. If you do not see this message, your phone will not support Bluetooth messaging.
The following options are also available from the Phone Configuration menu on your device. To access the menu,
go to the Toolbox, select Maint Menu, select Hardware Diagnostics, and select Phone Configuration.
Paired Devices (BT Configuration Menu)
Paired Devices allows you to view all the Bluetooth cell phones you have been paired with.
Disconnect (BT Configuration Menu)
Disconnect allows you to disconnect (or "unpair") from the phone you are currently using.
Ringer Menu (BT Configuration Menu)
Ringer Menu allows you to set the standard tones for Ringer and Notify Message and test the ringer volume.
Headphone Level (BT Configuration Menu)
If you have trouble hearing the person talking to you, select a higher number for this option. If the person's voice is
too loud, turn this option down.
Note: This option may be labeled “Input Volume” in your phone’s configuration menu.
Microphone (BT Configuration Menu)
By default the Microphone option is turned off. To use your device’s built-in microphone, select Built-in.
Mic Level (BT Configuration Menu)
If the other person is having trouble hearing you, select a higher number for this option. If the other person says
your voice is too loud, turn this option down.
Note: This option may be labeled “Output Volume” in your phone’ configuration menu.

Bluetooth Cell Phone 114
Bluetooth Beep Output (BT Configuration Menu)
When Bluetooth Beep Output is turned on, the person you are talking to will be able to hear your device beep as
you make message selections. If you turn it off, the listener will not hear anything while you select your messages.
Listen to Calls with (BT Configuration Menu)
There are several ways you can listen to callers: use the internal speakers; plug headphones into the connector on
the side of your device and/or pair with Bluetooth headphones; or use the internal speakers in combination with
headphones. On the Phone Dial Pad, select Phone Configuration. Listen to calls with allows you to select the
option(s) you want to use.
Auto-Delete TXT Messages (BT Configuration Menu)
Auto-Delete TXT Messages keeps your phone from filling up with text messages. If you turn Auto-Delete TXT
Messages on, your device will delete text messages from your phone once they are read and stored on your device.
Bluetooth Icons Visible in Status Display Area
The green figure to the left of the cell phone indicates the battery charge. A blue
phone indicates you are not using the phone.
The green phone indicates that you are talking on the phone.
This icon indicates that you are making or receiving a call.

Bluetooth Cell Phone 115
Using the Dial Pad
With some phones you may hear static and buzzing from your device when you make a call. This is not a problem
with your device. It is due to your phone software and PRC cannot fix this.
Not all phones support Bluetooth text messaging, so do not expect that your phone will. Look for "Text Messaging
Supported" in the Bluetooth Status box when you pair your device and phone. If you do not see this message, text
messaging is not supported.
When using a phone, your device and your phone should be within 10 feet of each other for best results
The Phone Dial Pad is available from your Phone activity or from the Phone Directory on your Phone page.
To make a call, your phone must be paired with your device and this icon must be visible in the status
display area. Before using the phone, check to make sure you have enough battery power available and some
active signal bars showing.
If you have the Display Skin set to Skin 1 or Skin 2 for your device, you will see these icons:
Your phone is paired and ready
Battery strength
Signal strength
The Cancel key will take you back one page.
If you select the Phone Dial Pad from your Phone Directory page, when you finish using the Phone Dial Pad you
can select the Cancel key to return to the Directory page.

Bluetooth Cell Phone 116
To Make a Call
1. Enter the number you want by selecting the keys on the number keypad.
2. Select the Send key.
3. While the phone is ringing you can select the Go to Core or Home key so you are ready to talk when someone
answers. If you are using the Phone page you will find some conversational messages on the page.
• While you are on the phone, you will see this icon in the status display area.
• If you are using the Skin 1 or Skin 2 you will see this icon
4. When the call has ended, select the End key on the Phone Dial Pad. The icon in the status display area will
switch to or .
Note: Use commas when you dial phone numbers that contain extensions. For example: 3302621984,123. If a
number contains more than one extension, use commas between each extension.
To Answer a Call
When you hear the phone ring or see the or icon in the status display area:
1. Select Send from the Phone Dial Pad or Phone Send/End from the Phone Directory page.
2. Use the Phone page, Core, or your spelling keyboard to talk.
3. When the call has ended select End on the Phone Dial Pad or Phone Send/End from the Directory.
Note: The Phone Directory contains a Phone Send/End key which allows you to answer and hang up without
having to use the Phone Dial Pad.
Add Contacts
You can add contacts two different ways: from the Phone Dial Pad or from the Directory page.
To Add a Contact:
1. Select the Add Contact key.
2. Type the phone number you want to add. Do not use spaces or hyphens.
3. Select OK.
4. Type the name of the contact.
5. Select OK.
6. Return to the Phone Dial Pad.
7. Select the Contacts key. You should see a key labeled with the contact name. You will see a number of keys if
you have entered lots of contacts.
8. Select a contact to dial.
9. Return to the Phone Dial Pad.
10. Select the Send key to dial your number.

Bluetooth Cell Phone 117
Add an Incoming Number
When you receive a call, the caller's number will be displayed in the text display area. You can add this number to
your Contacts.
1. When you receive a call and know it is a number you want to add, go to the Phone Dial Pad.
2. Select the Add Contact key. You will see a storing keyboard with the number on it.
3. Select OK.
4. Enter a name to go with the number.
5. Select OK.
6. Select the Contacts key. Your new entry will be listed.
Saving Your Contacts List
If you want to save your contacts list to a USB flash drive, you must use the Transfer Memory Menu. Select either
the Save Contacts key or Save Entire Device Contents key.
Note: Your Contacts list will not be saved if you select Save One User Area.
Using the Phone Directory Page
You can also store phone numbers in the Phone Directory. The PRC Service phone number and the PRC main
phone number have been stored for you. Use the Name keys to store numbers. If you are using a Unity vocabulary,
look for the Phone Directory key on your Phone page and/or in your Phone activity. If you are using an Essence
vocabulary, when you select Phone from the Directory, you will go to the Phone Directory page.
Store a Phone Number in the Directory
1. Select the Phone Directory key.
2. Select the Tools key on the front of the device or select the Setup key if your vocabulary offers it.
3. Select a Name key to modify.
4. Select Spell Message or Define Key Function.
5. Select Clear Display. You cannot add a number in the parenthesis here.
6. Select Insert Tool.
7. Use More Items until you see the Phone Dial Number tool. Select it.
8. Enter the phone number you want and then select OK.
9. Select OK to keep the number and exit your spelling page.
10. Use Change Label and/or Change Icon and type a name/add a picture for your key so you can remember what
number is stored there.

Bluetooth Cell Phone 118
Send a Text Message
Not all phones support Bluetooth text messaging, so do not expect that your phone will. Look for "Text Messaging
Supported" in the Bluetooth Status box when you pair your device and phone. If you do not see this message, text
messaging is not supported.
To send and receive text messages, use the Phone Dial Pad or store the Phone Send Text Message and Phone Text
Messages tools in your vocabulary or under icon sequences.
To Send a Text Message:
1. Use the Phone Dial Pad to dial the number you want. If you have stored the number in your Contacts, select it from
there.
2. Select the Send Text Message key.
Note: If the number is stored in your Phone Directory, and not in your Contacts, select it from the Directory
and then select the Phone Send Text Messages key.
3. The spelling keyboard is displayed.
4. Type the message you want to send.
Note: If you did not type a number from the Phone Dial Pad, the display will show Phone Number/Address.
Enter the number now and select OK. (Ignore the "Address" part. You cannot enter an address at this time.)
Then enter your message.
5. Select OK when you have finished. A yellow message box will tell you when your message has been sent.
Read a Text Message
When you receive a text message, an envelope icon will appear in the status display area of your device screen
near the other phone icons.
To Read a Text Message:
1. Select the Text Messages key on the Phone Dial Pad or the Phone Text Messages key on your Phone Directory
page.
2. A screen shows you any new text messages and all your saved text messages. The keys display the first few
words of the message stored under them.
3. Select the key that contains the message you want to read. The entire message is displayed.
4. You can Reply to the message; Delete the message; or select Cancel to save the message.
Auto-Delete TXT Messages
Auto-Delete TXT Messages is available from the Phone Configuration menu. If you turn Auto-Delete TXT Messages
on, your device will delete text messages from your phone once they are read and stored on your device. Auto-
Delete TXT Messages keeps your phone from filling up with text messages. To delete a text message from your
device, you must use the Delete message option.

Bluetooth Cell Phone 119
Listen-to-Calls-With
There are several ways you can listen to callers: use the internal speakers; plug headphones into the connector on
the side of your device and/or pair with Bluetooth headphones; or use the internal speakers in combination with
headphones. On the Phone Dial Pad, select Phone Configuration. Listen to calls with allows you to select the
option(s) you want to use.
Speakers
You will hear your caller through your device's internal speakers.
Headphones wired & BT
You can plug headphones into your device and listen to a caller through them. Or you can pair with Bluetooth
headphones and listen to the caller through those headphones. You can also plug in headphones and pair with
Bluetooth headphones. This way, two people can listen to a conversation.
Speakers & Headphones
You can listen using the internal speakers, plugged in headphones, and/or Bluetooth headphones in any
combination. To connect with Bluetooth headphones, go to the Toolbox, select Feedback Menu, and select
Bluetooth Speaker Menu.
Headphone Level
If you are using headphones, set Headphone Level to a level that is comfortable for you to listen to.
Using a Microphone to Speak
You can use your device’s internal microphone, a Bluetooth headset microphone, or both, to speak on the phone if
you are able to do this.
Using a Microphone
The Phone Configuration menu includes microphone options. Use the arrow keys to select the option you want—
Built-in; BT Headset, or Built-in & Headset. Adjust Mic Level to make the volume louder or softer.
Note: If the volume is too loud, you will hear feedback noise.
To connect with the Bluetooth headphones/headset, go to the Toolbox, select Feedback Menu, and select
Bluetooth Speaker Menu.
Adjusting Caller and Listener Volume
You can adjust the input and output volume of your calls in the Phone Configuration menu.
Input Volume
To prevent possible hearing damage, do not listen to earphones at high volume levels for long periods.
If you have trouble hearing the person who is talking to you, adjust the input volume higher. If the person's voice is
too loud, adjust the input volume lower.
Output Volume
If the other person is having trouble hearing you, set the output volume higher. If the other person says your voice
is too loud, adjust the output volume lower.
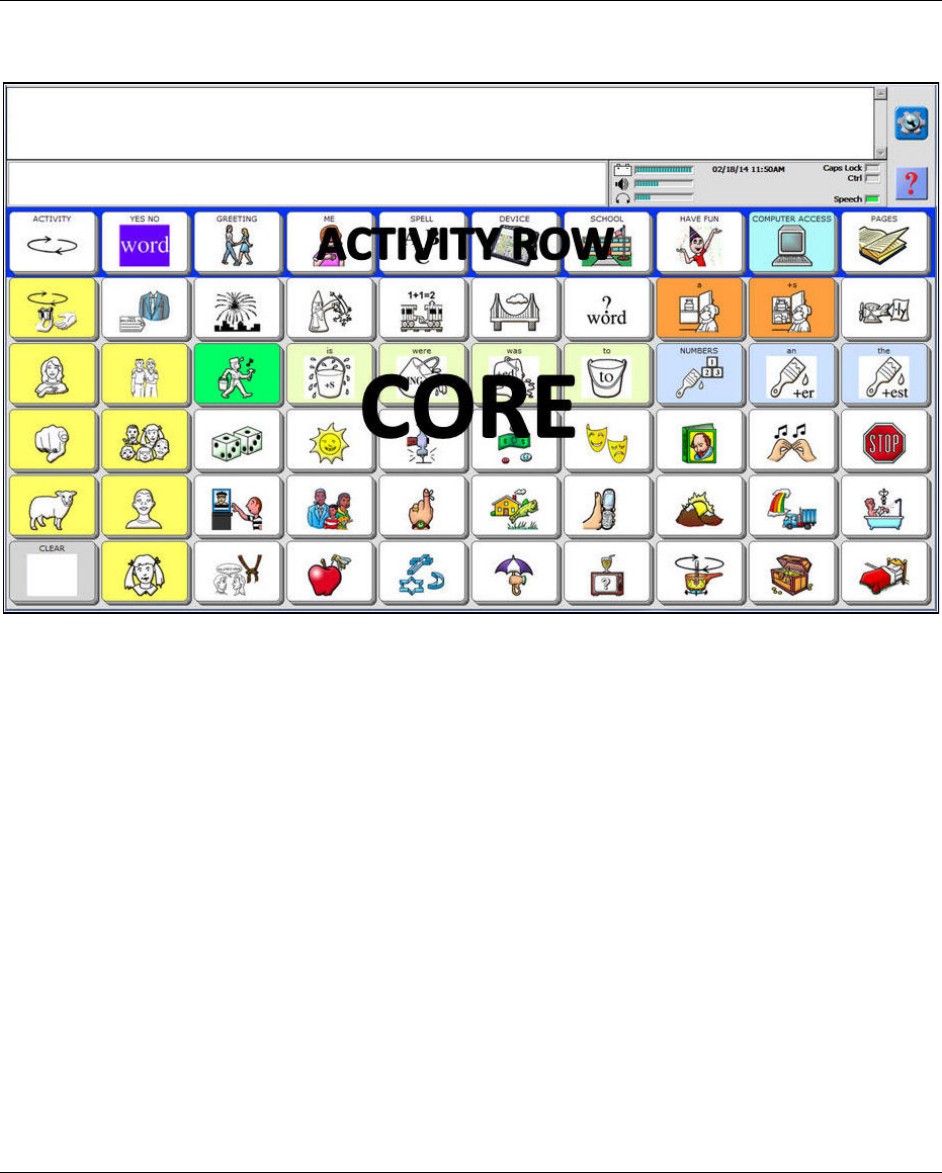
Unity 120
Unity
Unity is a unique language system used to represent language in your device. Within this language system there
are a variety of built-in vocabularies to choose from which are pre-populated with commonly used words, phrases,
and sentences. Use your vocabulary to communicate.
About Core Vocabulary and Activity Row Vocabulary
The Unity vocabularies store two kinds of vocabulary: Core vocabulary and activity row vocabulary. The activity
row vocabulary is in Row 1. Core Vocabulary is stored in the rest of the rows.
In general, Core vocabulary is made up of words that you use every day to make sentences. Pronouns, verbs, and
words like, “it,” “and,” “about,” and “the” can be found here. Core vocabulary is stored under icon sequences and
can be accessed with one, two, or three-hit sequences.
Activity row vocabulary generally contains single-hit vocabulary that is more specialized than your Core vocabulary.
Activities can be centered on a theme such as “School” or “Greetings”. Activities contain words that can help you
create complete sentences on topics you want to talk about.
Core vocabulary is very important. Many of the Core icons and messages are consistent throughout the Unity
vocabularies. Once you become familiar with your Core vocabulary, you will be able to communicate easily and
rapidly in any situation. For this reason, we recommend that you rarely, if ever, customize your Core.

Unity 121
Icon Prediction
Icon Prediction helps you learn where messages are stored on your vocabulary. When Icon Prediction is turned on
and you select an icon from your vocabulary, your device highlights the keys that you can select to produce a
message. You will not be able to select un-highlighted keys. Icon Prediction is always turned on unless you turn it
off in the Feedback Menu.
Gray
Turns unpredicted keys gray, but you can still see an outline of the icons on the keys.
White
Turns unpredicted keys white. You can still see the keys but you see nothing on them.
Blank
Makes the entire unpredicted key disappear. You cannot tell where the key was.
If you turn Icon Prediction off, no keys will be highlighted and all keys in your vocabulary will always be visible.
Press the key. The icon for the key you selected will appear in the icon display area, and some keys on the Core
will go blank.
If you select one of the keys with an icon on it, its icon will appear in the icon display area and the device will speak
the message that is stored under the sequence you just selected. Once a message is spoken, the device returns to
showing all the icons. When you press a key again, some keys will remain bright and some will turn blank.

Unity – Word Prediction 122
If you press a blank key, you will see the icon that belongs to that key in the Icon Display Area but no message will
be spoken. The Core resets and all keys become bright again.
Note: You can turn Icon Prediction off in the Feedback Menu in the Toolbox. You can also select to have the non-
predicted keys turn white or grey instead of blank.
Unity – Word Prediction
Core Vocabulary and Word Prediction
The following information covers items in word prediction that are specific to Unity vocabularies.
Unity Benefits
Unity vocabulary represents your Core vocabulary—verbs, adjectives, nouns, interjections, phrases, etc. These are
words that make up most sentences and turn sentences into conversation. But lots of sentences also contain
words that are not exactly "core" words. They are more like "fringe" vocabulary; words that help to make the
sentences interesting or to clarify meaning. These fringe words often are not stored in your Unity vocabulary
because they are words that you only use occasionally. To use them, you must spell them out which takes time,
cuts down on your ability to communicate rapidly and is labor-intensive. This is where word prediction helps.
Word Prediction Benefits
Word prediction systems help improve a person's ability to communicate by cutting down on the amount of time
spent in spelling out long and/or seldom used words.
Your Device has Two Word Prediction Systems
The PRC word prediction system predicts words based on how often (frequency) or how recently (recency) you
have used the word. The WordQ system predicts words based on words that are most likely to follow the word
you just typed.
When to use Word Prediction
Use your Core vocabulary when words are fewer than six letters in length. With words longer than six letters, you
can save time by selecting the predicted word in the window.
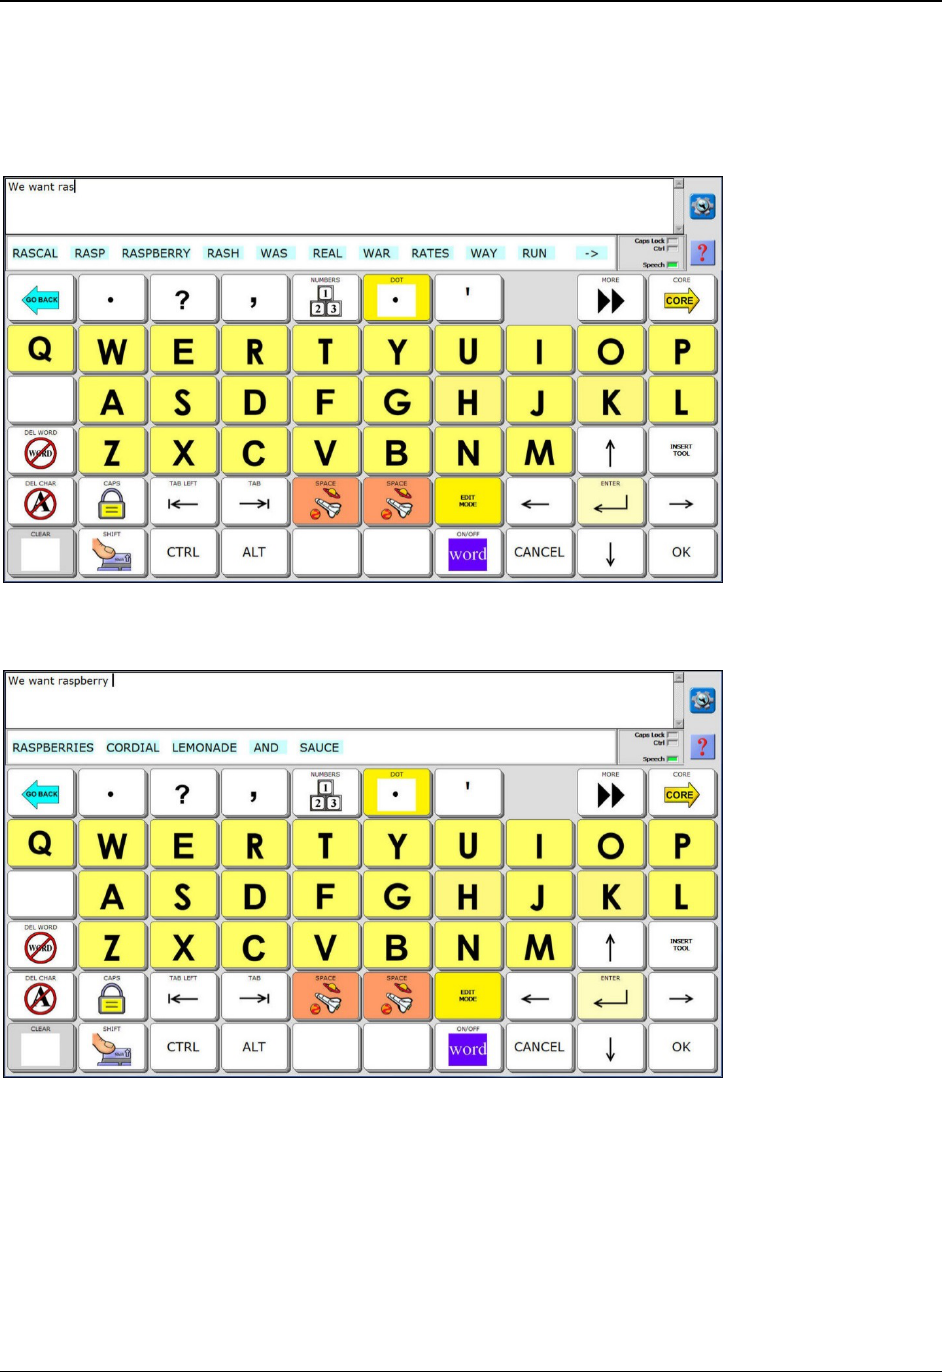
Unity – Word Prediction 123
Spell and Select Words
Turn word prediction on from the Word Prediction Menu in the Toolbox or your activity row. From the Toolbox or
from the Core, select your Spelling keyboard. Then from the keyboard, begin to spell a word.
Watch the display as you spell. Words appear in the Word Prediction window beneath the text display area. These are
words your device is predicting that you might want from the letters you have spelled. To select a word from the Word
Prediction window, press on the word. If you are scanning, select your switch when the word you want is highlighted.
Note: If you are scanning, you may need to switch to a Scanning Spell page or select the Scan Word Prediction key
if that key is available on your spelling page.
One of two things happens when you select a word.
• The word you selected appears in the text display area and the Word Prediction window disappears.
or
• More words are displayed. They may be words derived from the word you selected or they may be words
that might be associated with the word you selected. You can select one of these words or you can
continue to spell and watch more words come up in the Word Prediction window.

Unity – Word Prediction 124
You can continue to spell words and select them from the Word Prediction window as long as you want.
Icon Tutor On-the-Fly is an option in the Feedback Menu. When this option is turned on, Icon Tutor On-the-Fly will
show you any sequences in which your predicted word is stored.
Recommendation: We recommend that you learn your Core vocabulary before you begin to rely
on word prediction. When you are familiar with your Core vocabulary, you will find that communication is more
spontaneous and interactive than it is when you are using word prediction. Word prediction is a tool that should
be used to enhance your Core vocabulary, never replace it.
Unity – Add a Word to the Word Prediction Dictionary
1. Go to the Toolbox and select Word Predict Menu.
2. Select Add a Word.
3. Enter the root of the word you want to add. For example, enter the word abominate.
Note: A root word has no prefix (letters in front of the word) or suffix (letters at the end, such as “es”, “ing”, etc.).
4. The display asks you to enter a word with similar word endings (that is, a word used the same way in sentences
and with the same kind of endings as the word you entered). Type a similar word. For this example, type
terminate. "Terminate" appears in your Word Prediction window so you can select it. Select OK.
5. You will see a box containing the word you want to add with all its endings.
• If most of the endings are correct for the way you want to use your word, select Yes. The new word will
be entered into the dictionary.
• If the endings aren't right, select No, type a new "similar word", and try again.

Unity – Core Keys in the Toolbox 125
Unity – Core Keys in the Toolbox
Store a Recorded Core Message
1. Go to the Toolbox and select Store Core.
2. Select the icon sequence you want to use for your message and select OK. You are now in the storing menu.
3. In the Type of Message option, select Recorded Speech.
4. If you want the message to be displayed in the text display area, select Spell Message or Define Key Function,
type the message and select OK.
5. Select Record Message.
6. Press and hold the Record Message key and speak your message. As soon as you finish speaking release the
Record Message key.
7. Select Listen to Recording. If the message is too loud or too soft you can select Record Message, change the
Microphone Volume, and then re-record your message.
8. When you are satisfied with the message, you can select Change Label to spell a label that helps you
remember the message.
9. You can select Change Icon to add an icon that helps you remember the message.
When you select Change Icon you see the Icon Categories page. Select a category, then select an icon. If you
know the name of the icon you want, or you have an idea of a name, use Spell Icon to Find to type the name.
Your device will display a name or names for you to select.
10. You can select any of the other options and continue to work on your current key.
11. You can select Next Key to Define and store another message.
12. Select OK to save your work and exit the menu.
Note: In the storing menus, the blue keys with the small numbers 1, 2, 3, and 4 in the upper left corners are the
basic keys to use. You do not need to use them in their numbered order.
Erase a Recorded Core Message
1. Go to the Toolbox and select Erase Core.
2. Select the icon sequence of the message you want to erase.
3. Select OK.
4. A warning box asks you if you are sure you want to erase the sequence. Select Yes to erase the message or No
if you change your mind.
You can also erase a recorded message by recording over it.
1. Select Store Core in the Toolbox.
2. Select the sequence you want to record over.
3. Select Recorded in the Type of Message option.
4. Select Record Message and make a new recording.

Unity – Core Keys in the Toolbox 126
Store a Synthesized Speech Message
1. Select Store Core in the Toolbox
2. Select the icon sequence you want to use for your message and select OK. You are now in the storing menu.
3. In the Type of Message option, select Synthesized Speech.
4. Select Spell Message or Define Key Function.
5. Spell your message and select OK.
6. Select Change Label to spell a label that helps you remember the message.
7. Select Change Icon to add an icon that helps you remember the message.
When you select Change Icon you see the Icon Categories page. Select a category, then select an icon. If you
know the name of the icon you want, or you have an idea of a name, use Spell Icon to Find to type the name.
Your device will display a name or names for you to select.
8. You can select any of the other options and continue to work on your current key.
9. Select Next Key to Define and store another message.
10. Select OK to save your work and exit the menu.
Note: In the storing menus, the blue keys with the small numbers 1, 2, 3, and 4 in the upper left corners are the
basic keys to use. You do not need to use them in their numbered order.
Erase a Core Synthesized Speech Message
1. Go to the Toolbox and select Erase Core.
2. Select the icon sequence you want to erase.
3. Answer Yes to erase or No if you decide to keep the message.
Erasing a Dynamic Activity Link
• If you say Yes to erase and the sequence you want to erase is also linked to a dynamic activity, you will
see a new box asking if you want to unlink from the dynamic activity.
• If you say Yes to unlink, the last icon in your sequence will disappear from your Core and you will no
longer be able to access that particular sequence or its dynamic activity.
• If you say No, you do not want to unlink, the sequence itself will be erased, but the last icon in your
sequence will remain visible and you will continue to be able to access its dynamic activity.
Assign Core Keys
Note: When you assign a tool to a Core key, you can no longer use that key in a sequence. The tool replaces the icon.
1. Select Assign Core Keys in the Toolbox.
2. In your Core, select the key to which you want to assign a tool.
3. In Assign Key As, select the Tool option.
4. Select Enter Assignment.

Unity – Core Keys in the Toolbox 127
5. Select the Insert Tool key and then select the tool you want to assign.
6. Select OK.
7. The name of the tool appears as the label of the Core key. You can change the Icon and label or use any of the
other options in the menu.
8. Select OK. From now on, whenever you select this key from your Core, it will perform the function of the tool
you assigned to it. You will no longer be able to create or retrieve sequences that use the icon associated with
the key.
Erase the Tool and Restore the Original Icon
Select Icon in the Assign Core Keys menu screen to erase a tool from a Core key and restore the original icon.
Select Clear Key Contents to clear everything from the key.
To erase the tool and restore the Icon:
1. Go to the Toolbox and select Assign Core Keys.
2. Select the key on your Core that contains the tool you want to erase.
3. Select Icon in the Assign Key As box.
4. The original icon is restored.
5. Select OK.
To clear the entire contents of the key so it becomes a blank key:
1. Go to the Toolbox and select Assign Core Keys.
2. Select the key whose contents you want to erase.
3. Select the Clear Key Contents key.
4. Select OK. The key is now blank. It has neither an icon nor any contents.
Store a Tool Under an Icon Sequence
You can store a tool under an icon sequence instead of assigning one to a key. This way you do not lose a Core key.
1. Go to the Toolbox and select Store Core.
2. Select the icon sequence you want to use.
3. Select Spell Message or Define Key Function.
4. Select Insert Tool.
5. Select the tool you want and then select OK.
6. Change the last icon of your sequence and/or change the label if you want.
7. Select OK to exit the menu.
8. When you select the sequence, you will select the tool you just stored.

Unity – Core Keys in the Toolbox 128
To erase the sequence:
1. Go to the Toolbox and select Erase Core.
2. Select the icon sequence you stored the tool under.
3. Select OK.
4. Select Yes.
5. Select Go To Core.
Store a NuVoice Macro under an Icon Sequence
A NuVoice macro is a set of instructions that tell your device to do something. When you store more than one tool
in the same place or when you store tools and text together, you are making a macro. NuVoice macros are often
used as shortcuts for tasks that normally require a number of key activations.
Example: The Alert Signal Tool
The Alert Signal tool is in your Toolbox but you may not be in the Toolbox when you need some assistance. Let's
store the Alert Signal and add the words "Please help." under an icon sequence on your Core.
1. Go to the Toolbox and select Store Core.
2. Select the icon sequence you want to use to store the macro under.
3. Select OK.
4. In the Type of Message box select Synthesized Speech.
5. Select Spell Message or Define Key Function. Your Spelling keyboard is displayed.
6. Select the Insert Tool key.
7. The first page of the All Tools list is displayed. The tools are arranged alphabetically on the screen. Select the
Alert Signal tool.
8. Type Please help!
9. Select OK.
10. Optional: Change the last icon in the sequence and the label.
11. Select OK on the storing screen.
12. Check the status display area to make sure Speech is turned on.
Note: To turn speech on, select Speech On/Off in the Toolbox to toggle the Speech indicator on in the status
display.
13. Select the Core sequence you stored the macro under. Your device should play the Alert Signal and speak,
"Please help!"

Unity – Core Keys in the Toolbox 129
Assign a NuVoice Macro to a Core Key
When a tool or a NuVoice macro is assigned to a key, that key can no longer be used as part of a message
sequence. The tool replaces the key’s icon.
To assign tools and directions (NuVoice Macros) to a Core key:
1. Go to the Toolbox and select Assign Core Keys.
2. The Toolbox returns you to your Core. Select the key you want to use to store the macro under.
3. Select Tool in the Assign Key As box.
4. Select the Enter Assignment key. Your spelling keyboard is displayed.
5. Select the Insert Tool key.
6. The first page of the All Tools list is displayed. The tools are arranged alphabetically on the screen. Select the
Call tool.
7. Type Please help!
8. Select OK.
9. You can change the last icon in the sequence and the label if you wish.
10. Select OK on the storing screen.
11. Check the status display area to make sure Speech is turned on.
Note: To turn speech on, select Speech On/Off in the Toolbox to toggle the Speech indicator on in the status
display.
12. In your Core, select the key you stored the macro under. Your device should play the Call signal and speak,
"Please Help!"
Erase NuVoice Macros
To erase a NuVoice macro that has been stored under an icon sequence:
1. Go to the Toolbox and select Erase Core.
2. Select the icon sequence you stored the macro under.
3. Select OK.
4. Select Yes.
5. Select Go To Core.
To erase a NuVoice macro that has been assigned to a Core key:
1. Go to the Toolbox and select Assign Core Keys.
2. The Toolbox returns you to your Core. Select the key you assigned the macro to.
3. Erase the macro or clear the key’s contents.
• To erase the macro and restore the original icon, select Icon in the Assign Key As option.
• To clear the key of everything, select Clear Key Contents.
4. Enter a New Assignment or select OK to leave the key empty.

Unity – Core Keys in the Toolbox 130
Swap Core Keys
You can move keys around in Core by using Swap Core Keys. When you swap keys, the entire key, including any
sequences that might be stored under it, is swapped.
To swap two keys:
1. Go to the Toolbox and select Swap Core Keys.
2. Select the first key you want to swap.
3. Now select the key you want to swap the first key with.
4. Continue to swap keys as needed.
5. To exit and save your work, select OK.
Note: If you want to exit Swap Keys before you have completed an operation, select the text display area. This
is the same as using a Cancel key.
Hide Core Vocabulary Keys
Hide Keys works with single hit vocabulary. Use Vocabulary Masking on the Fly or the Vocabulary Builder Menu to
hide multiple-key sequences. If you are just beginning to learn about your vocabulary, you might want to use only a
few keys on your Core. You can hide all the keys that you don’t need. When you are ready to learn about more keys,
you can turn the hidden keys back on (“show” them) and see them in your Core.
When you hide a key, you are telling it to quit working. You won’t even see the icon in your Core. If you select the
space where the icon/key used to be, nothing will happen. In effect, you are turning the key off so that you can’t
use it.
To hide Core keys:
You must be using a single-hit (1-Hit) vocabulary.
1. Go to your Core and select the Setup key.
2. Select the Hide/Show Keys option.
3. Select the key or keys you want to hide. When you select a key it will turn gray.
4. You can hide activities as well as Core keys.
5. If you change your mind after you have selected a key, just select it again. It will return to its active state. You
can also use the Show All key in the Status Area.
6. When you have finished, click OK or select the text display area to exit.
7. Your Core will be displayed. Notice that the keys you have hidden are no longer visible.
To turn the key(s) back on: Repeat these steps or select the Show All option. Then click OK or select the text
display area to exit.

Unity – Core Keys in the Toolbox 131
Link a Core Icon Sequence to a Page
If, instead of setting up a message under an icon sequence on your Core, you want to link the sequence to a page
you have already created, follow the steps below.
1. Select Store Core in the Toolbox.
2. Select the icon sequence you want to use, then select OK.
3. Select Synthesized Speech from Type of Message.
4. Select Spell Message or Define Key Function.
5. Select Page Link on the spelling keyboard.
6. A yellow message box ask “Do you want the linked page to close after you select a key?”
7. Select Yes or No.
• If you select Yes, you can go to the page that you linked your sequence to, make one selection from the
linked page, and then automatically return to your original screen.
• If you select No, you will go to the linked page and remain on that page.
8. A list of all the pages in your device will be displayed. Select the page you want to link to.
9. Select OK.
10. Select Change Label to change the label.
11. Select OK. Now when you select the sequence you should go to the page you just linked to.

Unity – Pages 132
Unity – Pages
Store a Single Page Under an Icon Sequence
To store a specific page under an icon sequence:
1. Select Store Core in the Toolbox.
2. Choose the icon sequence you want to use and then select OK.
3. Select Synthesized Speech.
4. Select Spell Message or Define Key Function.
5. Spell any text you want to store.
6. Select Insert Tool.
7. Select Set Page or Set Page Temporary tool.
• Set Page means you will go to the page and stay there.
• Set Page Temporary means you will go to the page, stay there for one activation and then return to
wherever you were working.
8. Choose the page you want from the Page menu.
9. Select OK.
10. Select OK again.
To store an entire page menu under an icon sequence:
Change step 7 to Page menu and delete steps 8 and 9.

Unity – Activities 133
Unity – Activities
Activity Row
The top row of your Core is always the activity row. Each activity allows you to access words that are centered on a
particular theme. Each vocabulary has its own activities.
Activities contain single-hit vocabulary that enhances your vocabulary rather than duplicating or replacing it. You
can create your own activities for areas of your life where you would like to be able to participate in conversation
quickly and easily. You might want an activity for conducting banking transactions, one for a class at school or a
hobby. You can add and delete activities as your interests change.
Most vocabularies have more than one row of pre-stored activities. Select the key with the circling arrows on it to
see more activities.
Set Activity Template
Each vocabulary has a default template you can work from when creating an activity. It is generally called Blank or
Template. This will contain some essential keys such as More, Back, Core, OK, etc., placed where they are always
placed in the regular vocabulary. If you would prefer to select your own template, you can choose from any of the
activities in your vocabulary. The Set Activity Template option is in the User Area Menu.

Unity – Activities 134
Create a New Activity
You can create your own activities and add them to your activity row.
1. Go to the Toolbox and select Create Activity.
2. Spell a name for your new activity and select OK.
3. Choose an icon for the activity from one of the icon categories. If you do not want an icon, select No Icon or
Cancel. You have just defined the key you will see in your activity row.
4. A screen opens that allows you to set up how your activity functions. The first key in the activity is highlighted
in red. Notice that some keys are automatically defined for you in a new activity. The template below has
already defined the Activity key and the More key.
Note: The blue keys with the small numbers 1, 2, and 3 in the upper left corners are the basic keys to use. You
do not need to use them in their numbered order.
5. Select a blank key to define. The red highlight box moves to the key you selected.
6. Select the Change Icon key near the bottom the screen.
7. Select an icon to go with your key.
8. When you select an icon, your device automatically inserts the icon name as a text label for the icon in the
Text to Speak or Display box. This saves you some typing if this is what you want your device to speak. If not,
change the icon label later or select a different icon.
9. To add a message to your key, select Synthesized Speech or Recorded Speech under Type of Message.

Unity – Activities 135
10. Select Spell Message or Define Key Function.
• If you selected Recorded Speech, spell any text to go with the key and then select Record Message and
record your message.
• If you selected Synthesized Speech, spell your message and/or define the key function.
11. Select OK when you have finished recording or typing.
12. If you want a different label, select Change Label. Type a new label for your key. Select OK.
13. You can Hide or Show any of the keys in the activity.
14. Use Change Key Color to change the color of your key. (You could make all the keys in this activity the same
color.)
15. Select the next key you want to define and repeat these steps.
16. When you have completed defining keys in your activity, select OK. Then go to your Core and test the activity.
Note: If you make a mistake when you are defining a key, select Clear Key Contents and start over.
Dynamic Activities
You make an activity dynamic by linking it to an icon sequence and turning it on in the Dynamic Activity Menu.
Once the activity becomes a dynamic activity, you can be in any other activity, go to the new activity, speak a
message, and return automatically to the first activity.
1. Go to the Toolbox and select Dynamic Activity Menu.
2. Turn Dynamic Activities On.
3. Set Activity Persistence to Temporary or Permanent.
• Temporary means you can make one selection in the dynamic activity and then return to your original
activity. In most cases you will want Temporary so you do not stay in the dynamic activity.
• Permanent means you will remain in the dynamic activity.
4. Select Add Dynamic Activity.
5. Choose an icon or icon sequence to store and then select OK.
6. From the list, select the activity you want to make dynamic.
7. Select OK when you are finished.
Test the Dynamic Activity
1. Open any activity.
2. Select the icon you selected in the procedure above.
3. The activity you wanted opens. Select an icon in the activity.
4. The word is spoken and you return to your original activity.

Unity – Activities 136
Erase a Dynamic Activity Link
To erase a dynamic activity link:
This action erases the link to an activity, not the actual activity.
1. Go to the Toolbox and select Dynamic Activity Menu.
2. Select Delete Dynamic Activity.
3. Select the icon sequence for the dynamic activity you want to erase. Select OK.
4. Answer Yes if you are ready to delete the activity.
5. Select OK to exit the menu.
To erase an entire activity:
1. Go to the Toolbox and select Modify Activity.
2. Select Delete Activity.
3. Select Yes from the yellow message box.
Note: Within the activity itself, you can use the Delete Message option to delete just the message for that key.
Deleting Dynamically Linked Sequences
Sometimes a sequence contains both a message and a dynamic activity link. You can delete the contents of the
sequence but leave the dynamic activity link intact, or you can also erase the link to the dynamic activity. When
you attempt to erase the contents of a sequence that is also linked to a dynamic activity, a yellow message box will
ask you confirm: “This sequence is linked to Dynamic Activity < >. Do you want to unlink it?” Select Yes to erase the
link or No to keep it.
Review All Dynamic Activities
1. Go to the Toolbox and select Dynamic Activity Menu.
2. Select one of the Review options.
3. Your device shows you the dynamic activities. You see the sequence for the activity and the activity name.
4. Select More Items if you have more than one page of dynamic activities.
5. Select Cancel when you are finished.
6. Select OK to exit.

Unity – Activities 137
Modify an Existing Activity
When you modify an existing activity, you can modify the main activity key (the one you see in your activity row)
and you can modify the keys within the activity. Go to the Toolbox and select Modify Activity. Select the activity
you want to modify. If you want to modify keys within the activity, select Modify Item Within Activity.
To modify the main activity key:
1. Go to the Toolbox and select Modify Activity.
2. Select the activity you want to modify.
3. The menu provides options to modify a key in your activity row as well as make changes to the entire activity
row.
Alternative method:
1. Select the Tools key on the front of the case.
2. Select the Setup key from the menu.
3. Select an activity. The Modify Activity menu is displayed.
Note: If you select an activity first and then select the Setup key from the Tools menu, you will see the Modify
Item Within an Activity screen.
Modify Main Activity Options
Go to the Toolbox and select Modify Activity. Then select the activity you want to modify. The menu allows you to
modify keys in an activity row, not the keys within a specific activity.
Previous Items
If you have more than one row of activities, this will show you rows that come before the one you are currently
looking at.
Next Items
If you have more than one row of activities, this will show you the rows that come after the one you are looking at.
Store Category Prompt
Note: Category prompts are for scanning only.
You can add a category prompt to the main activity key that tells what the activity is about.
Rearrange Activities
Use Rearrange Activity Keys to move the More Items key, fill in empty keys, or set locked keys to remain in
position or move.
Move More Items Key: NO/Left/Right
This option allows you to move the More Items key from the right side of the row to the left side of the row, which
is generally more convenient when you are scanning.
Fill In Empty Keys: YES/NO
If you have blank keys here and there in an activity, this option will compress them and put all the non-blank keys
first so they are easy to access.
Locked Keys Stay Locked: YES/NO
If you decide to fill in empty keys, any locked keys will not move. If you want them to move, select Yes.

Unity – Activities 138
Make Changes to All Activities
Select this option when you want changes you have made in this menu to occur in all your activities. For example,
if you move More Items, you will probably want it moved in all your activities.
Make Changes to Selected Activities
Select this option when you want changes you have made in this menu to occur in specific activities only. For
example, you may only want filled in keys on a few activities.
Copy Activities
This key allows you to copy Selected Activities to a different user area. You can also copy All Activities to a
different user area.
Change Icon (Unity Main Activity Option)
Selecting Change Icon takes you to the Icon Categories page, where you can select an icon.
Change Label (Unity Main Activity Option)
Selecting Change Label takes you to your spelling page, where you can type a new label.
Change Key Color (Unity Main Activity Option)
Selecting Change Key Color takes you to the color chart, where you can select a different color.
Change Position (Unity Main Activity Option)
Use Change Position to change the position of a key in the activity row.
Activity Background Color
Use Activity Background Color to change the background color of the entire activity row.
Hide/Show Activity
Selecting Hide or Show under Activity allows you to hide or show any activity. To hide an activity, select the activity
and then select Hide. The activity turns dark grey and becomes inactive. To make an activity active again, select the
hidden activity and then select Show. The activity will turn bright and be ready to use. The Previous Items and
More Items options will often show you many hidden activities.
Hide All Activities
Selecting Hide All Activities hides all the activities in your activity row.
Delete Activity
Use Delete Activity to delete an entire activity.
Modify Item Within the Activity Options
The Modify Item Within an Activity screen is a basic storing screen with a few additions that relate specifically to
activities.
Previous Items (Unity)
If you have more than one row of activities, this option will show you rows that come before the one you are
currently looking at.
Next Items (Unity)
If you have more than one row of activities, this option will show you the rows that come after the one you are
looking at.
Type of Message (Unity)
Select Synthesized Speech to type a message your device will speak. Select Recorded Speech to have someone
record a message into your device.

Unity – Activities 139
Record Message (Unity)
When you select Recorded in the Type of Message option, the Record Message key becomes active. Press and hold
the Record Message key and record your message. Release the key when you finish recording.
Listen to Recording (Unity)
When you record a message, press this key to hear how the recording sounds.
Import Sound File (Unity)
This option allows you to store a sound file on a key.
Spell Message or Define Key Function (Unity)
If you select Synthesized Speech, type a message for your device to speak. You can also enter tools and text that
tell your device to perform some action. If you select Recorded Speech, you can type any text that you would like
to have displayed while the recording is speaking.
Change Icon (Unity Option within Activity)
This option takes you to the Icon Categories page, where you can select an icon.
Change Label (Unity)
A label can contain up to nine (9) letters. If you want a blank label, enter a space instead of a word.
Change Key Color (Unity)
This takes you to the color chart where you can select a new key color.
Change Position (Unity)
This allows you to change the key’s position in the row.
Key Position: Lock/Unlocked (Unity)
Select Lock to keep the key fixed in its place in the row. Select Unlock to allow a key to be shuffled in your activity
row. Keys you select a lot will move toward the front of the activity for easier access.
Recommendation: Lock the Go Back and More Items keys so that they do not shuffle.
Hide/Show This Key
Selecting Hide/Show This Key allows you to hide or show individual keys in the activity. To hide a key, select the
key you want to hide in the activity and then select the Hide option. To show a key, select the key you want to
show in the activity and then select the Show option.
Note: You can also be in your Core, select the Tools key on the front of the case, and select the Setup key from the
menu. The Hide/Show Keys button will appear in your status area. Select the keys you want to hide or show. You
can select keys from the activity row as well as Core. Select OK or select the text display area to exit.
Show All (Unity)
Select Show All to show any hidden keys in your activity.
Clear Key Contents (Unity)
Select Clear Key Contents to completely clear a key of its contents. As soon as you select this key it changes to
Undo Clear Key, which allows you to replace the key contents in case you change your mind. For Undo Clear Key
to work, you must select it right after you have cleared the key. If you make any other key selections, Undo Clear
Key will not work.
Add New Row (Unity)
Add a new row of blank keys to your activity.
Delete Current Row (Unity)
Delete the current activity row.

Unity – Activities 140
Link an Activity to a Page or to another Activity
You can link your activity to a page or to another activity. This means you can press a key in an open activity that
will take you to another activity or to a page that have already created.
To link an activity to another activity:
If you are creating a new activity: Select Create Activity in the Toolbox, spell the name of the activity, and select an icon.
If you want to link an activity you have already created: Select Modify Activity in the Toolbox and select the
activity you want to link. Then select Modify Item Within Activity.
1. Select the key inside the activity in which you want to store the link.
2. Select the Spell Message key.
3. Instead of spelling a message, select the Activity Link key on the Spelling keyboard.
4. You will see all the activities that are available. Select the one you want to link to.
5. Select OK.
6. Choose an icon for your key, label it, etc.
7. Select OK to save your changes and exit the menu.
Link a Page to an Activity
1. Go to the activity you want to link.
2. Select Modify Item Within Activity.
3. Select the Tools key on the front of the case.
4. Select the Setup key from the menu.
or
1. Go to the Toolbox and select Modify Activity.
2. Select the activity in which you want to put the link to a page.
3. Select Modify Item within Activity option.
4. Select the Spell Message key.
5. Instead of spelling a messages, select the Page Link key on the Spelling keyboard.
6. A yellow message box will ask “Do you want the linked page to close after you select a key?”
• If you select Yes, you will be able to go to your linked page, make one selection from it, and return
automatically to your original activity or page. If you are unsure what you want, we suggest you select Yes.
• If you select No, you will go to the linked page and stay there.
7. A list of pages will be displayed. Select the page you want to link to.
8. Select OK.
9. Choose an icon for the key, label it, etc.
10. Select OK to save your changes and exit the menu.

Unity – Activities 141
Assign Activity Keys
Use Assign Activity Keys in the Toolbox to assign a tool to your activity row. Assigning a tool to your activity row
can be useful if you need an empty key on your Core. For example, perhaps you want to assign a tool that you use
frequently to a key on your Core, but you have no blank keys. You decide if you could just move Clear Display to
the activity row, you could assign your new tool to the key where Clear Display used to be. Assign Activity Keys
lets you do this.
Assigning a tool to a key in the activity row is like adding a key to the row. You select a position in the row that
includes an activity, assign the tool to it, and your device places the tool where the activity was and moves the
activity one place to the right in the row.
Note: Assign Activity Keys will not allow you to assign a tool to a key within an activity. Use the Create Activity or
Modify Activity menus for that. Use the Spell Message or Define Key Function and the Insert Tool keys.
To assign a tool to a key in the activity row:
1. Select Assign Activities Keys in the Toolbox. The first row of available activities is displayed.
2. Select the key to which you want to assign a tool.
3. In Assign Key As select the Tool option.
4. Select Enter Assignment.
5. Select the Insert Tool key and then select the tool you want to assign.
6. Select OK.
7. Select any of the other options you want.
8. Select OK. You will see the tool in your activity row.
Note: If at some later time you decide you want the activity back in its original place, simply open Assign Activities
Keys, select the tool, and then select the Activity option. The tool key will disappear and the activity key will return
to its original place in the row.
Note: Use Assign Core Keys to assign a tool to a Core key.
Store a Tool in an Activity
If you want to store a tool or a macro on a key within an activity, follow these steps.
1. Go to the activity you want. Select Modify Item Within Activity. Select the Tools key on the front of your case
and then select the Setup key.
As an alternative, you can select Modify Activity from the Toolbox.
2. In your activity row, select the activity in which you want to store a tool.
3. Select Modify Item Within An Activity.
4. Select the key within the activity in which you want to add a tool.
5. Select Spell Message or Define Key Function.
6. On your spelling screen, select the Insert Tool key.
7. You see the first page of the All Tools list. The tools are arranged alphabetically. Select More Items to see
more tools.

Unity – Icon Tutor 142
8. Select the tool you want to add.
9. Select OK. The tool is added.
10. You can use Change Icon, Change Label, etc. until you have finished.
11. Select Next Key to Define or OK to exit the menu.
Unity – Icon Tutor
Unity – Icon-Tutor-on-the-Fly
Icon Tutor On-the-Fly is available from the Feedback Menu. When this option is turned on, you can spell a word
and find out if it is stored under a sequence in your vocabulary.
1. Go to your Spelling keyboard.
2. Spell a word and select a space or punctuation mark.
3. If the word is stored in your vocabulary, your device will display the sequence(s) for it in the Word Prediction
window.
Unity – Icon Tutor View Delay
Icon Tutor View Delay is available from the Feedback Menu. Use this option with Icon Tutor On-the-Fly turned on.
When Icon Tutor On-the-Fly finds a word in your vocabulary and displays its sequence(s), use this option to select
the length of time (in number of seconds—1-10) you would like to see the sequence(s) displayed.
Unity – Icon Tutor View Count
Icon Tutor View Count is available in the Feedback Menu. Use this option with Icon Tutor On-the-Fly turned on.
This option allows you to select the number of sequences (1-5) you would like to see displayed.
Search Icon Tutor
Search Icon Tutor is available in the Review Vocabulary Menu. Use this option to help you find sequences for
specific words. For example, let’s say you want to know where the word "watch" is stored.
1. Go to the Toolbox and select Review Vocabulary Menu.
2. Select Search Icon Tutor from the Review Vocabulary Menu.
3. Your Spelling keyboard is displayed. Spell the word you want to search for, in this case, "watch".
4. Select OK. The Matching Sequences page displays all sequences in which the word "watch" is used. You can
write down the sequences for later use. The word "watch" is used in two different sequences. Some words will
be used in more sequences; some in fewer or none.

Unity – Vocabulary Builder Menu 143
Tutor Auto-Update and Update Icon Tutor
Tutor Auto-Update is available in the Review Vocabulary Menu. Your device automatically sets Tutor Auto-
Update on or off according to the vocabulary you are using (not all vocabularies use icon sequencing). In most
cases there will be no reason to change this setting. However, if you find that the automatic updating of your icon
tutor is taking a very long time, you can turn this option off. If you manually turn Tutor Auto-Update off and then
make changes to your vocabulary, you must select Update Icon Tutor to save your changes. Any new searches will
include the updated changes.
Icon Tutor Advanced Settings
Icon Tutor Advanced Settings is available in the Review Vocabulary Menu. This option provides a way to
streamline an Icon Tutor update by excluding those pages and activities that don't generate vocabulary.
Icon Tutor Key in the Activity Row
All of the Unity vocabularies have an Icon Tutor key in the activity row. In some vocabularies it is in the device
Tools activity. When you select this key, you can search the Icon Tutor without having to go to the Review
Vocabulary Menu. Just type the word you are looking for and select OK.
Unity – Vocabulary Builder Menu
About the Vocabulary Builder Menu
The Vocabulary Builder Menu allows you to mask or unmask all vocabulary words, phrases, and sequences. Use
this menu to import, load, merge, rename, and back up word lists and sequence sets, save word lists, and select a
menu style. Use the menu’s Advanced Options submenu to turn Vocabulary Builder on or off.
Vocabulary Masking on the Fly allows you to mask and unmask all your vocabulary keys—words, phrases,
sequences, tools, activities, activity keys, page keys, etc. Vocabulary Masking on the Fly does not allow you to
import, load, merge, rename, back up word lists or sequence sets or save word lists. You cannot select a menu
style or turn Vocabulary Builder on or off.
Note: For active control of your entire vocabulary, you should use Vocabulary Masking on the Fly.
Note: For maintenance of your sequence sets and word lists, you should use the Vocabulary Builder Menu.
Vocabulary Builder and Vocabulary Masking on the Fly work only with sequences that start with Core vocabulary
icons or from the main activity row.

Unity – Vocabulary Builder Menu 144
Using the Vocabulary Builder Menu
Go to the Toolbox and select Vocabulary Builder Menu.
Notice that all the vocabulary in your user area is in the Unmasked Words/Phrases pane.
Vocabulary Builder Menu Options
Unmasked Words/Phrases (Word Order)
The Unmasked Word/Phrases pane displays the currently selected word list or specific words you select for a
sequence set. You can mask specific words (move them to the Masked Words/Phrases pane) by selecting Mask or
Mask All.
Masked Words/Phrases (Word Order)
The Masked Word/Phrases pane displays words from the current word list to which you applied Mask or Mask All.
You can search for specific words in the pane by using Find Unmasked Word or Spell to Mask, or by scrolling
through the pane. You can unmask specific words (move them to the Unmasked Words/Phrases pane) by selecting
Unmask or Unmask All.
Unmask
Selecting Unmask moves highlighted words and sequences from the Masked Words/Phrases pane list to the
Unmasked Words/Phrases pane.
Mask
Selecting Mask moves highlighted words and sequences from the Unmasked Words/Phrases pane to the Masked
Words/Phrases pane.
Unmask All
Selecting Unmask All moves all words and sequences from the Masked Words/Phrases pane to the Unmasked
Words/Phrases pane. This option clears all masking in your user area.

Unity – Vocabulary Builder Menu 145
Mask All (Vocabulary Builder Menu Options)
Selecting Mask All masks everything in your user area including page keys, activities, and keys within activities,
Core, etc. All words and sequences move from the Unmasked Words/Phrases pane to the Masked Words/Phrases
pane. Only basic tools will be visible. The basic tools are: Choose Activity, Go Back (Close Activity), More Items, OK,
Delete Character, Delete Word, Delete Icon, Clear Display, and Go To Home. To unmask a basic tool, you must
hand-select each basic tool key individually.
Include All Phrases
Selecting Include All Phrases searches the Masked Words/Phrases pane for phrases made up of words in the
Unmasked Words/Phrases pane. It will move these phrases from the Masked Words/Phrases pane to the
Unmasked Words/Phrases pane. For example, if "I", "can", and "not" are in the Unmasked Words/Phrases pane,
Include All Phrases will find and unmask phrases like "I can" and "I can not".
Find Unmasked Word
Selecting Find Unmasked Word allows you to type a partial or entire word or phrase to find. You can only find one
word or phrase at a time. If Vocabulary Builder finds an exact match it highlights it. Otherwise, it takes you to the
first word that starts with what you typed. This word is not highlighted.
Note: Make sure you have selected to sort your list by Words—“(Word Order)” should be visible below the two panes.
Spell to Mask
Selecting Spell to Mask allows you to type a single word or phrase or multiple words and phrases. Separate
multiple words and phrases with commas. This option automates the process of locating, selecting, and moving
sequences from one pane to the other.
Go to Masking on the Fly
Selecting Go to Masking on the Fly turns on Masking on the Fly.
OK (Vocabulary Builder Menu)
Selecting OK closes the Vocabulary Builder Menu.
Save As Sequence Set
Selecting Save As Sequence Set allows you to save words and sequences in the Unmasked Words/Phrases pane as a
sequence set. When you next load this sequence set, you will see only those words and sequences you have selected.
Advanced Options
Selecting Advanced Options opens the Vocabulary Builder Advanced Options menu. See Vocabulary Builder
Advanced Options for complete information.
Vocabulary Builder Advanced Options
When you select Advanced Options from the Vocabulary Builder Menu, the Vocabulary Builder Advanced Options
menu opens. From this menu you can turn Vocabulary Builder on or off; load, merge, delete, and rename
sequence sets; load, merge, delete, rename, and back up word lists; import a word list; and save words in the
Unmasked Words/Phrases pane as a word list.
Vocabulary Builder
This option turns Vocabulary Builder on or off. Select On if you want your vocabulary to be masked when you leave
the Vocabulary Builder Menu. Select Off if you want your complete vocabulary to be visible.
Note: When you leave this menu, your work will be saved, but it will only take effect when Vocabulary Builder is
turned on.
Display
Set word lists to display as either words only or words with icons.
Unity – Vocabulary Builder Menu 146
Words Only
When you select Words Only, lists in the Unmasked Words/Phrases pane and Masked Words/Phrases pane are
displayed as words in alphabetical order; no icons are visible.
Icons & Words
When you select Icons & Words, lists in the Unmasked Words/Phrases pane and Masked Words/Phrases pane are
displayed as both words and icons.
Sort List by
Set word lists to be sorted in the Unmasked Words/Phrases pane and Masked Words/Phrases pane alphabetically
by words or by first icons or last icons.
If you
select:
This will happen:
Words
When you select Words, lists in the Unmasked Words/Phrases pane
and Masked Words/Phrases pane are sorted alphabetically.
First Icons
When you select First Icons, lists in the Unmasked Words/Phrases
pane and Masked Words/Phrases pane are grouped by their starting
icons and the icons’ placement in your Core.
Last Icons
When you select Last Icons, lists in the Unmasked Words/Phrases
pane and Masked Words/Phrases pane are grouped by their ending
icons and the icons’ placement in your Core.
Vocabulary Builder Style
Set the display style of Vocabulary Builder menus.
PRC style
Selecting PRC style sets Vocabulary Builder menus to look like PRC device-style menus.
Use Sequence Sets
Selecting Use Sequence Sets opens the Vocabulary Builder Sequence Sets menu. From this menu you can load,
merge, delete, and rename sequence sets.
Load Sequence Set
Selecting Load Sequence Set replaces everything currently in the Unmasked Words/Phrases pane with the
sequence set you have selected.
Merge Sequence Set
Selecting Merge Sequence Set adds words or sequences to the words or sequences already in the Unmasked
Words/Phrases pane.
Delete Sequence Set
Selecting Delete Sequence Set deletes a sequence set from its user area.
Rename Sequence Set
Selecting Rename Sequence Set allows you to give a sequence set a new name.
Use Word Lists
Selecting Use Word Lists opens the Vocabulary Builder Word Lists menu. From this menu you can load, merge,
delete, rename, and back up word lists.
Load Word List
Selecting Load Word List replaces everything currently in the Unmasked Words/Phrases pane with the word list
you have selected.

Unity – Vocabulary Builder Menu 147
Merge Word List
Selecting Merge Word List adds words to the words already in the Unmasked Words/Phrases pane.
Delete Word List
Selecting Delete Word List deletes any word list you select. Once deleted, a word list is no longer available
anywhere in the device.
Rename Word List
Selecting Rename Word List allows you to rename any word list.
Backup Word List
Selecting Backup Word List allows you to back up a list to your USB drive.
Import New List
Selecting Import New List allows you to import a new word list from a USB flash drive or, if you are using PASS,
from a computer.
Save As Word List
Selecting Save As Word List allows you to save any words in the Unmasked Words/Phrases pane as a word list in
the “.txt” file format. When you next open this list, you will see the words you selected and all the sequences that
are possible for those words. When you select Save As Word List, the Spelling keyboard is displayed. Enter a name
for the word list and select OK.
About Sequence Sets
The power of Vocabulary Builder lies in sequence sets. Sequence sets are lists of targeted words with their icon
sequences. These sets can be based on different activities (e.g. meal time or field trip), categories of words (e.g.
colors or names) or words used during an academic subject (e.g. reading or science).
Your device already has a number of sequence sets that you can use, but you may want to create your own custom
sequence set. This can be tailored to meet an individual's specific communication needs.
Create a Sequence Set
Notice that in this example all the vocabulary in your user area is in the Unmasked Words/Phrases pane.

Unity – Vocabulary Builder Menu 148
Since we only want a few words from this vocabulary for our sequence set, let's move all the vocabulary to the
Masked Words/Phrases pane. Then we can select only the sequences we want and move those back to the
Unmasked Words/Phrases pane.
Select the Mask All button. The Unmasked Words/Phrases pane is empty, and all your words and icons are now in
the Masked Words/Phrases pane.
We are going to find the words/phrases we want and unmask them. It is easier to do this when the words and
phrases are in alphabetical order (word order).
To make sure what order your vocabulary is in, do one of the following:
• Check the label below the Masked Words/Phrases pane and the Unmasked Words/Phrases pane. The
words in parentheses ( ) tell you how the vocabulary is sorted. Make sure Word Order is displayed.
• Select the Advanced Options key and check the option selected under Sort List by. Make sure Words is
selected.
There are a number of different ways to select the words you want for your Set. Let's try them all so that next time
you will be able to pick the one you prefer.
Example: Create a Sequence Set
In this example, we’re going to create a “Birthday Party” sequence set.
1. Find the first word or phrase to the sequence set—in this example, “happy birthday”. Use either of the
following methods.
• Select the Find Masked Word key below the Masked Words/Phrases pane to open the Spelling keyboard.
Spell the word or phrase and select OK.
Note: You don't need to type the entire word. A few letters will at least get you to the vicinity of the word
you are looking for. Then you can use your arrow keys.
• Use the scroll bar to the right of the Masked Words/Phrases pane to scroll down to the word or phrase.
Then select it.
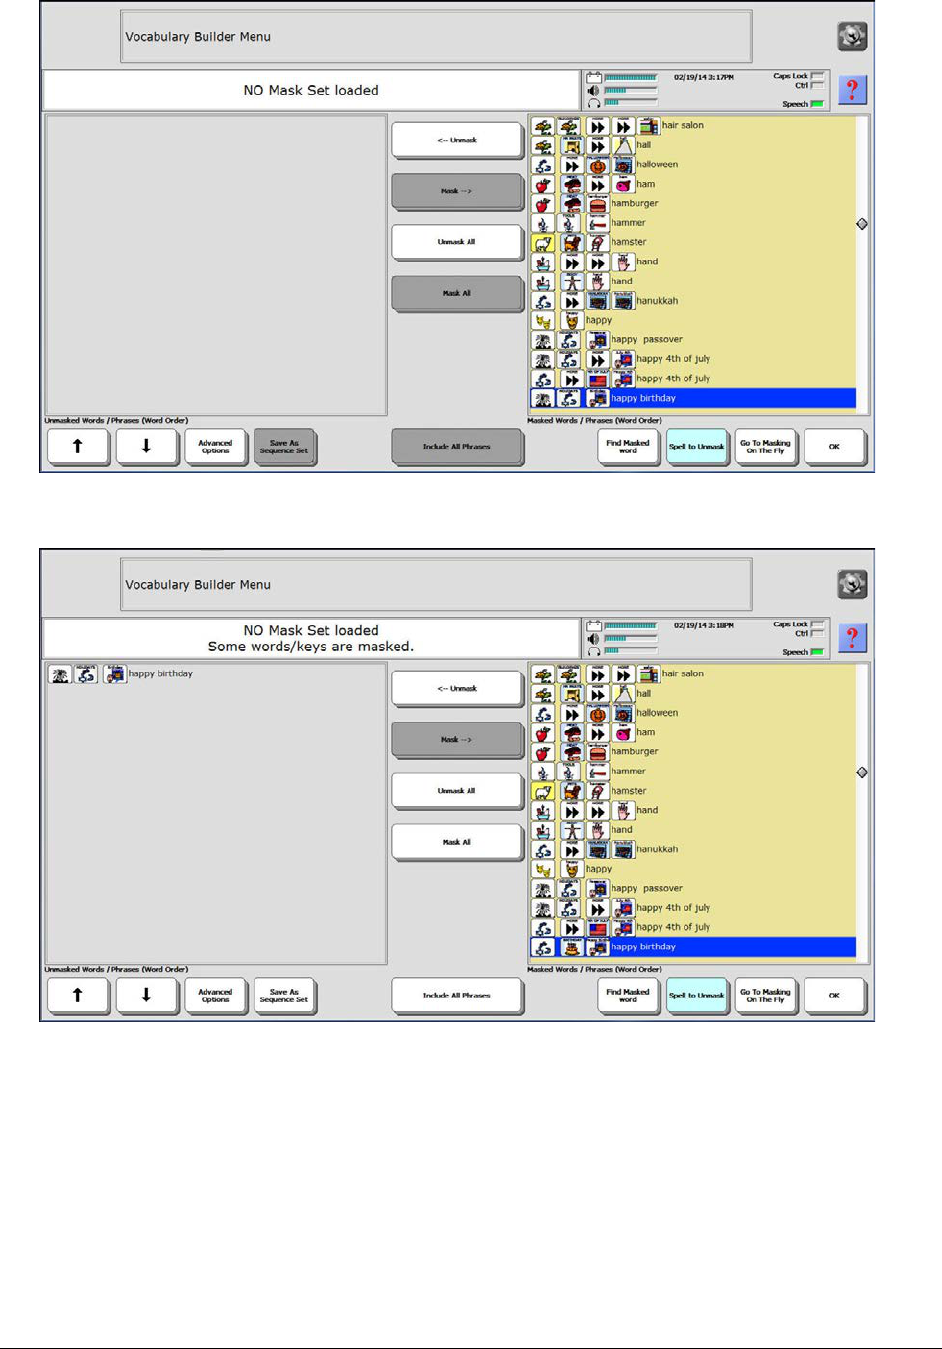
Unity – Vocabulary Builder Menu 149
2. Using either method, the word or phrase (in this example, “happy birthday”) and its sequence are highlighted
in the Masked Words/Phrases pane.
3. Select the Unmask button. The phrase “happy birthday” and its sequence now appear in the Unmasked
Words/Phrases pane.
4. Add another word to the sequence set—in this example, "party".
• Select the Find Masked Word key below the Masked Words/Phrases pane to open the Spelling keyboard.
Spell the word party and select OK.
• Use the scroll bar to the right of the Masked Words/Phrases pane to scroll down to the word party. Then
select it.
5. The word “party” and its sequence are highlighted in the Masked Words/Phrases pane.
6. Select the Unmask button. The word “party” and its sequence now appear in the Unmasked Words/Phrases
pane, along with “happy birthday” and its sequence.

Unity – Vocabulary Builder Menu 150
7. To add several words at once, select Spell to Unmask to open the spelling keyboard.
Note: This is similar to Find Masked Word, but with Spell to Unmask you can include more than one word.
The sequences for the words you decide to use are placed in the Unmasked Words/Phrases pane
automatically.
8. Spell the words you want for your sequence set—in this example, “gift”, “food”, and “games”. Separate the
words with a comma.
9. Select OK when you have finished spelling words.
10. The words you entered and their sequences appear in the Unmasked Words/Phrases pane, along with “happy
birthday”, “party”, and their sequences.
By using Spell to Unmask, you were able to unmask a group of words at once. You didn’t need to enter them
one-by-one and you didn’t need to move them from the Masked Words/Phrases pane to the Unmasked
Words/Phrases pane.
11. When the Unmasked Words/Phrases pane contains all the words and their sequences that you want to have in
your sequence set, select Save As Sequence Set. The spelling keyboard is displayed.
12. Enter a name for the sequence set and select OK. In this example, the name “Birthday Party” was entered for
the sequence set.
13. Click OK to exit the Vocabulary Builder Menu.
14. Once you have saved your sequence set, go to the Transfer Memory Menu in the Toolbox and save the user
area you are using to a USB drive. This saves and keeps your sequence set safe.
When a Word has More the One Sequence
All of the sequences for a word will appear in the Unmasked Words/ Phrases pane. In some cases there may be
more than one sequence for a word. Highlight the sequence(s) you don't want and select the Mask button so that
you are left with only the sequence you want. You are left with a sequence set (targeted words and their individual
sequences) in the Unmasked Words/Phrases pane.
Note: If you select the Include All Phrases button, Vocabulary Builder will search through the Masked
Words/Phrases pane for any masked phrases made up of the words in the Unmasked Words/Phrases pane. It will
automatically move these masked phrases to the Unmasked Word/Phrases pane. For example: if you have "Thank"
and "you" as single selections in your Unmasked Words/Phrases pane, you can select Include All Phrases and
Vocabulary Builder will put the phrase, "Thank you" in your Unmasked Words/Phrases pane.

Unity – Vocabulary Builder Menu 151
Word Lists
Both word lists and sequence sets are templates that you can load and modify. They save you the trouble of
searching the vocabulary lists to mask/unmask sequences. In most circumstances, you will probably never use
word lists. However, established word lists such as Dolch, Benajee, etc. or a list created by someone else can
sometimes be a good starting point for creating a sequence set. See Import New Word List
.
Using Word Lists
1. Go to the Toolbox and select Vocabulary Builder Menu.
2. Make sure “Word Order” appears below each pane.
3. Select Advanced Options to open the Vocabulary Builder Advanced Options menu.
4. Select Use Word Lists to open the Vocabulary Builder Word Lists menu.
5. Select Load Word List to open the Choose Word List to Load menu, which shows all the word lists in your
device.
6. Select the word list you want.
For this example, select the Colors word list. The Vocabulary Builder Advanced Options menu shows “Using
<Colors> Word List”.
7. Make any changes to the menu settings you want.
8. Click OK. The Vocabulary Builder Menu is displayed with the Colors word list loaded.
A Reminder about Sequence Sets
When you load a sequence set you will see only the specific sequences that were saved in the set.
You can load a word list into the Vocabulary Building system; merge a new word list into the current unmasked
words and phrases; delete one of the word lists; rename a word list; or back up a word list.
All word lists are accessible from all user areas. When you import a word list, it is available anywhere in the device.
When you delete a word list, it is no longer available anywhere.
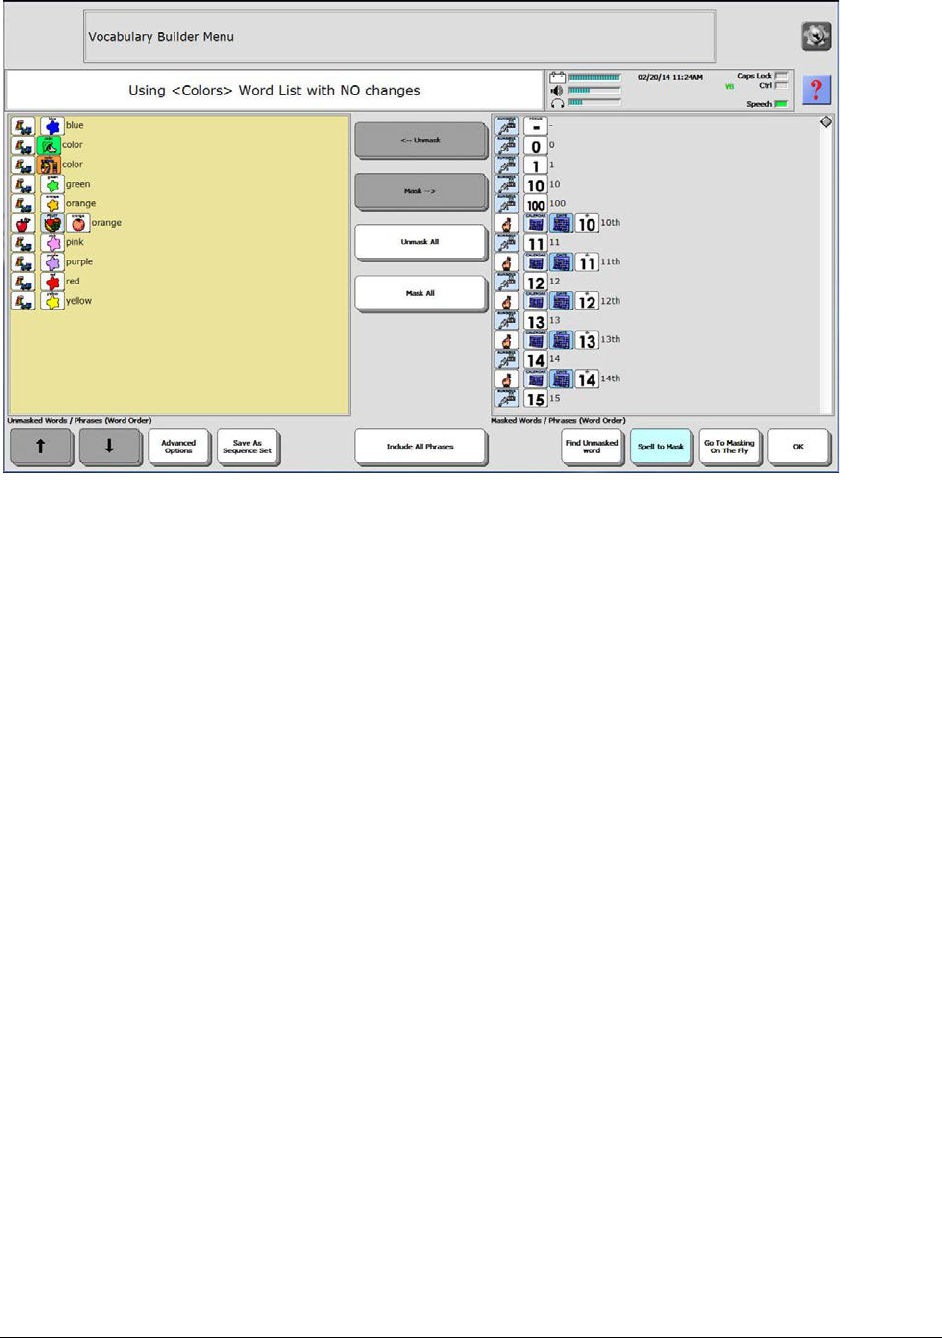
Unity – Vocabulary Builder Menu 152
A Look at the Colors Word List in the Vocabulary Builder Menu
Let's look at the Colors word list in the Unmasked Words/Phrases pane.
You are looking at all the Color sequences in your user area that match the words that were in the word list. Many
words have multiple sequences to choose from. Notice that "Color" and "Orange" are represented twice. "Orange"
is represented once as a Color and once as a Fruit.
Since this list is going to contain only colors, select the sequence for the fruit Orange and then select Mask. You
can also mask the "color" sequence you don't want to use.
Each time you load a word list, you will need to go through it to eliminate unwanted words/sequences. Once you
have only the sequences you want in your list:
1. Select Save As Sequence Set.
2. Name your sequence set or keep the original name if it already has one.
Note: If you keep the original name, any changes you have made will overwrite the original sequence set.
3. Select OK.
Saving the list as a sequence set means you do not need to clean out the sequences you don't want each time you
open it.

Unity – Vocabulary Masking on the Fly 153
Import New Word List
You, or someone else, may have created a word list that you want to import and use. If you are importing it into
your device, you must have it stored on a USB flash drive. Plug the USB drive into your device.
1. Go to the Toolbox and select Vocabulary Builder Menu.
2. Make sure “Word Order” appears below each pane.
3. Select Advanced Options to open the Vocabulary Builder Advanced Options menu.
4. Select Import New List.
5. Select the drive on which your list is stored.
6. Select the file or files you want to import.
7. Click OK to display the Spelling keyboard with the prompt “Enter a Word List name, then OK”.
8. Enter a name and click OK for each file. Each imported file is now available from the Choose Word List to Load
menu.
Remember:
Sequence sets cannot be imported, but they can be created and saved by starting with a word list.
Sequence sets can only be used in the user area in which they were created, but word lists can be used in any area.
Unity – Vocabulary Masking on the Fly
To use Vocabulary Masking on the Fly, Vocabulary Builder must be turned on in the Vocabulary Builder Advanced
Options menu.
1. Go to the toolbox and select Vocabulary Builder Menu.
2. Select Advanced Options.
3. Under Vocabulary Builder, select On.
About Vocabulary Masking on the Fly
Vocabulary Masking on the Fly allows you to mask and unmask all your vocabulary keys—words, phrases,
sequences, tools, activities, activity keys, page keys, etc. Vocabulary Masking on the Fly does not allow you to
import, load, merge, rename, or back up word lists or sequence sets or save word lists. You cannot select a menu
style or turn Vocabulary Builder on or off.
Note: For active control of your entire vocabulary, you should use Vocabulary Masking on the Fly. For
maintenance of your sequence sets and word lists, you should use the Vocabulary Builder Menu.
Vocabulary Masking on the Fly allows you to mask keys while you are using your Core. Masked keys mean you can
simplify a large vocabulary so that a user only has to see and learn a few words at a time. As a person gains skill,
more words can be added.
Vocabulary words and tools can be masked from sight, but when they are unmasked and become visible, they are
in their original places on the Core. This enhances motor learning and eliminates the problems caused by
transitioning from one vocabulary to another. Vocabulary Masking works only with sequences that start with Core
vocabulary icons or from the main activity row.
Note: If you want to mask words from a single-hit vocabulary, use Hide/Show Keys.

Unity – Vocabulary Masking on the Fly 154
Using Vocabulary Masking on the Fly
In most PRC devices the Vocabulary Masking on the Fly tool is in the Tools menu. Go to your Core, select the Tools
key on the front of the case, then select the Vocabulary Masking on the Fly key.
Using the Mask Keys in the Status Display Area
Go To Mask Menu
The Go To Mask Menu key opens the Vocabulary Builder Menu.
Mask Main Activity Row
The Mask Main Activity Row key masks the activity row. It does not, however, mask keys within activities. When
you are in a specific activity, you can mask/unmask those keys individually. For example, let's say you have masked
the main activity row, but you decide you want to be able to use the Yes, No, and Maybe keys in the Yes/No Word
activity.
1. Select the Yes/No Word activity to unmask it.
2. Select the Navigate key.
3. Select the Yes/No Word activity. You see the keys inside the activity.
4. Select the keys you want to mask or unmask.
Note: Keys within activities are automatically masked or unmasked when you use Mask All or Unmask All.
Mask All (Vocabulary Masking on the Fly)
The Mask All key masks all keys except “basic tool” keys such as Clear, Go Back, more, etc.

Unity – Vocabulary Masking on the Fly 155
Navigate
The Navigate key allows a masked key that you select to function the way it is supposed to. When you are in
Vocabulary Masking on the Fly you may want to navigate through pages and activities, use the Go Back or the
More Items keys, etc., without masking or unmasking keys along the way to your goal. The Navigate key allows
you to do these things. If you select the Navigate key, you will see directions that remind you which keys you can
select in order to Navigate through your Core.
Note: To exit an activity, select the Navigate key and then select the Activity key.
Example: Using Vocabulary Masking on the Fly
When you select the Vocabulary Masking on the Fly key, all your Core keys are visible; nothing is masked. Let's
change this so that only the “eat” sequence and the Clear key are visible. Start by selecting the Mask All key. All
keys are now masked except the Clear key.
Note: Basic tool keys are not automatically masked when you select the Mask All key. You must hand-select each
basic tool if you want it masked.
Unmask the “eat” sequence, using either of the following methods.
Method #1: When you know the sequence for the word you want
Select the Apple key. . Then select the Eat key. The Apple key is now unmasked.
Method #2: When you are unsure about the sequence for the word you want
1. Select the Go to Mask Menu button. In this example, all our vocabulary is currently masked. You see it listed
in the Masked Words/Phrases pane on the right.
2. Make sure “Word Order” appears below the pane. This alphabetizes your vocabulary words.
3. Now let's find the "eat" sequence, using any of these methods: Use the scroll bar to the right of the Masked
Words/Phrases pane; select Find Masked Word; or select Spell to Unmask. For this example, we’ll select Find
Masked Word.
4. The Spelling keyboard opens. Enter eat.
5. Select OK. The sequence for the word “eat” is highlighted in the Masked Words/Phrases pane on the right.

Unity – Vocabulary Masking on the Fly 156
6. We want this sequence to be visible so select Unmask.
7. “Eat” is now in the Unmasked Words/Phrases pane.
Note: If you use the Spell to Unmask key, your device will complete this step for you.
8. We are not finished setting up our masking yet, so select Return to Masking on the Fly. On the Vocabulary
Masking on the Fly screen, only the Clear key and the Apple key—the “eat” sequence apple + eat—are visible.

Unity – Vocabulary Masking on the Fly 157
Example: Adding a Sequence
The "eat" sequence contains a dynamic activity. Let's look at it.
1. Select the Apple key. The Food dynamic activity opens in the top row.
2. The activity is masked but the Go Back and More keys are visible because they are basic tools and are not
automatically masked. However, they are pretty useless right now since everything else in the activity is
masked, so let's mask those tools, too.
3. Select the Go Back key and then select the More key. They are now masked.
4. To return to where you started, select the Navigate key in the status display area and then select the masked
Go Back key. Your Core is displayed, with only Apple and Clear visible.
5. Select OK or select the text display area to exit Vocabulary Masking on the Fly. The display will appear similar
to this:
6. Select the apple key. The “eat” key appears.
7. Select the eat key.
Note: When this sequence is learned, you can use Vocabulary Masking on the Fly to add more sequences.

Essence 158
Essence
Essence is a unique language system used to represent language in your device. Within this language system there
are a variety of built-in vocabularies to choose from that you can use to communicate. The first time you turn your
device on, the Essence Welcome page will be displayed. From this page you can begin the process of setting up
Essence according to your needs.
Choose a Key Size
The first thing to do on the Essence Welcome page is to select the key size that best suits your needs.
Essence offers you five key sizes: 15, 45, 60, 84, and 144. The number indicates how many keys are on a page. A
keyboard with 60 keys on it, for example, will have larger keys than a keyboard with 84 keys on it. The smallest
keys are on the 144 keyboard.
Note: The Moving Target and Hunt keys in the upper corners of the Welcome page are linked to tests you may
want to use to determine the key size you need.

Essence 159
For now, select To Essence 60 to open a sample Essence 60-location keyboard.
Enter a few messages to see how this keyboard works for you.
You can type and speak a message on these sample keyboards. Type what you would like to say. The words appear
in the text display area. Press or select this area to hear the text spoken. Use the Clear key to clear the text display
area.
To test the other available sizes, use the following keys.
You can change the layout of the keyboard by selecting Change This Keyboard. This key
toggles between the QWERTY and ABC layouts.
The dark blue key at the top of the keyboard shows what layout the keyboard is currently set
to—“You are using: QWERTY” or “You are using: ABC”.
You can try other key sizes by selecting Return to Start and then selecting To Essence 15, To
Essence 45, To Essence 84, or To Essence 144.
When you determine that the current keyboard is the size and layout you want, choose Select
This Keyboard. This key will take you to the Directory page.
Note: To change the keyboard layout at any time, go to the Directory page, select the Tools key, select Change
Keyboard, select either Use ABC Keyboard or Use QWERTY Keyboard, and select My Keyboard to test the new
layout. To change the key size, select Return to Start from the Tools page and select the size you want.

Essence 160
The Directory Page
The Directory page gives you access to the applications in the Essence vocabulary. For now, you may choose any
key on this page to look at what's available in Essence.
To return to the Directory page from any page:
The Directory key will take you to the Directory page from any other page. The Directory key
is usually located in the lower right corner of the page.
The Close key will take you to the previous page. If you do not see the Directory key, press the
Close key as many times as necessary until you see the Directory key. The Close key is usually
located in the upper left corner of the page.
Most keyboards will have at least some of the Directory applications on them, so once your device is set-up, you
will not need to use the Directory often.
Choose an Access Method
"Access Method" means the way you use your device. You may touch the screen, scan with a switch, or select with
your eyes. There are three access methods already set up for you. You can customize your settings for many
different access methods and then save the settings so you can use them over and over.
You may want to set up more than one access method. Perhaps you use NuPoint in the morning when you are
fresh, but like to use a switch in the afternoon or evening when you begin to tire. You can save the settings for up
to three different setups.
On the Directory page, select the Tools key to open the Tools page.
From the Tools page select the Access Method Menu key. The Access Method Menu opens.
Warning! All access methods require a positioning analysis to prevent repetitive stress injuries.
Note: We recommend that you ask a clinician who is familiar with the access method you want to use to help you
set it up.

Essence 161
Change the Access Method
The current access method is shown after “Current Access Method” near the top of the menu. If the access method
shown is not the one you want, select Choose Different Access Method and select the access method you want.
Touch
You must be able to touch the keys on the screen to select them. You make direct selections on the keyboard by
pressing on the keys you want with your finger (or with the eraser end of a pencil or some “point and press”
device). You can use Touch with any screen.
Note: The touchscreen is hard plastic. Be careful not to scratch it with your pointing device.
1-Switch
Use a single switch to scan to any key on the screen. Choose to scan by rows and columns or by columns and rows.
Plug a single switch into either the Switch A or Switch B jack on your device. You can also use a Bluetooth Switch
for 1-switch scanning. See the directions that came with your Bluetooth switch.
2 Switch
Use a dual switch or two single switches to scan left, right, up and down to any key on the keyboard. Plug a dual
switch or two single switches into either switch connector on the device. You can also use a Bluetooth Switch for 2-
switch scanning. See the directions that came with your Bluetooth Switch.
NuPoint/Joystick
You can use a NuPoint module. Plug it into the NuPoint USB port on the top of your Accent device if it is not
already attached. You can also use a USB joystick. Plug the joystick into one of the USB ports. If you have a regular
joystick, you must have an adapter for it. See “The Joystick Adapter
on page 184. You may also need to plug a
switch into the adapter so you can make selections.
Eyegaze
The eyegaze tracking system attaches to your device case and plugs into the main power supply and a USB port.
See the NuEye User’s Guide that came with the unit for setup instructions.
Save Your Settings (Essence)
Once you have selected your access method, select the options you want to change. When the settings are the
way you want, select OK. The Tools page is again displayed. From here you can save your settings so you can recall
them at any time.
Select Save Settings #1, Save Settings #2, or Save Settings #3 to save the current device settings to the
corresponding settings file. For example, if you select Save Settings #1, a yellow message box will ask “Are you
sure you want to save your current settings under Settings #1?” Select Yes to save the settings.
After you save settings, you can recall them at any time by selecting Use Settings #1, Use Settings #2, or Use
Settings #3.
Note: You can save different settings with each of the three settings keys. For example, Save Settings #1 and Use
Settings #1 could be for eyegaze, while Save Settings #2 and Use Settings #2 could be for switch scanning. This way
you could quickly switch between access methods or other settings.
Choose a Voice
You can choose the voice you want to use. From the Directory page, select the Tools key. From the Tools page,
select the Speech Menu key. From the Tools page you can also turn speech on and off. The Speech Menu shows
the current voice and allows you to change voice settings.

Essence 162
Essence – Word Prediction
Word prediction systems help improve a person’s ability to communicate by reducing the amount of time spent in
spelling out words. The PRC Word Prediction system predicts words based on how often (frequency) or how
recently (recency) you have used the word.
1. Open the spelling keyboard in your Essence vocabulary.
2. From the keyboard page, select the Tools key to display tools on the keyboard page.
3. Select the Word Prediction key to turn word prediction on.
4. Begin to spell "Tell me about it." Notice the words that appear in the Word Prediction window. These words
will change every time you type a letter.
5. If you see the word you want, select it. In this example, selecting “about” will insert “about” after “me”.
Note: If you don’t see the word you want, select the arrow that follows the last word in the window to see
more words.
Note: The Word Prediction Menu is available by selecting the Tools key from the Directory page and
selecting Word Prediction Menu from the Tools page.
Note: From the Tools page you can also turn word prediction on and off.
Essence – Add a Word to the Word Prediction Dictionary
This option allows you to add words to the dictionary.
1. Select Add a Word and type the word you want to add.
2. Select OK.
3. The word is added.
Note: To learn about Abbreviation Expansion and other Word Predication Menu options, go to
The Word
Prediction Menu Options.

Essence 163
Essence – Feedback Menu
The Feedback Menu options give you information about what your device is doing and sometimes about what you
are doing on the device. Go to the Toolbox and select Feedback Menu.
Earphone Volume
To prevent possible hearing damage, do not listen to earphones at high volume levels for long periods.
If you have earphones plugged in, use this option to change the volume level.
Backlight Intensity
Select the Up or Down option keys. The highest intensity is 6; the lowest is 0. The intensity of the backlight
changes as you change the setting so that you can see the difference.
Activation Beep; Scan Beep
By default, these options are turned on. If you do not want to hear a beep, select Off.
Picture Message Label
Top
The label on your key will be at the top of the key. This is the default.
Bottom
The label on your key will be at the bottom of the key.
Speak When Spelling
When this option is turned on, your device speaks each letter as you spell it and then speaks the entire word. You
can select to turn this option off.
Bass; Treble
Use these options to adjust the bass and treble levels.
Text Size
Select the size of text you want.
Background and Text Colors
When you select this key, three additional keys are displayed: Workspace Background and Text Colors, Notebook
Background and Text Color, and Marked Text Background and Text Colors. These three keys allow you to choose
custom colors for your workspace (the text display area when you are not in a notebook), notebooks, and
highlighted text.
Raspberries
Raspberries controls the error beep. You will hear it if you try to do something your device does not allow you to
do. You can turn this option on or off.
External Speaker
If you have amplified stereo speakers plugged into your device, turn this option on.

Essence 164
Bluetooth Speaker Menu
The Bluetooth Speaker Menu allows you to pair (connect) your device with another Bluetooth device, pair
Bluetooth speakers with your device, disconnect pairing, and turn the Bluetooth beep on or off. When you select,
the following options are displayed: Paired Devices, Pair to Speaker, Disconnect, Bluetooth Beep Output.
If you select: This will happen:
Paired Devices
The key will show you the Bluetooth speakers you have been paired to,
up to a maximum of 16 devices. If you disconnect from a speaker and
then later decide you want to use it again, you can select this key and
select the speaker you want from the menu. The device will re-connect
to the speaker automatically.
Note: If the connection between your device and your Bluetooth
speaker is lost because you moved out of range, the device will re-
connect automatically once you move back into range.
Pair to Speaker
You can pair your device with a Bluetooth speaker.
1. With the Bluetooth Speaker Menu open, turn your speaker on and
hold down the "pair" button on your speaker.
2. In the Bluetooth Speaker Menu, select the Pair with Speaker key.
3. When the connecting light on your speaker begins to flash, release
the "pair" button.
4. You may see a "Please Wait" box on your screen. In a few seconds
you will see the name of your Bluetooth speaker in the Bluetooth
Status box in the menu. You are now paired with your speaker.
Disconnect
You will disconnect from your Bluetooth speaker.
Bluetooth Beep
Output
A listener will be able to hear the beeps that occur as you make
selections on your device. When this option is turned off, no beeps will
be heard as you make selections.
Skin Options
The device "skin" is the way your display looks—the vocabulary pages, menus, and message boxes. When you
select Skin Options, the following options are displayed.
If you select: This will happen:
Enhanced Icons
Fancier icons will be displayed. You can turn these icons on or off with
either skin.
Display Skin You can select Classic, Skin 1, and Skin 2. The default is Classic.
Key Visual
Feedback
You can select Off or On. Off shows you your keys as you are used to
seeing them. On inverts the key colors.
Copy these
settings to all
areas
You can copy your skin changes to all the user areas in your device.
Text Area Options
Selecting this key displays two options: Change Text Area Function and Speak Recorded Messages.
If you select: This will happen:
Change Text Area
Function
Your spelling keyboard will be displayed with the tool «SPEAK DISPLAY»
appearing in the text display area. You can change the tool by selecting
Insert Tool and then selecting the tool or tools you want.
Speak Recorded
Messages
Recorded messages that appear in the text display area will be spoken.

Essence 165
Essence – Auditory Prompt Menu
Auditory prompts can help you learn where keys are located in your vocabulary. Go to the Toolbox and select
Auditory Prompt Menu.
Essence – User Area Menu
Your device has six user areas. You can change and switch areas and perform other tasks in the User Area Menu.
To switch user areas:
1. Go to the Toolbox and select User Area Menu. The text display area shows you the user area and
vocabulary you are using.
2. Select the Switch User Area key. The six user areas are listed. The current area shows “(Current Area)” on
the key.
3. To switch from one user area to the other, simply select the user area key you want. Settings for the new
user area will be displayed.
4. Change settings as needed and click OK. If you don’t need to make any changes, select Cancel instead.
Spelling Keyboard
When you set up your device, you selected a key size and a keyboard. That keyboard is your Spelling keyboard.
If you want to change your keyboard, go to the Directory page, select the Tools key, and select the Change
Keyboard key.

Appendices 166
Appendices
These appendices contain reference information on the Unity Modify Scan Pattern and Mid-Sequence Category
options; the Essence Modify Scan Pattern option; pagelets; descriptions of all the insertable tools; RealSpeak™ and
DECtalk™ speech tips; and troubleshooting.
Unity – Modify Scan Pattern
Modify Scan Pattern is an option when you are creating or modifying Core or pages. As well as being able to use
“regular” scan patterns, the software allows you to create your own scan pattern based on user-definable blocks.
This customized block scanning allows you to scan any keys in any order, and even have different patterns for
individual pages.
Custom scanning is a good tool to use with visual scene pages. Let’s look in detail at one example. We will use the
1 Switch Auto Scan, Row/Column access method. If you are not set up for this, do the following:
1. Go to the Toolbox and select Access Method Menu.
2. Select Choose Different Access Method.
3. Select 1 Switch, select 1 Switch Auto Scan, Row/Column, and select OK.
4. Go to your Core and select the Pages key , select the Books key , and select the Goldilocks key .
5. Select the Tools key and then Setup Key.
6. Select any key. (If you have a USB mouse plugged into your device, right-click and select Setup.)
7. Select the Modify Scan Pattern key.
The top left quarter of the page shows the Preview screen. When you select Preview at the bottom left, you’ll see
a real-time preview of what the current scan looks like. Just below the preview is a box that shows each step in a
scan pattern.
In this example, the first scan starts at Row 1 Column 1 and highlights a single row and 10 columns. The next step is
to move to Row 2 Column 1 and highlight one row and 10 columns. This happens all the way through to Row 6.
This is a typical single switch row/column scan pattern. We are going to change it to suit our page.
1. Select the Make New Scan Pattern key from the menu.
2. To start our custom scan, select the Goldilocks key.
3. We want this to be a single scan, not a block scan, so select the Goldilocks key again. The Goldilocks key is
now outlined in red. This will be your first scan.
4. Now select the top left corner key in the scene. Then select the bottom right corner key in the scene. The
scene is now outlined in red and will be your second scan.

Appendices 167
5. Select each of the three story keys on the far right side of the page. Make each one an individual scan. That is,
select each story key twice.
6. Next, select the Next Page key twice.
7. Select the Go Back key twice.
8. Select the text display area to return to the Modify Page Scan menu.
9. Select the Preview key to see how your scan works. Notice that the scan box now names the rows and
columns you have selected.
10. If you want to change the order of the scans (rows/columns), you can use the up and down arrows to move
between scan blocks, then the Move Up and Move Down keys to determine which block goes where. The
scan starts from the top of the list and goes down.
11. When you are happy with your scan, select OK to exit the menu.
Modify Scan Patterns Menu
Our example was the easiest and fastest way to create a custom scan. But you can always use the Access Method
Menu to get to the first page of the Modify Scan Patterns menu. From there you select the kind of scan you want
to make.
If you select the Modify Page Scan Pattern option, you will be asked to select the page you want.
Use Default Scan Pattern Everywhere allows you to set all pages and your Core to the same pattern. You can use
the pre-set default scan or you can modify the default scan to your own liking and then use it everywhere.
Other Scan Pattern Menu Options
Copy Pattern From Another Page
Another way of setting up a scan pattern is to use the Copy Pattern From Another Page key to copy one from
another page. This allows you to use a specific pattern over and over again. When you select this key, a list of
pages will be displayed. Select the page you want to copy the scan from. It will be displayed in the preview area.
Scan Pattern Order
Another way to modify the scan pattern is to set the order in which the keys, text display area, and word
prediction window are scanned.
Select the order with the three toggle keys—Scan Keys, Scan Word Pred. List and Scan Text Area—and Scan User
Keys. The settings are interdependent. For example, if you changed Scan Keys to Second, Scan Word Pred. List
would change to First.
Using the default settings, the scan will highlight the Core and activity keys first, stepping through each assigned
block; then it will highlight the word prediction window and, if selected, scan through the word list; next it
highlights the text window, which speaks any text if selected. Last, it will scan the user-defined keys if that option is
turned on.
Appendices 168
Add Scan Block(s)
One of the more powerful uses of customizable block scanning is with scenes. Because each scene is likely to
contain different key elements in a variety of positions, you might want to scan each specific element rather than
use a regular row/column approach.
For example, you can create a scan pattern that highlights individual items. You can then scan through each item in
turn, or change the scan order by using the list.
Remember, each block here corresponds to an item: Row 3, Column 1 – 2 Rows, 3 Columns is “barn,” Row 5,
Column 2 – 2 Rows, 1 Column is “farmer,” and so on.
Scanning Block Within Blocks
One other feature of the customizable block scan is that you can also scan blocks within blocks. The scan will
outline each block in turn so when one is highlighted, you can speak that block, but when another is highlighted,
you can speak that block.
Treat Block As...
There is one more feature to point out and that is the option to treat a scannable block as either a block or a key.
The difference is based on what exactly a “block” is. Technically, it is a group of keys that can be scanned as a
whole but then scanned, key by key, within the block. So if you have defined a block, your scan will highlight it as
such, but when you hit your switch to select, the scan will operate as row/column, column/row, or linear within
the block, depending on your scan setting.
You can also use the following setting:
The default of Block means that if you select the block, you can scan within it to specific keys. If you switch to
Single Key, when you select the block, it will act as a large, single key and will do whatever is stored in the top-right
location. This is how we can scan blocks within blocks in scenes.
Delete Current Block
You can delete a block by selecting the Delete Current Block option.

Appendices 169
Unity – Mid-Sequence Category
This feature allows you to label keys within a sequence. Although it is called Mid-Sequence Category, you can use
it in sequences of any length. Let’s look at a specific example using Unity 144.
All food vocabulary starts with the icon and a second Core icon represents a sub-category. So, the following
examples show five categories of food.
FRUIT
SEAFOOD
MEAT
Using Mid-Sequence Category, it is possible to add a label to the second icon in the sequence.
You can also add a category label to the first icon of a sequence.
FOOD
FRUIT
FRUIT
FOOD
SEAFOOD
SEAFOOD
FOOD
MEAT
MEAT
Finally, the Mid-Sequence Category feature lets you change the icon.
FOOD
FRUIT
FRUIT
FOOD
SEAFOOD
SEAFOOD
FOOD
MEAT
MEAT
FRUIT
FRUIT
SEAFOOD
SEAFOOD
MEAT
MEAT

Appendices 170
Storing a Mid-Sequence Category
This feature is just a special type of Store operation. You use it by using the Mid Seq Category key instead of a
Store key. This means that the first thing you have to do is make sure you have the Mid Seq Category tool assigned
to a key or sequence on your Core. Once you have assigned it, here is the procedure for storing FRUIT in the APPLE
+ FLOWERS + ICON set.
1. Select your Mid Seq Category key.
2. The prompt Enter a partial sequence appears.
3. Select the keys to get to the one you want to label – in this case APPLE + FLOWERS.
4. Select OK at the top of the page.
5. You see the prompt Modify key as needed, then select OK, and the actual key;
6. Select Change Label, type FRUIT, then hit the OK button.
7. Select the OK button at the bottom of the page and the operation is complete.
Essence – Modify Scan Pattern
Modify Scan Pattern is an option in the Access Method Menu when you select a scanning method, and it's an
option on the storing page when you are creating or modifying pages.
This option allows you to create your own scan pattern based on user-definable blocks. This means you can scan
any keys in any order, and even have different patterns for individual pages.
Custom scanning is a good tool to use with visual scene pages. Let’s look in detail at one example.
We will use the 1 Switch Auto Scan, Row/Column access method. If you are not set up for this, do the following:
1. Go to the Toolbox and select Access Method Menu.
2. Select Choose Different Access Method.
3. Select 1 Switch.
4. Select 1 Switch Auto Scan, Row/Column.
5. Select OK.
6. Now go to your Directory or your Spelling keyboard and select the Pictures key.
7. Select the My Pets key.
8. Select Tools and then select Setup Key.
9. Select any key. (If you have a USB mouse plugged into your device, right-click and select Setup.)
10. Select the Modify Scan Pattern key.
The top left quarter of the page shows the Preview screen. When you hit the button marked Preview at the
bottom left, you’ll see a real-time preview of what the current scan looks like.

Appendices 171
Just below the preview is a box that shows each step in a scan pattern.
In this instance, the first scan starts at Row 1 Column 1 and highlights a single row and 10 columns. The next step is
to move to Row 2 Column 1 and highlight one row and 10 columns. This happens all the way through to Row 6.
This is a typical single switch row/column scan pattern. We are going to change it to suit our page.
1. Select the Make New Scan Pattern key from the menu.
2. Select the Close key.
3. We want this to be a single scan, not a block scan, so select the Close key again. The Close key is now outlined
in red. This will be your first scan.
4. Select the top left key in the scene picture. Then select the bottom right corner in the scene picture. The scene
is now outlined in red and will be your second scan.
5. Select each of the three Page keys on the far right, starting at Page 2 (we are already on Page1). Make each
one an individual scan. That is, select each key twice.
6. Continue to select keys.
7. Finally, select Clear twice to make a single scan key.
8. Select the text display area to return to the Modify Page Scan Pattern menu.
9. Select the Preview key to see how your scan works. The scan box now names the rows and columns you have
selected.
10. If you want to change the order of the scans (rows/columns), you can use the up and down arrows to move
between scan blocks, then the Move Up and Move Down keys to determine which block goes where. The
scan starts from the top of the list and goes down.
11. When you are happy with the scan, select OK to exit.
This is the easiest way to create a scan, but there are still some other options left that you can use.

Appendices 172
Other Options for Modifying a Scan
Scan Pattern Order (Essence)
Another way to modify the scan pattern is to set the order in which the keys, text display area, and word
prediction window are scanned.
Select the order with the toggle keys Scan Keys, Scan Word Pred. List, Scan Text Area, and Scan User Keys. The
settings are interdependent so if you change Scan Keys to Fourth, Scan Word Pred. List would change to First.
In the default, the scan will highlight the page keys first, stepping through each assigned block; then it highlights
the word prediction window and, if selected, scans through the word list; next it highlights the text window, which
speaks any text if selected. Last, it will scan the user-defined keys.
Add Scan Block(s) (Essence)
One of the more powerful uses of customizable block scanning is with scenes. Because each scene is likely to
contain different key elements in a variety of positions, you might want to scan each specific element rather than
use a regular row/column approach. For example, you can create a scan pattern that highlights individual items.
You can now scan through each item in turn, or change the scan order by using the list.
Remember, each block here corresponds to an item.
Scanning Block Within Blocks (Essence)
Another feature of the customizable block scan—you can also scan blocks within blocks. Previously scanned items
are outlined as before, but you can add another block that covers the block and includes the previously defined
items.
Treat Block As (Essence)
There is one more feature to point out—the option to treat a scannable block as either a block or a key. A block is
a group of keys that can be scanned as a whole but then scanned, key by key, within the block. Your scan will
highlight the block, but when you hit your switch to select, the scan will operate as row/column, column/row, or
linear within the block, depending on your scan setting.
If you have defined a block of letters like this:

Appendices 173
Your scan will highlight it as such, but when you hit your switch to select, the scan will operate as row/column,
column/row, or linear within the block, depending on your scan setting.
You can also use the following setting:
The default of Block means that if you select the block, you can scan within it to specific keys. If you switch to
Single Key, when you select the block, it will act as a large, single key and will do whatever is stored in the top-right
location. This is how we can scan blocks within blocks in scenes.
Delete Current Block (Essence)
You can delete a block by selecting the Delete Current Block option.
You can also use the Access Method Menu to go to the first page of the Modify Scan Pattern menu. From there
you select the kind of scan you want to make: Core (Home), Default, or Page.
If you select Modify Home Scan Pattern, this will take you to your Home page (default is the Directory or you may
have set a new Home page.)
If you select the Modify Page Scan Pattern option, you will be asked to select the page you want.
The Use Default Scan Everywhere option allows you to set all pages to the same pattern. You can use the pre-set
default scan or you can modify the default scan to your own liking and then use it everywhere.
Pagelets
Sometimes, when setting up special pages on a device, you may find yourself copying a particular page over and
over again just to change a few icons on that page. What if you could simply change some keys on a page
temporarily and then go back to your original page? In essence, that’s what pagelets do. A pagelet replaces a small
number of keys on a parent page by allowing a small group of keys to “sit on top” of the parent page. This makes it
easier to set up page functions.
What you do is set up the keys you want to see, then use Hide Keys to hide all the blank keys you don’t want to see.
When you then link to this pagelet, only the unhidden keys are seen; the hidden keys become transparent and you
can “see” through to the underlying parent page keys. Everything else stays the same except for the pagelet keys.

Appendices 174
Insertable Tools List (IT)
Depending on the device you are using, some of these tools may not be available to you. To store any of these
tools in your vocabulary, you must be in a storing menu. Select the Spell Message or Define Key Function key,
then select Insert Tool on your storing keyboard. The All Tools List will appear and you can select the tool(s) you
want to insert.
ABBREVIATION EXPANSION OFF
(IT)
Turns abbreviation expansion off
ABBREVIATION EXPANSION ON
(IT)
Turns abbreviation expansion on
ABBREVIATION EXPANSION ON/OFF
(IT)
Toggles abbreviation expansion on and off
ACCESS METHOD MENU
(IT)
Allows you to select the method you want to use to control your device and the options you want to use with
the method
ACTIVATE KEY
(IT)
Tells your device to select a particular key. This tool is usually used as part of a NuVoice macro.
ACTIVITY LINK
(IT)
Allows you to add an activity link
ADL MARKER
(IT)
The Automatic Data Logging tool can be assigned to a key that normally would not be logged as an activation
by data logging. For example, if a user selects Clear Display, this action is not logged by data logging. The
clinician can add the ADL Marker tool to the Clear Display key assignment, "<ADL MARKER>clear display", and
data logging will show "clear display" when that key is selected.
ALARM
(IT)
Allows you to store the Alarm wherever you want it
ALERT SIGNAL
(IT)
Emits a series of tones designed to get someone's attention
APPLY SETTING
(IT)
Allows you to store one or more settings on a key; for example, store color schemes without using the Settings
menu
ARROW DOWN
(IT)
Stores the Down arrow
ARROW LEFT
(IT)
Stores the Left arrow
ARROW RIGHT
(IT)
Stores the Right arrow
ARROW UP
(IT)
Stores the Up arrow
ASSIGN ACTIVITY KEYS
(IT)
Allows you to assign a tool in an activity row
ASSIGN CORE KEYS
(IT)
Allows you to assign one or more tools and text to a key in your vocabulary

Appendices 175
AUDITORY PROMPT MENU (IT)
Allows you to have the entire Auditory Prompts Menu assigned to a key or sequence
AUDITORY PROMPTS OFF
(IT)
Turns auditory prompts off
AUDITORY PROMPTS ON
(IT)
Turns auditory prompts on
AUDITORY PROMPTS ON/OFF
(IT)
Turns auditory prompts on or off or toggles between the two actions
BACKLIGHT INTENSITY DOWN
(IT)
Turns the backlight down
BACKLIGHT INTENSITY UP
(IT)
Allows you turn the backlight intensity up
BEEP OFF
(IT)
Turns the activation beep off
BEEP ON
(IT)
Turns the activation beep on
BEEP ON/OFF
(IT)
Turns the feedback beep on or off or toggles between the two actions
BLOCK MARK
(IT)
Allows you to highlight a block of text
BROWSE ICONS
(IT)
Acts as a "read-only" icon browser and allows you to look at the icons that are available in your system rather
than having to start a storing procedure and then use Change Icon. When you select an icon in the Icon
Browser, your device will speak the icon's name.
CALIBRATE EYEGAZE
(IT)
Stores calibrate eyegaze in an icon sequence or assigns it to a key to calibrate the eyegaze system
CAMERA MENU
(IT)
Stores the entire Camera Menu under a key or sequence
CAMERA OFF
(IT)
Turns the rear-facing camera off
CAMERA ON
(IT)
Turns the rear-facing camera on
CAMERA ON/OFF
(IT)
Allows you to toggle the rear-facing camera on or off
CANCEL
(IT)
Allows you to cancel an action. You would most likely use this tool when you are creating work pages.
CAPS LOCK
(IT)
Allows you to type using all capital letters. Select it again to turn Caps Lock off. When Caps Lock is in use, the
"Caps" box in the status area turns green.
CAPS OFF
(IT)
Turns Caps Lock off. This can be assigned as a separate key.
CAPS ON
(IT)
Turns Caps Lock on. This can be assigned as a separate key.

Appendices 176
CC HP MODE OFF (IT)
Turns CCHP Mode off on a NuPoint module. See CCHP Mode On.
CC HP MODE ON
(IT)
Turns CCHP Mode on and manually centers NuPoint at its current position and does not allow for adjustments
by moving off the sides of the device
CHOOSE ACTIVITY
(IT)
Cycles through available activities in the activity row or resets the open activity to the main activity row
CLEAR DISPLAY
(IT)
Removes all text and prompts from the display and text buffer
CLICK MAGNIFY OFF
(IT)
Turns the magnification off
CLICK MAGNIFY ON
(IT)
Turns magnification on
CLICK MAGNIFY ON/OFF
(IT)
Turns the magnification on or off as a toggle key
CLOCK MENU
(IT)
Allows you to set the time and date, which are then displayed in the status area
CLOSE ACTIVITY
(IT)
Allows you to get out of a dynamic activity when Persistence is set to Permanent and returns you to original
activity. In Unity vocabularies this function is part of the Go Back key.
CLOSE NOTEBOOK
(IT)
Allows you to close and open a notebook without going to the Notebook Menu
CLOSE PAGELET
(IT)
Allows you to close a pagelet you are using
COPY BLOCK
(IT)
Allows you to copy a block of highlighted text and paste it into another location or application
CREATE ACTIVITY
(IT)
Allows you to create an activity for your activity row
CREATE PAGE
(IT)
Allows you to create a page
CUT BLOCK
(IT)
Allows you to cut a block of highlighted text to paste into another location or application
DELAY
(IT)
Allows you to insert a delay in a NuVoice macro and set the delay value
DELETE CHARACTER
(IT)
Removes the character to the left of the cursor
DELETE ICON
(IT)
Deletes the last icon you selected. You can select a new icon or re-select the deleted one if you want.
DELETE LAST SELECTION
(IT)
Removes any text that you brought up on the display when you selected your last (previous) selection. If the
previous selection was a tool, Delete Last Selection does nothing.
DELETE PAGE
(IT)
Allows you to delete any page you have created

Appendices 177
DELETE WORD (IT)
Removes the word or group of letters to the left of the cursor up to the next space or punctuation mark. If the
character to the left of the cursor is a space, Delete Word removes the space.
DISABLE POINTER
(IT)
Allows you to pause/stop making selections with a mouse or eyegaze. Select this tool again to re-enable your
mouse or eyegaze system.
DISPLAY MESSAGE
(IT)
Allows you to create a message and insert it on a key. Any time the user selects that key, the message appears
in the text display area.
DYNAMIC ACTIVITY MENU
(IT)
Allows you to add a dynamic activity, delete a dynamic activity, and review all dynamic activities
EAR VOLUME DOWN
(IT)
Turns earphone volume down
EAR VOLUME UP
(IT)
Turns earphone volume up
EDIT CORE
(IT)
Allows you to edit core vocabulary sequences
EDIT MENU
(IT)
Allows you to cut, copy, edit, and replace text in your document
EDIT MODE
(IT)
Allows you to move through text by sentence, word, or character
END
(IT)
Moves the cursor to the end of the current line or page
ERASE CORE
(IT)
Erases sequences stored in your core vocabulary
EXIT THEME
(IT)
By itself, exits a theme temporarily; insert it twice to permanently exit a theme
EYEGAZE TRACK STATUS
(IT)
Turns the NuEye Track Status Box off or on
FEEDBACK MENU
(IT)
Allows you to change the feedback your device gives you
FILE ORGNIZER
(IT)
Allows you to move files from one memory storage device to another and move files to different folders on a
storage device
FIND AND REPLACE
(IT)
Allows you to find and replace a word
GO BACK PAGE
(IT)
Allows you to return to the previous page
GO BACK PAGE HERE
(IT)
Allows you to return to a specific page
GOTO HOME
(IT)
Takes you from the screen you are currently using to your Home page

Appendices 178
GOTO SPELL (IT)
Takes you from the screen you are currently using to the Spelling keyboard
GOTO TOOLBOX
(IT)
Takes you from the screen you are currently using to the Toolbox screen
HIDE/SHOW NOTEBOOK
(IT)
Allows you to hide the notebook you are working in and retrieve it later
HIDE/SHOW NUVOICE
(IT)
Allows you to hide NuVoice and reopen it later
HOME
(IT)
Moves the cursor to the beginning of the current line or page
ICON TUTOR
(IT)
Helps you locate sequences where specific words are used
INSERT DATE
(IT)
Allows you to insert the current date into a notebook, etc. Assign this tool to a key or under a sequence.
INSERT TIME
(IT)
Allows you to insert the current time into a notebook, etc. Assign this tool to a key or under a sequence.
INSERT TOOL
(IT)
Allows you to store tools or text and tools under icon sequences or assign them to keys. Select this tool before
each tool that you want to store. Then select the tool you want to store.
LANGUAGE
(IT)
Allows you to set the device setup language
LOAD SEQUENCE SET
(IT)
Use this tool with Vocabulary Builder to load sequence sets
MAINT MENU
(IT)
Allows you to rest your device, change language systems, lock your device, update software, check your
battery status, etc.
MERGE SEQUENCE SET
(IT)
Use this tool with Vocabulary Builder to merge sequence sets
MID SEQ CATEGORY
(IT)
Allows you label keys within a sequence
MODIFY ACTIVITY
(IT)
Allows you to make changes to an activity that has already been created
MODIFY PAGE
(IT)
Allows you to make changes to a page that has already been created
MORE ITEMS
(IT)
Allows you to access more items in an activity
NOTEBOOK MENU
(IT)
Allows you to access all the Notebook Menu options
OK
(IT)
Tells your device to save what you have done and return to the previous page. You will probably need this key
on any activities or pages you set up.
OPEN NOTEBOOK
(IT)
Allows you to open a notebook from a list of your notebooks

Appendices 179
PAGE DOWN (IT)
Moves the cursor down one page
PAGE LINK
(IT)
Allows you to insert a page link
PAGE MENU
(IT)
Gives you access to any pages you have created
PAGE UP
(IT)
Moves the cursor up one page
PASTE BLOCK
(IT)
Allows you to paste a block of copied or cut text into a location or application
PHONE DIAL NUMBER
(IT)
Allows you to create a "phone book" page of frequently called numbers. Store this tool under a key or sequence.
PHONE DIAL PAD
(IT)
Allows you to dial and receive calls, use text messaging, etc. This dial pad applies to the phone card option.
This is the most complete of the phone tools.
PHONE SEND TEXT MESSAGE
(IT)
Allows you to send text messages to other phones without using the dial pad
PHONE SEND/END
(IT)
Allows you to answer and end calls without using the dial pad. You cannot dial a call. Store this tool under a
key or sequence.
PHONE TEXT MESSAGES
(IT)
Allows you to view a menu of your text messages without using the dial pad
PLURAL
(IT)
When you select this tool, the word to the left of the cursor will be made plural.
PRINT NOTEBOOK
(IT)
Allows you to print a notebook from your vocabulary
PROMPT MARKER
(IT)
For use with Category Prompts: If a stored message is too long or otherwise inappropriate for a prompt, scroll
to the end of the message, select Insert Tool, select Prompt Marker, and type the text you want to use for a
prompt. The prompt is spoken but not displayed on the screen or added to the regular stored text.
PRONUNCIATION DICTIONARY
(IT)
Allows you to enter words into a pronunciation dictionary so that your device will pronounce them correctly
REVIEW VOCAB MENU
(IT)
Allows you to review all the vocabulary in your device. You can print it out or see it on the display.
SAVE CHANGES
(IT)
Allows you to save changes without turning your device off. You might want to store this tool if you are setting
up a lot of vocabulary pages and want to save your work periodically.
SAVE NOTEBOOK
(IT)
Allows you to save the notebook you are currently using
SCAN WORD LIST
(IT)
Select this key each time you want to scan the words in the Word Prediction list. When you do not select this
key, the scan will skip over the list.

Appendices 180
SCROLL KEYS (IT)
When your vocabulary is minimized, this tool allows you to scroll through it so that you can access all the keys
in it.
SET 1 ICON THEME
(IT)
Sets a 1 Icon theme when you are storing
SET 2 ICON THEME
(IT)
Sets a 2 icon theme when you are storing
SET ACTIVITY
(IT)
Allows you to go to a specific activity
SET HOME PAGE
(IT)
Allows you to set a page as your home page
SET PAGE
(IT)
Allows you to go to a specific page and stay there for more than one activation
SET PAGE TEMPORARY
(IT)
Takes you to a specific page for one selection and then returns you to where you were. This tool can be added
to Core vocabulary, activities, or pages.
SET PAGELET
(IT)
Links to a pagelet you have made
SET PAGELET TEMPORARY
(IT)
Takes you to a specific pagelet for one selection and then returns you to where you were
SET THEME HERE
(IT)
When you are part way through a sequence and select this tool, it sets a theme at that point in the sequence.
Assign this tool to a key.
SET USER SPELL PAGE
(IT)
Allows you to set the spell page you want to use
SETTINGS 1
(IT)
Recalls a group of previously saved settings
SETTINGS 2
(IT)
Recalls another group of previously saved settings
SETTINGS 3
(IT)
Recalls a third group of previously saved settings
SETTINGS MENU
(IT)
Allows you to save settings and change between settings. Use this tool with Settings 1, Settings 2, and Settings 3.
SETUP KEY
(IT)
Allows you to modify/assign keys without going to the Toolbox. Press the Tools key on the case to see this tool.
SHIFT
(IT)
When this is set, the next character you select will be an uppercase letter. The second character you select will
be in lowercase. When you select Shift, the "Shift" box in the status area will turn on.
SHUTDOWN
(IT)
Completely shuts down your device. When you use this tool, it will take your device longer to boot up when
you press the power button.
SLEEP
(IT)
Puts your device in “sleep” mode. Activate a key or switch to wake the device back up.

Appendices 181
SMART PUNCTUATION (IT)
Allows you to insert a punctuation key that already has all the "smart" instructions. You don't need to create
the instructions.
SPEAK ALL
(IT)
Instructs your device to speak all of the text in the text area of the display and in the buffer. (When you type,
letters and words will move off the screen to make room for new letters and words. Words that are no longer
on the screen will have moved to the "text buffer." You can use the arrow keys to bring them back onto the
display screen.) Clearing the display or turning the device off clears the buffer. This tool works whether speech
is turned on or off.
SPEAK DATE
(IT)
Instructs your device to speak the current date if the date and time have been set in the Clock Menu
SPEAK DISPLAY
(IT)
Instructs your device to speak everything that is visible in the text display area. This tool works whether
speech is turned on or off.
SPEAK LAST SELECTION
(IT)
Instructs your device to speak the last stored message you selected or the last spelling characters you put on
the display. This is helpful if you need to repeat yourself so that someone listening can understand you better,
or to get someone's attention. This tool works whether speech is turned on or off.
SPEAK NEXT SENTENCE
(IT)
Use this tool to speak the next sentence when you want to control the speech pace. It tells your device to
speak a sentence and then wait until you have selected Speak Next Sentence before continuing and speaking
the next sentence.
SPEAK NOTEBOOK
(IT)
Select this tool when you have a notebook open that you want spoken all at once. Your device will begin at the
beginning and continue on to the end.
SPEAK SENTENCE
(IT)
Instructs your device to speak the message that contains the cursor. This is helpful if you want to hear how
something you are working on sounds before you store it. It is also useful if you are going to give a speech or
presentation. People seem to understand synthesized speech better when they hear it one sentence at a time
until they are used to listening to it. This tool works whether speech is turned on or off.
SPEAK TIME
(IT)
Instructs your device to speak the time if the current date and time have been set in the Clock Menu
SPEAK WORD
(IT)
Instructs your device to speak the last word you typed on your Spelling keyboard, or the last word you brought
up in Minspeak
®
mode. If you are typing you can turn speech off (so you don't have to listen to your device
speak each letter) and type the word. Then you can select this key and the word you typed will be spoken.
SPEAKER VOLUME DOWN
(IT)
Turns your device’s internal speaker volume down
SPEAKER VOLUME UP
(IT)
Turns your device’s internal speaker volume up
SPEECH MARKER
(IT)
Marks the beginning of text in a sequence that is to be spoken but not displayed
SPEECH MENU
(IT)
Allows you to insert the Speech Menu in a NuVoice macro
SPEECH OFF
(IT)
Turns speech off in your device. Nothing will be spoken unless you select one of the “Speak” tools.

Appendices 182
SPEECH ON (IT)
Turns speech on in your device. Any messages you select or letters you type will be spoken. When speech is
turned on, the Speech indicator in the status area illuminates.
SPEECH ON/OFF
(IT)
Toggles speech on and off
SPELL HOME
(IT)
Toggles between your Core or Home page and your Spelling page
START SCAN
(IT)
Allows you to start a scan manually (e.g., if you have turned Auto-Scan off)
STORE CORE
(IT)
Allows you to store core vocabulary messages under icon sequences
STORE TEXT AREA
(IT)
Allows you to store text in the text display area directly to a key
SWAP CORE KEYS
(IT)
Allows you to swap Core vocabulary keys
SWAP PAGE KEYS
(IT)
Allows you to swap keys on any pages you use
SWITCH USER AREA
(IT)
Allows you to switch back and forth between user areas. Assign to a key or a sequence.
TEXT MARKER
(IT)
Marks the beginning of text in a sequence that is to be displayed but not spoken
TEXT SPEECH MARKER
(IT)
Marks the end of the text in a sequence where a Speech Marker and/or Text Marker has been used. Any text
that comes after the Text and Speech Marker will be both displayed and spoken.
TRANSFER MEMORY MENU
(IT)
Allows you to save the device's memory, transfer memory from one device to another, and import graphics
UNDO
(IT)
Performs the same functions as the Undo Text button in the Edit menu on the QWERTY Spelling page; deletes
the last thing you did for up to 20 text changes
USER AREA MENU
(IT)
Gives you access to the menu's options from a key or icon sequence
VOCABULARY BUILDER MENU
(IT)
Gives you access to Vocabulary Builder from a key or icon sequence
VOCABULARY BUILDER OFF
(IT)
Turns Vocabulary Builder off
VOCABULARY BUILDER ON
(IT)
Turns Vocabulary Builder on
VOCABULARY BUILDER ON/OFF
(IT)
Allows you to toggle Vocabulary Builder on and off
VOCABULARY MASKING ON THE FLY
(IT)
Gives you access to the Vocabulary Masking on the Fly options
VOICE CLEAR TEMPORARY
(IT)
Allows you to switch back to the original voice after using Voice Set Temporary

Appendices 183
VOICE SET TEMPORARY (IT)
Allows you to switch to a different voice temporarily. To switch back to the original voice, use Voice Clear
Temporary.
WAIT ANY KEY
(IT)
Pauses a NuVoice macro until a key is selected
WORD PREDICTION KEY
(IT)
Allows you to assign the word prediction function to a specific key
WORD PREDICTION KEYS OFF
(IT)
Allows you to turn word prediction keys on
WORD PREDICTION KEYS ON
(IT)
Allows you to turn word prediction keys off
WORD PREDICTION KEYS ON/OFF
(IT)
Allows you to toggle word prediction keys on and off
WORD PREDICTION MENU
(IT)
Allows you to turn word prediction on and off, add words to the word prediction dictionary, delete words, etc.
WORD PREDICTION OFF
(IT)
Turns word prediction off
WORD PREDICTION ON
(IT)
Turns word prediction on
WORD PREDICTION ON/OFF
(IT)
Toggles word prediction on and off
WORD PREDICTION WINDOW OFF
(IT)
Hides the word prediction window
WORD PREDICTION WINDOW ON
(IT)
Displays the word prediction window
WORD PREDICTION WINDOW ON/OFF
(IT)
Toggles the word prediction window between hidden and displayed
Appendices 184
The Joystick Adapter
In order to use a joystick with your device you must have an adapter to plug into your device and your joystick.
The schematic below shows you the adapter specifications. You can also call the PRC Service Department and ask
about the availability of Joystick adapters, (800)-262-1990.
9
6
8
7
5
4
2
3
1
T
O
J
O
Y
S
T
I
C
K
9
P
I
N
D
S
U
B
T
O
S
E
L
E
C
T
S
W
I
T
C
H
1
/
8
”
J
A
C
K
T
O
D
E
VI
C
E
S
W
I
T
C
H
B
1
/
8
”
P
L
U
G
T
O
D
E
V
I
C
E
S
W
I
T
C
H
A
1
/
8
”
P
L
U
G
J
O
Y
S
T
I
C
K
A
D
A
P
T
E
R
C
A
B
L
E

Appendices 185
RealSpeak Speech Tips
RealSpeak, AT&T Natural Voices, and Acapela speech use the Speech Application Program Interface (SAPI). The
following directions should work for all three synthesizers. You can change the pronunciation of words, alter the
rate at which words are spoken in a sentence, add pauses to sentences and tell RealSpeak to spell words out rather
than pronounce them. To do these things you must use certain tags that tell RealSpeak what you want it to do. In
the following pages you will learn how to use these tags. You will also learn how RealSpeak handles numbers and
you will find phoneme charts to use for entering correct pronunciation.
Pronouncing Words Correctly
RealSpeak may not pronounce some words, especially nouns such as names of people or places, correctly. To teach
the correct pronunciation of any word, you must enter it phonetically using a specific tag. This tag is shown below.
<pron sym="phonetic string"/>
Using this tag, you can enter words phonetically into the Speech Dictionary or into messages that you are storing.
Important Note! Phonemes must always be separated by spaces.
For example: the phonetic spelling of "bed" is B EH D. The phonetic spelling of "about" is AX B A + UH T. You must
add a space between each phoneme. Phoneme tables and instructions are available for three English language
variations: American English (page 185); British English (page 187); and Australian English (page 189).
Note: The following RealSpeak tips and tables are used by permission of Nuance Communications, Inc.
American English Phonemes
Enter any phonetic word with this tag: <pron sym="phonetic text"/>
Phoneme Example Phonetic Spelling
aa father 1 f aa - dh ax r
ae cat k ae t
ah cut k ah t
ao dog d ao g
aw foul f aw l
ax ago ax - 1 g ow
ay bite b ay t
b big b ih g
ch chin ch ih n
dh then dh eh n
eh pet p eh t
er fur f er
ey ate ey t
f fork f ao r k
g gut g ah t
h help h eh l p
ih fill f ih l
iy feel f iy l
jh joy jh oy
k cut k ah t
l lid l ih d
m mat m ae t

Appendices 186
Phoneme Example Phonetic Spelling
n no n ow
ng sing s ih ng
ow go g ow
oy toy t oy
p put p uh t
r red r eh d
s sit s ih t
sh she sh iy
t talk t aa k
th thin th ih n
uh book b uh k
uw too t uw
v vat v ae t
w with w ih dh
y yard y aa r d
z zap z ae p
zh pleasure 1 pleh - zh ax r
The table below shows various symbols (period, comma, etc.) that can be used to guide pronunciation as you enter
phonetic text.
Symbol Meaning Phonetic Use Spoken as
-
(Hyphen)
Syllable boundary h eh - 1 l ow ! Hello!
!
(Exclamation mark)
Sentence ender h eh - 1 l ow ! Hello!
&
Word boundary h eh - 1 l ow & ,
h aw & ao r & y uw ?
Hello,
how are you?
,
(Comma)
Sentence ender h eh - 1 l ow & ,
h aw & ao r & y uw ?
Hello,
how are you?
.
(Period)
Sentence ender h eh - 1 l ow . Hello.
?
(Question mark)
Sentence ender h eh - 1 l ow ? Hello?
_
(Underscore)
Silence h eh - 1 l ow _
h aw & ao r & y uw ?
Hello…..
How are you?
1 Primary stress h eh - 1 l ow
2 Secondary stress Ax - 2 f r ih - k ax - n ay - 1 z ey - sh ax n Africanization
A Note about Text and Speech Markers: If you are storing a message and enter a phonetically spelled word, also
enter the correctly spelled word and use the Text and Speech Marker tools so your device will speak the word
correctly and show the correct word on the display, but will hide the phonetic pronunciation.

Appendices 187
British English Phonemes
Enter any phonetic word with this tag: <pron sym="phonetic text"/>
Phoneme Example Phonetic Spelling
i beat s1 b i t
ih bit s1 b ih t
eh bed s1 b eh d
ae map s1 m ae p
o go s1 g o
q pot s1 p q t
aa car s1 k aa
ah but s1 b ah t
ao bought s1 b ao t
uh book B uh k
u boot s1 b u t
ax about ax s1 b a + uh t
er turn s1 t er n
i + ax or
iyx
here s1 h i + ax or
s1 h iyx
eh + ax
or
ehx
there s1 dh eh + ax
s1 dh ehx
u + ax or
uax
poor s1 p u + ax or
s1 p uax
e + i or
ei
bait s1 b e + i t or
s1 b ei t
ao + i or
oi
boy s1 b ao + i or
s1 b oi
a + i or
ai
buy s1 b a + i or
s1 b ai
a + uh
or
au
down s1 d a + uh n or
s1 d au n
p pan s1 p ae n
t tan s1 t ae n
k can s1 k ae n
b boy s1 b ao + ih
d day s1 d e + IH
g got s1 g q t
gt eat s1 gt i t
f fine s1 f a + ih n
th thin Si th ih n
s sin s1 s ih n
sh shine s1 sh a + ih n
v vine s1 v a n
dh that s1 dh ae t
z zone s1 z o + uh n

Appendices 188
Phoneme Example Phonetic Spelling
zh vision s1 v ih zh ax n
h head s1 h eh d
j you s1 j u
w wit s1 w ih t
r ride s1 r a + ih d
l let s1 l eh t
m my s1 m a + ih
n no s1 n o + uh
ng song s1 s q ng
t + sh church s1 t + sh er t + sh
d + zh jungle
s1 d + zh ah ng g ax
l
Symbol Meaning Phonetic Use Spoken as
_!
(underscore exclamation
mark)
Sentence ender h eh s1 l o _! Hello!
_&
(underscoreand)
Word boundary h eh s1 l o _& _, h au _& aa r _& j u _?
Hello, how
are you?
_,
(underscorecomma)
Sentence ender
h eh s1 l o _& _
, h au & aa r _& j u _?
Hello, how
are you?
_.
(underscoreperiod)
Sentence ender
h eh s1 l o _
.
Hello.
_?
(underscorequestion mark)
Sentence ender h eh s1 l o _? Hello?
_s
(underscore)
Silence
h eh s1 l o
_s
h au & aa r & j u ?
Hello…..
How are you?
S1 or s1 Primary stress h eh s1 l o Hello
S2 or s2 Secondary stress Ax - 2 f r ih - k ax - n ay - 1 z ey - sh ax n Africanization
A Note about Text and Speech Markers: If you are storing a message and enter a phonetically spelled word, also
enter the correctly spelled word and use the Text and Speech Marker tools so your device will speak the word
correctly and show the correct word on the display, but will hide the phonetic pronunciation.

Appendices 189
Australian English Phonemes
Enter any phonetic word with this tag: <pron sym="phonetic text"/>
Phoneme Example Phonetic Spelling
i beat s1 b i t
ih bit s1 b ih t
eh bed s1 b eh d
ae map s1 m ae p
o go s1 g o
q pot s1 p q t
aa car s1 k aa
ah but s1 b ah t
ao bought s1 b ao t
uh book b uh k
u boot s1 b u t
ax about ax s1 b a + uh t
ix roses S1 r o + uh z ix z
er turn s1 t er n
i + ax or
iyx
here s1 h i + ax
or
s1 h iyx
eh + ax
or
ehx
there s1 dh eh + ax
or
s1 dh ehx
u + ax or
uax
poor s1 p u + ax
or
s1 p uax
e + i or ei bait s1 b e + i t
or
s1 b ei t
ao + i
or
oi
boy s1 b ao + I
or
s1 b oi
a + i
or
ai
buy s1 b a + i
or
s1 b ai
a + uh
or
au
down s1 d a + uh n
or
s1 d au n
p pan s1 p ae n
t tan s1 t ae n
k can s1 k ae n
b boy s1 b ao + ih
d day s1 d e + IH
g got s1 g q t
gt eat s1 gt i t
f fine s1 f a + ih n

Appendices 190
Phoneme Example Phonetic Spelling
th thin s1 th ih n
s sin s1 s ih n
sh shine s1 sh a + ih n
v vine s1 v a n
dh that s1 dh ae t
z zone s1 z o + uh n
zh vision s1 v ih zh ax n
h head s1 h eh d
j you s1 j u
w wit s1 w ih t
r ride s1 r a + ih d
l let s1 l eh t
m my s1 m a + ih
n no s1 n o + uh
ng song s1 s q ng
t + sh church s1 t + sh er t + sh
d + zh jungle
s1 d + zh ah ng g ax
l
You can use this chart of various symbols (period, comma, etc.) to guide pronunciation as you enter phonetic text.
Symbol Meaning Phonetic Use Spoken as
_!
(underscoreexclamationmark)
Sentence ender h eh s1 l o + uh _! Hello!
_&
(underscoreand)
Word boundary
h eh s1 l o + uh _& _, h au _&
aa r _& j u _?
Hello, how
are you?
_,
(underscorecomma)
Sentence ender
h eh s1 l o + uh _& _
, h au &
aa r _& j u _?
Hello, how
are you?
_.
(underscoreperiod)
Sentence ender
h eh s1 l o + uh _
.
Hello.
_?
(underscorequestionmark)
Sentence ender h eh s1 l o + uh _? Hello?
_s
(underscore)
Silence
h eh s1 l o + uh
_s
h au _& aa r _& j u _?
Hello…..
How are you?
S1 or s1 Primary stress h eh s1 l o + uh Hello
S2 or s2
Secondary
stress
s1 l eh k s ih s2 k q n Lexicon
A Note about Text and Speech Markers: If you are storing a message and enter a phonetically spelled word, also
enter the correctly spelled word and use the Text and Speech Marker tools so your device will speak the word
correctly and show the correct word on the display, but will hide the phonetic pronunciation.

Appendices 191
Additional RealSpeak Speech Tips
Producing a Long "A" in the Middle of a Sentence
Usually an "A" by itself in the middle of a sentence is pronounced as "uh," but there may be times when you want
it to be pronounced as a long "A" ("ayee"). To achieve this, type the capital letter "A" and then add a punctuation
mark immediately following it:
A, A? A! (A ;
This will change the inflection of the sentence somewhat, but it will produce a long "A". For example: Give me an
A! Give me a B.
RealSpeak and Numbers
Most numbers are pronounced as you think they should be.
Cardinal Numbers
Cardinal numbers up to 15 digits are pronounced as full numbers. Numbers with more than 15 digits are
pronounced digit by digit. For example: 2,345,789 is pronounced as two million three-hundred-forty-five
thousand, seven-hundred-eighty-nine. 005 is pronounced as zero zero five.
Numbers from 1,100 through 9,999 are pronounced as full numbers when a comma is used. When no comma is
used, the number is treated as a year. For example: the number, 1,999, is pronounced one-thousand-nine-hundred
and ninety-nine. The year 1999 is pronounced nineteen-ninety-nine.
Exception: The years 2000-2029 are pronounced as cardinal numbers, (e. g., two-thousand-sixteen). At 2030 they
begin to be pronounced as years (e.g., twenty-thirty).
Telephone Numbers
Telephone numbers are pronounced digit by digit. To have the numbers pronounced as groups, add a space, a
slash or a hyphen between the groups. Area codes must be in parentheses.
For Example: (330) 262 1984 or
(330)/262/1984. Both of these are spoken as: Area Code 330, two six two, one nine eight four.
International and mobile (or cell) numbers are usually read correctly assuming you have used the correct spacing. For
example: +22 (1343) 465-586 is pronounced: plus twenty two one three four three four six five five eight six; 011 44
(1733) 370 470 is pronounced: zero one one forty-four one seven three three three seven zero four seven zero.
Entering Math Problems
For math problems to be pronounced correctly, you must space the numbers correctly. For example: 5 – 3 = 2
must be entered as:
5 –3 = 2 (5 space –no space3 space= space2)
4 + 5 = 9 is entered as
4 +5 = 9 (4 [space +no space5 space= space9)
With multiplication, use the "x" or the *
For Example: 2*8 = 16 or 2x8 = 16. In either case your device will speak "x" or "asterisk", not "times". Do not put
spaces between the multiplication sign and the numbers. Add a space before and after the "equals" sign.
Division is not available unless you have a "division" sign that you can assign to a key or sequence; otherwise, you
must enter the words "divided by" with spaces, as in: 4 divided by 2 = 2.
Fractions are usually spoken correctly
For example: 5/9 is spoken as five ninths; 3/2 is spoken as three over two; 223/845 is spoken as two hundred
twenty three over eight hundred forty five.

Appendices 192
Bank account, Social Security, credit card numbers
In order to have these types of numbers pronounced correctly, use hyphens between groups of numbers. Do not
put spaces before or after the hyphen. For example: 1234-5678-9123-4004 is pronounced as: one two three four
(pause) five six seven eight (pause) nine one two three (pause) four zero zero four.
Dates
Depending on your country, dates are read as month/day/year (America) or day/month/year (Britain, Australia).
Separate numbers with the date with slashes or hyphens. Do not add spaces. For example: 5/15/06 is pronounced
as: May fifteenth two-thousand-six in American English. 15-5-06 is pronounced: the fifteenth May two-thousand
six in British and Australian English.
Currencies
RealSpeak correctly handles the currency symbols $, £, ¥, and the most common currency abbreviations. The Euro
symbol is also supported. You can find this symbol on the QWERTY spell page. Press the Ext. Chars. key to find the
Euro symbol. For example: $40.00 is pronounced Forty dollars. £125 is pronounced One hundred twenty five
pounds. ¥60 is pronounced 60 yen. €20 is pronounced Twenty Euros.
Abbreviations
The RealSpeak dictionary contains most common abbreviations. Some abbreviations can be spoken in more than
one way, so RealSpeak looks for the context in which they are written. The abbreviation, "St." could be
pronounced as Saint or Street. If "St." is followed by a capital letter, it is pronounced as Saint. If not, it is
pronounced as street. Similarly, the abbreviation "Dr." could be pronounced as Doctor or Drive. If it is followed by a
capital letter, it's pronounced Doctor. If not, it is pronounced, Drive. For example: Dr. Johnson's St. is pronounced,
Doctor Johnson's Street. St. John's Dr. is pronounced Saint John's Drive. Dr. Johnson lives on St. Peter's St. is
pronounced, Doctor Johnson lives on Saint Peter's Street.
Acronyms and initialisms
Acronyms are abbreviations formed by combining the first letters of a group of words. They are pronounced as
words. For example: NATO ( nay toe), UNESCO (you ness coe)
Initialisms are abbreviations formed by combining the first letter of each part of a group of words. Initialisms are
spelled. For example: API (ay pee eye), FBI (eff bee eye), EC (ee cee)

Appendices 193
DECtalk Speech Tips
Sometimes a word has two different pronunciations. For instance, the word "record" can be pronounced as it is in
this sentence, "We kept a RECord of how many people attended the museum opening." The word can also be
pronounced as it is in this sentence, "Our speech teacher let us reCORD our voices on a tape recorder."
The way a word is most often spoken is the way your device will pronounce the word. In this case, if you type
"record" it is pronounced "RECord." If you want the alternate pronunciation for the word, select the Ctrl key and
then the Space key. Type the word you want and add a space after it.
If you store a word using Ctrl Space, every time you retrieve that word your device will speak the alternate
pronunciation of the word.
Note: We recommend that you do not store alternate pronunciations in the Dictionary, since they are the less
frequently used pronunciations of words.
The next few pages contain a list of words that have alternate pronunciations which DECtalk speech already
knows. There is also a list of all the abbreviations that you can use which DECtalk speech knows how to pronounce.
The last part of this appendix explains how your device and the DECtalk speech board handle numbers.
Words with Alternate Pronunciations
abstract console implant predicate rerun remake
abuse construct import predominate research
addict contest imprint present retake
advocate contract incense proceed rewrite
affix contrast incline produce segment
alternate converse increase progress separate
animate convert insert project subject
annex convict insult protest sublet
appropriate coordinate interchange read subordinate
associate defect intimate rebel suspect
attribute deliberate invalid recall syndicate
august desert lead recap suspect
bass digest live recess tear
close discharge miscount record torment
combat dove misuse recount transform
combine duplicate moderate refill transport
compact elaborate object refresh upset
compound
estimate overrun refund use
compress excuse perfect refuse wind
conduct exploit permit reject wound
content export pervert relapse
conflict extract polish relay
Copied with permission of Digital Equipment Corporation

Appendices 194
Abbreviations Recognized by DECtalk Speech
Abbreviation Word
All-in-1 All in one
All-in-one All in one
Apr. April
Assoc. Associates
Aug. August
Av. Avenue
Ave. Avenue
bldg. building
Blvd. Boulevard
CH. Chapter
Ch. Chapter
cm. centimeters
Cms centimeters
Co. Company
COD See-oh-dee
contd. continued
Corp. Corporation
Ctr. Center
CTRL Control
cu. cubic
Dec DEC (as in DECtalk)
Dist. District
deg. degrees
Dept. Department
doz. dozen
Dr. Doctor (when followed by a name)
Dr. Drive (when preceded by a name)
e.g. ee gee (not “for example”)
ESC escape
esp. especially
est. ee ess tee
etc. et cetera
ext. extension
Feb. February
fig. figure
flt. flight
FOB freight on board
fn. footnote
Fr. Father
Fri. Friday
ft. feet (not “foot”)
Ft. Fort (not “Foot”)
Gen. General

Appendices 195
Abbreviation Word
gm. grams
Gov. Governor
hrs. hours
i.e. Eye ee (not “that is”)
Inc. Incorporated
Intl. International
Jan January
Jr. Junior
Jul. July
Jun. June
kg kilograms
kgs kilograms
km. kilometers
lb. pounds
lbs. pounds
Ltd. Limited
Mar. March
mg. milligrams
mgs. milligrams
misc. miscellaneous
ml. milliliters
Mon. Monday
Mr. mister
Mrs. missus
Ms. Miz
msde. merchandise
msec. milliseconds
msecs. milliseconds
mss. manuscripts
Mt. Mount
Nov. November
Oct. October
oz. ounces
ozs. ounces
Pl. plural
pp. pages
ppd. Post paid
Pres. President
Rd. Road
recd. received
Rep. Representative
Rev. Reverend
rsts ris-tis
rsts/e Ris-tis-ee

Appendices 196
Abbreviation Word
Rte. route
Sat. Saturday
Sen Senator
Sep. September
Sept. September
sq. square
Sr. Senior
St. Saint (when followed by a name)
St. Street (when preceded by a name)
Sun. Sunday
Thu. Thursday
Thurs. Thursday
Tue. Tuesday
Tues. Tuesday
Univ. University
USA You-ess-aye
Vol. Volume
vs. versus
yds. yards
Copied with permission of Digital Equipment Corporation
Producing a Long "A" in the Middle of a Sentence:
Usually an "A" by itself in the middle of a sentence is pronounced as "uh," but there may be times when you want
it to be pronounced as a long "A" ("ayee"). To achieve this, type the capital letter "A" and then add a punctuation
mark immediately following it:
A, A? A! (A ;
This will change the inflection of the sentence somewhat, but it will produce a long "A".

Appendices 197
English Vowel Phonemes
Phoneme Symbol Example
aa f a ther
ae b a t
ah b u t
ao b ou ght
aw b ou t
ax a bou t
ay b i te
eh b e t
ey b a ke
R-Colored Dipthongs
ar b ar
er b ear
ir b eer
or b or e
ur p oor
el bott le
en butt on
rr butt er

Appendices 198
English Consonant Phonemes
Phoneme Symbol Example
b b in
ch ch in
d d ebt
dh th is
f f in
g g ive
hx h ead
jh g in
k c at
l l et
m m et
n n et
nx si ng
dx ri d er, wri t er
lx be ll
rx o r ation
tx La t in
p p in
r r ed
s s it
sh sh in
t t est
th th in
v v est
w w est
z z oo
Copied with permission from Digital Equipment Corporation

Appendices 199
How DECtalk Speech Handles Numbers
1998 is a year. 1,998 is a big number. 1998 (no comma) is spoken as "nineteen-ninety-eight." 1,998 (with a comma)
is spoken as "one-thousand-nine-hundred-and-ninety-eight." Any four-digit number is spoken as a year unless you
add a comma after the first digit. Commas are not necessary if a number contains more than four digits (e.g.,
10,375). Numbers containing up to 9 digits are pronounced correctly.
Examples of Entering Math Problems:
When you enter math problems, they must be spaced correctly for DECtalk speech and your device to pronounce
them correctly.
For example: 5 - 3 = 2
Enter this problem in the following manner:
5 (space) -3(no space between "-" and "3" but add a space after "3") =(space) 2.
The problem looks like this when it is entered:
5_-3_=_2 ("_" indicates a space)
Examples of Spacing for Other Math Problems:
2*8_=_16; 1*2_=_2 ("*" indicates "times" but your device speaks "asterisk".)
2_+8_=_10
1 1/2 must be entered as 1&_1/2
(1/2 can be entered by activating "1" the "forward slash" key "2".)
Examples of Entering Dates:
DECtalk speech does not recognize dates if you enter them this way: 6-8-1990 or 11/20/95
Enter dates in the following format for them to be spoken correctly: 6-Aug-1990 or 20-Nov-2010
These dates are spoken as "August 6, nineteen-ninety" and "November 20, twenty-ten".
Other speech synthesizers in your device may speak these numbers a little differently.
Example of Entering a Phone Number:
Phone numbers must be entered by placing spaces and commas as shown below:
1_1_6,_2_6_2,_1_9_8_4 or 2_6_2,_1_9_3_3

Appendices 200
Troubleshooting
If you have a problem that is not described here, go to the Troubleshooting section of the hardware manual for
your device. If a problem persists, call the PRC Service Department at 800-262-1990. Outside the U.S., call your
local distributor.
PRC Service Disclaimer: The PRC Service Department is not responsible for lost vocabulary on devices returned for
service. Before you return a device to PRC for servicing, back up your vocabulary on a USB memory device.
If you select a key or keys and your device makes a "raspberry" noise:
A dynamic activity is stored under the key(s) but it is hidden. Open the Dynamic Activity menu to see if
something is stored at this location. If you see the sequence but the activity is listed as "unknown" you
may have deleted the activity at some other time. You must either add the activity, or delete the
sequence by activating the Delete Dynamic Activity key in the Dynamic Activity menu and then selecting
the key or sequence you stored the activity under.
Your device won’t activate a key you have selected:
Your touchscreen may be dirty or greasy from fingerprints. Thoroughly clean and dry the screen. Follow
the Clean Your Display instructions in the Troubleshooting section of the hardware manual for your
device.
Auto-repeat won't work when you are using "Activate Key When = Released":
The key is selected after you have released it and after the Release Time has expired. If you have set a
long Release Time you must wait for it to expire before the key will begin to repeat.
Your device is not producing any audio—you cannot hear messages:
The volume may be muted in your device.
First: Check the status display area on your device screen to make sure lines are visible in the Volume bar
graph. If not, select the Volume Up key in the Toolbox until you see some lines in the bar graph. Then
select a message and see if it’s spoken so that you can hear it.
If that doesn’t work: Open the Feedback Menu and make sure the External Speaker option is turned off.
To prevent possible hearing damage, do not listen to earphones at high volume levels for long
periods.

Index 201
Index
1
1-Switch Scanning Methods 56
2
2-Switch Scanning Methods 57
A
Abbreviation Expansion Menu 87
ABBREVIATION EXPANSION OFF (IT) 174
ABBREVIATION EXPANSION ON (IT) 174
Abbreviation Expansion On/Off 87
ABBREVIATION EXPANSION ON/OFF (IT) 174
Abbreviations Recognized by DECtalk Speech 194
About Bluetooth Cell Phones 112
About Core Vocabulary and Activity Row Vocabulary
120
About Creating and Modifying Pages 101
About NuVoice Macros 99
About Sequence Sets 147
About Storing and Assigning Tools 98
About the Cursor 70
About the Pointer 70
About the Vocabulary Builder Menu 143
About Vocabulary Masking on the Fly 153
Acceptance Time 69
Acceptance Time (Eyegaze) 65
Access Method Menu 56
ACCESS METHOD MENU (IT) 174
ACTIVATE KEY (IT) 174
Activate Key When: Pushed or Released 69
Activate Text Area 72
Activation Beep and Scan Beep 35
Activation Delay 69
Active Eye: Both/Left/Right 66
Activity Background Color 38, 138
ACTIVITY LINK (IT) 174
Activity Row 133
Activity Row Background Color Preview 111
Add a Word 85
Add an Abbreviation 87
Add an Incoming Number 117
Add Contacts 116
Add Links to other Pages on a Scene Page 107
Add New Row (Unity) 139
Add Pronunciation 33
Add Pronunciation (Auditory Prompt Voice) 76
Add Pronunciation (Speech Menu) 75
Add Scan Block(s) 60
Add Scan Block(s) (Essence) 172
Additional RealSpeak Speech Tips 191
Adjusting Caller and Listener Volume 119
ADL MARKER (IT) 174
Advanced Color Options 110
Advanced Options (Pronunciations) 34
ALARM (IT) 174
Alert Signal 20
ALERT SIGNAL (IT) 174
American English Phonemes 185
Appendices 166
APPLY SETTING (IT) 174
ARROW DOWN (IT) 174
Arrow Keys 91
ARROW LEFT (IT) 174
ARROW RIGHT (IT) 174
ARROW UP (IT) 174
Assign a NuVoice Macro to a Core Key 129
Assign Activity Keys 141
ASSIGN ACTIVITY KEYS (IT) 174
Assign Core Keys 126
ASSIGN CORE KEYS (IT) 174
AUDITORY PROMPT MENU (IT) 175
Auditory Prompt Voice 75
Auditory Prompts Menu 21
AUDITORY PROMPTS OFF (IT) 175
Auditory Prompts Off/On 21
AUDITORY PROMPTS ON (IT) 175
AUDITORY PROMPTS ON/OFF (IT) 175
Australian English Phonemes 189
Auto Backlight Off 44
Auto Repeat 69
Auto Repeat (Eyegaze) 65
Auto Sleep 44
Auto Spell 36
Auto-Delete TXT Messages 118
Average Pitch 75
Average Pitch (Auditory Prompt Voice) 76
Averaging 71
B
Background and Text Colors 37
Backlight Intensity 35
BACKLIGHT INTENSITY DOWN (IT) 175
BACKLIGHT INTENSITY UP (IT) 175
Backup Word List 147
Basic Storing 94
Bass (Auditory Prompt Voice) 76
Bass (Speech Menu) 75
Bass and Treble (Feedback Menu) 37

Index 202
Battery Information 45
Battery Menu 45
BEEP OFF (IT) 175
BEEP ON (IT) 175
BEEP ON/OFF (IT) 175
Block Mark 92
BLOCK MARK (IT) 175
Bluetooth Beep Output (Bluetooth Speaker Menu)
22, 38
Bluetooth Beep Output (BT Configuration Menu) 114
Bluetooth Cell Phone 112
Bluetooth Icons Visible in Status Display Area 114
Bluetooth Speaker Menu (Auditory Prompts Menu)
22
Bluetooth Speaker Menu (Feedback Menu) 38
Bluetooth Switch 70
Bottom Off-Screen Key Color 72
Bottom Off-Screen Key Size 72
Bottom Off-Screen Keys 72
British English Phonemes 187
BROWSE ICONS (IT) 175
C
CALIBRATE EYEGAZE (IT) 175
Calibrate Now 63
Calibration Area 67
Calibration Points 67
Calibration Settings 66
Camera Menu 88
CAMERA MENU (IT) 175
CAMERA OFF (IT) 175
CAMERA ON (IT) 175
CAMERA ON/OFF (IT) 175
CANCEL (IT) 175
Cancel Time 70
CAPS LOCK (IT) 175
CAPS OFF (IT) 175
CAPS ON (IT) 175
Category Prompt 23
CC HP MODE OFF (IT) 176
CC HP MODE ON (IT) 176
Change All Occurrences of an Icon 28
Change Communication Language 30
Change Credentials 53
Change Home Location 30
Change Icon (Page) 103
Change Icon (Unity Main Activity Option) 138
Change Icon (Unity Option within Activity) 139
Change Key Color (Page) 103
Change Key Color (Unity Main Activity Option) 138
Change Key Color (Unity) 139
Change Label (Page) 103
Change Label (Unity Main Activity Option) 138
Change Label (Unity) 139
Change Number of Toolbox Locations 31
Change Position (Unity Main Activity Option) 138
Change Position (Unity) 139
Change Product Configuration 48
Change Text Area Function 39
Change Toolbox Disable Password 43
Change Visual Scene 106
Change Voice 75
Change Voice (Auditory Prompt Voice) 75
Choose a Custom Grid Size 102
Choose a Custom Key Size 108
Choose a Key Size 158
Choose a Voice 161
CHOOSE ACTIVITY (IT) 176
Choose an Access Method 160
Choose Camera 89
Choose Different Access Method 56
Choose Different Folder (Review Vocabulary Menu)
52
Choose Next Key to Define 108
Classic – ADL Icon 14
Classic – Caps Lock 14
Classic – Date and Time 14
Classic – Headphone Volume / 14
Classic – Speaker Volume / 14
Classic – Speech 14
Clear Data Log - 0 Bytes 55
Clear Display 19
CLEAR DISPLAY (IT) 176
Clear Key Contents 105
Clear Key Contents (Unity) 139
CLICK MAGNIFY OFF (IT) 176
CLICK MAGNIFY ON (IT) 176
CLICK MAGNIFY ON/OFF (IT) 176
Clock Menu 32
CLOCK MENU (IT) 176
Close a Notebook 49
CLOSE ACTIVITY (IT) 176
CLOSE NOTEBOOK (IT) 176
CLOSE PAGELET (IT) 176
Color 86, 110
Color Coverage 110
Color Preview Box 111
Color Selector Arrows 110
Configuration Menu Options 113
Connect Freedom Switch® / Disconnect ALL Freedom
Switch® 61
Controller Information 45
Copy a Notebook from One Area to Another 51
Copy a User Area 27
Copy a Vocabulary File 40

Index 203
Copy Activities 138
Copy All Abbreviation Expansions 30
Copy All Pages 28
Copy All Sequences Beginning with Selected Icon 30
COPY BLOCK (IT) 176
Copy Current Settings to All Areas 65
Copy from an existing page 102
Copy Pages 105
Copy Pages/Activities 28
Copy Pattern from Another Page 61
Copy Pronunciations to Another Voice 34
Copy Selected Pages 28
Copy these settings to all areas (Skin Options) 39
Copy this Assignment to 104
Core Vocabulary and Word Prediction 122
Create a Custom Color 112
Create a New Activity 134
Create a Scene Page 106
Create a Sequence Set 147
CREATE ACTIVITY (IT) 176
Create and Store NuVoice Macros 100
CREATE PAGE (IT) 176
Create Page and Modify Page Menu Options 102
Create Page from Template 102
Create Page/Modify Page Storing Options 103
Create Page: Start-Up 102
Create Person 53
Create Toolbox Disable Override 43
Create Visual Scene 90
Cursor Color 70
Cursor Size 70
Custom Color 1 - 6 111
Customize Eyegaze Settings 64
CUT BLOCK (IT) 176
Cut, Copy, and Paste, Highlighted Text 92
D
Data Analysis 53
Data Logging On/Off 52
Date (Clock) 32
Date Format (Clock) 32
DECtalk Speech Tips 193
Define Custom Keyguard 31
DELAY (IT) 176
Delete a Notebook 50
Delete a Vocabulary File 41
Delete a Word 85
Delete Activity 138
Delete All Abbreviations 87
Delete All Pronunciations (This Voice) 34
Delete an Abbreviation 87
Delete Character 92
DELETE CHARACTER (IT) 176
Delete Current Block 60
Delete Current Block (Essence) 173
Delete Current Row (Unity) 139
Delete Eyegaze Profile 64
DELETE ICON (IT) 176
DELETE LAST SELECTION (IT) 176
Delete Page 108
DELETE PAGE (IT) 176
Delete Pronunciation 34
Delete Sequence Set 146
DELETE WORD (IT) 177
Delete Word List 147
Deleting Dynamically Linked Sequences 136
Dictionary 84
DISABLE POINTER (IT) 177
Disable Toolbox 42
Disconnect (Bluetooth Speaker Menu) 22, 38
Disconnect (BT Configuration Menu) 113
Display 145
Display Areas 13
DISPLAY MESSAGE (IT) 177
Display Recent Words 85
Display Skin 38
Dwell Time 64
Dynamic Activities 135
DYNAMIC ACTIVITY MENU (IT) 177
E
EAR VOLUME DOWN (IT) 177
EAR VOLUME UP (IT) 177
Earphone Volume 35
Edit a Synthesized Speech Message 97
EDIT CORE (IT) 177
Edit Menu 92
EDIT MENU (IT) 177
Edit Mode 92
EDIT MODE (IT) 177
Edit Pronunciation 34
Embellished Icon: On/Off 36
Enable Icon Set Menu 45
End 91
END (IT) 177
English / Español 48
English Consonant Phonemes 198
English Vowel Phonemes 197
Enter a New Feature Code 46
Enter Shipping Mode 45
Erase a Core Synthesized Speech Message 126
Erase a Dynamic Activity Link 136
Erase a NuVoice Macro 100
Erase a Recorded Core Message 125
Erase a Recorded Message 96
Erase a Synthesized Speech Message 97

Index 204
Erase All Sequences Beginning with Selected Icon 30
Erase All Vocabulary 45
ERASE CORE (IT) 177
Erase NuVoice Macros 129
Erase the Tool and Restore the Original Icon 127
Erasing Prompts 23
Error Reporting 45
Essence 158
Essence – Add a Word to the Word Prediction
Dictionary 162
Essence – Auditory Prompt Menu 165
Essence – Feedback Menu 163
Essence – Modify Scan Pattern 170
Essence – User Area Menu 165
Essence – Word Prediction 162
Example: Create a Sequence Set 148
Example: Using Vocabulary Masking on the Fly 155
EXIT THEME (IT) 177
Expand a Page 29
Expand a User Area or Page 29
Expand User Area 29
Expanded Vocabulary Search 52
Ext. Chars (Extended Characters) 91
External Speaker: On/Off 37
Eye Track Status 63
Eyegaze Calibration: Global/Per User Area 67
Eyegaze Method 62
Eyegaze Positioning 63
EYEGAZE TRACK STATUS (IT) 177
F
Feedback Menu 35
FEEDBACK MENU (IT) 177
File Organizer Menu 40
FILE ORGNIZER (IT) 177
Fill Color 59
Fill In Empty Keys: YES/NO 137
Filter Method 68
FIND AND REPLACE (IT) 177
Find and Replace Text 93
Find Unmasked Word 145
Find Word 34
First Categories 36
Fixation Window X/Fixation Window Y 68
G
GO BACK PAGE (IT) 177
GO BACK PAGE HERE (IT) 177
Go To Home 20
Go To Mask Menu 154
Go to Masking on the Fly 145
Go To Spell 20
GOTO HOME (IT) 177
GOTO SPELL (IT) 178
GOTO TOOLBOX (IT) 178
Grid Size 102
H
Hardware Diagnostics 44
Headphone Level (BT Configuration Menu) 113
Help Button 43
Hide All Activities 138
Hide Core Vocabulary Keys 130
Hide/Show Activity 138
Hide/Show Keys 104
HIDE/SHOW NOTEBOOK (IT) 178
HIDE/SHOW NUVOICE (IT) 178
Hide/Show This Key 139
Highlight Keys 71
Highlight Settings 71
Highlight Settings (1-Switch/2-Switch) 58
Highlight Style 58
Home 91
HOME (IT) 178
Hours (Clock) 32
How DECtalk Speech Handles Numbers 199
Hue 111
I
I/O Function 44
Icon Message Labels: Top or Bottom 36
Icon or Word Prediction Area 13
Icon Prediction 121
Icon Prediction: Grey/White/Blank/Off 37
ICON TUTOR (IT) 178
Icon Tutor Advanced Settings 143
Icon Tutor Key in the Activity Row 143
Icon Tutor On-the-Fly 37
Icon Tutor Options 55
Icon Tutor View Count 37
Icon Tutor View Delay 37
Icons & Words 146
Import as Icon (Camera Menu) 89
Import as Scene (Camera Menu) 90
Import Icons 79
Import Icons or Scenes 79
Import New List 147
Import New Word List 153
Import Scenes 79
Import Sound File (Unity) 139
Include All Phrases 145
Increase a Word's Frequency Value 86
INSERT DATE (IT) 178

Index 205
INSERT TIME (IT) 178
Insert Tool 26
INSERT TOOL (IT) 178
Insertable Tools List (IT) 174
J
Joystick Auto Scan 62
Joystick Hold Scan 62
K
Key Padding 38
Key Position: Lock/Unlocked (Unity) 139
Key Shading 38
Key Visual Feedback 38
Keyboard Step-through 67
L
LANGUAGE (IT) 178
Large Color Box 111
Letter Case 86
Link a Core Icon Sequence to a Page 131
Link a Page to an Activity 140
Link an Activity to a Page or to another Activity 140
Listen to Recording (Unity) 139
Listen-to-Calls-With 119
Load a Notebook 50
Load an Area or Device Contents 78
Load Contacts 82
Load Default PRC Dictionary 87
Load Default Pronunciations (All Voices) 34
Load Entire Device Contents 78
Load Eyegaze Profile 64
Load Icons from MTI File 80
Load One User Area 78
Load Pages and Activities 81
Load Sequence Set 146
LOAD SEQUENCE SET (IT) 178
Load Word List 146
Lock a Notebook 51
Locked Keys Stay Locked: YES/NO 137
Low Battery Volume 45
Luminosity 111
M
Main Background 39
MAINT MENU (IT) 178
Maintenance Menu 42
Make Changes to All Activities 138
Make Changes to Selected Activities 138
Make New Scan Pattern 60
Manage Eyegaze Profiles 64
Manage Pronunciations (Auditory Prompt Voice) 76
Manage Pronunciations (Speech Menu) 75
Manage Pronunciations Menu Options 33
Managing Pronunciations for a Voice 33
Marked Text Background and Text Colors 37
Marked Text Preview 111
Mask 144
Mask All (Vocabulary Builder Menu Options) 145
Mask All (Vocabulary Masking on the Fly) 154
Mask Main Activity Row 154
Masked Words/Phrases (Word Order) 144
Maximum Blink Duration (Eyegaze) 65
Memory Transfer using a USB Flash Drive 77
Menu Background 39
Menu Parameter Background 39
Merge Sequence Set 146
MERGE SEQUENCE SET (IT) 178
Merge Word List 147
Message Box Background 39
Mic Level (BT Configuration Menu) 113
Microphone (BT Configuration Menu) 113
MID SEQ CATEGORY (IT) 178
Mid-Sequence Categories 36
Minimum Blink Duration (Eyegaze) 65
Minutes (Clock) 32
MODIFY ACTIVITY (IT) 178
Modify an Existing Activity 137
Modify Default Scan Pattern 59
Modify Home Scan Pattern 59
Modify Item Within the Activity Options 138
Modify Main Activity Options 137
MODIFY PAGE (IT) 178
Modify Page Scan Pattern 59
Modify Page: Start-Up 102
Modify Scan Pattern 106
Modify Scan Patterns (1-Switch/2-Switch) 59
Modify Scan Patterns Menu 167
Modify User Keys 26
Month (Clock) 32
MORE ITEMS (IT) 178
Move a Vocabulary File 41
Move More Items Key: NO/Left/Right 137
Move Up/Move Down (1-Switch/2-Switch) 60
N
Navigate 155
New Notebook 49
Next Items 137
Next Items (Unity) 138
Notebook Background and Text Color 37
Notebook Menu 48
NOTEBOOK MENU (IT) 178

Index 206
Notebook Preview 111
Notebook Text/Background Color 49
Number of Columns 102, 108
Number of Columns (Custom Keyguard) 31
Number of Rescans 69
Number of Rows 102, 108
Number of Rows (Custom Keyguard) 31
NuPoint/Joystick Method 62
NuPoint/Mouse/USB Joystick Method 62
O
Off-Screen Keys Settings 71
Off-Screen Pause Key 72
Off-Screen Pause Key Size 72
Off-Screen Tools Key 72
Off-Screen Tools Key Color 72
Off-Screen Tools Key Size 72
OK (IT) 178
OK (Toolbox) 19
OK (Vocabulary Builder Menu) 145
OK Use Pre-Set Folder (Review Vocabulary Menu) 52
OK/Cancel 108
On-Screen Tools Key 43
Open a Notebook 49
OPEN NOTEBOOK (IT) 178
Other Options for Modifying a Scan 172
Other Scan Pattern Menu Options 167
Outline Color 59
Outline Width 58
P
Page Down 92
PAGE DOWN (IT) 179
PAGE LINK (IT) 179
PAGE MENU (IT) 179
Page Menus 101
Page Up 92
PAGE UP (IT) 179
Page Up/Page Down/Arrows 34
Pagelets 173
Pair and Configure your Bluetooth Cell Phone 113
Pair to Speaker (Bluetooth Speaker Menu) 22, 38
Paired Devices (Bluetooth Speaker Menu) 22, 38
Paired Devices (BT Configuration Menu) 113
Pan 89
PASTE BLOCK (IT) 179
Pause/Resume (Eyegaze Profile) 64
Pause/Resume (Eyegaze) 62
PHONE DIAL NUMBER (IT) 179
PHONE DIAL PAD (IT) 179
PHONE SEND TEXT MESSAGE (IT) 179
PHONE SEND/END (IT) 179
PHONE TEXT MESSAGES (IT) 179
Picture Preview 89
Pitch Range 75
Pitch Range (Auditory Prompt Voice) 76
PLURAL (IT) 179
Pointer Border 70
Pointer Color 70
Pointer Mode 70
Pointer Settings 70
Pointer Size 70
Pointer Transparency 71
Pointer Type 70
Power Management 44
PRC style 146
Predict in Minspeak 85
Predictive Selection 69
Predictive Selection (Eyegaze) 65
Previous Items 137
Previous Items (Unity) 138
PRINT NOTEBOOK (IT) 179
PROMPT MARKER (IT) 179
Prompts By 21
Pronunciation Dictionary 33
PRONUNCIATION DICTIONARY (IT) 179
Pulldown Menu Button 43
Q
Quick Steps for Linking Pages 109
R
Raspberries On/Off 37
Read a Text Message 118
Realize Language Account 53
RealSpeak Speech Tips 185
Rearrange Activities 137
Record Message (Unity) 139
Recorded and Synthesized Speech 94
Release Time 69
Rename a Notebook 50
Rename Icon 90
Rename Page 107
Rename Sequence Set 146
Rename User Area 27
Rename Word List 147
Replace the Tools in the Tools Menu 99
Replace User Area 27
Reset Eyegaze Settings to Default 68
Reset to Factory Defaults 45
Restart 44
Restart Resumes at … 30

Index 207
Review 52
Review Abbreviations 87
Review All Dynamic Activities 136
Review Method 88
Review to Display & Speaker (Abbreviation
Expansion Menu) 88
Review to Display & Speaker (Review Vocabulary
Menu) 52
Review to Display (Abbreviation Expansion Menu) 88
Review to Display (Review Vocabulary Menu) 52
Review to Display (Word Prediction Menu) 86
Review to File (Abbreviation Expansion Menu) 88
Review to File (Pronunciations) 34
Review to File (Review Vocabulary Menu) 52
Review to File (Word Prediction Menu) 86
REVIEW VOCAB MENU (IT) 179
Review Vocabulary Menu 51
Right Off-Screen Key Color 72
Right Off-Screen Key Size 72
Right Off-Screen Keys 72
Ringer Menu (BT Configuration Menu) 113
S
Saturation 111
Save a Notebook 50
Save a Page 80
Save an Activity 80
Save an Area or Device Contents 78
Save as Icon 90
Save as Scene 89
Save As Sequence Set 145
Save As Word List 147
SAVE CHANGES (IT) 179
Save Contacts 82
Save Current Settings and Calibration to a Profile 64
Save Data Log to File 53, 54
Save Entire Device Contents 78
Save Multiple Activities 81
Save Multiple Pages 81
Save New Custom Color 111
Save Notebook 49
SAVE NOTEBOOK (IT) 179
Save One User Area 78
Save Pages and Activities (Menu) 81
Save Pages and Activities (Transfer Memory Menu)
80
Save Your Settings 73
Save Your Settings (Essence) 161
Save/Load Contacts 82
Saving Your Contacts List 117
Scan Auto Restart 69
Scan Keys/Scan Word Pred. List/Scan Text Area/Scan
User Keys 61
Scan Pattern Order (Essence) 172
SCAN WORD LIST (IT) 179
Scanning Block Within Blocks (Essence) 172
Scanning Speed 69
Scroll Keys 91
SCROLL KEYS (IT) 180
Search Icon Tutor 142
Seconds (Clock) 32
Select a Voice for Synthesized Speech 74
Select Background Color 67
Select Pointer Color 67
Selection Area 85
Selection Type 70
Selection Type (Eyegaze Only): Auto/Blink/Switch 64
Send a Text Message 118
SET 1 ICON THEME (IT) 180
SET 2 ICON THEME (IT) 180
SET ACTIVITY (IT) 180
Set Activity Template 29, 133
Set Custom Switch Times (1-Switch/2-Switch) 59
SET HOME PAGE (IT) 180
SET PAGE (IT) 180
Set Page Template 28
SET PAGE TEMPORARY (IT) 180
SET PAGELET (IT) 180
SET PAGELET TEMPORARY (IT) 180
SET THEME HERE (IT) 180
Set up a Wireless Connection 46
SET USER SPELL PAGE (IT) 180
SETTINGS 1 (IT) 180
SETTINGS 2 (IT) 180
SETTINGS 3 (IT) 180
Settings Menu 73
SETTINGS MENU (IT) 180
SETUP KEY (IT) 180
Shared Access Options 69
SHIFT (IT) 180
Show All (Unity) 139
Show Cursor 70
Show Last Validation Results 67
Show Selections By: Icon or Icon Name 36
Shutdown 44
SHUTDOWN (IT) 180
Single Function Keys 19
Skin 1/Skin 2 – ADL Icon / 15
Skin 1/Skin 2 – Battery Status / 15
Skin 1/Skin 2 – Date and Time 15
Skin 1/Skin 2 – Headphone Volume / 14
Skin 1/Skin 2 – Lowercase letter “a” 15
Skin 1/Skin 2 – Speaker Volume / 14
Skin 1/Skin 2 – Speech Bubble 15
Skin Options 38
SLEEP (IT) 180

Index 208
SMART PUNCTUATION (IT) 181
Smoothing 68
Sort List by 146
SPEAK ALL (IT) 181
SPEAK DATE (IT) 181
SPEAK DISPLAY (IT) 181
SPEAK LAST SELECTION (IT) 181
SPEAK NEXT SENTENCE (IT) 181
SPEAK NOTEBOOK (IT) 181
Speak Recorded Messages 40
SPEAK SENTENCE (IT) 181
SPEAK TIME (IT) 181
Speak When Spelling 36
SPEAK WORD (IT) 181
Speaker Volume 19
SPEAKER VOLUME DOWN (IT) 181
SPEAKER VOLUME UP (IT) 181
Special Single Function Keys 20
SPEECH MARKER (IT) 181
Speech Menu 74
SPEECH MENU (IT) 181
SPEECH OFF (IT) 181
SPEECH ON (IT) 182
Speech On/Off 19
SPEECH ON/OFF (IT) 182
Speech Rate 75
Speech Rate (Auditory Prompt Voice) 76
Spell and Select Words 123
SPELL HOME (IT) 182
Spell Message or Define Key Function (Page) 103
Spell Message or Define Key Function (Unity) 139
Spell One Word 36
Spell to Mask 145
Spelling Keyboard: QWERTY/User Defined 26
START SCAN (IT) 182
Status Area – Classic Skin 13
Status Area – Skin 1/Skin 2 14
Status Area Background 39
Stimulus Size 66
Stimulus Sound 66
Stimulus Speed 66
Stimulus Type: Point/Point 2/Cross/Image 66
Store a NuVoice Macro under an Icon Sequence 128
Store a Phone Number in the Directory 117
Store a Recorded Core Message 125
Store a Recorded Message: Basic Steps 95
Store a Single Page Under an Icon Sequence 132
Store a Synthesized Speech Message 126
Store a Synthesized Speech Message: Basic Steps 96
Store a Tool in an Activity 141
Store a Tool Under an Icon Sequence 127
Store a Tool: Basic Steps 98
Store Category Prompt 105, 137
STORE CORE (IT) 182
STORE TEXT AREA (IT) 182
Store Text Area Tool 109
Store the "Use Settings" Keys in Your Vocabulary 74
Storing a Mid-Sequence Category 170
Storing Keyboard: QWERTY/User Defined 26
Suggest Spelling 85
Swap Core Keys 130
SWAP CORE KEYS (IT) 182
Swap Page Keys 105
SWAP PAGE KEYS (IT) 182
Switch User Area 25
SWITCH USER AREA (IT) 182
Sync Automatically 53
Sync Data Log Now 53
System Information Box 44
T
Take Picture 89
Templates 28
Test Pronunciation 34
Test Speech 75
Test Speech (Auditory Prompt Voice) 76
Text Area Options 39
Text Display Area 13
Text Editing Keys 91
TEXT MARKER (IT) 182
Text Size 37
TEXT SPEECH MARKER (IT) 182
Text/Background 110
The Alarm Tool 20
The Built-In Camera(s) 89
The Directory Page 160
The Help Key 18
The Joystick Adapter 184
The Modify Scan Pattern Menus 60
The Notebook Workspace 48
The Page Menu 108
The Toolbox 17
The Tools Menu 18
Time Format (Clock) 32
To Answer a Call 116
To Go to the Toolbox 17
To Make a Call 116
Toolbox: Enable/Disable 42
Tools Key: Enable/Disable 43
Touch Method 56
Track Status Box 63
Track Status Size 63
Tracking Settings 68
Tracking Status Graphics 63
Transfer Memory Menu 77

Index 209
TRANSFER MEMORY MENU (IT) 182
Treat Block As 60
Treat Block As (Essence) 172
Treble (Auditory Prompt Voice) 76
Treble (Speech Menu) 75
Troubleshooting 200
Tutor Auto-Update and Update Icon Tutor 143
Type of Message (Page) 103
Type of Message (Unity) 138
U
UNDO (IT) 182
Unity 120
Unity – Activities 133
Unity – Add a Word to the Word Prediction
Dictionary 124
Unity – Core Keys in the Toolbox 125
Unity – Icon Tutor 142
Unity – Icon Tutor View Count 142
Unity – Icon Tutor View Delay 142
Unity – Icon-Tutor-on-the-Fly 142
Unity – Mid-Sequence Category 169
Unity – Modify Scan Pattern 166
Unity – Pages 132
Unity – Vocabulary Builder Menu 143
Unity – Vocabulary Masking on the Fly 153
Unity – Word Prediction 122
Unmask 144
Unmask All 144
Unmasked Words/Phrases (Word Order) 144
Update via a USB Flash Drive 47
Update via a Wireless Connection 47
Updating NuVoice 46
Use Default Pattern 60
Use Default Scan Pattern Everywhere 59
Use Earphone Off/On 22
Use Previous Word 85
Use Screen as Switch 69
Use Sequence Sets 146
Use Word Lists 146
User Area Menu 25
USER AREA MENU (IT) 182
Using a Label or Content for a Prompt 21
Using a Microphone to Speak 119
Using the Camera Menu 89
Using the Dial Pad 115
Using the Mask Keys in the Status Display Area 154
Using the Phone Directory Page 117
Using the Vocabulary Builder Menu 144
Using Vocabulary Masking on the Fly 154
Using Word Lists 151
V
Validate After Calibration 67
Validate Now 67
Validation Results 67
View Finder 89
Vocabularies 16
Vocabulary Builder 145
Vocabulary Builder Advanced Options 145
Vocabulary Builder Menu 83
VOCABULARY BUILDER MENU (IT) 182
Vocabulary Builder Menu Options 144
VOCABULARY BUILDER OFF (IT) 182
VOCABULARY BUILDER ON (IT) 182
VOCABULARY BUILDER ON/OFF (IT) 182
Vocabulary Builder Style 146
VOCABULARY MASKING ON THE FLY (IT) 182
VOICE CLEAR TEMPORARY (IT) 182
VOICE SET TEMPORARY (IT) 183
Volume (Auditory Prompts Menu) 23
W
WAIT ANY KEY (IT) 183
When a Word has More the One Sequence 150
Word Lists 151
WORD PREDICTION KEY (IT) 183
Word Prediction Keys 86
WORD PREDICTION KEYS OFF (IT) 183
WORD PREDICTION KEYS ON (IT) 183
WORD PREDICTION KEYS ON/OFF (IT) 183
Word Prediction Menu 84
WORD PREDICTION MENU (IT) 183
WORD PREDICTION OFF (IT) 183
WORD PREDICTION ON (IT) 183
Word Prediction On/Off 84
WORD PREDICTION ON/OFF (IT) 183
Word Prediction Window 86
WORD PREDICTION WINDOW OFF (IT) 183
WORD PREDICTION WINDOW ON (IT) 183
WORD PREDICTION WINDOW ON/OFF (IT) 183
Words Only 146
Words with Alternate Pronunciations 193
Workspace Background and Text Colors 37
Workspace Preview 111

Index 210
Y
Year (Clock) 32
Z
Zoom In 89
Zoom Out 89
