

Table of Contents
| iii
Table of Contents
Table of Contents ...........................................................................iii
1. Introduction ............................................................................ 1
1.1 Main Features ................................................................ 1
1.2 Installation Environment ............................................... 4
1.3 Installation ...................................................................... 5
2. Key Functions ........................................................................ 8
2.1 Screen Layout ................................................................ 8
2.2 Polaris Home (Cloud product) .................................... 10
2.3 Managing Document .................................................... 11
2.4 Common Option Functions .......................................... 13
2.5 Show Document Info.................................................... 16
3. WORD ................................................................................... 18
3.1 Character Format ........................................................ 18
3.2 Paragraph Format ........................................................ 20
3.3 Editing Document ........................................................ 23
3.4 Setting the Layout of the Document ........................... 27
3.5 Using Tables ................................................................ 31
3.6 Inserting Images .......................................................... 34
3.7 Setting Page ................................................................. 35
3.8 Reviewing Documents ................................................. 38
3.9 Personal Information Protection ................................. 42
4. Sheet ..................................................................................... 44
4.1 Changing the Cell Format ........................................... 44
4.2 Setting the Cell, Column/Row, and Sheet .................. 46
4.3 Using Formulas ............................................................ 50
4.4 Using Charts ................................................................ 51

Table of Contents
iv |
4.5 Using Conditional Formats .......................................... 54
4.6 Using Filter/Sort .......................................................... 55
4.7 Using Pivot Table ........................................................ 57
4.8 Setting Page ................................................................. 59
5. Slide ...................................................................................... 62
5.1 Creating a Slide ............................................................ 62
5.2 Picture .......................................................................... 66
5.3 Video ............................................................................ 71
5.4 Shape ............................................................................ 72
5.5 Text .............................................................................. 74
5.6 Effects .......................................................................... 76
5.7 Slide Show .................................................................... 79
5.8 Slide Master ................................................................. 82
6. ODT ....................................................................................... 86
6.1 Character Format ......................................................... 86
6.2 Paragraph Format ........................................................ 88
6.3 Editing Document ......................................................... 91
6.4 Setting the Layout of the Document ........................... 95
6.5 Using Tables ................................................................ 98
6.6 Inserting Images ........................................................ 101
6.7 Setting Page ............................................................... 102
6.8 Reviewing Documents ............................................... 105
6.9 Personal Information Protection ............................... 107
7. PDF ..................................................................................... 109
7.1 Annotations ................................................................ 109
7.2 Editing as Office Documents ..................................... 111

1. Introduction
| 1
1. Introduction
1.1 Main Features
◼ Use a single program to mange various formats of documents
With Polaris Office, you can create, edit, convert, and save
documents in various formats, such as doc(x), ppt(x), xls(x), HWP,
ODT, and PDF, all in one place.
◼ Personalized user menus using AI technology
Polaris Office AI provides a customized quick menu by analyzing
user usage patterns and frequently used menus.

1. Introduction
2 |
◼ Real-time collaborative documents (Cloud product)
Polaris Drive lets you share files safely and allows for multiple
users to work at the same time.
◼ Insert images and videos from the internet into your
document
High-resolution images provided by Pixabay and Pexels as well as
Youtube videos can be searched for and inserted directly from
within the document.

1. Introduction
| 3
◼ User-friendly interface
Polaris Office offers various menu themes to select from and
intuitively designed icons for its features, allowing you to edit your
document conveniently and effectively.
◼ Various OS support (Cloud product)
Once you save a file to My Polaris Drive, you can edit and save it
in various operating systems, such as Windows, Mac, Android, and
iOS with just one account.

1. Introduction
4 |
1.2 Installation Environment
The following system specifications are suggested for proper
installation and usage of Polaris Office:
▪ Software Specification
Category
Specification
OS
▪ Windows 7 or higher
▪ Hardware Specification
Category
Specification
CPU
▪ Minimum: Intel Pentium 4 or higher
▪ Recommended: Intel Core i3 or higher
RAM
▪ Minimum: 2 GB or more
▪ Recommended: 4 GB or more
Hard Disk
1 GB (spare space for installation)
Graphic card
Open GL 3.0 or higher
Screen
Resolution
▪ Optimal: 1,920 × 1,080
▪ Recommendation: 1,600 × 900
NOTE
The minimum specifications must be met to use Polaris Office, and there
may be variations in the execution speed of the program depending on
the system.

1. Introduction
| 5
1.3 Installation
1. Double click the Polaris Office execution file.
2. Select your language and check the box to agree to the Polaris
Office terms and conditions. Then, click [Agree and Install].
NOTE
To set Polaris Office as the default program, check the
corresponding box.
3. Once installation is complete, click [Complete].

1. Introduction
6 |
4. Register the product number or log in.
To register the product number, enter the 25 digit serial
number provided with the product and click [OK].
To use the cloud service, enter your login information and
click [Next]. If you don’t have an account, click [create an
account] to create a new account.
NOTE

1. Introduction
| 7
Even while using the product, you can register the product or log
in.
5. Check that the shortcut icon was created on your desktop.
Installing Polaris Office Service will cause icons for WORD,
HWP, SLIDE, SHEET, and PDF to be added to your desktop.
Installing only Polaris Office will cause the icon for Polaris
Office to be added to your desktop.
NOTE
HWP is provided only for Polaris Office Korea.

2. Key Functions
8 |
2. Key Functions
2.1 Screen Layout
2.1.1 Ribbon Menu and Themes
Ribbon menu UI allows users to choose a convenient interface
when creating a Word or HWP document.
▪ MS Office ribbon menu and shortcuts
▪ HWP ribbon menu and shortcuts
To change the theme, click the [Settings] icon ( ) at the top right
of the document editing window and choose the desired theme.
Alternative, you can go to [File > Options] and change the theme
under the [Other] tab in the [Options] window.

2. Key Functions
| 9
2.1.2 Quick Menu
The AI analyses user usage patterns and displays up to 5 of the
most frequently used features on the title bar. These quick menus
will automatically change to match usage pattern changes.

2. Key Functions
10 |
2.2 Polaris Home (Cloud product)
Polaris Home is a feature included in the Polaris Office Service.
Polaris Home is not supported if you have purchased the Polaris
Office stand-alone product.
Polaris Home is the main menu that appears when running Polaris
Office. On Polaris Home, you can create documents in a variety of
formats and search for and open existing documents.
Figure 2-1Polaris Home Layout
No.
Name
Description
1
View
Recent
documents
Recently saved Word, Sheet, Slide, HWP, ODT,
and PDF documents are listed in sequential order
regardless of format.

2. Key Functions
| 11
2
Open My
Documents
Loads locally saved documents.
3
New
Document
and
Templates
Create a blank Word, Sheet, Slide, HWP, or OPT
document, or open a template.
2.3 Managing Document
2.3.1 Creating New Document
1. Click [File > New Document].
2. Click the desired document format to create a new document or
select a template to start a new document.
2.3.2 Opening Document
1. Click [File > Open] or click [Open] icon ( ) on the toolbar.
2. Select from recently used documents or search for a document
saved on your PC.

2. Key Functions
12 |
2.3.3 Saving Document
◼ Save
Click [File > Save] or click the [Save] icon ( ) on the toolbar. The
document is saved in the selected format.
NOTE
▪ When you work on already saved documents, click [Save] to overwrite
an existing document.
▪ When saving the document for the first time, a window that can give
the document a new name appears.
◼ Save As
When keeping an existing document and renaming it, click [File >
Save As].
2.3.4 Editing Document
◼ Export to PDF
To export to PDF, click [File > Export > PDF Files]. Or click [File >
Save As] and set the file format to PDF to save the document as a
PDF. Only a PDF file will be created and saved; the file’s original

2. Key Functions
| 13
format will not be saved separately.
◼ Export to ODT
To export to ODT, click [File > Export > ODT Document]. Or click
[File > Save As] and set the file format to ODT to save the
document as an ODT. Only an ODT file will be created and saved;
the file’s original format will not be saved separately.
NOTE
Only Word or HWP documents can be converted to ODT format.
2.4 Common Option Functions
Go to [File > Options] and click the tab you wish to change.
Program options can be checked and configured. Different options
are available depending on the document you are using.
2.4.1 General
▪ [Default Save Location]: Set the browser’s opening start location
when searching for or saving a file.
▪ [Automatic Recovery]: Set the time for automatic recovery of
documents. Click to select the check box of the [Automatic
Recovery Cycle] option to set the automatic recovery time.
▪ [Automatic Update]: Enable/disable automatic updates for PDF
documents.
▪ [Export to PDF/A]: Convert to PDF/A format, which is the ISO
standard document preservation format.
▪ [Enter mode]: Configure whether the program will be controlled via
mouse or touch screen.

2. Key Functions
14 |
▪ [Extension]: Configure the default program extension for Polaris
Office. Click [Default Program] and select the filename extension
from the Control Panel’s default program window.
NOTE
The default program installation window may be minimized
depending on your PC and operational status.
2.4.2 Show
▪ [Display language]: Set the language of the UI that appears on the
screen.
▪ [Default Font for New Worksheet]: Set the default font for the
sheet.
▪ [Calculation Options]: Set automatic or manual sheet calculations.
▪ [Unit]: Set the program’s default units.
▪ [Formatting]: Set to always display formatting symbols such as tab
characters, spaces, and paragraph marks.
▪ [Apply Preview Icon]: Set to display the thumbnails of SLIDE
Documents on Windows Explorer.
2.4.3 Proofing
▪ [Auto correct options]: Configure automatic correction of language,
capitalization, and text.

2. Key Functions
| 15
[Kor/Eng auto correct]: Configure detection and automatic
changing between Korean and English.
[Capitalize the First Letter of Each Sentence]: Configure
automatic capitalization of the first letter of a sentence.
[Automatically replace as listed]: Configure usage of text
shortcuts to automatically change entered text into its
designated result value.
▪ [Spell Check]: Names and other terminology can be added to the
user dictionary.
2.4.4 Other
▪ [Printing Options]: Click the check box to set the desired
background color and image print option.
▪ [Ribbon Style]: Select the ribbon style. The menu layout and the
shortcut keys change depending on whether the document is an MS
Word or HWP file.
▪ [Office]: Change Office themes and colors.
▪ [Edit]: Configure what action the cursor will take when pressing
<Enter> while making a Sheet document.
▪ [Picture quality when]: Configure the quality of images inserted in
the document.

2. Key Functions
16 |
▪ [Advanced file storage]: Saves a more reliable document, but the
size of the file may increase.
2.4.5 Program Information
Register the product number to activate the product, then confirm
or update the version of your product.
2.5 Show Document Info
Click [File > Document Infomation]. The document information can
be checked.

2. Key Functions
| 17
For Word, Sheet, Slide, and HWP documents, the following
features are also enabled:
▪ [Document Protection]: You can set a password for a document.
▪ [Read-only recommended]: Save Word and Sheet documents as
read only.
▪ [Apply Preview Icon]: Configure the display of Slide files
thumbnails on Windows Explorer.

3. WORD
18 |
3. WORD
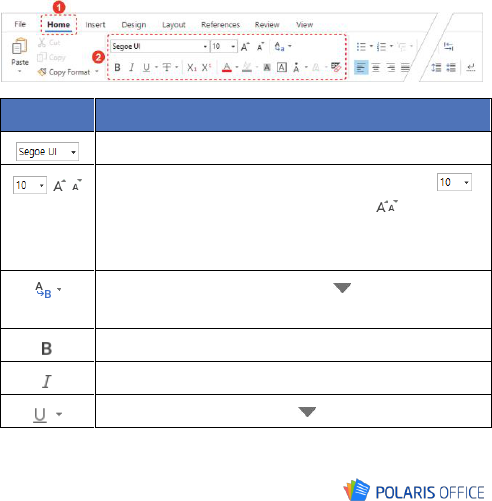
3.1 Character Format
3.1.1 Editing Fonts
The shape and size of the text entered into the document can be
changed to give a variety of effects.
◼ Changing from the Ribbon Menu
Select the text to edit by dragging it, and edit the font in the
[Home] tab.
Icons
Description
Change the font.
Change the size of the text. Enter the size into the [ ]
box or set the size to a preset value. The [ ] button can
also be clicked to enlarge or shrink in the order of the
preset font sizes.
Toggle the capitalization. Click the [ ] button to use the
option to toggle the capitalization.
Make the text bold.
Change the text to the italic font.
Insert an underline. Click the [ ] button to change the

3. WORD
| 19
Icons
Description
underline style and color.
Insert a strikethrough. Click the [ ] button to select the
type of strikethrough.
Add a superscript/subscript to the text.
Change the text color. Click the [ ] button to change the
color.
Highlight the text. Click the [ ] button to change the
color of the highlighted text.
Add a shade to the text. The default color is grey. Go to
the [Home] tab and click the [Shading] icon ( ).
Insert a border into the text.
Show the emphasis marks over each character. Click the
[ ] button to choose the type of emphasis mark.
Apply outlines, shadows, glimmer, and neon effects to
text. Click [ ] to select the effect type.
Clear all formatting applied to text except the text
highlight.
◼ Changing from the Font Window
1. Drag to select the text you wish to edit. Then right click it and
click the [Font] menu.
2. From the [Font] window, change the font style, character scaling,
spacing, and position. Then click [OK] to apply the changes.
3. WORD
20 |
3.2 Paragraph Format
3.2.1 Adjusting Paragraphs
Paragraphs are units of text in the document divided by changing
lines. To divided the text into paragraphs while typing, press the
<Enter> key.
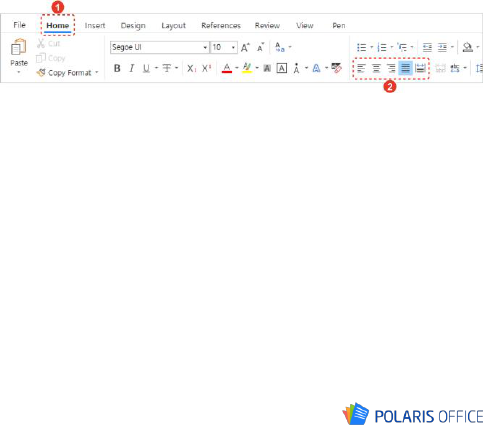
◼ Arranging Paragraphs
The paragraphs can be arranged to fit the left, center, or middle,
and the margins on either side.
Place the cursor at the paragraph you wish to change, and click
the desired arrange icon in the [Home] tab. The arrangement of
the paragraph the cursor is located at is changed.
When arranging all the paragraphs in the document,, press the
shortcut combination <Ctrl + A> and click the arrange icon.

3. WORD
| 21
3.2.2 Creating Bullets and Numbering
Create a list of several items, or a list with stages of an outline
level applied.
When listing several items, bullet symbols are normally used, and
when creating a list for consecutive movements or several steps,
numbering is applied.
◼ Adding Bullets
1. Place the cursor on the sentence to add bullets.
2. Go to the [Home] tab and click the [Bullets] icon’s ( ) extend
menu ( ) and select a desired type of bullet.
◼ Changing List Bulleting Standard
1. Place the cursor on the sentence that bullets are added to.
2. Click the expandable menu ( ) of the [Bullets] icon ( ) in the
[Home] tab to select the desired bullets.
3. Click the desired level from [Change List Level]. The default value
will be automatically applied to the list.

3. WORD
22 |
◼ Adding Numbers
1. Place the cursor on the sentence to add numbers.
2. Go to the [Home] tab and click the [Numbering] icon’s ( ) extend
menu ( ) and select a desired type of number.
◼ Setting the Numbering Value
1. When there are multiple numbered values dispersed throughout the
document and you wish to start again from 1, click the [Numbering]
expanding menu ( ) icon ( ), then click [Set Numbering Value].
The [Set Numbering Value] window will appear.
2. Set [Set Value To] as 1, and click the [OK] button. The numbering is
set again from 1.

3. WORD
| 23
3.3 Editing Document
Look for a particular word or phrase in the document, or search
for a word or phrase and automatically change it to a different
word or phrase.
3.3.1 Finding
1. Click [Find] in the [Home] tab. The [Find and Replace] window
appears.
2. Enter the content to search for. The search options can be set.
NOTE
When searching for more than one word, the search will not work if
the spacing is different.

3. WORD
24 |
3. Click the [Find Next] button. The page will move and show the
searched content each time the button is clicked. Clicking the
[Highlight All] button to search.
3.3.2 Replacing
1. Click [Find] in the [Home] tab. The [Find and Replace] window
appears.
2. Enter the content to search for. The search options can be set.
3. Click the [Replace] button. The page will move to the searched
content and replace it each time the button is clicked.
NOTE
Click the [Replace All] button to change the searched content all at
once.

3. WORD
| 25
3.3.3 Bookmark
Insert bookmarks to mark a place for easy access as with a
bookmark in a book. Custom names can be set for classification.
1. Select the text, image, or location to insert the bookmark in the
document.
2. Click [Insert > Bookmark]. The [Bookmark] window appears.
3. Enter the name into the [Bookmark name] box and click the [Add]
button.

3. WORD
26 |
NOTE
▪ To view the added bookmark, click [Insert > Bookmark]. On the
[Bookmark] window, the bookmark list is displayed.
▪ To move a certain bookmark position, go to the bookmark list and
select a bookmark position and click the [Move] button.
▪ To remove a bookmark, go to the bookmark list and select a
bookmark and click the [Delete] button.
3.3.4 Hyperlink
Insert web page hyperlinks that can send you to web pages by
clicking on text or objects.
1. Drag text or click objects to select them to use as hyperlinks in the
body.
2. Click [Hyperlink] in the [Insert] tab. The [Insert Hyperlink] window
appears.
3. Enter the web page address and click the [OK] button. The link is
applied and is shown in the body. Text with hyperlinks shows in a
different color.

3. WORD
| 27
NOTE
▪ To insert a hyperlink that can move to a certain location in the current
documet, click the [Current Document] tab on the [Insert Hyperlink]
window.
▪ To insert a hyperlink that can send an email, click the [Email] tab on
the [Insert Hyperlink] window.
▪ To move to a hyperlink, click the hyperlink while pressing the <Ctrl>
key on the keyboard.
▪ To remove an inserted hyperlink, place the cursor on the text where
the hyperlink is inserted, go to [Insert Hyperlink] window and click
the [Remove Link] button.
3.4 Setting the Layout of the Document
3.4.1 Page Break
1. Click the desired position to insert the page break in the document.
2. Go to the [Insert] tab and click [Page Break]. If the cursor is located
before a sentence, the page is broken before the cursor. If the
cursor is located after a sentence, the page is broken after the
cursor.

3. WORD
28 |
NOTE
To display formatting symbols such as paragraph marks or commands
while writing or editing a document, click the [Show/Hide Editing
Marks] icon ( ) from the [Home] tab.
3.4.2 Inserting the Header/Footer
Click the expandable menu ( ) on the Header or Footer to insert
the Header or Footer of the style provided by the program.
1. Click the [Header] or [Footer] button in the [Insert] tab or double
click the header area at the top of the page or the footer area at
the bottom of the page.

3. WORD
| 29
2. Click on the header or footer to add to document. A new
[Header/Footer] tab is formed, and the selected header or footer
style is applied.
3. To return to the document editing window, click the [Close
Header/Footer] button in the [Header/Footer] tab.
3.4.3 Removing the Header/Footer on the First Page
The instruction to creating the first page of the document as a title
page or creating the first page without a header/footer or page
number is as follows.
1. Click on the header or footer area.

3. WORD
30 |
2. Click [Header/Footer Options] in the [Header/Footer] tab.
3. Click [Different First Page]. The header, footer, and page number
disappears on the first page.
4. To return to the document editing window, click on [Close
Header/Footer] or click outside of the header and footer area.
3.4.4 Removing the header/footer
1. Double click on the header or footer area.
2. Double click on the header or footer to delete.
3. Click the <Delete> key on the keyboard. All connected headers and
footers are deleted.

3. WORD
| 31
3.5 Using Tables
3.5.1 Inserting Tables
1. Click [Insert > Table].
2. Move the mouse above the grids to designate the rows and
columns.
3. Click to insert the table.
NOTE
Use the [Insert Tables] window to insert a table. Select [Insert > Table
> Insert Table] and, on the [Insert Table] window, select the numbers of
columns and rows and click the [OK] button. You can insert a table that
is larger than the grid.

3. WORD
32 |
3.5.2 Editing Tables
◼ Inserting Rows and Columns
1. Select the cells to insert rows and columns at.
2. To insert a row from [Table Layout > Insert], click [Insert Above]
or [Insert Below]. To insert a column, click [Insert Left] or [Insert
Right]. A column and row is added.
◼ Deleting Rows and Columns
1. Select the cell to remove rows and columns at.
2. On [Table Layout > Delete], click [Delete Cells], [Delete Columns]
or [Delete Rows]. The rows or columns are deleted.

3. WORD
| 33
◼ Merging Cells
1. Drag to select two or more cells in the table.
2. Clicking [Table Layout > Merge Cells] will merge the selected cells
into one.
◼ Sorting Text
1. Place the cursor on the cell with the text to sort, or drag two or
more cells to select them.
2. Click [Table Layout > Align Text].
3. Click the desired text alignment option. The text position of the
selected cell is changed.

3. WORD
34 |
3.6 Inserting Images
3.6.1 Inserting Images Saved on the PC
1. Place the cursor on the position to place the image.
2. Click [Picture] in the [Insert] tab. The [Insert Picture] window
appears.
3. Select the image saved on the PC and click the [Open] button.
3.6.2 Inserting Screenshot Images
1. Place the cursor on the position to place the image.
2. Click [Screenshot] in the [Insert] tab. The currently activated
windows are viewed as thumbnails.
3. Select the desired thumbnail. The image is inserted into the chosen
position.

3. WORD
| 35
3.7 Setting Page
3.7.1 Setting the Margins
◼ Setting Preset Margins
Click [Layout > Margins]. The margins of the entire document can
be set to be identical.

3. WORD
36 |
◼ Setting Custom Margins
1. Click [Layout > Margins > Custom Margins...] or [Layout > Page
Settings]. The [Page Settings] window will appear.
2. After setting the margin in the [Page] tab, click the [OK] button.
3.7.2 Setting the Orientation
Click [Layout > Orientation]. The orientation of the entire
document can be set horizontally or vertically.

3. WORD
| 37
3.7.3 Setting Page Columns
After placing the cursor at the location where the column will
begin, click [Layout > Columns]. The document can be divided into
columns of a variety of types.
3.7.4 Changing the Text Direction
Click the desired text direction in [Layout > Text Direction].

3. WORD
38 |
▪ [Horizontal]: The text direction of the entire document is set
horizontally.
▪ [Vertical]: The text direction of the entire document is set vertically,
and text can be entered from the right side of the page.
▪ [Rotate Asian Characters 270˚]: Maintaining the horizontal text
direction of the entire document, Asian languages (2 byte
text/characters) are rotated 270˚, and European languages such as
English (1 byte text/characters) are excluded.
3.8 Reviewing Documents
3.8.1 Seeing the Word Count
Calculates and displays the number of words entered into the
document.
Click [Word Count] in the [Review] tab. The number of pages,
words, characters, paragraphs and lines can be checked.

3. WORD
| 39
3.8.2 Reviewing Spelling and Grammar
Click [Spelling and Grammar] or [Advanced Spell Check] in the
[Review] tab. You can check incorrect spelling or grammar by
going through the red underlines or by using the [Spell Check]
window on the right to make corrections directly.
3.8.3 Inserting Comments
1. Drag or place the cursor on the position to insert the comment.
2. Click [New Comment] in the [Review] tab. A comment is inserted in
the selected position.

3. WORD
40 |
3. Write comments in the comments window on the right.
4. Then click outside the comment box to end the Insert Comment
mode.
3.8.4 Using the Tracking Function
◼ Setting the Track Changes Function
Go to the [Review] tab and click the [Track Changes] icon ( ) or

3. WORD
| 41
go to the status bar and click [Track changes: Off] to set up the
tracking changes functions.
◼ Seeing Changes
Click the dropdown menu in the [Review] tab and set the options
for displaying changes and comments on the screen.
▪ [Simple Markup]: Comments and changes are displayed in a simple
manner.
▪ [No Markup]: Hides all comments and changes on the screen.
▪ [All Markup]: All comments and changes are displayed in the body
text.
▪ [Original]: Shows the original prior to change.

3. WORD
42 |
3.9 Personal Information Protection
You can select which types of personal information you wish to
protect.
1. Open a file’s original document, then go to [Home > Change
Personal Information]. The [Change Personal Information] window
will appear.
2. Click the desired format of personal information you wish to
protect.
[Customization Settings]: Add different information formats to
expand the search range.
[Set Display Format]: Change how protected information is
displayed in the document.
3. Click [Search] to search through the entire document. The next
instance of the search information will be highlighted with each
click.
4. When the information is highlighted, click the [Protect] button. To
protect all specified types of information all at once, click the
[Protect All] button.

3. WORD
| 43
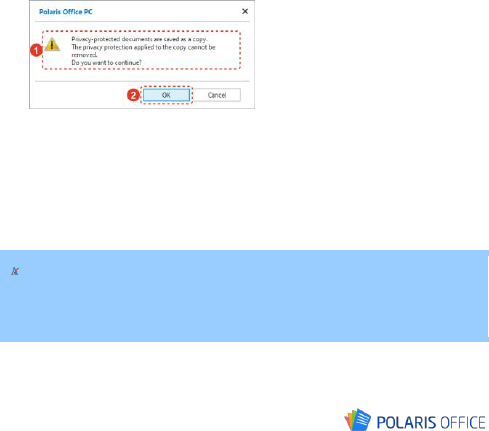
5. Read the warning message, then click [OK]. A copy of the
document will be created and the selected information will be
protected and replaced with asterisks (****).
6. Repeat steps 3–5 to protect the remaining information in the
document, then click [Close].
7. The protected information file is a copy of the original file. Choose
a document saving option in the [File] tab before closing to save
your document.
NOTE
Information encrypted in a protected document cannot be confirmed
within that document.

4. Sheet
44 |
4. Sheet
4.1 Changing the Cell Format
4.1.1 Editing Fonts
Select the text to edit by dragging it, and edit the font in the
[Home] tab.
4.1.2 Setting Borders and Filling
Cells can be selected to give a variety of border and filling effects.
◼ Modifying from the Ribbon Menu
Select the cell to apply changes, and edit the font in the [Home]
tab.
Icons
Description
Change the cell color. Click the [ ] button to change the
color.
Change the cell borders. Click the [ ] button to change
the position, line color, line style of the borders.

4. Sheet
| 45
◼ Editing from the Format Cells Window
1. Select the cell to set the borders of.
2. Click [Home > Format > Format Cells] or right click the cell and
click [Cell Format].
3. Click the [Border and Fill] tab in the [Cell Format] window.
4. Select the line style, line color and background color, and click the
border to apply them to.
5. Click the [OK] button. The set border settings will be applied to the
cell.
4.1.3 Setting the Text Alignment
Show the data more effectively by setting the text in cells in ways
such as vertical/horizontal alignment.
Select the cells to align, and click the align icon in the [Home] tab.
To change only the arrangement of certain cells, select the cells
you wish to change and click the arrange icon.

4. Sheet
46 |
4.2 Setting the Cell, Column/Row, and Sheet
4.2.1 Inserting
Click the cell you wish to insert a cell, row, or column and click
[Home > Insert] to insert a cell, row, or column. When inserting
sheets, a new sheet is inserted in front of an activated sheet.
You may also insert by selecting the relevant cell, row header,
column header, or sheet tab and right clicking.
NOTE
Click the cell you wish to insert a cell, row, or column and click [Insert
Cell] and the [Insert] window appears. Cells, rows, or columns can be
inserted into the desired position.
4. Sheet
| 47
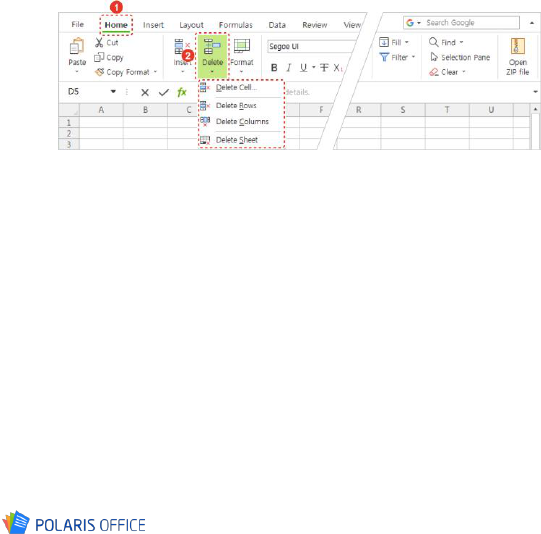
4.2.2 Deleting
Click the cell you wish to delete a cell, row, or column from and
click [Home > Delete] to delete a cell, row, or column. When
deleting sheets, an activated sheet is deleted.
You may also delete by selecting the relevant cell, row header,
column header, or sheet tab and right clicking.
4.2.3 Hiding and Unhiding
Hide and unhide rows in the same as hiding and unhiding columns.
◼ Hiding Rows
1. Select the row to hide.
2. Click [Home > Format > Hide Rows] or right click the row header
and click [Hide].

4. Sheet
48 |
◼ Restoring Visibility to Rows
1. Select rows so that the hidden row is included.
2. Click [Home > Format > Unhide Rows] or right click the row
header and click [Unhide].
◼ Hiding Sheets
1. Select the sheet to hide in the sheet tab.
2. Click [Home > Format > Hide Sheet] or right click the sheet tab
and click [Hide Sheet]. The selected sheet will be hidden.

4. Sheet
| 49
◼ Restoring Visibility to Sheets
1. Click [Home > Format > Unhide Sheet] or right click the sheet tab
and click [Unhide Sheets].
2. Click the sheet to restore visibility to in the [Unhide] window and
click the [OK] button. The hidden sheet will reappear.
4.2.4 Protecting Sheets
1. Select the sheet to protect in the sheet tab.
2. Click [Home > Format > Protect Sheet] or right click the sheet tab
and click [Protect Sheet].
Or click [Review > Protect Sheet].
3. Select the content to allow in the [Protect Sheet] tab and click the
[OK] button. The sheet will be protected.

4. Sheet
50 |
4.3 Using Formulas
4.3.1 Inserting Simple Formulas
The instruction to inserting simple formulas such as addition,
subtraction, multiplication and division is as follows.
1. Click the cell to insert a formula into.
2. Enter directly into the cell or click [Formula Bar] and enter as
follows.
3. Press the <Enter> key on the keyboard or click the [Enter] button
( ) at the formula and text entry bar. The formula will be inserted.
4.3.2 Inserting Functions
1. Click the cell to insert a formula into.
2. Select a desired function type on the [Formulas] tab.

4. Sheet
| 51
3. Click a function to insert it into the cell, then the [Formula] window
will appear. Enter the data into the formula input field.
4. Check the result in the [Formula] window, then click [OK]. The
formula will be inserted.
4.4 Using Charts
4.4.1 Inserting Charts
1. Drag to select the data area to insert the chart in.
2. Click the desired chart type in the [Chart] group in the [Insert] tab.
The chart is created in the designated area.

4. Sheet
52 |
4.4.2 Editing Charts
◼ Setting Chart Elements
To set up each chart element, click [Chart > Chart Element].
▪ [Axis]: The default horizontal and vertical axis can be hidden or
displayed.
▪ [Axis Title]: Click the [Axis Title] and the [Axis Title] window
appears. The X and Y axis titles can be entered and whether or not
it is displayed can be set.
▪ [Chart Title]: Click the [Chart Title] and the [Chart Title] window
appears. The chart title can be entered and whether or not it is
displayed can be set.
▪ [Data Label]: For each item, you may choose to hide the data, or
configure it to appear in the center, near the interior end, the
exterior end, or at the axis.
▪ [Data Table]: The data of a table can be displayed underneath the
chart in a table format.
▪ [Error Bars]: The error bars of the chart can be hidden, and the
error bars of the standard error, percentage, and standard
deviation can be added to the chart.
▪ [Gridlines]: Vertical and horizontal gridlines are shown in the chart
image area. Select multiple options to show them all.
▪ [Legend]: The legend is a small box that distinguishes the patterns
and colors assigned to the data types or items of the chart. The

4. Sheet
| 53
legend appears by default when a new chart is inserted, but
[Legend] can be clicked to hide or change the location of the
legend.
◼ Changing Chart Element Styles
1. Click the element to change the style of at the dropdown list in the
[Chart] tab.
2. On the [Chart] tab, click [Shape Styles], [Shape Fill], [Shape Outline],
or [Shape Effects] to change the style of the selected element.
◼ Changing Chart Styles
The style and color of inserted in charts by default can be
customized. Click [Change Colors] or [Styles] in the [Chart] tab.
◼ Converting the Rows/Columns of a Chart
Clicking [Chart > Switch Rows/Columns] switches the rows and
columns in the chart.
◼ Changing Chart Types
The chart type can be changed even without inserting a new chart.

4. Sheet
54 |
Click [Chart > Change Chart Type] and select the desired chart
type.
4.5 Using Conditional Formats
Select the cell that includes the data to apply conditional
formatting to and click [Home > Conditional Formatting]. The
formats and criteria to be applied to cells can be selected.
▪ [Cell Highlight Rules]: With comparison operators as the standard,
certain cell formats are designated within the cell range, making
cells much easier to find.
▪ [Top/Bottom Rules]: The maximum and minimum values in the cell
range can be searched for depending on the specified standard
value.
▪ [Data Bars]: Chosen cell values can be seen in comparison with
other cells with data bars. The length of the data bar represents
the cell value. As such, long bars represent top values and short
bars represent bottom values. Data bars are especially useful for
distinguishing top and bottom values within a large amount of data.

4. Sheet
| 55
▪ [Hue]: Hues are a helpful visual indicator for understanding data
distribution and alteration. Using two or three hues, you can
compare cell ranges with the hue gradation. The color shading
represents top/bottom values, or top/middle/bottom values.
▪ [Icon Set]: Categorize the data into 3-5 groups distinguished by the
threshold value, and use icon sets to attach footnotes. Each icon
represents a particular value range. For example, among 3 arrows
the red upwards arrow is the top value, the yellow sidewards arrow
the middle value, and the green downwards arrow the bottom value.
To clear a selected conditionally formatted cell or the rule of the
entire sheet, click [Home > Conditional Formatting > Clear Rules]
and select the desired item.
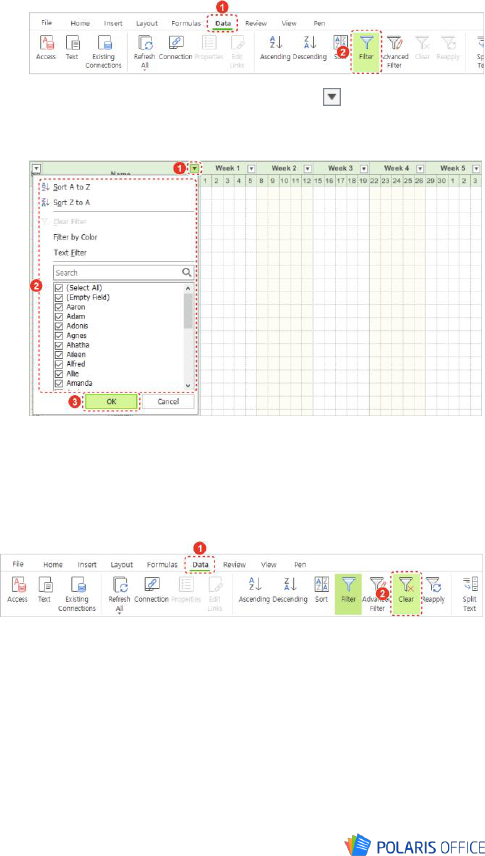
4.6 Using Filter/Sort
4.6.1 Creating Filters
1. Select the data on the sheet to use the filter function on.
2. On the [Data] tab, click [Filter]. A filter is created.
4. Sheet
56 |
3. Click the created filter’s expandable menu ( ). To specify a
sorting method or data filtering range, select the values to
show/hide and click [OK].
4.6.2 Removing Filters
If a value is hidden by a filter, go to the [Data] tab and click [Clear]
to show all hidden information.
4.6.3 Sorting Columns in Ascending Order and Descending
Order
The text, numbers, date, and time of one or more columns can
have data arranged in ascending or descending order.
1. Select the column to arrange.

4. Sheet
| 57
2. From the [Data] tab, click [Ascending] or [Descending].
4.7 Using Pivot Table
1. Ensure that data includes the table header and blank cells and click
[Insert > Pivot Table].
2. Select the range the data to analyze and the position where the
pivot table report will be inserted and then click the [OK] button.
3. From the [PivotTable Fields] window, drag the field list to the
desired position. A PivotTable will be inserted.

4. Sheet
58 |
4. Check your PivotTable report and adjust the field list.
[Update Later]: Checking this box will cause changes made to
the field list to not be immediately applied to the PivotTable.
Click the [Update] button to apply the changes.

4. Sheet
| 59
4.8 Setting Page
4.8.1 Quickly Setting the Print Area
1. Drag the mouse to select the area to print.
2. Click [Layout > Print Area > Set Print Area]. The print area will be
set.
4.8.2 Adding a Print Area
1. Select an area to print other than the set areas.
2. Click [Layout > Print Area > Add Print Area]. The print area will be
added.
4.8.3 Setting Custom Print Areas
1. Click [Page Settings] from the [Layout] tab, [Margins > Custom
Margins] or [Size > More Paper Sizes] to open the [Page Settings]
window.

4. Sheet
60 |
2. Specify the cell range that will be printed from the [Sheet] tab.
3. Click the [OK] button. The entered cell range will be set as the
print area.
4.8.4 Freezing Panes
Freeze a row or column so that it will be displayed in the
worksheet as you scroll up/down or left/right.
From the [View] tab, click the [Freeze Panes] icon ( ). A line will
appear over the currently selected row or column, causing it to
continuously be displayed as you navigate the worksheet.
Click the [ ] button from the [Freeze Panes] window to freeze the
first row or column.

4. Sheet
| 61
NOTE
To unfreeze, click the [Cancel Freeze Panes] icon ( ) from the [View]
tab. The freeze border will be deleted.

5. Slide
62 |
5. Slide
5.1 Creating a Slide
5.1.1 Inserting a New Slide
1. Select the slide above the position you wish to insert a slide.
2. Click the [Insert Slide] icon ( ) on the left side of the selected
slide. A slide with the same layout as the selected slide will be
inserted below it. To insert a blank slide, click the [New Slide] icon
( ) from the [Insert] tab.
5.1.2 Copying Slides
1. Select the slide you wish to copy in the downscaled slide layout to
the left of the screen.
2. Click the [Duplicate Slide] icon ( ) on the left sife of the selected
slide. From the [Insert] tab, click [New Slide], then [Duplicate
Selected Slide]. A duplicate of the selected slide will be inserted
below it.

5. Slide
| 63
5.1.3 Moving Slides
Slides can be moved to the desired position.
Click the slide to move in the downscaled slide layout to the left of
the screen, and drag it to the desired position.
5.1.4 Deleting Slides
Slides can be deleted.
Right click the slide you wish to delete from the outline on the left
side of the screen and click [Delete Slide]. Or select the slide you
wish to delete and press the keyboard’s <Delete> key.

5. Slide
64 |
5.1.5 Changing Layout
An existing slide can be given a new layout when creating a
presentation.
1. Choose the slide to change the layout of.
2. Click [Insert > Layout] or go to the [Home] tab and click [Layout]
icon ( ). You can change the layout.
3. Selected the desired layout. The layout is changed to what is
selected.
5.1.6 Changing the Slide Size
1. Click [Design> Slide Size].

5. Slide
| 65
2. Select a ratio. Slide sizes can be set to either 4:3 or 16:9.
5.1.7 Adding Footers
1. Select the slide to apply a footer to.
2. Click [Insert > Header/Footer].
3. Once the [Header/Footer] window appears, check [Footer] in the
[Slide] tab and enter desired text.
NOTE
▪ To add a date and time to the presentation, check the [Date and

5. Slide
66 |
Time] item and select a desired method.
▪ To add a slide number to the presentation, check the [Slide
Number] item.
4. Click [Apply]. The footer appears at the center of the bottom of the
slide.
5.2 Picture
5.2.1 Inserting Images
1. Select the slide to insert an image to.
2. Click [Picture] in the [Insert] tab. The [Insert Picture] window
appears.
3. Select the image saved on the PC and click the [Open] button.
5.2.2 Editing Images
◼ Setting the Position of the Image with Another Object
1. Click to select the image to set the position with another object
such as an image or shape.
2. On the [Picture] tab, click the [Bring Forward] icon ( ) or [Send
Backward] icon ( ).

5. Slide
| 67
[Bring Forward > Bring to Front]: Bring the image to the front.
[Send Backward > Send to Back]: Send the image to the back.
◼ Moving Images
Select the image you wish to move. The image can be dragged to
the desired position when the mouse cursor turns into a cross
shape ( ).
◼ Adjusting the image Size
1. Click to select the image you wish to adjust the size of.
2. Enter numbers into the size adjustment box in the [Picture] tab or
click the up/down arrow keys to adjust the size. Adjust the height
in the upper box, and the width in the lower box.
NOTE
▪ The absolute size of the image can be adjusted in the expandable
menu of [Size], which can be found by clicking the [Format Picture]
window that appears by clicking the [Size and Position] menu after
right clicking the image.

5. Slide
68 |
▪ The image size can be changed by dragging the edges and corners of
the image. The size of the image can be changed to be centered
around the middle of the image by dragging while pressing the
<Ctrl> key on the keyboard.
◼ Cropping the Image
1. Click to select the image to crop.
2. Click the [Crop] icon ( ) from the [Picture] tab.
3. Drag the edges and corners of the image to set the area to crop.
The gray area will be cropped.
4. Click the <Esc> key on the keyboard. The grey area is cropped,
and only the remaining parts will be visible.
◼ Rotating the Image
1. Click to select the image you wish to rotate.
2. Click [Rotate] in the [Picture] tab and select the desired rotating
options.

5. Slide
| 69
NOTE
▪ To rotate the image in angels other than the default 90 degree
rotation or mirroring option, click [Picture > Rotate > More Rotation
Options], or right click the image and then click [Size and Position]
and enter the rotation angle in the [Size] tab in the [Format Picture]
window.
▪ Click the image and a circle appears at the top. Placing the mouse on
the circle changes the mouse cursor into a rotating shape ( ), and
you can drag to change the angle of the image.
◼ Arranging Images
1. Select the image to arrange.
2. Go to [Picture> Alignment] and specify how the image will be
arranged.

5. Slide
70 |
[Align to the Slide]: Aligns the image to the slide.
[Align Selected Object]: When two or more objects like images,
shapes, and charts are selected, the selected objects become
the standards of each other.
3. Select the desired alignment option. The image is automatically
aligned based on the selected option.
◼ Creating Groups
Group multiple objects to edit as one entity.
1. To create a group, drag least two objects such as images or shapes
or click them while pressing the <Ctrl> on the keyboard.
2. Click [Picture > Group > Group]. The selected objects are put into
a single group.
NOTE
To ungroup, right click the group and click [Group > Ungroup].

5. Slide
| 71
◼ Applying Image Styles
1. Click to select the image you wish to apply a style to.
2. Click [Style], [Picture Border] or [Picture Effects] in the [Picture] tab
to set an image style.
◼ Changing the Image
1. Click to select the image to change
2. Click [Change Picture] in the [Picture] tab. The [Insert Picture]
window appears.
3. Select the desired image and click the [Open] button. The new
image will be inserted in the position of the previous image.
5.3 Video
5.3.1 Inserting Videos
1. Select the slide to insert the video file into.
2. Click [Insert > Video]. The [Insert Video] window appears.
3. Select a video file saved on your PC and click the [Open] button.
5.3.2 Editing Videos
On inserting a video, the [Video] tab is created. Videos can be

5. Slide
72 |
edited from the [Video] tab.
◼ Applying Video Options
Video options such as video previews, volume, and replay can be
set in the [Video] tab.
NOTE
▪ To insert an audio file, click [Insert > Audio], then select a file from
the [Insert Audio] window.
▪ To edit the audio, use the features of the [Audio Tools] tab.
5.4 Shape
5.4.1 Inserting Shapes
Lines, triangles, basic shapes, arrows, equation shapes, flowcharts,
stars/banners, and callouts can be inserted in the document.
1. Click [Shape] in the [Insert] tab.
2. Select the desired shape, and drag on the document editing window
to draw the shape. The shape is inserted.

5. Slide
| 73
◼ Changing Shape Types
You can change the shape type without inserting a new shape. On
the [Shape] tab, click [Change Shape] and select a desired shape
type.
5.4.2 Adding/Editing Text to Shape
To insert a text to a shape, right click the shape and click the [Edit
Text] menu. A cursor appears in the center of the shape where text
can be entered. After entering the content, click anywhere outside
the shape area or click the <Esc> key on the keyboard.
NOTE
To change the font, select a shape and designate the desired font style
in the [Home] tab.

5. Slide
74 |
5.5 Text
5.5.1 Inserting and Editing Text Boxes
1. Click [Text Box] in the [Insert] tab and click the desired text
direction.
2. Drag with the mouse to draw a text box of the desired size.
3. Put the insert pointer into the text box, and enter the content.
4. Click the text box you want to edit. The [Shape] tab is generated.
5. On the [Shape] tab, change the alignment, style, shading, text
direction, and size of the text box.
5.5.2 Inserting and Editing WordArt
1. Click [WordArt] in the [Insert] tab.

5. Slide
| 75
2. Click the desired WordArt. The WordArt is inserted in the
document in text box form.
3. Click the inserted WordArt text box and enter the content.
4. Click the WordArt text box you wish to edit. The [Shape] tab will
appear.
5. You can change the location, style, text direction, and size of the
WordArt from the [Shape] tab.
5.5.3 Inserting Symbols
1. Place the cursor on the position to place the symbol.
2. Click [Symbol] in the [Insert] tab. The recently used symbols
appear.
To insert any symbol, special character or Unicode character
that you don’t find on the keyboard, click [More Symbols]. The
[Symbol] window appears.

5. Slide
76 |
To insert special characters such as Em Dash, En dash,
Copyright, and Registered trade mark, go to the [Symbol]
window and click the [Special Characters] tab.
3. Click the desired symbol. The symbol will be inserted into the
selected position.
5.6 Effects
5.6.1 Setting Slide Transition Effects
◼ Applying Screen Transition Effects
1. Select the slide to apply a transition effect to.
2. Select a desired transition effect from the [Slide Transition] group
in the [Transition] tab.
NOTE
The direction of advancing slides can be set by clicking [Effect
Options]. If there are no direction options, [Effect Options] is not

5. Slide
| 77
activated.
3. Set the transition speed and timing in the [Timing] group. The
transition effect will be applied.
NOTE
▪ Click the [Apply to All] button and identical content is applied
to all slides.
▪ Click [Preview]. The transition applied to the slide can be
previewed.
◼ Removing Screen Transition Effects
1. Select the slide to remove a transition effect from.
2. On the [Transition] tab, go to [Slide Transition] group and click
[None]. Slide Transition Effects will be canceled.
5.6.2 Object Animation Effects
◼ Applying Animation Effects
1. Select the text or object to apply an animation effect to.

5. Slide
78 |
2. Click the desired animation effect from the [Animation Effect]
group in the [Animation] tab.
NOTE
▪ The animation effects can be changed by clicking [Effect
Options]. If there is no option content in the selected animation
effect, [Effect Options] is not activated.
▪ Click [Add Animation] to set a variety of animation effects to an
object.
3. Set the animation starting position and timing in the [Timing] group.
The animation effect is applied to the object.
NOTE
Click [Preview] to see the applied animation effect.
◼ Removing Animation Effects
1. Select the text or object to remove an animation effect from.

5. Slide
| 79
2. Click [None] from the [Animation Effect] group in the [Animation]
tab. The animation effect is disabled.
5.7 Slide Show
5.7.1 Starting Slide Show
◼ Starting from the Beginning
Slide shows can be started from the beginning.
Click [From Beginning] from the [Slide Show] tab. The slide show
will start from the beginning.

5. Slide
80 |
◼ Starting from the Current Slide
Slide shows can be started from the beginning.
1. Select the slide to start the slide show from.
2. Click [From Current Slide] in the [Slide Show] tab. The slide show
starts from the current slide.
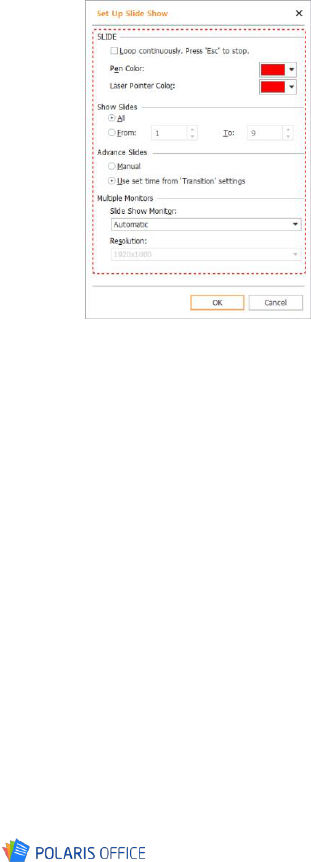
5.7.2 Setting Slide Show
1. Click [Set Up Slide Show] in the [Slide Show] tab.
2. Set the slide show options in the show setup window.
5. Slide
| 81
[SLIDE]: Set the color of the pen and laser pointer in the slide
show.
[Show Slides]: The position of the slides shown in the slide
show can be designated.
[Advance Slides]: The settings for advancing slides can be
configured to manual or a set time.
[Multiple Monitors]: The slide show can be displayed in
another connected monitor.
3. Click the [OK] button. The changes will be applied.
5.7.3 Hiding Slides
If there are slides that are necessary to the presentation but must
not be seen in the slide show, the slide can be hidden.
1. Select the slide show to hide in the slide show.
2. Click [Hide Current Slide] in the [Slide Show] tab.

5. Slide
82 |
3. Hide the slide so it does not appear in the slide show. Hidden slides
are indicated with a backslash (\) at the downscaled slide layout
to the left, and the downscaled slide is change to look blurry.
NOTE
Clicking [Hide Current Slide] again on a hidden slide and it will no
longer be hidden.
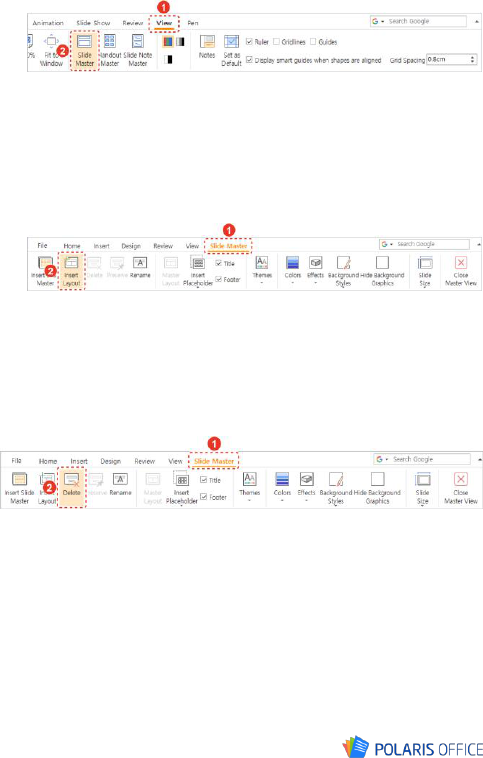
5.8 Slide Master
The slide master consists of the slide master (1) and a connected
layout (2).

5. Slide
| 83
5.8.1 Forming the Slide Master
◼ Adding the Slide Master
1. Click [Slide Master] from the [View] tab. 11 layouts linked to the
new slide master will be created, then the [Slide Master] tab will
appear.
2. Click [Insert Slide Master] in the [Slide Master] tab. The 11 layouts
linked to the new slide master are created.
5. Slide
84 |
◼ Adding Slide Layouts
1. Click [Slide Master] in the [View] tab. The [Slide Master] tab is
created.
2. In the downscaled slide layout to the left, select the slide above the
position you wish to insert a new layout.
3. Click [Insert Layout] in the [Slide Master] tab. A new slide layout is
created below the selected slide. However, if the layout is inserted
after selecting the slide master, it will be created in the previous
layout position.
5.8.2 Removing Slide Masters and Layouts
Select the slide master or layout you wish to delete and click
[Delete] in the [Slide Master] tab. The selected slide master or
layout is deleted.
▪ If a slide master is deleted, the connected layouts are also removed.
▪ However, if there is only a single slide master, it cannot be deleted.

5. Slide
| 85
5.8.3 Preserving the Slide Master
The slide master may be automatically deleted when the slides
following a slide master are all deleted or when a different design
format file is applied to the slides following the slide master. For
these cases, the master can be preserved so it is not automatically
deleted.
Select the slide master to preserve and click [Preserve] in the
[Slide Master] tab.
NOTE
If a slide layout is selected, [Preserve] cannot be activated.
6. ODT
86 |
6. ODT
6.1 Character Format
6.1.1 Editing Fonts
The shape and size of the text entered into the document can be
changed to give a variety of effects.
◼ Modifying from the Ribbon Menu
Select the text to edit by dragging it, and edit the font in the
[Home] tab.
Icons
Description
Change the font.
Change the size of the text. Enter the size into the [ ]
box or set the size to a preset value. The [ ] button can
also be clicked to enlarge or shrink in the order of the
preset font sizes.
Toggle the capitalization. Click the [ ] button to use the
option to toggle the capitalization.
Make the text bold.
Change the text to the italic font.
Insert an underline. Click the [ ] button to change the

6. ODT
| 87
Icons
Description
underline style and color.
Insert a strikethrough. Click the [ ] button to select the
type of strikethrough.
Add a superscript/subscript to the text.
Change the text color. Click the [ ] button to change the
color.
Add a shade to the text. The default color is grey. Go to
the [Home] tab and click the [Shading] icon ( ).
Insert a border into the text.
Show the emphasis marks over each character. Click the
[ ] button to choose the type of emphasis mark.
Clear all formatting applied to text except the text
highlight.
◼ Change from the Font Window
1. Drag to select the text you wish to edit. Then right click it and
click the [Font] menu.
2. From the [Font] window, change the font style, character scaling,
spacing, and position. Then click [OK] to apply the changes.

6. ODT
88 |
6.2 Paragraph Format
6.2.1 Adjusting Paragraphs
Paragraphs are units of text in the document divided by changing
lines. To divided the text into paragraphs while typing, press the
<Enter> key.
◼ Arranging Paragraphs
The paragraphs can be arranged to fit the left, center, or middle,
and the margins on either side.
Place the cursor at the paragraph you wish to change, and click
the desired arrange icon in the [Home] tab. The arrangement of
the paragraph the cursor is located at is changed.
When arranging all the paragraphs in the document, press the
shortcut combination <Ctrl + A> and click the arrange icon.
6.2.2 Creating Bullets and Numbering
Create a list of several items, or a list with stages of an outline
level applied.
When listing several items, bullet symbols are normally used, and
when creating a list for consecutive movements or several steps,

6. ODT
| 89
numbering is applied.
◼ Adding Bullets
1. Place the cursor on the sentence to add bullets.
2. Go to the [Home] tab and click the [Bullets] icon’s ( ) extend menu
( ) and select a desired type of bullet.
◼ Changing List Level
1. Place the cursor on the sentence that bullets are added to.
2. Click the expandable menu ( ) of the [Bullets] icon ( ) in the
[Home] tab to select the desired bullets.
3. Click the desired level from [Change List Level]. The default value
will be automatically applied to the list.
◼ Adding Numbers
1. Place the cursor on the sentence to add numbers.
2. Go to the [Home] tab and click the [Numbering] icon’s ( ) extend
menu ( ) and select a desired type of number.

6. ODT
90 |
◼ Setting the Numbering Value
1. When there are multiple numbered values dispersed throughout the
document and you wish to start again from 1, click the [Numbering]
expanding menu ( ) icon ( ), then click [Set Numbering To]. The
[Set Numbering To] window will appear.
2. Set [Set Value To] as 1, and click the [OK] button. The numbering is
set again from 1.

6. ODT
| 91
6.3 Editing Document
Look for a particular word or phrase in the document, or search
for a word or phrase and automatically change it to a different
word or phrase.
6.3.1 Finding
1. Click [Find] in the [Home] tab. The [Find and Replace] window
appears.
2. Enter the content to search for. The search options can be set.

6. ODT
92 |
NOTE
When searching for more than one word, the search will not work if
the spacing is different.
3. Click the [Find Next] button. The page will move and show the
searched content each time the button is clicked. Clicking the
[Highlight All] button to search.
6.3.2 Replacing
1. Click [Replace] in the [Home] tab. The [Find and Replace] window
appears.
2. Enter the content to search for. The search options can be set.
3. Click the [Replace] button. The page will move to the searched
content and replace it each time the button is clicked.

6. ODT
| 93
NOTE
Click the [Replace All] button to change the searched content all at
once.
6.3.3 Bookmark
Insert bookmarks to mark a place for easy access as with a
bookmark in a book. Custom names can be set for classification.
1. Select the text, image, or location to insert the bookmark in the
document.
2. Click [Insert > Bookmark]. The [Bookmark] window appears.
3. Enter the name into the [Bookmark name] box and click the [Add]
button.

6. ODT
94 |
NOTE
▪ To view the added bookmark, click [Insert > Bookmark]. On the
[Bookmark] window, the bookmark list is displayed.
▪ To move a certain bookmark position, go to the bookmark list and
select a bookmark position and click the [Go To] button.
▪ To remove a bookmark, go to the bookmark list and select a
bookmark and click the [Delete] button.
6.3.4 Hyperlink
Insert web page hyperlinks that can send you to web pages by
clicking on text or objects.
1. Drag text or click objects to select them to use as hyperlinks in the
body.
2. Click [Hyperlink] in the [Insert] tab. The [Insert Hyperlink] window
appears.

6. ODT
| 95
3. Enter the web page address and click the [OK] button. The link is
applied and is shown in the body. Text with hyperlinks shows in a
different color.
NOTE
▪ To insert a hyperlink that can move to a certain location in the current
documet, click the [Current Document] tab on the [Insert Hyperlink]
wondow.
▪ To insert a hyperlink that can send an email, click the [Email] tab on
the [Insert Hyperlink] window.
▪ To move to a hyperlink, click the hyperlink while pressing the <Ctrl>
key on the keyboard.
▪ To remove an inserted hyperlink, place the cursor on the text where
the hyperlink is inserted, go to [Insert Hyperlink] window and click
the [Remove Link] button.
6.4 Setting the Layout of the Document
6.4.1 Page Break
Pages can be broken where necessary while creating a document.
1. Click the desired position to insert the page break in the document.
2. Go to the [Insert] tab and click [Page Break]. If the cursor is located
before a sentence, the page is broken before the cursor. If the

6. ODT
96 |
cursor is located after a sentence, the page is broken after the
cursor.
6.4.2 Inserting the Header/Footer
Click the header or footer’s expandable menu ( ) to insert a
header or footer.
1. Click [Header > Edit Header] or [Footer > Edit Footer] from the
[Insert] tab.
2. Insert the contents of your document’s header or footer. The
[Header/Footer] tab will appear.

6. ODT
| 97
3. To return to the document editing window, click the [Close
Header/Footer] button in the [Header/Footer] tab.
6.4.3 Removing the Header/Footer
To delete the header or footer, click [Header > Remove Header]
or [Footer > Remove Footer] from the [Insert] tab.

6. ODT
98 |
6.5 Using Tables
6.5.1 Inserting Tables
1. Click [Insert > Table].
2. Move the mouse above the grids to designate the rows and
columns.
3. Click to insert the table.
NOTE
The fastest method to adding tables is to select from the grid. However,
tables exceeding the grid size cannot be inserted. To insert tables
exceeding the grid area, click [Insert > Table > Insert Table].

6. ODT
| 99
6.5.2 Editing Tables
◼ Inserting Rows and Columns
1. Select the cells to insert rows and columns at.
2. To insert columns from [Table Layout > Insert], click [Insert Above]
or [Insert Below]. To insert rows, click [Insert Left] or [Insert
Right]. A column and row is added.
◼ Deleting Rows and Columns
1. Select the cell to remove rows and columns at.
2. On [Table Layout > Delete], click [Delete Cell], [Delete Columns] or
[Delete Rows]. The rows or columns are deleted.

6. ODT
100 |
◼ Merging Cells
1. Drag to select two or more cells in the table.
2. Clicking [Table Layout > Merge Cells] will merge the selected cells
into one.
◼ Sorting Text
1. Place the cursor on the cell with the text to sort, or drag two or
more cells to select them.
2. Click [Table Layout > Align Text].
3. Click the desired text alignment option. The text position of the
selected cell is changed.

6. ODT
| 101
6.6 Inserting Images
6.6.1 Inserting Images Saved on the PC
1. Place the cursor on the position to place the image.
2. Click [Picture] in the [Insert] tab. The [Insert Picture] window
appears.
3. Select the image saved on the PC and click the [Open] button.
6.6.2 Inserting Screenshot Images
1. Place the cursor on the position to place the image.
2. Click [Screenshot] in the [Insert] tab. The currently activated
windows are viewed as thumbnails.
3. Select the desired thumbnail. The image is inserted into the chosen
position.

6. ODT
102 |
6.7 Setting Page
6.7.1 Setting the Margins
◼ Setting Preset Margins
Click [Layout > Margins]. The margins of the entire document can
be set to be identical.
◼ Setting Custom Margins
1. Click [Layout > Margins > Custom Margins...] or [Layout > Page
Settings]. The [Page Settings] window will appear.
2. After setting the margin in the [Page] tab, click the [OK] button.

6. ODT
| 103
6.7.2 Setting the Orientation
Click [Layout > Orientation]. The orientation of the entire
document can be set horizontally or vertically.
6.7.3 Setting Page Size Options
Click [Layout > Size]. The document paper size can be set to a
variety of sizes.

6. ODT
104 |
6.7.4 Setting Page Columns
The page can be divided into multiple columns with the column
setting function. Using columns makes the document appear more
organized and more content can be seen at once.
After placing the cursor at the location where the column will
begin, click [Layout > Columns]. The document can be divided into
columns of a variety of types.

6. ODT
| 105
6.8 Reviewing Documents
6.8.1 Seeing the Word Count
Calculates and displays the number of words entered into the
document.
Click [Word Count] in the [Review] tab. The number of pages,
words, characters, paragraphs and lines can be checked.
6.8.2 Reviewing Spelling and Grammar
Click [Spelling and Grammar] or [Advanced Spell Check] in the
[Review] tab. You can check incorrect spelling or grammar by
going through the red underlines or by using the [Spell Check]
window on the right to make corrections directly.

6. ODT
106 |
6.8.3 Inserting Comments
1. Drag or place the cursor on the position to insert the comment.
2. Click [New Comment] in the [Review] tab. A comment is inserted in
the selected position.
3. Write comments in the comments window on the right.
4. Then click outside the comment box to end the Insert Comment
mode.

6. ODT
| 107
6.9 Personal Information Protection
You can select which types of personal information you wish to
protect.
1. Open a file’s original document, then go to [Home > Change
Personal Information]. The [Change Personal Information] window
will appear.
2. Click the desired format of personal information you wish to
protect.
[Custommization Settings]: Add different information formats
to expand the search range.
6. ODT
108 |
[Set Display Format]: Change how protected information is
displayed in the document.
3. Click [Search] to search through the entire document. The next
instance of the search information will be highlighted with each
click.
4. When the information is highlighted, click the [Protect] button. To
protect all specified types of information all at once, click the
[Protect All] button.
5. Read the warning message, then click [OK]. A copy of the
document will be created and the selected information will be
protected and replaced with asterisks (****).
6. Repeat steps 3–5 to protect the remaining information in the
document, then click [Close].
7. The protected information file is a copy of the original file. Choose
a document saving option in the [File] tab before closing to save
your document.
NOTE
Information encrypted in a protected document cannot be confirmed
within that document.

7. PDF
| 109
7. PDF
7.1 Annotations
7.1.1 Adding Annotations
◼ Adding Sticker Notes
1. Click [Annotation > Sticker note].
2. Click where the sticker note will be placed. Then, the sticker note
icon ( ) will appear.
3. Double click the sticker note icon and enter your comment. When
you are done, press the <Esc> key.
◼ Using Text Editing Tools
1. Click [Highlight], [Underline], or [Strikethrough] in the [Annotation]
tab.
2. Drag the part in the body text to add emphasis or deletion marks to.
Emphasis or deletion marks are added to the body text.

7. PDF
110 |
◼ Using Drawing Markup Tools
1. Click a drawing markup tool in the [Annotation] tab.
2. Drag it to desired position. The drawing markup is added.
7.1.2 Showing Annotations
To show inserted annotations on the screen, click [Annotation >
Show Annotation]. Click [Show Annotation] again to hide the
annotations from the screen.
7.1.3 Deleting Annotations
The instructions to remove annotations displayed in the document
are as follows.
1. Click [Annotation > Show Annotation] to show all annotations on
the screen.
2. Click the [Delete] icon ( ) in the [Annotation] tab.

7. PDF
| 111
3. Select the annotations to delete. The selected annotations are
deleted.
NOTE
To delete all annotations added to the document, go to the
[Annotation] tab and click [Delete > Delete whole annotation].
7.2 Editing as Office Documents
You can convert a PDF file to a Word (.docx), Sheet (.xlsx), Slide
(.pptx) or Hangul (.hwp) format and edit the document.
1. Open the PDF file you wish to edit as an office document.
2. Select a format from the [Home] tab and save.
3. After saving in the selected format, edit the contents and save
again.

7. PDF
112 |
