

Printer’s Plan 2019 What’s New and Improved Page 1
Table of Contents
Page
New PayPal Integration
● PayPal Integration
● Notify the customer via Printer’s Plan
● Notify the customer via Paypal
● Receiving Payments
2
3
4
5
New Smtp Client
● SMTP Client
6
Deeper QuickBooks Integration
● Direct Connection to QuickBooks
● Quickbooks Class Tracking
● Export Invoices to QuickBooks
8
10
11
Jobs Section
● New Price Level Option
● New Jobs Ready to Post Option
● New Digital Printing Options
13
14
14
Print Options
● Improved Print Options
16
Web2Plan
● Send Status Updates
● New field on a Job: WebID
17
19
Other Changes and Improvements
● Changes and fixes to the program
20

Printer’s Plan 2019 What’s New and Improved Page 2
NEW PAYPAL INTEGRATION
Paypal Integration
When emailing invoices, optionally include a “Click Here to Pay” link and allow customers to securely pay their invoices
online with their credit card (a PayPal account is not required). In the Print window of an order there is a new invoice
option, E-Invoice (PayPal)
When you select this option the invoice will be generated online:

Printer’s Plan 2019 What’s New and Improved Page 3
Notify the customer via Printer’s Plan (recommended)
An email notification can be customized and sent from Printer’s Plan:

Printer’s Plan 2019 What’s New and Improved Page 4
Notify the customer via PayPal
Alternatively, an email with a link to pay can be sent directly from PayPal:

Printer’s Plan 2019 What’s New and Improved Page 5
Receiving Payment
When the client pays the invoice you will be sent an email notification, and if you are running the Printer’s Plan API
(Web2Plan) or Customer Facing Website (PlanWeb) solution, the payment will automatically be recorded in Printer’s
Plan.
To enable the PayPal integration follow the instructions in the following guide: PayPal Integration Guide

Printer’s Plan 2019 What’s New and Improved Page 6
NEW SMTP CLIENT
SMTP Client
Printer’s Plan will no longer require you to use Microsoft Outlook (or other email programs) to send emails. Instead,
you can now send emails directly from Printer’s Plan using the Printer’s Plan SMTP client.
To enable the Printer’s Plan SMTP client go to the Settings tab, open the General Settings folder and select SMTP
Settings.

Printer’s Plan 2019 What’s New and Improved Page 7
In the SMTP settings window enter your email account information and check-in the Enable SMTP option. This option
has to be enabled to use the Printer’s Plan SMTP client. If this option is not checked, Printer’s Plan will use the
computer’s default email client.
Once this is enabled, when you generate an email message the following Preview Email will open allowing you to send
email messages.
For a detailed explanation that outlines how to configure the SMTP client please refer to the following guide: SMTP
Client Guide

Printer’s Plan 2019 What’s New and Improved Page 8
DEEPER QUICKBOOKS INTEGRATION
New: Direct Connect to QuickBooks
Instead of creating an Export/Import (.iff) file you can directly connect Printer’s Plan data to QuickBooks. Using this
method you can transfer Sales data, or Individual Invoices to QuickBooks in a few clicks.
To enable this option go to the Settings tab, open the Third Party Integrations folder and select QuickBooks. The
QuickBooks Settings window will appear. In this window, set the Export Method field to Direct Connect.
To send the data, go to the Reports section, open the Posting Journal folder and click Regular Sales (click the Date
Range menu at the top of the screen to narrow the list of postings).

Printer’s Plan 2019 What’s New and Improved Page 9
Highlight the posting (or postings) and click the Export button.
Make sure that QuickBooks is open on the computer that is exporting the data and click OK. This will automatically
send the data to Quickbooks. Once the import is complete, a confirmation message will appear in Printer’s Plan.

Printer’s Plan 2019 What’s New and Improved Page 10
New: QuickBooks Class Tracking
When exporting data to QuickBooks you now have the option to include QuickBooks Class information.
For Sales Data exports, to enable this option go to the Settings tab open the Accounting folder and select Sales
Departments. In the table that appears enter the exact QuickBooks Class name in the QuickBooks Class column.
For Invoice Data exports, to enable this option go to the Settings tab open the Jobs folder and select Product Types.
In the table that appears enter the exact QuickBooks Class name in the QuickBooks Class column.
Printer’s Plan 2019 What’s New and Improved Page 11
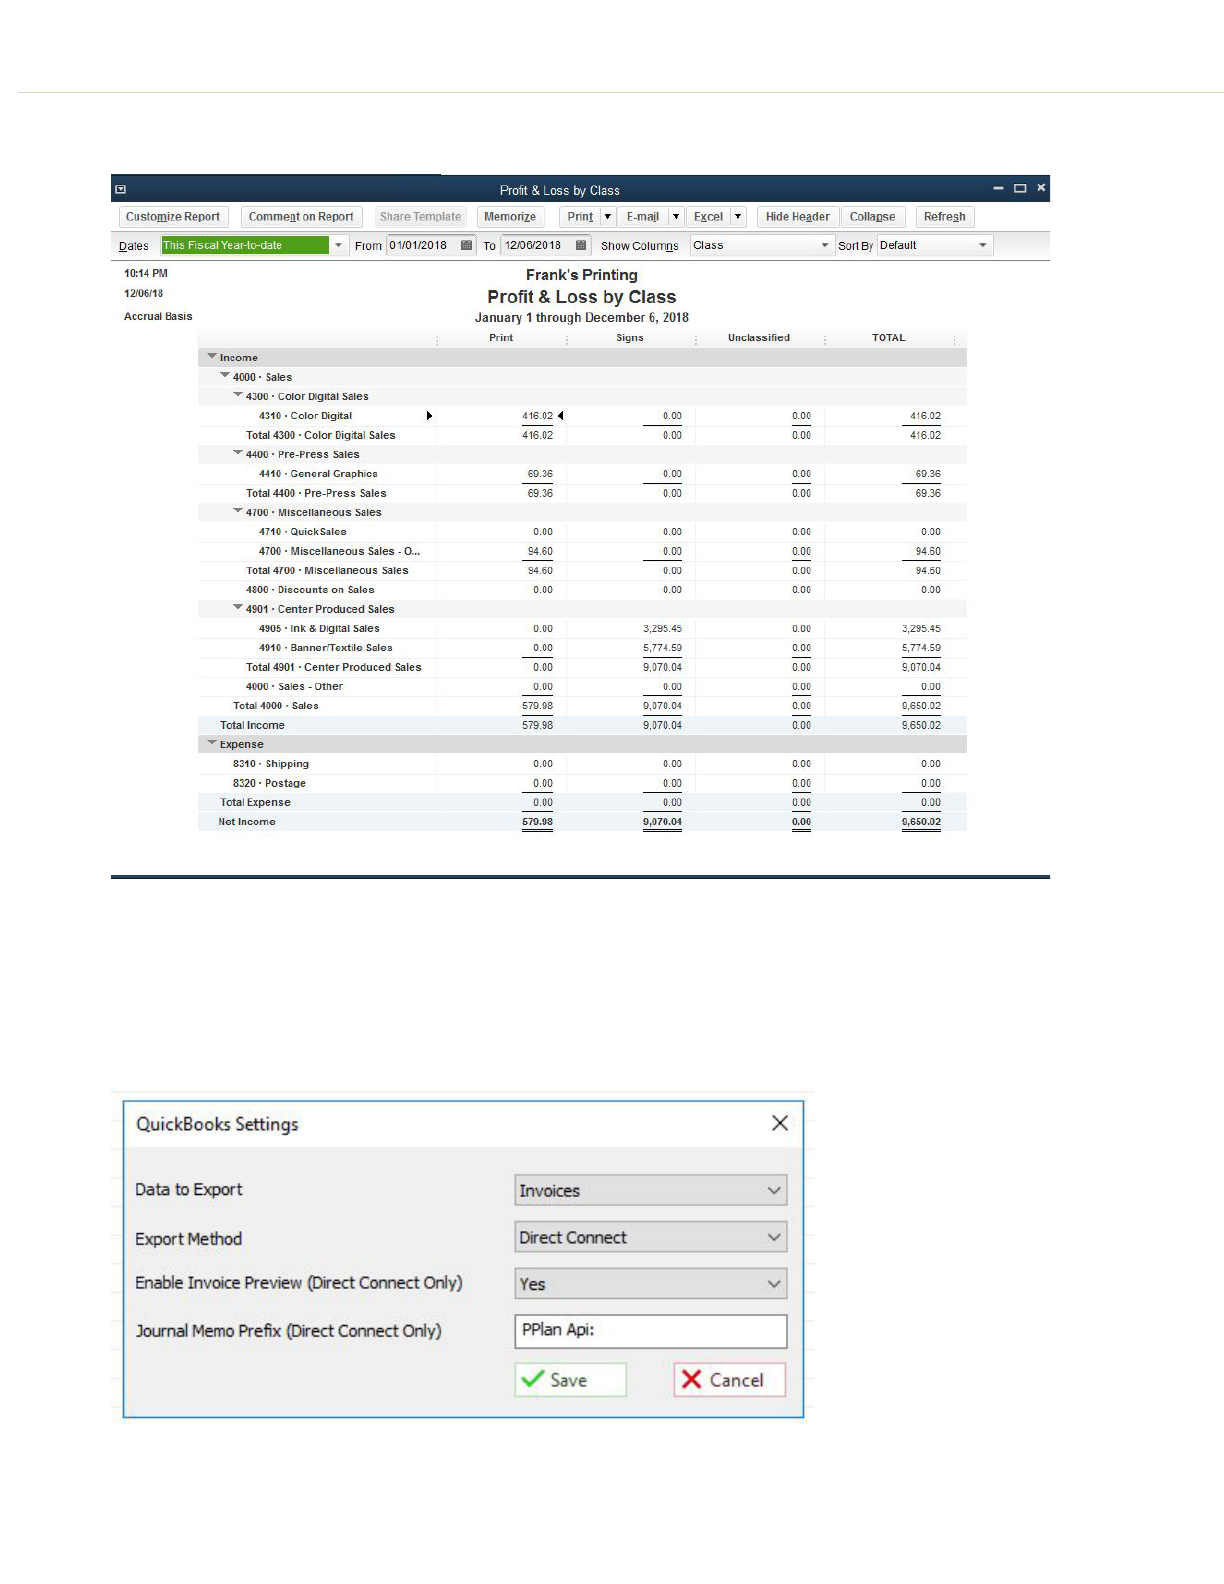
After exporting the Printer’s Plan data you can run reports in Quickbooks to analyze the sales by class:
New: Export Printer’s Plan Invoices to QuickBooks
You can now export all posted invoices to QuickBooks. To enable this option go to the Settings tab, open the Third
Party Integrations folder and select QuickBooks. The QuickBooks Settings window will appear. In this window, set
the Data to Export field to Invoices.

Printer’s Plan 2019 What’s New and Improved Page 12
To export the invoices, after each posting go to the Reports section, open the Posting Journal folder and click Regular
Sales. Highlight the posting and click the Export button.
In the Export window click OK. Either through the .IIF Export/Import, or via a direct connect, the Printer’s Plan invoice
will be sent to QuickBooks:
For detailed instructions on how to integrate Printer's Plan with QuickBooks please refer to the following guide:
QuickBooks Integration Guide
Important Note: The Printer’s Plan integration with QuickBooks is only available for the desktop version of
QuickBooks.

Printer’s Plan 2019 What’s New and Improved Page 13
JOBS
New Price Level Option
New Option: Keep Unit Price
When you select this option in the Price Level field, and then save the item, Printer’s Plan will ask you to enter the
unit price:
If you later make changes to the specs, including Item Quantity, Printer’s Plan will price the Item using that unit price
without asking you to confirm it. So, the Item Price will always be equal to Item Quantity X Unit Price. This feature is
helpful on multi-item (booklet) jobs where you would like to manually set the unit price. Then, if you update the
quantity you can maintain the established unit price without responding to numerous prompts.

Printer’s Plan 2019 What’s New and Improved Page 14
New Jobs Ready to Post Option
Easily change the status of an order, or a group of orders to Ready to Post without printing an invoice. In the Jobs
section, under the Orders folder bring up a list of jobs that you want to mark as Ready to Post. Highlight the group of
jobs and then right-click on one of the invoices. From the menu that appears select Make Job Ready To Post
This will mark the selected job(s) as having an invoice printed, and if a shipped date has not been assigned, it will set
today’s date in the Date Shipped field. The status of the selected orders will be updated to Ready to Post.
New Digital Printing Options
Previously, on digital jobs, Printer’s Plan would calculate the number of clicks and the sheet count by maximizing the
number of originals on a run size sheet. In the 2019 version of Printer’s Plan you can make a selection in the Print As
field of a paper service to adjust these calculations.
On a digital job, if the Print As field is blank, or set to Signature the program will operate identically to previous
versions -- maximizing the number of originals on a run size sheet.
New: If the Print As field is set to Regular the program will calculate the job using the same original on a run size
sheet.

Printer’s Plan 2019 What’s New and Improved Page 15
Example: 6 Names of 250 Business Cards run 24 up on a 12 x 18 sheet.
Option 1: Set the Print As to Signature (or blank).
In this scenario the program would calculate 63 (12 x 18) sheets and 63 clicks.
Option 2: Set the Print As field to Regular

Printer’s Plan 2019 What’s New and Improved Page 16
In this scenario the program would calculate 66 (12 x 18) sheets and 66 clicks.

Printer’s Plan 2019 What’s New and Improved Page 17
PRINT OPTIONS
Improved Print Options: Work Order / Vendor Info
On the Work Order, you now have the option to print, or suppress the vendor information (name + contact + phone).
To print this data, check the new print option:
Improved Print Options: Work Order / Page Header / Item Description
If the Page break between Items option is checked, the Item Description is printed at the top of the page. This feature
was added in version 2018 and caused a new problem: Item Description was printed over other text when the
description was too long and/or had line breaks. Now only the first 50 characters of the Item Description is printed at
the top of the page.
Improved Print Options: Work Order / “End With” Quantity
If the Print As option is set to Regular and #Originals (Sheets) is 2 or more, the End with quantity printed on the work
order is per original, otherwise, it is for the whole Item.
Improved Print Options: Work Order / Bold Note
On the Work Order, If the Notes (bold font) option is checked, the service name was also printed bold. Now it does
not.
Improved Print Options: Shipping Labels
If a field data, such as Item Note, included a special character ellipsis (…), the remaining fields were not exported. This
is now fixed.

Printer’s Plan 2019 What’s New and Improved Page 18
WEB2PLAN
Send Status Updates
When a Web Order is converted to a new Order a status update can be sent back to the website. To enable this
option go to the Settings tab, open the Third Party Integrations and select Web2Print.
In this window check in the Enable Web2Print Integration option.
In the Posting URL field, enter the posting address of the web2print website, this is the address where Printer’s Plan
will send that status update data. You must contact your web2print provider to obtain this address.
In the Secret Key field enter the secret key text, the text in this field is case sensitive. The web2print site should have
the same secret key information -- this ensures the security of the communications between Printer’s Plan and the
web2print site.
Set the Send status when you paste a weborder/quote to an order? field to Yes.
In the Paste Status field enter the status text that you want to send back to the web2print site.

Printer’s Plan 2019 What’s New and Improved Page 19
Your web2print site will also need to be configured to receive status updates. Please check with your web2print
provider to obtain this information. If you are connecting Printer’s Plan to My Order Desk the configuration page on
the website would look something like this:
Here is an example of this workflow, an order is placed online and the status of the order is set to Waiting for
Approval:
In Printer’s Plan the Web Order is converted to a new Order:

Printer’s Plan 2019 What’s New and Improved Page 20
After the new order is created a status update is automatically sent back to the website:
Depending on the settings of your web2print site this status update can be automatically sent to the purchaser.
New field on a Job: WebID
If you are integrating a front end web2print site with Printer’s Plan via the Printer’s Plan API (Web2Plan), jobs placed
online automatically flow into Printer’s Plan as Web Orders. In this scenario the front end website creates its own job
number that is not connected to Printer’s Plan. The 2019 version of Printer’s Plan will now save (and display) the
external job number that is created on the website.
Example: Order is placed online and the website creates a job number (34306):
The job arrives in Printer’s Plan as a Web Order, the website job number is captured and saved in the WebID field:
By storing this information the Printer’s Plan can establish a link to the job on the front end site. This allows Printer’s
Plan to send status updates back to the front end website.

Printer’s Plan 2019 What’s New and Improved Page 21
OTHER CHANGES AND IMPROVEMENTS
Job Window / Vendor Info
To display the vendor information in a job, in the Job window click on the Items button. From the menu that appears
select Customize Job View……
In the Options window, check the Vendor Info option

Printer’s Plan 2019 What’s New and Improved Page 22
Emailing / Form Letters
If you are sending emails from a job list, Printer’s Plan will ask you select whom to send the email: Ordered by, Default
Buyer or Default Payer.
Pricing / #Originals: 2 or more and #Ups 2 or more
If the Print As option is Regular, and Item Quantity is not evenly divisible by #Ups, #Run Size sheets was not rounded
up per each original.
Example: Quantity of 10, 2 Originals, printed 4 up. Previously this job calculated as 5 run size sheets (10 x 2 /4). Now it
is calculated as 2 x (10/4 round up) = 2 x 3 = 6 sheets.
Payment Note Reset
If you copied a History job to a new Quote, and this History job had a payment note, the payment note was not
cleared. In this version the payment note will be cleared. Previously this note only cleared if the History job was
copied to a new Order.
~ character in the Note field not clearing on new jobs
If you copied a History job to a new Quote (or Order), any line in the note or memo field that started with the ~
character would be cleared on the new job. Previously if the last character of the line containing the ~ character did
not contain a return the note would not clear. This is now fixed.
Copy and Paste Web Orders/Quotes
Previously Web Orders could only be copied as a new Order, and Web Quotes as a new Quote. Now you can copy
Web Orders (and Web Quotes) as a new Order or new Quote.
If Printer’s Plan was set to automatically assign a due date to a new job (x number of days after the date in), this
functionality did not work if a Web Order was copied to a new Order. This is now fixed.
Emailing PDF attachments using Thunderbird
Sending emails with PDF attachments using the Thunderbird email client caused the attached PDF file to become
corrupted. This is now fixed.

Printer’s Plan 2019 What’s New and Improved Page 23
Scheduler / JobTracker
In the Services section if you altered the sort order of the Service Departments these changes were not properly
reflected in Job Tracker. The Service Department icons in Job Tracker were not displayed in the correct order. This is
now fixed.
Settings / Printing / Barcodes window
The “Save” icon was not visible if the scale of the display was set to more than 100%, this is now fixed.
Printer’s Plan 2019
Upgrade Guide
(Revised December 13, 2018)
Printersplan.com - [email protected] - 866-770-7561
