
Sage University
Certified course curriculum
Sage 300 Construction and Real Estate
Document Designer
Tutorial and Reference Guide
IMPORTANT NOTICE
This is a publication of Sage Software, Inc.
Copyright © 2015 Sage Software, Inc. All rights reserved.
Sage, the Sage logos, and the Sage product and service names mentioned herein are registered trademarks or trademarks
of Sage Software, Inc. or its affiliated entities. Microsoft, Office, and Word are either registered trademarks or trademarks
of Microsoft Corporation in the United States and/or other countries. This workbook is an independent publication and is
not affiliated with, nor has it been authorized, sponsored, or otherwise approved by Microsoft Corporation.All other
trademarks are the property of their respective owners.
Your use of this document and the Sage product(s) described herein is governed by the terms and conditions of the Sage
End User License Agreement ("EULA") or other agreement that is provided with or included in the Sage product.
Nothing in this document supplements, modifies or amends those terms and conditions. Except as expressly stated in
those terms and conditions, the information in this document is provided by Sage "AS IS" and Sage disclaims all express,
implied or statutory warranties of any kind, including but not limited to the warranties of merchantability, fitness for a
particular purpose or of non-infringement. No implied license is granted to you under any Sage intellectual property or
trade secret right. Sage reserves the right to revise, supplement or remove information in this document at any time
without notice to you or others.
10/2015

Document Designer Tutorial and Reference Guide Contents
© 2015 Sage Software, Inc. 1
Contents
Document Designer . . . . . . . . . . . . . . . . . . . . . . . . . . . . . . . . . . . . . . . . . . . . . 3
Document Designer Requirements . . . . . . . . . . . . . . . . . . . . . . . . . . . . . . . . . . . . . . 4
Sage 300 Construction and Real Estate Security . . . . . . . . . . . . . . . . . . . . . . . . . . . 4
Templates . . . . . . . . . . . . . . . . . . . . . . . . . . . . . . . . . . . . . . . . . . . . . . . . . . . . . . . . . 4
Create a Document . . . . . . . . . . . . . . . . . . . . . . . . . . . . . . . . . . . . . . . . . . . . . . . . . . 6
Activity 1—Create a New Document . . . . . . . . . . . . . . . . . . . . . . . . . . . . . . . . . . . . . 6
Create a Template . . . . . . . . . . . . . . . . . . . . . . . . . . . . . . . . . . . . . . . . . . . . . . . . . . . 9
Activity 2—Create a New Template . . . . . . . . . . . . . . . . . . . . . . . . . . . . . . . . . . . . . . 9
Display Information in a Table . . . . . . . . . . . . . . . . . . . . . . . . . . . . . . . . . . . . . . . . . 12
Insert Fields From Other Database Tables . . . . . . . . . . . . . . . . . . . . . . . . . . . . . . . 13
Activity 3—Insert Fields From Other Database Tables . . . . . . . . . . . . . . . . . . . . . . 14
Insert a Table of Information . . . . . . . . . . . . . . . . . . . . . . . . . . . . . . . . . . . . . . . . . . 17
Activity 4—Insert a Table of Information . . . . . . . . . . . . . . . . . . . . . . . . . . . . . . . . . 17
Working With Templates . . . . . . . . . . . . . . . . . . . . . . . . . . . . . . . . . . . . . . . . . . . . . 20
Use an Existing Document as a Template . . . . . . . . . . . . . . . . . . . . . . . . . . . . . . . . 20
Delete a Template . . . . . . . . . . . . . . . . . . . . . . . . . . . . . . . . . . . . . . . . . . . . . . . . . . 20
Where Template Files Are Stored . . . . . . . . . . . . . . . . . . . . . . . . . . . . . . . . . . . . . . 21
Documents Based on Sample Templates . . . . . . . . . . . . . . . . . . . . . . . . . . . . . . . . 22

Contents Sage 300 Construction and Real Estate
2 © 2015 Sage Software, Inc.

Document Designer Tutorial and Reference Guide Document Designer
© 2015 Sage Software, Inc. Online Training and Workbooks at www.SageU.com 3
Document Designer
You can now take advantage of today’s industry-standard word processing program,
Microsoft Word, with your Sage software. Using Document Designer, you can
generate a Word document with your data directly from Sage 300 Construction and
Real Estate, then use the powerful word processing features of Word to format and
refine your document.
NOTE: Document Designer is available in the U.S., Canadian, and Australian editions of
Sage 300 Construction and Real Estate.
In this handout, you will be introduced to Document Designer concepts, including:
Software requirements.
How to access and use this feature.
Creating documents based on templates.
Designing custom templates.

Document Designer Requirements Sage 300 Construction and Real Estate Version 15.1
4 Local Training From Business Partners© 2015 Sage Software, Inc.
Document Designer Requirements
In order to use Document Designer, you must have the following installed on your
machine:
Sage 300 Construction and Real Estate CD version 15.1 and higher.
Microsoft Word 2010 and higher (32-bit).
Sage 300 Construction and Real Estate
Security
Document Designer is only available in the Enter Commitment window. To use it,
you must have security permissions to:
JC: Tasks > Commitments or PJ: Contract Control > Commitments.
Manage Templates and/or Create Documents for Document Designer.
Menu Path—Sage Desktop > Tools Security Administration > Security Permissions by
Type > Tasks
WARNING: Record level and file security does not affect Document Designer. In order to
safeguard sensitive company information, you should carefully consider which users to
grant the permissions to use Document Designer.
Templates
The documents you generate in Document Designer are based on templates. A
template contains text, images, formatting, and placeholders for database fields.
When it is used to generate a document, the placeholders are replaced by actual
values from your data.
Compare the document in Figure 1 to the template in Figure 2 on the next page.

Document Designer Tutorial and Reference Guide Templates
© 2015 Sage Software, Inc. Online Training and Workbooks at www.SageU.com 5
Figure 1—Document
Figure 2—Template

Create a Document Sage 300 Construction and Real Estate Version 15.1
6 Local Training From Business Partners© 2015 Sage Software, Inc.
Sage provides the following commitment-related sample templates:
Letter of Intent.docx
Notice to Proceed.docx
Purchase Order.docx
Subcontract Agreement Checklist.docx
Subcontract.docx.
FOR MORE INFORMATION: See “Documents Based on Sample Templates” on page 22
for examples of documents based on the sample templates.
You can also create custom templates in Document Designer.
FOR MORE INFORMATION: See “Create a Template” on page 9.
FOR MORE INFORMATION: To find out where the template files are stored, see “Where
Template Files Are Stored” on page 21.
Create a Document
NOTE: Only users with the security permissions for Create Documents are allowed to
perform this task. See “Sage 300 Construction and Real Estate Security” on page 4.
You create a document for one commitment at a time in the Enter Commitment
window.
Activity 1—Create a New Document
1. Select JC: Tasks > Commitments or PJ: Contract Control > Commitments.
2. Select the commitment for which you want to create a document and press
Enter on your keyboard. You can only print documents for the commitment that
is currently in the Enter Commitment window.
TIP: If it is a new commitment, save it first.
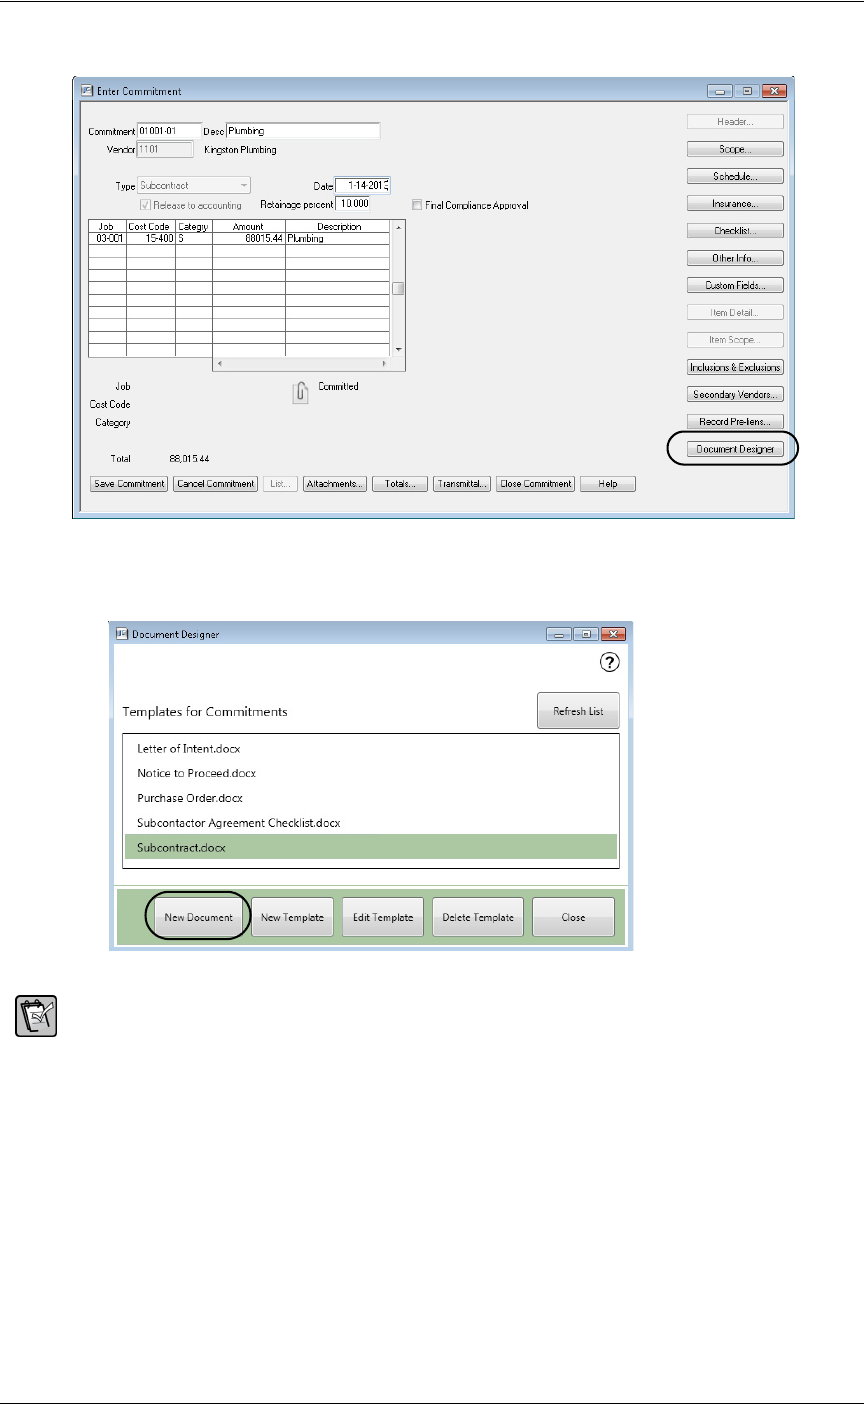
3.
Click Document Designer.
Document Designer Tutorial and Reference Guide Create a Document
© 2015 Sage Software, Inc. Online Training and Workbooks at www.SageU.com 7
Menu Path—JC: Tasks > Commitments or PJ: Contract Control > Commitments
4. When the Document Designer window opens, select a template and click New
Document.
NOTE: The Document Designer window does not display templates that are already
open in Microsoft Word.

Create a Document Sage 300 Construction and Real Estate Version 15.1
8 Local Training From Business Partners© 2015 Sage Software, Inc.
5. When the New Document window opens:
Enter the file name for the document (a); the file extension is automatically
*docx.
By default, the file is saved in your company data folder or the location
specified in File Locations (File > Company Settings) for Attachments.
If you want to save the file elsewhere, click the browse button (b) to specify
the location.
If you want to access the document through a file link in the Commitment
Attachments window in the future, select the Link as Attachment check
box (c).
Click Create New Document.
6. The document opens in Microsoft Word and contains information about the
commitment that is currently in the Enter Commitment window. If needed,
you can type additional text or apply formatting to finalize the document.
7. When you are finished with the changes, save the document in Microsoft Word.
TIP: If you did not make any changes to the document, you do not need to save it before
closing Microsoft Word.
WARNING: Unlike Sage 300 Construction and Real Estate reports and inquiries which
restrict the information that a user can access based on record level and file security,
documents created through Document Designer do not. For example, your template
includes bank information from the Cash Management master and transaction files. Even
though the user does not have security permissions to these files, when he uses the
template to create a document, the bank information is included. In order to safeguard
sensitive company information, you should carefully consider which users to grant the
permissions to use Document Designer. See “Sage 300 Construction and Real Estate
Security” on page 4.
a
b
c

Document Designer Tutorial and Reference Guide Create a Template
© 2015 Sage Software, Inc. Online Training and Workbooks at www.SageU.com 9
Create a Template
When you create a template, you define the text, images, database fields as
placeholders, and formatting.
The first time you use Document Designer to open an existing template or create
a new template, you will be prompted to install the Word Document add-in in
Microsoft Word.
Activity 2—Create a New Template
NOTE: Only users with the security permissions for Manage Templates are allowed to
perform this task. See “Sage 300 Construction and Real Estate Security” on page 4.
1.
Select JC: Tasks > Commitments or PJ: Contract Control > Commitments.
2. Select a commitment and press Enter on your keyboard.
NOTE: After you create the template, you will be able to use it with any commitment.
3.
Click Document Designer.
4. In the Document Designer window, click New Template.
5. In the New Template window, enter a name for the template. Do not use the
same name as a template that already exists in the Document Designer window.
When you click Create New Template, the software automatically creates a
Microsoft Word document and saves the file (*.docx) to the User Template
folder of where Sage 300 Construction and Real Estate is installed on your
server.

Create a Template Sage 300 Construction and Real Estate Version 15.1
10 Local Training From Business Partners© 2015 Sage Software, Inc.
FOR MORE INFORMATION: To find out where the template files are stored, see “Where
Template Files Are Stored” on page 21.
6.
The template opens in Microsoft Word.
You enter text, apply formatting, and insert images in the template content
area (a).
You use the Document Actions pane (b) to insert database fields as
placeholders in the template content area.
TIP: If the Document Actions pane is not automatically displayed, go to the View tab and
click Document Actions in the toolbar.
a
b

Document Designer Tutorial and Reference Guide Create a Template
© 2015 Sage Software, Inc. Online Training and Workbooks at www.SageU.com 11
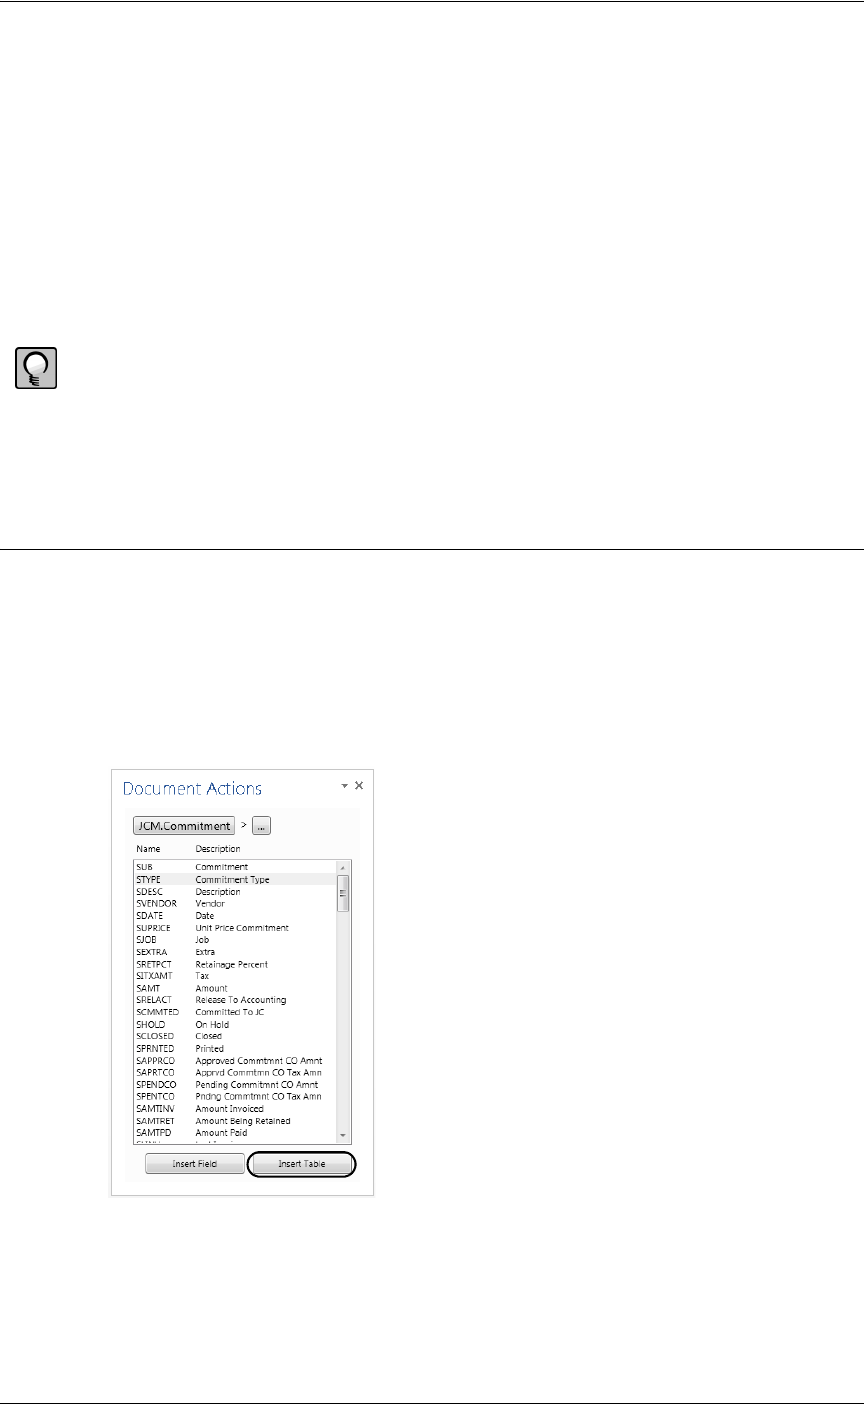
7. In the Document Actions pane, the fields for a specific database table (a) are
displayed in the list (b). In the example shown below, the list shows fields from
the Commitment table (JCM.Commitment).
8. To add a field to the template content area, select it from the Document Actions
pane and then click Insert Field or double-click. You can only select one field
at a time.
9. Once a field is added to the template content area, it becomes a placeholder
object and is shown with the full database name (table.field) enclosed with curly
braces. For example, Commitment appears as {Commitment.Commitment}.
Notice a border appears around the placeholder object when you select it.
a
b

Create a Template Sage 300 Construction and Real Estate Version 15.1
12 Local Training From Business Partners© 2015 Sage Software, Inc.
As you design your template, make sure you type outside the placeholder object
because any text that is entered inside the border is not shown when you
generate a document.
10. To delete a placeholder field from the template content area, select it and press
Delete on your keyboard.
11. After you finish designing your template, remember to save it in Microsoft
Word.
TIP: As you work on your template design, remember to save the file periodically in
Microsoft Word.
Display Information in a Table
You may want use a table (with or without borders or grid lines) to display or align
information in columns.
After you insert the table (MS Word: Insert (tab) > Table), be sure to insert text or
a space in a table cell before you insert a field in that table cell. Otherwise, when
you use the template to generate a document, the field name will appear instead of
the actual value from your database.
Incorrect
You type the comma inside the placeholder object; the comma will not appear
when you generate a document from the template
Correct
You type the comma outside the placeholder object; the comma will appear when
you generate a document from the template.

Document Designer Tutorial and Reference Guide Create a Template
© 2015 Sage Software, Inc. Online Training and Workbooks at www.SageU.com 13
Insert Fields From Other Database Tables
When you initially open a template, the Document Actions pane only shows fields
from the Commitment table (JCM.Commitment). This may not be enough for your
document; you may also want to show information about the job, vendor, and so on.
Let’s take the document shown in Figure 3 as an example—in addition to the
commitment scope of work (d), you want to show your company name and address
(a), the name of the subcontractor/vendor (b), and the job description (c). The
information for (a) to (c) comes from other database tables.
Figure 3—Sample document
The table below shows the database fields used as placeholders in the document.
Follow the steps in Activity 3 to learn how to insert these database fields in a
template.
Item Database Table Field(s)
a Company Settings Company Name, Address 1, City, State, Zip Code
b Vendor Name
c Job Description
d Commitment Scope of Work
a
b
c
d

Create a Template Sage 300 Construction and Real Estate Version 15.1
14 Local Training From Business Partners© 2015 Sage Software, Inc.
Activity 3—Insert Fields From Other Database Tables
1. If you saved and closed the template from the last activity, select it in the
Document Designer window and click Edit Template.
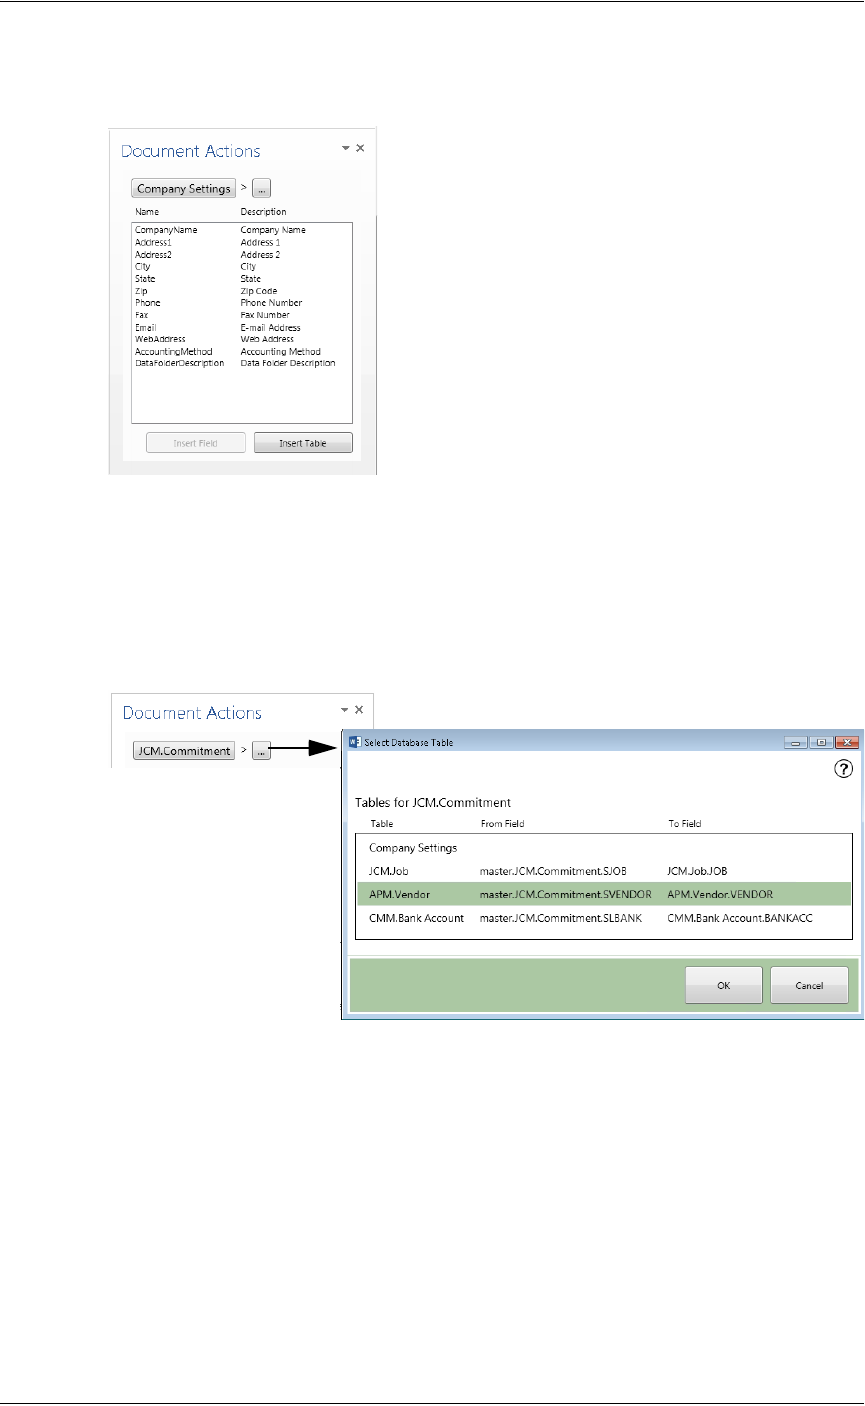
2. When the template initially opens, you only see fields from the Commitment
table (JCM.Commitment) in the Document Actions pane. To switch to
another database table, click the browse button.
3. The Select Database Table window opens, listing tables that are related to the
previous table. In the example shown below: Company Settings, Job
(JCM.Job), Vendor (APM.Vendor), and Bank Account (CMM.Bank
Account) are included because they are related to Commitment
(JCM.Commitment).
WARNING: Users are not affected by file security when creating or editing Document
Designer templates, even if this type of security is activated in Sage 300 Construction and
Real Estate. In order to safeguard sensitive company information, you should carefully
consider which users to grant the permissions to use Document Designer. See “Sage 300
Construction and Real Estate Security” on page 4.
4.
Select Company Settings and click OK.
Document Designer Tutorial and Reference Guide Create a Template
© 2015 Sage Software, Inc. Online Training and Workbooks at www.SageU.com 15
5. Notice the list in the Document Actions pane now displays fields from
Company Settings.
6. Insert fields from the Company Settings table into the template content area as
needed.
7. Next, you use the Vendor table. In the Document Actions pane, click the
browse button, and then select JCM.Commitment and click OK.
8. Click the browse button again, and then select APM.Vendor and click OK.

Create a Template Sage 300 Construction and Real Estate Version 15.1
16 Local Training From Business Partners© 2015 Sage Software, Inc.
9. The list now shows fields from the Vendor table, the last table added. Insert
fields from this table into the template content area as needed.
10. Next, you use the Job table. When you click the browse button next to
APM.Vendor, notice that the Job table is not shown in the Select Database
Table window. This is because Job is not related to Vendor.
11. Click Cancel to close the Select Database Table window.
12. Click JCM.Commitment to navigate back to the Commitment table. Notice
that APM.Vendor is removed.
13. Click the browse button. Now, JCM. Job is in the Select Database Table
window and you can select it.
14. Insert fields from the Job table into the template content area as needed.
15. To insert fields from the Commitment table, click JCM.Commitment to
navigate back to that table.
Document Designer Tutorial and Reference Guide Create a Template
© 2015 Sage Software, Inc. Online Training and Workbooks at www.SageU.com 17
16. Save and close the template in Microsoft Word.
Insert a Table of Information
You may want to show commitment items in your document. For example, the
quantity and price of all the items in a purchase order. To do so, you add the database
fields in a table format in the template. This is because of the one-to-many
relationship between Commitment and Commitment Items—each commitment can
have many commitment items.
TIP: Remember you can always apply formatting in Microsoft Word and change the border
style and shading in the table.
Follow the steps in Activity 4 to learn how to include commitment items in a
template.
Activity 4—Insert a Table of Information
1. If you saved and closed the template from the last activity, select it in the
Document Designer window and click Edit Template.
2. In the Documents Action pane, click JCM.Commitment to navigate back to
the Commitment table (if there are other database tables shown).
3. Click Insert Table.

Create a Template Sage 300 Construction and Real Estate Version 15.1
18 Local Training From Business Partners© 2015 Sage Software, Inc.
4. In the Select Database Table window, select JCM.Commitment Item and
click Select Fields.
NOTE: When you click Insert Table, the Select Database Table window displays tables
that have a many-to-one relationship with the last table added in the Document Actions
pane. For example, JCM.Commitment Item has a many-to-one relationship with
JCM.Commitment because there may be several commitment items for each
commitment.

Document Designer Tutorial and Reference Guide Create a Template
© 2015 Sage Software, Inc. Online Training and Workbooks at www.SageU.com 19
5. The Select Fields for Table window opens and you select the fields for the
template content area.
Under Available Fields, double-click the following fields to add them as
Selected Fields: Item Number, Description, Amount.
The fields will appear as columns in the order displayed. Use the up and down
arrows to rearrange the order if needed.
Clear the Include column headings check box if you do not want to show
column headings.
Click OK.
6. The commitment items appear in a table format in the template content area.
7. Apply formatting to the table as needed.
8. Save and close the template in Microsoft Word.

Working With Templates Sage 300 Construction and Real Estate Version 15.1
20 Local Training From Business Partners© 2015 Sage Software, Inc.
Working With Templates
When you work with templates, do not open the file directly in Microsoft Word.
Instead, open the Document Designer window from the Enter Commitment
window, and then select a template and click Edit Template.
When the template opens in Microsoft Word, it is a version that is integrated with
Sage 300 Construction and Real Estate. Make any edits as needed, and then save
the file. If you save the file with another name, make sure to save it to the proper
location—see “Where Template Files Are Stored” on page 21.
Also, you cannot copy a placeholder database field from one template and paste it
into another template. Although it may appear that the field was copied, documents
created using that template may not generate data for that placeholder.
Use an Existing Document as a Template
If you have an existing document that you want to use as a template, follow these
steps:
1. Create a new template through the Document Designer window. This opens an
instance of Word that is integrated with Sage 300 Construction and Real Estate.
2. Within Word, open your existing document and copy the content.
3. Paste the copied content into your new template.
4. Insert database fields as needed into your new template.
5. Save your new template.
Delete a Template
When you select a template in the Document Designer window and click Delete
Template, it removes the template from the list and deletes the template file.

Document Designer Tutorial and Reference Guide Working With Templates
© 2015 Sage Software, Inc. Online Training and Workbooks at www.SageU.com 21
Where Template Files Are Stored
The Document Designer window only display templates stored in this location:
\\Servername\ProgramData\SAGE\TIMBERLINE
OFFICE\9.5\ACCOUNTING\WordIntegration\UserTemplate
All sample templates and the custom ones that you create are saved to the
UserTemplate folder by default.
If you deleted or edited the sample templates and want to restore them to their
original state, you can locate the backup files in this location:
\\Servername\ProgramData\SAGE\TIMBERLINE
OFFICE\9.5\ACCOUNTING\WordIntegration\Backup\UserTemplate
The file named Sage.LS1.WordDocumentAddinMasterTemplate.docx is
required for the Document Designer feature—do not delete, edit, or move this
file. It is stored in this location.
\\Servername\ProgramData\SAGE\TIMBERLINE
OFFICE\9.5\ACCOUNTING\WordIntegration\MasterTemplate

Documents Based on Sample Templates Sage 300 Construction and Real Estate Version 15.1
22 Local Training From Business Partners© 2015 Sage Software, Inc.
Documents Based on Sample Templates
Figures 4 to 8 show examples of documents based on the sample templates provided
by your Sage software.
Figure 4—Letter of Intent

Document Designer Tutorial and Reference Guide Documents Based on Sample Templates
© 2015 Sage Software, Inc. Online Training and Workbooks at www.SageU.com 23
Figure 5—Notice to Proceed

Documents Based on Sample Templates Sage 300 Construction and Real Estate Version 15.1
24 Local Training From Business Partners© 2015 Sage Software, Inc.
Figure 6—Purchase Order

Document Designer Tutorial and Reference Guide Documents Based on Sample Templates
© 2015 Sage Software, Inc. Online Training and Workbooks at www.SageU.com 25
Figure 7—Subcontract Checklist

Documents Based on Sample Templates Sage 300 Construction and Real Estate Version 15.1
26 Local Training From Business Partners© 2015 Sage Software, Inc.
Figure 8—Subcontract
