
Share the warmth and leave a review.
convectair.com/sharethewarmth
Your input helps to create even better
products and experiences.
We value your feedback!
5100/5101
FLBFLB+
Panel Convector
7216580100R01
300001582 Issue 1
INSTALLATION AND USERS GUIDE
To be read and kept by the user.
A BRAND OF GLEN DIMPLEX AMERICAS

2

3
Dear owner,
Congratulations on the purchase of your new CONVECTAIR electric heater.
To obtain the best results and the ultimate in performance and comfort, please
take a moment to read the installation, operation and maintenance instructions
detailed in this manual.
WARNING :
If your unit is equipped with a high precision electronic thermostat
(FLB+ models), it should not be connected to a wall thermostat.
Foreword
Summary
Important Instructions ..................................................... 4
Quick Start ................................................................ 6
Characteristics ............................................................ 7
Location Recommendations ............................................... 8
Installation and Securing................................................... 10
Electrical Wiring ........................................................... 12
How to Use Your Convectair FLB heater..................................... 13
How to Use Your Convectair FLB+ heater ................................... 13
Day and Time Conguration .............................................. 13
Setting the Temperature Unit Display ..................................... 14
Setting the Set Temperature.............................................. 14
Programming Daily Settings.............................................. 15
Adaptive Start ........................................................... 16
Key lock ................................................................. 16
Thermal Protection ........................................................ 17
Maintenance .............................................................. 17
Identifying Your Device..................................................... 18
Warranty .................................................................. 19

4
Important Instructions
When using electrical appliances, basic precautions should always be followed to reduce
the risk of re, electric shock and injury to person, including the following:
1. THESE INSTRUCTIONS SHOULD BE READ CAREFULLY AND RETAINED FOR
FUTURE REFERENCE. Note also the information presented on the appliance.
CAUTION: FAILURE TO FOLLOW THESE INSTRUCTIONS MAY CAUSE INJURY AND/
OR DAMAGE AND MAY VOID YOUR WARRANTY.
2. SUITABLE APPLICATIONS.
WARNING: This heater is suitable for normal domestic household purposes and
should not be used in any other type of environment. This product should only be
used in the country where it is purchased from by a recognized commercial retailer.
Do not use outdoors.
3. Do not operate any heater after it malfunctions. Disconnect power at the service
panel and have the heater inspected by a reputable electrician before using.
4. To disconnect the heater, turn the controls to the OFF position, and turn o the power
to the heater circuit at the main disconnect panel.
5. To prevent a possible re, do not block the air intakes or exhaust in any manner.
6. A heater has hot and arcing or sparking parts inside. Do not use it in areas where
gasoline, paint, or ammable vapors or liquids are used or stored.
WARNING: In order to avoid overheating, do not cover the heater.
7. This heater is hot when in use. To avoid burns, do not let bare skin touch hot surfaces.
Keep combustible materials, such as furniture, pillows, bedding, papers, clothes, etc.
and curtains at least 3 ft. (0.9 m) from the front and sides of the heater.
8. Use this heater only as described in this manual. Any other use not recommended by
the manufacturer may cause re, electric shock, or injury to persons.
9. IMPORTANT: The heater must not be located immediately below a socket-outlet.
10. WARNING: The FLB series heaters are not equipped with a device to control the
room temperature. Do not use this heater in small rooms when they are occupied by
persons not capable of leaving the room on their own, unless constant supervision is
provided.
11. CAUTION: Some parts of this product can become very hot and cause burns.
Particular attention has to be givenwhere children and vulnerable people are present.

5
12. This appliance can be used by children aged from 8 years and above and persons
with reduced physical, sensory or mental capabilities or lack of experience and
knowledge if they have been given supervision or instruction concerning the use of
the appliance in a safe way and understand the hazards involved. Children shall not
play with the appliance. Cleaning and user maintenance shall not be made by children
without supervision.
13. Children of less than 3 years should be kept away unless continuously supervised.
14. Children aged from 3 years and less than 8 years shall only switch on/o the
appliance provided that it has been placed or installed in its intended normal
operating position and they have been given supervision or instruction concerning
the use of the appliance in a safe way and understand the hazards involved. Children
aged from 3 years and less than 8 years shall not plug in, regulate and clean the
appliance or perform user maintenance.
Important Instructions
SAVE THESE INSTRUCTIONS

6
Quick Start
Display
Heater On/O
Indicator
Mode Indicator:
Eco (green) or
Comfort (red)
Adjustment
keys
Conrm
Return
Turning the Heater On or O (FLB and FLB+ models):
Press the toggle switch on I to turn heater on, or on O to turn it o.
Setting the Temperature:
Using the adjustment keys, increase or decrease the temperature according to
the desired comfort.
Heat Mode (Eco and Comfort):
Press to toggle between Comfort and Eco modes. The Mode Indicator is green
when in Eco mode and red when in Comfort mode.
Lock the Controls
Press and - simultaneously to lock (Locd) or unlock (OPEn) the controls.

7
Specications
Model Series
Total
Power
Voltage
Width
(mm)
Height
(mm)
Depth
(mm)
Weight
(kg)
5101-C05-BB FLB+
500 W
240 V
425
(16 ⁄")
400
(15 ⁄")
115
(4 ⁄")
2.7
(6 lb)
5100-C05-BB FLB
5101-C10-BB FLB+
1000 W
525
(20 ⁄")
3.4
(7.5 lb)
5100-C10-BB FLB
5101-C15-BB FLB+
1500 W
625
(24 ⁄")
3.8
(8.4 lb)
5100-C15-BB FLB
5101-C20-BB FLB+
2000 W
825
(32 ⁄")
4.2
(9.3 lb)
5100-C20-BB FLB

8
Location Recommendations
- The installation must comply with the national and local standards in place and
CONVECTAIR recommends that it be performed by a master electrician.
- Your appliance must be installed in such manner that switches and other control
devices cannot be touched by a person in the bathtub or in the shower. Do not install
over a bath or any other container of water.
- Do not install behind a door, cabinet or box, or in front of an air extractor. Keep
combustible fabrics, such as curtains, away from heaters.
- Avoid positioning a window sill, behind curtains, doors, or under an air extractor.
- Your appliance has a heating element which gets very hot. Do not install or use in the
presence of gasoline, paint, or near ammable products.
- The device must not be installed under a power outlet.
- The wall bracket supplied with the heater must be used.
- Do not install the product if it is damaged.
PLEASE READ CAREFULLY:
These instructions are essential for safe installation and use of your CONVECTAIR unit.

9
Do not cover the
heater.
Recommendations and advice
CAUTION :
Do not insert anything into the unit.
The rst time the heater is turned on, there may be an odor. This phenomenon
disappears after a few minutes of operation.
CAUTION: DO NOT COVER
There is a risk of overheating if the device is covered. It is therefore strictly
forbidden to cover or block the air inlet or outlet grilles at the risk of incidents or
damage to the device.
Respect the minimum installation distances to the oor, walls, furniture, etc. (Fig. 1).
CAUTION: DO NOT INSTALL THE BOTTOM LESS THAN 58 mm (2 po) ABOVE THE
FLOOR, THE SIDES LESS THAN 30 mm (1.2 po) AND THE TOP LESS THAN 300 mm
(12 po) FROM ANY SURFACE
Fig. 1
Min.
300mm
Min.
30mm
(1.2 in.)
(11.8 in.)
Min.
30mm
(1.2 in.)
Min.
50mm
(1.97 in.)
Min.
50mm
(1.97 in.)

10
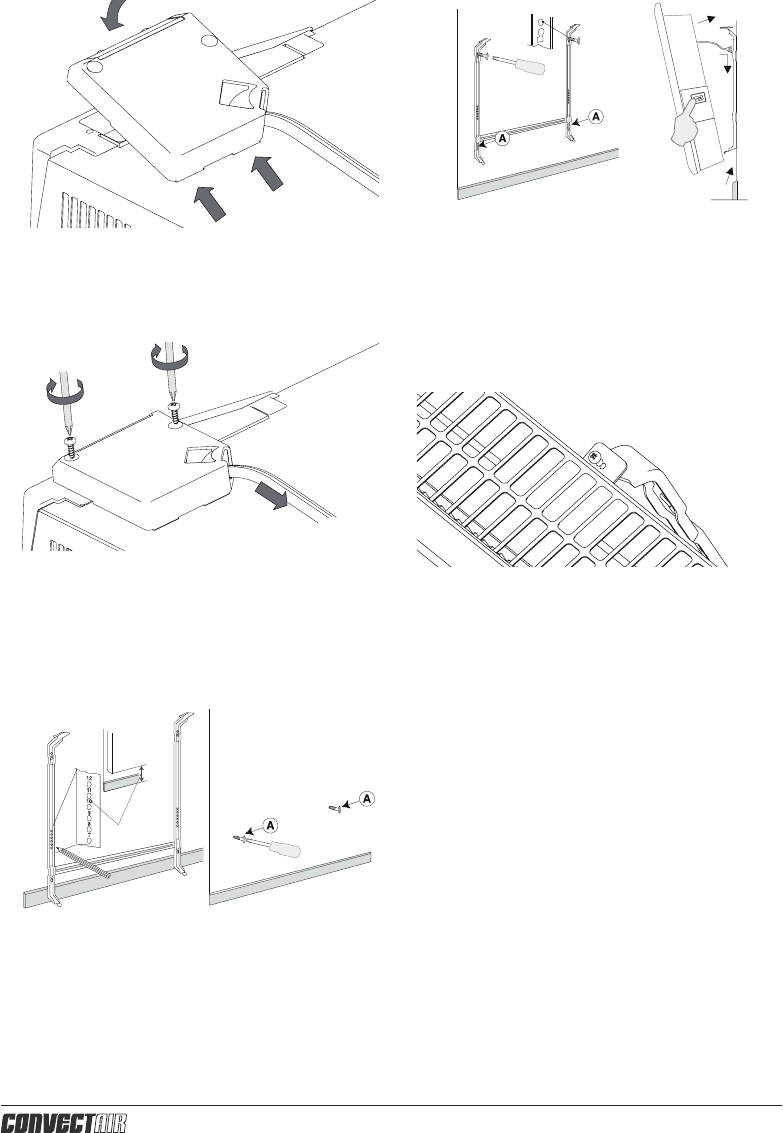
Installation and Mounting
1. Insert the supply cable through the
strain relief of the installation cover.
Remove 1.97 inches (50mm) of the
outer insulation, and .4 inches (10mm)
of the inner insulation.
50mm
10mm
(.4 in.)
(1.97 in.)
2. Connect the grounding wire to the chassis
using the designated grounding screw.
3. Cut two 30mm pieces of the insulating
sleeve and slide over the line wires of
the supply cable. Connect each lead to
the corresponding wires on the heater,
using the wire nuts provided (see
Electrical Wiring, page 12.)
! NOTE: The insulating sleeve,
supplied with the product, must be
placed over the exposed line wires of
the supply cable.
®
(4) 1½" Screws
Stud Finder
(Optional)
#2 Phillips
Screwdriver
(4) Wall anchors (if needed):
must be suitable for
min. 50 lb / 22.7 kg
Wire Strippers
Utility Knife
Wire Connectors
Tape Measure
Level
TOOLS REQUIRED
11
4. Insert the two tabs of the installation
cover into the two slots in the chassis
and fold the cover over the wiring.
Pull
10
10 cm
(3.94 in.)
1
2
3
5. Fasten the installation cover with the
two screws. Make sure the supply
cable is securely fastened by rmly
pulling it.
6. The wall bracket can be used as a
measuring device for placing the
heater on the wall. Mark the location
for the two bottom screws (A-A) and
fasten the two screws in the wall.
7. Place the wall bracket onto the bottom
screws (A-A). Then fasten the wall
bracket with the top screws. Place the
heater on the wall bracket (1), secure
the tilt strap (2) and click the heater
onto the top catches (3).
8. For additional safety, secure the heater
safely to the wall. Fasten a screw (not
included) on each of the two catches at
the top of the wall bracket.

12
- CONVECTAIR recommends that devices be installed by a master
electrician, in accordance with applicable national and local codes.
- The device must be connected to a 240 volt, 60 cycle circuit.
Disconnect the power before making any connections to avoid
electric shock or damage to the device.
- To avoid short circuits, turn o the power at the electrical panel
before any installation or repair.
- If the power supply wires of the device are damaged, they must be
replaced by the manufacturer, its after-sales service, or a similarly
qualied person in order to avoid a danger.
!
CONNECTION DIAGRAM
- Turn o the power to the heater before opening.
- This heater must be grounded.
- A circuit breaker is necessary for the installation; do not load it to more than 80% of
its capacity.
- Secure the device to the back bracket before turning it on.
Electrical Wiring
B=BLACK W=WHITE G=GREEN L1=LINE 1 L2=LINE 2 G=GROUND
B
L1
L2
W
G
G
13
How to Use Your Convectair FLB Heater
FLB panel convectors do not have integrated controls. They must be controlled using a
properly sized wall thermostat, which must be purchased separately.
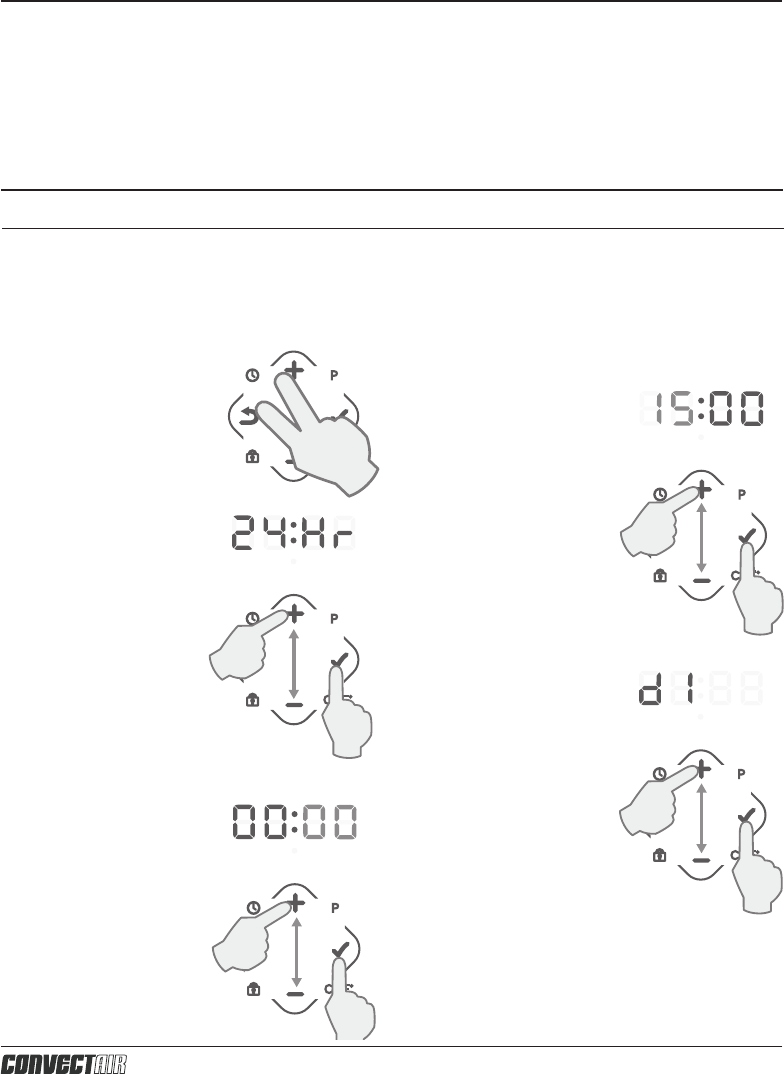
DAY AND TIME CONFIGURATION
NOTE : when switching on for the rst time (or after a fairly long power outage) 00:00 is
displayed, the time must be set.
After each intervention on the controls, after 5s the time display returns.
How to Use Your Convectair FLB+ Heater
Press + and
simultaneously.
A
B
C
D
E
F
G
H
A. Select
12H/24H
(press +)
B. Conrm
(press )
E. Set the minutes
(press + or -)
F. Conrm
(press )
G. Set the day
(press + or -)
H. Conrm
(press )
A
B
C
D
E
F
G
H
C. Set the hour
(press + or -)
D. Conrm
(press )
d1: Monday
d2: Tuesday
d3: Wednesday
d4: Thursday
d5: Friday
d6: Saturday
d7: Sunday

14
SETTING THE SET TEMPERATURE
SETTING THE TEMPERATURE UNIT DISPLAY
The heater can be set:
either in Comfort mode (for setting the desired temperature)
or in Eco mode (recommended for short absences)
30˚C
7˚C
.... ....
30˚C
7˚C
OFF
.... ....
=
˚C ˚F
30˚C
7˚C
.... ....
30˚C
7˚C
OFF
.... ....
=
˚C ˚F
Red = Comfort
Adjust Comfort
temperature by
pressing + or -
Green = Eco
Adjust Eco
temperature by
pressing + or -
30˚C
7˚C
.... ....
30˚C
7˚C
OFF
.... ....
=
˚C ˚F
Pressing overrides the status from
Comfort to Eco or vice versa.
The override is terminated automatically
upon the next event in the program, or at
03:00.
30˚C
7˚C
.... ....
30˚C
7˚C
OFF
.... ....
=
˚C ˚F
A centre dot in the numerical
display will ash when the heater
is heating
Press - and
simultaneously.

15
PROGRAMMING DAILY SETTINGS
This heater has nine 24-hour programs. Select one program for each day of the week.
Pr. 1
Pr. 2
Pr. 3
Pr. 4
Pr. 5
Pr. 6
Pr. 7
Pr. 8
Pr. 9
0600 2300
0700 2400
1500 2300
150008000600 2300
170008000600 2300
0600 1600
0600 2000
0000 2400
0000
2400
Press and +
simultaneously.
A. Select from above
programs for day 1
(Monday) (press + or -)
B. Conrm (press )
C. Now select from
above programs for
day 2 (Tuesday)
(press + or -)
D. Conrm
(press )
Repeat for each day
(d1 to d7)
A
B
C
D
A
B
C
D
d1: Monday
d2: Tuesday

16
This function allows you to block
access to the device settings to
prevent inadvertent modications.
ADAPTIVE START
KEY LOCK
Adaptive start allows the heater to learn what time it needs to start heating so that the
room is at the set temperature by the time of the programmed setting. For example, if
the programming is set to 20 degrees Celsius at 6am, the heater will start heating up
before 6am so that by 6am, the room will be 20 degrees Celsius.
Many factors impact on room heat up times (e.g. size of the room and insulation)
and initially the heater may start too early or too late. However it will learn and re-
calibrate itself over several days optimising itself to the best time to start heating.
Press and - simultaneously to
lock (Locd) or unlock (OPEn).

17
Should the heater overheat, an automatic thermal cut out will turn the heater o. The
heater will reactivate once the heater has cooled. It will continue to cycle on and o
automatically until the reason for overheating is removed.
In the event of abnormal operation, turn o the device. Check that the grilles are not
blocked. Clean if necessary.
WARNING: Disconnect power and allow the unit to completely cool before attempting
any maintenance or cleaning to reduce the risk of re, electric shock, or injury to persons.
To keep the appliance clean, regular maintenance is recommended. To remove dust, use
a soft cloth. To remove a stain, dampen the cloth.
For best performance and maximum eciency of the appliance, it is recommended to
regularly remove dust and debris that may accumulate on the grilles of the FLB/FLB+
panel convector.
NEVER USE ABRASIVE OR ACETONEBASED PRODUCTS, AS THEY COULD
DAMAGE THE EPOXY COATING.
ALL SERVICING ON CONVECTAIR APPLIANCES MUST BE CARRIED OUT WITH THE
POWER OFF, AND BY QUALIFIED AND AUTHORIZED PERSONNEL.
Overheat Protection
Maintenance
18
Recommendations and advice
Your CONVECTAIR appliance becomes hot during use. Particular care must be taken in order to inform
young children.
Do not insert objects into the openings of the grilles; this could cause short circuits, res, or damage to
devices.
Any other use not recommended by CONVECTAIR may cause short circuits, res, or injury to users.
In some conditions, the grille of the devices may turn yellow after some time. This phenomenon is not
due to a manufacturing defect. Rather, it is caused by the ambient air which contains fumes or suspended
particles, which are heated and then exhausted through the grille. This phenomenon is particularly visible
on pure white devices and can cause severe discoloration.
Prevention: it is advisable to clean the grills frequently, especially for appliances installed in places
exposed to cigarette smoke or in the kitchen. CONVECTAIR devices must never be used during
construction work or other activities which generate a lot of dust.
When switching on the CONVECTAIR for the rst time, a slight smoke may emerge from it. This
phenomenon is quite normal and will go away on its own after 2 or 3 minutes of operation of the device.
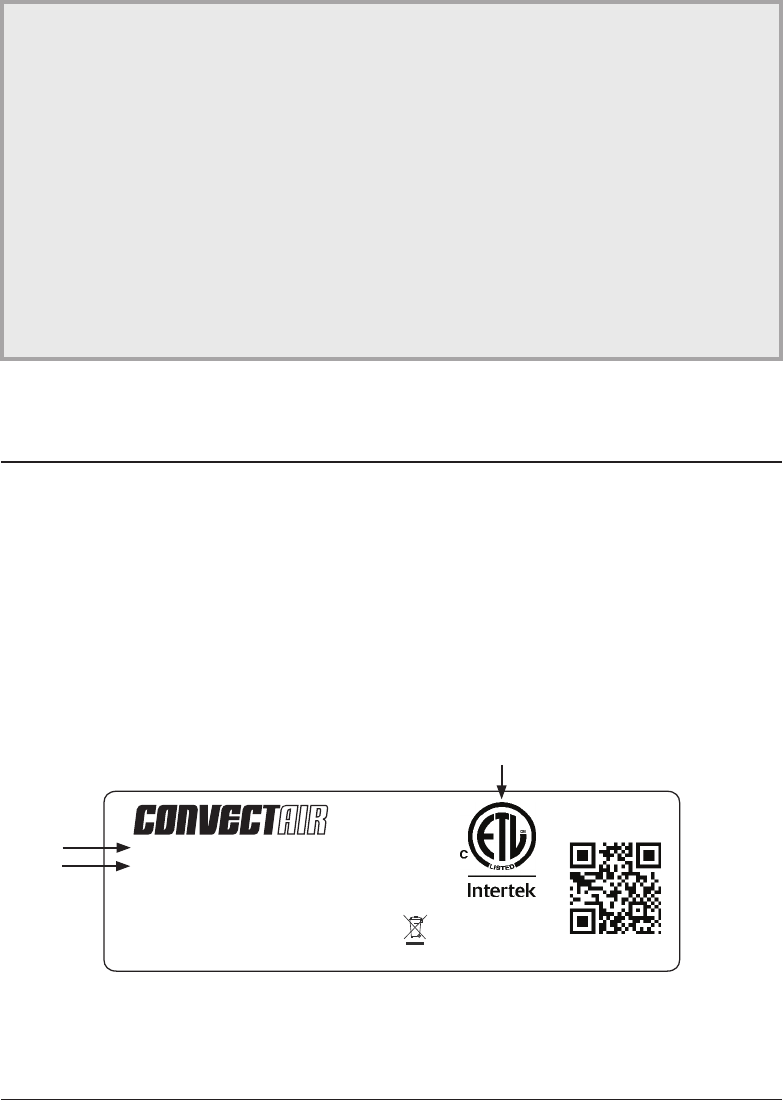
IMPORTANT: PRODUCT INFORMATION APPEARS ON THE RATING LABEL.
The rating label allows for identication of the heater. and is placed on the back of the
unit near the supply grille.
It includes:
- The complete model number (A), which must be included in any
warranty claim.
- Its power in Watts (B).
- Standard certication (C).
Identifying Your Device
OCN
All materials must comply with the
requirements of European Directive
2011/65/EU on the restriction of the
use of certain hazardous substances
R.o.H.S. compliant
Dunleer, Co.Louth, Ireland. Tel: ++353(0)41 6872200. Fax: ++353(0)41 6851464.
SHT 1
OF 1
A4
NO.OFF:
MODIFICATIONS
DATE
APPD
THIRD
DO NOT SCALE
IF IN DOUBT ASK
ANGLE PROJECTION
C
PROJECT
TITLE
DRG NO
FINISH
DRAWN BY
DATE
DATEAPP'D BY
SCALE GEN TOL
DIM IN
HOLE TOL
ANGLES
MATERIAL
+/-0.05
+/-0.5
mm
GLEN DIMPLEX
0 +/-0,4
0,0 +/-0,2
0,00+/-0,1
ISSUE
THIS DRAWING IS SUPPLIED IN CONFIDENCE AND THE COPYRIGHT
THEREOF IS THE PROPERTY OF GLEN DIMPLEX : IT MUST NOT BE
USED BY A THIRD PARTY WITHOUT PRIOR PERMISSION.
RESEARCH &
DEVELOPMENT
Compact Heater
2021
Label Template AM
00/90045/0
NM
03/03/2021 -
Black Print
LBE3000001
Issued for Production
JB
03/03/21
1
Notes:
Refer to Drawing 00/90017/0 for font details
5101-C10-BB
780/1000W 208/240V~ IP20
RAL 9016 White/Blanc
400000617
Product type
GDN part no.
cETL
w/ certication number
GDID
QR-code
Output
Voltage
IP class
Colour
GDID: 010119720001
wwyy
Production
week and year
Made in UK
Fabriqué au Royaume-Uni
Glen Dimplex Europe Limited, Airport Road,
Cloghran, Co. Dublin, Ireland K67 VE08
5014739
Cert. to CSA Std.
No. E60335-2-30
18.8mm
18.8mm
JB 03/03/2021
A
B
C

19
2 years against all defects / 10 years on the heating element.
Please keep your purchase and/or installation invoice.
Warranty
SERVICE CENTERS:
To nd the nearest Service Center, visit our website (www.convectair.ca) or
contact CONVECTAIR customer service at the following number: 1 800 463-6478
The Manufacturer warrants the convector heater and components of the enclosed product
against any defect in material or workmanship for a period of two years from the date of purchase,
with the exception of the elements which are warranted to be free from defect in material and
workmanship for ten years. In full satisfaction of any claims under this Warranty the Manufacturer
will repair or replace without charge, in its factory or in the eld as it alone may decide, any parts
which in its opinion are defective.
The Manufacturer shall not be responsible for any transportation or shipping costs in relation to
such repair or replacement except as specically assumed by it. Misuse of this product or repairs
by persons other than the Manufacturer’s authorized personnel without the Manufacturer’s
written approval, will void this Warranty.
This Warranty is in lieu of all other warranties or conditions whether expressed or implied
including but not limited to those of merchantability or tness for purpose and shall constitute the
sole remedy of the Purchaser and the sole liability of the Manufacturer in respect of the sale of
the product, whether in the nature of breach or breach of fundamental term, or of negligence or
otherwise.
The Manufacturer shall not be liable for any special, indirect or consequential damages or for any
damages resulting from removal or replacement of a convector heater subject to warranty claim
without the Manufacturer’s authorization.
Any claims under this Warranty must be submitted in writing to the Service Manager, Glen
Dimplex Americas Ltd., 1367 Industrial Rd., Cambridge, Ontario N3H 4W3, Canada.

1-888-346-7539 | www.dimplex.com
In keeping with our policy of continuous
product improvement, we reserve the right
to make changes without notice.
© 2020 Glen Dimplex Americas
A BRAND OF GLEN DIMPLEX AMERICAS
Share the warmth and leave a review.
convectair.com/sharethewarmth
Your input helps to create even better
products and experiences.
We value your feedback!
