
Information Services
IT
www.york.ac.uk/it-services/training
Essential
Spreadsheets
Book 2


Essential Spreadsheets
Book 2
This material explains how to use spreadsheets, and is based around:
Microsoft Excel 2016 on a University of York Managed PC
Google Sheets running in an up-to-date browser
Screen-shots have been chosen to reflect the similarities and differences
between these.
Every attempt has been made to ensure the accuracy of the information
provided, however you may find some differences when working with other
or personalised systems.
Note This information is correct at the time of writing, but new
features are added to Google Sheets on a regular basis – check
periodically for new options appearing in menus.
A collection of exercises is also available, with task documents in both Excel
and Google Sheets format.
See also our support site: https://goo.gl/OY1Wzy
Last Updated: September 2017

~Contents~
Part 3~ Working with lists and data 1
10 ~ Data validation 1
11 ~ List structure 4
11.1
- Working with larger lists 4
12 ~ Sorting and Filtering 6
12.1 - Sorting data in Excel 6
12.2 - Filtering data in Excel 7
12.3 - Subtotals in Excel 9
12.4 - Working with data in Google Sheets 10
12.5 - Sorting/filtering data in Google Sheets 10
12.6 - Collaborative data tools 11
13 ~ Lookup functions 14
13.1 - LOOKUP 14
13.2 - VLOOKUP 15
13.3 - Range lookups 16
13.4 - MATCH and INDEX 17
14 ~ Introducing Pivot Tables 18
14.1 - Data you can’t pivot 18
14.2 - Data structure rules 20
14.3 - Pivot table anatomy 21
14.4 - Some example pivot tables 21
14.5 - Creating pivot tables 23
Part 4~ Presenting data visually 26
15 ~ Conditional Formatting 26
15.1 - Conditional formatting in Excel 26
15.2 - Conditional formatting in Google Sheets 27
16 ~ From Spreadsheet to Chart 29
16.1 - Effective charts 29
16.2 - Creating Charts 31
16.3 - Using Charts in other applications 33

Part 3~Working with lists and data
1
Part 3~Working with lists and data
Although originally designed for numeric data, spreadsheets are a powerful tool for
working with sets of data that include text values, enabling calculation and manipulation
of data, including sorting and filtering.
Google Sheets are also used as a repository for tables of data generated from Google
forms and manipulated with Google’s scripting language, Apps Script.
If you are using a spreadsheet to store and process complex data, you should be aware
of the advantages of using a Relational Database Management System (RDBMS) such as
Microsoft Access. If your data includes several related sets or a lot of repeated data you
should investigate using a RDBMS. The data can easily be exported to a spreadsheet for
further numeric analysis if needed.
If access control and collaboration are key requirements, or you need to integrate with
Google forms, email, or calendar, Google Sheets may be the preferred option.
10 ~ Data validation
The outcome of data processing will always depend in part on the quality of the source
data, and although you can never ensure 100% accuracy of the data entered in
spreadsheet, you can take steps to minimise the likelihood of errors and improve
consistency.
Validation is about making sure the data entered is reasonable, at the point it is entered
by the user. This can be achieved by:
Checking the type of data entered in a cell
Testing data to see if it lies within a sensible range
Providing lists of values for a user to pick from
For example you might:
Ensure cells that should contain valid dates can’t include plain text (eg ‘Next
Tuesday’)
Check that an entered date of birth isn’t in the future
Decide on a maximum price and prevent very large values being entered
Provide options such as ‘Pending review’, ‘Approved’, ‘Rejected’ as a drop-down
list – this is particularly useful if you will later sort or filter when spelling
mistakes could introduce errors

2
Validation with Excel
1 Select the cells to which you wish to apply a particular validation rule, and choose
Data > Data Tools > Data Validation – a dialogue box opens.
2 On the Settings tab, choose the validation criteria as appropriate. After choosing
the data type in the Allow option, the other settings will change to match.
Configure these as necessary.
3 The Input Message tab lets you prepare a prompt to appear when the cell is
chosen. Over-use of this can be annoying!
4 The Error Alert tab is more important, as you can select how to respond when
invalid data is encountered. The options are:
Stop – Prevent the data being entered
Warning – Advise the user that the value is not valid, but give them the option
to continue or cancel entry
Information – Let the user know the data is invalid, but let them carry on or
cancel (this is essentially the same as Warning, but Warning looks more scary)
Picking from a list
If you select the List option for allowed data, you are asked to provide a source for this
list, either as a cell range or named range. Points to note:
The sources list can be on another sheet in the file
Choosing this List option provides a drop-down control on the cell when
selected
If the Error Alert tab is set to Stop, only values in the drop-down can be used,
but Warning and Information allow the user to enter a value not on the list
List-based validation improves consistency as it forces users to choose from a
limited set of possibilities, and so can make sorting/filtering more reliable.
Choose the data type
Configure these
as appropriate

Part 3~Working with lists and data
3
Validation with Google Sheets
1 Select the cells to which you want to apply validation and choose
Data > Validation… - a dialogue box opens.
2 Configure the criteria as necessary.
3 Choose whether simply to show a warning or reject the input.
4 If Show validation help text is ticked, the message in the line below appears when
you hover over the cell.
Picking from a list
There are two pick from list options:
List from a range – you will need to define a cell range or named range (usually
on a another worksheet)
List of items – the list is entered directly in the dialogue box
Try to use the first option to avoid having to edit the validation dialogue
Tip If you create the list at the top of an otherwise empty column on another sheet,
select the whole column for the list range. This means any new items added to
this column will automatically appear in the list.
Generating a validation list from existing data values
If you use a column from an existing data set as the range for the list values, a list is
automatically generated containing one of each of the unique values in the column, not
a list of the whole column.
It is also possible to generate a list of unique values from a range using the unique
function.
Configure the criteria
as appropriate
Choose whether to
warn or reject

4
11 ~ List structure
In order to make best use of available features when working with structured sets of
data, some simple rules should be observed:
Lists should be entered down the page, each new item occupying a new row
Each column should contain one type of information (eg text, number, date)
Each cell should contain just one value
Enter column headings in one row at the top of the list – never use more, and
never merge cells for labels
Do not leave whole rows or columns empty (but blank cells where the
information is not applicable/unknown are OK)
Stick to one list per tab of your spreadsheet file
A Good list:
A
B
C
D
1
Month
Fruit
Number
2
Jan
Apple
22
3
Jan
Orange
23
4
Feb
Apple
31
5
Feb
Orange
18
Preventing some common mistakes:
A full name in one column makes it impossible to sort/filter by family name, so
split titles and names into multiple columns
Stick to one data type in a column
Store one attribute per column – don’t combine values
Use proper dates in a Date column. ‘Next Tuesday’ is not a date; neither is
‘Sometime in May?’ nor ‘Jan-Feb’.
11.1 - Working with larger lists
If you are working with a list that is longer/wider than your screen, labels keep
disappearing when you scroll, or you wish to compare data from cells that are a way
apart, try one of these:
Zoom
Changing the zoom level can help if the list is only slightly bigger than
the current screen
Use the zoom control (bottom
right) or View > Zoom
As Google Sheets are
browser-based, use the
browser built-in zoom
controls
(PC: Ctrl and +, - and 0)
(Mac: Cmnd and +, - and 0)

Part 3~Working with lists and data
5
Freeze
panes
This feature ‘locks’ rows and/or columns in position so they remain on
screen as you scroll
Select the cell
immediately below and
to the right of the
rows/columns you want to
freeze
Choose View > Window >
Freeze panes > Freeze Panes
Use the same control to
unfreeze
If you want to freeze
more than 2 rows or
columns, first select the
cell that is in the last
row/ column you want frozen
Choose View > Freeze and select as
appropriate (rows and columns are
treated separately)
Use the same menu to unfreeze
Split view
Excel also includes a
split view, which
creates up to 4 semi-
independently scrollable areas
on the sheet
First select the cell where you
want the split
Then choose View > Window >
Split
You can drag the position of the
split once it’s there
There is no equivalent in
Google Sheets, but it is
possible to open two
separate instances of
the same file in two separate
browser windows/tabs, allowing
you to view and work with two
different views of the same
document
Tip Finding the edges of a list
Some keyboard short-cuts are useful for finding the extreme right/bottom of a
long or wide list:
Jump to the last occupied cell in a column
Ctrl +
Jump to the last occupied cell in a row
Ctrl +
Excel only - Jump to the last occupied cell in a range
Ctrl + End
And yes, using up, left and Home keys with Ctrl also works as you would expect.

6
12 ~ Sorting and Filtering
If a list has been created using the above principles, sorting and filtering can easily be
applied to organize and locate information.
Sorting a list will re-arrange the rows in a specific order – for example you could sort by
price to find the most expensive item in a list.
Filtering will display only rows containing values matching specified criteria, temporarily
hiding all other rows – for example, you could filter to show just students in year 1.
Note Google Sheets includes tools designed for a collaborative environment, so
although the methods used for sorting and filtering have a lot in common, the
two applications are explained separately.
While both Excel and Google Sheets will sort by full dates, at the time of
writing only Excel can correctly sort cells containing the names of days or
months in day/year order.
Google sheets will sort these alphabetically whereas Excel will order them
chronologically. A simple work-around for this if you wish to use Google
Sheets is to enter days of week or months as dates.
12.1 - Sorting data in Excel
The following data types can be sorted:
Numbers – ascending or descending
Text – alphabetical, ascending/descending
Dates – ascending/descending
Days – can be sorted in weekday order
Month names – can be sorted in year order
The controls for sorting can be found on the Data tab:
Single field sort
1 Select any one cell in the column by which you wish to sort
2 From Data > Sort & Filter select either Ascending or Descending
Note If your data contains entire blank rows/columns this method will not work
correctly, and you may corrupt data by ‘shuffling’ it.
ascending
descending
Dialogue-based sort
Quick sort

Part 3~Working with lists and data
7
Advanced sorting
A custom sort, using a dialogue, will allow you to:
Fix incorrect detection of header rows
Sort in weekday or month order
Sort by multiple fields
Method:
1 Select any one cell in the data you wish to sort
2 Choose Data > Sort & Filter > Sort
3 Configure the sort as necessary and then select OK
Note Options: case-sensitive sort, or lists that run horizontally.
12.2 - Filtering data in Excel
Data lists are filtered by enabling a series of drop-down controls in the header row:
Method:
1 Select any one cell in the range to be filtered.
2 Select Data > Sort & Filter > Filter. The filter button will remain highlighted and
drop-down controls will be applied to the column header row.
3 Use the drop-down controls to configure the filter for one or more columns.
4 Filtered columns show a filter icon on the drop-down; filtered row numbers are
coloured; and the application status bar will display the number or records.
Header row
Add/remove sort levels
Sort orders:
A to Z
Z to A
Custom (includes weekdays and months)
Clear applied filters
Enable filter controls
Re-apply filter to
include new data

8
The filter options available will depend on the type of data – text or number:
Note If you enter new records immediately below the current data, the filter range will
be automatically expanded. Then choose Data > Sort & Filter > Reapply to re-
filter the changed data.
To clear filters:
Clear a single filter
From the drop-down control, choose Clear Filter
From…
Clear all filters
From Data > Sort & Filter, choose Clear
Clear and remove controls
From Data > Sort & Filter, choose Filter
Select the
value(s) you
want to be
displayed…
…or choose one of
these other text
filter options
Text data
This list of
values will be
less useful with
numbers…
…but these options let
you configure ranges
of values to display
Numerical data

Part 3~Working with lists and data
9
12.3 - Subtotals in Excel
This feature is available in Excel, but not Google Sheets as it acts directly on
the source data and so is not appropriate in a collaborative context.
It is used when a list includes values that fall into categories and subtotalling is required.
The name is misleading as it can perform other calculations, including averages.
Creating subtotals
1 First ensure there are no filters applied to the list and sort the data so records are
grouped by a specific category.
2 Ensure the active cell is within the list, and select Data > Outline > Subtotal
3 In the dialogue select:
The field by which you wish to group
The function required
The field(s) requiring the subtotal
4 Choose OK to insert the subtotals.
Extra rows are inserted containing the subtotals and a grand total.
Additional controls appear on the left to collapse and expand sections of
the worksheet, showing or hiding sub and grand totals
Editing or removing subtotals
One advantage of using the subtotals feature is that it is very easy to change or remove:
1 Ensure the list is fully expanded, and the active cell is within the list region.
2 Select Data > Outline > Subtotal to open the dialogue box, and then:
For editing: change the dialogue box as appropriate, and ensure Replace
current subtotals is ticked. Click OK to apply these new options
To remove subtotals: choose Remove All
Select the field by
which the records
are grouped
Select the required
function
Select the field(s)
requiring a subtotal
to be calculated

10
12.4 - Working with data in Google Sheets
When working collaboratively, the disadvantage of the ‘standard’ sort/filter
tools is that the data is changed for all users. Google Sheets therefore has
features designed specifically with collaboration in mind.
12.5 - Sorting/filtering data in Google Sheets
There are two approaches , both using the same sort and filter tools:
Directly on the data set – every collaborator sees the result of this
Indirectly using a Filter View – this leaves the underlying data untouched and is
the best option when working collaboratively
Single field sort or filter
There are sort options in the Data menu, but if your list has a header row either ‘freeze’
the header row (View > Freeze…) or use the following method for both sorting and
filtering:
1 Select any one cell in the data range you wish to sort or filter.
2 Enable the filter controls (even if you only want to apply a sort) by choosing
Data > Filter (also available as a button on the toolbar).
a) Sort: In the header of the column on which you wish to sort, select the filter
control drop-down, and choose Sort A Z or Sort Z A.
At the time of writing, you can sort by:
Numbers – ascending or descending
Text – alphabetical, ascending/descending
Dates – ascending/descending
b) Filter: To apply a single field filter, choose one or more values from the drop-
down list, or choose an option from Filter by condition…
Filter by condition includes
criteria for text…
…and for numbers

Part 3~Working with lists and data
11
Multi-column sorting and filtering
You must first select the whole data range or you risk corrupting your data by shuffling it
when you sort. The quickest way to do this is either to enable the Filter, which
automatically selects the whole data range, or alternatively select the range using
keyboard methods. Then:
1 Select Data > Sort Range… - the sort dialogue opens.
2 Configure this as appropriate and then choose OK.
12.6 - Collaborative data tools
The sort and filter limitations reflect the fact that these are essentially
destructive processes; they change the view of the data, which is not helpful
in collaborative use.
Google Sheets therefore include features that leave the underlying source data
untouched: filter views and data functions.
Filter Views
These allow you to create a particular set of filter/sort criteria; the two advantages are:
The filter view effectively sits on top of the source data so does not affect the
view for other users, who can create their own filter views too.
It can be named and saved for future use by you and other collaborators
Tick if you have
a header row
Check the data
range is correct
Add extra columns
for sorting as
appropriate
Select the
sort order
Select the
column
Name filter view
Close filter view
Other
options

12
Create a new filter view as follows:
1 Select any cell in the data range and choose Data > Filter Views… > Create new
filter view. The first thing you will notice is a change to the colouring of the page –
this is to ensure you know you are in a filter view.
2 Configure any sorting and filtering as required (same methods as above).
3 For future use, name the filter suitably, and when you’ve finished, close filter view.
4 To re-visit a filter view, select Data > Filter Views and choose it from the list.
Data functions
An effective, non-destructive way to work with a data set is to generate a sub-data set
on another worksheet using data functions. As the output is generated by functions, it
will automatically reflect any changes made to the underlying data.
=Sort(dataSet,n,true,m,false...)
=Filter(dataSet,criterion_1,criterion_2...)
=Unique(dataSet!A:E)
=Query(source_data,"query criteria")
Of these, the Query function is the most powerful, as it includes an expression that
defines the columns to be used, sort orders, criteria and even grouping or calculated
values. The expression is based on Structured Query Language (SQL), used by database
systems, but is not difficult for straightforward sorting and filtering.
Some examples, where dataList is a named range (see Book 1):
=query(dataList, “select A,F,B”)
simple select of three columns
=query(dataList, “select A,F,B order by B desc”)
select and sort by one column
query(dataList,"select A,F,B where F=3")
select rows where the data in F = 3
You’ll find a fuller description of these functions in the on-line support resources.
Saved filter views
New filter view
Data menu
Name filter view
Options (includes Delete)
Close current filter view

Part 3~Working with lists and data
13
ImportRange
As Google Sheets is a web application, it is not possible directly to reference cells in
worksheets from another file within a formula (this can be done in Excel).
To enable data from one file to be used in another, the importrange function is
provided. Although the name would suggest a one-off data import, it does in fact create
a link to the source data.
To use this function you need to know:
Either the URL or unique ID (“Key”) of the source file (both should work)
The range you want to import
Syntax
=importrange(“URL or Key”, “range”)
The range can be:
Sheet name and range
Sheet1!A1:G50
Sheet name and column range
Sheet1!A:G
A named range
demoData
Examples
Here is an example using the full URL and a range:
=importrange("https://docs.google.com/spreadsheets/d/1vbNC338Lbj7ayP6sEC
J6K1gv935eW9hpT4INNFI","Sheet1!A:G")
This example uses the spreadsheet key and a named range (‘demoData’):
=importrange("1vbNC338Lbj7ayP6sECJ6K1gv935eW9hpT4INNFI","demoData")
Note that…
Both the URL or Key and the range must each be enclosed in quotes
When you first insert the function, the #REF! error will display because you need
to allow the sheets to connect – hover over the cell to see the button
Using ImportRange in other functions
The ImportRange function can be used as the data source in other functions such as the
Query function. In this case the Select expression must refer to columns as Col1, Col2
etc rather than A, B etc.
After inserting the
importrange function
you must allow access
before data is visible

14
13 ~ Lookup functions
Lookup functions provide a means to reference data stored as a table elsewhere in a
spreadsheet, and so extract values from it for use elsewhere.
There are three lookup functions:
LOOKUP
Locates a supplied value in one column and returns a value from
the same row in another column
VLOOKUP
Locates a supplied value (or its position in ranges of values) in the
first column of a range of data and returns the value from the
same row in any other specified column
HLOOKUP
Works the same as VLOOKUP but with data that is arranged in
rows rather than columns – not used very often
Two other functions, MATCH and INDEX, can provide similar functionality (see below).
13.1 - LOOKUP
=lookup(lookup value, range to look in, range to find in)
Example:
A
B
C
D
1
ID
Item
Portion (g)
Calories
2
1001
Chocolate Cake
150
200
3
1002
Apple Pie
200
180
4
1003
Lemon drizzle cake
170
200
5
1004
Muffins
90
120
6
1005
Flapjack
160
210
7
1006
Sausage rolls
85
130
=lookup(G2,B:B,D:D)
Muffins
120
Assume this
is cell G2
‘Muffins’ located in column B
Corresponding value
returned from column D
Using LOOKUP, a supplied value (‘Muffins’) is looked up in one column (B)
and the value in the same row of another column (D) is returned

Part 3~Working with lists and data
15
13.2 - VLOOKUP
=vlookup(lookup value, table array, index number, range lookup)
lookup_value
a reference to the value to find in the first column of the table
(the value you are looking for)
table_array
the range of cells to lookup in (it is easier if this is a named
range)
index_num
from which column of the table_array to return a value (this is
a number, not a column letter)
range_lookup
(Excel)
is_sorted
(Google Sheets)
whether to perform a range lookup or not – set to false or 0
to get exact matches only (range lookups are explained in the
next section)
Example:
The first table contains anonymised exam results, showing only the student ID. Using
VLOOKUP, we can locate the corresponding names in another table.
This example uses a named range as the data source (‘students’).
A
B
C
D
1
StudentID
Exam Ref
Result
Surname
2
1001
B1
68
Lister
3
1001
A2
72
4
1002
A1
56
5
1002
B2
63
6
1003
A1
81
A
B
C
1
StudentID
Forename
Surname
2
1001
Kate
Lister
3
1002
Angela
Jones
4
1003
David
Hoskins
5
1004
Lee
Hodges
6
1005
Homer
Gumble
=vlookup(A2,students,3,false)
Value from A2 (1001)
located in first
column
Value from column 3
returned (Lister)
Cells A1:C6 are a named range (‘students’)

16
13.3 - Range lookups
In the example above, the 4th argument was set to false. This means a student surname
will only be returned if their StudentID has an exact match in the lookup table.
A range lookup is generally used with numerical data and does not expect an exact
match, but instead uses a sorted list to find out where the value falls in a range. The 4th
argument is then true.
For example, some exams could have the following grade boundaries, and we need to
work out the grade for some results. The range lookup will match the closest range
value below the supplied value:
Note When you use a range lookup, the values in the first column must be sorted in
ascending order.
You must include the lowest possible value – in this case a zero is needed
otherwise values below 40 would generate an error.
A
B
1
Mark
Grade
2
0
Fail
3
40
E
4
50
D
5
60
C
6
70
B
6
80
A
Cells A1:B6 are a
named range (‘grades’)
A
B
C
D
E
1
StudentID
Exam
Result
Forename
Grade
2
1001
1
68
Lister
C
3
1001
2
72
Lister
4
1002
1
56
Jones
5
1002
2
63
Jones
6
1003
1
81
Hoskins
=vlookup(C2,grades,2,true)

Part 3~Working with lists and data
17
13.4 - MATCH and INDEX
These functions are often used together, when they provide LOOKUP functionality.
=match(search value, range, type)
identifies a value in a column (range), returning
the row number
=index(range, row number)
uses the row number to return a value from a
column (range)
Note When using MATCH, the type is set to 0 for an exact match or 1 for a ‘nearest
match below’ in a sorted column of values (the equivalent of true in VLOOKUP)
Consider this data set as an example. The student ID is not in the first column, so
VLOOKUP cannot be used. The Surname for a particular StudentID is required.
MATCH is used first, to identify the row, and then this row number is used with INDEX to
find the Surname:
Note To use just one cell for the result, MATCH can be nested inside INDEX. In the
example above this would become:
=index(B:B,match(G3,C:C,0))
The returned value would still be Jones
A
B
C
D
E
1
Forename
Surname
StudentID
Shoe size
2
Kate
Lister
1001
5
3
Angela
Jones
1002
4
4
David
Hoskins
1003
8
5
Lee
Hodges
1004
9
6
Homer
Gumble
1005
7
Data set:
F
G
H
I
1
2
Student ID
MATCH
INDEX
3
1002
3
Jones
4
=match(G3,C:C,0)
=index(B:B,H3)
18
14 ~ Introducing Pivot Tables
Using Pivot Tables allows you to rearrange a data set so as to view it from different
perspectives. In order to do this, the data must be organised; you cannot create a pivot
table from poorly-organised data. An example may make this clearer.
The scenario – Students have volunteered to take part in activities to raise funds for
charity, and we want to analyse the proceeds to see which activities were most
successful, which colleges raised the most, and so on.
In order to facilitate pivoting, the structure should be:
A
B
C
D
E
1
Student name
Year
College
Activity
Amount
2
David Jones
2
Derwith
Bean bath
60.00
3
David Jones
2
Derwith
10k run
75.50
4
David Jones
2
Derwith
Tandem jousting
55.00
5
Kate Thomson
1
Alcricke
Bean bath
70.00
6
Kate Thomson
1
Alcricke
Parachute jump
45.00
7
Kate Thomson
1
Alcricke
Tandem jousting
85.00
8
John Smith
2
Langburgh
10k run
65.50
9
John Smith
2
Langburgh
Parachute jump
95.50
10
John Smith
2
Langburgh
Tandem jousting
35.00
This may look odd, particularly the repetition, but it means each row is a collection of
separate data items including all relevant information for each instance of a student
doing an activity.
Many users are more likely to create a structure that makes for easy data entry and
display, but which makes it impossible to use pivot tables.
14.1 - Data you can’t pivot
Example 1: The data has been recorded like this:
A
B
C
D
E
F
G
1
Student name
Year
College
Bean bath
10k run
Parachute
jump
Tandem
jousting
2
David Jones
2
Derwith
60.00
75.50
55.00
3
Kate Thomson
1
Alcricke
70.00
85.00
45.50
4
John Smith
2
Langburgh
65.50
95.50
35.00
This cannot be pivoted!
It seems a perfectly reasonable way to record the data; you can easily total the amounts
for each activity and student. It would, however, take a lot of rearrangement,
conditional functions (in Excel perhaps the Subtotal feature) to total the amounts for
each college or year, because the data is already recorded in a ‘pivoted’ format.
Part 3~Working with lists and data
19
Example 2: The data has been recorded like this:
A
B
C
D
E
F
1
Student name
Year
College
Activities
2
David Jones
2
Derwith
Bean bath,
60.00
10k run,
75.50
Tandem
jousting,
55.00
3
Kate Thomson
1
Alcricke
Bean bath,
70.00
Parachute
jump,
85.00
Tandem
jousting,
45.50
4
John Smith
2
Langburgh
10k run,
65.50
Parachute
jump, 95.50
Tandem
jousting,
35.00
This cannot be pivoted!
This is even worse. Cells in columns D-F contain both text and numbers, which means
the numbers cannot be used in any calculations at all, and the data is still in multiple
columns. The use of one heading for 3 columns is also an issue, as you need to be able
to identify each column individually. No functions could easily rescue this!
Example 3: The data has been recorded like this:
A
B
C
D
E
1
Student name
Year
College
Activities
Amount
2
David Jones
2
Derwith
Bean bath, 10k run, Tandem
jousting
190.50
3
Kate Thomson
1
Alcricke
Bean bath, Parachute jump,
Tandem jousting
200.50
4
John Smith
2
Langburgh
10k run, Parachute jump, Tandem
jousting
196.00
This cannot be pivoted!
The total amount has been entered in column E. With some extra work you could find
sub-totals for colleges and years, but the amounts for individual activities cannot be
calculated, and you couldn’t find out if particular activities were more popular with
particular years groups.
Example 4: Using a different data set, monitoring spending:
A
B
C
D
E
F
G
1
Item
Dept
Jan
Feb
Mar
Apr
May
2
Paper
Admin
25.00
60.00
75.50
3
Printing
Admin
15.00
35.00
85.00
4
Tea-bags
Finance
8.99
9.99
12.99
This cannot be pivoted!
This is a very common way to record monthly data, but it cannot be pivoted because it
has in effect already been ‘pivoted’ to show items versus months.

20
14.2 - Data structure rules
The rules for data structure are more or less the same as for lists:
Data should be entered down the page, each item occupying a new row, so that
each row contains one instance of the value to be used in calculation
Each column should contain just one type of information (eg text, number,
date), and each cell should contain just one value
Enter column headings in one row at the top of the list – never use more, and
never merge cells for labels
Do not repeat attributes across several columns (eg month names)
Do not leave whole rows or columns empty (some blank cells are OK)
Stick to one data set per tab of a spreadsheet file
Planning the ideal data structure
Here’s one approach that may help you plan or check your data structure. We’ll
continue to use the student fund-raising example.
First, identify the data that provides the individual values (ie not totals or sub-totals) – in
this case, it’s the amount raised at a specific activity undertaken by a specific student:
Next, surround this with the collection of related attributes:
Also include ‘attributes of attributes’ if you are likely to make use of them. For example,
College and year are technically attributes of the student, but since we are storing all
the data in one table, these must also be regarded as attributes of the amount, and
included with each value.
These attributes should then be the additional columns used in the data set, so each
amount has a corresponding activity, student, college and year.
amount
amount
student
activity
college
year

Part 3~Working with lists and data
21
14.3 - Pivot table anatomy
In order to construct a pivot table, you need to choose:
A field that contains the values to be used in calculation
A field to be used as labels on the left (row labels)
A field to be used as labels across the top (column labels)
Optional – a field to be used for filtering
Ask yourself what two attributes you want to compare – one of these will become the
row labels, the other the column labels.
The filter allows you to limit the rows, columns and values by another field. You could,
for example, compare totals for students against activity, but use the filter to use only
the values for first years, or just certain selected colleges.
Based on the activity example above:
14.4 - Some example pivot tables
Q1: Which activities generated the most money in each year group?
Values
Column labels
Row labels
Filter
Could be year,
college or activity
Could be student,
year, college or
activity
Could be year,
college or activity
Must be amount
Row labels:
activity
Column labels: year
Values: amount

22
Q2: Which activities were most successful in each college?
Q3: How well did students in year 1 do at raising funds – which activities raised most?
Note In this particular example, three row fields are used: students are identified by an
ID number, and first name & surname are added too.
Q4: Which activities by year 2 students raised the most?
Q5: How many activities did each college undertake?
Row labels:
activity
Column labels: college
Values: amount
Row labels:
students,
first name,
surname
Values: amount
Column labels: activity
Filter applied: year 1
Row labels:
activity
Values:
amount
No column labels
Filter applied: year
Row labels:
activity
Column labels: activity
Values: activity summarised by COUNTA

Part 3~Working with lists and data
23
14.5 - Creating pivot tables
Whether you’re using Excel or Google Sheets, you first need to ensure your data is
suitable for pivoting. You also then need to be very clear about what questions you want
to ask of your data, and which field contains the numerical values.
Excel
1 In your data set, select any cell and choose Insert > Tables > PivotTable – the
data range is indicated and a dialogue opens with the range already entered.
Note Excel 2016 has a Recommended Pivot Tables option gives you an idea of what’s
possible with your data.
2 You will probably want your pivot table on a new sheet, but you can opt to put it on
an existing sheet – in which case you must define the position of the top left cell of
the area to be used.
Tip If you use this option, rather than a new sheet, always start on row 3 as the filter
need two rows above the pivot table.
3 Choose OK and the framework for the pivot is created.
4 Using the panel that appears on the right, drag fields from the list into the
appropriate areas below. As you do this, the used fields will be ticked.
Alternatively you can tick the required fields and Excel will decide which area to put
them in. This may not be what you want, but you can drag to rearrange.
5 The field you choose for the Values will usually (but not always) be numeric. For
numeric data you can choose to display a Sum, Average etc by choosing the drop-
down and selecting Value Field Settings…
If the active cell is in your
data range, it will be
selected automatically
A pivot table is often
created on a separate,
new sheet

24
You may also need to
choose the Value Field
Settings from here and
change the calculation
– the default is COUNT
As you drag fields, the
pivot table will be built
Filter
The resulting
pivot table

Part 3~Working with lists and data
25
Google Sheets
1 In your data set, select any cell and choose Data > Pivot table report… –
the framework for the pivot table is created (a pivot table is always created
on a new sheet).
2 Using the Report Editor pane on the right, add fields to the Rows, Columns
and Values using the Add field link. Choose a field for the filter if you need
this too.
As you choose fields, the
pivot table will be built

26
Part 4~Presenting data visually
Data in a spreadsheet can be quickly turned into charts, providing visual representation
of data. Several types of graph are supported, with options to control the appearance.
15 ~ Conditional Formatting
Conditional formatting modifies the visual appearance of cells based on the value it
contains and is useful for identifying values that need you attention – very high, very
low, outliers etc.
The methods used in Excel and Google Sheets are different, but conversion between
Excel and Google Sheets (via upload and download) preserves conditional formatting
that is common to both applications.
15.1 - Conditional formatting in Excel
1 Select the range of cells to be formatted.
2 Choose Home > Styles > Conditional Formatting. You are presented with a range
of rule options (see below).
3 Select the appropriate rule and specify the condition for formatting the chosen cell
or range of cells. Try to use cell references rather than values in the condition.
4 When done, choose OK.
Rule options
Highlight Cells Rules
Identifies cells that are greater than, less than,
between, etc specified criteria
Top/Bottom Rules
Identifies cells that are the top ten, bottom ten,
etc in a range of cells
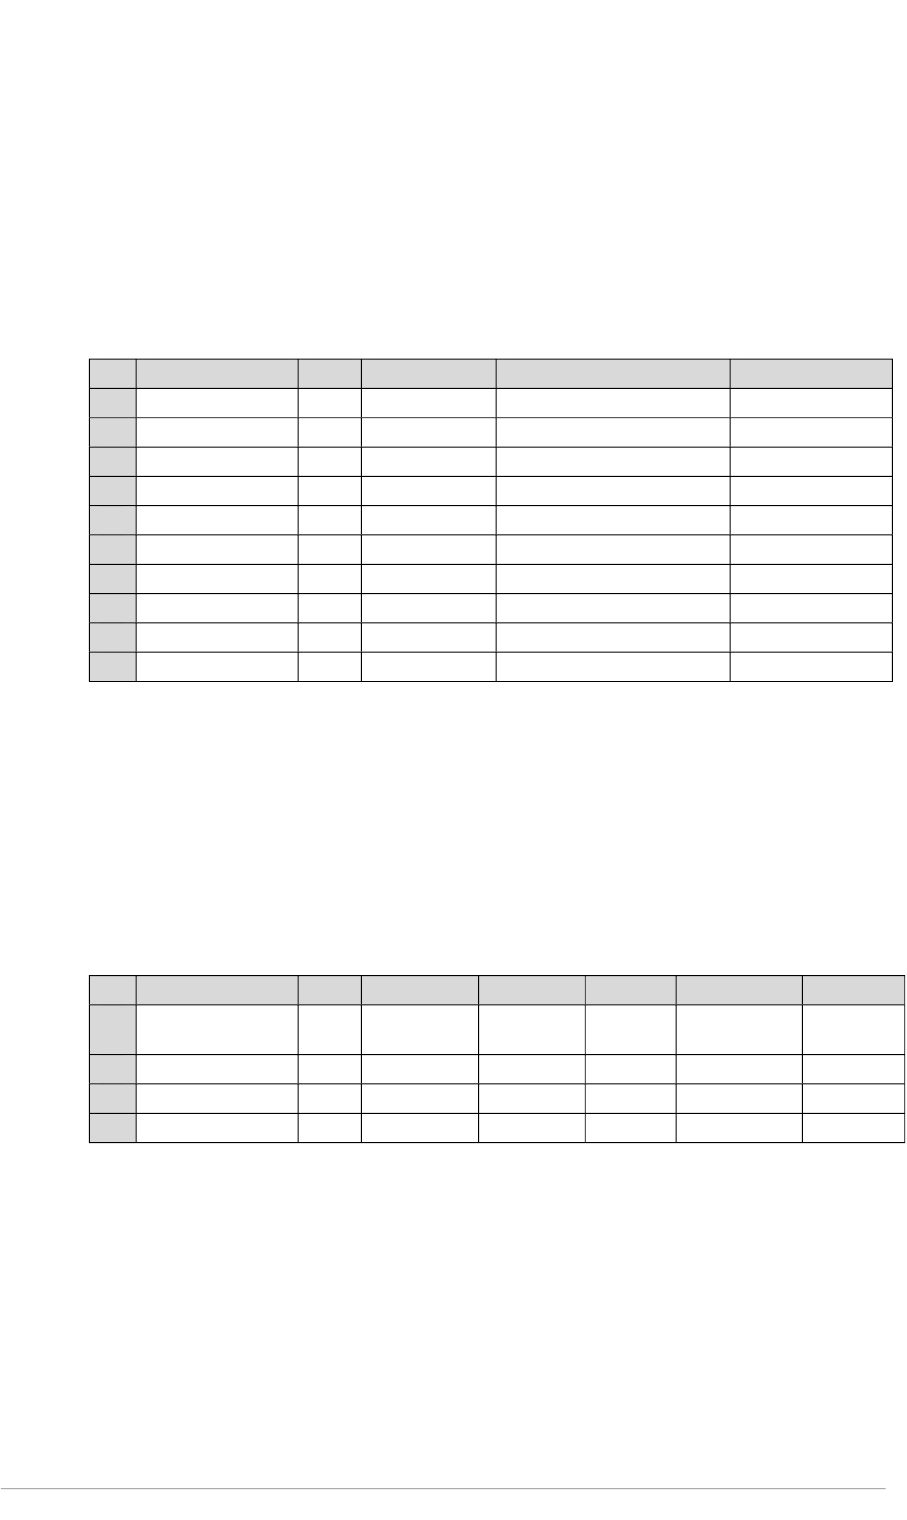
Data Bars, Colour Bars, Icon Sets
(not available in Google Sheets)
Identifies with bars, colours or icons how the
value of a cell or range of cells compares with
other cells
This can be a value, but
using a cell reference
is more flexible
Configure formatting
Part 4~Presenting data visually
27
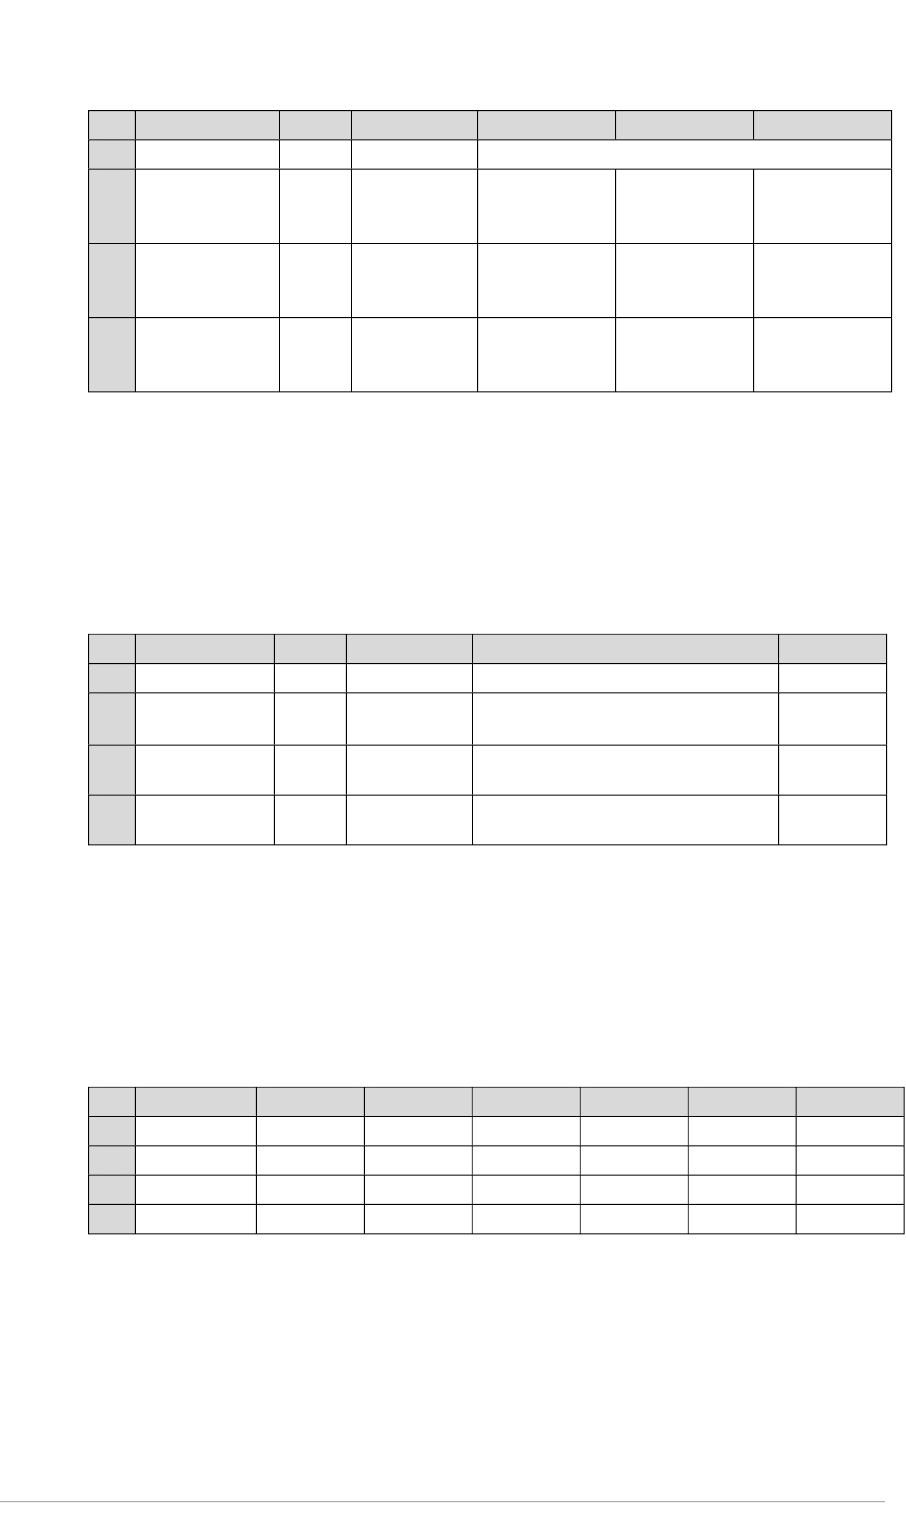
Managing multiple conditional formats - Excel
1 Select the cells and choose Home > Styles > Conditional Formatting
> Manage Rules… to open the Rules Manager dialogue box.
2 If no rules are shown, check the setting for Show formatting rules for
From here you can add, edit and delete rules and the order in which they are applied.
15.2 - Conditional formatting in Google Sheets
1 Select the range of cells to be formatted and choose
Format > Conditional formatting… to open the side panel.
2 Configure the rule and format in the side panel.
3 Select Done when complete.
Highlight
cells
Data
bars
Icon
sets
Icon set with
data bars
examples
Controls which rules are listed
Rules are applied in the order listed

28
Managing multiple rules in Google Sheets
The rules side panel is used to add, remove or edit conditional formatting rules.
1 First select the cells containing the rules you want to change.
2 Choose a rule to edit it, or add/delete rules using the appropriate controls.
Note The rules are applied in the order they appear in the side panel, from bottom to
top. This means a rule higher on the list can override one lower down.
One colour or a
graduated scale
Range affected
Formatting rules
Appearance
when rule is met
Select rule to
be edited
Add a new rule
Delete this rule

Part 4~Presenting data visually
29
16 ~ From Spreadsheet to Chart
In the chart below, a single series shows the number of apples consumed in the months
January-March. Values and labels can both be used in the graph.
Before inserting a chart, ensure your data is laid out appropriately:
Do not leave empty rows/columns in your data if avoidable
Include axis labels, but enter them in just one cell for each row/column
Well laid out for charting:
A
B
C
D
1
Apples
Oranges
Pears
2
Jan
26
8
20
3
Feb
31
12
15
4
Mar
28
9
12
5
Apr
19
14
23
16.1 - Effective charts
You need to choose the right sort of chart for your data – the final arbiter is not how
pretty it looks, but how effectively it presents your data. In part this will depend on
whether your data are categorised or purely numeric.
In particular, you need to be clear about the types of data you are working with. Some
graphs plot numerical values for categorised data, whereas some plot two sets of
related numerical data.
Categorised data is often plotted using bar, column or pie charts, but related numerical
data usually requires a scatter graph.
Below are some examples:
Horizontal (x) Axis
Labels from
column A
Series label /
Legend
Vertical (y)
Axis
Series 1 values plotted

30
Categorised data: the number of fruit items eaten per month:
Numeric data: the mass of a dog and the number of biscuits it eats.
Implied numeric values
Some data may appear to be categorised, but is better understood as a special case of
numeric data. The most common case of this is when a value is plotted over time, either
months, days of the week or years. In this case, the time/week days/months may need
to be recorded in a format that provides a numeric value (spreadsheets store dates and
times numerically) so as to achieve a linear scale
In this example, if the days are used as categories, a non-linear scale for the week is
generated (left), but treating the days as dates includes the missing days and provides a
linear scale for the horizontal axis.
Day
Spent (£)
Mon
45
Tue
67
Thu
34
Fri
78
Sun
38
Non-linear scale for days
Linear scale for days

Part 4~Presenting data visually
31
16.2 - Creating Charts
In many cases, simply selecting data and choosing the kind of chart you require will give
a good initial graph, which can then be modified to your requirements.
Google charts from Sheets
1 Select the range of cells you wish to create a chart from, including any
labels that are required.
2 Choose Insert > Chart, or select the Insert Chart
button on the toolbar. A ‘provisional’ Chart will appear,
with an editing panel on the right
3 Use the controls on the panel to configure the chart as
required – the DATA tab lets you choose how to use
the data, and the CUSTOMISE tab controls the
appearance.
The chart will initially appear within the current
spreadsheet; you can reposition and resize it, and the chart
can be moved into its own tab (see below).
Customising Google Charts
Selecting an existing chart twice (or double-clicking) re-
enables the Chart Editor.
When a chart is selected, there is also a short menu to allow
other common actions, including moving to its own sheet:
Additional visualisation options
Google sheets includes some more unusual chart types,
including maps, trees, gauges organisational charts and animated ‘motion’ graphs. Most
of these are also designed to be embedded on web pages and include a measure of
interaction.

32
Creating charts from Excel
1 Select the range of cells you wish to create a chart from, including any
labels that are required.
2 On the ribbon, select the Insert tab. Excel versions categorise charts differently,
but the choices are essentially the same.
3 Choose the type of chart you require. Excel will
create a basic chart from your data. You can
then use the controls provided with the chart or
the Ribbon tools to adapt the chart’s
appearance.
The chart will initially appear within the current spreadsheet; you can move and resize
it, or the chart can be moved into its own tab from the ribbon controls.
Customising Excel Charts
There are several tools for modifying the behaviour and appearance of a chart:
The controls for elements, styles and filters that
appear when a chart is selected
The ribbon controls (two extra tabs) which are
enabled when a chart is selected
A side panel which appears when you double-
click a chart or choose further options from the
ribbon controls
Right-click on a chart and choose options as
appropriate
Various dialogue boxes or the side
panel will appear
Ribbon
controls
Add/remove chart elements
Chart styles
Chart filters

Part 4~Presenting data visually
33
16.3 - Using Charts in other applications
Excel
Charts constructed in Excel can be placed in other Office applications including
Word and PowerPoint. All you have to do is copy and paste the chart, however
there are essentially three different options, and you need to understand the
implications.
Method
Notes
Embed
A copy of the entire Excel file is inserted
into the document
Separate Excel file no longer needed
Chart and data editable from within
Word/PowerPoint
Makes your document file larger
Sharing the Word/PowerPoint file shares
your whole spreadsheet
Link
The chart that appears in the document
is dynamically tied to the separate Excel
file
Changes made in Excel are reflected in
the document automatically
Minimal effect on file size
Complicates document management –
must keep document and Excel files
together for updating to take place
Static image
An image
Chart/data cannot be edited in document
(updates must be made in Excel and
pasted back again)
Chart only included in document – no
access to data
Pasting a Chart
To place a chart in a Word/PowerPoint document:
1 Select the chart in Excel and choose Edit > Copy (or CTRL + C)
2 Switch to the document/presentation and Paste into the target document
3 Choose the appropriate paste option:
Paste as picture
Link, keep destination
formatting
Embed, use
destination theme
Embed, keep source
formatting
Link, use source
theme

34
Editing a linked or embedded chart
If you are using Linked charts, any edits to the linked Excel file will automatically
reflected in the document, but a linked or embedded chart can also be edited from
within Word/PowerPoint:
1 Select the chart, right-click and choose Edit data…
2 Choose either to Edit Data using a mini-window (See below) in the document or to
Edit Data in Excel
3 After making changes to embedded charts, simply close the Excel window; with
linked charts you can continue to work with both open.
Excel charts in other applications
For many other non-office applications (including online tools), inserting the chart as an
image is generally the only option, and is what usually happens you paste a copied chart
into an application.
High Quality Charts
If you need professional quality images for publication, one option is to transfer the
chart into a vector drawing application such as Corel Draw. This allows you to work to a
high resolution (publishers usually need 300dpi) or use CMYK colours, usually required
for commercial colour printing.
To make sure you can edit the charts as a vector drawing object in Corel Draw, try one of
the following methods:
1 Copy the chart and paste using Edit > Paste Special, choosing
a) Windows metafile
b) Or Windows enhanced metafile
2 Put the chart on its own Excel sheet and save as a pdf – import this into Corel Draw

Part 4~Presenting data visually
35
Google sheets
A chart can be inserted into a Document or Slides presentation as a static or linked
image. When linked, the chart can be updated. There are two methods:
Select and copy the chart,
switch applications and paste –
you will be presented with the
option to link
When pasting a copied chart
linking is the default option, but
you can change this if you want
a ‘snapshot’ of data
In the ‘other’ application (Docs
or Slides) chose Insert > Chart >
From Sheets…; select the file
and chart, and choose whether
or not to link
Linking is again the default
option
Updating: A linked chart will show an UPDATE button when selected, if the chart has
changed. Also included are controls to un-link and open the source file.
Static Charts
If you do not want a chart to update in a document or slide, deselect the link option
when you insert it.
If you need the chart in another context and do not want it to update, you could also
save it as an image from the short menu. The image will be in PNG format and will be
saved on your Windows/Mac filing system.
update (only shown if
source chart has changed)
un-link

36
Google New Sites
Charts in sheets can be embedded on Google Sites pages, allowing this to
be published to a wider audience.
The New Sites make it very simple to insert an existing chart on a page and the chart is
always linked to the source spreadsheet data:
1 On a New Sites page, from the INSERT tab choose Charts
2 Locate the Sheets file that contains the chart, select it and choose INSERT
3 In the dialogue select the chart (a Sheets file could contain several) and choose
ADD
Note: Use the Preview to check the chart is updating, as this may not be
apparent in Design mode.
choose the file
choose the chart
