
Milestone Systems
XProtect® VMS
Hardening guide

Changes to this document
Version history
Document
version
Release Comments
Version 25 2024 R1 No changes to this document
Version 24 2023 R3 No changes to this document
Version 23 2023 R2 No changes to this document
Version 22 2023 R1
Added hardening information for the SQL Server connection in Connection to the
SQL Server databases on page 72.
Updated information about the UseRemoting option in Disable legacy remoting
channel on page 74.
Version 21 2022 R3 No changes to this document
Version 20 2022 R2
Added information on Disable IIS header information on the Identity Provider on
page 77.
Warning removed stating that the Mobile Server is not configurable when the
Management Server is in a cluster from Use a "demilitarized zone" (DMZ) to
provide external access on page 80.
Version 19 2022 R1
Added information about Encryption of communication with the Event Server on
page 37.
Version 18 2021 R2 Added new section CIS Microsoft IIS 10 benchmark on page 121.
Version 17 2021 R1
Updated reference to Microsoft Security Update Guide to
https://msrc.microsoft.com/update-guide.
Added new section Configure the Content Security Policy (CSP) on page 85.
Updated restrictions to Mobile Server in a DMZ in Use a "demilitarized zone"
Hardening guide | XProtect® VMS
2 | Changes to this document

Document
version
Release Comments
(DMZ) to provide external access on page 80.
Version 16 2020 R3 Updated new supported FIPS compliant drivers in Supported drivers on page 111.
Version 15 2020 R3
Added new sections FIPS 140-2 compliance on page 100 and Drivers and FIPS
140-2 on page 111.
Added information on Disable the IIS Default Page on page 76.
Updated information on Disable IIS HTTP TRACE / TRACK verbs on page 76.
Port 25 for the recording server and failover recording server is deprecated. See
Use firewalls to limit IP access to servers and computers on page 51.
Version 14 2020 R2
Added information to deny access to X-Frames in Manage IIS header information
on page 75.
Version 13 2020 R2
Added information about encryption between the management server and the
data collector (see Encryption between the management server and the Data
Collector server (explained) on page 34
Added information on Disable IIS HTTP TRACE / TRACK verbs on page 76.
Version 12 2020 R1
Microsoft Internet Explorer no longer supported. Microsoft Edge is supported.
See Use only supported browsers with the latest security updates on page 97.
Version 11 2019 R3
Port 5432 is disabled by default. See Use firewalls to limit IP access to servers
and computers on page 51.
Added information on Manage IIS header information on page 75.
Version 10 2019 R2
Added section Secure communication (explained) on page 31
l Management server encryption (explained) on page 31
l Encryption from the management server to the recording server
(explained) on page 33
l Mobile server data encryption (explained) on page 38
Added hardening information for the SQL Server database connection in
Hardening guide | XProtect® VMS
3 | Changes to this document

Document
version
Release Comments
Connection to the SQL Server databases on page 72.
Added hardening information for Recording Server in Harden Network Attached
Storage (NAS) to store recorded media data on page 79.
Version 9 2019 R1
Added encryption from the recording server to all clients, described here:
Encryption from the management server to the recording server (explained) on
page 33
Version 8 2018 R3
Added design recommendations, described here: Privacy by design on page 23.
Log Server uses port number 22337, described here: Use firewalls to limit IP
access to servers and computers on page 51 and Limit the IP access to Log
Server on page 86.
Mobile server no longer uses port 8000 for communication with Tray Manager.
This was removed from Use firewalls to limit IP access to servers and computers
on page 51.
New recommendation for scanning for devices, described in Scanning for devices
on page 50.
Version 7 2018 R2 No changes to this document
Version 6 2018 R1
Clarified the need to add specific firewall rules to the Management Server,
described here: Use firewalls to limit IP access to servers and computers on page
51.
Version 5 2018 R1 No changes to this document
Version 4 2017 R3 No changes to this document
Version 3 2017 R2
This document applies to XProtect VMS versions 2017 R2 and before.
These are the changes to the document:
l Added Two-step verification for XProtect Mobile (see Set up users for two-
step verification via email on page 81)
l Storage and Recording Settings properties on page 77
Hardening guide | XProtect® VMS
4 | Changes to this document

Document
version
Release Comments
Version 2 2016 R3
This document applies to XProtect VMS versions 2016 R3 and before.
These are the changes to the document:
l Added Changes to this document topic
l Added Kerberos support (see Kerberos authentication (explained) on page
40)
l Updated port numbers in Use firewalls to limit IP access to servers and
computers on page 51
Version 1 2016 R2 This document applies to XProtect VMS versions 2016 R3 and before.
Hardening guide | XProtect® VMS
5 | Changes to this document

Contents
Changes to this document 2
Version history
2
Copyright, trademarks, and disclaimer 13
Introduction 14
Introduction
14
What is "hardening?"
14
Target audience
14
Resources and references
15
Hardware and device components
16
Cyber threats and cyber risks
16
Cyber Risk Management Framework
17
Hardening system components
21
General setup 22
Overview
22
Privacy by design
23
Servers, Workstations, Clients and Applications 27
Servers, Workstations, Clients and Applications
27
Basic steps – Servers, Workstations, Clients and Applications
27
Establish surveillance and security objectives
28
Establish a formal security policy and response plan
28
Use Windows users with Active Directory
29
Secure communication (explained)
31
Management server encryption (explained)
31
Encryption from the management server to the recording server (explained)
33
Encryption between the management server and the Data Collector server (explained)
34
Encryption to clients and servers that retrieve data from the recording server (explained)
35
Encryption of communication with the Event Server
37
Mobile server data encryption (explained)
38
Hardening guide | XProtect® VMS
6 | Contents

Mobile server encryption requirements for clients
39
Kerberos authentication (explained)
40
Use Windows update
41
Keep software and device firmware updated
42
Use antivirus on all servers and computers
42
Monitor logs in the VMS for signs of suspicious activity
43
Advanced steps – Servers, Workstations, Clients and Applications
44
Adopt standards for secure network and VMS implementations
45
Establish an incident response plan
45
Protect sensitive VMS components
46
Follow Microsoft OS Security best practices
46
Use tools to automate or implement the security policy
46
Follow established network security best practices
47
Devices and network 48
Devices and network
48
Basic steps – Devices
48
Use strong passwords instead of default passwords
48
Stop unused services and protocols
48
Create dedicated user accounts on each device
49
Scanning for devices
50
Basic steps – Network
50
Use secure and trusted networks connection
50
Use firewalls to limit IP access to servers and computers
51
Use a firewall between the VMS and the Internet
66
Connect the camera subnet to the recording server subnet only
66
Advanced steps – Devices
67
Use Simple Network Management Protocol to monitor events
67
Advanced steps – Network
67
Use secure wireless protocols
67
Use port-based access control
68
Hardening guide | XProtect® VMS
7 | Contents

Run the VMS on a dedicated network
68
Milestone Servers 69
Basic steps – Milestone servers
69
Use physical access controls and monitor the server room
69
Use encrypted communication channels
69
Advanced steps – Milestone servers
69
Run services with service accounts
70
Run components on dedicated virtual or physical servers
70
Restrict the use of removable media on computers and servers
70
Use individual administrator accounts for better auditing
70
Use subnets or VLANs to limit server access
71
Enable only the ports used by Event Server
71
SQL Server
72
Connection to the SQL Server databases
72
Run the SQL Server database on a separate server
72
Management Server
73
Adjust the token time-out
73
Enable only the ports used by the management server
73
Disable non-secure protocols
74
Disable legacy remoting channel
74
Before XProtect VMS 2023 R1
74
From XProtect VMS 2023 R1
74
Manage IIS header information
75
Disable IIS header information
75
Set X-Frame Options
75
Disable IIS HTTP TRACE / TRACK verbs
76
Disable the IIS Default Page
76
Identity Provider
77
Disable IIS header information on the Identity Provider
77
Recording Server
77
Hardening guide | XProtect® VMS
8 | Contents

Storage and Recording Settings properties
77
Use separate network interface cards
79
Harden Network Attached Storage (NAS) to store recorded media data
79
XProtect Mobile Server
79
Only enable ports that Mobile Server uses
80
Use a "demilitarized zone" (DMZ) to provide external access
80
Disable non-secure protocols
80
Set up users for two-step verification via email
81
Requirements
81
Two-step verification tab
82
Configure the Content Security Policy (CSP)
85
Log Server
85
Install Log Server on a separate server with SQL Server
85
Limit the IP access to Log Server
86
Client programs 87
Client programs
87
Basic steps (all client programs)
87
Use Windows users with AD
87
Restrict permissions for client users
87
Always run clients on trusted hardware on trusted networks
89
Advanced steps – XProtect Smart Client
89
Restrict physical access to any computer running XProtect Smart Client
89
Always use a secure connection by default, particularly over public networks
90
Activate login authorization
90
Do not store passwords
93
Turn on only required client features
94
Use separate names for user accounts
94
Prohibit the use of removable media
95
Advanced steps – XProtect Mobile client
95
Always use the XProtect Mobile client on secure devices
95
Hardening guide | XProtect® VMS
9 | Contents

Download the XProtect Mobile client from authorized sources
96
Mobile devices should be secured
96
Advanced steps – XProtect Web Client
96
Always run XProtect Web Client on trusted client computers
96
Use certificates to confirm the identity of XProtect Mobile server
97
Use only supported browsers with the latest security updates
97
Advanced steps – Management Client
98
Use Management Client profiles to limit what administrators can view
98
Allow administrators to access relevant parts of the VMS
98
Run the Management Client on trusted and secure networks
99
Compliance 100
FIPS 140-2 compliance
100
What is FIPS?
100
What is FIPS 140-2?
101
Which XProtect VMS applications can operate in a FIPS 140-2 compliant mode?
101
Is XProtect VMS always FIPS compliant?
101
Should you enable FIPS 140–2 mode?
101
How to ensure XProtect VMS can operate in FIPS 140-2 compliant mode?
101
Considerations regarding upgrade
102
Recommended upgrade process for customers running XProtect VMS
102
Verify third-party integrations
103
Connect devices: background
103
Device connectivity requirements
103
Effects of operating in FIPS 140-2 compliant mode
104
Devices running over Milestone Open Network Bridge
104
Media database: Considerations regarding backward compatibility
104
Media upgrade depending on XProtect VMS version
105
Media upgrade details
105
Media database data upgrade: XProtect VMS 2017 R1 and earlier
108
Media database upgrade: XProtect VMS 2017 R2 to XProtect VMS 2019 R3
108
Hardening guide | XProtect® VMS
10 | Contents

What is the media conversion tool?
108
Media conversion tool workflow
109
Media database upgrade: XProtect VMS 2020 R1 or XProtect VMS 2020 R2
109
FIPS Group Policy on the Windows operating system
109
FIPS Group Policy and Milestone Federated Architecture
110
Install XProtect VMS
110
Encrypt hardware detection passwords
110
Drivers and FIPS 140-2
111
Requirements for FIPS 140-2 compliant mode
111
Device requirements
111
Supported drivers
111
Effects of running in FIPS 140-2 compliant mode
112
How to configure the device and the driver for FIPS 140-2
112
Axis drivers
113
Canon drivers
114
Bosch drivers
114
Hanwha drivers
115
ONVIF drivers
115
Universal drivers
116
VideoPush driver
117
Example of FIPS 140-2 compliant cipher suites
117
FIPS resources
119
Center for Internet Security (CIS) Benchmarks 121
CIS Microsoft IIS 10 benchmark
121
Controls that do not impact XProtect VMS functionality
121
Controls that impact XProtect VMS functionality
121
Product comparision chart 123
Product comparison
123
Appendix 124
Appendix 1 - Resources
124
Hardening guide | XProtect® VMS
11 | Contents


Copyright, trademarks, and disclaimer
Copyright © 2024 Milestone Systems A/S
Trademarks
XProtect is a registered trademark of Milestone Systems A/S.
Microsoft and Windows are registered trademarks of Microsoft Corporation. App Store is a service mark of
Apple Inc. Android is a trademark of Google Inc.
All other trademarks mentioned in this document are trademarks of their respective owners.
Disclaimer
This text is intended for general information purposes only, and due care has been taken in its preparation.
Any risk arising from the use of this information rests with the recipient, and nothing herein should be construed
as constituting any kind of warranty.
Milestone Systems A/S reserves the right to make adjustments without prior notification.
All names of people and organizations used in the examples in this text are fictitious. Any resemblance to any
actual organization or person, living or dead, is purely coincidental and unintended.
This product may make use of third-party software for which specific terms and conditions may apply. When that
is the case, you can find more information in the file 3rd_party_software_terms_and_conditions.txt
located in your Milestone system installation folder.
Hardening guide | XProtect® VMS
13 | Copyright, trademarks, and disclaimer

Introduction
Introduction
This guide describes security and physical security measures and best practices that can help secure your
XProtect video management software (VMS) against cyber-attacks. This includes security considerations for the
hardware and software of servers, clients and network device components of a video surveillance system.
This guide adopts standard security and privacy controls and maps them to each of the recommendations. That
makes this guide a resource for compliance across industry and government security, and network security
requirements.
What is "hardening?"
Developing and implementing security measures and best practices is known as "hardening." Hardening is a
continuous process of identifying and understanding security risks, and taking appropriate steps to counter
them. The process is dynamic because threats, and the systems they target, are continuously evolving.
Most of the information in this guide focuses on IT settings and techniques, but it’s important to remember that
physical security is also a vital part of hardening. For example, use physical barriers to servers and client
computers, and make sure that things like camera enclosures, locks, tamper alarms, and access controls are
secure.
The following are the actionable steps for hardening a VMS:
1. Understand the components to protect
2. Harden the surveillance system components:
1. Harden the servers (physical and virtual) and client computers and devices
2. Harden the network
3. Harden the cameras
3. Document and maintain security settings on each system
4. Train and invest in people and skills, including your supply chain
Target audience
Everyone in an organization must understand at least the basics about network and software security. Attempts
to compromise critical IT infrastructure are becoming more frequent, so everyone must take hardening and
security seriously.
This guide provides basic and advanced information for end users, system integrators, consultants, and
component manufacturers.
Hardening guide | XProtect® VMS
14 | Introduction

l Basic descriptions give general insight into security
l Advanced descriptions give IT-specific guidance for hardening XProtect VMS products. In addition to
software, it also describes security considerations for the hardware and device components of the
system.
Resources and references
The following organizations provide resources and information about best practices for security:
l International Standards Organization (ISO),
l United States (US) National Institute of Standards and Technology (NIST)
l Security Technical Implementation Guidelines (STIGs) from the US Defense Information Systems
Administration (DISA)
l Center for Internet Security
l SANS Institute
l Cloud Security Alliance (CSA)
l Internet Engineering Task Force (IETF)
l British Standards
Additionally, camera manufacturers provide guidance for their hardware devices.
See Appendix 1 - Resources on page 124 for a list of references and Appendix 2 -
Acronyms on page 125 for a list of acronyms.
This guide leverages country, international, and industry standards and specifications. In particular, it refers to
the United States Department of Commerce National Institute of Standards and Technology Special Publication
800-53 Revision 5 Security and Privacy Controls for Federal Information Systems and Organizations
(https://csrc.nist.gov/publications/detail/sp/800-53/rev-5/final).
The NIST document is written for the US Federal government; however, it is generally
accepted in the security industry as the current set of best practices.
This guide refers and links to additional information about security controls. The guidance can be cross-
referenced to industry-specific requirements and other international security and risk management standard
and frameworks. For example, the current NIST Cybersecurity Framework uses SP 800-53 Rev4 as a basis for
the controls and guidance. Another example is Appendix H in SP 800-53 Rev 4, which contains a reference to
ISO/IEC 15408 requirements, such as Common Criteria.
Hardening guide | XProtect® VMS
15 | Introduction

Hardware and device components
In addition to software, the components of an XProtect VMS installation typically include hardware devices, such as:
l Cameras
l Encoders
l Networking products
l Storage systems
l Servers and client computers (physical or virtual machines)
l Mobile devices, such as smartphones
It is important to include hardware devices in your efforts to harden your XProtect VMS installation. For example,
cameras often have default passwords. Some manufacturers publish these passwords online so that they’re
easy for customers to find. Unfortunately, that means the passwords are also available to attackers.
This document provides recommendations for hardware devices.
Cyber threats and cyber risks
There are many sources of threats to a VMS, including business, technology, process and human attacks or
failures. Threats take place over a lifecycle. The threat lifecycle, sometimes called the "cyber kill" or "cyber
threat chain," was developed to describe the stages of advanced cyber threats.
Each stage in the threat lifecycle takes time. The amount of time for each stage is particular to the threat, or
combination of threats, and its actors and targets.
Hardening guide | XProtect® VMS
16 | Introduction

The threat lifecycle is important for risk assessment because it shows where you can mitigate threats. The goal
is to reduce the number of vulnerabilities, and to address them as early as possible. For example, discouraging
an attacker who is probing a system for vulnerabilities can eliminate a threat.
Hardening puts in place actions that mitigate threats for each phase in the threat lifecycle. For example, during
the reconnaissance phase an attacker scans to find open ports and determine the status of services that are
related to the network and the VMS. To mitigate this, hardening guidance is to close unnecessary system ports in
XProtect VMS and Windows configurations.
The risk and threat assessment process includes the following steps:
l Identify information and security risks
l Assess and prioritize risks
l Implement policy, procedures, and technical solutions to mitigate these risks
The overall process of risk and threat assessment, and the implementation of security controls, is referred to as
a risk management framework. This document refers to NIST security and privacy controls and other
publications about risk management frameworks.
Cyber Risk Management Framework
The security and privacy controls in SP 800-53 Revision 5 (https://csrc.nist.gov/publications/detail/sp/800-53/rev-
5/final) are part of an overall risk management framework from NIST. The NIST document SP800-39
Hardening guide | XProtect® VMS
17 | Introduction

(https://csrc.nist.gov/publications/detail/sp/800-39/final) is a guide to applying a risk management framework.
SP800-36 is a foundational document for the NIST Cybersecurity Framework, which is described in Cybersecurity
Framework (https://www.nist.gov/cyberframework).
The figures here show:
l An overview of the risk management process. It shows a high-level, overall approach.
l Risk management at a business level, taking strategic and tactical considerations into account.
l The lifecycle of a risk management framework, and the NIST documents that provides details for each of
the steps in the lifecycle.
Security and privacy controls represent specific actions and recommendations to implement as part of a risk
management process. It’s important that the process includes the assessment of the organization, the particular
requirements of a given deployment, and the aggregation of these activities into a security plan. SP 800-18
Revision 1 (https://csrc.nist.gov/publications/detail/sp/800-18/rev-1/final) provides references for detailed
security plans.
High-level view of risk management (SP 800-39, page 8 (https://csrc.nist.gov/publications/detail/sp/800-39/final))
The process is interactive, and responses and their outcomes are iterative. Security threats, risks, responses
and results are dynamic and adapt, and as a result so must a security plan.
This diagram shows how a risk management framework considers IT systems, business processes, and the
organization as a whole to find a balance for the security plan.
Hardening guide | XProtect® VMS
18 | Introduction

Balancing security and business goals (SP 800-39, page 9 (https://csrc.nist.gov/publications/detail/sp/800-
39/final))
When hardening a system, you balance the impact on business productivity and usability for the sake of security,
and vice versa, in the context of the services you deliver. Security guidance is not isolated from other business
and IT activities.
For example, when a user enters their password incorrectly on three consecutive attempts, the password is
blocked and they cannot access the system. The system is secure from brute-force attacks, but the unlucky user
cannot use the device to do their work. A strong password policy that requires 30 character passwords, and
changing passwords every 30 days is a best practice, but it’s also difficult to use.
Hardening guide | XProtect® VMS
19 | Introduction

Example of a risk management framework (SP 800-53 Rev 5, page 8
(https://csrc.nist.gov/publications/detail/sp/800-53/rev-5/final))
To document its risk management framework, NIST produced multiple special publications. It includes the
following components:
1. Categorization (identification of risk level)
2. Selection of security and privacy controls
3. Implementation
4. Assessment of the effectiveness of security controls
5. Creating an improved system security profile, and what’s called an Authority to Operate (ATO)
6. Monitoring and evaluating through iterations
The risk management framework helps put a security plan and guidance in a security context.
Hardening guide | XProtect® VMS
20 | Introduction

Hardening system components
To harden system components, you change configurations to reduce the risk of a successful attack. Attackers
look for a way in, and look for vulnerabilities in exposed parts of the system. Surveillance systems can involve
100s or even 1000s of components. Failure to secure any one component can compromise the system.
The need to maintain configuration information is sometimes overlooked. XProtect VMS provides features for
managing configurations, but organizations must have a policy and process in place, and commit to doing the
work.
Hardening requires that you keep your knowledge about security up-to-date:
l Be aware of issues that affect software and hardware, including operating systems, mobile devices,
cameras, storage devices, and network devices. Establish a point-of-contact for all of the components in
the system. Ideally, use reporting procedures to track bugs and vulnerabilities for all components.
l Keep current on Common Vulnerabilities and Exposures (CVEs) (described in Common Vulnerabilities and
Exposures (https://cve.mitre.org/)) for all system components. These can relate to the operating systems,
devices that have hard-coded maintenance passwords, and so on. Address vulnerabilities for each
component, and alert manufacturers to vulnerabilities.
l Review Milestone Knowledge Base (KB) articles, and regularly review logs for signs of suspicious activity.
For more information, see the Milestone Knowledge Base
(https://force.milestonesys.com/support/MccKnowledgeBase).
l Maintain up-to-date configuration and system documentation for the system. Use change-control
procedures for the work you perform, and follow best practices for configuration management, as
described in SP 800-128 (https://csrc.nist.gov/publications/detail/sp/800-128/final).
The following sections provide basic and advanced hardening and security recommendations for each system
component. The sections also contain examples of how these relate to specific security controls described in the
NIST Special Publication 800-53 Revision 4, titled Security and Privacy Controls for Federal Information Systems
and Organizations.
In addition to the NIST document, the following sources are referenced:
l Center for Internet Security
l SP 800-53
l ISO 27001
l ISO/IEC 15408 (also known as Common Criteria, ISO/IEC 15408-1:2022
(https://www.iso.org/standard/72891.html)) .
Appendix 1 - Resources on page 124 in this document provides recommendations from camera manufacturers.
This is a relatively new effort from manufacturers, so limited resources are available. For the most part, the
recommendations can be generalized across camera manufacturers.
Hardening guide | XProtect® VMS
21 | Introduction

General setup
Overview
To help secure your surveillance system, Milestone recommends the following:
l Restrict access to servers. Keep servers in locked rooms, and make it difficult for intruders to access
network and power cables.
(PE2 and PE3 in Appendices D and F in NIST SP 800-53 Rev5
(https://csrc.nist.gov/publications/detail/sp/800-53/rev-5/final) (PE Physical and Environment Protection).)
l Design a network infrastructure that uses physical network or VLAN segmentation as much as possible.
(SC3 in Appendices D and F in NIST SP 800-53 Rev5 (https://csrc.nist.gov/publications/detail/sp/800-
53/rev-5/final) (SC System and Communication Protection).)
l Separate the camera network from the server network by having two network interfaces in each
recording server: one for the camera network, and one for the server network.
l Put the mobile server in a "demilitarized zone" (DMZ) with one network interface for public
access, and one for private communication to other servers.
(SC7 in Appendices D and F NIST SP 800-53 Rev5 (https://csrc.nist.gov/publications/detail/sp/800-
53/rev-5/final).)
l Many precautions can be taken when it comes to general set up. In addition to firewalls, these
include techniques to segment the network and control access to the servers, clients and
applications.
(AC3, AC4, AC6, CA3, CM3, CM6, CM7, IR4, SA9, SC7, SC28, SI3, SI 8 in Appendices D and F in NIST
SP 800-53 Rev5 (https://csrc.nist.gov/publications/detail/sp/800-53/rev-5/final) (AC Access
Controls), (CM Configuration Management) (IR Incident Response) (SA System and Service
Acquisition) (SI Systems and Information Integrity).)
l Configure the VMS with roles that control access to the system, and designate tasks and responsibilities.
(AC2, AC3, AC6, AC16, AC25, AU6, AU9, CM5, CM11, IA5, PL8, PS5, PS7, SC2, SI7, in Appendices D and F
in NIST SP 800-53 Rev5 (https://csrc.nist.gov/publications/detail/sp/800-53/rev-5/final) (AU Audit and
Accountability) (IA Identification and Authentication) (PL Planning).)
The figure shows an example of a general setup.
Hardening guide | XProtect® VMS
22 | General setup

Privacy by design
Milestone products are designed to deliver secure, end-to-end communication. Milestone products are designed
to protect privacy and to secure data. Data protection is always important, but especially if you intend to be
General Data Protection Regulation (GDPR) compliant in the EU.
According to GDPR, the controller of personal data, when processing such data, has an obligation to implement
technical or organizational measures which are designed to implement the data protection principles set out in
GDPR. GDPR refers to this as privacy by design.
In the context of a surveillance camera, a relevant example of privacy by design would be a feature that digitally
allows the user to restrict image capture to a certain perimeter, preventing the camera from capturing any
imagery outside this perimeter that would otherwise be captured.
In XProtect, there is support for privacy masking in two forms – permanent masks that cannot be removed, and
liftable masks that (with the appropriate permissions) can be lifted to reveal the image behind the mask.
The controller also has an obligation to implement technical or organizational measures which by default ensure
the least privacy intrusive processing of the personal data in question. GDPR refers to this as privacy by default.
In the context of a camera, a relevant example of privacy by default could be using privacy masking to keep a
sensitive area within the view of the camera private.
Hardening guide | XProtect® VMS
23 | General setup

What should you do to ensure privacy by design?
l Consider the resolution of different points in the camera scene and document these settings
Different purposes require different image qualities. When identification is not necessary, the camera
resolution and other modifiable factors should be chosen to ensure that no recognizable facial images
are captured.
l Encrypt your recordings
Milestone recommends that you secure your recordings by enabling at least Light encryption on your
recording servers' storage and archives. Milestone uses the AES-256 algorithm for encryption. When you
select Light encryption, only a part of the recording is encrypted. When you select Strong encryption, the
entire recording is encrypted.
l Secure the network
Milestone recommends that you select cameras that support HTTPS. It is recommended that you set the
cameras on separate VLANs and use HTTPS for your camera to recording server communication.
It is recommended that XProtect Smart Clients and XProtect Smart Walls are on the same VLAN as the
servers.
Use a VPN encrypted network or similar if using Smart Client or Smart Wall from a remote location.
l Enable and document the intended retention time
According to Article 4(1)(e) of the GDPR, recordings must not be retained longer than necessary for the
specific purposes for which they were made. Milestone recommends that you set the retention time
according to regional laws and requirements, and in any case, to set the retention time to a maximum of
30 days.
l Secure exports
Milestone recommends that you only allow access to export functionality for a select set of users that
need this permission.
Milestone also recommends that the Smart Client profile is changed to only allow export in XProtect
Format with encryption enabled. AVI and JPEG exports should not be allowed, because they can not be
made secure. This makes export of any evidence material password protected, encrypted and digitally
signed, making sure forensic material is genuine, untampered with and viewed by the authorized
receiver only.
l Enable privacy masking – permanent or liftable
Use privacy masking to help eliminate surveillance of areas irrelevant to your surveillance target.
Milestone recommends that you set a liftable blurring mask for sensitive areas and in places where
person identification is not allowed. Create then a second role that can authorize the mask to be lifted.
Hardening guide | XProtect® VMS
24 | General setup

l Restrict access permissions with roles
Apply the principle of least privilege (PoLP).
Milestone recommends that you only allow access to functionality for a select set of users that need this
permission. By default, only the system administrator can access the system and perform tasks. All new
roles and users that are created have no access to any functions until they are deliberately configured by
an administrator.
Set up permissions for all functionality, including: viewing live video and recordings, listening to audio,
accessing metadata, controlling PTZ cameras, accessing and configuring Smart Wall, lifting privacy
masks, working with exports, saving snapshots, and so on.
Grant access to only the cameras that the specific operator needs to access, and restrict access to
recorded video, audio, and metadata for operators, either completely, or grant access to only the video,
audio, or metadata recorded in the past few hours or less.
Regularly assess and review roles and responsibilities for operators, investigators, system administrators
and others with access to the system. Does the principle of least privilege still apply?
l Enable and use two-step verification
Milestone recommends that you specify an additional login step for users of XProtect Mobile or XProtect
Web Client by enabling two-step verification.
l Restrict administrator permissions
Milestone recommends that you limit the number of users that have an Administrator role. If you need to
create multiple Administrator roles, you can restrict their access by creating Administrator roles that can
manage only select parts of the system, such as certain devices or functions.
Milestone also recommends that the VMS administrator does not have full administrator permissions on
the storage that contains recorded video, and the storage administrator should not have access to the
VMS or backup administration.
For security, segment the network so there is a client/management network, and camera networks behind the
recording servers:
Hardening guide | XProtect® VMS
25 | General setup

For greater security, put the mobile server in a "demilitarized zone" (DMZ) with one network interface for public
access, and one for private communication to other servers, and use VPN encrypted networks for external
connections or to increase security for less secure internal networks:
Hardening guide | XProtect® VMS
26 | General setup

Servers, Workstations, Clients and Applications
Servers, Workstations, Clients and Applications
This section provides hardening guidance based on Microsoft Windows and the services that XProtect VMS uses.
This includes:
l The XProtect VMS product, for example XProtect® Corporate or XProtect® Enterprise running on
Windows Servers
l The device pack installed on the recording servers
l The server hardware or virtual platforms, and operating systems and services
l The client computers for XProtect® Smart Client and XProtect® Web Client
l Mobile devices and their operating systems and applications
Basic steps – Servers, Workstations, Clients and Applications
Establish surveillance and security objectives 28
Establish a formal security policy and response plan 28
Use Windows users with Active Directory 29
Secure communication (explained) 31
Management server encryption (explained) 31
Encryption from the management server to the recording server (explained) 33
Encryption between the management server and the Data Collector server (explained) 34
Encryption to clients and servers that retrieve data from the recording server (explained) 35
Encryption of communication with the Event Server 37
Mobile server data encryption (explained) 38
Kerberos authentication (explained) 40
Use Windows update 41
Keep software and device firmware updated 42
Use antivirus on all servers and computers 42
Monitor logs in the VMS for signs of suspicious activity 43
Hardening guide | XProtect® VMS
27 | Servers, Workstations, Clients and Applications

Establish surveillance and security objectives
Before implementing the VMS, Milestone recommends that you establish surveillance objectives. Define goals
and expectations related to capturing and using video data and related metadata. All stakeholders should
understand the surveillance objectives.
Specifics of surveillance objectives can be found in other documents, for example BS EN
62676-1-1: Video surveillance systems for use in security applications. System requirements.
General.
When surveillance objectives are in place, you can establish the security objectives. Security objectives support
the surveillance objectives by addressing what to protect in the VMS. A shared understanding of security
objectives makes it easier to secure the VMS and maintain data integrity.
With the surveillance and security objectives in place, you can more easily address the operational aspects of
securing the VMS, such as how to:
l Prevent data from being compromised
l Respond to threats and incidents when they occur, including roles and responsibilities.
Learn more
The following control(s) provide additional guidance:
l NIST SP 800-53 PL-2 System Security Plan
l NIST SP 800-53 SA-4 Acquisition Process
Establish a formal security policy and response plan
In compliance with NIST SP 800-100 Information Security Handbook: A Guide for Managers
(https://csrc.nist.gov/publications/detail/sp/800-100/final), Milestone recommends that you establish a formal
security policy and a response plan that describe how your organization addresses security issues, in terms of
practical procedures and guidelines. For example, a security policy can include:
l A password policy defined by the internal IT department
l Access control with ID badges
l Restrictions for smartphones from connecting to the network
Adopt existing IT policies and plans if they adhere to security best practices.
Learn more
The following control(s) provide additional guidance:
l NIST SP 800-53 IR-1 Incident Response Policy and Procedures
l NIST SP 800-53 PM-1 Information Security Program Plan
Hardening guide | XProtect® VMS
28 | Servers, Workstations, Clients and Applications

Use Windows users with Active Directory
There are two types of users in XProtect VMS:
l Basic user: a dedicated VMS user account authenticated by a combination of username and password
using a password policy. Basic users connect to the VMS using a secure socket layer (SSL) with current
Transport Layer (TLS) security protocol session (https://datatracker.ietf.org/wg/tls/charter/) for login,
encrypting the traffic contents and username and password.
l Windows user: the user account is specific to a machine or a domain, and it is authenticated based on the
Windows login. Windows users connecting to the VMS can use Microsoft Windows Challenge/Response
(NTML) for login, Kerberos (see Kerberos authentication (explained) on page 40), or other SSP options
from Microsoft (https://msdn.microsoft.com/en-us/library/windows/desktop/aa380502(v=vs.85).aspx).
Milestone recommends that, whenever possible, you use Windows users in combination with Active Directory
(AD) to authorize access to the VMS. This allows you to enforce:
l A password policy that requires users to change their password regularly
l Brute force protection, so that the Windows AD account is blocked after a number of failed authentication
attempts, again in line with the organization password policy
l Multi-factor authentication in the VMS, particularly for administrators
l Role-based permissions, so you can apply access controls across your domain
If your organization does not use AD, you can add Windows users to workgroups on the management server
instead. Workgroups give you some of the same advantages as Windows users with AD. You can enforce a
password policy, which helps protect against brute force attacks, but Milestone recommends that you use a
Windows Domain because this gives you central control over user accounts.
Windows users have the advantage of being authenticated via the directory as a single authoritative source and
enterprise service for the network and not ad hoc for their local machine. This lets you use role based access
controls to assign permissions to users and groups consistently across the domain and the computers on the
network.
If you use local Windows users, the user must create a local user name and password on each machine, which is
problematic from security and usability perspectives.
To add Windows users or groups to roles in Management Client, follow these steps:
Hardening guide | XProtect® VMS
29 | Servers, Workstations, Clients and Applications

1. Open Management Client.
2. Expand the Security node.
3. Select the role to which you want to add the Windows users.
4. On the Users and Groups tab, click Add, and select Windows user. A pop-up window appears.
5. If the domain name does not appear in the From this location field, click Locations.
6. Specify the Windows user, and then click OK.
To verify that the Windows user is an AD user, the domain name must appear as a prefix,
for example "Domain\John".
Learn more
The following control(s) provide additional guidance:
l NIST SP 800-53 CM-6 Configuration Settings
l NIST SP 800-53 SA-5 Information System Documentation
l NIST SP 800-53 SA-13 Trustworthiness
Hardening guide | XProtect® VMS
30 | Servers, Workstations, Clients and Applications

Secure communication (explained)
Hypertext Transfer Protocol Secure (HTTPS) is an extension of the Hypertext Transfer Protocol (HTTP) for secure
communication over a computer network. In HTTPS, the communication protocol is encrypted using Transport
Layer Security (TLS), or its predecessor, Secure Sockets Layer (SSL).
In XProtect VMS, secure communication is obtained by using TLS/SSL with asymmetric encryption (RSA).
TLS/SSL uses a pair of keys—one private, one public—to authenticate, secure, and manage secure connections.
A certificate authority (CA) is anyone who can issue root certificates. This can be an internet service that issues
root certificates, or anyone who manually generates and distributes a certificate. A CA can issue certificates to
web services, that is to any software using https communication. This certificate contains two keys, a private key
and a public key. The public key is installed on the clients of a web service (service clients) by installing a public
certificate. The private key is used for signing server certificates that must be installed on the server. Whenever
a service client calls the web service, the web service sends the server certificate, including the public key, to the
client. The service client can validate the server certificate using the already installed public CA certificate. The
client and the server can now use the public and private server certificates to exchange a secret key and thereby
establish a secure TLS/SSL connection.
For manually distributed certificates, certificates must be installed before the client can make such a verification.
See Transport Layer Security for more information about TLS.
Certificates have an expiry date. XProtect VMS will not warn you when a certificate is
about to expire. If a certificate expires:
• The clients will no longer trust the recording server with the expired certificate and thus
cannot communicate with it
• The recording servers will no longer trust the management server with the expired
certificate and thus cannot communicate with it
• The mobile devices will no longer trust the mobile server with the expired certificate and
thus cannot communicate with it
To renew the certificates, follow the steps in this guide as you did when you created
certificates.
For more information, see the certificates guide about how to secure your XProtect VMS installations.
Management server encryption (explained)
You can encrypt the two-way connection between the management server and the recording server. When you
enable encryption on the management server, it applies to connections from all the recording servers that
connect to the management server. If you enable encryption on the management server, you must also enable
encryption on all of the recording servers. Before you enable encryption, you must install security certificates on
the management server and all recording servers.
Hardening guide | XProtect® VMS
31 | Servers, Workstations, Clients and Applications

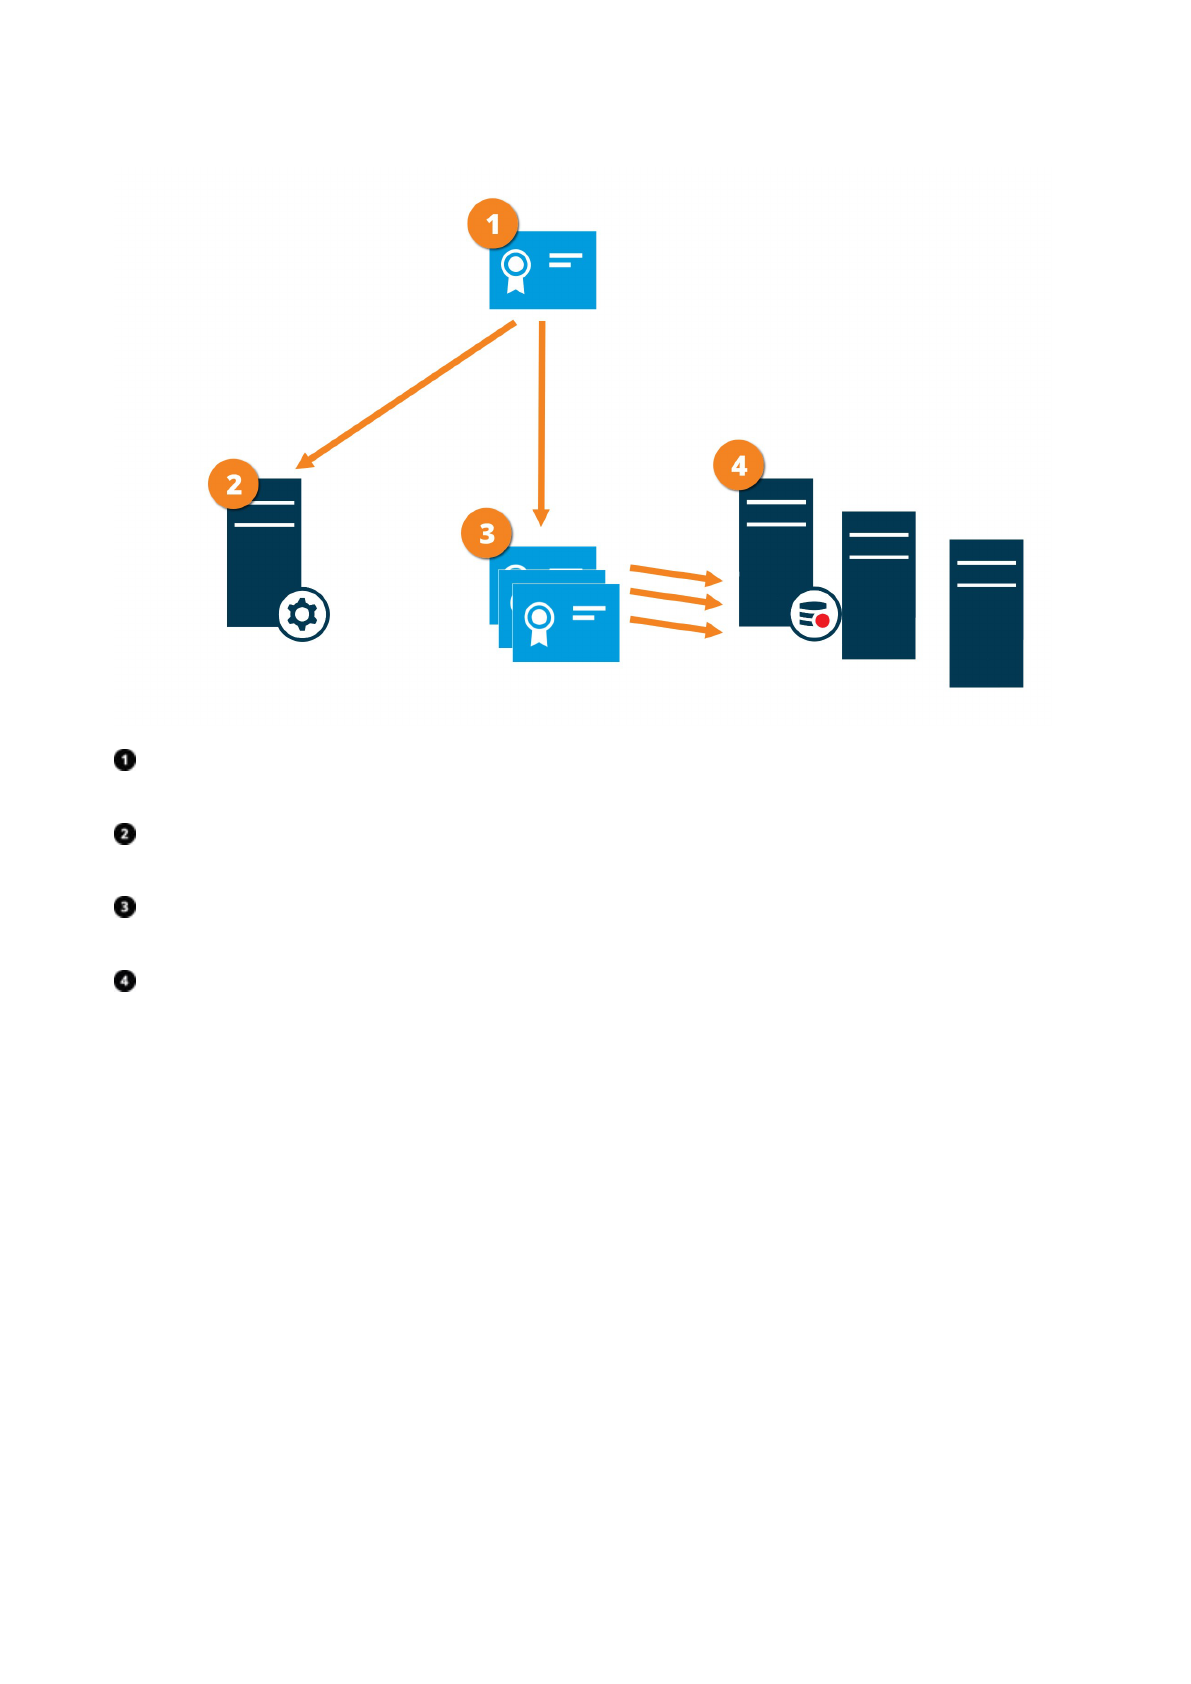
Certificate distribution for management servers
The graphic illustrates the basic concept of how certificates are signed, trusted, and distributed in XProtect VMS
to secure the communication to the management server.
A CA certificate acts as a trusted third party, trusted by both the subject/owner (management server) and by
the party that verifies the certificate (recording servers)
The CA certificate must be trusted on all recording servers. In this way, the recording servers can verify the
validity of the certificates issued by the CA
The CA certificate is used to establish a secure connection between the management server and the
recording servers
The CA certificate must be installed on the computer on which the management server is running
Requirements for the private management server certificate:
l Issued to the management server so that the management server's host name is included in the
certificate, either as subject (owner) or in the list of DNS names that the certificate is issued to
l Trusted on the management server itself, by trusting the CA certificate that was used to issue the
management server certificate
l Trusted on all recording servers connected to the management server by trusting the CA certificate that
was used to issue the management server certificate
Hardening guide | XProtect® VMS
32 | Servers, Workstations, Clients and Applications

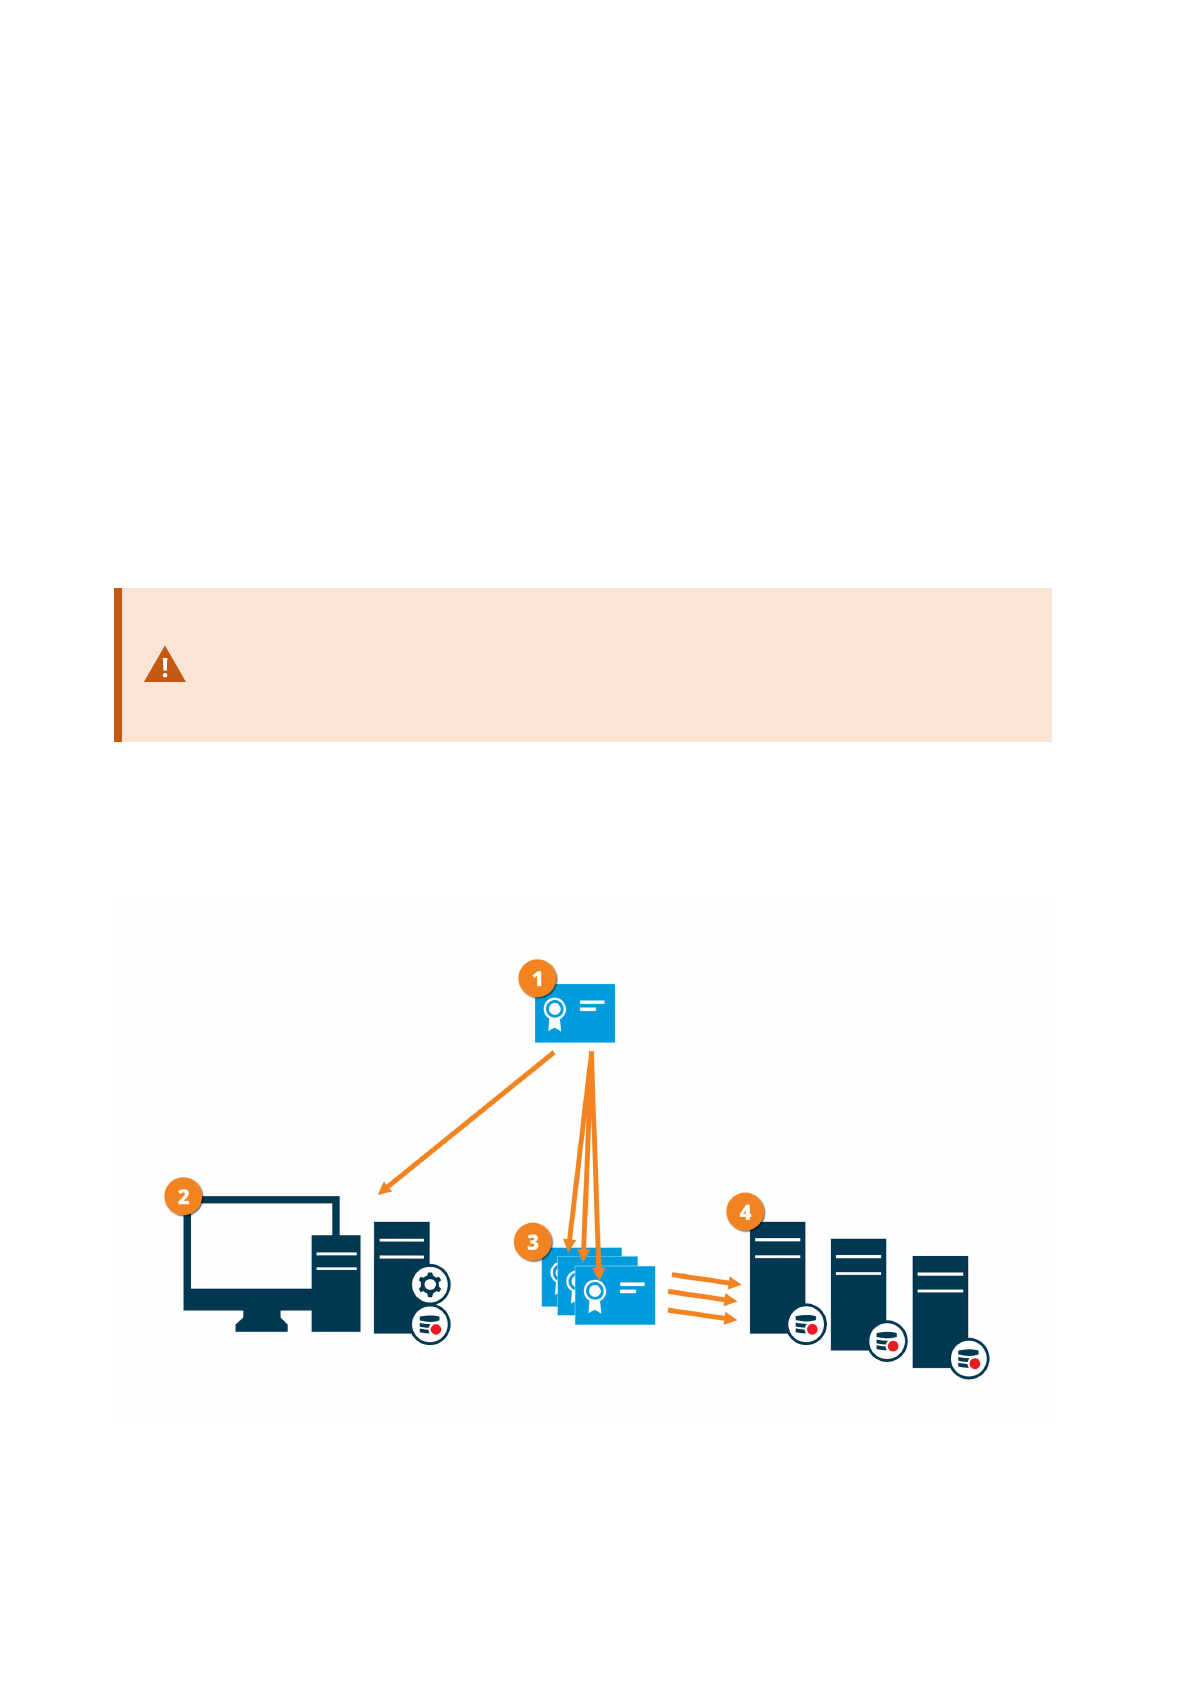
Encryption from the management server to the recording server (explained)
You can encrypt the two-way connection between the management server and the recording server. When you
enable encryption on the management server, it applies to connections from all the recording servers that
connect to the management server. Encryption of this communication must follow the encryption setting on the
management server. So, if management server encryption is enabled, this must also be enabled on the
recording servers and vice-versa. Before you enable encryption, you must install security certificates on the
management server and all recording servers, including failover recording servers.
Certificate distribution
The graphic illustrates the basic concept of how certificates are signed, trusted, and distributed in XProtect VMS
to secure the communication from the management server.
A CA certificate acts as a trusted third party, trusted by both the subject/owner (recording server) and by the
party that verifies the certificate (management server)
The CA certificate must be trusted on the management server. In this way, the management server can verify
the validity of the certificates issued by the CA
The CA certificate is used to establish a secure connection between the recording servers and the
management server
The CA certificate must be installed on the computers on which the recording servers are running
Requirements for the private recording server certificate:
Hardening guide | XProtect® VMS
33 | Servers, Workstations, Clients and Applications

l Issued to the recording server so that the recording server's host name is included in the certificate,
either as subject (owner) or in the list of DNS names that the certificate is issued to
l Trusted on the management server by trusting the CA certificate that was used to issue the recording
server certificate
Encryption between the management server and the Data Collector server
(explained)
You can encrypt the two-way connection between the management server and the Data Collector affiliated when
you have a remote server of the following type:
l Recording Server
l Event Server
l Log Server
l LPR Server
l Mobile Server
When you enable encryption on the management server, it applies to connections from all the Data Collector
servers that connect to the management server. Encryption of this communication must follow the encryption
setting on the management server. So, if management server encryption is enabled, this must also be enabled
on the Data Collector servers affiliated with each remote server and vice-versa. Before you enable encryption,
you must install security certificates on the management server and all Data Collector servers affiliated with the
remote servers.
Certificate distribution
The graphic illustrates the basic concept of how certificates are signed, trusted, and distributed in XProtect VMS
to secure the communication from the management server.
Hardening guide | XProtect® VMS
34 | Servers, Workstations, Clients and Applications
A CA certificate acts as a trusted third party, trusted by both the subject/owner (data collector server) and by
the party that verifies the certificate (management server)
The CA certificate must be trusted on the management server. In this way, the management server can verify
the validity of the certificates issued by the CA
The CA certificate is used to establish a secure connection between the data collector servers and the
management server
The CA certificate must be installed on the computers on which the data collector servers are running
Requirements for the private data collector server certificate:
l Issued to the data collector server so that the data collector server's host name is included in the
certificate, either as subject (owner) or in the list of DNS names that the certificate is issued to
l Trusted on the management server by trusting the CA certificate that was used to issue the data collector
server certificate
Encryption to clients and servers that retrieve data from the recording server
(explained)
When you enable encryption on a recording server, communication to all clients, servers, and integrations that
retrieve data streams from the recording server are encrypted. In this document referred to as 'clients':
Hardening guide | XProtect® VMS
35 | Servers, Workstations, Clients and Applications
l XProtect Smart Client
l Management Client
l Management Server (for System Monitor and for images and AVI video clips in email notifications)
l XProtect Mobile Server
l XProtect Event Server
l XProtect LPR
l Milestone Open Network Bridge
l XProtect DLNA Server
l Sites that retrieve data streams from the recording server through Milestone Interconnect
l Some third-party MIP SDK integrations
For solutions built with MIP SDK 2018 R3 or earlier that accesses recording servers: If the
integrations are made using MIP SDK libraries, they need to be rebuilt with MIP SDK 2019
R1; if the integrations communicate directly with the Recording Server APIs without using
MIP SDK libraries, the integrators must add HTTPS support themselves.
Certificate distribution
The graphic illustrates the basic concept of how certificates are signed, trusted, and distributed in XProtect VMS
to secure the communication to the recording server.
Hardening guide | XProtect® VMS
36 | Servers, Workstations, Clients and Applications

A CA certificate acts as a trusted third-party, trusted by both the subject/owner (recording server) and by the
party that verifies the certificate (all clients)
The CA certificate must be trusted on all clients. In this way, the clients can verify the validity of the
certificates issued by the CA
The CA certificate is used to establish a secure connection between the recording servers and all clients and
services
The CA certificate must be installed on the computers on which the recording servers are running
Requirements for the private recording server certificate:
l Issued to the recording server so that the recording server's host name is included in the certificate,
either as subject (owner) or in the list of DNS names that the certificate is issued to
l Trusted on all computers running services that retrieve data streams from the recording servers by
trusting the CA certificate that was used to issue the recording server certificate
l The service account that runs the recording server must have access to the private key of the certificate
on the recording server.
If you enable encryption on the recording servers and your system applies failover
recording servers, Milestone recommends that you also prepare the failover recording
servers for encryption.
Encryption of communication with the Event Server
You can encrypt the two-way connection between the Event Server and the components that communicate with
the Event Server, including the LPR Server. When you enable encryption on the Event Server, it applies to
connections from all the components that connect to the Event Server. Before you enable encryption, you must
install security certificates on the Event Server and all connecting components.
When the Event Server communication is encrypted, this applies to all communication
with that Event Server. That is, only one mode is supported at a time, either http or https,
but not at the same time.
Encryption applies to every service hosted in the Event Server, including Transact, Maps, GisMap, and
Intercommunication.
Before you enable encryption in the Event Server, all clients (Smart Client and
Management Client) and the XProtect LPR plug-in must be updated to at least version
2022 R1.
HTTPS is only supported if every component is updated to at least version 2022 R1.
Hardening guide | XProtect® VMS
37 | Servers, Workstations, Clients and Applications

Certificate distribution
The graphic illustrates the basic concept of how certificates are signed, trusted, and distributed in XProtect VMS
to secure the communication to the event server.
A CA certificate acts as a trusted third party, trusted by both the subject/owner (event server) and by the
party that verifies the certificate
The CA certificate must be trusted on all clients. In this way, the clients can verify the validity of the
certificates issued by the CA
The CA certificate is used to establish a secure connection between the event server and the clients
The CA certificate must be installed on the computer on which the event server is running
Mobile server data encryption (explained)
In XProtect VMS, encryption is enabled or disabled per mobile server. When you enable encryption on a mobile
server, you will have the option to use encrypted communication with all clients, services, and integrations that
retrieve data streams.
Certificate distribution for mobile servers
The graphic illustrates the basic concept of how certificates are signed, trusted, and distributed in XProtect VMS
to secure the communication with the mobile server.
Hardening guide | XProtect® VMS
38 | Servers, Workstations, Clients and Applications

A CA certificate acts as a trusted third party, trusted by both the subject/owner (mobile server) and by the
party that verifies the certificate (all clients)
The CA certificate must be trusted on all clients. In this way, clients can verify the validity of the certificates
issued by the CA
The CA certificate is used to establish a secure connection between the mobile server and clients and
services
The CA certificate must be installed on the computer on which the mobile server is running
Requirements for the CA certificate:
l The mobile server's host name must be included in the certificate, either as subject/owner or in the list of
DNS names that the certificate is issued to
l The certificate must be trusted on all devices that are running services that retrieve data streams from
the mobile server
l The service account that runs the mobile server must have access to the private key of the CAcertificate
Mobile server encryption requirements for clients
For security reasons, Milestone recommends that you use secure communication between the mobile server
and clients when you manage user account settings.
Hardening guide | XProtect® VMS
39 | Servers, Workstations, Clients and Applications

If you do not enable encryption and use an HTTP connection, the push-to-talk feature in XProtect Web Client will
not be available.
Kerberos authentication (explained)
Kerberos is a ticket-based network authentication protocol. It is designed to provide strong authentication for
client/server or server/server applications.
Use Kerberos authentication as an alternative to the older Microsoft NT LAN (NTLM) authentication protocol.
Kerberos authentication requires mutual authentication, where the client authenticates to the service and the
service authenticates to the client. This way you can authenticate more securely from XProtect clients to
XProtect servers without exposing your password.
To make mutual authentication possible in your XProtect VMS you must register Service Principal Names (SPN)
in the active directory. An SPN is an alias that uniquely identifies an entity such as a XProtect server service.
Every service that uses mutual authentication must have an SPN registered so that clients can identify the
service on the network. Without correctly registered SPNs, mutual authentication is not possible.
The table below lists the different Milestone services with corresponding port numbers you need to register:
Service Port number
Management server - IIS 80 - Configurable
Management server - Internal 8080
Recording server - Data Collector 7609
Failover Server 8990
Event Server 22331
LPR Server 22334
The number of services you need to register in the active directory depends on your
current installation. Data Collector is installed automatically when installing Management
Server, Recording Server, Event Server, LPR Server or Failover Server.
You must register two SPNs for the user running the service: one with the host name and one with the fully
qualified domain name.
Hardening guide | XProtect® VMS
40 | Servers, Workstations, Clients and Applications

If you are running the service under a network user service account, you must register the two SPNs for each
computer running this service.
This is the Milestone SPN naming scheme:
VideoOS/[DNS Host Name]:[Port]
VideoOS/[Fully qualified domain name]:[Port]
The following is an example of SPNs for the recording server service running on a computer with the following
details:
Hostname: Record-Server1
Domain: Surveillance.com
SPNs to register:
VideoOS/Record-Server1:7609
VideoOS/Record-Server1.Surveillance.com:7609
Use Windows update
Milestone recommends that you use Windows Update to protect your VMS against vulnerabilities in the
operating system by making sure that the latest updates are installed. XProtect VMS is Windows-based, so
security updates from Windows Update are important.
Updates can require a connection to the Internet, so Milestone recommends that this connection is open only as
required, and that it is monitored for unusual traffic patterns.
Windows Updates often require a restart. This can be a problem if high-availability is required, because the
server cannot receive data from devices while it restarts.
There are several ways to avoid this, or minimize the impact. For example, you can download updates to the
server, and then apply them at a time when a restart will disrupt surveillance as little as possible.
If high availability is a concern, Milestone recommends that you run management server and event servers in
clusters that include one or more failover servers. The failover server will take over while the recording server
restarts, and surveillance is not interrupted. Do not include recording servers in the cluster. For recording
servers, use a failover recording server.
Before implementing Windows updates across the organization, Milestone recommends
that you verify the updates in a test environment. See NIST 800-53 CM-8 Information
system component inventory and sandboxing and SC-44 Detonation Chambers.
Learn more
The following control(s) provide additional guidance:
l NIST SP 800-53 SI-2 Flaw Remediation
Hardening guide | XProtect® VMS
41 | Servers, Workstations, Clients and Applications

Keep software and device firmware updated
Milestone recommends that you use the latest version of XProtect VMS and firmware for the hardware devices,
for example the cameras. This will ensure that your system includes the latest security fixes.
For hardware, network components, and operating systems, check the CVE database as well as any updates
pushed out by manufacturers.
Before you upgrade the device firmware, verify that XProtect VMS supports it. Also, make sure that the device
pack installed on the recording servers supports the device firmware.
Do this in a test environment for configuration, integration and testing before putting it into the production
environment.
To verify that the VMS supports a device, follow these steps:
1. Open this link (Milestone Device Packs).
2. Click the link that matches your XProtect VMS product.
3. Select the device brand and model.
4. Click Select. The version of the firmware that the device pack supports is available for download.
Learn more
The following control(s) provide additional guidance:
l NIST SP 800-53 SI-2 Flaw Remediation
Use antivirus on all servers and computers
Milestone recommends that you deploy anti-virus software on all servers and computers that connect to the
VMS. Malware that gets inside your system can lock, encrypt, or otherwise compromise data on the servers and
other devices on the network.
If mobile devices connect to the VMS, this includes ensuring that the devices have the latest operating systems
and patches (though not directly anti-virus) installed.
When you do virus scanning, do not scan recording server directories and subdirectories that contain recording
databases. In addition, do not scan for viruses on archive storage directories. Scanning for viruses on these
directories can impact system performance.
For more information, see the section about how to exclude file types, folders, ports, and network traffic from
virus scanning in the administrator manual for your XProtect VMS product.
Learn more
The following control(s) provide additional guidance:
l NIST SP 800-53 PL-8 Information Security Architecture
l NIST SP 800-53 SI-2 Flaw remediation
l NIST SP 800-53 SI-3 Malicious Code Protection
Hardening guide | XProtect® VMS
42 | Servers, Workstations, Clients and Applications

l NIST SP 800-53 SI Information Systems Monitoring
Monitor logs in the VMS for signs of suspicious activity
XProtect VMS provides features for generating and viewing logs that provide information about patterns of use,
system performance, and other issues. Milestone recommends that you monitor the logs for signs of suspicious
activities.
There are tools that leverage logs for operational and security purposes. Many businesses use syslog servers to
consolidate logs. You can use syslog to note activities at a Windows level, however, XProtect VMS does not
support syslog.
Milestone recommends that you use the Audit Log in XProtect VMS, and enable user access logging in
Management Client. By default, the Audit Log notes only user logins. However, you can turn on user access
logging so that the Audit Log notes all user activities in all of the client components of XProtect VMS products.
This includes the times of the activities and the source IP addresses.
The client components are XProtect Smart Client, Web Client, and the XProtect Management Client component,
and also integrations made by using the MIP SDK. Examples of activities are exports, activating outputs, viewing
cameras live or in playback, and so on.
The Audit log does not note unsuccessful login attempts, or when the user logs out.
Logging all user activities in all clients increases the load on the system, and can affect performance.
You can adjust the load by specifying the following criteria that controls when the system will generate a log
entry:
l The number of seconds that comprise one sequence. The VMS generates one log entry when a user
plays video within the sequence.
l The number of frames that a user must view when playing back video before the VMS generates a log
entry.
To turn on and configure extended user access logging, follow these steps:
1. In Management Client, click Tools, and select Options.
2. On the Server Logs tab, under Log settings, select Audit Log.
3. Under Settings, select the Enable user access logging check box.
4. Optional: To specify limitations for the information that is noted, and reduce impact on performance,
make selections in the Playback sequence logging length and Records seen before logging fields.
To view the Audit Log in XProtect VMS, follow these steps:
Hardening guide | XProtect® VMS
43 | Servers, Workstations, Clients and Applications
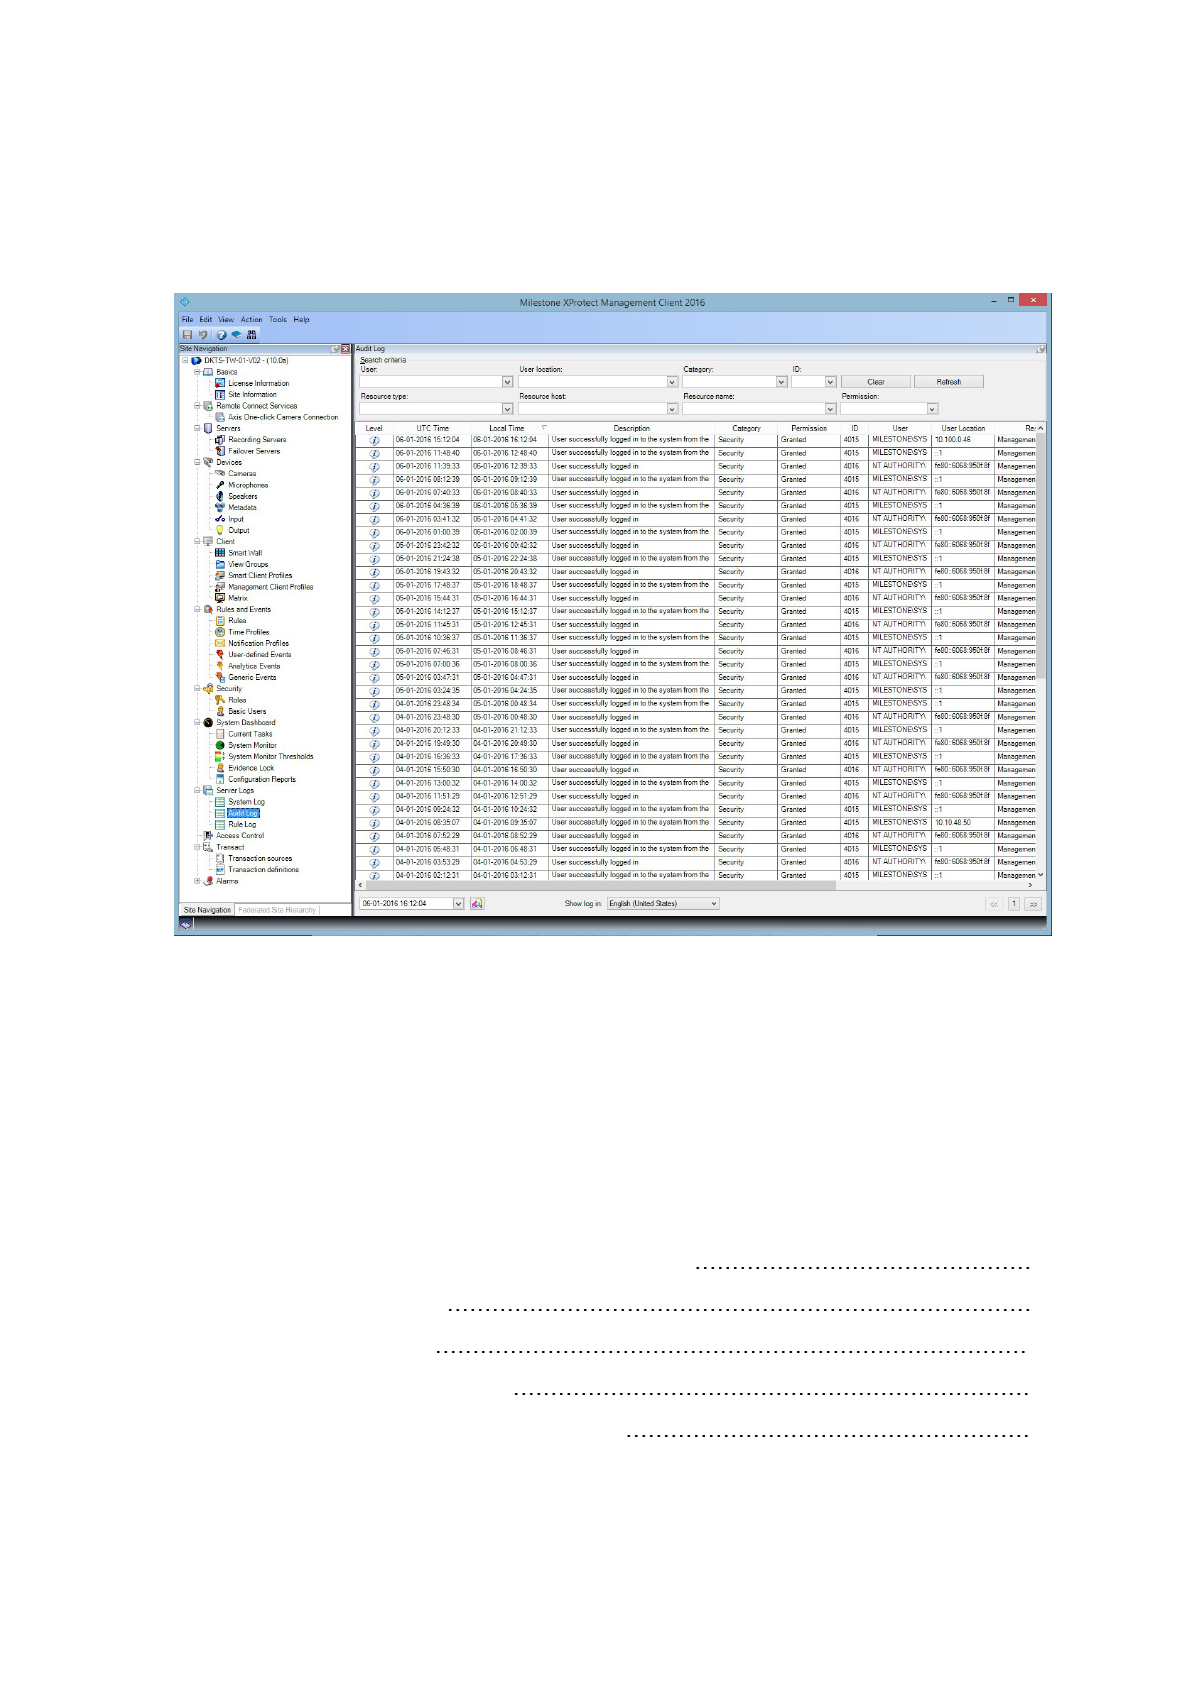
1. Open Management Client.
2. Expand the Server Logs node.
3. Click Audit Log.
Learn more
The following control(s) provide additional guidance:
l NIST SP 800-53 AU-3 Content of Audit Records
l NIST SP 800-53 RA-5 Vulnerability Scanning
l NIST SP 800-53 AU-6 Audit Review, Analysis and Reporting
Advanced steps – Servers, Workstations, Clients and Applications
Adopt standards for secure network and VMS implementations 45
Establish an incident response plan 45
Protect sensitive VMS components 46
Follow Microsoft OS Security best practices 46
Use tools to automate or implement the security policy 46
Hardening guide | XProtect® VMS
44 | Servers, Workstations, Clients and Applications

Follow established network security best practices 47
Adopt standards for secure network and VMS implementations
Milestone recommends that you adopt standards for secure networking and XProtect VMS implementations. The
use of standards is a basic component of Internet and network engineering, and the basis of interoperability and
system conformance. This also applies to the use of cryptographic solutions, where standards-based
cryptography is the most commonly accepted approach.
Establish an incident response plan
Milestone recommends you start with a set of policies and procedures and establish an incident response plan.
Designate staff to monitor the status of the system and respond to suspicious events. For example, activities that
happen at unusual times. Establish a security Point of Contact (POC) with each of your vendors, including
Milestone.
The following image is adapted from the NIST Cybersecurity Framework (https://www.nist.gov/cyberframework).
It shows the lifecycle that needs to be considered when creating a plan. The supporting material in the
framework provide details about the lifecycle and security controls for incident response plans.
Learn more
The following control(s) provide additional guidance:
l NIST SP 800-53 IR 1-13 Incident Response
Hardening guide | XProtect® VMS
45 | Servers, Workstations, Clients and Applications

Protect sensitive VMS components
Milestone recommends that you use physical access control, and use the VMS to monitor and protect its
sensitive VMS components. Physical restriction and role-based physical access control are countermeasures
that keep servers and workstations secure.
Administrators and users should only have access to the information they need in order to fulfill their
responsibilities. If all internal users have the same access level to critical data, it’s easier for attackers to access
the network.
Learn more
The following control(s) provide additional guidance:
l NIST SP 800-53 PE-1 Physical and Environmental Protection Policy and Procedures
l NIST SP 800-53 PE-2 Physical Access Authorizations
l NIST SP 800-53 PE-3 Physical Access Control
l NIST SP 800-53 AC-4 Least Privilege
Follow Microsoft OS Security best practices
Milestone recommends that you follow the security best practices for Microsoft operating systems (OS) to
mitigate OS risks and maintain security. This will help you keep the Microsoft servers and client computers
secure.
For more information, see Microsoft Security Update Guide (https://msrc.microsoft.com/update-guide).
Use tools to automate or implement the security policy
Milestone recommends that you find one or more tools to help you automate and implement the security policy.
Automation reduces the risk of human error and makes it easier to manage the policy. For example, you can
automate the installation of security patches and updates on servers and client computers.
One way to implement this recommendation is to combine the Microsoft Security Configuration Manager
(SCCM) with the Security Content Automation Protocol (SCAP).(See for example, Geek of All Trades: Automate
Baseline Security Settings (https://technet.microsoft.com/en-us/magazine/ff721825.aspx) and Security Content
Automation Protocol (SCAP) Validation Program (https://csrc.nist.gov/projects/scap-validation-program).) This
gives you a framework to create, distribute, and validate security settings on computers across your network.
Learn more
The following control(s) provide additional guidance:
l NIST SP 800-53 CM-1 Configuration Management Policy and Procedures
l NIST SP 800-53 CM-2 Baseline Configuration
l NIST SP 800-53 CM-3 Configuration Change Control
Hardening guide | XProtect® VMS
46 | Servers, Workstations, Clients and Applications

Follow established network security best practices
Milestone recommends that you follow IT and vendor best practices to ensure that devices on your network are
securely configured. Ask your vendors to provide this information. It is important to open and maintain a security
dialogue, and a discussion of best practices is a good place to start.
It is important to deny access to the VMS by not using vulnerable network settings. For more information, see SP
800-128 (https://csrc.nist.gov/publications/detail/sp/800-128/final), SP 800-41-rev1
(https://csrc.nist.gov/publications/detail/sp/800-41/rev-1/final) (specific to firewalls), and CISA’s role in industrial
control systems (https://www.cisa.gov/ics) (general list).
Learn more
The following control(s) provide additional guidance:
l NIST 800-53 CM-6 Configuration Settings
l NIST 800-53 MA-3 Maintenance Tools
Hardening guide | XProtect® VMS
47 | Servers, Workstations, Clients and Applications

Devices and network
Devices and network
This section provides guidance for hardening the devices and network components related to XProtect VMS. This
includes key parts of the system such as the cameras, storage, and the network.
Surveillance systems often include cameras at the edge of the network. Cameras and their network connections,
if left unprotected, represent a significant risk of compromise, potentially giving intruders further access to the
system.
Basic steps – Devices
Use strong passwords instead of default passwords 48
Stop unused services and protocols 48
Create dedicated user accounts on each device 49
Scanning for devices 50
Use strong passwords instead of default passwords
Milestone recommends that you change the default passwords on devices, for example, on a camera. Do not
use default passwords because they are often published to the Internet and are readily available.
Instead, use strong passwords for devices. Strong passwords include eight or more alpha-numeric characters,
use upper and lower cases, and special characters.
Learn more
The following control(s) provide additional guidance:
l NIST 800-53 IA-4 Authenticator Management
l NIST 800-53 IA-8 Authenticator Feedback
l NIST 800-53 SI-11 Error Handling
Stop unused services and protocols
To help avoid unauthorized access or information disclosure, Milestone recommends that you stop unused
services and protocols on devices. For example, Telnet, SSH, FTP, UPnP, Ipv6, and Bonjour.
It is also important to use strong authentication on any services that access the VMS, network, or devices. For
example, use SSH keys instead of user names and passwords, and use certificates from a Certificate Authority
for HTTPS. For more information, see the hardening guides and other guidance from the device manufacturer.
Learn more
The following control(s) provide additional guidance:
Hardening guide | XProtect® VMS
48 | Devices and network

l NIST SP 800-53 AC-17 Remote Access (Disable Unused Protocols)
l NIST SP 800-53 CM-6 Configuration Settings
l NIST SP 800-53 CM-7 Least Functionality
l NIST SP 800-53 IA-2 Identification and Authentication
l NIST SP 800-53 SA-9 External Information Services
Create dedicated user accounts on each device
All cameras have a default user account with a user name and password that the VMS uses to access the device.
For auditing purposes, Milestone recommends that you change the default user name and password.
Create a user account specifically for use by the VMS, and use this user account and password when you add the
camera to the VMS. When a recording server connects to the camera, it uses the user name and password you
have created. If the camera has a log, this log shows that the recording server has connected to the camera.
With a dedicated user name and password, the device logs can help you determine whether a recording server
or a person accessed the camera. This is relevant when investigating potential security issues affecting devices.
You can change the user name and password for a device before or after you add it in Management Client.
To change the user name and password before you add the device, follow these steps:
1. Go to the device’s web interface, and change the default user name and password.
2. In Management Client, add the device, and specify the user name and password.
To change the user name and passwords of devices that are already added, follow these steps:
1. In Management Client, in the Site Navigation pane, expand the Servers node and select Recording
Servers.
2. In the Recording Server pane, expand the recording server that contains the device, and then right-click
the device and select Edit hardware.
3. Under Authentication, enter the new user name and password.
Learn more
Hardening guide | XProtect® VMS
49 | Devices and network

The following control(s) provide additional guidance:
l NIST SP 800-53 AC-2 Account Management
l NIST SP 800-53 AC-4 Least Privilege
Scanning for devices
Scanning for devices (for example, Express scan or Address range scanning when adding hardware) is done
using broadcasts that may contain user names and passwords in plain text.
Unless this is an initial setup, this functionality should not be used for adding devices to the system. Use the
Manual option instead and manually select the driver.
Basic steps – Network
Use secure and trusted networks connection 50
Use firewalls to limit IP access to servers and computers 51
Use a firewall between the VMS and the Internet 66
Connect the camera subnet to the recording server subnet only 66
Use secure and trusted networks connection
Network communications must be secure, whether or not you are on a closed network. By default, secure
communications should be used when accessing the VMS. For example:
l VPN tunnels or HTTPS by default
l Latest version of the Transport Layer Security (https://datatracker.ietf.org/wg/tls/charter/) (TLS, currently
1.2) with valid certificates that meet industry best practices, such as from Public-Key Infrastructure
(X.509) (https://datatracker.ietf.org/wg/ipsec/documents/) and CA/Browser Forum
(https://cabforum.org/).
Otherwise, credentials may be compromised and intruders might use them to access the VMS.
Configure the network to allow client computers to establish secure HTTPS sessions or VPN tunnels between the
client devices and the VMS servers.
Learn more
The following control(s) provide additional guidance:
l NIST SP 800-53 SI-2 Flaw remediation
l NIST SP 800-53 CM-6 Configuration Settings
l NIST SP 800-53 SC-23 Session Authenticity
Hardening guide | XProtect® VMS
50 | Devices and network

Use firewalls to limit IP access to servers and computers
Milestone recommends that you use secure connections, and the following additional steps:
l Use secure device authentication
l Use TLS
l Use device whitelisting to authenticate devices
l Use firewalls to limit network communication between servers and client computers and programs.
All XProtect components and the ports needed by them are listed in individual sections below. To ensure, for
example, that the firewall blocks only unwanted traffic, you need to specify the ports that the XProtect VMS uses.
You should only enable these ports. The lists also include the ports used for local processes.
They are arranged in two groups:
l Server components (services)—Offer their service on particular ports which is why they need to listen for
client requests on these ports. Therefore, these ports need to be opened in the Windows Firewall for
inbound connections.
l Client components (clients)—Initiate connections to particular ports on server components. Therefore,
these ports need to be opened for outbound connections. Outbound connections are typically open by
default in the Windows Firewall.
If nothing else is mentioned, ports for server components must be opened for inbound connections, and ports
for client components must be opened for outbound connections.
Do keep in mind that server components can act as clients to other server components as well.
The port numbers are the default numbers, but this can be changed. Contact Milestone Support, if you need to
change ports that are not configurable through the Management Client.
Server components (inbound connections)
Each of the following sections list the ports which need to be opened for a particular service. In order to figure
out which ports need to be opened on a particular computer, you need to consider all services running on this
computer.
Restrict remote access to the Management Server by adding firewall rules to only allow
Recording Servers to connect to TCP port 9000.
Management Server service and related processes
Hardening guide | XProtect® VMS
51 | Devices and network

Port
number
Protocol Process
Connections
from...
Purpose
80 HTTP IIS
All servers
and the
XProtect
Smart Client
and the
Management
Client
The purpose of port 80 and port 443 is the same.
However, which port the VMS uses depends on
whether you have used certificates to secure the
communication.
l When you have not secured the
communication with certificates, the VMS
uses port 80.
l When you have secured the
communication with certificates, the VMS
uses port 443 except for communication
from the event server to the management
server. The communication from the
event server to the management server
uses Windows Secured Framework (WCF)
and Windows authentication on port 80.
443 HTTPS IIS
6473 TCP
Management
Server
service
Management
Server
Manager
tray icon,
local
connection
only.
Showing status and managing the service.
8080 TCP
Management
server
Local
connection
only.
Communication between internal processes on
the server.
9000 HTTP
Management
server
Recording
Server
services
Web service for internal communication between
servers.
12345 TCP
Management
Server
service
XProtect
Smart Client
Communication between the system and Matrix
recipients.
You can change the port number in the
Hardening guide | XProtect® VMS
52 | Devices and network

Port
number
Protocol Process
Connections
from...
Purpose
Management Client.
12974 TCP
Management
Server
service
Windows
SNMP
Service
Communication with the SNMP extension agent.
Do not use the port for other purposes even if
your system does not apply SNMP.
In XProtect 2014 systems or older, the port
number was 6475.
In XProtect 2019 R2 systems and older, the port
number was 7475.
SQL Server service
Port
number
Protocol Process Connections from... Purpose
1433 TCP
SQL
Server
Management Server
service
Storing and retrieving configurations via the
Identity Provider.
1433 TCP
SQL
Server
Event Server service
Storing and retrieving events via the Identity
Provider.
1433 TCP
SQL
Server
Log Server service
Storing and retrieving log entries via the
Identity Provider.
Data Collector service
Port
number
Protocol Process Connections from... Purpose
7609 HTTP IIS
On the management server computer: Data Collector System
Hardening guide | XProtect® VMS
53 | Devices and network

Port
number
Protocol Process Connections from... Purpose
services on all other servers.
On other computers: Data Collector service on the
Management Server.
Monitor.
Event Server service
Port
number
Protocol Process Connections from... Purpose
1234 TCP/UDP
Event
Server
Service
Any server sending generic
events to your XProtect
system.
Listening for generic events from
external systems or devices.
Only if the relevant data source is
enabled.
1235 TCP
Event
Server
service
Any server sending generic
events to your XProtect
system.
Listening for generic events from
external systems or devices.
Only if the relevant data source is
enabled.
9090 TCP
Event
Server
service
Any system or device that
sends analytics events to
your XProtect system.
Listening for analytics events from
external systems or devices.
Only relevant if the Analytics
Events feature is enabled.
22331 TCP
Event
Server
service
XProtect Smart Client and
the Management Client
Configuration, events, alarms, and
map data.
22332
WS/WSS
HTTP/HTTPS*
Event
Server
service
API Gateway and the
Management Client
Event/State Subscription, Events
REST API, Websockets Messaging
API, and Alarms RESTAPI.
22333 TCP
Event
Server
service
MIP Plug-ins and
applications.
MIP messaging.
Hardening guide | XProtect® VMS
54 | Devices and network

*A403 error will be returned when accessing HTTPto access an HTTPS-only endpoint.
Recording Server service
Port
number
Protocol Process
Connections
from...
Purpose
25 SMTP
Recording
Server
Service
Cameras,
encoders,
and I/O
devices.
Listening for event messages from
devices.
The port is disabled by default.
(Deprecated) Enabling this will open
a port for non-encrypted
connections and is not
recommended.
5210 TCP
Recording
Server
Service
Failover
recording
servers.
Merging of databases after a
failover recording server had been
running.
5432 TCP
Recording
Server
Service
Cameras,
encoders,
and I/O
devices.
Listening for event messages from
devices.
The port is disabled by default.
7563 TCP
Recording
Server
Service
XProtect
Smart Client,
Management
Client
Retrieving video and audio streams,
PTZ commands.
8966 TCP
Recording
Server
Service
Recording
Server
Manager
tray icon,
local
connection
only.
Showing status and managing the
service.
9001 HTTP
Recording
Server
Service
Management
server
Web service for internal
communication between servers.
Hardening guide | XProtect® VMS
55 | Devices and network

Port
number
Protocol Process
Connections
from...
Purpose
If multiple Recording Server
instances are in use, every instance
needs its own port. Additional ports
will be 9002, 9003, etc.
11000 TCP
Recording
Server
Service
Failover
recording
servers
Polling the state of recording
servers.
12975 TCP
Recording
Server
Service
Windows
SNMP
service
Communication with the SNMP
extension agent.
Do not use the port for other
purposes even if your system does
not apply SNMP.
In XProtect 2014 systems or older,
the port number was 6474.
In XProtect 2019 R2 systems and
older, the port number was 7474.
65101 UDP
Recording
Server
service
Local
connection
only
Listening for event notifications from
the drivers.
In addition to the inbound connections to the Recording Server service listed above, the
Recording Server service establishes outbound connections to:
l Cameras
l NVRs
l Remote interconnected sites (Milestone Interconnect ICP)
Failover Server service and Failover Recording Server service
Hardening guide | XProtect® VMS
56 | Devices and network

Port
number
Protocol Process Connections from... Purpose
25 SMTP
Failover
Recording
Server
Service
Cameras, encoders, and
I/O devices.
Listening for event messages from
devices.
The port is disabled by default.
(Deprecated) Enabling this will open a
port for non-encrypted connections
and is not recommended.
5210 TCP
Failover
Recording
Server
Service
Failover recording
servers
Merging of databases after a failover
recording server had been running.
5432 TCP
Failover
Recording
Server
Service
Cameras, encoders, and
I/O devices.
Listening for event messages from
devices.
The port is disabled by default.
7474 TCP
Failover
Recording
Server
Service
Windows SNMP service
Communication with the SNMP
extension agent.
Do not use the port for other purposes
even if your system does not apply
SNMP.
7563 TCP
Failover
Recording
Server
Service
XProtect Smart Client
Retrieving video and audio streams,
PTZ commands.
8844 UDP
Failover
Recording
Server
Service
Communication between
failover recording server
services.
Communication between the servers.
8966 TCP
Failover
Recording
Failover Recording
Server Manager tray
Showing status and managing the
service.
Hardening guide | XProtect® VMS
57 | Devices and network

Port
number
Protocol Process Connections from... Purpose
Server
Service
icon, local connection
only.
8967 TCP
Failover
Server
Service
Failover Server Manager
tray icon, local
connection only.
Showing status and managing the
service.
8990 HTTP
Failover
Server
Service
Management Server
service
Monitoring the status of the Failover
Server service.
9001 HTTP
Failover
Server
Service
Management server
Web service for internal
communication between servers.
In addition to the inbound connections to the Failover Server / Failover Recording Server
service listed above, the Failover Server / Failover Recording Server service establishes
outbound connections to the regular recorders, cameras, and for Video Push.
Log Server service
Port
number
Protocol Process Connections from... Purpose
22337 HTTP
Log Server
service
All XProtect components except for
the recording server.
Write to, read from, and
configure the log server.
This port uses HTTP, but the communication is encrypted with message security which uses the WS-Security
specification to secure messages. For more information, see Message Security in WCF.
Mobile Server service
Hardening guide | XProtect® VMS
58 | Devices and network

Port
number
Protocol Process Connections from... Purpose
8000 TCP
Mobile
Server
service
Mobile Server Manager tray icon,
local connection only.
SysTray application.
8081 HTTP
Mobile
Server
service
Mobile clients, Web clients, and
Management Client.
Sending data streams;
video and audio.
8082 HTTPS
Mobile
Server
service
Mobile clients and Web clients.
Sending data streams;
video and audio.
40001 -
40099
HTTP
Mobile
Server
service
Recording server service
Mobile Server Video
Push.
This port range is
disabled by default.
LPR Server service
Port
number
Protocol Process Connections from... Purpose
22334 TCP
LPR
Server
Service
Event server
Retrieving recognized license plates
and server status.
In order to connect, the Event server
must have the LPR plug-in installed.
22334 TCP
LPR
Server
Service
LPR Server Manager tray
icon, local connection only.
SysTray application
Milestone Open Network Bridge service
Hardening guide | XProtect® VMS
59 | Devices and network

Port
number
Protocol Process
Connections
from...
Purpose
580 TCP
Milestone Open Network
Bridge Service
ONVIF
clients
Authentication and requests for video
stream configuration.
554 RTSP RTSP Service
ONVIF
clients
Streaming of requested video to
ONVIF clients.
XProtect DLNA Server service
Port
number
Protocol Process
Connections
from...
Purpose
9100 HTTP
DLNA
Server
Service
DLNA device
Device discovery and providing DLNA channels
configuration. Requests for video streams.
9200 HTTP
DLNA
Server
Service
DLNA device Streaming of requested video to DLNA devices.
XProtect Screen Recorder service
Port
number
Protocol Process
Connections
from...
Purpose
52111 TCP
XProtect
Screen
Recorder
Recording
Server
Service
Provides video from a monitor. It appears and acts
in the same way as a camera on the recording
server.
You can change the port number in the
Management Client.
XProtect Incident Manager service
Hardening guide | XProtect® VMS
60 | Devices and network

Port
number
Protocol Process
Connections
from...
Purpose
80 HTTP IIS
XProtect Smart
Client and the
Management
Client
The purpose of port 80 and port 443 is the same.
However, which port the VMS uses depends on
whether you have used certificates to secure the
communication.
l When you have not secured the
communication with certificates, the VMS
uses port 80.
l When you have secured the communication
with certificates, the VMS uses port 443.
443 HTTPS IIS
Server components (outbound connections)
Management Server service
Port
number
Protocol Connections to... Purpose
443 HTTPS
The License server that hosts the
License Management service.
Communication is via
https://www.milestonesys.com/
OnlineActivation/
LicenseManagementService.asmx
Activating
licenses.
Recording Server service
Port
number
Protocol Connections to... Purpose
80 HTTP
Cameras, NVRs,
encoders
Authentication, configuration, data streams, video,
and audio.
Hardening guide | XProtect® VMS
61 | Devices and network

Port
number
Protocol Connections to... Purpose
Interconnected sites Login
443 HTTPS
Cameras, NVRs,
encoders
Authentication, configuration, data streams, video,
and audio.
554 RTSP
Cameras, NVRs,
encoders
Data streams, video, and audio.
7563 TCP Interconnected sites Data streams and events.
11000 TCP
Failover recording
servers
Polling the state of recording servers.
40001 –
40099
HTTP Mobile Server service
Mobile Server Video Push.
This port range is disabled by default.
Failover Server service and Failover Recording Server service
Port number Protocol Connections to... Purpose
11000 TCP Failover recording servers Polling the state of recording servers.
Event Server service
Port
number
Protocol Connections to... Purpose
80 HTTP
API Gateway and the
Management Server
Access the Configuration API from the API
Gateway
Hardening guide | XProtect® VMS
62 | Devices and network

Port
number
Protocol Connections to... Purpose
443 HTTPS
API Gateway and the
Management Server
Access the Configuration API from the API
Gateway
443 HTTPS
Milestone Customer Dashboard
via
https://service.milestonesys.com/
Send status, events and error messages from
the XProtect system to Milestone Customer
Dashboard.
Log Server service
Port number Protocol Connections to... Purpose
443 HTTP Log server Forwarding messages to the log server.
API Gateway
Port
number
Protocol Connections to... Purpose
443 HTTPS
Management
Server
RESTful API
22332
WS/WSS
HTTP/HTTPS*
Management
Client
Event/State Subscription, Events REST API, Websockets
Messaging API, and Alarms REST API.
Cameras, encoders, and I/O devices (inbound connections)
Hardening guide | XProtect® VMS
63 | Devices and network

Port
number
Protocol Connections from... Purpose
80 TCP
Recording servers and failover
recording servers
Authentication, configuration, and data
streams; video and audio.
443 HTTPS
Recording servers and failover
recording servers
Authentication, configuration, and data
streams; video and audio.
554 RTSP
Recording servers and failover
recording servers
Data streams; video and audio.
Cameras, encoders, and I/O devices (outbound connections)
Port
number
Protocol Connections to... Purpose
25 SMTP
Recording servers and failover
recording servers
Sending event notifications
(deprecated).
5432 TCP
Recording servers and failover
recording servers
Sending event notifications.
The port is disabled by
default.
22337 HTTP Log server
Forwarding messages to the
log server.
Only a few camera models are able to establish outbound connections.
Client components (outbound connections)
XProtect Smart Client, XProtect Management Client, XProtect Mobile server
Hardening guide | XProtect® VMS
64 | Devices and network

Port
number
Protocol Connections to... Purpose
80 HTTP
API Gateway and
Management Server service
Authentication and other APIs in the API Gateway.
443 HTTPS
API Gateway and
Management Server service
Authentication of basic users when encryption is
enabled and other APIs in the API Gateway.
443 HTTPS
Milestone Systems A/S
(doc.milestonesys.com at
52.178.114.226)
Management Client and Smart Client occasionally
check if the online help is available by accessing
the help URL.
7563 TCP Recording Server service
Retrieving video and audio streams, PTZ
commands.
22331 TCP Event Server service Alarms.
XProtect Web Client, XProtect Mobile client
Port number Protocol Connections to... Purpose
8081 HTTP XProtect Mobile server Retrieving video and audio streams.
8082 HTTPS XProtect Mobile server Retrieving video and audio streams.
API Gateway
Port number Protocol Connections to... Purpose
80 HTTP Management Server RESTful API
443 HTTPS Management Server RESTful API
Learn more
Hardening guide | XProtect® VMS
65 | Devices and network

The following control(s) provide additional guidance:
l NIST SP 800-53 CA-3 System Interconnections
l NIST SP 800-53 CM-6 Configuration Settings
l NIST SP 800-53 SC-7 Boundary Protection
Use a firewall between the VMS and the Internet
The VMS should not connect directly to the Internet. If you expose parts of the VMS to the Internet, Milestone
recommends that you use an appropriately configured firewall between the VMS and the Internet.
If possible, expose only the XProtect Mobile server component to the Internet, and locate it in a demilitarize zone
(DMZ) with firewalls on both sides. This is illustrated in the following figure.
Learn more
The following control(s) provide additional guidance:
l NIST SP 800-53 CA-3 System Interconnections
Connect the camera subnet to the recording server subnet only
Milestone recommends that you connect the camera subnet only to the recording server subnet. The cameras
and other devices need to communicate only with the recording servers. For more information, see Recording
Server on page 77.
Learn more
The following control(s) provide additional guidance:
Hardening guide | XProtect® VMS
66 | Devices and network

l NIST 800-53 SC-7 Boundary Protection
Advanced steps – Devices
Use Simple Network Management Protocol to monitor events
Milestone recommends that you use Simple Network Management Protocol (SNMP) to monitor events on the
devices on the network. You can use SNMP as a supplement for syslog. SNMP works in real-time with many
types of events that can trigger alerts, for example if a device is restarted.
For this to work, the devices must support logging via SNMP.
There are multiple versions of SNMP protocols available. Versions 2c and 3 are the most current.
Implementation involves a suite of standards. A good overview can be found on the SNMP reference site
(https://www.snmp.com/protocol/snmp_rfcs.shtml).
Learn more
The following control(s) provide additional guidance:
l NIST SP 800-53 SI-4 Event Monitoring
Advanced steps – Network
Use secure wireless protocols 67
Use port-based access control 68
Run the VMS on a dedicated network 68
Use secure wireless protocols
If you use wireless networks, Milestone recommends that you use a secure wireless protocol to prevent
unauthorized access to devices and computers. For example, use standardized configurations. The NIST
guidance on wireless local area networks provides specific details on network management and configuration.
For more information, see SP 800-48 revision 1, Guide to Securing Legacy IEEE 802.11 Wireless Networks
(https://csrc.nist.gov/publications/detail/sp/800-48/rev-1/archive/2008-07-25).
Additionally, Milestone recommends that you do not use wireless cameras in mission-critical locations. Wireless
cameras are easy to jam, which can lead to loss of video.
Learn more
The following control(s) provide additional guidance:
l NIST SP 800-53 AC-18 Wireless Access
l NIST SP 800-53 SC-40 Wireless Link Protection
Hardening guide | XProtect® VMS
67 | Devices and network

Use port-based access control
Use port-based access control to prevent unauthorized access to the camera network. If an unauthorized device
connects to a switch or router port, the port should become blocked. Information about how to configure
switches and routers is available from the manufacturers. See SP 800-128, Guide for Security-Focused
Configuration Management of Information Systems (https://csrc.nist.gov/publications/detail/sp/800-128/final), for
information about configuration management of information systems.
Learn more
The following control(s) provide additional guidance:
l NIST 800-53 CM-1 Configuration Management Policy and Procedures
l NIST 800-53 CM-2 Baseline Configuration
l NIST 800-53 AC-4 Least Privilege
l NIST 800-53 CM-6 Configuration Settings
l NIST 800-53 CM-7 Least Functionality
Run the VMS on a dedicated network
Milestone recommends that, whenever possible, you separate the network where the VMS is running from
networks with other purposes. For example, a shared network such as the printer network should be isolated
from the VMS network. In addition, XProtect VMS deployments should follow a general set of best practices for
system interconnections.
Learn more
The following control(s) provide additional guidance:
l NIST SP 800-53 CA-3 System Interconnections
Hardening guide | XProtect® VMS
68 | Devices and network

Milestone Servers
Basic steps – Milestone servers
Use physical access controls and monitor the server room 69
Use encrypted communication channels 69
Use physical access controls and monitor the server room
Milestone recommends that you place the hardware with the servers installed in a designated server room, and
that you use physical access controls. In addition, you should maintain access logs to document who has had
physical access to the servers. Surveillance of the server room is also a preventive precaution.
Milestone supports integration of access control systems and their information. For example, you can view
access logs in XProtect Smart Client.
Learn more
The following control(s) provide additional guidance:
l NIST 800-53 PE-3 Physical Access Control
Use encrypted communication channels
Milestone recommends that you use a VPN for communication channels for installations where servers are
distributed across untrusted networks. This is to prevent attackers from intercepting communications between
the servers. Even for trusted networks, Milestone recommends that you use HTTPS for configuration of cameras
and other system components.
Learn more
The following control(s) provide additional guidance:
l NIST 800-53 AC-4 Information Flow Enforcement
l NIST 800-53 AC-17 Remote Access
Advanced steps – Milestone servers
Run services with service accounts 70
Run components on dedicated virtual or physical servers 70
Restrict the use of removable media on computers and servers 70
Use individual administrator accounts for better auditing 70
Use subnets or VLANs to limit server access 71
Enable only the ports used by Event Server 71
Hardening guide | XProtect® VMS
69 | Milestone Servers

Run services with service accounts
Milestone recommends that you create service accounts for services related to XProtect VMS, instead of using a
regular user account. Set up the service accounts as domain users, and only give them the permissions required
to run the relevant services. See Kerberos authentication (explained) on page 40. For example, the service
account should not be able to log on to the Windows desktop.
Learn more
The following control(s) provide additional guidance:
l NIST 800-53 AC-5 Separation of Duties
l NIST 800-53 AC-6 Least Privilege
Run components on dedicated virtual or physical servers
Milestone recommends that you run the components of XProtect VMS only on dedicated virtual or physical
servers without any other software or services installed.
Learn more
The following control(s) provide additional guidance:
l NIST 800-53 CM-9 Configuration Management Plan
Restrict the use of removable media on computers and servers
Milestone recommends that you restrict the use of removable media, for example USB keys, SD cards, and
smartphones on computers and servers where components of XProtect VMS are installed. This helps prevent
malware from entering the network. For example, allow only authorized users to connect removable media
when you need to transfer video evidence.
Learn more
The following control(s) provide additional guidance:
l NIST 800-53 MP-7 Media Use
Use individual administrator accounts for better auditing
As opposed to shared administrator accounts, Milestone recommends using individual accounts for
administrators. This lets you track who does what in XProtect VMS. This helps prevent malware from entering
the network. You can then use an authoritative directory such as Active Directory to manage the administrator
accounts.
You assign administrator accounts to roles in Management Client under Roles.
Learn more
The following control(s) provide additional guidance:
Hardening guide | XProtect® VMS
70 | Milestone Servers

l NIST 800-53 AC-5 Separation of Duties
l NIST 800-53 CM-9 Configuration Management Plan
Use subnets or VLANs to limit server access
Milestone recommends that you logically group different types of hosts and users into separate subnets. This
can have benefits in managing privileges for these hosts and users as members of a group with a given function
or role. Design the network so that there is a subnet or VLAN for each function. For example, one subnet or VLAN
for surveillance operators and one for administrators. This allows you to define firewall rules by group instead of
for individual hosts.
Learn more
The following control(s) provide additional guidance:
l NIST SP 800-53 AC-2 Account Management
l NIST SP 800-53 CSC 11: Secure Configurations for Network Devices such as Firewalls, Routers, and Switches
l NIST SP 800-53 SC-7 Boundary Protection
Enable only the ports used by Event Server
Milestone recommends that you enable only the ports used by event server, and block all other ports, including
the default Windows ports.
The event server ports used in XProtect VMS are: 22331, 22333, 9090, 1234, and 1235.
The ports used depend on the deployment. If in doubt, contact Milestone Support.
Learn more
The following control(s) provide additional guidance:
l NIST SP 800-53 CSC 11: Secure Configurations for Network Devices such as Firewalls, Routers, and Switches
Hardening guide | XProtect® VMS
71 | Milestone Servers

SQL Server
Connection to the SQL Server databases
Any SQL Server connection string can be specified, including one where SQL Server
authentication is used (user name/password). This can be useful during testing because it
does not require access to an AD. However, we do not recommend using user
name/password authentication for production setups since both user name and password
are persisted un-encrypted on the computer. For production setups we recommend using
integrated security.
Communication between the Milestone XProtect VMS and the SQL Server database can potentially be tampered
by an attacker because the certificate is not validated.
To mitigate this, you must first set up verifiable server certificates. After the certificates are set up, you must
modify the ConnestionString in the Windows registry by removing trustServerCertificate=true, as follows:
Registry key: Computer\HKEY_LOCAL_MACHINE\SOFTWARE\VideoOS\Server\Common\ConnectionString
l Current
connection string: Data Source=localhost;initial catalog='Surveillance';Integrated
Security=SSPI;encrypt=true;trustServerCertificate=true
l Hardened
connection string: Data Source=localhost;initial catalog='Surveillance';Integrated
Security=SSPI;encrypt=true
This results in encryption occurring only if there is a verifiable server certificate, otherwise the connection
attempt fails.
This issue is described in detail in the article Using Encryption Without Validation.
Run the SQL Server database on a separate server
Milestone recommends that you make the SQL Server database redundant. This reduces the risk of real or
perceived downtime.
To support Windows Server Failover Clustering (WSFC), Milestone recommends that you run the SQL Server
database on a separate server, and not on the management server.
SQL Server must run in WSFC setup, and the management and event servers must run in a Microsoft Cluster
setup (or similar technology). For more information about WSFC, see Windows Server Failover Clustering (WSFC)
with SQL Server (https://msdn.microsoft.com/en-us/library/hh270278.aspx).
Learn more
The following control(s) provide additional guidance:
Hardening guide | XProtect® VMS
72 | Milestone Servers

l NIST 800-53 SC-7 Boundary Protection
l NIST 800-53 CM-9 Configuration Management Plan
Management Server
Adjust the token time-out 73
Enable only the ports used by the management server 73
Disable non-secure protocols 74
Disable legacy remoting channel 74
Manage IIS header information 75
Disable IIS HTTP TRACE / TRACK verbs 76
Disable the IIS Default Page 76
Adjust the token time-out
XProtect VMS uses session tokens when it logs in to the management server using SSL (basic users) or NTLM
(Windows users) protocols. A token is retrieved from the management server and used on the secondary
servers, for example the recording server and sometimes also the event server. This is to avoid that NTLM and
AD lookup is performed on every server component.
By default, a token is valid for 240 minutes. You can adjust this down to 1 minute intervals. This value can also be
adjusted over time. Short intervals increase security, however, the system generates additional communication
when it renews the token.
The best interval to use depends on the deployment. This communication increases the system load and can
impact performance.
Learn more
The following control(s) provide additional guidance:
l NIST SP 800-53 IA-5 Authenticator Management
Enable only the ports used by the management server
Milestone recommends that you enable only the ports used by the management server, and that you block all
other ports, including the default Windows ports. This guidance is consistent for the server components of
XProtect VMS.
The management server ports used in XProtectVMS are: 80, 443, 1433, 7475, 8080, 9000, 12345.
The ports used depend on the deployment. If in doubt, contact Milestone Support.
Learn more
Hardening guide | XProtect® VMS
73 | Milestone Servers

The following control(s) provide additional guidance:
l NIST SP 800-53 AC-2 Account Management
l NIST SP 800-53 SC-7 Boundary Protection
Disable non-secure protocols
When a basic user logs in to the management server through IIS, the Management Client will use any protocol
available. Milestone recommends that you always implement the latest version of the Transport Layer Security
(TLS, currently 1.2) (https://datatracker.ietf.org/wg/tls/charter/), and disable all improper cipher suites and
obsolete versions of TLS/SSL protocols. Perform actions to block non-secure protocols at the OS level. This
prevents the Management Client from using protocols that are not secure. The OS determines the protocol to use.
The protocols used depend on the deployment. If in doubt, contact Milestone Support.
Learn more
The following control(s) provide additional guidance:
l NIST 800-53 AC-17 Remote Access (Disable Unused Protocols)
l NIST 800-53 CM-6 Configuration Settings
l NIST 800-53 CM-7 Least Functionality
Disable legacy remoting channel
Before XProtect VMS 2023 R1
Communication between the recording servers and the management server became more secure with the
solution implemented in 2019 R2. If you upgrade from a previous XProtect VMS release, the management server
still starts the legacy 3rd party technology to be able to communicate with recording servers on older releases.
When all recording servers in your system are upgraded to version 2019 R2 or later, you can set UseRemoting
to False in the management server configuration file.
The UseRemoting option prevents starting the legacy remoting channel and setting this option after all
recording servers are upgraded makes the XProtect VMS less vulnerable.
From XProtect VMS 2023 R1
When upgrading to 2023 R1, it is not possible to remote to legacy 3rd party technology to communicate with
recording servers on older releases.
If you upgrade from a version 2019 R1 or earlier to 2023 R1, both the management server and the recording
server must be upgraded before the communication between the recording server and the management server
can be established.
Hardening guide | XProtect® VMS
74 | Milestone Servers

Also, from 2023 R1, the option to set UseRemoting to False in the management server configuration file is not
applicable.
Learn more
The following control(s) provide additional guidance:
l NIST 800-53 AC-17 Remote Access (Disable Unused Protocols)
l NIST 800-53 CM-6 Configuration Settings
Manage IIS header information
Disable IIS header information
For security purposes, Milestone recommends that you disable the X-Powered-By HTTP and X-AspNet-Version
headers.
The HTTP header X-Powered-By reveals the version of IIS being used on the server. Disable this header by doing
the following:
1. Open the IIS Manager.
2. Select the Default website.
3. Select HTTP Response Headers.
4. Select the X-Powered-By HTTP header and select Remove.
The HTTP header X-AspNet-Version reveals the version of ASP.NET being used by the Management Server
application pool. Disable this header by doing the following:
1. Open the web.config file located in %windir%\Microsoft.NET\Framework\v4.0.30319\CONFIG.
2. After the <system.web> tag, add this: <httpRuntime enableVersionHeader="false" />
3. Save the file.
The SERVER header variable should not be removed, because it will cause functionality
within Management Server to break.
Set X-Frame Options
For security purposes, Milestone recommends that you set the X-Frame-Options to deny.
When you set the HTTP header X-Frame-Options to deny, this disables the loading of the page in a frame,
regardless of what site is trying to gain access.
Change this header by doing the following:
Hardening guide | XProtect® VMS
75 | Milestone Servers

1. Open the IIS Manager.
2. Select the Default website > Installation.
3. Select HTTP Response Headers.
4. Right-click and select Add from the menu.
5. In the Name field write X-Frame-Options, and in the Value field write deny.
Disable IIS HTTP TRACE / TRACK verbs
For security purposes, Milestone recommends that you disable the HTTP TRACE verb in your IIS installation.
Disable the HTTP TRACE verb by doing the following:
1. Open the IIS manager.
2. Select the Default website.
3. Double-click Request filtering.
If Request filtering is not available, install it by following the instructions here:
https://docs.microsoft.com/en-
us/iis/configuration/system.webserver/security/requestfiltering/
4. Select the HTTP Verbs tab.
5. Select Deny Verb from the Actions menu.
6. Type TRACE and click OK.
7. Select Deny Verb from the Actions menu.
8. Type TRACK and click OK.
9. Select Deny Verb from the Options menu.
10. Type OPTIONS and click OK.
Disable the IIS Default Page
For security purposes, Milestone recommends that you disable the IIS Default Page. By doing this, you remove
information that could be used to discover what technologies are used in your installation, and you align with IIS
Best Practices as defined by Microsoft. Disable the default page by doing the following:
1. Open the IIS manager.
2. Select the Default website.
3. Double-click Default Document.
4. Select Disable in the Actions menu.
Hardening guide | XProtect® VMS
76 | Milestone Servers

Identity Provider
Disable IIS header information on the Identity Provider
For security purposes, Milestone recommends that you disable the server header on the Identity Provider
application.
The server header describes the software used by the server of original that handles a request. Disable this
header by doing the following.
Note: This is only applicable for IIS 10 and above.
1. Open the IIS Manager.
2. Under the Default website, select IDP.
3. Open the Configuration Editor.
4. Select the section system.webServer/security/requestFiltering.
5. Set removeServerHeader to True.
Recording Server
Storage and Recording Settings properties 77
Use separate network interface cards 79
Harden Network Attached Storage (NAS) to store recorded media data 79
Storage and Recording Settings properties
Available functionality depends on the system you are using. See the complete feature list, which is available on
the product overview page on the Milestone website (https://www.milestonesys.com/products/software/product-
index/).
In the Storage and Recording Settings dialog box, specify the following:
Name Description
Name Rename the storage if needed. Names must be unique.
Path
Specify the path to the directory to which you save recordings in this storage. The storage
Hardening guide | XProtect® VMS
77 | Milestone Servers

Name Description
does not necessarily have to be located on the recording server computer.
If the directory does not exist, you can create it. Network drives must be specified by using
UNC (Universal Naming Convention) format, example: \\ server\volume\directory\.
Retention
time
Specify for how long recordings should stay in the archive before they are deleted or moved
to the next archive (depending on archive settings).
The retention time must always be longer than the retention time of the previous archive or
the default recording database. This is because the number of retention days specified for an
archive includes all the retention periods stated earlier in the process.
Maximum
size
Select the maximum number of gigabytes of recording data to save in the recording
database.
Recording data in excess of the specified number of gigabytes is auto-moved to the first
archive in the list - if any is specified - or deleted.
When less than 5GB of space is free, the system always auto-archives
(or deletes if no next archive is defined) the oldest data in a database.
If less than 1GB space is free, data is deleted. A database always
requires 250MB of free space. If you reach this limit (if data is not
deleted fast enough), no more data is written to the database until you
have freed enough space. The actual maximum size of your database
is the amount of gigabytes you specify, minus 5GB.
Signing
Enables a digital signature to the recordings. This means, for example, that the system
confirms that exported video has not been modified or tampered with when played back.
The system uses the SHA-2 algorithm for digital signing.
Encryption
Select the encryption level of the recordings:
l None
l Light (Less CPU usage)
l Strong (More CPU usage)
The system uses the AES-256 algorithm for encryption.
Hardening guide | XProtect® VMS
78 | Milestone Servers

Name Description
If you select Light, a part of the recording is encrypted. If you select Strong, the whole
recording is encrypted.
If you choose to enable encryption, you must also specify a password below.
Password
Enter a password for the users allowed to view encrypted data.
Milestone recommends that you use strong passwords. Strong passwords do not contain
words that can be found in a dictionary or are part of the user's name. They include eight or
more alpha-numeric characters, upper and lower cases, and special characters.
Use separate network interface cards
Milestone recommends that you use multiple network interface cards (NICs) to separate the communication
between recording servers and devices from the communication between recording servers and client
programs. Client programs do not need to communicate directly with devices.
Learn more
The following control(s) provide additional guidance:
l NIST SP 800-53 SC-7 Boundary Protection
Harden Network Attached Storage (NAS) to store recorded media data
The Recording Server can use Network Attached Storage (NAS) to store recorded media data.
If you choose to use NAS, it can be hardened by using SMB 3.0 security enhancements, as described in this
document on SMB security enhancements.
XProtect Mobile Server
Only enable ports that Mobile Server uses 80
Use a "demilitarized zone" (DMZ) to provide external access 80
Disable non-secure protocols 80
Set up users for two-step verification via email 81
Configure the Content Security Policy (CSP) 85
Hardening guide | XProtect® VMS
79 | Milestone Servers

Only enable ports that Mobile Server uses
Milestone recommends that you enable only the ports that Mobile Server uses, and block all other ports,
including the default Windows ports.
By default, the XProtect Mobile Server uses ports 8081 and 8082.
The ports used depend on the deployment. If in doubt, contact Milestone Support.
Learn more
The following control(s) provide additional guidance:
l NIST SP 800-53 AC-2 Account Management
l NIST SP 800-53 SC-7 Boundary Protection
Use a "demilitarized zone" (DMZ) to provide external access
Milestone recommends that you install Mobile Server in a DMZ, and on a computer with two network interfaces:
l One for internal communication
l One for public Internet access
This allows mobile client users to connect to Mobile Server with a public IP address, without compromising the
security or availability of the VMS network.
Learn more
The following control(s) provide additional guidance:
l NIST SP 800-53 SC-7 Boundary Protection
Disable non-secure protocols
Milestone recommends that you use only the necessary protocols, and only the latest versions. For example,
implement the latest version of the Transport Layer Security (TLS, currently 1.2) and disable all other cipher
suites and obsolete versions of TLS/SSL protocols. This requires configuration of Windows and other system
components, and the proper use of digital certificates and keys.
The same recommendation is given for the Management Server. For more information,
see Disable non-secure protocols on page 74.
Learn more
The following control(s) provide additional guidance:
Hardening guide | XProtect® VMS
80 | Milestone Servers

l NIST 800-53 AC-17 Remote Access (Disable Unused Protocols)
l NIST 800-53 CM-6 Configuration Settings
l NIST 800-53 CM-7 Least Functionality
Set up users for two-step verification via email
Available functionality depends on the system you are using. See the complete feature list, which is available on
the product overview page on the Milestone website (https://www.milestonesys.com/products/software/product-
index/).
To impose an additional login step on users of the XProtect Mobile client or XProtect Web Client, set up two-step
verification on the Mobile Server. In addition to the standard user name and password, the user must enter a
verification code received by email.
Two-step verification increases the protection level of your surveillance system.
Requirements
l You have installed an SMTP server.
l You have added users and groups to your XProtect system in the Management Client on the Roles node
in the Site Navigation pane. On the relevant role, select the Users and Groups tab.
l If you upgraded your system from a previous version of XProtect, you must restart the Mobile Server to
enable the two-step verification feature.
In the Management Client, perform these steps:
1. Enter information about your SMTP server.
2. Specify the settings for the verification code that will be sent to the client users.
3. Assign login method to users and domain groups.
This topic describes each of these steps.
Enter information about your SMTP server
The provider uses the information about the SMTP server:
1. In the navigation pane, select Mobile Servers, and select the relevant Mobile Server.
2. On the Two-step verification tab, select the Enable two-step verification check box.
3. Below Provider settings, on the Email tab, enter information about your SMTP server and specify the
email that the system will send to client users when they log in and are set up for a secondary login. For
details about each parameter, see Two-step verification tab on page 82.
Specify the verification code that will be sent to the users
To specify the complexity of the verification code:
Hardening guide | XProtect® VMS
81 | Milestone Servers

1. On the Two-step verification tab, in the Verification code settings section, specify the period within
which XProtect Mobile client or XProtect Web Client users, do not have to reverify its login in case of, for
example, a disconnected network. Default period is 3 minutes.Specify the period within which the user
can use the received verification code. After this period, the code is invalid and the user has to request
for a new code. Default period is 5 minutes.Specify the maximum number of code entry attempts, before
the user will be blocked. Default number is 3.
2. Specify the number of characters for the code. Default length is 6.
3. Specify the complexity of the code that you want the system to compose.
Assign login method to users and Active Directory groups
On the Two-step verification tab, in the User settings section, the list of users and groups added to your
XProtect system appears.
1. In the Login method column, select between no login, no two-step verification, or delivery method of
codes.
2. In the Details field, add the delivery details such as email addresses of individual users. Next time the
user logs into the XProtect Mobile client or the XProtect Web Client, he or she is asked for a secondary
login.
3. If a group is configured in Active Directory, the Mobile Server uses details, such as email addresses, from
Active Directory.
Windows groups do not support two-step verification.
4. Save your configuration.
You have completed the steps for setting up your users for two-step verification via email.
Two-step verification tab
Available functionality depends on the system you are using. See the complete feature list, which is available on
the product overview page on the Milestone website (https://www.milestonesys.com/products/software/product-
index/).
Use the Two-step verification tab to enable and specify an additional login step on users of:
l XProtect Mobile app on their iOS or Android mobile devices
l XProtect Web Client
The first type of verification is a password. The second type is a verification code, which you can configure to be
sent to the user via email.
For more information, see Set up users for two-step verification via email on page 81.
The following tables describe the settings on this tab.
Provider settings > Email
Hardening guide | XProtect® VMS
82 | Milestone Servers

Name Description
SMTP server
Enter the IP address or host name of the simple mail transfer protocol
(SMTP) server for two-step verification emails.
SMTP server port
Specify the port of the SMTP server for sending emails.
Default port number is 25 without SSL and 465 with SSL.
Use SSL Select this check box if your SMTP server supports SSL encryption.
User name Specify the user name for logging in to the SMTP server.
Password Specify the password for logging in to the SMTP server.
Use Secure Password
Authentication (SPA)
Select this check box if your SMTP server supports SPA.
Sender's email address Specify the email address for sending verification codes.
Email subject
Specify the subject title for the email. Example: Your two-step verification
code.
Email text
Enter the message you want to send. Example: Your code is {0}.
If you forget to include the {0} variable, the code is
added at the end of the text by default.
Verification code settings
Name Description
Reconnection
timeout (0-30
minutes)
Specify the period within which XProtect Mobile client users do not have to reverify their
login in case of, for example, a disconnected network. The default period is three
minutes.
This setting does not apply to XProtect Web Client.
Hardening guide | XProtect® VMS
83 | Milestone Servers

Name Description
Code expires
after (1-10
minutes)
Specify the period within which the user can use the received verification code. After this
period, the code is invalid and the user has to request for a new code. The default period
is five minutes.
Code entry
attempts (1-10
attempts)
Specify the maximum number of code entry attempts before the provided code
becomes invalid. The default number is three.
Code length (4-
6 characters)
Specify the number of characters for the code. The default length is six.
Code
composition
Specify the complexity of the code that you want the system to generate. You can select
among:
l Latin uppercase (A-Z)
l Latin lowercase(a-z)
l Digits (0-9)
l Special characters (!@#...)
User settings
Name Description
Users and
groups
Lists the users and groups added to the XProtect system.
If a group is configured in Active Directory, the Mobile Server uses details, such as email
addresses, from Active Directory.
Windows groups do not support two-step verification.
Verification
method
Select a verification setting for each user or group. You can select among:
l No login: the user cannot log in
l No two-step verification: the user must enter user name and password
Hardening guide | XProtect® VMS
84 | Milestone Servers

Name Description
l Email: the user must enter a verification code in addition to user name and
password
User details Enter the email address to which each user will receive codes.
Configure the Content Security Policy (CSP)
WebSockets with wildcards should be removed from the CSP headers on the Mobile Server.
Currently the ws://*:* and wss://*:* cannot be removed from the CSP described in Mobile Server configuration
due to Safari browser limitations.
To increase the security on your Mobile Server, do the following:
1. Open the VideoOS.MobileServer.Service.exe.config file, which is located in the installation folder of the
Mobile Server.
2. Modify the <HttpHeaders> section, where the value of key="Content-Security-Policy" as follows:
l If Safari browser support is not needed, remove ws://*:* and wss://*:* from the header.
l If Safari browser support is required, replace ws://*:* and wss://*:* with relevant ‘ws://[hostname]:
[port] and wss://[hostname]:[port]’ values, where hostname and port are the relevant ones used
for accessing the Mobile Server.
3. Restart the Mobile Server.
Log Server
Install Log Server on a separate server with SQL Server 85
Limit the IP access to Log Server 86
Install Log Server on a separate server with SQL Server
For very large systems with many transactions to and from the log server's SQL Server database, Milestone
recommends that you install the Log Server component on a separate server with its own SQL Server and store
logs in a SQL Server database on that local SQL Server. If the Log Server is affected by performance issues, for
example, due to flooding or other reasons, and uses the same SQL Server as the management server, both
services can be affected.
Learn more
The following control(s) provide additional guidance:
Hardening guide | XProtect® VMS
85 | Milestone Servers

l NIST SP 800-53 SC-7 Boundary Protection
l NIST SP 800-53 CM-9 Configuration Management Plan
Limit the IP access to Log Server
Milestone recommends that only VMS components can contact the Log Server. Log Server uses port 22337.
Learn more
The following control(s) provide additional guidance:
l NIST 800-53 CM-6 Configuration Settings
l NIST 800-53 CM-7 Least Functionality
Hardening guide | XProtect® VMS
86 | Milestone Servers

Client programs
Client programs
This section provides guidance about how to protect the Milestone client programs.
The client programs are:
l XProtect Smart Client
l XProtect Web Client
l XProtect Management Client
l XProtect Mobile client
Basic steps (all client programs)
Use Windows users with AD 87
Restrict permissions for client users 87
Always run clients on trusted hardware on trusted networks 89
Use Windows users with AD
Milestone recommends that, whenever possible, you use Windows users in combination with Active Directory
(AD) to log in to the VMS with the client programs. This enables you to enforce a password policy, and apply user
settings consistently across the domain and network. It also provides protection against brute force attacks. For
more information, see Use Windows users with Active Directory.
Learn more
The following control(s) provide additional guidance:
l NIST 800-53 CM-6 Configuration Settings
l NIST 800-53 SA-5 Information System Documentation
l NIST 800-53 SA-13 Trustworthiness
Restrict permissions for client users
Milestone recommends that administrators specify what users can do in Management Client or XProtect Smart
Client.
The following instructions describe how to do this. Additional information is available in the Advanced Security
Management white paper.
To restrict client user permissions, follow these steps:
Hardening guide | XProtect® VMS
87 | Client programs

1. Open Management Client.
2. Expand the Security node, select Roles, and then select the role that the user is associated with.
3. On the tabs at the bottom, you can set permissions and restrictions for the role.
By default, all users associated with the Administrator role have unrestricted access to
the system. This includes users who are associated with the Administrator role in AD as
well as those with the role of administrator on the management server.
Learn more
The following documents provide additional information:
Hardening guide | XProtect® VMS
88 | Client programs

l NIST 800-53 AC-4 Least Privilege
l NIST 800-53 CM-6 Configuration Settings
l NIST 800-53 CM-7 Least Functionality
Always run clients on trusted hardware on trusted networks
Milestone recommends that you always run XProtect clients on hardware devices with the proper security
settings. Specific guidance for mobile devices is available in SP 800-124
(https://csrc.nist.gov/publications/detail/sp/800-124/rev-1/final). These settings are specific to the device.
Learn more
The following control(s) provide additional guidance:
l NIST SP 800-53 SC-7 Boundary Protection
l NIST SP800-53 CM-6 Configuration Settings
Advanced steps – XProtect Smart Client
Restrict physical access to any computer running XProtect Smart Client 89
Always use a secure connection by default, particularly over public networks 90
Activate login authorization 90
Do not store passwords 93
Turn on only required client features 94
Use separate names for user accounts 94
Prohibit the use of removable media 95
Restrict physical access to any computer running XProtect Smart Client
Milestone recommends that you restrict physical access to computers running XProtect Smart Client. Allow only
authorized personnel to access the computers. For example, keep the door locked, and use access controls and
surveillance.
Learn more
The following control(s) provide additional guidance:
l NIST SP 800-53 PE-1 Physical and Environmental Protection Policy and Procedures
l NIST SP 800-53 PE-2 Physical Access Authorizations
l NIST SP 800-53 PE-3 Physical Access Control
l NIST SP 800-53 PE-6 Monitoring Physical Access
Hardening guide | XProtect® VMS
89 | Client programs

Always use a secure connection by default, particularly over public networks
If you need to access the VMS with XProtect Smart Client over a public or untrusted network, Milestone
recommends that you use a secure connection through VPN. This helps ensure that communication between
XProtect Smart Client and the VMS server is protected.
Learn more
The following control(s) provide additional guidance:
l NIST SP 800-53 AC-2 Account Management
l NIST SP 800-53 AC-17 Remote Access
l NIST SP 800-53 CM-6 Configuration Settings
Activate login authorization
Login authorization requires a user to log in on XProtect Smart Client or Management Client, and another user
who has an elevated status, such as a supervisor, to provide approval.
You set up login authorization on the roles. Users associated with the role are prompted for a second user (a
supervisor) to authorize their access to the system.
Login authorization is currently not supported by mobile client, and XProtect Web Client,
and any Milestone Integration Platform SDK (MIP SDK) integrations.
To turn on login authorization for a role, follow these steps:
Hardening guide | XProtect® VMS
90 | Client programs

1. Open Management Client.
2. Expand the Security node, select Roles, and then select the relevant role.
Select the Login authorization required check box.
To configure the roles that authorize and grant access, follow these steps:
Hardening guide | XProtect® VMS
91 | Client programs

1. To create a new role, for example "Security supervisor", expand the Security node, right-click Roles and
create a new role.
2. Click the Overall Security tab, and select the Management Server node.
Select the Allow check box next to the Authorize users check box.
Learn more
The following control(s) provide additional guidance:
l NIST SP 800-53 AC-2 Account Management
l NIST SP 800-53 AC-6 Least Privilege
l NIST SP 800-53 AC-17 Remote Access
l NIST SP 800-53 CM-6 Configuration Settings
Hardening guide | XProtect® VMS
92 | Client programs

Do not store passwords
XProtect Smart Client provides the option to remember passwords for users. To reduce the risk of unauthorized
access, Milestone recommends that you do not use this feature.
To turn off the remember password feature, follow these steps:
1. Open Management Client.
2. Expand the Client node, select Smart Client Profiles, and then select the relevant Smart Client profile.
3. In the Remember password list, select Unavailable.
The Remember password option is not available the next time a user with this profile
logs into XProtect Smart Client.
Learn more
The following control(s) provide additional guidance:
l NIST SP 800-53 AC-2 Account Management
l NIST SP 800-53 CM-6 Configuration Settings
l NIST SP 800-53 IA-1 Identification and Authentication Policy and Procedures
Hardening guide | XProtect® VMS
93 | Client programs

Turn on only required client features
Turn on only required features, and turn off features that a surveillance operator does not need. The point is to
limit opportunities for misuse or mistakes.
You can turn on and turn off features in XProtect Smart Client and in XProtect Management Client.
In Management Client, configure Smart Client profiles to specify sets of permissions for users who are assigned
to the profile.Smart Client profiles are similar to Management Client profiles, and the same user can be
assigned to each type of profile.
To configure a Smart Client profile, follow these steps:
1. Open Management Client.
2. Expand the Client node, select Smart Client Profiles, and then select the relevant Smart Client profile.
3. Use the tabs to specify settings for features in Smart Client. For example, use the settings on the
Playback tab to control features used to investigate recorded video.
Before you assign a user to a Smart Client profile, ensure that the permissions for the
user’s role are appropriate for the profile. For example, if you want a user to be able to
investigate video, make sure that the role allows the user to play back video from
cameras, and that Sequence Explorer tab is available on the Smart Client profile.
Learn more
The following control(s) provide additional guidance:
l NIST SP 800-53 AC-2 Account Management
l NIST SP 800-53 AC-6 Least Privilege
l NIST SP 800-53 CM-6 Configuration Settings
Use separate names for user accounts
Milestone recommends that you create a user account for each user, and use a naming convention that makes it
easy to identify the user personally, such as their name or initials. This is a best practice for limiting access to
only what is necessary, and it also reduces confusion when auditing.
Learn more
The following control(s) provide additional guidance:
l NIST 800-53 AC-4 Least Privilege
l NIST 800-53 CM-1 Configuration Management Policy and Procedures
Hardening guide | XProtect® VMS
94 | Client programs

l NIST 800-53 CM-2 Baseline Configuration
l NIST 800-53 CM-6 Configuration Settings
l NIST 800-53 CM-7 Least Functionality
Prohibit the use of removable media
For video exports, establish a chain of procedures that are specific to evidence. Milestone recommends that the
security policy allows only authorized XProtect Smart Client operators to connect removable storage devices
such as USB flash drives, SD cards, and smartphones to the computer where XProtect Smart Client is installed.
Removable media can transfer malware to the network, and subject video to unauthorized distribution.
Alternatively, the security policy can specify that users can export evidence only to a specific location on the
network, or to a media burner only. You can control this through the Smart Client profile.
Learn more
The following control(s) provide additional guidance:
l NIST SO 800-53 MP-7 Media Use
l NIST SP 800-53 SI-3 Malicious Code Protection
Advanced steps – XProtect Mobile client
SP 800-124 revision 1 (https://csrc.nist.gov/publications/detail/sp/800-124/rev-1/final) provides guidance that is
specifically for mobile devices. The information it contains applies to all topics in this section.
Always use the XProtect Mobile client on secure devices 95
Download the XProtect Mobile client from authorized sources 96
Mobile devices should be secured 96
Always use the XProtect Mobile client on secure devices
Milestone recommends that you always use the XProtect Mobile client on secure devices that are configured
and maintained according to a security policy. For example, ensure that mobile devices do not allow users to
install software from unauthorized sources. An enterprise app store is one example of a way to constrain device
applications as part of overall mobile device management.
Learn more
The following control(s) provide additional guidance:
l NIST SP 800-53 SC-7 Boundary Protection
l NIST SP800-53 CM-6 Configuration Settings
Hardening guide | XProtect® VMS
95 | Client programs

Download the XProtect Mobile client from authorized sources
Milestone recommends that you download the XProtect Mobile client from one of these sources:
l Google Play Store
l Apple App Store
l Microsoft Windows Store.
Learn more
The following control(s) provide additional guidance:
l NIST SP 800-53 SC-7 Boundary Protection
l NIST SP 800-53 CM-6 Configuration Settings
Mobile devices should be secured
If you want to access the VMS with a mobile device over a public or untrusted network, Milestone recommends
that you do so with a secure connection, use proper authentication and Transport Layer Security (TLS)
(https://datatracker.ietf.org/wg/tls/charter/) (or connect through VPN
(https://datatracker.ietf.org/wg/ipsec/documents/)) and HTTPS. This helps protect communications between the
mobile device and the VMS.
Milestone recommends that mobile devices use screen-lock. This helps prevent unauthorized access to the VMS,
for example, if the smart phone is lost. For maximum security, implement a security policy to prohibit the
XProtect Mobile client from remembering the user name and password.
Learn more
The following control(s) provide additional guidance:
l NIST SP 800-53 AC-2 Account Management
l NIST SP 800-53 AC-17 Remote Access
l NIST SP 800-53 CM-6 Configuration Settings
Advanced steps – XProtect Web Client
Always run XProtect Web Client on trusted client computers 96
Use certificates to confirm the identity of XProtect Mobile server 97
Use only supported browsers with the latest security updates 97
Always run XProtect Web Client on trusted client computers
Always securely connect all components of the VMS. Server-to-server and client-to-server connections should
use proper authentication and Transport Layer Security (TLS) (https://datatracker.ietf.org/wg/tls/charter/) (or
connect through VPN (https://datatracker.ietf.org/wg/ipsec/documents/)) and HTTPS. Always run XProtect Web
Hardening guide | XProtect® VMS
96 | Client programs

Client on trusted computers, for example, do not use a client computer in a public space. Milestone recommends
that you educate users about the security measures to remember when using browser-based applications, such
as XProtect Web Client. For example, make sure they know to disallow the browser from remembering their
password.
Learn more
The following control(s) provide additional guidance:
l NIST SP 800-53 AC-2 Account Management
l NIST SP 800-53 CM-6 Configuration Settings
l NIST SP 800-53 IA-2 Identification and Authentication
Use certificates to confirm the identity of XProtect Mobile server
This document emphasizes the use of the latest TLS. With that comes the need for the proper use of certificates
and the implementation of the TLS cipher suite. Milestone recommends that you install a certificate on the
XProtect Mobile server to confirm the identity of the server when a user tries to connect through XProtect Web
Client.
For more information, see the certificates guide about how to secure your XProtect VMS installations.
Learn more
The following control(s) provide additional guidance:
l NIST SP 800-53 AC-2 Account Management
l NIST SP 800-53 CM-6 Configuration Settings
l NIST SP 800-53 IA-2 Identification and Authentication
Use only supported browsers with the latest security updates
Milestone recommends that you install only one of the following browsers on client computers. Make sure to
include the latest security updates.
l Apple Safari
l Google Chrome
l Microsoft Edge
l Mozilla Firefox
Learn more
The following control(s) provide additional guidance:
Hardening guide | XProtect® VMS
97 | Client programs

l NIST SP 800-53 CM-1 Configuration Management Policy and Procedures
l NIST SP 800-53 CM-2 Baseline Configuration
l NIST SP 800-53 CM-6 Configuration Settings
l NIST SP 800-53 PL-8 Information Security Architecture
l NIST SP 800-53 SI-3 Malicious Code Protection
Advanced steps – Management Client
Use Management Client profiles to limit what administrators can view 98
Allow administrators to access relevant parts of the VMS 98
Run the Management Client on trusted and secure networks 99
Use Management Client profiles to limit what administrators can view
Milestone recommends that you use Management Client profiles to limit what administrators can view in the
Management Client.
Management Client profiles allow system administrators to modify the Management Client user interface.
Associate Management Client profiles with roles to limit the user interface to represent the functionality
available for each administrator role.
Display only the parts of the VMS that administrators need to perform their duties.
Learn more
The following control(s) provide additional guidance:
l NIST 800-53 AC-4 Least Privilege
l NIST 800-53 CM-1 Configuration Management Policy and Procedures
l NIST 800-53 CM-2 Baseline Configuration
l NIST 800-53 CM-6 Configuration Settings
l NIST 800-53 CM-7 Least Functionality
Allow administrators to access relevant parts of the VMS
If you have a setup that requires multiple administrators, Milestone recommends that you configure different
administrator permissions for administrators who use the Management Client.
To define administrator permissions, follow these steps:
Hardening guide | XProtect® VMS
98 | Client programs

1. In Management Client, expand the Security node, select Roles, and then select the relevant
administrator role.
You cannot modify the built-in administrator role, so you must create additional administrator roles.
2. On the Overall Security tab, specify the actions that the administrator can take for each security group.
3. On the other tabs, specify the security settings for the role in the VMS.
For more information, see the administrator manual for XProtect VMS.
4. On the Info tab, associate the role with a Management Client profile.
You can turn on or turn off features by using the Management Client profile. Before you
assign a user to a Management Client profile, ensure that the permissions for the user’s
role are appropriate for the profile. For example, if you want a user to be able to manage
cameras, make sure that the role allows the user to do this, and that cameras are enabled
on the Management Client profile.
Learn more
The following control(s) provide additional guidance:
l NIST 800-53 AC-4 Least Privilege
l NIST 800-53 CM-1 Configuration Management Policy and Procedures
l NIST 800-53 CM-2 Baseline Configuration
l NIST 800-53 CM-6 Configuration Settings
l NIST 800-53 CM-7 Least Functionality
Run the Management Client on trusted and secure networks
If you access the Management Server with Management Client over HTTP, the plain text communication can
contain unencrypted system details.Milestone recommends that you run the Management Client only on trusted
and known networks. Use a VPN to provide remote access.
Learn more
The following control(s) provide additional guidance:
l NIST SP 800-53 AC-2 Account Management
l NIST SP 800-53 CM-6 Configuration Settings
l NIST SP 800-53 IA-2 Identification and Authentication
Hardening guide | XProtect® VMS
99 | Client programs

Compliance
FIPS 140-2 compliance
This section discusses FIPS 140-2 and how to configure and use XProtect VMS to operate in FIPS 140-2 compliant
mode.
The terms "FIPS 140-2 compliant" and "FIPS 140-2 compliant mode" are not legally binding. The terms are used
here for clarity.
FIPS 140-2 compliant means that software uses FIPS 140-2-validated instances of algorithms and hashing
functions in all instances in which encrypted or hashed data is imported to or exported from the software.
Additionally, this means that software will manage keys in a secure manner, as is required of FIPS 140-2-
validated cryptographic modules. The key management process also includes both key generation and key
storage.
FIPS 140-2 compliant mode refers to software that contains both FIPS-approved and non-FIPS approved security
methods, where the software has at least one "FIPS mode of operation". This mode of operation only allows for
the operation of FIPS-approved security methods. This means that when the software is in the "FIPS mode", a
non-FIPS approved method is not used in lieu of the FIPS approved method.
The following topics are discussed.
What is FIPS? 100
What is FIPS 140-2? 101
Which XProtect VMS applications can operate in a FIPS 140-2 compliant mode? 101
How to ensure XProtect VMS can operate in FIPS 140-2 compliant mode? 101
Considerations regarding upgrade 102
Verify third-party integrations 103
Connect devices: background 103
Media database: Considerations regarding backward compatibility 104
FIPS Group Policy on the Windows operating system 109
Install XProtect VMS 110
Encrypt hardware detection passwords 110
What is FIPS?
Federal Information Processing Standards (FIPS) are a family of standards developed by the following two
government bodies:
Hardening guide | XProtect® VMS
100 | Compliance

l The National Institute of Standards and Technology (NIST) in the United States
l The Communications Security Establishment (CSE) in Canada
These standards aim at ensuring computer security and interoperability.
All software solutions deployed in government and highly regulated industries in the United States and Canada
are required to comply with FIPS 140-2.
What is FIPS 140-2?
FIPS 140-2, titled "Security Requirements for Cryptographic Modules," specifies which encryption algorithms and
which hashing algorithms can be used and how encryption keys are to be generated and managed.
The security requirements specified in this standard are intended to maintain the security provided by a
cryptographic module, but conformance to this standard is not sufficient to ensure that a particular module is
secure. The operator of a cryptographic module is responsible for ensuring that the security provided by the
module is sufficient and acceptable to the owner of the information that is being protected, and that any residual
risk is acknowledged and accepted.
Which XProtect VMS applications can operate in a FIPS 140-2 compliant mode?
As of XProtect VMS 2020 R3, all encryption algorithms have been replaced with Microsoft's Cryptography API:
Next Generation (CNG), which adheres to the latest security technologies available and is FIPS compliant. That
is, all XProtect VMS 2020 R3 applications can operate in FIPS compliant mode.
For the sake of backward compatibility, some non-compliant algorithms and processes persist in XProtect VMS,
even after version 2020 R3, but this does not affect the ability to operate the system in FIPS compliant mode.
Is XProtect VMS always FIPS compliant?
No. Some non-compliant algorithms and processes persist in XProtect VMS. But, XProtect VMS can be configured
and operate so that it uses only the FIPS 140-2 certified algorithm instances and thereby operate in a FIPS
compliant mode.
Should you enable FIPS 140–2 mode?
Before enabling the FIPS 140–2 mode it is necessary to understand whether you need it or not. For instance, if
you are working and connected to a US or Canadian government network and infrastructure, then it is
mandatory to comply with FIPS 140–2 and enable it on your computer for communication as per the standard.
Furthermore, enabling FIPS 140–2 mode on your Windows operating system restricts many programs and
services from running, since only FIPS-approved algorithms and services will be supported after that. Therefore,
it is advised to check whether there is a necessity or not.
How to ensure XProtect VMS can operate in FIPS 140-2 compliant mode?
In order to operate XProtect VMS in a FIPS 140-2 mode of operation you must:
Hardening guide | XProtect® VMS
101 | Compliance

l Ensure third-party integrations can operate on a FIPS enabled Windows operating system (see Verify
third-party integrations on page 103)
l Connect to devices in a way that ensures a FIPS 140-2 compliant mode of operation (see Connect
devices: background on page 103)
l Ensure that data in the media database is encrypted with FIPS 140-2 compliant algorithms (see Media
database: Considerations regarding backward compatibility on page 104)
l Run Windows operating system in FIPS 140-2 approved mode of operation. See the Microsoft site for
information on enabling FIPS.
Considerations regarding upgrade
Upgrading to XProtect VMS 2020 R3 to operate in FIPS compliant mode requires a unique upgrade process. This
upgrade process is required only by existing XProtect VMS users who must operate in a FIPS compliant mode.
The upgrade process depends on which version of XProtect VMS you are upgrading from.
Recommended upgrade process for customers running XProtect VMS
1. Start investigation whether third-party integrations are FIPS 140-2 compliant (see Verify third-party
integrations on page 103).
2. Prepare device connections to be FIPS 140-2 compliant (see Connect devices: background on page 103).
3. Export recordings made with XProtect VMS versions that are older than 2017 R2 (see Media database:
Considerations regarding backward compatibility on page 104).
This applies to customers who have encrypted or signed recordings at any point in time.
4. Disable FIPS on the Windows operating system (see FIPS Group Policy on the Windows operating system
on page 109).
Hardening guide | XProtect® VMS
102 | Compliance

5. Install XProtect VMS (see Install XProtect VMS on page 110).
6. Upgrade the recordings in the media database that are made with XProtect VMS 2019 R3 or earlier (see
Media database: Considerations regarding backward compatibility on page 104).
7. Update the encryption of hardware discovery passwords (see Encrypt hardware detection passwords on
page 110).
8. Enable FIPS on the Windows operating system and restart all of the computers with XProtect VMS
installed.
Do not enable FIPS until all of the computers in the XProtect VMS network,
including XProtect Smart Client workstations, are prepared for FIPS.
Verify third-party integrations
If an integration is not FIPS 140-2 compliant, it cannot run on a Windows operating system with the FIPS Group
Policy flag enabled.
In addition, because of changes made to the MIP SDK in relation to FIPS, integrations that access the feature list
in the license must be recompiled.
In order to ensure that the integrations will still work after upgrading to XProtect VMS 2020 R3, you must:
l Make an inventory of all your integrations to XProtect VMS
l Contact the providers of these integrations and ask if the integrations are FIPS 140-2 compliant and
whether they foresee that the integrations need to be changed due to the MIP SDK updates
l Deploy the FIPS 140-2 compliant integrations to XProtect VMS after the VMS has been updated
Connect devices: background
If you want to operate XProtect VMS in a FIPS compliant mode, you must make sure that the drivers, and hence
the communication to the devices, also adhere to FIPS compliance.
The Milestone XProtect VMS device drivers can be FIPS 140-2 compliant because they can be configured and
operate so that they use only FIPS 140-2 compliant algorithm instances. Only specific drivers in a specific
configuration are FIPS 140-2 compliant. In this specific FIPS 140-2 configuration the driver will be able to
communicate with devices in a compliant way. The devices must fulfill several requirements in order to be able
to accept this communication. In addition, the FIPS Group Policy flag must be enabled in Windows on the server
where the recording server is installed. When the FIPS Group Policy flag is enabled, the FIPS 140-2 capable
drivers will operate in compliant mode and will not use non-approved cryptographic primitives. The drivers will
use the algorithms used only for secured channels of communication.
Device connectivity requirements
XProtectVMS is guaranteedandcanenforce FIPS 140-2 compliantmode ofoperationif the followingcriteria are met:
Hardening guide | XProtect® VMS
103 | Compliance

l Devices use only drivers from the list (Supported drivers on page 111) to connect to XProtect VMS
This list shows drivers that can assure and enforce compliance.
l Devices use device pack version 11.1 or higher
Drivers from the legacy driver device packs cannot guarantee a FIPS 140-2 compliant connection.
l Devices are connected over HTTPS and on either Secure Real-Time Transport Protocol (SRTP) or Real
Time Streaming Protocol (RTSP) over HTTPS for the video stream
Driver modules cannot guarantee FIPS 140-2 compliance of a connection over
HTTP. The connection may be compliant, but there is no guarantee that it is in fact
compliant.
l The computer that is running the recording server must have the FIPS Group Policy flag enabled in
Windows
Effects of operating in FIPS 140-2 compliant mode
When operating in FIPS 140-2 compliant mode, some drivers will be unavailable for use. Drivers which are listed
as FIPS 140-2 might not be able to connect to devices that do not fulfill the device requirements.
A driver is FIPS 140-2 compliant and the communication with the device is FIPS 140-2 compliant if the FIPS 140-2
capable driver:
l Operates in an environment with the FIPS Group Policy enabled
l Is connected to a device that fulfills the device requirements (see Device requirements on page 111)
l Is configured properly (see How to configure the device and the driver for FIPS 140-2 on page 112)
If any of the requirements for FIPS 140-2 compliant mode are not fulfilled, then there is no guarantee about the
FIPS 140-2 compliancy of the driver or the communication with the device. See Drivers and FIPS 140-2 on page
111 for more information.
Devices running over Milestone Open Network Bridge
When running on a computer that has the FIPS Group Policy flag enabled in Windows, the Milestone Open
Network Bridge uses SHA-256 as a hashing algorithm. On a computer that does not have FIPS enabled, then you
can select either MD5 or SHA-256 for hashing.
Media database: Considerations regarding backward compatibility
It is possible to have recordings in the same storage from several different versions of XProtect VMS at the
same time.
Data that is signed or encrypted must be:
Hardening guide | XProtect® VMS
104 | Compliance

l Exported from the storage if it was recorded with XProtect VMSversion 2017 R1 or older
Data export is done by using the XProtect Smart Client.
l Upgraded, if it was recorded with XProtect VMS version 2017 R2 or newer
Data upgrade is done in collaboration with Milestone Support, using a media conversion tool provided by
Milestone Support.
The FIPS Group Policy flag must be disabled on the Windows operating system for
the media conversion tool to run.
The recording server must also be stopped while the media conversion tool is
running, and there are no recordings being made while the tool is running.
Media upgrade depending on XProtect VMS version
l Data recorded with XProtect VMS version 2017 R1 and earlier
Encrypted media data that was recorded with XProtect VMS 2017 R1 and earlier is not available if
enabling FIPS, even if the media conversion tool has been run.
Export the media data that was recorded with XProtect VMS 2017 R1 and earlier to access it offline.
See Media database data upgrade: XProtect VMS 2017 R1 and earlier on page 108.
l Data recorded with XProtect VMS version 2017 R2 to 2019 R3
Media data that was recorded with XProtect VMS versions 2017 R2 to 2019 R3 will not automatically be
re-encrypted. Conversion can be time consuming and should be planned in advance.
To get older data updated to use FIPS compliant algorithms, contact Milestone support to get the media
conversion tool.
See Media database upgrade: XProtect VMS 2017 R2 to XProtect VMS 2019 R3 on page 108.
l Data recorded with XProtect VMS version 2020 R1 or 2020 R2
Media data that was recorded with XProtect VMS 2020 R1 or 2020 R2 will automatically be re-encrypted
with FIPS 140-2 compliant algorithms when the recording server is started after an upgrade. See Media
database upgrade: XProtect VMS 2020 R1 or XProtect VMS 2020 R2 on page 109.
Media upgrade details
Re-encrypting the data with a recording server with FIPS compliant algorithms is a central part of the upgrade
process. Therefore, the upgrade process varies, based on the version of XProtect VMS used for recording that
data.
Hardening guide | XProtect® VMS
105 | Compliance

Data recorded with
2017 R1 and earlier
2017 R2 -
2019 R3
2020 R1 - 2020 R2 2020 R3 and later
Changes
Data encrypted with
DES
Signing using MD5
Passwords:
l Cookie in
storage
CONFIG.XML
l Password _a &
_b in table
CONFIG.XML's
l DES
encrypted
Data
encrypted
with AES
Signing
using SHA
Password list in
storage
CONFIG.XML
Passwords in
password list are
DES encrypted
Passwords in password list
are encrypted using AES
A media conversion tool is
available for updating table
CONFIG.XML's from having
password _a & _b, to use
updated password list
FIPS
disabled
All functionality works as expected
FIPS
enabled
Signed
data
Signed data can
playback
Verify signing during
export fails
Signed data can be played back
Verify signing during export works
FIPS
enabled
Encrypted
data
Media
conversion
tool not
run
Storage stays offline
(Storage may stay offline if encryption was ever enabled for
storage)
All functionality works as
expected
Hardening guide | XProtect® VMS
106 | Compliance

Data recorded with
2017 R1 and earlier
2017 R2 -
2019 R3
2020 R1 - 2020 R2 2020 R3 and later
FIPS
enabled
No
encryption
Media
conversion
tool not
run
All functionality works as expected
Media
conversion
tool has
run
Media conversion tool may require a
lot of time to run because it updates
table CONFIG.XML's for all encrypted
tables
Media conversion
tool runs fast
because it only
needs to update
storage
CONFIG.XML
Media conversion tool runs
fast because no update is
needed
FIPS
enabled
Encrypted
data
Media
conversion
tool has
run
Encrypted data is not
available
Connection lost on
playback
Archiving with
Reduce to key-frames
archives entire GoP
Encrypted data can be played back
Archiving with Reduce to key-frames works as expected
FIPS
enabled
No
encryption
No signing
Media
conversion
tool has
run
All functionality works as expected
Hardening guide | XProtect® VMS
107 | Compliance

Media database data upgrade: XProtect VMS 2017 R1 and earlier
If you are running XProtect VMS version 2017 R1 or earlier or if you have signed or encrypted data recorded with
these versions, the recordings are encrypted with algorithms that are not considered secure by the FIPS 140-2
standard.
It is not possible to access these recordings from a computer where the FIPS Group Policy flag is enabled.
As a consequence, it is required to export the media database to a location where it can still be accessed.
Media database upgrade: XProtect VMS 2017 R2 to XProtect VMS 2019 R3
If you are running a version of XProtect VMS between XProtect VMS 2017 R2 and XProtect VMS 2019 R3 and if at
any point in time encryption has been enabled in the media database, in order to access these recordings you
must do one of the following options.
Both options require the use of the media conversion tool. The recording server must be
stopped while the media conversion tool is running, and there are no recordings being
made while the tool is running. See What is the media conversion tool? on page 108 for
more information.
l Option 1
Use this option to be able to operate in a FIPS environment immediately, and if you have a long retention
time. The time required to run the media conversion tool could be significant.
1. Upgrade XProtect VMS to 2020 R3.
2. With FIPS disabled on the Windows operating system, run the media conversion tool that is
provided by Milestone support.
3. Enable the FIPS Group Policy flag on the Windows operating system.
l Option 2
Use this option if operating in a FIPS environment can wait, if you have a short retention time, and if you
are running the media conversion tool on less data.
1. Upgrade XProtect VMS to 2020 R3.
2. Run the XProtect VMS through the retention time without enabling FIPS on the Windows operating
system.
3. Run the media conversion tool to ensure that all the data is converted to be FIPS compliant.
4. Enable the FIPS Group Policy flag on the Windows operating system.
What is the media conversion tool?
The media conversion tool is a stand-alone PowerShell script, that is delivered in source. It is not part of any
installation.
Hardening guide | XProtect® VMS
108 | Compliance

It is to be distributed to customers only through Milestone support.
It can convert all storage in bulk, or it can be run on a specific storage.
Progress indicators show how far the tool has gotten.
If the conversion takes too long, you can cancel the job and continue without FIPS enabled.
The media conversion tool converts encrypted credentials inside existing media table files to the newest format
that is FIPS compatible.
The media conversion tool does not change the encryption of the video data itself. If the video data is encrypted
with a non-compliant algorithm (DES), the updated tables will load, but video will be inaccessible in FIPS
compliant mode.
The media conversion tool converts and checks if all tables are using FIPS compliant algorithms.
Approved tables will be marked to eliminate them from being checked by media conversion tool again.
After running the media conversion tool, the XProtect VMS 2020 R3 will be able to load tables in FIPS compliant
mode.
Media conversion tool workflow
Media database upgrade: XProtect VMS 2020 R1 or XProtect VMS 2020 R2
If you are running XProtect VMS version 2020 R1 or XProtect VMS 2020 R2, media data that is recorded with one
of these versions will be automatically re-encrypted with FIPS 140-2 compliant algorithms during the recording
server upgrade.
FIPS Group Policy on the Windows operating system
FIPS mode of operation is enabled and disabled with the FIPS Group Policy flag on the Windows operating
system. See the Microsoft site for information on enabling and disabling FIPS.
Hardening guide | XProtect® VMS
109 | Compliance

Before you upgrade, you must disable the FIPS Group Policy flag on all the computers that are part of the
XProtect VMS , including the computer that hosts SQL Server and all XProtect Smart Client workstations.
There are two reasons why the FIPS Group Policy flag must be disabled on all computers in the XProtect VMS
before you upgrade:
l During the upgrade, data that is encrypted with non-approved FIPS algorithms is re-encrypted with
approved algorithms. In order to run the decryption on the Windows operating system, the FIPS Group
Policy flag must be disabled.
l If the FIPS Group Policy flag is enabled in Windows, you will not be able to use the XProtect VMS until all
components are upgraded. For example, a 2020 R2 XProtect Smart Client will not be able to communicate
with a 2020 R3 Management Server if the Management Server is on a computer that has the FIPS Group
Policy flag enabled.
FIPS Group Policy and Milestone Federated Architecture
If any site in a Milestone Federated Architecture must operate with the FIPS Group Policy flag enabled in
Windows, then all of the sites must also operate with the FIPS Group Policy flag enabled in Windows.
In consequence, the entire Milestone Federated Architecture installation must be upgraded to version 2020 R3.
Install XProtect VMS
When you upgrade, the XProtect VMS installer will check the FIPS security policy and will prevent the upgrade
from starting if FIPS is enabled.
Encrypt hardware detection passwords
The hardware detection passwords must be updated after you upgrade to XProtect VMS 2020 R3.
The encryption of the hardware detection passwords is not updated during upgrade from earlier version of
XProtect VMS . But, these passwords cannot be read if the FIPS Group Policy flag is enabled in Windows.
You must trigger a conversion of these passwords before you enable FIPS. Do the following:
1. Make sure the FIPS Group Policy flag is disabled in Windows.
2. In XProtect Management Client, open the Add Hardware wizard.
Hardening guide | XProtect® VMS
110 | Compliance

3. Select the detection method to open the hardware detection page.
This triggers the re-encryption of the hardware detection passwords with FIPS-compliant algorithms.
The credentials are now encrypted with FIPS-compliant algorithms.
Drivers and FIPS 140-2
This section discusses FIPS 140-2 and how to configure and use the Milestone drivers to operate in FIPS 140-2-
compliant mode.
Requirements for FIPS 140-2 compliant mode
The Milestone XProtect VMS device drivers can be FIPS 140-2 compliant because they can be configured and
operate so that they use only FIPS 140-2 compliant algorithm instances. Only specific drivers in a specific
configuration are FIPS 140-2 compliant. In this specific FIPS 140-2 configuration the driver will be able to
communicate with devices in a compliant way. The devices must fulfill several requirements in order to be able
to accept this communication. In addition, the FIPS Group Policy flag must be enabled in Windows on the server
where the recording server is installed. When the FIPS Group Policy flag is enabled, the FIPS 140-2 capable
drivers will operate in compliant mode and will not use non-approved cryptographic primitives. The drivers will
use the algorithms used only for secured channels of communication.
Device requirements
For a device to be able to communicate with a driver running in FIPS 140-2 compliant mode it must fulfill all of
these:
l The device must support HTTPS communication with at least one FIPS 140-2 compliant cipher suite (for
examples see Example of FIPS 140-2 compliant cipher suites on page 117)
l The device must support RTSP over HTTPS (Tunneling RTSP and RTP over HTTP) using HTTP Basic
Authentication (RFC2068 Section 11.1) or HTTP Digest Authentication (RFC2069, RFC7616)
or
The device must support media streaming using SRTP and RTSPS (RFC3711)
Supported drivers
Currently only a subset of drivers is FIPS 140-2 compliant. These drivers support communication through a
secured channel for all available features.
Hardening guide | XProtect® VMS
111 | Compliance

Axis 1 channel Axis 1 channel PTZ Axis 2 channel Axis 3 channel
Axis 4 channel Axis 8 channel Axis 11 channel Axis 12 channel
Axis Audio Bosch PTZ Bosch 1 channel Bosch 2 channel
Bosch 3 channel Bosch 16 channel Bosch X20XF Bosch X40XF
Canon 1 channel Canon 1 channel PTZ Canon VBM Canon VBM 40
Canon VBS Canon VBS No Ptz Digital Barriers TVI Decoder Hanwha Generic
ONVIF ONVIF16 Universal Universal 16 channel
Universal 64 channel VideoPush
The drivers in the table are capable of running in FIPS 140-2 compliant mode when configured properly. This list
is not final and may expand in the future. Some drivers are FIPS 140-2 compliant with limited capabilities. Refer
to specific driver sections below for information on how to configure them and any limitations.
FIPS 140-2 compliant mode for drivers is available since Device Pack 11.1.
Effects of running in FIPS 140-2 compliant mode
When operating in FIPS 140-2 compliant mode, some drivers will be unavailable for use. Drivers which are listed
as FIPS 140-2 might not be able to connect to devices that do not fulfill the device requirements.
A driver is FIPS 140-2 compliant and the communication with the device is FIPS 140-2 compliant if the FIPS 140-2
capable driver:
l Operates in an environment with the FIPS Group Policy enabled
l Is connected to a device that fulfills the device requirements (see Device requirements on page 111)
l Is configured properly (see How to configure the device and the driver for FIPS 140-2 on page 112)
If any of the requirements for FIPS 140-2 compliant mode are not fulfilled, then there is no guarantee about the
FIPS 140-2 compliancy of the driver or the communication with the device.
How to configure the device and the driver for FIPS 140-2
The configuration of the device and driver for FIPS 140-2 compliant mode is device and driver specific. Some
general guidelines apply:
Hardening guide | XProtect® VMS
112 | Compliance

l The communication channels between the driver and the device must be secure and encrypted (HTTPS,
RTSP over HTTPS, SRTP).
l The device must be configured for operation using secure channels.
l The driver and device must be configured to use secure channels for communication in XProtect VMS.
Axis drivers
Do the following:
l Set HTTPS Enabled to Yes.
l Set HTTPS Validate Certificate to Yes.
l Set HTTPS Validate Hostname to Yes.
l For every enabled media channel and media stream, set Streaming Mode to RTP/RTSP/HTTP/TCP.
Hardening guide | XProtect® VMS
113 | Compliance

Canon drivers
l Set the HTTPS Enabled to Yes.
l For every enabled media channel and media stream, set Streaming Mode to RTP/RTSP/HTTP/TCP.
Bosch drivers
Do the following:
l Set HTTPS Enabled to Yes.
l Set HTTPS Validate Certificate to Yes.
l Set HTTPS Validate Hostname to Yes.
l For every enabled media channel and media stream, set Streaming Mode to one of the following:
l RTP/RTSP/HTTP/TCP
l SRTP/RTSPS/UDP
l SRT/RTSPS/UDP multicast
Hardening guide | XProtect® VMS
114 | Compliance

Hanwha drivers
l Set the HTTPS Enabled to Yes.
l For every enabled media channel and media stream, set Streaming Mode to HTTP streaming.
ONVIF drivers
Do the following:
Hardening guide | XProtect® VMS
115 | Compliance

l Set HTTPS Enabled to Yes.
l Set HTTPS Validate Certificate to Yes.
l Set HTTPS Validate Hostname to Yes.
l For every enabled media channel and media stream, set Streaming method to RTP/RTSP/HTTP/TCP.
l The Audio backchannel (Audio Out, Device Speaker) must not be used when the driver is running in FIPS
140-2 compliant mode.
Universal drivers
Do the following:
l Set HTTPS Enabled to Yes.
l Set HTTPS Validate Certificate to Yes.
l Set HTTPS Validate Hostname to Yes.
Hardening guide | XProtect® VMS
116 | Compliance

l For every enabled media channel and media stream, set Streaming Mode to either RTP/RTSP/HTTP/TCP
or HTTP, depending whether streaming or snapshot retrieval mode is used.
VideoPush driver
No specific configuration is needed. Enabling the FIPS Group Policy will force the driver to communicate with the
XProtect Mobile serverin a FIPS 140-2 compliant way.
Example of FIPS 140-2 compliant cipher suites
0x1302 TLS_AES_256_GCM_SHA384
Hardening guide | XProtect® VMS
117 | Compliance

0x1303 TLS_CHACHA20_POLY1305_SHA256
0x1301 TLS_AES_128_GCM_SHA256
0xC02C TLS_ECDHE_ECDSA_WITH_AES_256_GCM_SHA384
0xC030 TLS_ECDHE_RSA_WITH_AES_256_GCM_SHA384
0x00A3 TLS_DHE_DSS_WITH_AES_256_GCM_SHA384
0x009F TLS_DHE_RSA_WITH_AES_256_GCM_SHA384
0xC02B TLS_ECDHE_ECDSA_WITH_AES_128_GCM_SHA256
0xC02F TLS_ECDHE_RSA_WITH_AES_128_GCM_SHA256
0x00A2 TLS_DHE_DSS_WITH_AES_128_GCM_SHA256
0x009E TLS_DHE_RSA_WITH_AES_128_GCM_SHA256
0xC024 TLS_ECDHE_ECDSA_WITH_AES_256_CBC_SHA384
0xC028 TLS_ECDHE_RSA_WITH_AES_256_CBC_SHA384
0x006B TLS_DHE_RSA_WITH_AES_256_CBC_SHA256
0x006A TLS_DHE_DSS_WITH_AES_256_CBC_SHA256
0xC023 TLS_ECDHE_ECDSA_WITH_AES_128_CBC_SHA256
0xC027 TLS_ECDHE_RSA_WITH_AES_128_CBC_SHA256
0x0067 TLS_DHE_RSA_WITH_AES_128_CBC_SHA256
0x0040 TLS_DHE_DSS_WITH_AES_128_CBC_SHA256
0x00AD TLS_RSA_PSK_WITH_AES_256_GCM_SHA384
Hardening guide | XProtect® VMS
118 | Compliance

0x00AB TLS_DHE_PSK_WITH_AES_256_GCM_SHA384
0x009D TLS_RSA_WITH_AES_256_GCM_SHA384
0x00A9 TLS_PSK_WITH_AES_256_GCM_SHA384
0x00AC TLS_RSA_PSK_WITH_AES_128_GCM_SHA256
0x00AA TLS_DHE_PSK_WITH_AES_128_GCM_SHA256
0x009C TLS_RSA_WITH_AES_128_GCM_SHA256
0x00A8 TLS_PSK_WITH_AES_128_GCM_SHA256
0x003D TLS_RSA_WITH_AES_256_CBC_SHA256
0x003C TLS_RSA_WITH_AES_128_CBC_SHA256
0x0035 TLS_RSA_WITH_AES_256_CBC_SHA
0x002F TLS_RSA_WITH_AES_128_CBC_SHA
This list is not exhaustive. There are other cipher suites that are FIPS 140-2 compliant.
This list is given only as a sample of cipher suites that are FIPS 140-2 compliant.
FIPS resources
1. FIPS 140-2 Security Requirements for Cryptographic Modules
https://csrc.nist.gov/publications/detail/fips/140/2/final
2. Annex A: Approved Security Functions for FIPS PUB 140-2
https://csrc.nist.gov/CSRC/media/Publications/fips/140/2/final/documents/fips1402annexa.pdf
3. Guidelines for the Selection, Configuration, and Use of Transport Layer Security (TLS) Implementations
https://nvlpubs.nist.gov/nistpubs/SpecialPublications/NIST.SP.800-52r2.pdf
Hardening guide | XProtect® VMS
119 | Compliance

4. Implementation Guidance for FIPS 140-2 and the Cryptographic Module Validation Program
https://csrc.nist.gov/csrc/media/projects/cryptographic-module-validation-program/documents/fips140-
2/fips1402ig.pdf
5. Microsoft’s approach to FIPS 140-2 validation
https://docs.microsoft.com/en-us/windows/security/threat-protection/fips-140-validation
6. TLS/SSL overview (Schannel SSP)
https://docs.microsoft.com/en-us/windows-server/security/tls/tls-ssl-schannel-ssp-overview
7. Cipher Suites in TLS/SSL (Schannel SSP)
https://docs.microsoft.com/en-us/windows/win32/secauthn/cipher-suites-in-schannel
8. TLS Cipher Suites in Windows 10 v1903, v1909, and v2004
https://docs.microsoft.com/en-us/windows/win32/secauthn/tls-cipher-suites-in-windows-10-v1903
9. TLS Elliptic Curves in Windows 10 version 1607 and later
https://docs.microsoft.com/en-us/windows/win32/secauthn/tls-elliptic-curves-in-windows-10-1607-and-
later
Hardening guide | XProtect® VMS
120 | Compliance

Center for Internet Security (CIS) Benchmarks
CIS Microsoft IIS 10 benchmark
The Center for Internet Security (CIS) is a nonprofit entity with a mission to identify and develop best practice
solutions for cyber defense. Cybersecurity and IT professionals from government, business, and academia from
around the world follow a consensus decision-making model to develop standards and best practices, including
CIS benchmarks, controls, and hardened images.
CIS benchmarks are configuration baselines and best practices for securely configuring a system.
The CIS Microsoft IIS 10 benchmark is a set of best practices that apply to the Microsoft Internet Information
Services (IIS) version 10 running on Microsoft Windows Server 2016.
Controls that do not impact XProtect VMS functionality
Milestone has identified that only those controls listed in Controls that impact XProtect VMS functionality on page
121 can impact the VMS functionality. Other controls will not impact the VMS functionality when applied properly.
Controls that impact XProtect VMS functionality
Some of the controls present on the CIS benchmark will affect the functionality of the XProtect VMS.
According to section 4.7 Ensure Unlisted File Extensions are not allowed (Scored) in the benchmark, it is
recommended that all extensions be unallowed at the most global level possible, with only those necessary
being allowed.
Following is a list of extensions that the IIS applications use:
l htm
l html
l svc
l png
l css
l js
l gif
l svg
l ttf
l jpg
l xml
Hardening guide | XProtect® VMS
121 | Center for Internet Security (CIS) Benchmarks

l asmx
l exe
(Only the installation application uses .exe files. It can be disabled for all other applications.)
The benchmark suggests creating an extension whitelist to reduce the attack surface of the web application.
Extension filtering can be applied to all applications except the Identity Provider application.
The Identity Provider application follows the OpenID specification and it defines URLs that do not end on any
extension. Because of this, if the option Allow unlisted file name extensions is not enabled, the application will
stop working and reply with the error code 404.7 for any request. The Identity Provider application is a central
piece of the VMS services. It cannot be omitted and it must run for the VMS to work.
The installation application uses URLs that do not end with any extension for the purpose of redirection. But, if
the option Allow unlisted file name extensions is not enabled, the user must enter the entire URL:
l http://localhost/Installation/default-en-US.htm instead of http://localhost/Installation/
l http://localhost/Installation/admin/default-en-US.htm instead of http://localhost/Installation/admin/
Learn more
The following links provide additional guidance:
l CIS Benchmarks FAQ
l CIS Security webpage
l OpenID
Hardening guide | XProtect® VMS
122 | Center for Internet Security (CIS) Benchmarks

Product comparision chart
Product comparison
XProtect VMS includes the following products:
l XProtect Corporate
l XProtect Expert
l XProtect Professional+
l XProtect Express+
l XProtect Essential+
See the complete feature list, which is available on the product overview page on the Milestone website
(https://www.milestonesys.com/products/software/product-index/).
Hardening guide | XProtect® VMS
123 | Product comparision chart

Appendix
Appendix 1 - Resources
1. Axis Communications: Hardening Guide
2. Bosch Security Systems: Bosch IP Video and Data Security Guidebook
3. British Standard BS EN 62676-1-1: Video surveillance systems for use in security applications, Part 1-1: System
requirements – General
Describes the minimum requirements for a video surveillance system. See also related standards.
4. Center for Internet Security: The CIS Critical Security Controls for Effective Cyber Defense
5. Cloud Security Alliance (CSA) and the Cloud Controls Matrix
6. Defense Information Systems Agency (DISA): Security Technical Implementation Guides (STIGs)
7. Internet Engineering Task Force (IETF), multiple references
8. ISO/IEC 15048 Information technology - Security techniques - Evaluation criteria for IT security
9. ISO/IEC 31000, Risk management – Principles and guidelines
10. ISO/IEC 31010, Risk management – Risk assessment techniques
11. ISO 27001: Information security, cybersecurity and privacy protection — Information security management
systems — Requirements
12. ISO 27002: Information security, cybersecurity and privacy protection — Information security controls
13. Microsoft Security Update Guide
See also Administer security policy settings, among others
14. National Institute of Standards and Technology: Computer Security Division Computer Security Resource
Center
15. National Institute of Standards and Technology: Cybersecurity Framework
16. Risk Management Framework for Information Systems and Organizations: A System Life Cycle Approach for
Security and Privacy
17. National Institute of Standards and Technology: Managing Information Security Risk
18. National Institute of Standards and Technology: Security and Privacy Controls for Federal Information
Systems and Organizations SP 800-53- Revision 5
19. NIST SP 800-100 Information Security Handbook: A Guide for Managers
20. NIST SP 800-124 Guidelines for Managing the Security of Mobile Devices in the Enterprise
21. SANS Institute website and the SANS Critical Security Controls
22. XProtect® Corporate – Advanced Security Management
Hardening guide | XProtect® VMS
124 | Appendix

Appendix 2 - Acronyms
AD – Active Directory
CSA – Cloud Security Alliance
CVE – Common Vulnerabilities and Exposures
HTTP – Hypertext Transfer Protocol
HTTPS – Hypertext Transfer Protocol Secure
IEC – International Electrotechnical Commission
IETF – Internet Engineering Task Force
IP – Internet Protocol
ISO – International Standards Organization
IT – Information Technology
KB – Knowledge Base
NIST – National Institute of Standards and Technology
RSTP – Rapid Spanning Tree Protocol
SMTP – Simple Mail Transfer Protocol
SSL – Secure Socket Layer
STIG – Security Technical Information Guide
TCP – Transmission Control Protocol
TLS- Transport Layer Security
UDP – User Datagram Protocol
VMS – Video Management Software
VPN – Virtual Private Network
Hardening guide | XProtect® VMS
125 | Appendix

About Milestone
Milestone Systems is a leading provider of open platform video management software; technology that helps
the world see how to ensure safety, protect assets and increase business efficiency. Milestone Systems
enables an open platform community that drives collaboration and innovation in the development and use of
network video technology, with reliable and scalable solutions that are proven in more than 150,000 sites
worldwide. Founded in 1998, Milestone Systems is a stand-alone company in the Canon Group. For more
information, visit https://www.milestonesys.com/.
helpfeedback@milestone.dk
