

2 of 24
Introduction
Your Aspect Wi-Fi Solar Pro gathers and
uploads accurate and detailed weather data to
Weather Underground. It offers professional weather
observers or serious weather enthusiasts robust
performance. You will get your own local forecast,
high/lows, totals and averages for virtually all weather
variables without using a desktop computer.
Your Solar Pro Outdoor Sensor measures
outdoor temperature, humidity, wind, rain, UV and
light, continually transmitting weather data to the
Main Console. Both your Outdoor Sensor and
your Wireless Hygro-Thermo Indoor Sensor are
fully assembled and calibrated for easy installation.
They send data via a low power RF signal to the
Main Console from up to 150m away (line of sight).
Within your Main Console, high-speed processors
are embedded to analyse your weather data at real-
time, and publish it to Weather Underground via
your home Wi-Fi network and internet connection
Your Main Console can also synchronise with
internet time servers to show high precision time and
weather data date/time stamp. The colour LCD display
shows informative weather readings with advanced
features, such as high/low alert alarm, different
weather index, and max/min records. With calibration,
sunrise/sunset and moon phase features, this system
is a great weather station for your backyard.
This instruction manual contains useful information
on the proper use and care of this product. Please
read through to fully understand and enjoy its
features, and keep it handy for future use.
Contents
Introduction 2
Precautions 3
Overview 4
Main Console 4
LCD Display 4
Hygro-Thermo Indoor Sensor 5
Solar Pro Outdoor Sensor 5
Installation and Setup 6
Main Console 6
Hygro-Thermo Indoor Sensor 7
Solar Pro Outdoor Sensor 8
Wi-Fi Connection Setup 9
Operation and Settings 12
Reading your Data in Weather Underground 12
Manual Clock Setting 12
Moon Phase 12
Sunrise and Sunset Time 12
Setting Alarm Time 13
Temperature Alarm Functions 13
Temperature/Humidity Functions 13
Comfort Indication 13
Wireless Sensor Signal 13
View Additional Indoor Channels 14
Trend Indicator 14
Wind Speed and Direction 14
Weather Index 14
Weather Forecast 15
Barometric Pressure 15
Rainfall 15
Sun Data 16
Max/Min Data Record 16
Past 24 Hours History Data 17
Weather Alert Setting 17
Backlight 18
Display Contrast 18
Maintenance 19
Battery Replacement 19
Solar Pro Outdoor Sensor 19
Specifications 20
Troubleshooting 22
Warranty 23

3 of 24
Precautions
Do not subject the unit to excessive force, shock, dust, temperature or humidity
Do not cover the ventilation holes with any items such as newspapers, curtains etc.
Do not immerse the indoor components in water. If you spill liquid over
them, dry immediately with a soft, lint-free cloth
Do not clean the unit with abrasive or corrosive materials
Do not tamper with the unit’s internal components to avoid invalidating your warranty
Placement of this product on certain types of wood may result in
damage to its finishing for which Holman Industries will not be responsible
Only use fresh batteries. Do not mix new and old batteries
Only use genuine HOLMAN attachments or accessories available at www.holmanindustries.com.au
Images shown in this User Guide may differ from the actual display
When disposing of this product, ensure it is collected separately for special treatment
Dispose of used batteries according your local recycling regulations
Ensure your Main Console is installed near your power outlet and is easily accessible
The contents of this manual may not be reproduced without the permission of Holman Industries
Technical specifications and user manual contents for this product are subject to change without
notice. We advise checking www.holmanindustries.com.au for the latest information
This product is not a toy. Keep out of the reach of children
The Main Console is intended to be used only indoors
Only use the supplied power adaptor to power your Main Console
Risk of explosion if battery is replaced by an incorrect type
The manufacturer and supplier cannot accept any responsibility for any incorrect readings, export data lost and any consequences that occur should an inaccurate
reading take place. This product is designed for use in the home only as indication of weather conditions. This product is not to be used for medical purposes or
for public information. Weather Underground is a registered trademark of The Weather Channel, LLC. both in the United States and internationally. The Weather
Underground Logo is a trademark of Weather Underground, LLC. iOS is a trademark of Apple Inc. Android is a trademark of Google LLC. The Android robot is
reproduced or modified from work created and shared by Google and used according to terms described in the Creative Commons 3.0 Attribution License.

4 of 24
Overview
Main Console
LCD Display
1. BAROMETER
2. WIND
3. ALARM/SNOOZE
4. SUN
5. RAIN
6. LCD display
7. Display
brightness adjuster
8. INDEX
9. HISTORY
10. MAX/MIN
11. CHANNEL
12. CLOCK SET
13. Wall mount
14. REFRESH
15. SENSOR/Wi-Fi
16. RESET
17. °C/°F
18. ALARM
19. ALERT
20. OFF/HI/LO slider
21. Battery
compartment
22. Table stand
23. Power jack
1. Outdoor temperature
and humidity
2. Wind direction
and speed
3. Indoor temperature
and humidity
4. Weather index
5. UV index and
light intensity
6. Weather forecast
7. Calendar and
moon phase
8. Time/alarm
9. Barometer
10. Sunrise and
sunset time
11. Rainfall and rain rate
1
4
7
2
5
8
3
6
9
10
11
WI-FI
SENSOR REFRESH ALERTALARMCLOCK
SET
RESET
OFF LO HI
DC 5V 1A
ALARM / SNOOZEBARO WIND SUN RAIN
1
6
5
11
20
12
7
13
18
22
23
14
15
8
9
10
19
2 3 4
16
17
21

5 of 24
Solar Pro Outdoor Sensor
1. Wind vane
2. Wind cups
3. Antenna
4. Radiation shield
5. Thermo-hygro
sensor
6. Mounting parts
(to fit 35-40mm
diameter pole)
7. Battery door
8. RESET
9. Transmission
status LED
10. Bubble level
11. Rain collector
12. UV/light sensor
13. Solar panel
Hygro-Thermo Indoor Sensor
1. Transmission status LED
2. Wall mount
3. Channel slider
4. RESET
5. Battery compartment
917MHz
Overview (continued)
1
4
5
6
13
7
8
9
11
2
12
3
10
1
2
5
3
4

6 of 24
Main Console
Console Setup:
1. Power up the Main Console by plugging the
adaptor provided to the power jack at the back
2. Once it is powered on, all the segments of the
LCD Display will be shown momentarily
3. The Main Console will automatically enter
SENSORSYNCHRONISATIONMODE
and APMODE
If no data appears on the LCD Display
after you plug the adaptor,
press RESET using a pointed object
Synchronising Your Sensors:
1. While still in SENSORSYNCHRONISATIONMODE,
the Solar Pro Outdoor Sensor and
Hygro-Thermo Indoor Sensor can be
paired to the Main Console automatically
2. Once your sensors are paired, their signal
strength and weather readings will appear
on your LCD Display
Backup Battery:
Backup batteries are used to keep time-sensitive
information on the Main Console memory during
a power failure, including time, date, alarm time,
max/min, past-24-hour records, alert setting
values, sensor channel history, and units
1. Remove the battery door of the console
2. Insert three new AAA batteries
with polarity as indicated
3. Replace the battery door
Built-in Memory:
The console has built-in flash memory that holds
the vital settings including time zone, timesync
status, Wi-Fi and weather server settings,
latitude/longitude, hemisphere, calibration
values, and sensor ID of paired sensors
Reset and Factory Hard Reset:
1. To reset the Main Console and start
again, press RESET once
2. To perform hard reset and restore the
Main Console to factory settings,
press and hold RESET for 6 seconds
Resynchronise Sensors:
Press SENSOR/Wi-Fi once to enter
SENSOR SYNCHRONISATION MODE,
to re-register all the sensors that have
already been registered to it before
The Main Console will not lose the connection
of the sensors that you have paired previously
Changing Sensor Batteries:
Whenever Outdoor or Indoor Sensor batteries are
changed, resynchronisation must be done manually
1. Replace all the batteries in the desired Sensor
2. Press SENSOR/Wi-Fi on the Main Console to
enter SENSOR SYNCHRONISATION MODE
3. Press RESET on the desired Sensor
Installation and Setup
7 of 24
Hygro-Thermo Indoor Sensor
Pairing with the Main Console:
1. Remove the battery door of the sensor
2. Insert 2 × AA size batteries into the battery
compartment. Make sure you insert them the
right way according to the polarity information
marked on the battery compartment
3. Close the battery door. The transmission
status LED will begin to flash every minute
If you need to re-assign the sensor channel,
firstly slide the channel slide switch to
the new channel, press SENSOR on the
Main Console, and then press RESET on the
Hygro-Thermo Indoor Sensor to pair them again
Avoid placing the sensors in direct
sunlight, rain or snow
To avoid the sensors and Main Console pairing
failure, please power up the sensors first, and then
press RESET on the Main Console
(no need on sensors)
Placing the sensor:
Place a screw on the wall that you wish to
hang the sensor on. Hang the sensor onto the
screw by the wall mounting holder. You can
also place the sensor on a table by itself
Synchronising Additional Indoor
Sensors (Optional):
The console can support up to seven additional
Hygro-Thermo Indoor Sensors
1. Press SENSOR/Wi-Fi once on the Main Console
to enter SENSOR SYNCHRONISATION MODE
2. Press RESET on the new sensor, and
wait a few minutes for the new sensor
to pair with the Main Console
Channel number of the indoor sensor must
not be duplicated among Indoor Sensors
Installation and Setup (continued)

8 of 24
Installation and Setup (continued)
Solar Pro Outdoor Sensor
Your outdoor sensor measures windspeed, wind
direction, rainfall, UVindex, temperature and humidity.
Southern Hemisphere Setup:
The Solar Pro Outdoor Sensor is calibrated
to point north. However, for users in the
Southern Hemisphere, it is necessary to use the
sensor with the wind vane pointing south
1. Install the Outdoor Sensor with the
windmeter end pointing south
2. Select S for Hemisphere when setting
up the Weather Server connection
(refer to Weather Server Connection
on page 10 for more details)
Changing the hemisphere setting will
automatically switch the direction of the
moon phase on the LCD Display
Pairing the Outdoor Sensor with the Main Console:
1. Unscrew the battery door at the bottom of the unit
and insert the batteries according to the polarity
information marked on the battery compartment
2. Screw on tightly
3. Once the batteries are installed, the
transmission status LED will begin to flash
Ensure the battery door screw locked well
Ensure the transmission status LED
is flashing every 12 seconds
Installing the Solar Pro Outdoor Sensor:
Install in an open location with no obstructions
above and around the sensor for accurate
rain and wind measurement
To insure a tight grip, apply the rubber pads provided
before fastening to the pole (not included)
Mounting guideline:
1. Install the sensor at least 1.5m off the ground for
better and more accurate wind measurements
2. Choose an open area within 150m
from the Main Console
3. Install as level as possible to achieve accurate
rain and wind measurements. Use the level
indicator on the top to ensure a level installation
4. Mount with the solar panel end pointing to North
to correctly orient the direction of the wind vane
ADD RUBBER PADS BEFORE
MOUNTING ON POLE OR POST
N
MOUNTING POLE
AND STAND
NOT INCLUDED
MIN 1.5m
SOUTH

9 of 24
Installation and Setup (continued)
Wi-Fi Connection Setup
Your Main Console can upload weather data to
Weather Underground through a Wi-Fi router
To connect your Main Console to Wi-Fi, it must
be registered with Weather Underground
These setup instructions are
correct as of June2020; Refer to
https://www.wunderground.com/ for details as
their website is subject to change without notice
Register your Aspect Wi-Fi Solar Pro
with Weather Underground:
1. Visit https://www.wunderground.com/
and click JOIN in the top right corner, and
follow the prompts to create an account
Your email address must be validated by
Weather Underground before proceeding.
If you already have an account with
Weather Underground you can simply LOG IN
2. After logging in to your account, click MYPROFILE
and select MY DEVICES in the menu
3. On the following page, click ADD NEW DEVICE
4. Under PERSONAL WEATHER STATION,
use the drop-down menu to select OTHER
at the bottom of the list and click NEXT
On the following page, you will be
prompted to enter your address
5. When you start entering your address, it
should appear in full in a drop-down menu
below–select your address accordingly
6. After selecting your address,
Weather Underground will confirm "your
location has been verified and added" with
your LONGITUDE and LATITUDE listed
below: note these down for later
This information is required as part
of the setup process later on. Be sure
to note down this data accurately
7. Click NEXT
8. Fill out the following prompts and click NEXT to
complete registration of your weather station
9. After registering, Weather Underground will
confirm "Congratulations! Your personal
weather station is now registered with Weather
Underground" with your STATION ID and
STATIONKEY list below: note these down for later
This information is required as part
of the setup process later on. Be sure
to note down this data accurately
Set the Main Console to transmit weather
data to Weather Underground:
1. Plug the adaptor into the DC jack to power up
your Main Console for the initial start-up
You can also access AP MODE by holding
SENSOR/Wi-Fi for six seconds in NORMAL MODE
2. Using your Wi-Fi enabled device (computer, tablet or
smartphone) connect to the Wi-Fi network generated
by your Main Console (SSID: PWS-XXXXXX)
This may temporarily disconnect your computer
or smartphone from the internet, and will
reconnect at the end of the setup process
3. Once connected, open the web browser on
your device, type http://192.168.1.1 into
the address bar and press ENTER to access
the Main Console setup interface
Some browsers will treat 192.168.1.1 as a search,
so be sure to include http:// at the start
We recommended using the latest
versions of the following web browsers:
Chrome, Safari, Edge, or Firefox
4. Fill in the connection information for the setup
interface. Your Main Console will use this
information to connect your Wi-Fi router

10 of 24
Installation and Setup (continued)
Wi-Fi Connection Setup (continued)
Wi-Fi Connection Status:
Main Console is in connection with Wi-Fi router
Main Console is trying to connect
Main Console is in AP MODE
Weather Server Connection:
Enter the following information into the below SETUP page to connect the Main Console to the weather server. If
you do not want to use Weather Underground, please empty the STATION ID and KEY to ignore the data upload
nist.time.gov
Server URL:
0.0000 North
*Latitude:
0.0000
Enter 0 to 90, no negative numbers
Enter 0 to 180, no negative numbers
East
*Longitude:
Time server setup
Location for sunrise / sunset
WiFi Router setup
ADVANCED
Wunderground
Station ID:
WDw124
******
******
Weather server setup
Station key:
Router:
Add Router
Search
Security type:
Router Password:
WAP2
ROUTER_A
Language: English
Weathercloud
Station ID:
Station key:
******
IDCR21w1
http://W
Station ID:
URL:
Station key:
Mac address 00:0E:C6:00:07:10
Hemisphere
* Depends on the model
SETUP
Apply
Firmware version: 1.00
0:00
Time Zone:
N
Press "ADVANCED" icon
to Advanced page
Press to search router
Press to allow add
router manually
Enter the Latitude value
Enter the Longitude
value
Select setup UI display language
Press to complete the setting
Select router (SSID) for connection
Enter new Station ID and Station key
that assigned by Wundergriund
Leave blank
Manually enter the SSID if not on list
Select time server
Select time zone of your location
Select the direction (e.g. EU
countries Longitude is East and US
is West)
Select the sensor located hemisphere
(e.g. US and EU countries are also "N",
Australia is "S")
Select router's security type (usually
WAP2)
Router's password (leave blank if the
Security type is "Open")
SETTINGS
After the dialogue confirms the setup
process is complete, you can log back
in to your home Wi-Fi network
During AP MODE, you can press and hold
SENSOR/Wi-Fi for six seconds to stop AP MODE
and the console will restore your previous setting

11 of 24
Installation and Setup (continued)
Wi-Fi Connection Setup (continued)
Time Server Connection Status:
After the Main Console has connected to the
internet, it will attempt to connect to the internet time
server to obtain the UTC time. Once the connection
succeeds and the time has been updated, the
SYNC icon will appear on the LCD Display
The time will automatically synchronise with the
Internet time server at 12:00 AM and 12:00 PM
each day. You can also press REFRESH to sync
the internet time manually within 1 minute.
Calibration:
Click ADVANCED at the top of the setup interface to
enter the advance setting page. This page allows you
to set and view the calibration data of the console
1. You can input offset and gain values
for different data parameters
2. Once completed, press APPLY at the
bottom of the SETUP page
Calibration of most parameters is not required,
with the exception of RELATIVEPRESSURE,
which must be calibrated to sea-level
to account for altitude effects
Indoor temperature and humidity calibration
values are not applicable for this console
Upload
Browse
Firmware version: 1.00
-560~ 560hpa / -16.54 ~ 16.54inHg / -420 ~ 420mmHg
Setting Range:
Temperature
o
C
Outdoor
Indoor
CH 1
CH 2
CH 3
CH 4
CH 5
CH 6
CH 7
Humidity %
Relative Pressure Offset:
Absolute Pressure Offset:
hpa
Range: -20 ~ 20
(Default: 0.0)
Current offset: 10Current offset: -9
Current offset: -5Current offset: 2
Current offset: -2Current offset: 3
Current offset: -2Current offset: 1.2
Current offset: -5Current offset: -0.2
Current offset: -3Current offset: -20.1
Current offset: -10Current offset: 11.5
Current offset: -3
Current offset: -3
(Default: 0)
Current offset: 10
(Default: 0)
Current offset: 0.2
Current offset: -5Current offset: 1
Pressure
Range: -20.0 ~ 20.0
o
C
-36.0 ~ 36.0
o
F (Default: 0.0)
*UV gain:
Range: 0.01 ~ 10(Default: 1.00)
Current gain: 1.1
*Light gain:
Range: 0.01 ~ 10(Default: 1.00)
Current gain: 1.1
* Depends on the model
*Wind speed gain:
*Wind direction:
*Rain gain:
Range: 0.5 ~ 1.5(Default: 1.00)
Range: -10 ~ 10(Default: 0
o
)
Range: 0.5 ~ 1.5(Default: 1.00)
Current gain: 0.85
Current offset: 2
o
Current gain: 0.75
SETUP ADVANCED
Select setting unit
Press "SETUP" icon to
Setup page
Outdoor and Ch 1~7
temperature calibration
section
Pressure calibration
section
version
function only available
in PC web browser
Select setting unit
The rain, wind speed, UV and Light
calibration use gain method. The
wind direction is +/- 10 offset.
Outdoor and Ch 1~7 humidity
calibration section
Current offset value is the value
that you set before to offset the
pressure reading.
SETTINGS

12 of 24
Reading your Data in Weather Underground
To view your weather station data live in a web browser, visit https://www.wunderground.com/, and enter your
STATION ID in the SEARCHLOCATIONS box at the top of the page. Your weather data should be visible on the
following screen. You can also login your account to view and download the recorded data of your weather station.
You can also check Weather Underground web site to learn more about
their smartphone apps for
Android and
iOS.
Manual Clock Setting
This console is receives UTC time by synchronising
with the assigned internet time server. If you want to
use it offline, you can set the time and date manually.
1. During initial start-up, press and hold
SENSOR/Wi-Fi for six seconds and let the
Main Console revert back to Normal Mode
2. In Normal Mode, press and hold
CLOCK SET for two seconds
3. In Clock Set Mode, press CLOCK SET to cycle
through the following time settings:
HOUR MINUTE SECOND
12/24HOURFORMAT YEAR
MONTH DAY MD/DM FORMAT
TIMESYNCON/OFF WEEKDAY LANGUAGE
4. Press or INDEX to change the value, or
press and hold either key for quicker adjustment
5. Press CLOCK SET to save and exit
Clock Set Mode, or the unit can automatically
exit this mode in 60 seconds
In normal mode, press CLOCK SET to switch
between YEAR and DATE display
When in Clock Set Mode, you can press
and hold CLOCK SET key for two seconds
to exit back to Normal Mode
Moon Phase
This is determined by the time, date and timezone.
The following table explains the MOON PHASE icons.
Operation and Settings
Northern
Hemisphere
Moon Phase
Southern
Hemisphere
New Moon
Waxing Crescent
First quarter
Waxing Gibbous
Full Moon
Waning Gibbous
Third quarter
Waning
Crescent
Sunrise and Sunset Time
The console indicates your location sunrise and
sunset times by the time zone, latitude and longitude
entered in the setup process. If the latitude and
longitude values do not match the time zone, the
sunrise and sunset times cannot be shown.

13 of 24
Operation and Settings (continued)
Setting Alarm Time
1. In Normal Mode, press and hold ALARM
for two seconds until the alarm HOUR digit
flashes to enter Alarm Time Setting Mode.
2. Press or INDEX to change the value, or
press and hold either key for quicker adjustment
3. Press ALARM again to set the MINUTE value
4. Press or INDEX to change the value, or
press and hold either key for quicker adjustment
5. Press ALARM to save and exit the setting
In alarm mode, the icon will
show on the LCD Display
The alarm function will turn on automatically
once you set the alarm time
When the alarm sounds, it will auto-stop
after two minutes and the alarm will
activate again in the next day
Press ALARM/SNOOZE to enter Snooze Mode
where the alarm will sound again after five minutes
Alternatively, press and hold ALARM/SNOOZE
for two seconds to stop the alarm and
will activate again in the next day
During Snooze Mode, the icon will flash
Temperature Alarm Functions
1. In normal mode, press ALARM to show
the alarm time for five seconds
2. When the alarm time displays, press
ALARM again to activate the alarm function,
or press ALARM twice to activate the
alarm with ice pre-alarm function
ALARM OFF ALARM ON ICE ALERT
Once the ice pre-alert activates, the pre-set alarm
will sound and ice-alert icon will flash 30 minutes
earlier if the outdoor temperature is below -3°C
Temperature/Humidity Functions
The temperature and humidity reading are
displayed in the OUT and IN (CH) sections.
Use the°C/°F button to choose temperature units
If temperature/humidity is below the
measurement range, the reading will show LO
If temperature/humidity is above the measurement
range, the reading will show HI
Comfort Indication
The comfort indication is a pictorial indication
based on indoor air temperature and humidity
in an attempt to determine comfort level
Comfort indication can vary under the same
temperature, depending on the humidity.
There is no comfort indication when
temperature is below 0°C or over 60°C
Wireless Sensor Signal
The console displays signal strength for the
wireless sensors, as shown below:
OUTDOOR
INDOOR
If the signal has disconnected and does not
recover within 15 minutes, the signal icon will
disappear. The temperature and humidity will
display ER for the corresponding channel.
If the signal does not recover within 48 hours,
the ER display will become permanent.
Replace the batteries and then press
SENSOR/Wi-Fi to pair the sensor again

14 of 24
Operation and Settings (continued)
View Additional Indoor Channels
The Main Console can pair with an Outdoor Sensor
and up to seven Indoor Sensors.
If you have two or more Indoor Sensors,
you can press CHANNEL to switch between
different wireless channels in Normal Mode
Press and hold CHANNEL for two seconds
to auto-cycle through the connected
channels at a four-second interval
During the auto-cycle, the icon will show
in the IN section of the LCD display
Press CHANNEL to stop the auto-cycle
and display the current channel
Additional Indoor Sensors are available at
www.holmanindustries.com.au
Trend Indicator
The trend indicator shows weather trends in the
forthcoming few minutes. The icon will appear in
TEMPERATURE, HUMIDITY, INDEX and BARO section
Wind Speed and Direction
1. In Normal Mode, press and hold WIND
for two seconds and the units will flash
2. Press or INDEX to change the windspeed
units in this sequence:
m/s km/h knots mph
3. Press WIND again and the wind
direction reading will flash
4. Press or INDEX to select the display
format between 360 degree or 16 direction
5. Press WIND again to return to Normal Mode
6. In Normal Mode, press WIND to switch between
BEAUFORT SCALE, AVERAGE and GUST
For more information on the Beaufort Scale, visit
https://www.holmanindustries.com.au/
beaufort-wind-force-scale/
Past wind
directions indicator
of last 5 minutes
Wind direction
Wind speed
level indicator
Real time wind
direction indicator
Average / gust
wind speed
Weather Index
Press INDEX to view different weather indices in this sequence:
FEELS LIKE DEW POINT HEAT INDEX WIND CHILL
Feels Like: Shows what the outdoor temperature will
feel like. It is a collective mixture of Wind Chill factor
(18°C or below) and the Heat Index (26°C or above).
Dew Point: The temperature below which
the water vapour in air at constant barometric
pressure condenses into liquid water at the
same rate at which it evaporates. The dew point
temperature is determined by the temperature
and humidity data from the Outdoor Sensor.
Wind Chill: A combination of the Outdoor Sensor
temperature and wind speed data determines
the current wind chill factor.

15 of 24
Operation and Settings (continued)
Weather Index (continued)
Heat Index: The heat index which is determined by the Outdoor Sensor temperature
and humidity data when the temperature is between 26°C and 50°C
Weather Forecast
The built-in barometer continually monitors atmosphere pressure. Since variation in atmospheric pressure greatly
affected by weather, it is possible to forecast the weather by measuring the changes in pressure. Based on the data
collected, it can predict the weather conditions in the forthcoming 12~24hours within a 30~50km radius.
The accuracy of a general pressure-based weather forecast is approximately 70-75%
Forecast is reflecting the weather situation for next 12~24 hours, it may not necessarily reflect the current situation
SNOWY forecast is not based on the atmospheric pressure, but based on outdoor temperature below -3°C
Barometric Pressure
The atmospheric pressure is the pressure at any
location of the earth caused by the weight of the column
of air above it. This refers to the average pressure
and gradually decreases as altitude increases.
In Normal Mode, press BARO to change barometer
units in this sequence: hPa inHg mmHg
To set absolute or relative barometric
pressure, in Normal Mode, press and
hold BARO to switch between ABSOLUTE
and RELATIVE barometric pressure
Rainfall
1. To set rainfall units, press and
hold RAIN for two seconds
2. Press or INDEX to toggle between mm
and in (rainfall) or mm/h and in/h (rain rate)
3. Press RAIN to confirm and exit
In Normal Mode, press RAIN to toggle between:
HOURLY: total rainfall in the past hour
DAILY: total rainfall from midnight (default)
WEEKLY: the total rainfall of the current week
MONTHLY: the total rainfall of the current month
TOTAL: the total rainfall since the last reset
RATE: Current rate (last 10 minutes of rain data)

16 of 24
Operation and Settings (continued)
Rainfall (continued)
Rain Rate Level Definition:
To reset the total rainfall record, in Normal Mode, press and hold HISTORY for two seconds
To ensure correct data, please reset all the rainfall records when installing your Outdoor Sensor to a new location
Sun Data
Press the SUN to cycle through sun data modes in
the following sequence:
LIGHT (intensity) UV INDEX SUNBURN TIME
In Light Mode, press and hold SUN for two
seconds to change units, and press or
INDEX to edit in the following sequence: klx
kfc W/m², then press SUN to confirm and exit
In UV Index Mode, corresponding
exposure level and suggested protection
indicator are also displayed
Sunburn Time Mode shows the recommended
sunburn time according to current UV level
Max/Min Data Record
The Main Console can record the accumulated max/min weather data with a corresponding time stamp
To view this data in Normal Mode, press MAX/MIN to display in the following sequence:
OUTDOORMAXTEMPERATURE OUTDOOR MIN TEMPERATURE OUTDOOR MAX
HUMIDITY OUTDOOR MIN HUMIDITY INDOOR CURRENT CHANNEL MAX TEMPERATURE
INDOORCURRENTCHANNEL MIN TEMPERATURE INDOOR CURRENT CHANNEL MAX
HUMIDITY INDOOR CURRENT CHANNEL MIN HUMIDITY MAX AVERAGE WIND SPEED
MAX GUST MAXFEELS LIKE MIN FEELS LIKE MAX DEW POINT MIN DEW POINT
MAX HEAT INDEX MIN HEAT INDEX MAX WIND CHILL MIN WIND CHILL MAX UV
INDEX MAX LIGHT INTENSITY MAX RELATIVE PRESSURE MIN RELATIVEPRESSURE
MAX ABSOLUTE PRESSURE MIN ABSOLUTE PRESSURE MAX RAIN RATE

17 of 24
Operation and Settings (continued)
Max/Min Data Record (continued)
To clear the max/min records, press and
hold MAX/MIN for two seconds
The LCD Display will also show the
MAX/MIN, HISTORY icons,
data records time and date
Past 24 Hours History Data
The Main Console automatically stores the
weather data of the past 24 hours.
Press HISTORY to check the
current hour weather data
Continue pressing HISTORY key to view
older readings of the past 24 hours
The LCD will also display the HISTORY icon, history
data records with time and date
Weather Alert Setting
WEATHER ALERT can alert you of certain weather
conditions. Once the alert criterion is met, the alarm
sound will activate and the alert icon will flash
1. To set an alert, press ALERT to select and
display the desired weather alert reading in
the sequence listed in the table below:
Alert reading Sequence Setting Range Display Section Default
Outdoor Temperature High Alert
-40°C ~ 80°C
Outdoor temperature &
humidity
40°C
Outdoor Temperature Low Alert 0°C
Outdoor Humidity High Alert
1% ~ 99%
80%
Outdoor Humidity Low Alert 40%
Indoor Current Channel
Temperature High Alert
-40°C ~ 80°C
Indoor CH temperature
& humidity
40°C
Indoor Current Channel
Temperature Low Alert
0°C
Indoor Current Channel
Humidity High Alert
1% ~ 99%
80%
Indoor Current Channel
Humidity Low Alert
40%
Average Wind Speed 0.1m/s ~ 50m/s Wind direction & speed 17.2m/s
Feels Like High Alert
-65°C ~ 50°C
Weather index
20°C
Feels Like Low Alert 0°C
Dewpoint High Alert
-40°C ~ 80°C
10°C
Dewpoint Low Alert -10°C
Heat Index High Alert 26°C ~ 50°C 30°C
WindChill Low Alert -65°C ~ 18°C 0°C
UV index High Alert 1 ~16
UV & light intensity
10
Light intensity High Alert 0.01 ~ 200.0Klux 100Klux
Pressure Drop 1hPa ~ 10hPa Barometer 3hPa
Hourly Rainfall 1mm ~ 1000mm Rainfall 100mm

18 of 24
Operation and Settings (continued)
Weather Alert Setting (continued)
2. Under the current alert reading, press and hold ALERT for two seconds, then the setting and alert reading will flash
3. Press or INDEX to adjust the value or press and hold to change rapidly
4. Press ALERT to confirm the value
5. Press ALARM to toggle the regarding alert on or off
6. Press ALERT to shift to the next alert reading
7. Press any key on the front side of the Main Console to save alert on/off status and go back to
Normal Mode, or it will automatically revert back to Normal Mode after 30 seconds
To silence the alert alarm, press ALARM/SNOOZE to silence the alert alarm
or let the alarm automatically turn off after two minutes
Once the alert is triggered, the alarm will sound for two minutes and the related alert icon and readings will flash
If the alert alarm is automatically off after two minutes, the alert icon and readings
will still keep flashing until the weather reading is out of the alert range
Backlight
The main unit backlight can be adjusted, using the
OFF/HI/LO slider to select the appropriate brightness
Slide to the HI position for the brighter backlight
Slide to the LO position for the dimmer backlight
Slide to the OFF position turn off the backlight
Display Contrast
Press in Normal Mode
to adjust LCD Display contrast

19 of 24
Maintenance
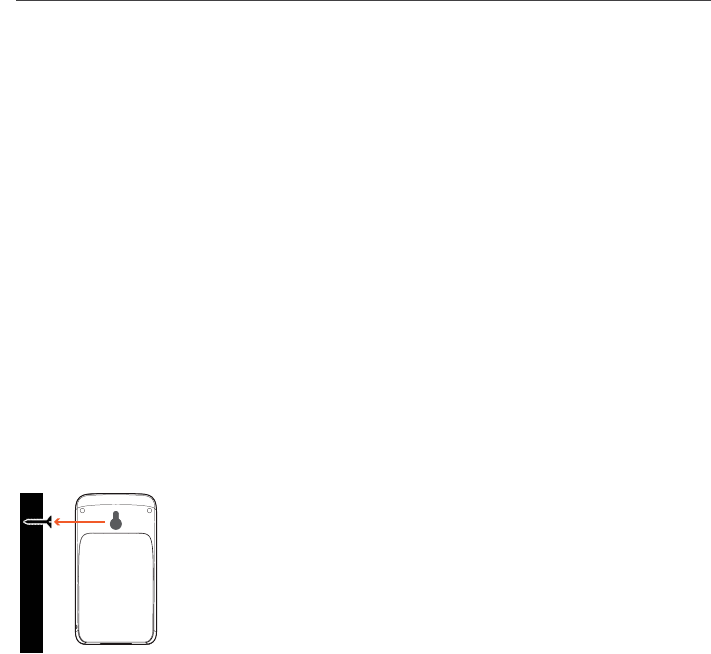
Battery Replacement
When low battery indicator is displayed in the OUT or IN section of the LCD Display, indicates that
the respective Outdoor or Indoor Sensor battery power is low. Please replace with new batteries.
Solar Pro Outdoor Sensor
20 of 24
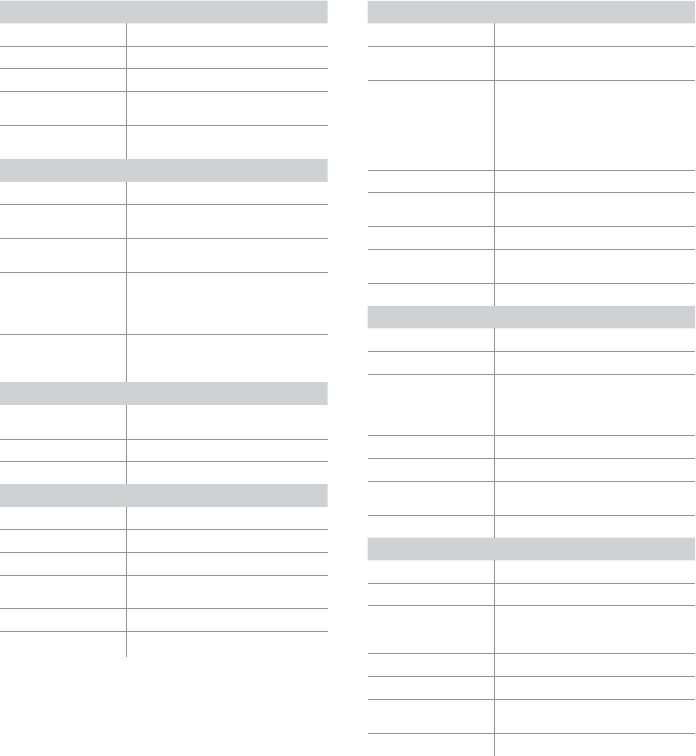
Specications
Main Console
General
Dimensions (W×H×D) 215 × 172 × 29mm
Weight 639g (with batteries)
Main power DC 5V, 1A adaptor
Backup battery
3 × AAA size 1.5V batteries
(alkaline recommended)
Operating
temperature range
-5˚C ~ 50˚C
Wi-Fi
Wi-Fi standard 802.11 b/g/n
Wi-Fi operating
frequency
2.4GHz
Supported router
security type
WPA/WPA2, OPEN, WEP (WEP only
supports hexadecimal passwords)
Supported device
for setup UI
Built-in Wi-Fi with AP Mode function
smart devices, laptops or desktops:
Android smart phone, Android pad,
iPhone, iPad or Windows laptop
Recommended web
browser for setup UI
Web browsers that support HTML 5,
such as the latest version of Chrome,
Safari, IE, Edge, Firefox or Opera.
Wireless Sensor
Support sensors
1× Solar Pro Outdoor Sensor and up
to 7× Hygro-Thermo Indoor Sensors
RF frequency 917M hz
RF transmission range 150m
Time
Time display HH:MM:SS
Hour format 12hr AM/PM or 24hr
Date display DD/MM or MM/DD
Time synchronise
method
Through Internet time server
to synchronise the UTC
Weekday languages EN/DE/FR/ES/IT/NL/RU
Time Zone +13 ~ -12 hour
Barometer
Barometer unit hPa, inHg and mmHg
Measuring range
540 ~ 1100hPa (relative setting
range 930 ~ 1050hPa)
Accuracy
(700 ~ 1100hPa ± 5hPa)/(540 ~
696hPa ± 8hPa) (20.67 ~ 32.48inHg
± 0.15inHg)/(15.95 ~ 20.55inHg
± 0.24inHg) 525 ~ 825mmHg ±
3.8mmHg)/(405 ~ 522mmHg ±
6mmHg) Typical at 25°C (77°F)
Resolution 1hPa/0.01inHg/0.1mmHg
Weather forecast
Sunny/Clear, Slightly Cloudy, Cloudy,
Rainy, Rainy/Stormy and Snowy
Display modes Current
Memory modes
Historical data of past 24
hours, daily Max/Min
Alarm Pressure change alert
Indoor/Outdoor Temperature
Temperature unit °C and °F
Display range -40 ~ 80°C (-40 ~ 176°F)
Accuracy
55~60°C ± 0.5°C (131~140°F ± 0.9°F)
10~55°C ± 0.4°C (50~131°F ± 0.7°F)
-20~10°C ± 1.3°C (-4~50°F ± 2.3°F)
-40~-20°C ± 1.9°C (-40~-4°F ± 3.4°F)
Resolution °C / °F (1 decimal place)
Display modes Current
Memory modes
Historical data of past 24
hours, daily Max/Min
Alarm Hi/Lo temperature alert
Indoor/Outdoor Humidity
Humidity unit %
Display range 0 ~ 100%
Accuracy
1~20% RH ± 6.5% RH @ 25°C
21~80% RH ± 3.5% RH @ 25°C
81~99% RH ± 6.5% RH @ 25°C
Resolution 1%
Display modes Current
Memory modes
Historical data of past 24
hours, daily Max/Min
Alarm Hi/Lo Humidity Alert

21 of 24
Specications (continued)
Wind Speed and Direction
Wind speed unit mph, m/s, km/h and knots
Wind speed
display range
0 ~ 112mph, 50m/s, 180km/h, 97knots
Resolution
mph, m/s, km/h and knots
(1 decimal place)
Speed accuracy
< 5m/s: +/- 0.5m/s; > 5m/s:
+/- 6% (whichever is greater)
Display mode Gust/Average
Memory modes
Historical Data of past 24 hours,
daily Max Gust/Average
Alarm Hi Wind Speed Alert (Average/Gust)
Direction display modes 16 directions or 360 degree
Rain Display
Unit for rainfall mm and in
Accuracy for rainfall ± 7%
Range of rainfall 0 ~ 19999mm (0 ~ 787.3 in)
Resolution 0.254mm (3 decimal place in mm)
Display modes Current
Memory modes
Historical Data of the past
24 hours, daily Max
Rainfall display mode Hourly/Daily/Weekly/Monthly/Total rainfall
Alarm Hi Daily Rainfall Alert
UV Index
Display range 0 ~ 16
Resolution 1 decimal place
Display mode UV index, sunburn time
Memory modes Historical Data of past 24 hours, Max
Alarm Hi UV Alert
Light Intensity
Light intensity unit klx, kfc and W/m²
Display range 0 ~ 200Klux
Resolution klx, kfc and W/m² (2 decimal place)
Memory modes Historical Data of past 24 hours, Max
Alarm Hi Light Intensity Alert
Weather Index
Weather index mode
Feels like, Wind Chill,
HeatIndex and Dew point
Feels like display range -65 ~ 50°C
Dew point display range -20 ~ 80°C
Heat index display range 26 ~ 50°C
Wind chill display range -65 ~ 18°C (wind speed >4.8km/h)
Display modes Current
Memory modes Historical Data of past 24 hours, Max/Min
Alarm
Feels like Hi/Lo Alert; DewPoint
Hi/Lo Alert; Heat Index HiAlert,
Wind Chill Lo Alert
Solar Pro Outdoor Sensor
General
Dimensions (W × H × D) 370.5 × 334 × 144.5mm
Weight 1096g (with batteries)
Main power
3× AA size 1.5V batteries
(Lithium batteries recommended)
Weather data
Temperature, Humidity,
WindSpeed, WindDirection,
Rainfall, UV and Light Intensity
RF transmission range 150m
RF frequency 917M hz
Transmission interval
12 seconds for UV, light intensity,
windspeed and wind direction data
24 seconds for temperature,
humidity and rain data
Operating range -40~60°C Lithium batteries required
Wireless Hygro-Thermo Indoor Sensor
General
Dimensions (W × H × D) 61 × 113 × 39.5mm (2.4 × 4.4 × 1.6in)
Weight 144g (with batteries)
Main power
2 × AA size 1.5V batteries
(alkaline recommended)
Weather data Temperature and Humidity
RF frequency 917M hz (AU )
RF transmission range 150m
Transmission interval 60 seconds
Operating range -40~60°C Lithium batteries required

22 of 24
Troubleshooting
Outdoor Sensor connection is intermittent or non-existent
Ensure the Outdoor Sensor is within the transmission range
Reset the Outdoor Sensor and
resynchronise with the Main Console
Indoor Sensor connection is intermittent or non-existent
Ensure the Indoor Sensor is within the transmission range
Ensure the channel shown on the LCD Display matches to the channel selection on the Indoor Sensor
Reset the Indoor Sensor and
resynchronise with the Main Console
No Wi-Fi connection
Check for the Wi-Fi symbol on the LCD Display; it should be always on
Ensure your Main Console is connected
to the 2.4GHz band and not the 5GHz band
of your Wi-Fi router
Data not reporting toWeather Underground
Ensure your STATION ID and STATION KEY are correct
Ensure the date and time is correct on the tablet, as you may be reporting old data, not real time data
Ensure your time zone is set correctly, as you may be reporting old data, not real time data
Ensure the time zone of the device on Weather Underground is set correctly
Ensure the time zone on your Main Console is correct
Weather Underground Precip. Accum. Total graph offset 1 hour reset time, during summer DST
Ensure the time zone of the device on Weather Underground is set correctly
Ensure the time zone on your Main Console is correct
As this device does not have daylight savings functions, ensure your weather station
is registered outside of the United States in Weather Underground

23 of 24
Warranty
3 Year Replacement Guarantee
Holman offers a 3 year replacement guarantee with this product.
In Australia our goods come with guarantees that cannot be excluded under the Australian Consumer
Law. You are entitled to a replacement or refund for a major failure and compensation for any other
reasonably foreseeable loss or damage. You are also entitled to have the goods repaired or replaced
if the goods fail to be of acceptable quality and the failure does not amount to a major failure.
As well as your statutory rights referred to above and any other rights and remedies you have under
any other laws relating to your Holman product, we also provide you with a Holman guarantee.
Holman guarantees this product against defects caused by faulty workmanship and materials for
3 years domestic use from the date of purchase. During this guarantee period Holman will replace
any defective product. Packaging and instructions may not be replaced unless faulty.
In the event of a product being replaced during the guarantee period, the guarantee on the replacement product
will expire 3 years from the purchase date of the original product, not 3 years from the date of replacement.
To the extent permitted by law, this Holman Replacement Guarantee excludes liability for consequential
loss or any other loss or damage caused to property of persons arising from any cause whatsoever. It also
excludes defects caused by the product not being used in accordance with instructions, accidental damage,
misuse, or being tampered with by unauthorised persons, excludes normal wear and tear and does not cover
the cost of claiming under the warranty or transporting the goods to and from the place of purchase.
Should you suspect your product may be defective and need some clarification or advice please contact us directly:
1300 716 188
11 Walters Drive, Osborne Park 6017 WA
If you are certain your product is defective and is covered by the terms of this warranty, you will
need to present your defective product and your purchase receipt as proof of purchase to the place
you purchased it from, where the retailer will replace the product for you on our behalf.

Thanks for being a
#SMARTGARDENER
We really appreciate having you as a customer, and would like to say thank you for choosing us.
We recommend registering your new product on our website. This will ensure we have
a copy of your purchase and activate an extended warranty. Keep up to date to with
relevant product information and special offers available through our newsletter.
www.holmanindustries.com.au/product-registration/
Thanks again for choosing Holman
