1 www.pkjayan.wordpress.com Jayachandran PK
Step-by-step installation guide for monitoring untrusted servers using
Operations Manager (Part 1 of 3)
Most of the time through Operations Manager, you may require to monitor servers and clients
that are located outside of the Active Directory environment. These servers and clients may be
located in the DMZ as workgroup machines, or maybe you have a number of completely
different Active Directory domains and forests that have no relation with each other but need
to be monitored by a central Operation Monitor implementation.
The Operations Manager agents support two types of authentication method, Kerberos or
certificate based authentication. In order to monitor servers and clients located outside the
Operations Manager’s native Active Directory domain, you will need to configure certificate
authentication using either an internal Certificate Authority or through a 3rd party Certificate
Authority.
Following are the high-level overview of tasks involved in monitoring servers and clients located
outside Active Directory domain.
Check communication port availability
Download the Trusted Root (CA) certificate
Import the Trusted Root (CA) certificate
Create a certificate template
Request a certificate from the enterprise CA
Manual installation of agents and importing the SCOM certificate to the servers to be
monitored
Import the certificate into SCOM
Approve agents in SCOM console
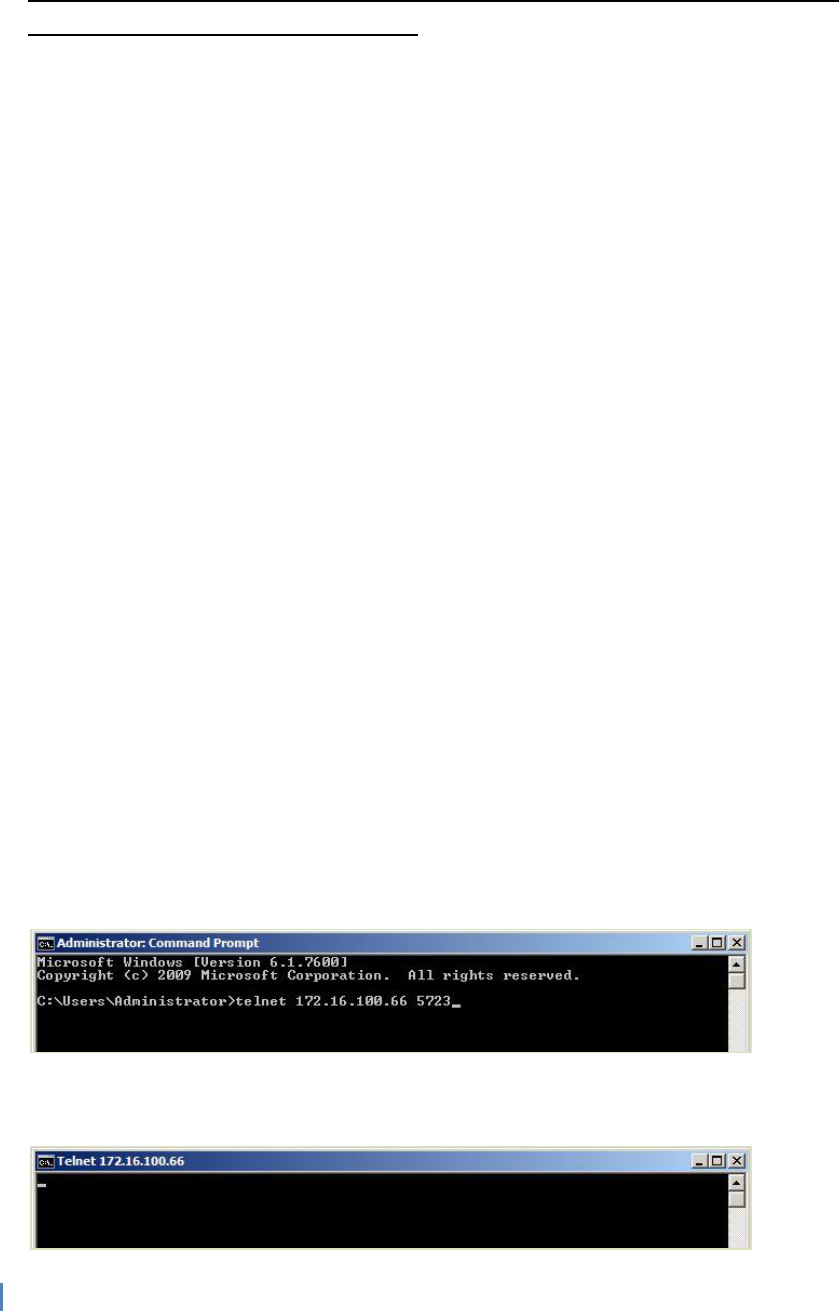
Agent communication port availability:
The SCOM agent uses TCP Ports 5723 and 5724 (both ways) to communicate with root
management server.
To test the port access between agent server and root management server, you may Log on to
the agent server and from command prompt, type Telnet <Management Server> 5723
If you get a cursor at the top left corner then the port is open, any other errors indicate that the
port is still closed.

2 www.pkjayan.wordpress.com Jayachandran PK
Download the Trusted Root (CA) Certificate:
The trusted root certificate must be installed on the RMS, MS, Gateway server or
DMZ/untrusted domain servers. To download the trusted root certificate, Log on to the
computer where you want to install a certificate and connect to the Certificate Enrolment URL
on the certificate Authority Server. For example, http://<CAservername>/certsrv
In case the server in DMZ or untrusted domain cannot reach the certificate Authority Server, you may
download the Root (CA) Certificate to any server which has access to the Certificate Enrolment URL on
the certificate Authority Server. Then copy the certificate using removable media and imports the
same to desired server in DMZ or untrusted domain.
On the Welcome page, click Download a CA Certificate, certificate chain, or CRL.
On the Download a CA Certificate, Certificate Chain, or CRL page, under Encoding method, click
Base 64, and then click Download CA certificate chain.

3 www.pkjayan.wordpress.com Jayachandran PK
In the File Download dialog box, click Save
Then save the certificate with a relevant name such as ‘rootcert’ to the C:\ drive of your
computer.
When the download has finished, close Internet Explorer.

4 www.pkjayan.wordpress.com Jayachandran PK
Import the Trusted Root (CA) certificate:
Logon to the server (RMS, MS, Gateway server or DMZ/untrusted domain servers), click Start,
and then click Run. In the Run dialog box, type mmc, and then click OK.
In the Console1 window, click File, and then click Add/Remove Snap-in.
In the Add or Remove Snap-in dialog box, under the available snap-ins, select Certificates, and
then click Add.

5 www.pkjayan.wordpress.com Jayachandran PK
In the Certificates snap-in dialog box, select Computer account, and then click Next.

6 www.pkjayan.wordpress.com Jayachandran PK
In the Select Computer dialog box, ensure that Local computer: (the computer this console is
running on) is selected, and then click Finish.
In the Add or Remove Snap-in dialog box, click OK.

7 www.pkjayan.wordpress.com Jayachandran PK
In the Console1 window, expand Certificates (Local Computer), then expand Trusted Root
Certification Authorities, and then click Certificates.
Right-click Certificates, select All Tasks, and then click Import.
A Certificate Import Wizard opens. In the Certificate Import Wizard window, click Next

8 www.pkjayan.wordpress.com Jayachandran PK
On the File to Import page, click Browse and select the location where you downloaded the CA
certificate file, for example, c:\rootcert.cer, select the file, and then click Open.

9 www.pkjayan.wordpress.com Jayachandran PK
If the server in DMZ or untrusted domain cannot reach the certificate Authority Server, make sure you
copy the root CA certificate from the server where you downloaded the same using the previous step.
On the certificate store page, select Place all certificates in the following store and ensure that
Trusted Root Certification Authorities appears in the Certificate store box, and then click Next.
On the Completing the Certificate Import Wizard page, click Finish to complete the process.
At this point you should now have the Trusted Root CA certificate downloaded and installed
onto your server. You may verify the same from the local certificate store.

10 www.pkjayan.wordpress.com Jayachandran PK
Create a certificate template:
To create certificate template, you need to access the Certification authority console. Follow
the below steps to access Certification authority console.
Logon to the Server running Enterprise CA. From the desktop, click Start, point to Programs,
point to Administrative Tools, and then click Certification Authority.

11 www.pkjayan.wordpress.com Jayachandran PK
Under Certification authority (Local), Expand the <Servername-CA name>, right-click Certificate
Templates, and then click Manage to open the Certificate Templates Console.
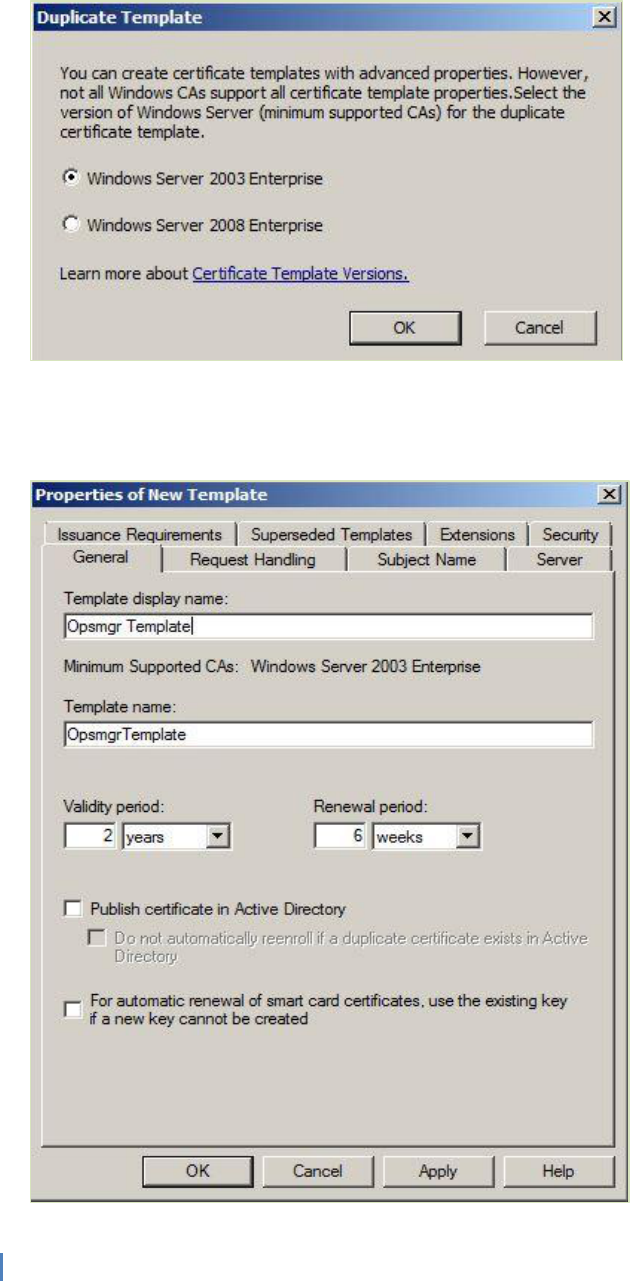
From the Certificate Templates console, in the results pane, right-click IPSec (Offline request),
and then click Duplicate Template
12 www.pkjayan.wordpress.com Jayachandran PK
Select either Windows Server 2003 Enterprise or Windows Server 2008 Enterprise as the
minimum supported CA type from the window.
In the Properties of New Template dialog box, on the General tab, under the Template display
name: type a new name for this template (for example, Opsmgr Template). Also set the validity
and renewal periods for the certificate if required.

13 www.pkjayan.wordpress.com Jayachandran PK
On the Request Handling tab, set the Minimum Key Size and select the Allow private key to be
exported check box.
If you have a specific cryptographic service provider that falls in line with your business
policies, you may change the same by clicking on the CSPs box. That will open the CSP
Selection window to change the cryptographic service provider. Otherwise leave the default
settings.

14 www.pkjayan.wordpress.com Jayachandran PK
On the Extensions tab, under Extensions included in this template: select Application Policies,
and then click Edit
In the Edit Application Policies Extension box, click IP security IKE intermediate, and then click
Remove.

15 www.pkjayan.wordpress.com Jayachandran PK
Click Add, and in the Application policies list, hold down the CTRL key to multi-select items
from the list, click Client Authentication and Server Authentication, and then click OK
In the Edit Application Policies Extension dialog box, click OK

16 www.pkjayan.wordpress.com Jayachandran PK
On the Security tab, ensure that the Authenticated Users group has Read and Enroll
permissions, and then click OK to complete
If you are using Windows Server 2008 R2 Certificate Authority, The Computer object for the
Certificate Authority must have Read and Enroll permissions within the Security tab.
Following additional steps need to be completed in order to meet the additional security
requirements in Windows Server 2008 R2 Certificate Authority.
Select the Add button from the screen above and then click on the Object Types button from
the next screen that pops up.

17 www.pkjayan.wordpress.com Jayachandran PK
This will open the Object Types window from which you will select the box beside Computers
as shown below and then click on OK
In the Select Users, Computers, Service Accounts or Groups window, type the name of your
Certificate Authority server and then click OK
Notice the Certificate Authority computer listed under the Security tab. Select the Certificate
Authority computer name and then select the Read and Enroll permissions.
Once you have selected the correct permissions for the Authenticated Users and Certificate
Authority Computer accounts, click OK to close the Opsmgr Template properties window.

18 www.pkjayan.wordpress.com Jayachandran PK
Since we have the Opsmgr Template created and configured with the correct permissions, we
need to add that template into the Certificate Authority Templates folder in order to be
available for the clients to use it.
From the Certification Authority snap-in, right-click the Certificate Templates folder, point to
New, and then click Certification Template to Issue.

19 www.pkjayan.wordpress.com Jayachandran PK
From the Enable Certificate Templates box, select the certificate template that you created,
and then click OK

20 www.pkjayan.wordpress.com Jayachandran PK
Notice that the new Opsmgr Template is appeared in the result pane of Certificate Templates.
This will now enable the new Opsmgr Template to be used when requesting future certificates
for Operation Manager through the Certificate Authority Web Browser enrolment tool.
