
1
Azure Virtual Desktop (AVD) user guide
Remote Desktop (RD) client app in Windows
2
Table of Contents
1. Introduction 3
Keywords 3
1.1. Purpose of the document 3
2. Installing and accessing AVD from the RD client. 3
3. Opening BTS (SAP GUI - Portal) using RD client. 8
4. Edge browser settings 12
5. Reconnecting after session time out. 15
6. Launching multiple applications (OneDrive) using RD Client. 16
6.1. Syncing One Drive 23
7. Transferring files (Upload/Download) 16
7.1. Upload files from your local computer to the AVD 19
7.2. Download/transfer files from AVD to your local device 20
8. Printing from AVD. 24
9. Client Settings 26
9.1. Update the Remote Desktop client 26
9.2. Refresh or unsubscribe from a workspace or see its details. 27
10. Sign-out/close apps 30
11. Help desk support details for AVD 31

3
1. Introduction
Azure Virtual Desktop (AVD) is a cloud-based desktop and application virtualization
solution. Designed to optimize user experience, AVD ensures a consistent Windows
environment across all devices. Using a Windows virtual machine (VM) and cloud-hosted
applications, AVD empowers users to seamlessly access their digital workspace from any
device, enabling unparalleled flexibility and productivity.
Keywords
AVD
Azure Virtual Desktop
Remote desktop client
(RD client)
This is an application to be installed to connect AVD (Azure
Virtual Desktop) and other resources (Remote Apps)
Workspace
Workspaces are Remote App programs, session-based
desktops, and virtual desktops published by your admin using
Remote Desktop Services.
1.1. Purpose of the document
This document will show you how to connect to Azure Virtual Desktop (AVD), using the
Remote Desktop (RD) Client App. Furthermore, this document will enable you to navigate
the application and guide you through detailed step-by-step instructions on how to utilize
Azure Virtual Desktop (AVD), using RD Client.
2. Installing and accessing AVD from the RD client.
Step 1: Click on the Link (for Windows 64-bit) / Link (for Windows 32-bit) to download the
installer. It will automatically download to your default download folder.

4
Step 2: Open the downloaded installer. You will receive the installation prompt shown
below. Click on Next to continue.
Step 3: Select the checkbox to accept the terms in the License agreement. Click on Next to
proceed.

5
Step 4: Select Install just for you and click on Install.
Step 5: Once the setup is complete, select the checkbox to launch the application and click
on Finish.

6
Step 6: You will now see that the RD client app has opened. Once the Let’s get started
page has appeared, click on Subscribe.
Step 7: Enter your LAUSD username and click on Next.
PS: User must have configured MFA (Multi factor authentication) for LAUSD Single Sign-
On, before you proceed further. Please refer https://achieve.lausd.net/mfa for more
information.

7
Step 8: Input your LAUSD password and click on Sign in.
Step 9: If the portal asks you to provide MFA (Multi factor authentication), please approve
the sign in request using your method of choice.
PS: User must have configured MFA (Multi factor authentication) for LAUSD Single Sign-
On, before you proceed further. Please refer https://achieve.lausd.net/mfa for more
information.
or
8
Step 10: After authentication, the screen displayed below will begin to load.
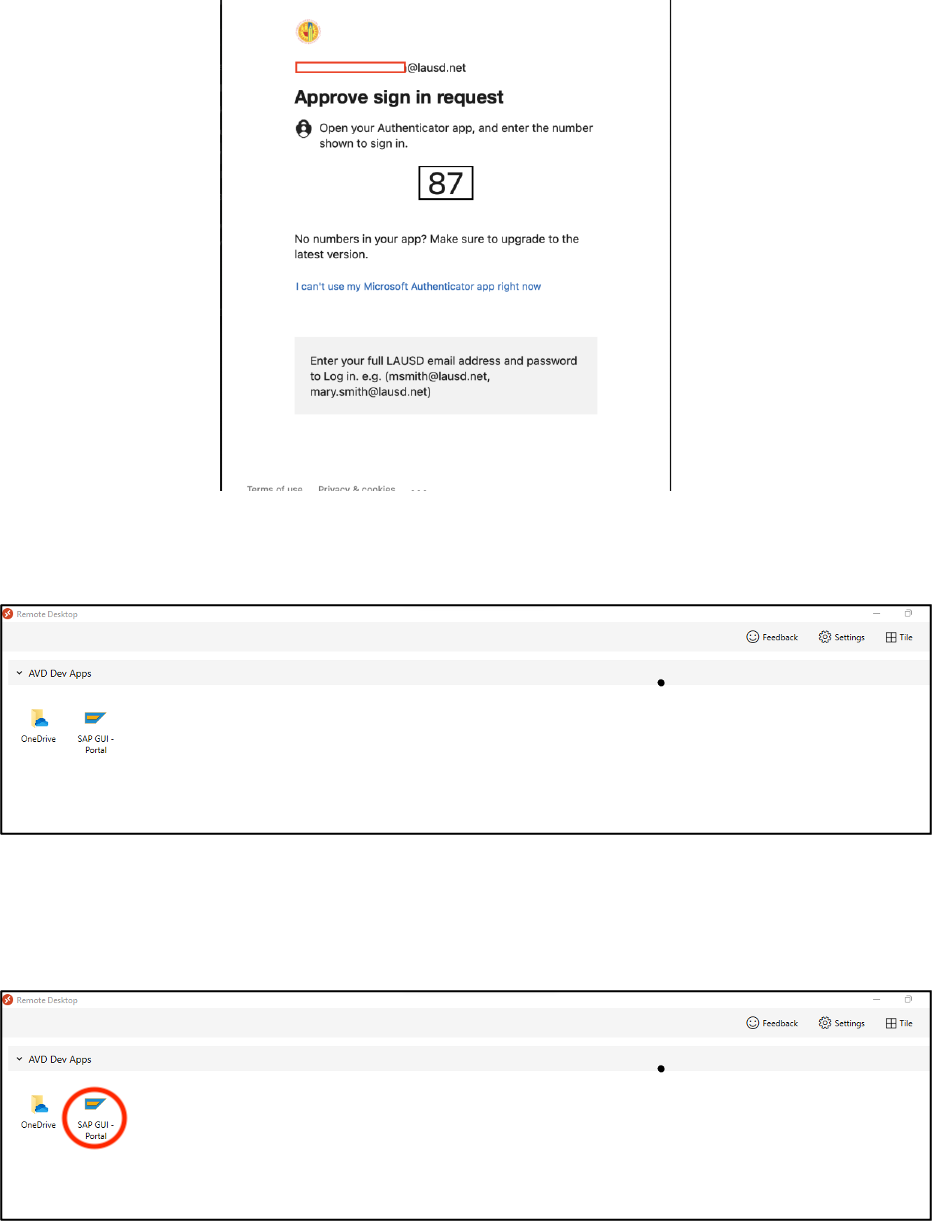
3. Opening BTS (SAP GUI - Portal) using RD client.
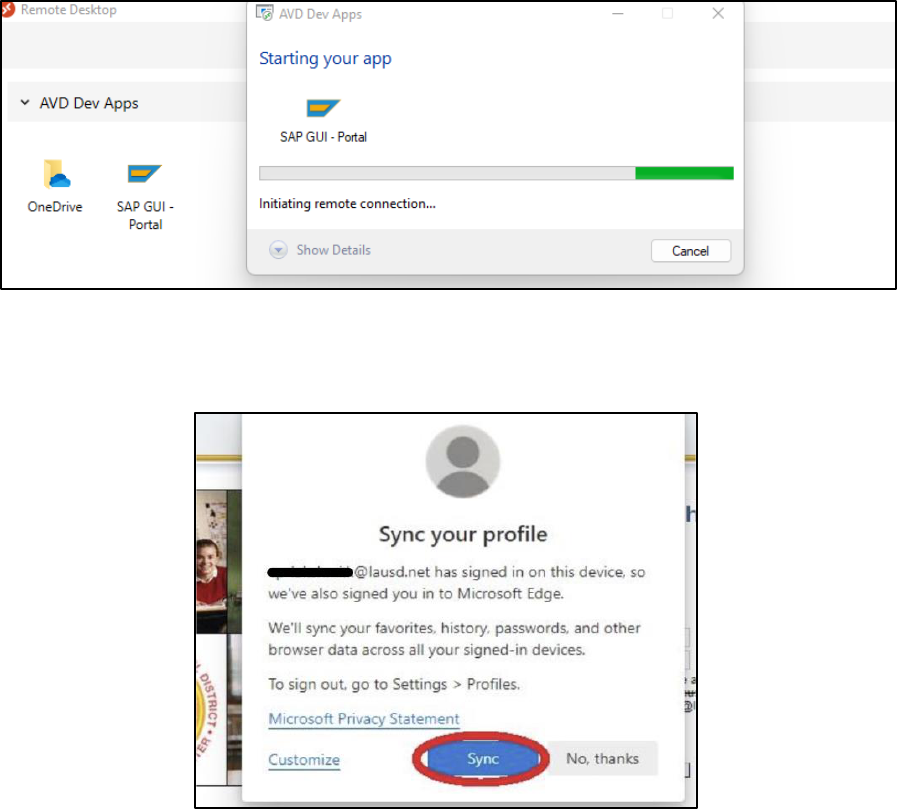
Step 1: To open, SAP GUI-Portal app, double click on the SAP GUI - Portal.

9
You will see the screen below.
Step 2: Input your LAUSD password and click on OK. You can check the checkbox for
Remember me however, this is optional.
PS: User must have configured MFA (Multi factor authentication) for LAUSD Single Sign-
On, before you proceed further. Please refer https://achieve.lausd.net/mfa for more
information.

10
or

11
Step 3: Now, you will be able to see a screen with the name of the virtual machine that you
will be connecting to in AVD. Click on Yes to continue.
Note: You will see a name such as prodazavdra- x. This is just an indication of
connecting to a remote device and will not lead to any issues with your account. Continue
by clicking on Yes.
Step 4: Wait for the client to load your session.
Step 5: Now, you will be able to see that the BTS Portal page has opened in Edge browser
as a new window. You can start working on it normally as you do. In the taskbar, you can
see the SAP remote app icon as shown below.
12
4. Edge browser settings
This section covers settings you can configure in Edge to automatically populate your
credentials in AVD.
Step 1: Go to SAP GUI-Portal app.
Step 2: First, you have to sync your account with Microsoft Edge (This will be a one-time
activity). If you receive the popup displayed below, click on Sync.

13
Another option is to click on Sign-in on the edge of the tab towards the right. This will
redirect you to a prompt where you have to select Sign in.
Step 3: If required, provide MFA (Multi factor authentication) using your preferred method.
PS: User must have configured MFA (Multi factor authentication) for LAUSD Single Sign-
On, before you proceed further. Please refer https://achieve.lausd.net/mfa for more
information.
or

14
Step 4: After verification, you will be able to observe that Sync is turned on. This means
that your browser settings will now be available in AVD.
Step 5: You will see a pop-up after entering your credentials (SAP credentials for example).
To save passwords to your edge browser settings, enable the toggle named Automatically
save passwords and click on Save & Turn on.

15
5. Reconnecting after session time out.
Note: There is a session timeout set for the environment. If you keep your application idle,
your session will disconnect after 30 minutes. Once this occurs, you will be shown the
popup below for 2 minutes. Click on OK to stay connected.
If you do not click OK on the popup, you will receive another one as shown below. In order
to get back to your previous session, click Reconnect. If this does not work, it means that

16
you have been disconnected for more than 10 minutes and this option will no longer work.
From here, you will be required to click on Cancel and begin to reconnect again.
6. Transferring files (Download/ Upload) from SAP via AVD
6.1. Download files from SAP to your local computer
Step 1: Launch any SAP transaction that produces an outbound downlodable file
Below is a sample data extract screen from SAP:
Extract from file structure, select a file you would like to download and Press Download.
You must have SAP transaction permissions to perform this action in SAP

17
File name will be populated on SAP Dowload Files window as shown below:
1
3

18
File downloaded on users local machine at a fille path location provided:
This PC → Redirected drives and folders: This is the path which you can use to
download/save any file to a local device. Similarly, you can use this path to upload/open
any file from a local device.
Note: The screenshot below is an example of the redirected drives from your local device.
Important Note: Don’t go to “Network” Tab. Ensure to only follow the instructions shown in

19
the picture below.
Step 2: After launching the One Drive application, go to This PC.
6.2. Upload files from your local computer to the AVD
Note: To upload/transfer a file, you have to navigate to Redirected drives and folders
seen in Step 3 of section 2.5. (Attached below is an example of how to select a file from
your local device, if asked for a selection.)
Step 1: Select This PC.

20
Step 2: Now, you will be able to see Redirected drives and folders. Navigate to the
required folder and select your file from your local drive.
Note: Your view will be different from what is displayed below. You will be able to see the
local drives according to your local system.
6.3. Download/transfer files from AVD to your local device
Step 1: Navigate to the Location/Folder in AVD (the folder that you want to transfer files into
your local device) and copy the file.

21
Step 2: Now, select ‘This PC’. You'll see Redirected drives and folders here. Select the
drive you want to download your file to. (Your view might be different from the screenshot
provided below.)
Step 3: Now, navigate to your preferred folder in any of your local redirected drives and
click on paste.
You will be able to see the downloaded file in your local drive in your laptop.

22
7. Launching multiple applications (OneDrive) using RD Client.
Step 1: To open another app simultaneously (for example OneDrive here), go to the RD
client app. Now, double click on the application you want to open (For example, OneDrive
here). It will not ask for your credentials again.
PS: Plese refer to:
Microsoft OneDrive Basics
Step 2: You will be able to see that the OneDrive app has opened in a new window.

23
7.1. Syncing One Drive
Step 1: In order save files to your OneDrive, navigate to your OneDrive as shown below.
Paste the required file/files in OneDrive. Now, you will be able to see the syncing status.
Step 2: After a while, you will be able to see that the status changed. This indicates that the

24
file is synced with OneDrive, which will now be available in OneDrive on your local
machine, along with the online version of OneDrive.
8. Printing from AVD.
Step 1: Access the file you wish to print by navigating to the File menu and selecting the
Print option. A list of available printers will be displayed, including those labeled as
Redirected, which are printers from your local device. Below is an example of redirected
printers.

25
Step 2: After selecting your printer, click on Print. Now, you will be able to see the printer
notification.
Step 3: The file will connect to printers that are available on your local machine. Continue to
execute your printing process like normal.

26
9. Client Settings
9.1. Update the Remote Desktop client
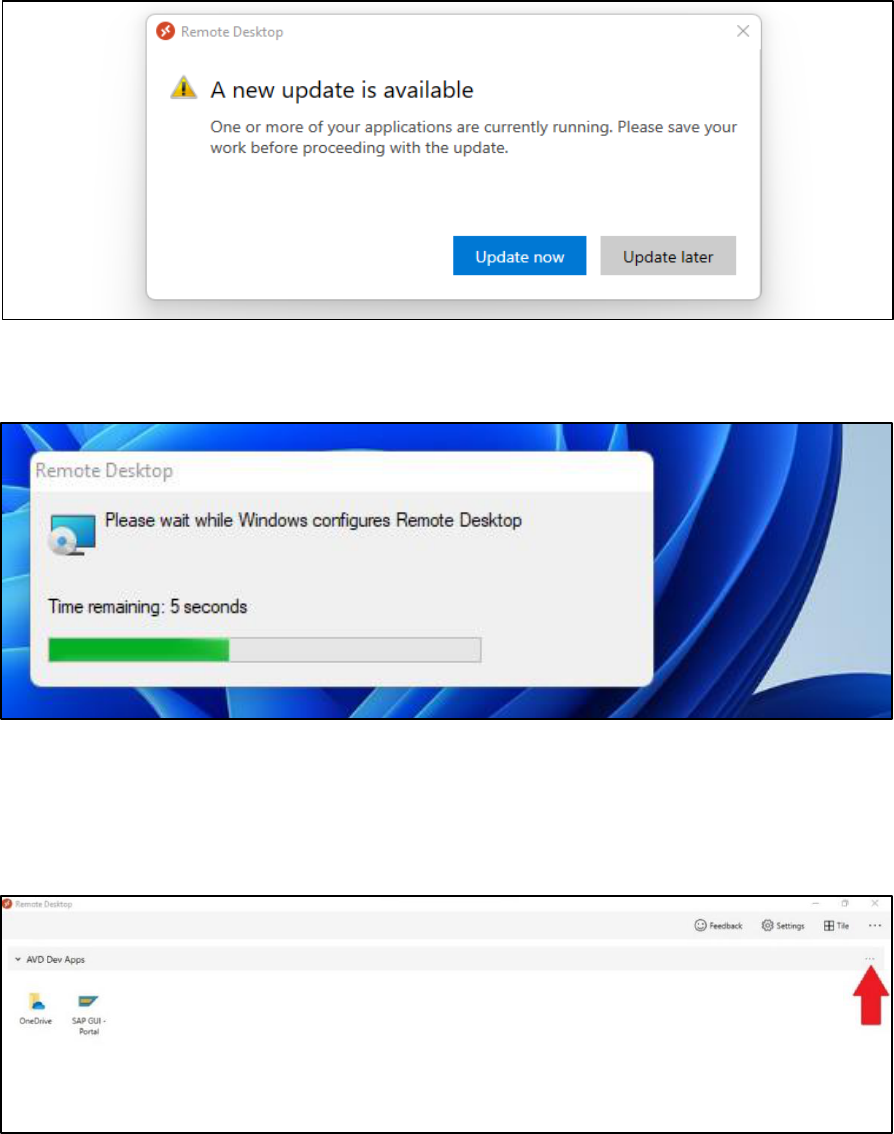
Step 1: It is ideal to access AVD using the latest version of Remote Desktop Client. To
update your client, click on the three dots positioned at the top-right of your client. If
updates are available, a button will appear, as shown below. Click on Update available.
Step 2: You will get the below shown prompt, click on Update now.
27
Step 3: Upon completion of the update process, you will be presented with a screen
displaying the progress. Subsequently, the application will automatically reopen, refreshing
your feed.
9.2. Refresh or unsubscribe from a workspace or see its details.
Step 1: Open the Remote Desktop application on your device to access the workspace
details or perform actions like refreshing or unsubscribing. Locate the name of the
workspace and click on the three dots positioned to the right-hand side.
Step 2: A menu will appear, providing options for Details, Refresh, and Unsubscribe.

28
Step 3: Details shows you more information about the workspace (for example, AVD Dev
Apps here).
Clicking on details will show you:
● The name of the workspace shown on top of your apps.
● The URL and username used to subscribe:
● The number of desktops and apps.
● The date and time of the last refresh.
● The status of the last refresh.
● Refresh button
Step 4: The Refresh button ensures that you have the most up-to-date desktops, apps, and
settings provided by your administrator. If any modifications have been made to your
assignment, clicking on this button will refresh the client. After clicking on "Refresh," you will
see a screen confirming the refresh process.

29
Step 5: If you wish to remove the workspace from the Remote Desktop client, click on
Unsubscribe. A confirmation prompt will appear, asking you to confirm your decision.
Upon clicking Continue, the workspace will be removed, and any open apps will be
disconnected.
Step 6: If you accidentally click on Unsubscribe and Continue, don’t worry. You will get
back to the subscribe page in step 6 of section 2.1. Repeat the same steps to subscribe
and get back to view your applications and workspace again.

30
10. Sign-out/close apps
Step 1: To sign-out from the session, click on Ctrl+Alt+End. This will lead to the screen
shown below. Click on Sign Out.
Step 2: In Order to close the SAP page, click on the exit button, as shown below.

31
Step 3: If you want to close OneDrive, click on the exit button as shown below.
11. Help desk support details for AVD
AVD Technical Support
**Phone lines and chat services are open 7:30 am to 5:00 pm PST Monday through
Friday**
Call 213-241-5200 and PRESS 8 for any other issues. Mention the key words: “AVD” or
“VDI” or “Virtual Desktop”
(OR)
Chat with an agent
