
MOBILE FRAMEWORK
DEVELOPER GUIDE
Acumatica ERP 2019 R1
| Contents | 2
Contents
Copyright......................................................................................................4
Working with Mobile Framework................................................................. 5
To Start Acumatica ERP on a Mobile Device.................................................7
Mobile Site Map............................................................................................8
To Update the Main Menu of a Mobile App..........................................................................8
To Update a Screen of a Mobile App.................................................................................. 8
To Add a Screen to the Mobile Site Map.............................................................................9
To Remove a Screen of a Mobile App............................................................................... 10
To Convert an XML Mobile Site Map to MSDL Format.......................................................... 10
To Reverse Changes Made to the Mobile Site Map..............................................................11
Configuring the Mobile Site Map................................................................ 12
Main Menu.................................................................................................................... 12
Sidebar Menu................................................................................................................ 16
Screens......................................................................................................................... 17
Getting the WSDL Schema.....................................................................................17
Configuring Lists................................................................................................... 19
Configuring Editing Screens....................................................................................21
Mapping Reports................................................................................................... 23
Mapping Dashboards............................................................................................. 25
Grouping Fields on a Screen.................................................................................. 27
Configuring Attachments........................................................................................ 28
Configuring Selectors.............................................................................................30
Configuring Related Containers............................................................................... 31
Adding Entity Attributes to Mobile Screens...............................................................36
Redirecting the User to Different Screens and Containers...........................................38
Displaying Any Field as a Text Field........................................................................ 41
Creating the User Signature................................................................................... 41
Configuring the Mobile Site Map by Using XML (deprecated)..................... 44
To Customize the Mobile Site Map for a Form....................................................................44
To Add a Form to the Mobile Site Map by Using an XML File................................................ 44
To Generate the Delta from Two Mobile Site Maps..............................................................46
How to Use XML Examples of This Section........................................................................47
Main Menu.................................................................................................................... 47
Sidebar Menu................................................................................................................ 52
Screens......................................................................................................................... 53
Getting the WSDL Schema.....................................................................................53
Configuring Lists................................................................................................... 55
| Contents | 3
Configuring Editing Forms...................................................................................... 60
Mapping Reports................................................................................................... 62
Mapping Dashboards............................................................................................. 64
Grouping Fields on a Form.....................................................................................65
Configuring Attachments........................................................................................ 66
Configuring Selectors.............................................................................................68
Configuring Nested Containers................................................................................70
Adding Entity Attributes to Mobile Screens...............................................................77
Redirecting to Different Screens and Containers....................................................... 78
Displaying Any Field as a Text Field........................................................................ 82
Creating the User Signature................................................................................... 82
Mobile Site Map Reference.........................................................................87
MSDL............................................................................................................................ 87
Object Types........................................................................................................ 88
Constants........................................................................................................... 110
Instructions........................................................................................................ 110
Error Messages................................................................................................... 116
XML Tags.....................................................................................................................117
<sm:Action>...................................................................................................... 119
<sm:Attachments>..............................................................................................121
<sm:Attributes>................................................................................................. 121
<sm:Container>..................................................................................................122
<sm:ContainerLink>............................................................................................ 122
<sm:Field>.........................................................................................................123
<sm:Folder>.......................................................................................................127
<sm:Group>.......................................................................................................127
<sm:Include>.....................................................................................................128
<sm:Layout>......................................................................................................128
<sm:RecordActionLink>....................................................................................... 130
<sm:Screen>..................................................................................................... 130
<sm:SelectorContainer>...................................................................................... 131
<sm:Type>.........................................................................................................131
Icons...........................................................................................................................132
ac.exe MOBILEITEMAP Reference............................................................ 139

| Copyright | 4
Copyright
©
2019 Acumatica, Inc.
ALL RIGHTS RESERVED.
No part of this document may be reproduced, copied, or transmitted without the express prior consent
of Acumatica, Inc.
11235 SE 6th Street, Suite 140
Bellevue, WA 98004
Restricted Rights
The product is provided with restricted rights. Use, duplication, or disclosure by the United States
Government is subject to restrictions as set forth in the applicable License and Services Agreement
and in subparagraph (c)(1)(ii) of the Rights in Technical Data and Computer Software clause at DFARS
252.227-7013 or subparagraphs (c)(1) and (c)(2) of the Commercial Computer Software-Restricted
Rights at 48 CFR 52.227-19, as applicable.
Disclaimer
Acumatica, Inc. makes no representations or warranties with respect to the contents or use of this
document, and specifically disclaims any express or implied warranties of merchantability or fitness for
any particular purpose. Further, Acumatica, Inc. reserves the right to revise this document and make
changes in its content at any time, without obligation to notify any person or entity of such revisions or
changes.
Trademarks
Acumatica is a registered trademark of Acumatica, Inc. HubSpot is a registered trademark of HubSpot,
Inc. Microsoft Exchange and Microsoft Exchange Server are registered trademarks of Microsoft
Corporation. All other product names and services herein are trademarks or service marks of their
respective companies.
Software Version: 2019 R1
Last updated: March 14, 2019

| Working with Mobile Framework | 5
Working with Mobile Framework
By using Acumatica Mobile Framework, you can access and use Acumatica ERP through a mobile device
wherever you are.
Acumatica Mobile Framework is a modern web development platform that provides the following key
features:
• Real-time access: The Acumatica mobile app connects to your Acumatica ERP instance in real
time, so users always have access to up-to-date information.
• Developer-selected functionality: Any Acumatica ERP functionality can be exposed on a mobile
device.
• Mobile device integration: The Acumatica mobile app uses the unique capabilities of the
applicable mobile device, such as the camera or fingerprint reader.
• Ease of customization: The framework gives you the ability to configure the mobile app by
using metadata without coding. You do not need to learn how to program for iOS or Android.
The framework contains the following components (see the diagram below):
• The native mobile client application that Acumatica provides for iOS devices
• The native mobile client application that Acumatica provides for Android devices
• The Mobile API, which is a part of the Acumatica Framework API
Figure: Acumatica Mobile Framework architecture
An Acumatica mobile client application uses the Mobile API to access the data of the forms that are
mapped for mobile apps in the Acumatica ERP instance. The metadata of the mobile site map is used to
configure the user interface of the mobile client application. You can expose any form of Acumatica ERP
on your mobile device if the mobile site map includes the metadata for the form.
: The Acumatica mobile app is like a browser for an instance of Acumatica ERP in that it does not have
built-in ERP-related functionality. The Acumatica mobile app instead uses the configuration and data in
Acumatica ERP and displays it to the user.
| Working with Mobile Framework | 6
This part of the guide describes how to configure the Acumatica ERP mobile site map. The part is
intended for application developers who are learning how to customize Acumatica ERP or other
Acumatica Framework–based applications.

| To Start Acumatica ERP on a Mobile Device | 7
To Start Acumatica ERP on a Mobile Device
The Acumatica mobile app provides access to the functionality of Acumatica ERP, such as approving
documents, managing time cards, processing sales orders, and handling expense receipts and claims.
The Acumatica mobile app is an out-of-the-box solution that gives users the ability to access Acumatica
ERP from mobile devices to enter and manage their work documents. This application provides the user
interface to access the data and functionality of Acumatica ERP by using the predefined original mobile
site map.
To start using Acumatica ERP on a mobile device, perform the following actions:
1. Download the free Acumatica mobile app from Apple Store or Google Play, and install it on the
mobile device.
2. Launch the app.
3. Enter the URL and optional name of your Acumatica site (for example, https://
your.acumatica.site.com), and tap Next.
: If both the Acumatica ERP server and mobile device use the same local wireless network, you can
specify the URL in one of the following ways:
• https://<Computer Name>/<Website Name>, such as http://MyComputer/MySite
• https://<IP Address>/<Website Name>, such as http://111.222.3.44/MySite
4. Enter the credentials of your user account.
5. Tap Sign In to enter the site.
The app connects to the Acumatica ERP server, and the server authorizes the user and returns the
metadata to render the main menu and screens of the mobile site.

| Mobile Site Map | 8
Mobile Site Map
The mobile site map is the metadata you use to configure the mobile app. The mobile site map contains
descriptions of the elements that should appear on the mobile device, including the main menu, the
screens, and the fields and actions on the screens.
The mobile site map is defined with Mobile Site Map Definition Language (MSDL) code. You access and
edit the mobile site map definition by using the Customization Project Editor.
To Update the Main Menu of a Mobile App
You can update the main menu of the customized Acumatica mobile app by using the Customization
Project Editor.
To Update the Main Menu of a Mobile App
1. Open the Customization Project Editor.
2. On the page toolbar of the Mobile Application page, click Customize > Update Main Menu.
The Update: MENU page opens. The Update MENU appears in the list of modified screens on the
Mobile Application page of the Customization Project Editor.
3. In the Result Preview area of the Update: MENU page, explore the original code of the main
menu.
4. In the Commands area of the Update: MENU page, implement your code using Mobile Site Map
Definition Language (MSDL). For details, see Main Menu.
5. Save your changes.
Your commands are applied to the menu. If any errors have occurred, you can see them in
the Errors area of the form. If your changes have been applied successfully, you can see the
updated site map of the main menu in the Result Preview area of the form.
6. Publish your customization project.
To Update a Screen of a Mobile App
You can update an existing screen of a customized mobile app by using the Customization Project
Editor.
To Update a Screen of a Mobile App
1. Open the Customization Project Editor.
2. On the page toolbar of the Mobile Application page, click Customize > Update Existing
Screen.
3. In the Update Existing Screen dialog box, which appears, specify the ID of the screen you
want to update, and click OK.
The Update: <screen_name> page opens. The new update screen with its details appears in the
list of modified screens on the Mobile Application page of the Customization Project Editor.
4. Explore the original code of the screen in the Result Preview area of the Update page.
5. Implement your code using Mobile Site Map Definition Language (MSDL) in the Commands area
of the Update page. For details, see Screens.

| Mobile Site Map | 9
6. Save your changes.
Your commands are applied to the site map. If any errors have occurred, you can see them in
the Errors area of the page. If your changes have been applied successfully, you can see the
updated site map of the main menu in the Result Preview area of the form.
7. Publish the customization project.
To Add a Screen to the Mobile Site Map
Suppose that you need to add to the mobile app a screen that corresponds to an Acumatica ERP form.
The form ID is XXX. The desired mobile screen has to contain the Date and Description fields and the
Insert and Delete actions of the original XXX form of Acumatica ERP.
Figure: Use of MSDL to configure a screen in the mobile app
The diagram shows how the Acumatica Mobile Framework uses the MSDL code to configure the XXX
screen in the mobile app. (See Configuring the Mobile Site Map for details.) You declare the desired
screen, containers, fields, actions and other objects by using Mobile Site Map Definition Language
(MSDL) in the Customization Project Editor. The objects you want to be displayed on the mobile app
screen must be present on the original Acumatica ERP form (See Getting the WSDL Schema).
After you publish your customization project, the screen you have defined using MSDL appears in the
mobile app.
To Add a Screen to the Mobile Site Map
1. Get the WSDL schema for the original XXX screen of Acumatica ERP, as described in Getting the
WSDL Schema.
2. Open the Customization Project Editor.
3. On the page toolbar of the Mobile Application page, click Customize > Add New Screen.
4. In the Add New Screen dialog box, which opens, enter the form ID of the Acumatica ERP form
(and thus of the corresponding screen in the mobile app) that you want to add to the mobile
app, and click OK.
The Add: <screen_name> page opens. The row with the add screen and its details appears in
the list of modified screens on the Mobile Application page of the Customization Project Editor.

| Mobile Site Map | 10
5. Notice that the initial code of the screen includes only one add instruction.
add screen <screen_ID> {
# you can add commands here
# ObjectAttribute = Value
}
(See add for details about the instruction.)
6. Implement the code of the new screen in the Commands area of the Add page. For details, see
Screens.
While implementing the code, use the WSDL schema to understand which actions and fields are
available for the form you are adding. For details, see Getting the WSDL Schema.
7. Save your changes.
Your commands are applied to the site map. If any errors have occurred, you can see them in
the Errors area of the page. If your changes have been applied successfully, you can see the
updated site map of the main menu in the Result Preview area of the form.
8. On the Update: MENU page, add a shortcut for the new screen in the main menu, as illustrated
in the following code.
add item <screen_ID> {
visible = True
displayName = "screen_title" }
9. Save your changes, and publish the project.
To Remove a Screen of a Mobile App
You can remove a screen of a customized mobile app by using the Customization Project Editor.
To Remove a Screen of a Mobile App
1. Open the Customization Project Editor.
2. On the page toolbar of the Mobile Application page, click Customize > Remove Existing
Screen.
3. In the Remove Existing Screen dialog box, which appears, specify the ID of the screen you
want to remove, and click OK.
The selected screen is removed. The Remove <screen_name> row appears in the list of modified
screens on the Mobile Application page of the Customization Project Editor.
To Convert an XML Mobile Site Map to MSDL Format
You can convert an XML mobile site map to MSDL format any time you want by using the ac.exe
command-line utility, as described in this topic.
To Convert an XML Site Map to MSDL Format
Run the ac.exe command-line utility, which is located in the Data folder of your Acumatica ERP
installation folder, with the MOBILESITEMAP command, the convert argument, and the following
parameters:
• The path to the folder with the mobile site map, which is the \App_Data\Mobile folder of the
Acumatica ERP application instance. The file containing the mobile site map must be named
mobilesitemap.xml.
| Mobile Site Map | 11
• The path to the MSD script file to which you want to save the generated site map .
The following code shows an example of the command line. (The line breaks are only for display
purposes.)
ac.exe MOBILESITEMAP c s
"D:\ProgramFiles\AcumaticaERP\CustomizedAcumaticaDB\App_Data\Mobile"
"D:\ProgramFiles\AcumaticaERP\CustomizedAcumaticaDB\App_Data\Mobile\sitemap.msd"
: You can use the short name of the convert argument, which is c.
To Reverse Changes Made to the Mobile Site Map
When you are customizing the mobile site map in the Customization Project Editor, you might need to
go back to the out-of-the-box site map and base functionality. You can return to the original site map
to one tenant or to all tenants without removing the other changes you have made in the customization
project.
To Reverse Changes Made to the Mobile Site Map
1. Open the Customization Project Editor.
2. Click Mobile Application in the navigation pane to open the Mobile Application page.
3. If you want to reverse the changes to the current tenant only, on the page toolbar, click Clear
Current Tenant. If you want to reverse the changes to all tenants, on the page toolbar, click
Clear All Tenants.
The mobile app customization is unpublished from the selected tenants.
To return to your changes, publish your customization project, as described in To Publish the Current
Project.

| Configuring the Mobile Site Map | 12
Configuring the Mobile Site Map
You develop the code that creates or changes the mobile site map in the memory of the Acumatica ERP
server by using Mobile Site Map Definition Language (MSDL).
: Before Acumatica Framework 2019 R1, XML was used to configure the mobile site map.
MSDL Overview
MSDL provides the capability to configure the user interface of the Acumatica mobile app. It transcends
XML in terms of its flexibility of usage for the mobile site map, because you can apply MSDL code
multiple times for any Acumatica ERP form, whether it is a custom, customized, or original form. In
contrast with XML, Acumatica Mobile Framework can successively apply MSDL code for a form from
multiple customizations without problems or restrictions.
If you already have an XML site map in MSDL format, you should convert the XML mobile site map to
MSDL format, as described in To Convert an XML Mobile Site Map to MSDL Format.
See the MSDL section of Mobile Site Map Reference for details about MSDL syntax, object types, and
instructions.
User Interface Structure
You can modify the elements of the Acumatica mobile app user interface by using MSDL. The user
interface of the Acumatica mobile app has the following structure:
• Main Menu. You can customize the main menu by using instuctions that work with the Folder and
Screen objects.
• Sidebar Menu. You can customize the sidebar menu by including there links to favorite folders and
screens.
• Screens. You can customize the mobile app screens by using instructions that work with
Container, Field, Action, and other objects.
How to Use the MSDL Examples of This Section
In this section, each example contains a list of MSDL instructions that modify the mobile site map for
your instance of Acumatica ERP.
To use the examples from this section, you should first add a new page (or modify an existing one) in
the Customization Project Editor, and then insert the code in the Commands area. You can see your
changes after you publish the customization project. For details, see the topics of the Mobile Site Map
chapter.
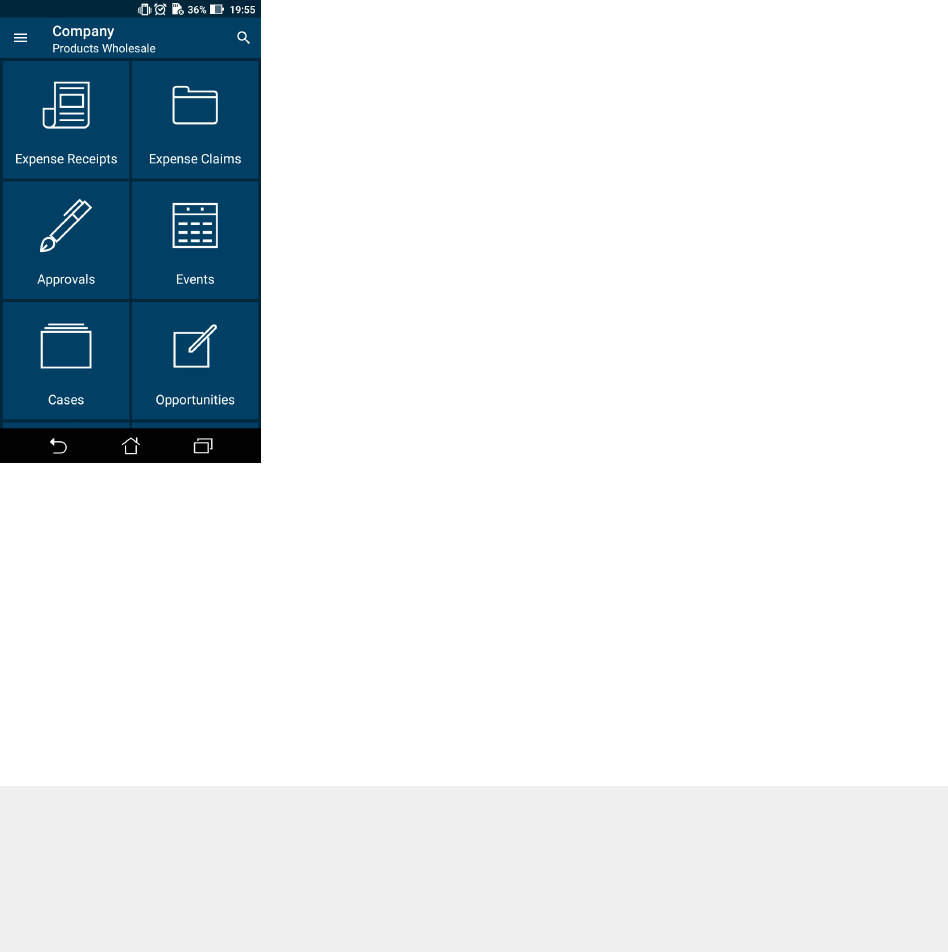
Main Menu
The main menu of the Acumatica mobile application consists of links to folders and screens. A user taps
a folder link to open the folder, which may include links to screens and other folders. Thus, the folders
have a hierarchy, as the folders in file systems do. The main menu provides access to screens in the
mobile site map, and folders are used to organize the screens.
: The access rights for screens in the mobile application are the same as the access rights for screens in
Acumatica ERP.
The start page of the main menu contains all child tags of the sitemap instruction.
| Configuring the Mobile Site Map | 13
In this topic, you can read about and perform several simple examples that demonstrate how to build
the main menu of the mobile application.
Exploring the Original Main Menu Code
You can view the original code of the Acumatica mobile app main menu by doing the following:
1. Open the Customization Project Editor.
2. On the page toolbar of the Mobile Application page, click Customize > Update Main Menu.
The Update: MENU page opens. The Update MENU screen appears in the list of modified screens
on the Mobile Application page of the Customization Project Editor.
3. Explore the original code of the main menu in the Result Preview area of the Update: MENU
page.
The app's main menu is shown in the following screenshot.
Figure: The main menu of the mobile app
Example: Adding a Screen to a Folder
Adding a screen to a folder consists of two actions:
• Adding a new screen to the mobile site map, as described in To Add a Screen to the Mobile Site
Map
• Adding the new screen shortcut to the main menu.
In this example, you will add a shortcut of the Controller screen to the Dashboards folder of the main
menu. Copy the code below to the Commands area of the Update: MENU page in the Customization
Project Editor.
update sitemap {
add folder "Folder_0" {
displayName = "Dashboards"
icon = "system://Folder"
add item "DB000015" {
displayName = "Controller"
icon = "system://Graph1"
}

| Configuring the Mobile Site Map | 14
}
}
The screenshots below show the results of this code on the mobile device.
Figure: The main menu, the contents of the folder, and the screen
: A folder must include at least one screen.
A folder can be of one of the following types, which determine how the folder contents are displayed:
• ListFolder (default): With a folder of this type, folders and screens are represented as tiles with
icons (see the first screenshot in the example in this section, shown above). You need to tap an
icon to open a folder or screen.
• HubFolder: In a folder of this type (see an example in the right screenshot at the end of the next
section), the content of a screen is displayed like a tab item on a form. You swipe left and right to
navigate through the contents of the folder.
: Nested folders of the HubFolder type are not supported. That is, you may not add a folder of the
HubFolder type within another folder of HubFolder type.
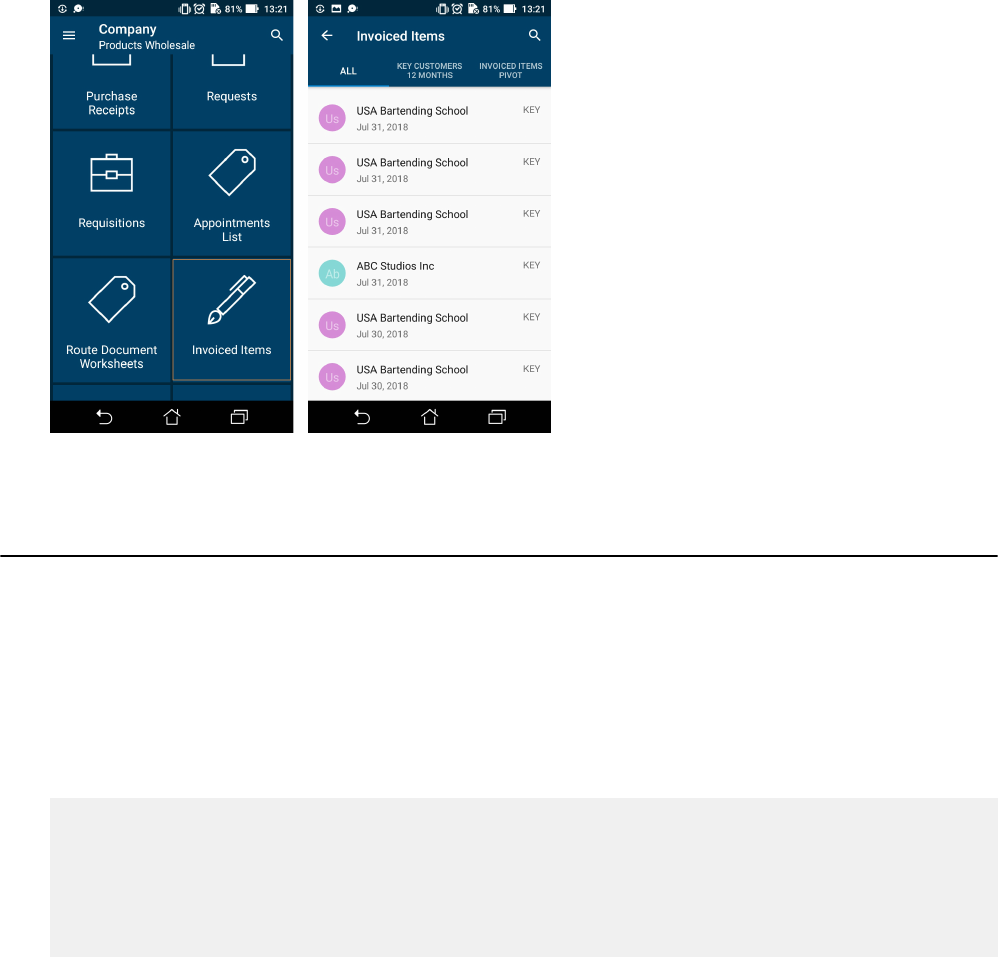
Example: Configuring Screens for Forms with Tabs
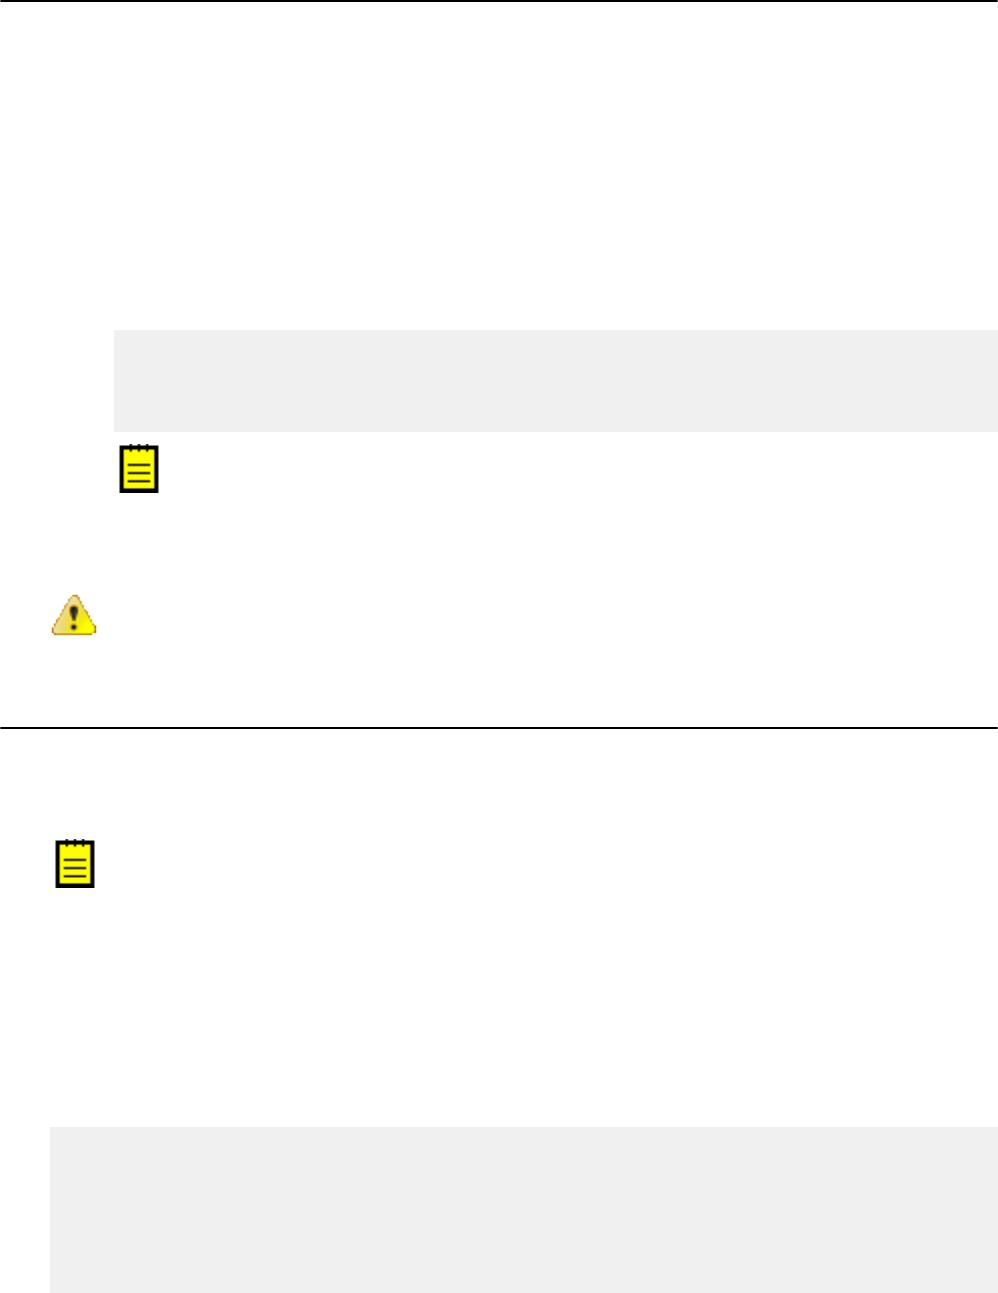
Some Acumatica ERP forms display lists on multiple tabs (as the following screenshot shows).

| Configuring the Mobile Site Map | 15
Figure: Acumatica ERP form with multiple tabs
In the mobile app, such a form is represented as multiple subscreens, with each subscreen
corresponding to a single tab. However, you have to configure only one screen because the mobile API
server automatically performs the screen expansion into multiple screens.
: In the following example and the screenshot shown above, we will use the Invoiced Items generic inquiry
(GI000008). If you don't have this generic inquiry in your instance of Acumatica ERP you can create this
generic inquiry. For details, see To Add a Generic Inquiry to a Project.
To configure a screen for a form, do the following:
1. Add the GI000008 screen to the mobile site map, as described in To Add a Screen to the Mobile
Site Map.
2. Copy the following code to the Commands area of the Add: GI000008 page, and save your
changes.
add screen GI000008 {
add container "Result" {
add field "AccountName"
add field "CustomerClassID"
add field "InvoiceDate"
}
}
3. Update the main menu of the mobile app, as described in To Update the Main Menu of a Mobile
App, with the following code.
add folder "Invoiced_Items" {
type = HubFolder
displayName = "Invoiced Items"
icon = "system://Pen"
add item "GI000008" {
displayName = "Invoiced Items"
}
}
4. Publish your customization project, and open the mobile app.
The following screenshots show the result of this code on a mobile device. The first screenshot shows
the changes to the main menu. The second screenshot shows the added screen with tabs.
| Configuring the Mobile Site Map | 16
Figure: The multi-tab screen represented as a folder
Sidebar Menu
The mobile app has a sidebar menu, which is the shortcut menu for favorite folders and screens. You
can add links to folders and screens to the sidebar menu.
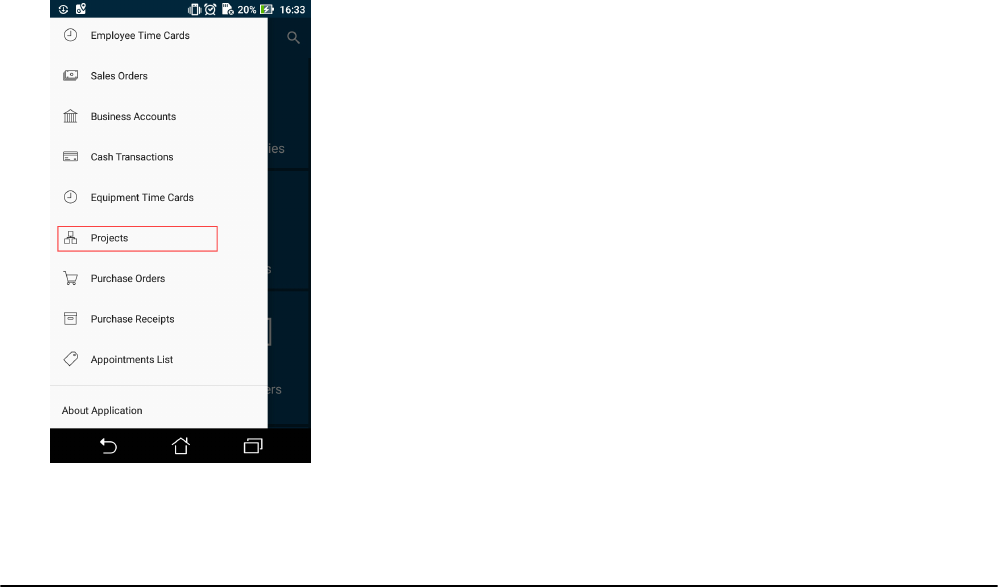
Example: Adding a Screen to the Sidebar Menu
To add a folder or screen to the sidebar menu, you need to set the IsDefaultFavorite attribute of the
folder or screen to true.
To do this, copy the code below to the Commands area of the Update: MENU page, and publish the
customization project.
update sitemap {
...
update item "PM301000" {
isDefaultFavorite = True
}
...
}
The resulting sidebar menu of the mobile app will include a link for quick access to the Projects
(PM301000) screen.
| Configuring the Mobile Site Map | 17
Figure: A link to the screen in the sidebar menu
Screens
This section consists of the following topics, which describe different tasks of configuring screens in the
mobile application:
• Getting the WSDL Schema
• Configuring Lists
• Configuring Editing Screens
• Mapping Reports
• Mapping Dashboards
• Grouping Fields on a Screen
• Configuring Attachments
• Configuring Selectors
• Configuring Related Containers
• Adding Entity Attributes to Mobile Screens
• Redirecting the User to Different Screens and Containers
• Displaying Any Field as a Text Field
• Creating the User Signature
Getting the WSDL Schema
You can get the needed information to configure a screen from the WSDL schema, which is available on
the title bar of the form in Acumatica ERP through Tools > Web Service in the modern UI or Help >
Web Service in the classic UI. To obtain the WSDL schema, perform the following steps:
1. In Acumatica ERP, open the form for which you want information.

| Configuring the Mobile Site Map | 18
2. On the title bar of the form, click Tools > Web Service in the modern UI or Help > Web
Service in the classic UI.
3. On the screen with the web service links, click Service Description, as shown in the following
screenshot.
Figure: Getting the service description for a form
See the following screenshot for an example of the WSDL schema. The schema includes containers
(such as the ReceiptDetails container in this example), the list of container fields, and the Actions
list.

| Configuring the Mobile Site Map | 19
Figure: Viewing an example of the WSDL schema
With this information, you can start configuring the screen.
Before configuring a screen in the mobile application, you should check how the form looks in the web
version of Acumatica ERP to decide how to configure the screen.
Configuring Lists
This topic describes how to configure a screen that contains a list of records created by an entry form in
Acumatica ERP.
Example: Creating a Simple List View Layout
A list view (that is, a list of records) is the simplest screen layout.
In this example, you will add a list of records that have been created on the Invoices and Memos
(AR301000) form or its corresponding screen. To prepare a screen for this example, you should do the
following:
• Add a screen based on the Invoices and Memos (AR301000) form to the mobile site map. For
details, see To Add a Screen to the Mobile Site Map.
• Add a screen shortcut to the main menu of the mobile app. For details, see Main Menu.

| Configuring the Mobile Site Map | 20
Before adding a list of records created by a particular form, you explore the WSDL schema of the
Invoices and Memos (AR301000) form, which the screen will be based on, as described in Getting
the WSDL Schema, and find the elements you want to add to the mobile screen. In this example, we
want to add an action button and several fields of a record that will be displayed in the list. The WSDL
schema elements are shown below.
Figure: WSDL schema elements used in the example
So to add the highlighted action buttons and fields to the screen you are creating, you should use the
following code.
add screen AR301000 {
add container "InvoiceSummary" {
add field "Customer"
add field "Location"
add field "ReferenceNbr"
add field "Terms"
add field "DueDate"
add recordAction "Save" {
behavior = Save
}
add recordAction "Cancel" {
behavior = Cancel
}
}
}
: You must declare the Cancel action for all screens that include it in the WSDL schema. Without the
Cancel action mapped, the changes discarded in the mobile app might not be discarded on the server.
The left screenshot below shows the resulting screen you will see in the mobile application; you can tap
any record to make changes to it. The right screenshot shows the form view of an individual record.
Once you change any setting in this view, the ✓ symbol appears. Tap it to save your changes.

| Configuring the Mobile Site Map | 21
Figure: List view layout and form view layout
: All list views in Acumatica ERP mobile app support multi-selection. You can select multiple records and
perform actions that have been declared as selectionAction.
Configuring Editing Screens
You may have to configure an editing screen (that is, a screen that can be used to enter and edit a data
record) based on the use of the corresponding form in Acumatica ERP.
In some cases, Acumatica ERP uses a single form to manage data records of a particular type (that
is, the .aspx page contains the FormView and Grid controls). In these cases, in the mobile site map,
you have to configure both the form view and the list view by using a single declaration of the Screen
object.
In other cases, Acumatica ERP uses the following separate forms for data records of a particular type:
• A list view (the .aspx page contains one Grid control) to manage records, which is called the
substitute form. (It has this name because this form is brought up instead of the data entry form
when a user navigates to or searches for the form; it shows these records in a tabular format. On
the substitute form, when the user clicks a record, the entry form opens to show the details of the
selected record.)
• A form view (the .aspx page with one FormView control) to enter and edit settings, which is
usually called a form or entry form.
In these cases, you have to configure two separate declarations of the Screen object (that is, two
screens): the list screen (which corresponds to the Acumatica ERP substitute form), and the editing
screen.
Example: Creating the Same Layout for the List View and the Form View
An example of a screen with the same layout for the list view and the form view is presented in the
Configuring Lists topic.
You can see the list of fields and edit them at the same time.

| Configuring the Mobile Site Map | 22
Example: Configuring the List and the Editing Form Separately
In this example, we will add the Invoices (SO3030PL) list screen, which corresponds to the Invoices
(SO3030PL) substitute form (a grid listing all available invoices), and the Invoices (SO303000) editing
screen, which corresponds to the Invoices (SO303000) entry form (used to enter and edit the data of
one invoice) in Acumatica ERP .
To configure these screens, do the following:
1. Add the Invoices (SO3030PL) list screen, as described in To Add a Screen to the Mobile Site Map.
2. Insert the following code in the Commands area of the Add: SO3030PL page.
add screen SO3030PL {
add container "Result" {
add field "ReferenceNbrSOInvoiceRefNbr"
add field "Status"
add field "Customer"
add field "Date"
add containerAction "Insert" {
icon = "system://Plus"
behavior = Create
redirect = True
}
add containerAction "EditDetail" {
behavior = Open
redirect = True
}
}
}
In the screen, you find two actions that can be invoked to open the editing screen for a data
record: behavior = Create and behavior = Open. The redirect = True attribute
indicates that the editing screen needs to be opened separately. The actual screen that will be
opened is determined by the server logic.
3. Add the Invoices (SO303000) screen, as described in To Add a Screen to the Mobile Site Map.
4. Insert the following code in the Commands area of the Add: SO303000 page.
add screen SO303000 {
add container "InvoiceSummary" {
add field "Customer"
add field "Location"
add field "Terms"
add field "DueDate"
add field "CashDiscountDate"
add field "Currency" {
selector {
add field "CurrencyID"
}
PickerType = Attached
}
add recordAction "Save" {
behavior = Save
}
add recordAction "Cancel" {
behavior = Cancel
}
}
}
5. Add the screens to the main menu of the mobile app using the Update Main Menu page as
shown below.
add item "SO3030PL" {
displayName = "Invoices"

| Configuring the Mobile Site Map | 23
icon = "system://NewsPaper"
}
add item "SO303000" {
displayName = "Invoice"
visible = False
}
: The visible attribute of the Invoices (SO303000) screen is set to false to hide the editing
screen from the main menu of the mobile app so that a user can access it only from the Invoices
(SO3030PL) screen.
After you publish the customization project, you should see a new tile on the main menu of the mobile
app and the corresponding screens, as shown below.
Figure: The List and the Editing Forms
In this example, you use the Invoices (SO3030PL) screen to display the list screen, and you use the
Invoices (SO303000) screen to display the editing screen. The same approach is used with forms in
Acumatica ERP.
Mapping Reports
A user can create and view an Acumatica Report Designer report through the mobile app if the following
conditions are met:
• The report form already exists in Acumatica ERP.
• The report form metadata has been added to the mobile site map.
• The user has been granted the access rights to the report.
To map a report form, you have to add a screen for the report form. The screen must have the type
attribute set to Report.
The following screenshot displays a sample screen of the Report type and the DisplayName attribute set
to Shipment Report.

| Configuring the Mobile Site Map | 24
Figure: Viewing a report screen
On the screenshot, the round blue button corresponds to the Run Report button on the report form
toolbar in Acumatica ERP.
Using an Action to Generate a Report
The system supports the Acumatica ERP actions that generate reports. To enable such an action in the
mobile app, you should map the action, for example, in the corresponding entry form. In the mobile site
map, the containerAction, recordAction, or selectionAction object has to contain the Redirect
attribute set to True, as in the following sample code.
update screen SO301000 {
update container "OrderSummary" {
add recordAction "PrintSalesOrderQuoteReport" {
redirect = True
}
}
}
The following screenshot shows the resulting report action button in the screen's menu.

| Configuring the Mobile Site Map | 25
Figure: Viewing the report action button on the Sales Orders (SO301000) screen
: For a report action, the appropriate report form must be mapped to the mobile site map because the
action uses this form to create the report.
When a user performs the action by using the mobile app, the app immediately receives the
corresponding report in PDF format from the Acumatica ERP server and displays the report for the user,
as shown in the following screenshot.
Figure: Viewing the report
Mapping Dashboards
You can add a dashboard to the mobile site map. To do this, you have to do the following:
• Add a screen with the corresponding dashboard. For details, see To Add a Screen to the Mobile
Site Map.

| Configuring the Mobile Site Map | 26
: If a user taps a dashboard widget, the mobile app tries to open the appropriate screen that
supplies data to the widget. You may also want to add the screens that contain the data on which
dashboard widgets are based. If the screen is absent in the mobile site map, the mobile app displays
a warning.
• Add a shortcut of the added dashboard screen to the main menu.
A screen of the Dashboard type can display the following types of dashboard widgets:
• Chart
• Data Table
• Score Card
• Trend Card
Widgets of other types are not available in the mobile app. For details on dashboards types, see
Dashboards.
Example: Adding a Dashboard Screen
In this example, you will add the Controller (DB000015) screen with a set of dashboard widgets. Do the
following:
• Add the Controller (DB000015) screen in the Customization Project Editorby using the following
code.
add screen DB000015 {
type = Dashboard
}
• Add the Dashboards folder and the Controller (DB000015) screen to the main menu of the mobile
app, as shown in the following code. The code must be inside the sitemap instruction.
...
add folder "Folder_0" {
displayName = "Dashboards"
icon = "system://Folder"
add item "DB000015" {
displayName = "Controller"
icon = "system://Graph1"
}
}
...
The following screenshot displays the Controller (DB000015) screen for that is defined in an instance of
Acumatica ERP. If you click on any widget, the screen is not displayed because the appropriate screens
were not added to the mobile site map. You can add them to the mobile site map later.

| Configuring the Mobile Site Map | 27
Figure: Viewing a dashboard screen
Grouping Fields on a Screen
You can combine fields into groups to make data entry more logical and intuitive by using the group
object, as the following example shows.
Example: Grouping Fields
The following example enhances the Sales Order Preferences (SO101000) screen. To see an example
of grouping fields into a group, add the Sales Orders Preferences (SO101000) screen to your
customization project (as described in To Add a Screen to the Mobile Site Map), copy the code below to
the Commands area of the Add: SO101000 page, and publish the project.
add screen SO101000 {
add container "GeneralSettingsDataEntrySettings" {
add field "DefaultSalesOrderType"
add group "DataEntrySettings" {
displayName = "Data Entry Settings"
collapsable = True
collapsed = True
add field "DefaultTransferOrderType"
add field "ShipmentNumberingSequence"
}
add recordAction "Save" {
behavior = Save
}
}
}
While entering data, the user may collapse or expand a particular group of fields. You can prevent a
group from being collapsed by setting the collapsable attribute of the group to False (by default,
the attribute value is True). If a group is collapsible (the collapsable attribute is set to True), the
collapsed attribute indicates whether a group is initially collapsed (by default, the attribute value is
False).
You can see the result in the mobile application in the following screenshots.
The left screenshot shows the Data Entry Settings group, which is initially collapsed. If the user clicks
on the header of the group, the group is expanded, as shown in the right screenshot.

| Configuring the Mobile Site Map | 28
Figure: A collapsible group on a screen
Configuring Attachments
By default, the mobile application enables file attachments and displays them on a screen if the screen
supports the attachments. However, the default handling of attachments can be overridden.
Example: Configuring a Screen with Attachments
The following sample code gives the Invoices (SO303000) screen the ability to accept attachments of
various formats. To see an example, add the Invoices (SO303000) screen to your customization project
(as described in To Add a Screen to the Mobile Site Map), copy the code below to the Commands area
of the Add: SO303000 page, and publish the project.
add screen SO303000 {
add container "InvoiceSummary" {
add field "Customer"
add field "Location"
add field "Terms"
add field "DueDate"
add field "CashDiscountDate"
add field "Currency" {
selector {
add field "CurrencyID"
}
PickerType = Attached
}
add recordAction "Save" {
behavior = Save
}
add recordAction "Cancel" {
behavior = Cancel
}
attachments {
add type "jpg" {
extension = "jpg"
}
add type "png" {
extension = "png"
}
add type "pdf" {
extension = "pdf"

| Configuring the Mobile Site Map | 29
}
}
}
}
To enable or disable attachments and configure the file types that are allowed, you use the
attachments instruction inside the container object.
: If a screen does not support attachments, the attachments are not displayed even if you set the
disabled attribute of the attachments instruction to False.
The screenshot below shows the resulting screen in the mobile application. To attach an item, the
user taps the paper clip symbol in the top right corner of the screen. After at least one item has been
attached, the number next to the paper clip indicates how many items have been attached.
Figure: A screen with attachments
The Enhancement of Images Taken from the Camera
The functionality of enhancing images taken from the camera of a mobile device is implemented in
the Acumatica mobile app. This image enhancement makes the image look better and more readable.
This functionality is useful for any printed document, such as expense receipts that may be attached to
documents in Acumatica ERP.
To switch on image enhancement in the Acumatica mobile app, you should set the
imageAdjustmentPreset attribute to Receipt in the attachments instruction of the mobile site map as
follows.
attachments {
imageAdjustmentPreset = Receipt
}
When the imageAdjustmentPreset attribute is set to Receipt, a corresponding button appears in the
attachment area (see the screenshot below). When a user taps the highlighted button, a special camera
mode is switched on in the Acumatica mobile app. In this mode, the following enhancements of the
image captured by the camera are performed:
• The image is cropped by the bounding box of the detected edges.
• Any image distortion is removed.

| Configuring the Mobile Site Map | 30
• The image is converted into black and white.
• The contrast of the image is maximized.
Each of these enhancements is first performed automatically and then the user can also add manual
adjustments. The automatic changes cannot be undone.
Figure: A screen with the attachment area to add photos in enhanced mode
If the imageAdjustmentPreset attribute is not specified or has value other than Receipt, the
Acumatica mobile app attaches the original image taken from the camera.
Configuring Selectors
You can configure selector fields to be displayed as pop-up windows or grids by using the selector
instruction.
Example: Configuring a Screen with Selectors
The following example configures a selector for the Currency field of the Invoices (SO303000) screen.
To see an example, copy the code below to the Add: SO303000 Invoices page of the Customization
Project Editor, and publish the project.
add screen SO303000 {
add container "InvoiceSummary" {
add field "Customer"
add field "Location"
add field "Terms"
add field "DueDate"
add field "CashDiscountDate"
add field "Currency" {
selector {
add field "CurrencyID"
}
pickerType = Attached
}
add recordAction "Save" {
behavior = Save
}
}
}

| Configuring the Mobile Site Map | 31
A selector with pickerType="Attached" is displayed as a field on the first screenshot and as a pop-
up window on the second screenshot.
Figure: A selector as a pop-up window
Configuring Related Containers
This topic describes how to configure different types of related containers on the same screen.
Example: Configuring a Screen with One-to-Many (Master-Detail) Containers
With one-to-many containers declared inside the screen object, one container is considered the master
container, while all other containers are considered detail containers.
The following code is an example of the one-to-many-containers scheme. You can see the full example
if you select Update Existing Screen > EP301000 on the toolbar of the Mobile Application page in
the Customization Project Editor.
add screen EP301000 {
openAs = Form
add container "DocumentSummary" {
...
}
add container "AddReceipts" {
type = SelectionActionList
visible = False
listActionsToExpand = 1
add field "Description"
add field "ClaimAmount"
add field "Date"
add field "Currency"
add listAction "SubmitReceipt" {
icon = "system://Check"
behavior = Void
}
attachments {}
}
add container "ExpenseClaimDetails" {
fieldsToShow = 6
listActionsToExpand = 3
containerActionsToExpand = 3
add field "Description"

| Configuring the Mobile Site Map | 32
add field "Amount"
...
attachments {}
}
...
}
In this example, DocumentSummary is the master container. All other declared detail containers are
displayed on the screen below the master container in the order of their declaration.
The following screenshot shows the resulting screen in the mobile application.
Figure: Screen with one-to-many containers
Example: Displaying Fields from Different Containers in One Container
You can configure a container so that it displays fields form different containers.
The screen in this example includes the ClaimDetails container, which also has a field from the
ReceiptDetailsExpenseDetails container. You do not need to declare both containers. Instead,
in the field object, you separate the corresponding container name and its field with the # symbol, as
shown in the following sample code.
add screen EP301020 {
openAs = Form
add container "ClaimDetails" {
…
add field "ReceiptDetailsExpenseDetails#Description"
add field "Date"
add field "ExpenseItem" {
pickerType = Searchable
selector {
add field "Description"
add field "InventoryID"

| Configuring the Mobile Site Map | 33
}
}
…
}
…
}
In this example, the Description field of the ReceiptDetailsExpenseDetails container is
displayed (among other fields). To see the full example, in the navigation pane of the Customization
Project Editor select the Mobile Application page and click Customize > Update Existing Screen >
EP301020.
The following screenshot shows the resulting screens with containers containing declared fields.
Figure: Screens with containers containing declared fields
Example: Configuring a Screen with Many-to-One (Master-Detail) Containers
Acumatica ERP includes dialog boxes that are opened from forms and that provide additional actions for
items in a grid. For example, on the Expense Claims (EP301030) form, you could use the Add Receipts
dialog box to add receipts to an expense claim entity. See the following screenshot.

| Configuring the Mobile Site Map | 34
Figure: Example of a dialog box with a grid
To map this kind of dialog box to the mobile app, you need to specify type =
SelectionActionList for the container corresponding to this dialog box in the form's WSDL schema
and specify a listAction, as shown in the following code.
add screen EP301000 {
openAs = Form
…
add container "AddReceipts" {
type = SelectionActionList
visible = False
listActionsToExpand = 1
add field "Description"
add field "ClaimAmount"
add field "Date"
add field "Currency"
add listAction "SubmitReceipt" {
icon = "system://Check"
behavior = Void
}
attachments {}
}
…
}
To see the full example, in the navigation pane of the Customization Project Editor select the Mobile
Application page and click Customize > Update Existing Screen > EP301000.
The screenshots below show the resulting screens in the mobile app. Screens with list actions support
selecting multiple items.

| Configuring the Mobile Site Map | 35
The first screenshot shows the content of the DocumentSummary container of the Expense Claims
(EP301030) screen and the Add Receipts button, which corresponds to the listAction
"SubmitReceipt".
: The DisplayName attribute is not defined for the nested container; therefore, for the container, the
mobile application displays the Add Receipts name, which is obtained from the Mobile API server.
If a user taps the Add Receipts button, the mobile app displays the content of this container and
provides multi-selection, as the second screenshot shows. The user can tap Expense Claim Details,
as shown in the third screenshot, to view the Expense Claim Details screen, shown in the fourth
screenshot.
Figure: Container supporting list actions
Example: Configuring a Screen with a Container Link
In the mobile app, a container can contain a link to another container on the screen toolbar or on the
screen among the fields. To use a container link, do the following:
• Declare the container to which you want to add a link
• Add the containerLink object
See the following code for an example of the creation of a link to the Summary container.
add screen EP305000 {
add container "DocumentSummary" {
…
add containerLink "Summary" {
control = "ListItem"
formPriority = 52
}
…
}
add container "Summary" {
…}
…
}
Based on this code, you can open the Summary screen by using the list entry.
The screenshots below show the Timecard (EP305000) screen with the container links and the opened
Summary screen.

| Configuring the Mobile Site Map | 36
Figure: Use of container link to open a container
Adding Entity Attributes to Mobile Screens
In Acumatica ERP, a class is a grouping of entities—such as leads, opportunities, customers, cases,
projects, and stock or non-stock items—that have similar properties. For each class as a business
object, you can define a list of entity attributes to gather specific information about members of the
class.
On an Acumatica ERP form where attributes are defined for an entity, the attributes are usually
displayed on a separate tab as a table that contains a set of key-value pairs. Entity attributes are
dynamic, which means that they can be reconfigured, added, or removed at any time. That is why it is
not possible to explicitly specify them in a mobile site map. Therefore, specific definitions are used to
show the attributes in a mobile application.
Thus, in a mobile application, entity attributes are displayed as a screen or part of a screen with input
fields rather than as a table. For improved usability, you can apply a group as a container for attributes.
Suppose that in the mobile app, you need to display the attributes of a case class shown on the
Cases(CR306000) form of Acumatica ERP, which are shown in the screenshot below.

| Configuring the Mobile Site Map | 37
Figure: Viewing the Attributes tab on the Cases (CR306000) form
Example: Configuring a Screen with a Group of Attributes
The following example adds a group of attributes in the CaseSummary container.
add screen CR306000 {
openAs = Form
…
add container "CaseSummary" {
add group "AttributesGroup" {
displayName = "Attributes"
collapsable = True
collapsed = True
add attributes "Attributes"
}
…
}
In this code, the attributes object is wrapped in the group named AttributesGroup. To see the full
example, in the navigation pane of the Customization Project Editor select the Mobile Application page
and click Customize > Update Existing Screen > CR306000.
The following screenshot shows the resulting screen in the mobile app.

| Configuring the Mobile Site Map | 38
Figure: Viewing the Cases screen and the Attributes group
Also, you can use the attributes object to map a pair of columns from any grid of Acumatica ERP to
a form view in the mobile app as a key-value pair. For example, if a grid contains a key field, a value
field, and a field for sorting, to create a sorted group of key-value pairs of the grid on a form view of
the mobile app, you might define the following attributes object (see for details).
add container … {
add group … {
add attributes "GridDataView" {
displayName = "Column1_FieldName"
displayName = "Column3_FieldName"
}
}
}
In the example above, GridDataView is the DataMember defined for the grid; Column1_FieldName,
Column5_FieldName, and Column3_FieldName are respectively the key field, the value field, and
the field for sorting.
Redirecting the User to Different Screens and Containers
You can redirect the user to different screens and containers in a mobile app in one of the following
ways:
• Allow a redirection that is already implemented in Acumatica ERP
• Create a new redirection
Redirections can be performed to the following objects:
• A container inside the current screen
• Another screen
• A container inside another screen
Allowing of a Redirection That Is Implemented in Acumatica ERP
While executing an action, you may need to redirect the mobile app from the current screen to
a different screen or to an external URL. As a rule, the business logic of Acumatica ERP handles
redirection to a screen by using the PXRedirectRequiredException and PXPopupRedirectException
exceptions.

| Configuring the Mobile Site Map | 39
In the mobile app, you can allow a redirection that is implemented in an action of Acumatica ERP.
To do this, you set the redirect attribute of the appropriate containerAction, recordAction, or
selectionAction object to True.
Use of an Existing Redirection from the List Form View to the Editing Form View
You can see an example of redirecting from the list form view to the editing form view in the
Configuring Editing Screens topic.
In the Invoices (SO3030PL) list screen, you can find two actions that can be invoked to open the editing
form for a data record: Behavior="Create" and Behavior="Open". The Redirect="true"
attribute indicates that the editing screen needs to be opened separately. The actual screen that will be
opened is determined by the server logic.
You can still control the current screen after an action is completed by using the After attribute of the
corresponding action object. The After attribute defines more complex behavior of the container when
the redirect attribute of this object is set to True. The possible values for the after attribute have the
following meanings:
• If redirection doesn't happen:
• Refresh: The current container is refreshed.
• Close: The current container is closed, and the previous container in the stack is loaded.
• If redirection happens:
• Refresh: A new screen is loaded, and the previous one is saved in the stack.
• Close: The current container is closed, and the new one is opened, which takes the position
of the closed container in the stack.
The default value of the after attribute is Refresh.
Example: Using the Existing Redirection to an External URL
If an action on an Acumatica ERP form provides redirection to an external URL, you can map the action
to use it in the mobile app. To do this, you need no additional attributes in the action object. However,
the redirect attribute of the tag must be set to True, as shown in the following example.
...
add recordAction "ViewOnMap" {
behavior = Void
redirect = True
}
...
On a mobile device, such action launches the default browser and passes the URL, which is obtained
from the Acumatica ERP server, to the browser that opens the webpage specified in the URL.
Creation of a New Redirection to a Screen or Container
You can create a redirection to any container or screen in the mobile app when the redirection does not
exist in Acumatica ERP. For example, you can do this to implement pop-up windows in the mobile app.
To create a redirection, you use the following attributes:
• RedirectToScreen specifies the ID of the screen to redirect the user to. If the redirection target
is within the current screen (such as a different container), don't use this attribute.
• RedirectToContainer specifies the name of the container to redirect the user to. If you don't
specify this attribute, you are redirected to the primary container of the target screen.
Example: Creating a Redirection to Another Container Inside the Screen

| Configuring the Mobile Site Map | 40
The following is an example of redirecting the user to another container inside the screen.
add screen "EP301000" {
openAs = Form
add container "DocumentSummary" {
add field "ReferenceNbr" {
forceIsDisabled = True
}
add field "Description"
add recordAction "ShowSubmitReceipt" {
behavior = Void
redirect = True
redirectToScreen = "EP301000"
redirectToContainer = "SubmitReceipts$List"
}
add recordAction "Save" {
behavior = Save
after = Close
}
add recordAction "Cancel" {
behavior = Cancel
}
attachments {
disabled = True
}
}
add container "SubmitReceipts" {
type = SelectionActionList
visible = False
add field "Description"
add field "Date"
add field "ClaimAmount"
add listAction "SubmitReceipt" {
behavior = Void
}
}
}
In this example, the Expense Claims (EP301000) screen includes the following containers:
• DocumentSummary, which contains the following redirection on the record action.
add recordAction "ShowSubmitReceipt" {
behavior = Void
redirect = True
redirectToScreen = "EP301000"
redirectToContainer = "SubmitReceipts$List"
}
• SubmitReceipts, to which the redirection is declared by the redirectToContainer =
"SubmitReceipts$List" attribute.
The RedirectToScreen attribute is not applicable here because both containers belong to the same
screen.
The value of the redirectToContainer attribute can be expanded with special arguments separated
with the $ symbol (as shown in the following example).
RedirectToContainer="InventoryLookup$List$InventoryLookupInventory"
These arguments allow more detailed configuration of the container behavior. The arguments are
specified as follows:
1. The first argument is the name is the name of the container.
2. The second argument specifies how to open the container:

| Configuring the Mobile Site Map | 41
• List: The container should be opened as a list view
• Form: The container should be opened as a form view
3. If the second argument is set to List, you may specify a third argument to indicate an
additional container that is used as a filter for the data records in the main container.
: To use the expanded way of configuring a redirection, you should clearly understand how the target
screen works, how its business logic operates, and how the state of the business logic objects changes after
any of the actions is executed.
Displaying Any Field as a Text Field
The mobile API gives you the ability to map a control of any type from an Acumatica ERP form to a text
box in the mobile app. This ability can be useful when both of the following conditions are met:
• You have one of the following problems with the use of the field in the mobile application:
• A value in the control for the field is displayed oddly or incorrectly.
• The mapping of the field raises an exception.
• You do not need to add a new value for the field in the mobile app.
When these conditions are met, you can force the mobile application to treat this field as a common
text field.
To do this, in the Field object of the field, specify the ForceType="String" attribute. The input
value is inserted directly into the cache of the corresponding container.
Warning: We do not recommend that you use the ForceType attribute unless you have extensive
experience developing custom controls and fully understand the outcome of using this attribute. Note that
by using the ForceType attribute, you could switch off some types of field validation, which could damage
data in the database.
Creating the User Signature
The mobile app provides the additional functionality for user to create a signature and attach the
signature image file to an Acumatica ERP form that supports file attachments.
: This functionality does not work in the container object with attachments disabled (the attachments
instuction with the disabled attribute set to True).
To add this functionality to your mobile app, you should update the corresponding page by adding the
recordAction object with the behavior attribute set to SignReport. The container to which you add the
recordAction object must support attachments.
For example, to add an area for adding a user signature to the Sales Orders (SO301000) screen, open
the Update: SO301000 page (for details, see To Update a Screen of a Mobile App), and insert the
following code in the Commands area.
update screen SO301000 {
update container "OrderSummary" {
...
add recordAction "SignReport" {
behavior = SignReport
displayName = "Sign"
}
...
}
}
As a result, the Sign action appears on the appropriate screen of the mobile app, as the following
screenshot shows.

| Configuring the Mobile Site Map | 42
Figure: Viewing the Sign action on the screen toolbar
When the user clicks this action, the app displays a blank form with the Cancel and OK buttons and the
words Sign here to instruct the user to add the signature, as shown in the following screenshot. A user
can add multiple signatures to one record.
Figure: Creating a signature
After the user clicks the Save (✓) button on the screen toolbar (shown in the following screenshot), the
mobile app sends the signature file to the Acumatica ERP server, which saves the file in the database as
a file attached to the appropriate form. In the mobile app, the attachment is displayed as an image that
is attached to the Acumatica ERP form.

| Configuring the Mobile Site Map | 43
Figure: Viewing signatures added to the screen

| Configuring the Mobile Site Map by Using XML (deprecated) | 44
Configuring the Mobile Site Map by Using XML
(deprecated)
: Using XML for customizing the Mobile Site Map is deprecated since Acumatica 2019 R1. Use Configuring
the Mobile Site Map instead.
The user interface of the Acumatica mobile app has the following structure:
• Main Menu, which can include the sm:Folder and sm:Screen elements
• Sidebar Menu, which can include links to favorite folders and screens
• Screens, which can include sm:Container, sm:Field, sm:Action, and other elements
See Mobile Site Map Reference for detailed descriptions of all tags.
To Customize the Mobile Site Map for a Form
Before you start to customize the original mobile site map, we recommend that you explore the files
in the \App_Data\Mobile folder of the website to learn which forms of Acumatica ERP are used in the
map. The folder can contain the files with the XML metadata and MSDL code of not only the original
mobile site map but also any customizations that have been applied to the map.
To customize the mapping for an Acumatica ERP form that is included in the original mobile site map,
we recommend that you develop custom MSDL code. (See Configuring the Mobile Site Map for details.)
Warning: We recommend that you avoid including in the mobile site map the XML metadata for an
Acumatica ERP form that is already included in the original mobile site map. Currently, the mobile
framework does not allow the merging of multiple sets of metadata for the same form of Acumatica ERP.
Also, we recommend that you not customize the files of the original mobile site map. In a future version of
Acumatica ERP, an XML file can contain additional metadata for new functionality, about which you would
never know because the file is replaced by the customized one.
After you have saved the MSDL code in a .msd file in the \App_Data\Mobile folder of the website, you
can add this file to a customization project that can be deployed to an instance of Acumatica ERP.
To Add a Form to the Mobile Site Map by Using an XML File
To add the metadata for an Acumatica ERP form to the mobile site map, you have to include it in a new
.xml file in the \App_Data\Mobile folder of the website. If the metadata must contain multiple new
.xml.inc files, place the files in the \App_Data\Mobile\includes folder of the website.
Suppose that you need to add to the mobile site map an Acumatica ERP form with the XXX screen ID,
and you are sure that the mobile site map does not contain the XML metadata for this form. Further
suppose that you have to add the Date and Description fields and the Insert and Delete actions of
the original XXX screen of Acumatica ERP to the screen on the mobile device, as the following diagram
shows.

| Configuring the Mobile Site Map by Using XML (deprecated) | 45
Figure: Use of an XML file to configure a screen in the mobile app
The diagram shows how Acumatica Mobile Framework uses the metadata of the example.xml file
to configure the XXX screen in the mobile app. (See Configuring the Mobile Site Map by Using XML
(deprecated) for details.)
To create the metadata for the form, perform the following actions:
1. In the \App_Data\Mobile folder, create the example.xml file, which contains the XML header
and the sm:SiteMap tag, as follows.
<?xml version="1.0" encoding="UTF-8"?>
<sm:SiteMap xmlns:sm="http://acumatica.com/mobilesitemap" xmlns:xsi="http://
www.w3.org/2001/XMLSchema-instance">
</sm:SiteMap>
: See Mobile Site Map Reference for detailed descriptions of all tags used in the mobile site map.
2. Get the WSDL schema for the original XXX screen of Acumatica ERP, as described in Getting the
WSDL Schema.
3. Add the sm:Screen tag to the sm:SiteMap tag, as described in Configuring Lists.
4. In the WSDL schema, find the Insert and Delete actions and make sure that these actions
belong to the Action container.
5. In the WSDL schema, find the Date and Description fields and make sure that these fields
belong to the NameX container.
6. Add the sm:Container tag to the sm:Screen tag, assigning it the NameX name to map the
NameX container of the original XXX screen of Acumatica ERP to the XXX screen in the mobile
app (see the figure above).
7. For each required field, add an sm:Field tag with the original name to the container tag to map
the field to the XXX screen in the mobile app.

| Configuring the Mobile Site Map by Using XML (deprecated) | 46
8. For each required action, add an sm:Action tag with the original name to the container tag to
map the action to the XXX screen in the mobile app.
: Once you have changed the mobile site map, you can include the added .xml and .xml.inc files in
a customization project as File items to deploy the customization on the target system. For details, see
Custom Files in the Customization Guide.
To Generate the Delta from Two Mobile Site Maps
: The following information is applicable only for Acumatica Framework versions earlier than 2019 R1.
If you have developed a custom site map for the mobile application and want to redistribute it to
multiple Acumatica ERP instances, you can generate a delta script file that can be applied to the default
site map. You then add this delta file to the customization project, as described in this topic.
To Generate the Delta from Two Mobile Site Maps
1. For an Acumatica ERP instance, customize the site map for the mobile application. (For details,
see To Customize the Mobile Site Map for a Form.)
: Make sure all nodes of the site map have the Name attribute specified. This attribute is used by
the system during the generation of the delta file.
2. Deploy another Acumatica ERP instance of the same version with the default site map for the
mobile application.
3. Run the ac.exe command-line utility, which is located in the Data folder of your Acumatica ERP
installation folder, with the MOBILESITEMAP command, the delta argument, and the following
parameters:
• The path to the folder with the default site map, which is the \App_Data\Mobile folder of
the corresponding Acumatica ERP application instance.
: If the folder specified in this parameter is empty, the utility converts the XML site map
specified in the second parameter to MSDL format.
• The path to the folder with the customized site map, which is the \App_Data\Mobile folder
of the customized Acumatica ERP application instance.
• The path to the MSD script file to save the generated delta. You have to save the MSD file
with the delta in the \App_Data\Mobile folder of the Acumatica ERP application instance
to make Acumatica ERP apply the delta automatically when a user starts the mobile
application connected to this instance.
The following code shows an example of the command line. (The line breaks are only for display
purposes.)
ac.exe MOBILESITEMAP d s
"D:\ProgramFiles\AcumaticaERP\DefaultAcumaticaDB\App_Data\Mobile"
"D:\ProgramFiles\AcumaticaERP\CustomizedAcumaticaDB\App_Data\Mobile"
"D:\ProgramFiles\AcumaticaERP\CustomizedAcumaticaDB\App_Data\Mobile
\delta.msd"
: You can use the short name of the delta argument, which is d.
4. Add the delta file to a customization project to apply the changes in the mobile site map to other
instances of Acumatica ERP.
| Configuring the Mobile Site Map by Using XML (deprecated) | 47
How to Use XML Examples of This Section
In this section, each example contains the XML metadata that you can use as the mobile site map for
your instance of Acumatica ERP.
All examples include the metadata for the Acumatica ERP forms that are used in the original mobile
site map. Because the Acumatica Mobile Framework does not allow the merging of multiple sets of
metadata for the same form of Acumatica ERP, you cannot use the examples while the website contains
the original mobile site map. To avoid possible errors on the server, you should temporarily (during the
period while you are reading the guide and completing its examples) cancel the original mapping in the
instance of Acumatica ERP where you intend to test the examples.
To do this, perform the following actions:
1. In the \App_Data\Mobile folder of the website, rename the mobilesitemap.xml file to
mobilesitemap.xml.bak.
2. In the same folder, create the mobilesitemap.xml file, which contains the following XML code.
<?xml version="1.0" encoding="UTF-8"?>
<sm:SiteMap xmlns:sm="http://acumatica.com/mobilesitemap"
xmlns:xsi="http://www.w3.org/2001/XMLSchema-instance">
</sm:SiteMap>
: If you want the Acumatica ERP server to load all XML files from the \App_Data\Mobile folder
of the website, the mobilesitemap.xml file is mandatory in this folder. If the file is absent, the
server does not load other XML files, and the mobile site map is empty.
After you have completed these actions, the mobile site map is empty, and the server loads all other
XML files from the \App_Data\Mobile folder of the website. Therefore, you can add .xml files with the
sample code provided in the examples to the \App_Data\Mobile folder to perform testing.
Warning: We recommend that you remove the code of each tested example before testing the next one,
because some examples contain the metadata for the same forms of Acumatica ERP.
Main Menu
The main menu of the Acumatica mobile application consists of links to folders and screens. Clicking on
a folder link opens the folder, which may include links to screens and other folders. Thus, the folders
have a hierarchy, as the folders in file systems do. The main menu provides access to screens in the
mobile site map, and folders are used to organize the screens.
: Access rights for screens in the mobile application are the same as the access rights for screens in
Acumatica ERP.
The start page of the main menu contains all child tags of the sm:SiteMap tag.
In this topic, you can read about and perform several simple examples that demonstrate how to build
the main menu of the mobile application.
Example: Viewing the Simplest Configuration of the Mobile Application
To see an example of the mobile application with a simple configuration, copy the code below to an
.xml file, place the file in the \App_Data\Mobile folder of the Acumatica ERP website, and start the
mobile application.
<?xml version="1.0" encoding="UTF-8"?>
<sm:SiteMap xmlns:sm="http://acumatica.com/mobilesitemap" xmlns:xsi="http://
www.w3.org/2001/XMLSchema-instance">
<sm:Screen Id="PM301000" Type="SimpleScreen" DisplayName="Projects"
Icon="system://Display1">
<sm:Container Name="ProjectSummary">
<sm:Field Name="Status" />
<sm:Field Name="ProjectID" />

| Configuring the Mobile Site Map by Using XML (deprecated) | 48
<sm:Field Name="Customer" />
<sm:Field Name="TemplateID" />
<sm:Field Name="Hold" />
<sm:Field Name="Description" />
</sm:Container>
</sm:Screen>
</sm:SiteMap>
On a mobile device, the mobile application will look like the application shown in the following
screenshots.
Figure: The simple mobile application
Notice that the main menu contains only the link to the Projects screen; there are no folders on the
menu.
Example: Adding a Screen to a Folder
In this example, you will add a screen to a folder. If you copy the code below to an .xml file in the
\App_Data\Mobile folder, the Projects screen will be located in the Organization folder.
<?xml version="1.0" encoding="UTF-8"?>
<sm:SiteMap xmlns:sm="http://acumatica.com/mobilesitemap" xmlns:xsi="http://
www.w3.org/2001/XMLSchema-instance">
<sm:Folder DisplayName="Organization" Icon="system://NewsPaper" >
<sm:Screen Id="PM301000" Type="SimpleScreen" DisplayName="Projects"
Icon="system://Display1">
<sm:Container Name="ProjectSummary">
<sm:Field Name="Status" />
<sm:Field Name="ProjectID" />
<sm:Field Name="Customer" />
<sm:Field Name="TemplateID" />
<sm:Field Name="Hold" />
<sm:Field Name="Description" />
</sm:Container>
</sm:Screen>
</sm:Folder>
</sm:SiteMap>

| Configuring the Mobile Site Map by Using XML (deprecated) | 49
The screenshots below show the results of this code on the mobile device.
Figure: The main menu, the contents of the folder, and the screen
: A folder must include at least one screen.
A folder can be of one of the following types, which determine how the folder contents are displayed:
• ListFolder (default): With a folder of this type, folders and screens are represented as icons
(see the example in this section, shown above). You need to tap an icon to open a folder or
screen.
• HubFolder: In a folder of this type, the content of a screen is displayed like a tab item on a form.
You swipe left and right to navigate through the contents of the folder, as the example in the next
section shows.
: Nested folders of the HubFolder type are not supported. That is, you may not add a folder of the
HubFolder type within another folder of HubFolder type.
Example: Creating a Folder of the HubFolder Type
In this example, you will create a folder of the HubFolder type and add two screens to it. Copy the code
below to an .xml file in the \App_Data\Mobile folder, and start the mobile application.
<?xml version="1.0" encoding="UTF-8"?>
<sm:SiteMap xmlns:sm="http://acumatica.com/mobilesitemap" xmlns:xsi="http://
www.w3.org/2001/XMLSchema-instance">
<sm:Folder DisplayName="Organization" Icon="system://NewsPaper"
Type="HubFolder">
<sm:Screen Id="PM301000" Type="SimpleScreen" DisplayName="Projects">
<sm:Container Name="ProjectSummary">
<sm:Field Name="Status" />
<sm:Field Name="ProjectID" />
<sm:Field Name="Customer" />
<sm:Field Name="TemplateID" />
<sm:Field Name="Hold" />
<sm:Field Name="Description" />
</sm:Container>
</sm:Screen>

| Configuring the Mobile Site Map by Using XML (deprecated) | 50
<sm:Screen Id="CR306020" Type="SimpleScreen" DisplayName="Tasks">
<sm:Container Name="Details">
<sm:Field Name="Summary" />
<sm:Field Name="StartDate" />
<sm:Field Name="Internal" />
<sm:Field Name="DueDate" />
<sm:Field Name="Completion" />
<sm:Field Name="Workgroup" />
<sm:Field Name="Owner" />
<sm:Field Name="Reminder" />
<sm:Field Name="RemindAtReminderDateDate" />
<sm:Field Name="RemindAtReminderDateTime" />
</sm:Container>
</sm:Screen>
</sm:Folder>
</sm:SiteMap>
In the following screenshots, you can see the results of this code on a mobile device.
Figure: The main menu and the folder of HubFolder type
When you tap the Organization icon, the mobile application opens the folder with the Projects and
Tasks lists in it. You can switch between these lists by swiping right and left.
Example: Configuring Screens with Tabs
Some Acumatica ERP forms display lists on multiple tabs (as the following screenshot shows).
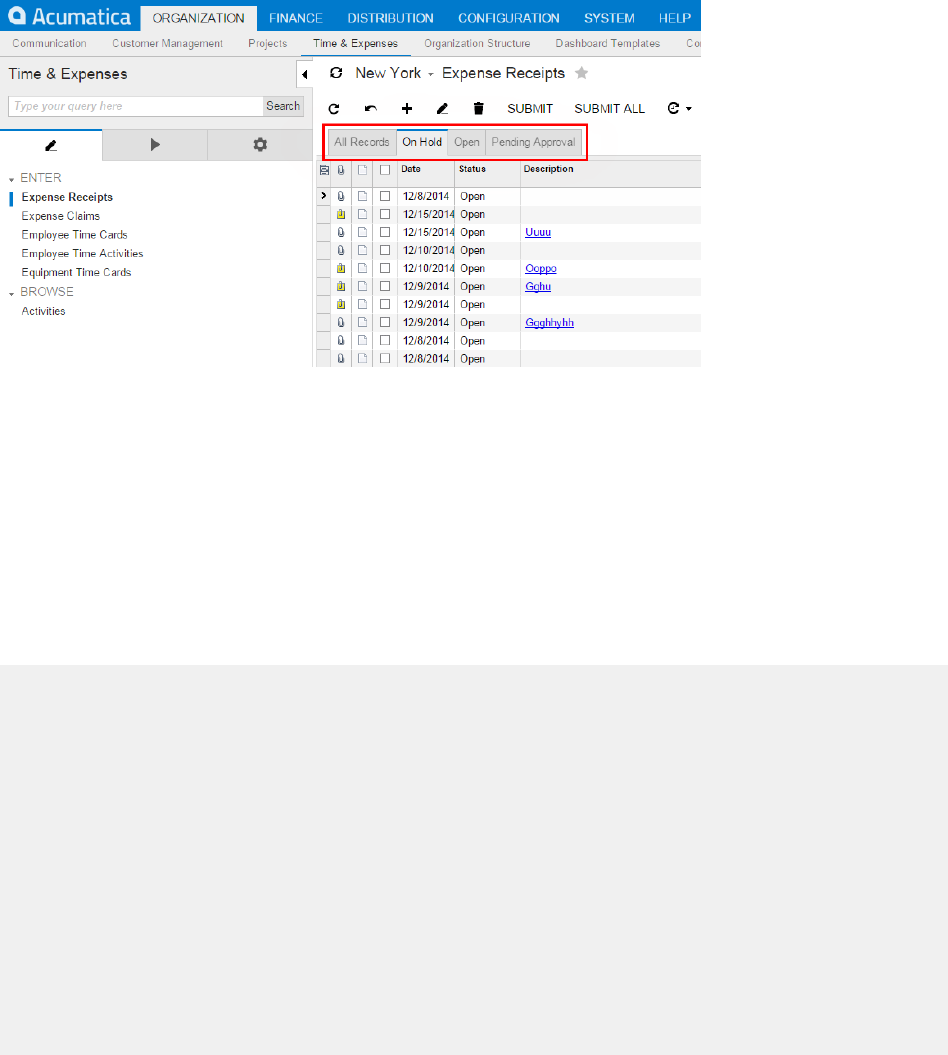
| Configuring the Mobile Site Map by Using XML (deprecated) | 51
Figure: Acumatica ERP form with multiple tabs
In the mobile application, such a form is represented as multiple screens, with each screen
corresponding to a single tab. However, you have to configure the screen only once because the mobile
API server automatically performs the screen expansion into multiple screens.
Copy the code below to an .xml file in the \App_Data\Mobile folder, and start the mobile application.
In this example, you will notice that the Expense Receipts form (EP301010) is represented by a
number of screens, each corresponding to a single tab (All Records, On Hold, Open, or Pending
Approval). This example adds the screens to a folder of the HubFolder type, so you will switch
between tabs by swiping right and left. If you changed the folder type to ListFolder, the tabs would
be represented by icons.
<?xml version="1.0" encoding="UTF-8"?>
<sm:SiteMap xmlns:sm="http://acumatica.com/mobilesitemap" xmlns:xsi="http://
www.w3.org/2001/XMLSchema-instance">
<sm:Folder DisplayName="Expense Receipts" Type="HubFolder" Icon="system://
NewsPaper">
<sm:Screen Id="EP301010" Type="SimpleScreen" DisplayName="Expense Receipts">
<sm:Container Name="ExpenseReceipts">
<sm:Field Name="Date" />
<sm:Field Name="ClaimAmount"/>
<sm:Field Name="DescriptionTranDesc"/>
<sm:Field Name="Currency" />
</sm:Container>
</sm:Screen>
</sm:Folder>
</sm:SiteMap>
The following screenshots show the result of this code on a mobile device.

| Configuring the Mobile Site Map by Using XML (deprecated) | 52
Figure: The multi-tab screen represented as a folder
Sidebar Menu
The mobile application has a sidebar menu, which is the shortcut menu for favorite folders and screens.
You can insert links to folders and screens into the sidebar menu.
Example: Adding a Screen to the Sidebar Menu
To add a folder or screen to the sidebar menu, you need to set the IsDefaultFavorite attribute of the
folder or screen to true.
Copy the code below to an .xml file, put the file in the \App_Data\Mobile folder of the Acumatica ERP
website, and start the mobile application.
<?xml version="1.0" encoding="UTF-8"?>
<sm:SiteMap xmlns:sm="http://acumatica.com/mobilesitemap" xmlns:xsi="http://
www.w3.org/2001/XMLSchema-instance">
<sm:Folder DisplayName="Organization" Icon="system://NewsPaper" >
<sm:Screen Id="PM301000" Type="SimpleScreen" DisplayName="Projects"
Icon="system://Display1" IsDefaultFavorite="true">
<sm:Container Name="ProjectSummary">
<sm:Field Name="Status" />
<sm:Field Name="ProjectID" />
<sm:Field Name="Customer" />
<sm:Field Name="TemplateID" />
<sm:Field Name="Hold" />
<sm:Field Name="Description" />
</sm:Container>
</sm:Screen>
</sm:Folder>
</sm:SiteMap>
The resulting sidebar menu of the mobile application will include a link for quick access to the Projects
screen.
| Configuring the Mobile Site Map by Using XML (deprecated) | 53
Figure: A link to the screen in the sidebar menu
Screens
This section describes how to configure screens in the mobile application.
The section consists of the following topics:
• Getting the WSDL Schema
• Configuring Lists
• Configuring Editing Forms
• Mapping Reports
• Mapping Dashboards
• Grouping Fields on a Form
• Configuring Attachments
• Configuring Selectors
• Configuring Nested Containers
• Adding Entity Attributes to Mobile Screens
• Redirecting to Different Screens and Containers
• Displaying Any Field as a Text Field
• Creating the User Signature
Getting the WSDL Schema
You can get the needed information to configure a screen from the WSDL schema, which is available on
the title bar of the form in Acumatica ERP through Tools > Web Service in the modern UI or Help >
Web Service in the classic UI. To obtain the WSDL schema, perform the following steps:
1. In Acumatica ERP, open the form for which you want information.
2. On the title bar of the form, click Tools > Web Service in the modern UI or Help > Web
Service in the classic UI.
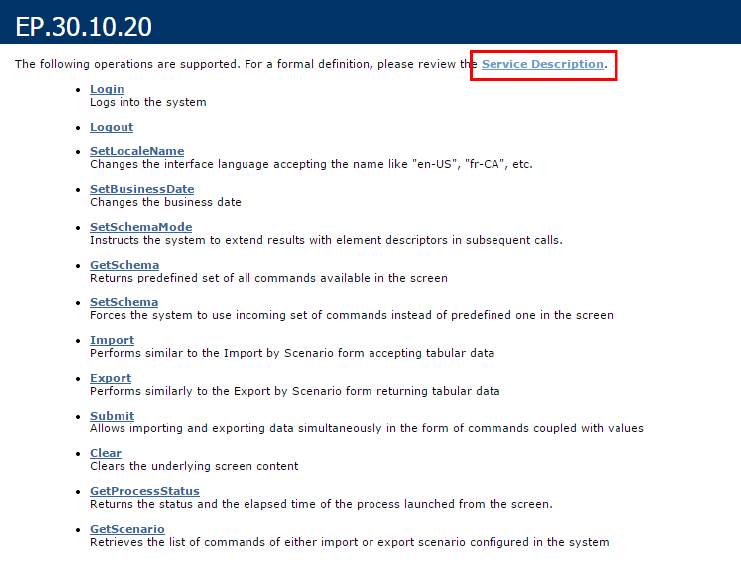
| Configuring the Mobile Site Map by Using XML (deprecated) | 54
3. On the screen with the web service links, click Service Description, as shown in the following
screenshot.
Figure: Getting the service description for a form
See the following screenshot for an example of the WSDL schema. The schema includes containers
(such as the ReceiptDetails container in this example), the list of container fields, and the Actions
list.

| Configuring the Mobile Site Map by Using XML (deprecated) | 55
Figure: Viewing an example of the WSDL schema
With this information, you can start configuring the screen.
Before configuring a screen in the mobile application, you should check how the form looks in the web
version of Acumatica ERP to decide how to configure the screen.
Configuring Lists
This topic describes how to configure a screen that contains a list of records.
Example: Creating a Simple List View Layout
A list of records is the simplest screen layout.
To complete an example of configuring the simplest screen layout, copy the code below to an .xml
file, put the file in the \App_Data\Mobile folder of the Acumatica ERP website, and start the mobile
application.
<?xml version="1.0" encoding="UTF-8"?>
<sm:SiteMap xmlns:sm="http://acumatica.com/mobilesitemap" xmlns:xsi="http://
www.w3.org/2001/XMLSchema-instance">
<sm:Screen DisplayName="Expense Receipt" Icon="system://Display1" Id="EP301020"
Type="SimpleScreen">

| Configuring the Mobile Site Map by Using XML (deprecated) | 56
<sm:Container FieldsToShow="3" Name="ReceiptDetails">
<sm:Field Name="Date" />
<sm:Field Name="Description" />
<sm:Field Name="ExpenseItem" />
<sm:Field Name="TotalAmount" />
<sm:Action Behavior="Create" Context="Container" DisplayName="Add"
Icon="system://Plus" Name="Insert" />
<sm:Action Behavior="Delete" Context="Selection" Icon="system://Trash"
Name="Delete" />
</sm:Container>
</sm:Screen>
</sm:SiteMap>
This example uses the WSDL schema elements marked in the screenshot below.

| Configuring the Mobile Site Map by Using XML (deprecated) | 57
Figure: WSDL schema elements used in the example
The following screenshot shows the resulting screen you will see in the mobile application.

| Configuring the Mobile Site Map by Using XML (deprecated) | 58
Figure: List view layout
The FieldsToShow attribute of the sm:Container tag is used to limit the number of fields for a record
that will be shown in the list. You use this attribute only when the same screen description is used for
both the list view and form view.
You use the sm:Action tag for actions that are available in the UI. (You can get the list of actions from
the WSDL schema; see Getting the WSDL Schema.) The Name attribute should be set to the name of
the action, as found in the WSDL schema.
Actions are divided into standard actions (such as Open, Save, and Cancel) and all other actions (such
as Void). The placement of the standard actions can be different from that of other actions, and some
standard actions (such as Open) are not displayed on the UI at all. Whether an action is considered
standard depends on the value of the Behavior attribute.
The Context attribute is used to set the target of the action. For example, you can use an action with
Context="Selection" when the multiple selection of records, as shown in the screenshot below, is
activated.
Figure: Selection of multiple records

| Configuring the Mobile Site Map by Using XML (deprecated) | 59
You use the Icon attribute to set the icon that is displayed on the UI.
: See <sm:Action> for more information about the attributes of the sm:Action tag.
Example: Creating a Screen with a Filtered List
To see an example of configuring a screen with a filtered list, copy the code below to an .xml file, put
the file in the \App_Data\Mobile folder of the Acumatica ERP website, and start the mobile application.
<?xml version="1.0" encoding="UTF-8"?>
<sm:SiteMap xmlns:sm="http://acumatica.com/mobilesitemap" xmlns:xsi="http://
www.w3.org/2001/XMLSchema-instance">
<sm:Folder DisplayName="Expense Claims" Type="HubFolder" Icon="system://Folder"
>
<sm:Screen Id="EP301030" Type="FilterListScreen" DisplayName="Expense
Claims" >
<sm:Container Name="Selection" >
<sm:Field Name="Employee" />
</sm:Container>
<sm:Container Name="Claim" >
<sm:Field Name="Date" />
<sm:Field Name="Status" />
<sm:Field Name="Description" />
<sm:Field Name="ClaimTotal" />
</sm:Container>
</sm:Screen>
</sm:Folder>
</sm:SiteMap>
To configure a screen with a filtered list, do the following:
1. Specify the screen type: Type="FilterListScreen".
2. In the WSDL schema, find the container corresponding to the filter, and add it to the screen
description ( sm:Container Name="Selection" in the example above).
3. In the WSDL schema, find the container corresponding to the list of records, and add it to the
screen description ( sm:Container Name="Claim" in the example above).
As a result, in the mobile application, the screen will include a button that opens the filter. When you
tap the button, you open the form so you can edit the filter fields (see the screenshots below).

| Configuring the Mobile Site Map by Using XML (deprecated) | 60
Figure: Use of a filter on a screen
Configuring Editing Forms
You have to configure an editing form (that is, a form that is used to enter and edit a data record)
based on the use of the form in Acumatica ERP.
In some cases, Acumatica ERP uses a single form to manage data records of a particular type (that is,
the .aspx page contains the FormView and Grid controls). In these cases, in the mobile site map, you
have to configure both the editing form and the list form by using a single declaration of the sm:Screen
tag.
In other cases, Acumatica ERP uses the following separate forms for data records of a particular type:
• A list view (the .aspx page contains one Grid control) to manage records
• A form view (the .aspx page with one FormView control) to edit fields
In these cases, you have to configure two separate declarations of the sm:Screen tag: one for the list
form, and another for the editing form.
Example: Creating the Same Layout for the Editing Form and the List
To see an example of configuring an editing form to use the same layout as a list does, copy the code
below to an .xml file, put the file in the \App_Data\Mobile folder of the Acumatica ERP website, and
start the mobile application.
<?xml version="1.0" encoding="UTF-8"?>
<sm:SiteMap xmlns:sm="http://acumatica.com/mobilesitemap" xmlns:xsi="http://
www.w3.org/2001/XMLSchema-instance">
<sm:Screen DisplayName="Expense Receipt" Icon="system://Display1" Id="EP301020"
Type="SimpleScreen">
<sm:Container FieldsToShow="3" Name="ReceiptDetails">
<sm:Field Name="Date" />
<sm:Field Name="Description" />
<sm:Field Name="ExpenseItem" />
<sm:Field Name="TotalAmount" />
<sm:Action Behavior="Save" Context="Record" Name="Save" />
<sm:Action Behavior="Cancel" Context="Record" Name="Cancel" />
<sm:Action Behavior="Create" Context="Container" DisplayName="Add"
Icon="system://Plus" Name="Insert" />

| Configuring the Mobile Site Map by Using XML (deprecated) | 61
<sm:Action Behavior="Delete" Context="Selection" Icon="system://Trash"
Name="Delete" />
</sm:Container>
</sm:Screen>
</sm:SiteMap>
This example is almost identical to Example: Creating a Simple List View Layout, except that it adds
two actions, Save and Cancel, which you need to save or cancel changes to a data record.
Example: Configuring the List and the Editing Form Separately
To see an example of configuring the editing form differently than you do a list form, copy the code
below to an .xml file, put the file in the \App_Data\Mobile folder of the Acumatica ERP website, and
start the mobile application.
<?xml version="1.0" encoding="UTF-8"?>
<sm:SiteMap xmlns:sm="http://acumatica.com/mobilesitemap" xmlns:xsi="http://
www.w3.org/2001/XMLSchema-instance">
<sm:Folder DisplayName="Expense Receipts" Type="HubFolder" Icon="system://
NewsPaper" >
<sm:Screen Id="EP301010" Type="SimpleScreen" DisplayName="Expense Receipts"
>
<sm:Container Name="ExpenseReceipts" >
<sm:Field Name="Date" />
<sm:Field Name="ClaimAmount" />
<sm:Field Name="DescriptionTranDesc" />
<sm:Field Name="Currency" />
<sm:Action Name="addNew" Context="Container" Behavior="Create"
Redirect="true" Icon="system://Plus" />
<sm:Action Name="editDetail" Context="Container" Behavior="Open"
Redirect="true" />
<sm:Action Name="Delete" Context="Selection" Behavior="Delete"
Icon="system://Trash" />
</sm:Container>
</sm:Screen>
</sm:Folder>
<sm:Screen Id="EP301020" Type="SimpleScreen" Icon="system://Display1"
DisplayName="Expense Receipt" Visible="false" OpenAs="Form">
<sm:Container Name="ReceiptDetails" >
<sm:Field Name="Date" />
<sm:Field Name="Description" />
<sm:Field Name="ExpenseItem" />
<sm:Field Name="TotalAmount" />
<sm:Action Name="Save" Context="Record" Behavior="Save" />
<sm:Action Name="Cancel" Context="Record" Behavior="Cancel" />
</sm:Container>
</sm:Screen>
</sm:SiteMap>
In this example, you use the EP301010 screen to display the list form, and you use the EP301020
screen to display the editing form. The same approach is used in Acumatica ERP.
To hide the editing form from the main menu of the mobile application, set the Visible attribute to
false for the sm:Screen tag; see the EP301020 screen configuration above.
In the list form (EP301010), you find two actions that can be invoked to open the editing form for
a data record: Behavior="Create" and Behavior="Open". The Redirect="true" attribute
indicates that the editing form needs to be opened as a different screen. The actual screen that will be
opened is determined by the server logic.
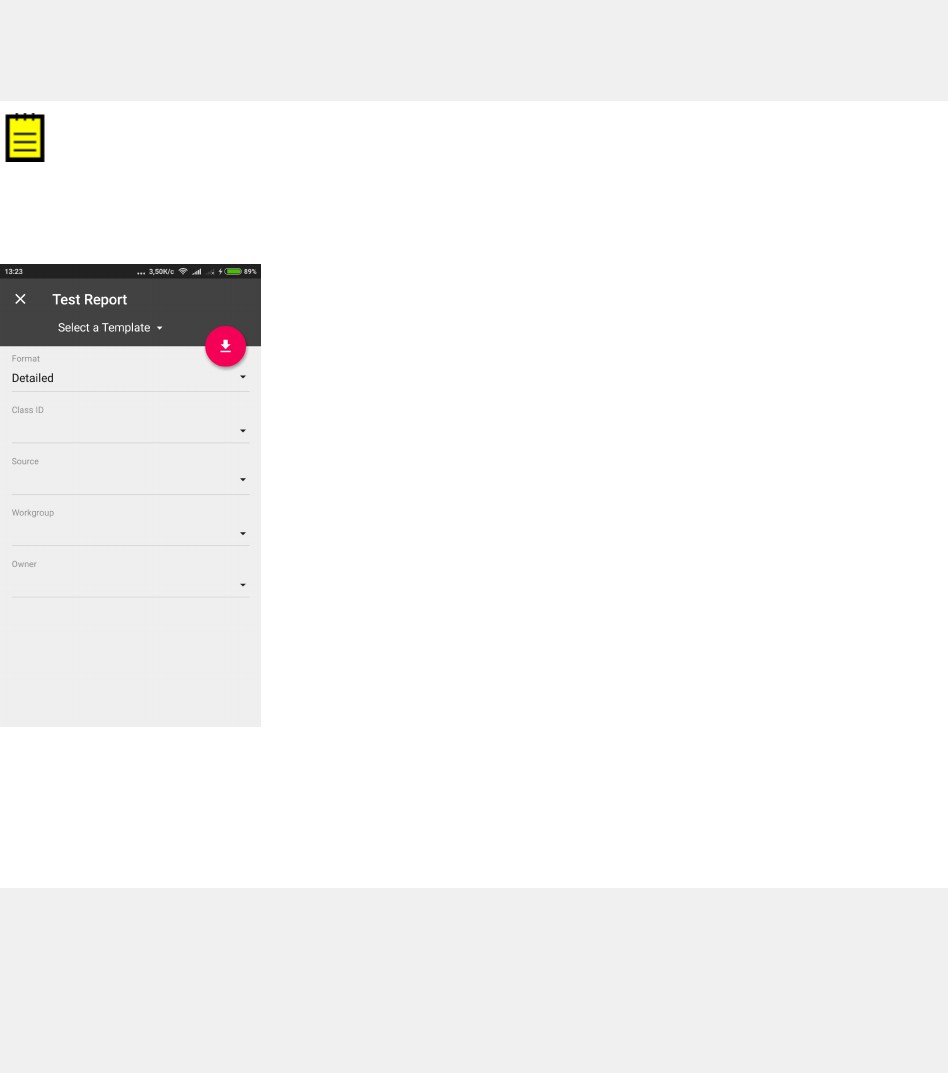
| Configuring the Mobile Site Map by Using XML (deprecated) | 62
Mapping Reports
The user can create and view an Acumatica Report Designer report through the mobile app, if the
following conditions are met:
• The report form is implemented in Acumatica ERP.
• The report form metadata is added to the mobile site map.
• The user is granted the access rights to the report.
To map a report form, you have to add to the mobile site map the sm:Screen tag with the Id attribute
set to the report form ID and the Type attribute set to Report. The following example provides mapping
of the Shipment Summary report (SO620500).
...
<sm:Screen DisplayName="Shipment Summary" Icon="system://Credit" Id="SO620500"
Type="Report"/>
...
: In the mobile site map, you cannot define the content of a report form, for example, to change the set
of parameters or the form layout. The Report type of the screen forces the system to map the screen as is
without changes. Therefore, within the sm:Screen tag with the Type attribute set to Report, a nested tag
is ignored.
The following screenshot displays a screen of the Report type with the DisplayName attribute set to
Test Report.
Figure: Viewing a report screen
On the screenshot, the red button corresponds to the Run Report button of the report in Acumatica
ERP.
In the main menu of the mobile app, to organize report screens, you can create a special folder of the
ListFolder type and include in the folder the links to multiple reports, as in the following example.
...
<sm:Folder DisplayName="Reports" Icon="system://Folder" Type="ListFolder">
<sm:Screen DisplayName="Test Report" Icon="system://Clock" Id="CR621010"
Type="Report"/>
<sm:Screen DisplayName="Sales Order Summary" Icon="system://Cash" Id="SO610500"
Type="Report"/>
<sm:Screen DisplayName="Shipment Summary" Icon="system://Credit" Id="SO620500"
Type="Report"/>
</sm:Folder>

| Configuring the Mobile Site Map by Using XML (deprecated) | 63
...
Using an Action to Generate a Report
The system supports the Acumatica ERP actions that generate reports. To enable such action for a
business entity in the mobile app, you should map the action, for example, in the entry form for the
entity. In the mobile site map, the sm:Action tag has to contain the Redirect attribute set to true, as
in the following example.
...
<sm:Screen DisplayName="Sales Orders">
...
<sm:Container Name="OrderSummary">
...
<sm:Action Behavior="Record" Context="Record" Name="PrintSalesOrderQuoteReport"
Redirect="true"/>
...
</sm:Container>
...
</sm:Screen>
Figure: Viewing the report action button on the Sales Orders screen
: For a report action, the appropriate report form must be mapped because the action uses this form to
create the report.
Once the action is performed by using the mobile app, the app immediately receives the corresponding
report in PDF format from the Acumatica ERP server and displays the report for the user, as shown in
the following screenshot.

| Configuring the Mobile Site Map by Using XML (deprecated) | 64
Figure: Viewing the report
Mapping Dashboards
You can add a dashboard to the mobile site map. To do this, you have to add to the mobile site map
the sm:Screen tag with the Id attribute set to the dashboard form ID and the Type attribute set to
Dashboard. The following example provides mapping of three dashboard screens for the mobile app.
...
<sm:Folder DisplayName="Dashboards" Icon="system://Folder" Type="ListFolder">
<sm:Screen DisplayName="Controller" Icon="system://Graph1" Id="DH000025"
Type="Dashboard" />
<sm:Screen DisplayName="Financial" Icon="system://Graph1" Id="DH000045"
Type="Dashboard" />
<sm:Screen DisplayName="Sales Manager" Icon="system://Graph1" Id="DH000005"
Type="Dashboard" />
</sm:Folder>
...
A screen of the Dashboard type can display the following types of dashboard widgets:
• Chart
• Data Table
• Score Card
• Trend Card
Widgets of other types will be hidden.
If you click a dashboard widget, the mobile app tries to open the appropriate screen. If the screen is
absent in the mobile site map, the mobile app displays a warning.
The following screenshot displays a screen for the Sales Manager dashboard page that is defined in an
instance of Acumatica ERP.

| Configuring the Mobile Site Map by Using XML (deprecated) | 65
Figure: Viewing a dashboard screen
Grouping Fields on a Form
You can combine fields into groups, as the following example shows, to make data entry more logical
and intuitive.
Example: Grouping Fields
To see an example of grouping fields into groups, copy the code below to an .xml file, put the file in the
\App_Data\Mobile folder of the Acumatica ERP website, and start the mobile application.
<?xml version="1.0" encoding="UTF-8"?>
<sm:SiteMap xmlns:sm="http://acumatica.com/mobilesitemap" xmlns:xsi="http://
www.w3.org/2001/XMLSchema-instance">
<sm:Folder DisplayName="Expense Receipts" Type="HubFolder" Icon="system://
NewsPaper" >
<sm:Screen Id="EP301010" Type="SimpleScreen" DisplayName="Expense Receipts"
>
<sm:Container Name="ExpenseReceipts" >
<sm:Field Name="Date" />
<sm:Field Name="ClaimAmount" />
<sm:Field Name="DescriptionTranDesc" />
<sm:Field Name="Currency" />
<sm:Action Name="addNew" Context="Container" Behavior="Create"
Redirect="true" Icon="system://Plus" />
<sm:Action Name="editDetail" Context="Container" Behavior="Open"
Redirect="true" />
<sm:Action Name="Delete" Context="Selection" Behavior="Delete"
Icon="system://Trash" />
</sm:Container>
</sm:Screen>
</sm:Folder>
<sm:Screen Id="EP301020" Type="SimpleScreen" Icon="system://Display1"
DisplayName="Expense Receipt" Visible="false" OpenAs="Form">
<sm:Container Name="ReceiptDetails" >
<sm:Field Name="Date" />
<sm:Field Name="Description" />
<sm:Group DisplayName="Details" Collapsable="true" Collapsed="true">
<sm:Field Name="ExpenseItem" />

| Configuring the Mobile Site Map by Using XML (deprecated) | 66
<sm:Field Name="TotalAmount" />
</sm:Group>
<sm:Action Name="Save" Context="Record" Behavior="Save" />
<sm:Action Name="Cancel" Context="Record" Behavior="Cancel" />
</sm:Container>
</sm:Screen>
</sm:SiteMap>
While entering data, the user may collapse or expand a particular group of fields. You can prevent a
group from being collapsed by setting the Collapsable attribute of the group to false (by default,
the attribute value is true). If a group is collapsible (the Collapsable attribute is set to true), the
Collapsed attribute indicates whether a group is initially collapsed (by default, the attribute value is
false).
You can see the result in the mobile application in the following screenshots.
Figure: A collapsible group on a screen
The left screenshot shows the Details group that is initially collapsed. If the user clicks on the header
of the group, the group will expand, as shown in the right screenshot.
Configuring Attachments
By default, the mobile application enables attachments and displays them on a screen if the screen
supports the attachments. However, the default handling of attachments can be overridden.
Example: Configuring a Screen with Attachments
To see an example of changing the way attachments are handled, copy the code below to an .xml
file, put the file in the \App_Data\Mobile folder of the Acumatica ERP website, and start the mobile
application.
<?xml version="1.0" encoding="UTF-8"?>
<sm:SiteMap xmlns:sm="http://acumatica.com/mobilesitemap" xmlns:xsi="http://
www.w3.org/2001/XMLSchema-instance">
<sm:Folder DisplayName="Expense Receipts" Type="HubFolder" Icon="system://
NewsPaper" >
<sm:Screen Id="EP301010" Type="SimpleScreen" DisplayName="Expense Receipts"
>
<sm:Container Name="ExpenseReceipts" >

| Configuring the Mobile Site Map by Using XML (deprecated) | 67
<sm:Field Name="Date" />
<sm:Field Name="ClaimAmount" />
<sm:Field Name="DescriptionTranDesc" />
<sm:Field Name="Currency" />
<sm:Action Name="addNew" Context="Container" Behavior="Create"
Redirect="true" Icon="system://Plus" />
<sm:Action Name="editDetail" Context="Container" Behavior="Open"
Redirect="true" />
<sm:Action Name="Delete" Context="Selection" Behavior="Delete"
Icon="system://Trash" />
</sm:Container>
</sm:Screen>
</sm:Folder>
<sm:Screen Id="EP301020" Type="SimpleScreen" Icon="system://Display1"
DisplayName="Expense Receipt" Visible="false" OpenAs="Form">
<sm:Container Name="ReceiptDetails" AttachmentsControlPriority="75">
<sm:Attachments Disabled="false">
<sm:Type Extension="jpg" />
<sm:Type Extension="png" />
<sm:Type Extension="pdf" />
</sm:Attachments>
<sm:Field Name="Date" FormPriority="90"/>
<sm:Field Name="Description" FormPriority="80" />
<sm:Field Name="ExpenseItem" FormPriority="70" />
<sm:Field Name="TotalAmount" FormPriority="60" />
<sm:Action Name="Save" Context="Record" Behavior="Save" />
<sm:Action Name="Cancel" Context="Record" Behavior="Cancel" />
</sm:Container>
</sm:Screen>
</sm:SiteMap>
: If a screen does not support attachments, the attachments will not be displayed even if you specify
<sm:Attachments Disabled="false">.
You specify the position of the attachments by using the AttachmentsControlPriority container
attribute and the FormPriority field attribute. The fields and attachments are aligned vertically
according to the priority—the higher the priority, the higher the element's position.
To disable attachments and configure the file types that are allowed, you use the sm:Attachments tag
inside the sm:Container tag.
The screenshot below shows the resulting screen in the mobile application.

| Configuring the Mobile Site Map by Using XML (deprecated) | 68
Figure: A screen with attachments
Enhancing Images Taken from the Camera
The functionality of enhancing images taken from the camera of a mobile device is implemented in the
Acumatica mobile app. This image enhancement makes the image look better and more readable. This
functionality is useful for photos of expense receipts that may be attached to documents in Acumatica
ERP.
To switch on image enhancement in the Acumatica mobile app, you should set the
ImageAdjustmentPreset attribute to Receipt in the sm:Attachments tag of the mobile site map as
follows:
<sm:Attachments ImageAdjustmentPreset="Receipt"/>
When the ImageAdjustmentPreset attribute is set to Receipt, a special camera mode is switched on
in the Acumatica mobile app. In this mode, the following enhancements of the image captured by the
camera are preformed automatically:
• The image is cropped by the bounding box of the detected edges.
• The image distortion is removed.
• The image is converted into black and white.
• The contrast of the image is maximized.
If the ImageAdjustmentPreset attribute is not specified or has another value, the Acumatica mobile
app attaches an original image taken from the camera.
Configuring Selectors
You can configure selector fields to be displayed as pop-up windows or grids.
Example: Configuring a Screen with Selectors
To see an example of configuring a selector field, copy the code below to an .xml file, put the file in the
\App_Data\Mobile folder of the Acumatica ERP website, and start the mobile application.
<?xml version="1.0" encoding="UTF-8"?>
<sm:SiteMap xmlns:sm="http://acumatica.com/mobilesitemap" xmlns:xsi="http://
www.w3.org/2001/XMLSchema-instance">

| Configuring the Mobile Site Map by Using XML (deprecated) | 69
<sm:Folder DisplayName="Expense Receipts" Type="HubFolder" Icon="system://
NewsPaper" >
<sm:Screen Id="EP301010" Type="SimpleScreen" DisplayName="Expense Receipts"
>
<sm:Container Name="ExpenseReceipts" >
<sm:Field Name="Date" />
<sm:Field Name="ClaimAmount" />
<sm:Field Name="DescriptionTranDesc" />
<sm:Field Name="Currency" />
<sm:Action Name="addNew" Context="Container" Behavior="Create"
Redirect="true" Icon="system://Plus" />
<sm:Action Name="editDetail" Context="Container" Behavior="Open"
Redirect="true" />
<sm:Action Name="Delete" Context="Selection" Behavior="Delete"
Icon="system://Trash" />
</sm:Container>
</sm:Screen>
</sm:Folder>
<sm:Screen Id="EP301020" Type="SimpleScreen" Icon="system://Display1"
DisplayName="Expense Receipt" Visible="false" OpenAs="Form">
<sm:Container Name="ReceiptDetails" >
<sm:Field Name="Date" />
<sm:Field Name="Description" />
<sm:Field Name="ExpenseItem" >
<sm:SelectorContainer FieldsToShow="2" PickerType="Detached">
<sm:Field Name="InventoryID" />
<sm:Field Name="Description" />
</sm:SelectorContainer>
</sm:Field>
<sm:Field Name="Currency" >
<sm:SelectorContainer PickerType="Attached">
<sm:Field Name="CurrencyID" />
</sm:SelectorContainer>
</sm:Field>
<sm:Action Name="Save" Context="Record" Behavior="Save" />
<sm:Action Name="Cancel" Context="Record" Behavior="Cancel" />
</sm:Container>
</sm:Screen>
</sm:SiteMap>
To configure a selector field, you use the sm:SelectorContainer tag inside the sm:Field tag. The
PickerType attribute specifies which of the two ways the selector should be displayed.
A selector with PickerType="Attached" is displayed as a pop-up window (see the screenshot
below).

| Configuring the Mobile Site Map by Using XML (deprecated) | 70
Figure: A selector as a pop-up window
A selector with PickerType="Detached" is displayed as a grid (as shown in the screenshot below).
You can configure the fields to display by adding nested sm:Field tags.
Figure: A selector as a grid
Configuring Nested Containers
This topic describes how to configure the types of related containers on the same screen.
Example: Configuring a Screen with One-to-Many (Master-Detail) Containers
With one-to-many containers, one container declared inside the sm:Screen tag is considered the master
container, while all other containers are considered detail containers.
To see an example of configuring one-to-many containers, copy the code below to an .xml file, put the
file in the \App_Data\Mobile folder of the Acumatica ERP website, and start the mobile application.
<?xml version="1.0" encoding="UTF-8"?>

| Configuring the Mobile Site Map by Using XML (deprecated) | 71
<sm:SiteMap xmlns:sm="http://acumatica.com/mobilesitemap" xmlns:xsi="http://
www.w3.org/2001/XMLSchema-instance">
<sm:Folder DisplayName="Expense Claims" Type="HubFolder" Icon="system://Folder"
IsDefaultFavorite="true">
<sm:Screen Id="EP301030" Type="FilterListScreen" DisplayName="Expense
Claims" Visible="true" >
<sm:Container Name="Selection">
<sm:Field Name="Employee"/>
</sm:Container>
<sm:Container Name="Claim" >
<sm:Field Name="Date" />
<sm:Field Name="Status" />
<sm:Field Name="Description" />
<sm:Field Name="ClaimTotal" />
<sm:Action Name="CreateNew" Context="Container" Behavior="Create"
Redirect="true" Icon="system://Plus" />
<sm:Action Name="EditDetail" Context="Container" Behavior="Open"
Redirect="true" />
</sm:Container>
</sm:Screen>
</sm:Folder>
<sm:Screen Id="EP301000" Type="SimpleScreen" DisplayName="Expense Claim"
Visible="false" OpenAs="Form">
<sm:Container Name="DocumentSummary" >
<sm:Attachments Disabled="true"/>
<sm:Field Name="Date" />
<sm:Field Name="Status" />
<sm:Field Name="Description" />
<sm:Field Name="ClaimTotal" />
<sm:Field Name="Currency" />
<sm:Action Name="Save" Context="Record" Behavior="Save" />
<sm:Action Name="Cancel" Context="Record" Behavior="Cancel" />
</sm:Container>
<sm:Container Name="ExpenseClaimDetails" >
<sm:Attachments Disabled="true"/>
<sm:Field Name="Date" ListPrioruty="99" FormPriority="99" />
<sm:Field Name="Description" FormPriority="98" />
<sm:Field Name="ExpenseItem" FormPriority="97"/>
<sm:Field Name="Currency" FormPriority="95"/>
<sm:Field Name="TotalAmount" ListPriority="96" FormPriority="94" />
<sm:Field Name="ProjectContract" Container="ReceiptClassification"
FormPriority="93" />
<sm:Field Name="ProjectTask" Container="ReceiptClassification"
FormPriority="92" />
<sm:Action Name="Insert" Context="Container" Behavior="Create"
Icon="system://Plus"/>
<sm:Action Name="Delete" Context="Selection" Behavior="Delete" />
<sm:Action Name="Save" Context="Record" Behavior="Save" />
<sm:Action Name="Cancel" Context="Record" Behavior="Cancel" />
</sm:Container>
</sm:Screen>
</sm:SiteMap>
All declared detail containers are displayed on a screen below the screen fields in the order of their
declaration.

| Configuring the Mobile Site Map by Using XML (deprecated) | 72
To add, update, and delete data records in a detail container, you use the
Behavior="Create", Behavior="Open" and Behavior="Delete" actions, as you do on the
master screen.
The screenshot below shows the resulting screen in the mobile application.
Figure: Screen with one-to-many containers
Example: Configuring a Screen with Many-as-One Containers
Some screens include multiple containers that are displayed as one container.
The screen in this example includes the ReceiptDetails and ReceiptClassification containers,
which have a many-as-one relationship. You do not declare both containers; instead, you use the
Container attribute of the sm:Field tag to display fields from the ReceiptClassification container.
To configure these containers, copy the code below to an .xml file, put the file in the \App_Data
\Mobile folder of the Acumatica ERP website, and start the mobile application.
<?xml version="1.0" encoding="UTF-8"?>
<sm:SiteMap xmlns:sm="http://acumatica.com/mobilesitemap" xmlns:xsi="http://
www.w3.org/2001/XMLSchema-instance">
<sm:Folder DisplayName="Expense Receipts" Type="HubFolder" Icon="system://
NewsPaper" >
<sm:Screen Id="EP301010" Type="SimpleScreen" DisplayName="Expense Receipts"
>
<sm:Container Name="ExpenseReceipts" >
<sm:Field Name="Date" />
<sm:Field Name="ClaimAmount" />
<sm:Field Name="DescriptionTranDesc" />
<sm:Field Name="Currency" />
<sm:Action Name="addNew" Context="Container" Behavior="Create"
Redirect="true" Icon="system://Plus" />
<sm:Action Name="editDetail" Context="Container" Behavior="Open"
Redirect="true" />
<sm:Action Name="Delete" Context="Selection" Behavior="Delete"
Icon="system://Trash" />
</sm:Container>
</sm:Screen>
</sm:Folder>

| Configuring the Mobile Site Map by Using XML (deprecated) | 73
<sm:Screen Id="EP301020" Type="SimpleScreen" Icon="system://Display1"
DisplayName="Expense Receipt" Visible="false" OpenAs="Form">
<sm:Container Name="ReceiptDetails" >
<sm:Field Name="Date" />
<sm:Field Name="Description" />
<sm:Field Name="ExpenseItem" />
<sm:Field Name="Currency" />
<sm:Field Name="ProjectContract" Container="ReceiptClassification" />
<sm:Field Name="ProjectTask" Container="ReceiptClassification" />
<sm:Action Name="Save" Context="Record" Behavior="Save" />
<sm:Action Name="Cancel" Context="Record" Behavior="Cancel" />
</sm:Container>
</sm:Screen>
</sm:SiteMap>
The following screenshot shows the resulting screen in the mobile application.
Figure: Screen with many-as-one containers
Example: Configuring a Screen with Many-to-One (Master-Detail) Containers with Multi-
Selection
Acumatica ERP includes a special type of container that supports multi-selection—selection of multiple
items or options.
To see an example of configuring a container with multi-selection, copy the code below to an .xml
file, put the file in the \App_Data\Mobile folder of the Acumatica ERP website, and start the mobile
application.
<?xml version="1.0" encoding="UTF-8"?>
<sm:SiteMap xmlns:sm="http://acumatica.com/mobilesitemap" xmlns:xsi="http://
www.w3.org/2001/XMLSchema-instance">
<sm:Folder DisplayName="Expense Claims" Type="HubFolder" Icon="system://Folder"
IsDefaultFavorite="true">
<sm:Screen Id="EP301030" Type="FilterListScreen" DisplayName="Expense
Claims" Visible="true" >
<sm:Container Name="Selection">
<sm:Field Name="Employee"/>
</sm:Container>

| Configuring the Mobile Site Map by Using XML (deprecated) | 74
<sm:Container Name="Claim" >
<sm:Field Name="Date" />
<sm:Field Name="Status" />
<sm:Field Name="Description" />
<sm:Field Name="ClaimTotal" />
<sm:Action Name="CreateNew" Context="Container" Behavior="Create"
Redirect="true" Icon="system://Plus" />
<sm:Action Name="EditDetail" Context="Container" Behavior="Open"
Redirect="true" />
</sm:Container>
</sm:Screen>
</sm:Folder>
<sm:Screen Id="EP301000" Type="SimpleScreen" DisplayName="Expense Claim"
Visible="false" OpenAs="Form">
<sm:Container Name="DocumentSummary" >
<sm:Attachments Disabled="true"/>
<sm:Field Name="Date" />
<sm:Field Name="Status" />
<sm:Field Name="Description" />
<sm:Field Name="ClaimTotal" />
<sm:Field Name="Currency" />
<sm:Action Name="Save" Context="Record" Behavior="Save" />
<sm:Action Name="Cancel" Context="Record" Behavior="Cancel" />
</sm:Container>
<sm:Container Name="SubmitReceipts" Type="SelectionActionList" >
<sm:Field Name="Description" />
<sm:Field Name="Date" />
<sm:Field Name="ClaimAmount" />
<sm:Action Name="SubmitReceipt" Context="List" Behavior="Void"
Icon="system://Plus" />
</sm:Container>
</sm:Screen>
</sm:SiteMap>
In the code, you enable multi-selection by setting the container type with
Type="SelectionActionList" and specifying the action context with Context="List".
The screenshots below show the resulting screen in the mobile application.

| Configuring the Mobile Site Map by Using XML (deprecated) | 75
Figure: Container supporting multi-selection
The left screenshot shows the content of the DocumentSummary container of the Expense Claim screen
and the header of the SubmitReceipts nested container. If the user taps the header of the nested
container, the mobile application displays the content of this container and provides multi-selection, as
the second screenshot shows.
: The DisplayName attribute is not defined for the nested container, therefore for the container, the
mobile application displays the Submit Receipts name that is obtained from the Mobile API server.
Example: Configuring a Screen with a Container Link
In the mobile application, a container can contain a link to another container on the action panel or on
the screen among the fields. To create a container link on the action panel, use the sm:ContainerLink
tag, as the following example shows.
To see an example of creating a container link on the action panel, copy the code below to an .xml
file, put the file in the \App_Data\Mobile folder of the Acumatica ERP website, and start the mobile
application.
<?xml version="1.0" encoding="UTF-8"?>
<sm:SiteMap xmlns:sm="http://acumatica.com/mobilesitemap" xmlns:xsi="http://
www.w3.org/2001/XMLSchema-instance">
<sm:Folder DisplayName="Expense Claims" Type="HubFolder" Icon="system://Folder"
IsDefaultFavorite="true">
<sm:Screen Id="EP301030" Type="FilterListScreen" DisplayName="Expense
Claims" Visible="true" >
<sm:Container Name="Selection">
<sm:Field Name="Employee"/>
</sm:Container>
<sm:Container Name="Claim" >
<sm:Field Name="Date" />
<sm:Field Name="Status" />
<sm:Field Name="Description" />
<sm:Field Name="ClaimTotal" />
<sm:Action Name="CreateNew" Context="Container" Behavior="Create"
Redirect="true" Icon="system://Plus" />
<sm:Action Name="EditDetail" Context="Container" Behavior="Open"
Redirect="true" />

| Configuring the Mobile Site Map by Using XML (deprecated) | 76
</sm:Container>
</sm:Screen>
</sm:Folder>
<sm:Screen Id="EP301000" Type="SimpleScreen" DisplayName="Expense Claim"
Visible="false" OpenAs="Form">
<sm:Container Name="DocumentSummary" >
<sm:Attachments Disabled="true"/>
<sm:Field Name="Date" />
<sm:Field Name="Status" />
<sm:Field Name="Description" />
<sm:Field Name="ClaimTotal" />
<sm:Field Name="Currency" />
<sm:ContainerLink Container="SubmitReceipts" Control="Button"/>
<sm:Action Name="Save" Context="Record" Behavior="Save" />
<sm:Action Name="Cancel" Context="Record" Behavior="Cancel" />
</sm:Container>
<sm:Container Name="SubmitReceipts" Type="SelectionActionList" >
<sm:Field Name="Description" />
<sm:Field Name="Date" />
<sm:Field Name="ClaimAmount" />
<sm:Action Name="SubmitReceipt" Context="List" Behavior="Void"
Icon="system://Plus" />
</sm:Container>
</sm:Screen>
</sm:SiteMap>
In this code, you can open the SubmitReceipts container by using the button in the action panel
(because of the Control="Button" attribute of sm:ContainerLink).
The screenshot below shows the resulting screen, which displays the container link on the action panel
in the mobile application.
Figure: Use of a button on the action panel to open a container
To locate the container link among the screen fields, you use the Control="ListItem" attribute
instead of the Control="Button" one. To set the exact position of the container link among the
screen fields, specify the appropriate value for the Priority attribute.

| Configuring the Mobile Site Map by Using XML (deprecated) | 77
Adding Entity Attributes to Mobile Screens
In Acumatica ERP, for a class as a business object, you can define a list of entity attributes to gather
specific information about members of the class. Attributes are defined for a particular class, which is a
grouping of entities—such as leads, opportunities, customers, cases, projects, and stock or non-stock
items—that have similar properties.
On an Acumatica ERP form where attributes for an entity is defined, the attributes are usually displayed
on a separate tab as a table that contains a set of key-value pairs. Because entity attributes are
dynamic, it is not possible to explicitly specify them in a mobile site map. Therefore, specific definitions
are used to show the attributes in a mobile application.
Thus, in a mobile application, entity attributes are displayed as a form or part of a form with input fields
rather than as a table. For improved usability, you can apply a group as a container for attributes.
Suppose that in the mobile app you need to display the attributes of the Case Classes form (CR206000)
of Acumatica ERP, which are shown in the screenshot below.
Figure: Viewing the Attributes tab on the Case Classes form
Example: Configuring a Screen with a Group of Attributes
To see an example of creating a group for the attributes of a particular form, copy the code below to
an .xml file, put the file in the \App_Data\Mobile folder of the Acumatica ERP website, and start the
mobile application.
<?xml version="1.0" encoding="UTF-8"?>
<sm:SiteMap xmlns:sm="http://acumatica.com/mobilesitemap" xmlns:xsi="http://
www.w3.org/2001/XMLSchema-instance">
<sm:Screen DisplayName="Case" Id="CR306000" OpenAs="Form" Type="SimpleScreen">
<sm:Container FormActionsToExpand="1" Name="CaseSummary">
<sm:Field Name="ClassID">
<sm:SelectorContainer PickerType="Attached" />
</sm:Field>
<sm:Group Collapsable="true" Collapsed="true" DisplayName="Case
Attributes">
<sm:Attributes From="Attributes" />
</sm:Group>
</sm:Container>
</sm:Screen>

| Configuring the Mobile Site Map by Using XML (deprecated) | 78
</sm:SiteMap>
The From attribute of the sm:Attributes tag specifies the name of the screen container that holds the
entity attributes.
In this code, note that the sm:Attributes tag is wrapped in the group named Case Attributes.
The screenshot below shows the resulting screen in the mobile application.
Figure: Viewing the Case Attributes group
Also, you can use the sm:Attributes tag to map a pair of columns from any grid of Acumatica ERP to
a form view in the mobile app as a key-value pair. For example, if a grid contains a key field, a value
field, and a field for sorting, to create a sorted group of key-value pairs of the grid on a form view of
the mobile app, you might define the following <sm:Attributes> tag (see <sm:Attributes> for details).
...
<sm:Container ...>
...
<sm:Group ...>
<sm:Attributes From="GridDataView" IDField="Column1_FieldName"
IDValue="Column5_FieldName" OrderField="Column3_FieldName" />
</sm:Group>
</sm:Container>
...
In the example above, GridDataView is the DataMember defined for the grid; Column1_FieldName,
Column5_FieldName, and Column3_FieldName are correspondingly the key field, the value field,
and the field for sorting.
Redirecting to Different Screens and Containers
You can redirect the user to different screens and containers in a mobile application in one of the
following ways:
1. Allow a redirection that is already implemented in Acumatica ERP
2. Create a new redirection to a screen or container
These ways are described in the following sections.

| Configuring the Mobile Site Map by Using XML (deprecated) | 79
Allowing a Redirection That Is Implemented in Acumatica ERP
While executing an action, you may need to redirect the application from the current screen to
a different screen or to an external URL. As a rule, the business logic of Acumatica ERP handles
redirection to a screen by using the PXRedirectRequiredException and PXPopupRedirectException
exceptions.
In a mobile application, you can allow a redirection that is implemented in an action of Acumatica ERP.
To do this, you set the Redirect attribute of the <sm:Action> tag to true in an .xml file of the mobile
site map.
Example: Using Existing Redirection from the List to the Editing Form
To see an example of allowing a redirection implemented in an action, copy the code below to an .xml
file, put the file in the \App_Data\Mobile folder of the Acumatica ERP website, and start the mobile
application.
<?xml version="1.0" encoding="UTF-8"?>
<sm:SiteMap xmlns:sm="http://acumatica.com/mobilesitemap" xmlns:xsi="http://
www.w3.org/2001/XMLSchema-instance">
<sm:Folder DisplayName="Expense Receipts" Type="HubFolder" Icon="system://
NewsPaper" >
<sm:Screen Id="EP301010" Type="SimpleScreen" DisplayName="Expense Receipts"
>
<sm:Container Name="ExpenseReceipts" >
<sm:Field Name="Date" />
<sm:Field Name="ClaimAmount" />
<sm:Field Name="DescriptionTranDesc" />
<sm:Field Name="Currency" />
<sm:Action Name="addNew" Context="Container" Behavior="Create"
Redirect="true" Icon="system://Plus" />
<sm:Action Name="editDetail" Context="Container" Behavior="Open"
Redirect="true" />
<sm:Action Name="Delete" Context="Selection" Behavior="Delete"
Icon="system://Trash" />
</sm:Container>
</sm:Screen>
</sm:Folder>
<sm:Screen Id="EP301020" Type="SimpleScreen" Icon="system://Display1"
DisplayName="Expense Receipt" Visible="false" OpenAs="Form">
<sm:Container Name="ReceiptDetails" >
<sm:Field Name="Date" />
<sm:Field Name="Description" />
<sm:Field Name="ExpenseItem" />
<sm:Field Name="TotalAmount" />
<sm:Action Name="Save" Context="Record" Behavior="Save" />
<sm:Action Name="Cancel" Context="Record" Behavior="Cancel" />
</sm:Container>
</sm:Screen>
</sm:SiteMap>
In this example, you use the EP301010 screen to display the list and the EP301020 screen to display
the editing form. In the list view (EP301010), notice two actions that result in opening the form view
for a data record: Behavior="Create" and Behavior="Open". The Redirect="true" attribute
indicates that the editing form needs to be opened as a different screen.
You can still control the current screen after an action is completed by using the After attribute of the
corresponding sm:Action tag. The After attribute defines more complex behavior of the container
when the Redirect attribute of this tag is set to true. Possible values for the After attribute have the
following meanings:
• If redirection doesn't happen:

| Configuring the Mobile Site Map by Using XML (deprecated) | 80
• Refresh: The current container is refreshed.
• Close: The current container is closed, and the previous container in the stack is loaded.
• If redirection happens:
• Refresh: A new screen is loaded, and the previous one is saved in the stack.
• Close: The current container is closed, and the new one is opened and takes the position of
the closed container in the stack.
The default value of the After attribute is Refresh.
Example: Using Existing Redirection to an External URL
If an action on an Acumatica ERP form provides redirection to an external URL, you can map the action
to use in the mobile app. To do this, you need no additional attributes in the <sm:Action> tag. However,
the Redirect attribute of the tag must be set to true as in the following example.
...
<sm:Action Behavior="Void" Context="Record" Name="ViewOnMap" Redirect="true"/>
...
On a mobile device, such action launches the default browser and passes the URL, which is obtained
from the Acumatica ERP server, to the browser that opens the webpage specified in the URL.
Creating a New Redirection to a Screen or Container
You can create a redirection to any container or screen in the mobile application when the redirection
is absent in Acumatica ERP. For example, you can do this to implement pop-up windows in the mobile
application.
To create a redirection, you use the following attributes:
• RedirectToScreen sets the ID of the screen to redirect to. If the redirection target is within the
current screen (such as a different container), don't use this attribute.
• RedirectToContainer sets the name of the container to redirect to. If you don't specify this
attribute, you are redirected to the primary container of the target screen.
Example: Creating a Redirection to Another Container Inside the Screen
To see an example of creating a new redirection to a another container inside the screen, copy the code
below to an .xml file, put the file in the \App_Data\Mobile folder of the Acumatica ERP website, and
start the mobile application.
<?xml version="1.0" encoding="UTF-8"?>
<sm:SiteMap xmlns:sm="http://acumatica.com/mobilesitemap" xmlns:xsi="http://
www.w3.org/2001/XMLSchema-instance">
<sm:Folder DisplayName="Expense Claims" Icon="system://Folder" Type="HubFolder">
<sm:Screen DisplayName="Expense Claims" Id="EP301030"
Type="FilterListScreen">
<sm:Container Name="Selection">
<sm:Field Name="Employee"/>
</sm:Container>
<sm:Container Name="Claim">
<sm:Field ForceIsDisabled="true" Name="ReferenceNbr"/>
<sm:Field Name="Status"/>
<sm:Field Name="Date"/>
<sm:Field Name="ClaimTotal"/>
<sm:Field Name="Description"/>
<sm:Action Behavior="Open" Context="Container" Name="EditDetail"
Redirect="true"/>

| Configuring the Mobile Site Map by Using XML (deprecated) | 81
<sm:Action Behavior="Create" Context="Container" Icon="system://
Plus" Name="CreateNew" Redirect="true"/>
</sm:Container>
</sm:Screen>
</sm:Folder>
<sm:Screen DisplayName="Expense Claim" Id="EP301000" OpenAs="Form"
Type="SimpleScreen" Visible="false">
<sm:Container Name="DocumentSummary">
<sm:Attachments Disabled="true"/>
<sm:Field ForceIsDisabled="true" Name="ReferenceNbr"/>
<sm:Field Name="Description"/>
<sm:Action Behavior="Void" Context="Record" Name="ShowSubmitReceipt"
Redirect="true" RedirectToScreen="EP301000" RedirectToContainer="SubmitReceipts
$List"/>
<sm:Action After="Close" Behavior="Save" Context="Record" Name="Save"/>
<sm:Action Behavior="Cancel" Context="Record" Name="Cancel"/>
</sm:Container>
<sm:Container Name="SubmitReceipts" Type="SelectionActionList"
Visible="false">
<sm:Field Name="Description"/>
<sm:Field Name="Date"/>
<sm:Field Name="ClaimAmount"/>
<sm:Action Behavior="Void" Context="List" Name="SubmitReceipt"/>
</sm:Container>
</sm:Screen>
</sm:SiteMap>
In this example, the EP301000 screen with DisplayName="Expense Claim" includes the following
containers:
• DocumentSummary, which contains the following redirection on the Record action:
<sm:Action ... Context="Record" Name="ShowSubmitReceipt" Redirect="true"
RedirectToScreen="EP301000" RedirectToContainer="SubmitReceipts$List"/>
• SubmitReceipts, to which the redirection is declared by the RedirectToContainer attribute
The RedirectToScreen attribute cannot be declared because both containers belong to the same
screen.
In the example presented in this section, the container name has the "SubmitReceipts$List"
value, which consists of two parts. You can expand the name of the container with special arguments
for more detailed configuration of the container behavior (as shown in the following example).
RedirectToContainer="InventoryLookup$List$InventoryLookupInventory"
In this example, the RedirectToContainer value consists of the following parts:
• Part of the string (up to the first $ sign) is the name of the container.
• Part of the string (between the first and second $ sign) specifies how to open the container:
• List: Open as a list
• Form: Open as a form (default)
• If the second parameter is set explicitly to List, in the rest of the string, you can specify an
additional container that is used as a filter for the data records in the main container.

| Configuring the Mobile Site Map by Using XML (deprecated) | 82
: To use the expanded way of configuring a redirection, you should clearly understand how the target
screen works, how its business logic operates, and how the state of the business logic objects changes after
any of the actions is executed.
Displaying Any Field as a Text Field
The mobile API gives you the ability to map a control of any type from an Acumatica ERP form to a text
box in the mobile application. This ability can be useful when both of the following conditions are met:
• You have one of the following problems with the use of the field in the mobile application:
• A value in the control for the field is displayed oddly or incorrectly.
• The mapping of the field raises an exception.
• You do not need to specify a new value for the field in the mobile application.
For these conditions, you can force the mobile application to treat this field as a common text field.
To do this, in the sm:Field tag for the field, you can specify the ForceType="String" attribute. The
input value is inserted directly into the cache of the corresponding container.
Warning: We do not recommend that you use the ForceType attribute unless you have extensive
experience developing custom controls and fully understand the outcome of using this attribute. Note that
by using the ForceType attribute, you could switch off some types of field validation, which could damage
data in the database.
Creating the User Signature
The mobile app provides an additional functionality to create the user signature and attach the
signature image file to an Acumatica ERP form that supports file attachments.
: This functionality does not work in the <sm:Container> tag that contains the <sm:Attachments> tag
with the Disabled attribute set to true.
To add this functionality to the mobile site map, you should add the <sm:Action> tag with the
Behavior attribute set to SignReport to a container of a screen that is mapped to a form, which
supports attachments. In the action tag, you should also specify the Name and Context attributes as
shown in the following example.
...
<sm:Action Behavior="SignReport" Context="Record" DisplayName="Sign"
Name="SignReport"/>
...
As a result, the SIGN action will appear on the appropriate screen of the mobile app, as the following
screenshot shows.

| Configuring the Mobile Site Map by Using XML (deprecated) | 83
Figure: Viewing the SIGN action on the toolbar of a screen
When the user clicks this action, the application displays a blank form with the Cancel and OK buttons
and suggests the user to add the signature, as shown in the following screenshot.

| Configuring the Mobile Site Map by Using XML (deprecated) | 84
Figure: Creating a signature
After the user signs the form and clicks OK, an attachment with the signature adds to the screen in the
mobile app (see the following screenshot). To save the signature file in the database, the user should
click the Save button.

| Configuring the Mobile Site Map by Using XML (deprecated) | 85
Figure: Viewing the signature added to the screen of the mobile app
After the user clicks Save on the screen toolbar, the mobile app sends the signature file to the
Acumatica ERP server that saves the file in the database as a file attached to the appropriate form. In
the mobile application, the attachment is displayed as an image that is attached to the Acumatica ERP
form.

| Configuring the Mobile Site Map by Using XML (deprecated) | 86
Figure: Viewing the signature added to the Acumatica ERP form

| Mobile Site Map Reference | 87
Mobile Site Map Reference
This chapter contains reference information for the elements that are used to configure the mobile site
map of the Acumatica mobile app.
In This Chapter
• MSDL
• XML Tags (deprecated)
• Icons
MSDL
Mobile Site Map Definition Language (MSDL) can be used for the following purposes:
• To change the mobile site map
• To create the content for the empty mobile site map
MSDL includes the following regulations and recommendations:
• Instruction names are not case sensitive. For example, you can enter the add instruction as Add,
ADD, or aDD.
• Each instruction must be written in a new line of MSDL code.
• You can use any number of spaces before an instruction in a line of code.
• If an instruction is located inside braces, this instruction is executed in the context of the object of
the instruction that contains the opening bracket.
• An instruction can contain multiple nested instructions within braces.
• To specify or update the value of an attribute of an object in the mobile site map, add the
attribute assignment within braces for the instruction for the object, as shown in the following
code.
add recordAction "EditDetail" {
behavior = Open
}
• An instruction can contain multiple assignment commands within braces.
• Braces for an instruction can be placed on the same line after the instruction or on the next line,
as shown in the following code.
add field "Date" {
...
}
add field "Description"
{
...
}
• You can omit the space before and after braces, as the following example shows.
add item "EP301010"{
displayName = "Expense Receipts"}
| Mobile Site Map Reference | 88
• A comment starts with the # symbol and is considered finished at the end of the line.
# this is a comment
This section contains detailed information about the following elements of MSDL:
• Object Types
• Constants
• Instructions
• Error Messages
Object Types
An MSDL instruction can be applied to the following object types:
• The following action object types:
• containerAction (applied to a whole container)
• listAction (applied to a list view)
• recordAction (applied a single opened record)
• selectionAction (applied to a list of selected records)
• These link object types:
• containerLink
• recordActionLink
• attributes
• container
• field
• folder
• group
• item
• screen
• type
Objects have attributes, and each attribute can have any number of possible values. If the attribute is
an indicator, it can have only the true or false value.
The topics in this section provide reference information on each of these object types, including a list of
attributes and an example of the use of the object type.
attributes
An object that maps an entity attributes to the mobile app screen.
Attributes
Attribute Description
From The name of the data view for the grid that contains the entity attributes.
FormPriority The priority value that defines the position of the entity attributes on the
screen.
Name The identifier of the attributes, as found in the WSDL schema.

| Mobile Site Map Reference | 89
The attributes object can also be used to map a grid of Acumatica ERP to a form view that displays
key-value pairs. Then you should also use the following attributes inside the instruction.
Attribute Description
IDField The identifier of the grid field, as found in the WSDL schema, that specifies
the key field for the key-value pairs. By default, the value is AttributeID.
IDValue The identifier of the grid field, as found in the WSDL schema, that specifies
the value field for the key-value pairs. By default, the value is Value.
OrderField Optional. The grid field identifier, as found in the WSDL schema, that is used
for sorting rows in the grid to display in the form view. By default, the value
is Order.
Example
In the following example, a grid containing two entity attributes is added.
add attributes "GridDataView" {
displayName = "Status"
displayName = "Quantity"
}
container
An object that maps a form container to the mobile app. The object can include fields, actions, nested
containers, and other elements.
Attributes
Attribute Description
AttachmentsControlPriorityThe priority value that defines the position of the attachments in the list.
: This attrubute is deprecated. Now the attachments icon is displayed on
the top toolbar of the app screen. For details, see Configuring Attachments.
Attributes An indicator of whether this container holds entity attributes. If the indicator
value is true, you should not specify the items of the container, because the
container configuration is generated dynamically.
ContainerActionsToExpandThe number of containerAction objects to be visible in the toolbar on
the list screen. The default value depends on the platform of the particular
mobile device running the app.
DisplayName The name of the container on the UI.
FieldsToShow The number of fields to be displayed in the list.
FormActionsToExpand The number of recordAction objects to be visible in the toolbar on the
editing screen. The default value depends on the platform of particular
mobile device running the app.
ListActionsToExpand The number of listAction and selectionAction objects to be visible
in the toolbar on the list screen when the multiple selection of records
is activated. The default value depends on the platform of the particular
mobile device running the app.
Type An optional attribute that specifies the type of the container. The only
possible value is SelectionActionList, which is used for a listAction object.

| Mobile Site Map Reference | 90
Attribute Description
See Example: Configuring a Screen with Many-to-One (Master-Detail)
Containers or listAction for details.
Visible An indicator of whether the link to the container is visible on the editing
screen. This attribute can be applied to a secondary container. By default,
the value is true.
Example
In the following example, a container with two fields is added.
add container "OrdersToApply" {
fieldsToShow = 2
add field "AppliedToOrder" {
listPriority = 90
}
add field "NoteText" {
textType = PlainMultiLine
}
}
containerAction
In the mobile site map, an object that defines the appearance and behavior of an action that is related
to a container and performs the business logic implemented in Acumatica ERP. This type of action is
displayed only on the list view.
Attributes
Attribute Description
After
The behavior of the current container after the action is completed. The
value can be one of the following:
• Refresh: The current container should be refreshed after the action is
completed.
• Close: The current container should be closed after the action is
completed.
If the Redirect attribute of an action object is set to true, the After
attribute of this object defines more complex behavior for the current
container. See Redirecting to Different Screens and Containers for details.
Behavior
Required. The behavior of the action—which defines how the mobile app
obtains from the server the data resulting from the action and processes
this data. The value can be one of the following:
• Create: Creates a new data record. If the Redirect attribute value
is true, this action redirects the user to a container defined on a
different screen.
• Open: Opens the data record for editing on a different screen. If the
Redirect attribute value is true, this action redirects the user to a
container defined on a different screen.
• Record: Indicates that the mobile app should to expect a single
record as the server response.

| Mobile Site Map Reference | 91
Attribute Description
• SignReport: Indicates that the mobile app should add the Sign action
to the container. This action is not implemented in Acumatica ERP and
uses the specific capabilities of the mobile devices to create the user
signature as an image file. The user can save the signature in the
database of the Acumatica ERP instance as a file attachment for the
appropriate form. See Creating the User Signature for details.
• Void: Tells the mobile app to not use any records that are returned in
the server response.
DisplayName The name of the action in the UI.
Icon The name of the image that is used to display the action icon on the UI. If
this attribute is not specified for an action, the action is displayed on the UI
without an icon.
See Icons for the possible values and the corresponding images for the
Icon attribute.
Priority The priority value that defines the position of the action on the screen or
the toolbar relative to other container actions.
Redirect An indicator of whether the action redirects the user to a container of a
screen. You can use this attribute to do the following:
• Allow a redirection defined for the action in Acumatica ERP by setting
the attribute to true.
• Deny a redirection defined for the action in Acumatica ERP by setting
the attribute to false. This is the default setting of the Redirect
attribute.
• Define a new redirection for the action by setting the attribute to true
and specifying the attributes of this tag to set one of the following as
the destination of the redirection:
• RedirectToScreen, to redirect to the primary container of the
specified screen
• RedirectToContainer, to redirect to another container of the
current screen
• RedirectToScreen and RedirectToContainer, to redirect to a
specified container of a specified screen
: See Redirecting to Different Screens and Containers for more
details.
RedirectToContainer The name of the destination container. The name can consist of the
following parts separated by the $ symbol:
• The name of the container
• The display type of the container: List or Form (default)
• The optional name of the additional container whose data is used as a
filter
The mobile site map has to include the metadata for this container.
For details, see Redirecting the User to Different Screens and Containers.

| Mobile Site Map Reference | 92
Attribute Description
RedirectToScreen The name of the destination screen. The mobile site map has to include the
metadata for this screen. For details, see Redirecting the User to Different
Screens and Containers.
SyncLongOperation An indicator of whether the mobile app should wait until the action
is completed if this action is defined as a PXLongRunOperation one
and is executed asynchronously in Acumatica ERP. By default, the
SyncLongOperation attribute is set to false.
Example
In the following example, an action for creating a new record is added.
add containerAction "Insert" {
icon = "system://Plus"
behavior = Create
}
containerLink
An object that specifies a link to another container on the screen toolbar or on the screen among the
fields.
Attributes
Attribute Description
Container The name that that will serve as the link to the container.
Control The type of control, which is one of the following values:
• ListItem: An indicator that the link to the container is displayed among
the fields on the screen according to the value defined in the Priority
attribute of this object.
• Button: An indicator that the link to the container is displayed in
the screen toolbar according to the value defined in the Priority
attribute of this object.
Icon The name of the image that is used to display the link when the Control
attribute is set to Button and the link is displayed in the action panel in the
UI. If this attribute is not specified for a link, the link is displayed in the UI
without an icon. See the possible values and the corresponding images for
the Icon attribute in Icons.
Priority The priority value that defines the position of the link in the enclosing
container on the screen.
ValueField The name of the field whose value is used as the link text. The field must be
declared in the container.
Weight The value that is used to set the width of the link within the row of the UI
element defined by the layout object with the Template attribute set to
Inline. The default value is 1.

| Mobile Site Map Reference | 93
Example
In the following example, a link to a container is added.
add containerLink "Details" {
control = "ListItem"
formPriority = 51
}
field
An object that maps a UI element field to the mobile app. This object can include fields, actions, nested
containers, and other elements.
If a field from one container is also used in another container, you should use the
ContainerName#FieldName format of the field name, where ContainerName is the name of the
container (as it is specified in the WSDL schema) that contains the field, and FieldName is the name
of the field in this container. See Example: Displaying Fields from Different Containers in One Container
for details.
Attributes
Attribute Description
displayName The name for the field, which by default is automatically set by the system.
However, you can change it.
forceIsDisabled An indicator of whether the field will be unavailable on the editing form
regardless of the server logic. By default, the field availability depends on
the server logic.
forceIsVisible An indicator of whether the field is visible on the editing form regardless of
the server logic. By default, the field visibility depends on the server logic.
forceRequired An indicator of whether the field is mandatory and must be filled in on the
screen. If its value is true, the field is mandatory. If its value is false, the
field is not mandatory. If the attribute is not specified, the need to fill the
field is determined by the data obtained from the server.
forceType The field type that is used by the application instead of the original field
type. The only value of this attribute is String, which is an indicator of
whether the field is visible on the editing form regardless of the server logic.
By default, the field visibility depends on the server logic.
formPriority The priority value that defines the position of the field on the form.
listDisplayFormat The format that is used to display the field in the list. The value can be one
of the following:
• Value: An indicator that the field is represented only by the field value
in the list.
• CaptionValue: An indicator that the field is represented by the caption
and the value in the list.
This attribute is applicable only to selector fields. See selector and
Configuring Selectors for details.
listPriority The priority value that defines the position of the field in the list.
pickerType The processing type of the selector field value; this attribute is applicable to
only selector fields. The value can be one of the following:

| Mobile Site Map Reference | 94
Attribute Description
• Attached: An indicator that the selector is displayed as a pop-up
dialog box.
• Detached: An indicator that the selector is displayed as a separate
screen.
• Searchable: An indicator that the mobile app should display the
Search button ( ) right of the field control. If the user enters a
text fragment in the control and clicks the button, the app sends to
the Acumatica ERP server a query to search the records, and find
those that contain the specified fragment in the field value. After the
response, the mobile app opens the selector screen and displays the
list of the field values obtained from the server. The user uses the list
to select a value for the selector control.
selectorDisplayFormat The selector field format that is used to display the field value. The value
can be one of the following:
• Key: An indicator that the value is represented by the key field of the
selector.
• Description: An indicator that the value is represented by
the value field of the selector. This is the default value of the
SelectorDisplayFormat attribute.
• KeyDescription: An indicator that the value is represented by the
combination of the key and value fields of the selector.
This attribute is applicable to only selector fields. See selector and
Configuring Selectors for details.
special
The field type that is used by the mobile app for a specific purpose. The
value can be one of the following:
• AllowEdit (applicable to selector fields only): An indicator that the app
should display the Edit button ( ) right of the field. If the user taps
the button, the mobile app opens the data entry form for the business
entity (such as a customer or sales order), selected in the field. The
button appears if both of the following conditions are met:
• On the Acumatica ERP form, the edit button is displayed for the
corresponding control.
• In the mobile app, the field is not empty and contains an ID
that can be used to select the appropriate data record of the
business entity.
• EmailAddress: An indicator that the app should treat this field as an
input box for an email address. It enables auto-complete for email
addresses: As the user types an email address for a new email activity
by using the on-screen keyboard, the system displays a list of possible
completions, which are derived from the system database or from the
device's address book. The EmailAddress value is not supported in iOS
apps.
• EmailSend: An indicator that the app should display the Send Email
button ( ) right of the field control. If the user clicks the button, the
mobile app forces the system of the mobile device to create a new

| Mobile Site Map Reference | 95
Attribute Description
email message and use the field value as the destination address for
the message. In iOS, the Mail app is opened.
• PhoneCall: An indicator that the app should display the Phone Call
button ( ) right of the field. If the user taps the button, the mobile
app forces the system of the mobile device to open an app for voice
calls with the phone number that has been specified in the field.
• GpsCoords: An indicator that the app should obtain the location of the
user's mobile device and fill the field before sending to the Acumatica
ERP server the data record that is being modified on the screen. If the
field with this attribute value does not have a value, an action mapped
on the screen cannot be executed; for example, the user cannot save
a data record that contains an empty field with the Special attribute
set to GpsCoords.
The location is reported as a string in the following
format: <Latitude>:<Longitude> (for instance,
65.61295166666667:-20.137938333333334).
You can forcibly hide the field by setting the ForceIsVisible attribute
to false, so it is not shown in the user interface, or you can make the
field unavailable for editing by setting the ForceIsDisabled attribute
to true. If the ForceIsVisible and ForceIsDisabled attributes are
not specified, then the appropriate field state will be defined by the
Acumatica ERP server.
• UrlOpen: An indicator that the app should display the Open URL
button ( ) right of the field control. If the user clicks the button,
the mobile app forces the system of the mobile device to launch the
default browser (Safari in iOS) for the external URL specified in the
field control.
The following screenshot shows an example of using the Special attribute
for fields mapped on a screen in the mobile app.

| Mobile Site Map Reference | 96
Attribute Description
Figure: Viewing the fields with the Special attribute in the mobile app
textType The type of text to be used for the field value. The value can be one of the
following:
• HTML: The text can be HTML markup.
• PlainSingleLine: The text is displayed on a single line.
• PlainMultiLine: The text is displayed on multiple lines. The look of the
input control depends on the platform.
weight The value that is used to set the width of the field within the UI element
line defined by the layout object with the layout attribute set to Inline. The
default value is 1.
In the following example, the TotalAmount field takes two-thirds of the
total width, and the Currency field takes one-third.
add layout "Layout_1" {
layout = "Inline"
add field "ReceiptDetailsExpenseDetails#TotalAmount" {
weight = 2
}
add field "ReceiptDetailsExpenseDetails#Currency" {
pickerType = Attached
}

| Mobile Site Map Reference | 97
Attribute Description
}
Example
In the following example, a field is added.
add field "OrderNbr" {
forceIsDisabled = True
listPriority = 100
}
folder
An object of the main menu of the mobile app that can hold multiple folders and screen shortcuts.
Attributes
Attribute Description
DisplayName The name of the folder in the UI.
Icon The name of the image that is used to display the folder icon on the main
menu (and on the sidebar menu, if specified) of the mobile application. This
attribute is optional; if this attribute is not specified for a folder, the folder is
displayed in the UI without an icon.
See the possible values and the corresponding images for the Icon attribute
in Icons.
IsDefaultFavorite An indicator of whether a link for the folder is added to the sidebar menu as
a favorite folder. If the attribute is set to True, a link is added to the sidebar
menu. By default, this attribute is set to False.
Type The type of the folder (that is, the way it is displayed and used), which is
one of the following values:
• ListFolder: An indicator that the folder contents are displayed as tiles.
• HubFolder: An indicator that the folder contents are displayed as
pages that the user navigates by swiping.
Example
In the following example, a new folder containing the Expense Rexeipts (EP301010) screen is added to
the main menu of the mobile app. The added folder will also appear in the sidebar menu of the mobile
app.
add folder "ExpenseReceipts" {
type = HubFolder
isDefaultFavorite = True
displayName = "Expense Receipts"
icon = "system://NewsPaper"
add item "EP301010" {
displayName = "Expense Receipts"
}
}

| Mobile Site Map Reference | 98
group
An object that maps a field group to the mobile app. The object can contain the following objects and
instructions:
• field
• layout
• Attributes
• recordActionLink
Attributes
Attribute Description
Collapsable
An indicator of whether this group may be collapsed or expanded. If its
value is true, the group can be collapsed or expanded, and you can specify
whether the group is collapsed when the screen is opened by using the
Collapsed attribute. If the value is false, the group is expanded and cannot
be collapsed.
If the Template attribute is set to ExpansionPanel, the value of the attribute
is ignored. Expansion panels are always collapsible.
Collapsed
An indicator of whether this group is collapsed by default. If its value is true,
the group is collapsed when the screen is opened. If the value is false, the
group is expanded when the screen is opened.
If Template=Group (or the Template attribute is not set) and
Collapsable=false, the value of the attribute is ignored.
For expansion panels (Template=ExpansionPanel) and collapsible groups
(Template=Group and Collapsable=true), if the value of the attribute is
not specified, the group is collapsed when the screen is opened.
DisplayName
The name of the group in the UI.
If the Template attribute is set to ExpansionPanel, the value of the attribute
is ignored. An expansion panel does not have the name of the group in the
UI.
Field
Obsolete. The name of the field whose value is displayed when the group is
collapsed.
The value of this field is ignored. Expansion panels
(Template=ExpansionPanel) always display the first field (sm:field) or
layout definition (sm:layout) in the group. Other groups (Template=Group)
do not display any fields when the group is collapsed.
FormPriority The priority value that defines the position of the group on the screen.
Template
The template that is used for the group. The following values can be used
for this attribute:
• ExpansionPanel: An expansion panel, which can be collapsed or
expanded. The collapsed expansion panel displays only the first field
(field) or layout definition (layout) in the group. An expansion panel
does not have the name of the group in the UI. You can configure
how the expansion panel is displayed by using the Collapsed and
FormPriority attributes of the object.

| Mobile Site Map Reference | 99
Attribute Description
• Group: A group of UI elements. You can configure how the group is
displayed by using the DisplayName, Collapsable, Collapsed, and
FormPriority attributes of the object.
If the value of the attribute is not specified, the Group template is used.
Example
In the following example, a group of fields is added to a screen. Fields from the added group contain
information from the PaymentSettings container.
add group "PayInfoGroup" {
displayName = "Payment Settings"
collapsable = True
collapsed = True
add field "PaymentSettings#PaymentMethod"
add field "PaymentSettings#CardAccountNo"
add field "PaymentSettings#CashAccount"
add field "PaymentSettings#PaymentRef"
add field "PaymentSettings#ProcessingStatus" {
displayName = "CC Processing Status"
}
}
item
An object of the main menu that defines a screen of a mobile app.
Attributes
Attribute Description
DisplayName The name of the menu item on the UI.
ExpandSelector The name of a selector field from the primary container. An Acumatica ERP
form can contain a selector control that acts like a filter. For example, the
Order Type selector control on the Sales Orders form (SO301000) works
as a filter. If the ExpandSelector attribute is specified for a screen, then
the mobile app represents the screen as multiple tabs, where each tab
corresponds to a single value of the referenced selector field.
Icon The name of an image that is used to display the screen icon on the main
menu (and on the sidebar menu, if item is specified as favorite) of a mobile
application. If this optional attribute is not specified for a screen, the screen
is displayed in the UI without an icon. See Icons for the possible values and
the corresponding images for the Icon attribute.
isDefaultFavorite An indicator of whether a link for the screen is added to the sidebar menu
as a favorite screen. This attribute has the following possible values:
• true, indicating that the screen is displayed in the sidebar menu.
• false, meaning that the screen is not displayed in the sidebar menu.
This value is set by default.
Visible An indicator of the visibility of the screen in the main menu. If the value of
this attribute is true, the screen is visible on the main menu. By default, the
value is true.

| Mobile Site Map Reference | 100
Example
In the following example, the Transaction (CA304000) screen is added to the main menu of the mobile
app.
add item "CA304000" {
expandSelector = "TranType"
displayName = "Cash Transactions"
icon = "system://Credit"
}
layout
An object that helps to arrange multiple UI elements on a screen of the mobile app. The object can
contain the following types of nested objects:
• field
• group
• containerLink
• recordActionLink
• layout
: The layout object with the layout attribute set to HeaderSimple, HeaderFirstAttachment, and
Tab can include nested layout objects with Template=Inline. The layout objects for which
the Template attribute is Inline cannot include any nested layout objects. The layout objects for
which the Template attribute is DataTab can include only containerLink objects.
Attributes
Attribute Description
Layout The template that is used to define the layout. The following values can be used for
this attribute:
• HeaderFirstAttachment: An indicator that the mobile app should arrange the
UI elements, which are mapped by the nested objects, in a group-like header
container with an attachment icon on the left. If you click the attachment
icon, you can take a photo and attach the photo to the screen of the mobile
app. The camera behavior is affected by the attributes of the attachments
instruction.
The tag with the attribute set to HeaderFirstAttachment can include nested
layout objects with layout=Inline. The objects with the attribute set to
HeaderFirstAttachment cannot be nested in other layout instuction and can
be nested only in container objects.
• HeaderSimple: An indicator that the mobile app should arrange the UI
elements, which are mapped by the nested objects, in a group-like header
container.
An object with the attribute set to HeaderSimple can include nested
layout objects with Layout=Inline. An object with the attribute set to
HeaderSimple cannot be nested in other layout objects and can be nested
only in container objects.
• Inline: An indicator that the mobile app should arrange UI elements that are
mapped by the nested tags, in a line by using the Weight attributes specified
for these elements. If the Weight attribute is not defined for a nested tag, the
mobile app uses 1 as the default value.

| Mobile Site Map Reference | 101
Attribute Description
The object with the attribute set to Inline cannot include nested layout
objects. The objects with the attribute set to Inline can be nested in other
layout objects.
• Tab: An indicator that the mobile app can contain elements valid for
templates, such as other layouts with Inline template, recordAction objects,
and cotainerLink objects.
Objects that are inside the object wrapping the tab object but not included
in the tab explicitly are located in a default tab that is always displayed in
the mobile app as the first tab on the screen. The name of the default tab is
Summary.
• DataTab: A layout object that can contain only containerLink objects.
Containers that are referenced using containerLink objects from the
dataTab are displayed as a list of elements, not links to containers.
Example
In the following example, the fields are arranged in three rows using the layout object.
add layout "OrderHeader" {
displayName = "OrderHeader"
layout = "HeaderSimple"
add layout "OrderHeaderNbrRow" {
layout = "Inline"
add field "OrderNbr"
add field "OrderTotal"
}
add layout "OrderHeaderTaxTotalRow" {
layout = "Inline"
add field "Status"
add field "DiscountTotal"
}
add layout "OrderHeaderTotalRow" {
layout = "Inline"
add field "OrderedQty"
add field "TaxTotal"
}
}
The result is presented on the following screenshot.
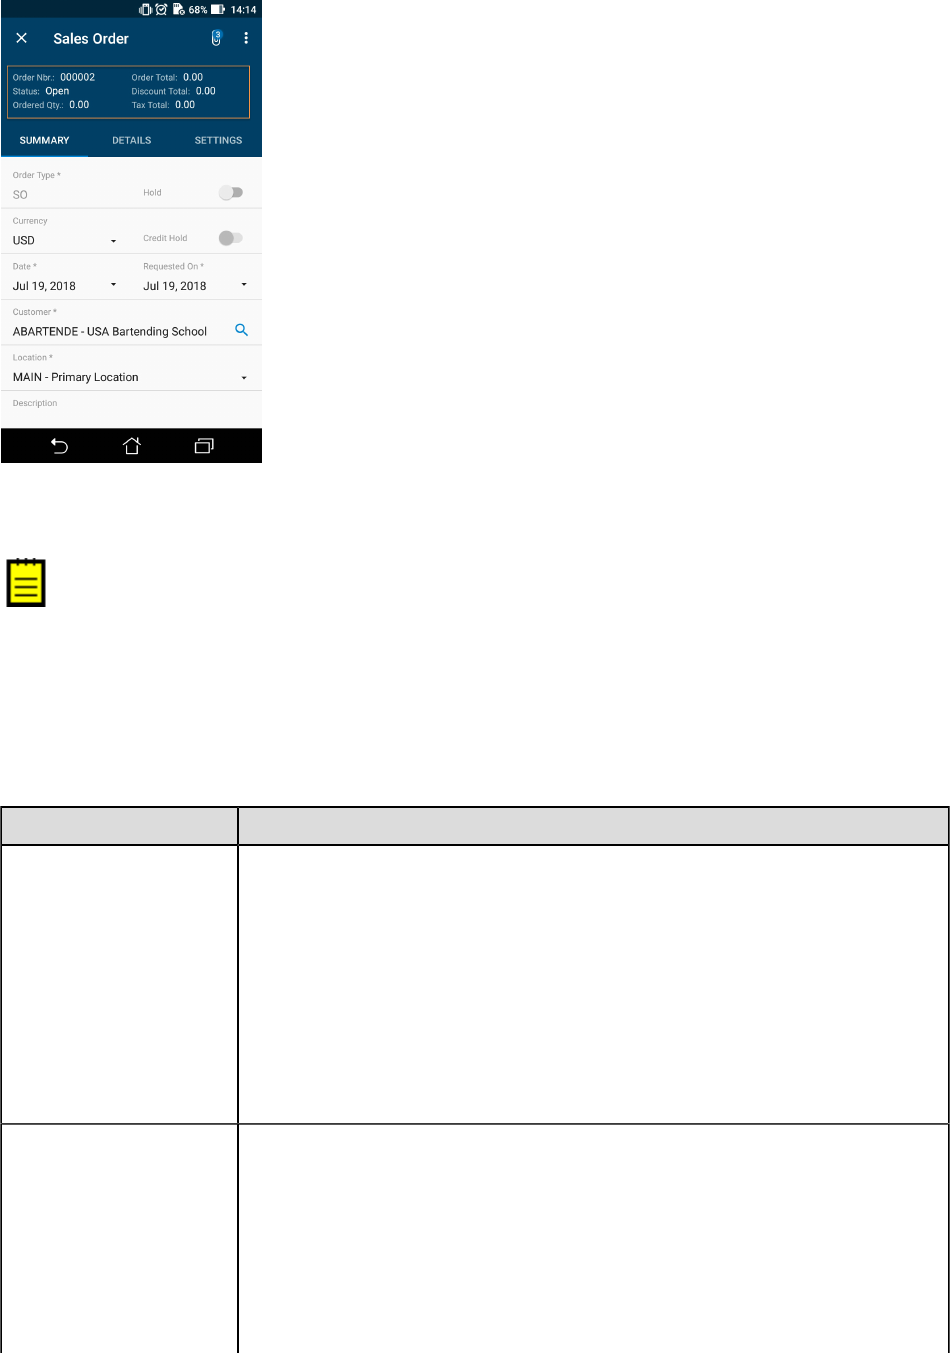
| Mobile Site Map Reference | 102
Figure: Viewing the organized layout
listAction
: This object type is deprecated.
In the mobile site map, an object that defines the appearance and behavior of an action that is
performed on the data records selected in the list. Such an action is displayed only on the list view.
You can use this object if the implementation of the action in Acumatica ERP supports the processing of
multiple records. Then if the user has selected multiple records in the list, the action is applied at once
to all the rows selected in the list.
Attributes
Attribute Description
After
The behavior of the current container after the action is completed. The
value can be one of the following:
• Refresh: The current container should be refreshed after the action is
completed.
• Close: The current container should be closed after the action is
completed.
If the Redirect attribute of the sm:Action tag is set to true, the After
attribute of this object defines more complex behavior for the current
container. See Redirecting to Different Screens and Containers for details.
Behavior
Required. The behavior of the action—which defines how the mobile app
obtains from the server the data resulting from the action and processes
this data. The value can be one of the following:
• Cancel: Discards the unsaved changes. You must declare the action if
it is present in the WSDL.
• Create: Creates a new data record. If the Redirect attribute value is
true, this action redirects the user to a container defined on a different
screen.

| Mobile Site Map Reference | 103
Attribute Description
• Delete: Deletes the data record.
• Open: Opens the data record for editing on a different screen. If the
Redirect attribute value is true, this action redirects the user to a
container defined on a different screen.
• Record: Indicates that the mobile app should expect a single record as
the server response.
• Save: Saves the data record.
• SignReport: Indicates that the mobile app should add the Sign action
to the container. This action is not implemented in Acumatica ERP
and uses the specific capabilities of the mobile devices to create the
user signature as an image file. The user can save the signature in the
database of the Acumatica ERP instance as a file attachment for the
appropriate form. See Creating the User Signature for details.
• Void: Tells the mobile app to not use any records that are returned in
the server response.
DisplayName The name of the action in the UI.
Icon The name of the image that is used to display the action icon on the UI. If
this attribute is not specified for an action, the action is displayed on the UI
without an icon.
See Icons for the possible values and the corresponding images for the Icon
attribute.
Priority The priority value that defines the position of the action on the screen or the
toolbar relative to other list actions.
Redirect An indicator of whether the action redirects the user to a container of a
screen. You can use this attribute to do the following:
• Allow a redirection defined for the action in Acumatica ERP by setting
the attribute to true.
• Deny a redirection defined for the action in Acumatica ERP by setting
the attribute to false. This is the default setting of the Redirect
attribute.
• Define a new redirection for the action by setting the attribute to true
and specifying the attributes of this tag to set one of the following as
the destination of the redirection:
• RedirectToScreen, to redirect to the primary container of the
specified screen
• RedirectToContainer, to redirect to another container of the
current screen
• RedirectToScreen and RedirectToContainer, to redirect to a
specified container of a specified screen
: See Redirecting to Different Screens and Containers for more
details.
RedirectToContainer The name of the destination container. The name can consist of the
following parts separated by the $ symbol:
| Mobile Site Map Reference | 104
Attribute Description
• The name of the container
• The display type of the container: List or Form (default)
• The optional name of the additional container whose data is used as a
filter
The mobile site map has to include the metadata for this container.
RedirectToScreen The name of the destination screen. The mobile site map has to include the
metadata for this screen.
SyncLongOperation An indicator of whether the mobile app should wait until the action
is completed if this action is defined as a PXLongRunOperation one
and is executed asynchronously in Acumatica ERP. By default, the
SyncLongOperation attribute is set to false.
Example
In the following example, an action for processing the list of records is added.
add listAction "Process" {
behavior = Void
redirect = True
syncLongOperation = True
}
recordAction
In the mobile site map, an object that defines the appearance and behavior of an action that is
performed on the current data record. This type of action is displayed only on the form view (editing
screen).
Attributes
Attribute Description
After
The behavior of the current container after the action is completed. The
following possible values indicate what to do:
• Refresh: Refresh the current container after the action is completed.
• Close: Closed the current container after the action is completed.
If the Redirect attribute of the sm:Action tag is set to true, the After
attribute of this object defines more complex behavior for the current
container. See Redirecting to Different Screens and Containers for details.
Behavior
Required. The behavior of the action—which defines how the mobile app
obtains from the server the data resulting from the action and processes
this data. The value can be one of the following:
• Cancel: Discards the unsaved changes. You must declare this action if
it is present in the WSDL.
• Create: Creates a new data record. If the Redirect attribute value is
true, this action redirects the user to a container defined on a different
screen.
• Delete: Deletes the data record.

| Mobile Site Map Reference | 105
Attribute Description
• Open: Opens the data record for editing on a different screen. If the
Redirect attribute value is true, this action redirects the user to a
container defined on a different screen.
• Record: Tells the mobile app to expect a single record as the server
response.
• Save: Saves the data record.
• SignReport: Indicates that the mobile app should add the Sign action
to the container. This action is not implemented in Acumatica ERP
and uses the specific capabilities of the mobile devices to create the
user signature as an image file. The user can save the signature in the
database of the Acumatica ERP instance as a file attachment for the
appropriate form. See Creating the User Signature for details.
• Void: Indicates to the mobile app to not use any records that are
returned in the server response.
DisplayName The name of the action in the UI.
Icon The name of the image that is used to display the action icon on the UI. If
this attribute is not specified for an action, the action is displayed on the UI
without an icon.
See Icons for the possible values and the corresponding images for the Icon
attribute.
Priority The priority value that defines the position of the action on the screen or the
toolbar relative to other record actions.
Redirect An indicator of whether the action redirects the user to a container of a
screen. You can use this attribute to do the following:
• Allow a redirection defined for the action in Acumatica ERP by setting
the attribute to true.
• Deny a redirection defined for the action in Acumatica ERP by setting
the attribute to false. This is the default setting of the Redirect
attribute.
• Define a new redirection for the action by setting the attribute to true
and specifying the attributes of this tag to set one of the following as
the destination of the redirection:
• RedirectToScreen, to redirect to the primary container of the
specified screen
• RedirectToContainer, to redirect to another container of the
current screen
• RedirectToScreen and RedirectToContainer, to redirect to a
specified container of a specified screen
: See Redirecting to Different Screens and Containers for more
details.
RedirectToContainer The name of the destination container. The name can consist of the
following parts separated by the $ symbol:
• The name of the container

| Mobile Site Map Reference | 106
Attribute Description
• The display type of the container: List or Form (default)
• The name of the additional container whose data is used as a filter
(optional)
The mobile site map has to include the metadata for this container.
RedirectToScreen The name of the destination screen. The mobile site map has to include the
metadata for this screen.
SyncLongOperation An indicator of whether the mobile app should wait until the action
is completed if this action is defined as a PXLongRunOperation one
and is executed asynchronously in Acumatica ERP. By default, the
SyncLongOperation attribute is set to false.
Example
In the following example, an action to delete an opened record is added.
add recordAction "Delete" {
Icon = "system://Trash"
Behavior = Delete
After = Close
}
recordActionLink
An object that you can use to remove an action from the screen toolbar and put the action among the
field objects on a editing screen. The action to which this object refers must be declared with the same
name within the same container by using any action object (for details, see Object Types).
Attributes
Attribute Description
weight The value that is used to set the width of the link within the UI element line
defined by the layout object with the Template attribute set to Inline. The
default value is 1.
Example
In the following example, a container with an action and corresponding action link is added.
add container "SampleContainer" {
add recordActionLink "ViewOnMap"
add recordAction "ViewOnMap" {
behavior = Void
redirect = True
}
}
screen
An object that maps an Acumatica ERP form to the mobile app. This object can include the definition of
screen containers and the assignment of attributes.

| Mobile Site Map Reference | 107
Attributes
Attribute Description
OpenAs The display type of the screen. When the screen is opened from a menu,
this attribute specifies how to open the primary container. Otherwise,
when the screen is opened by a redirection from an action and the
RedirectToContainer attribute of this action does not explicitly specify
how to open the container, then this attribute specifies how to open the
redirected container of the screen. The value can be one of the following:
• List: The screen opens as a list.
• Form: The screen opens as a form.
Type The type of the screen, which is one of the following values:
• SimpleScreen: The screen is a common screen.
• FilterListScreen: The screen corresponds to the Acumatica ERP form
based on the FormDetail form template. Such a screen must include
two containers. The first container maps the form area of the form
(filter), and the second one maps the grid.
• Report: The screen is an Acumatica Report Designer report.
• Dashboard: The screen is a dashboard. A screen of this type can
display the following types of dashboard widgets:
• Chart
• Data Table
• Score Card
• Trend Card
Other widget types will be hidden.
Example
In the following example, the Sales Orders (SO301000) screen that has been present in the original
mobile site map is updated.
update screen SO301000 {
update container "OrderSummary" {
add recordAction "PrintSalesOrderQuoteReport" {
redirect = True
}
add recordAction "SignReport" {
behavior = SignReport
displayName = "Sign"
}
}
}
selectionAction
In the mobile site app, an action can be performed with data records selected in the list. The
selectionAction object defines the appearance and behavior of this action. This type of action is
displayed only on the list view. If the user has selected multiple records in the list, the action is applied
successively to each selected record.

| Mobile Site Map Reference | 108
Attributes
Attribute Description
After
The behavior of the current container after the action is completed. The
value can be one of the following:
• Refresh: The current container should be refreshed after the action is
completed.
• Close: The current container should be closed after the action is
completed.
If the Redirect attribute of an action object is set to true, the After
attribute of this object defines more complex behavior for the current
container. See Redirecting to Different Screens and Containers for details.
Behavior
Required. The behavior of the action—which defines how the mobile app
obtains from the server the data resulting from the action and processes
this data. The value can be one of the following:
• Cancel: Discards the unsaved changes. You must declare this action if
it is present in the WSDL.
• Create: Creates a new data record. If the Redirect attribute value is
true, this action redirects the user to a container defined on a different
screen.
• Delete: Deletes the data record.
• Open: Opens the data record for editing on a different screen. If the
Redirect attribute value is true, this action redirects the user to a
container defined on a different screen.
• Record: Indicated that the mobile app should expect a single record as
the server response.
• Save: Saves the data record.
• SignReport: Indicates that the mobile app should add the Sign action
to the container. This action is not implemented in Acumatica ERP
and uses the specific capabilities of the mobile devices to create the
user signature as an image file. The user can save the signature in the
database of the Acumatica ERP instance as a file attachment for the
appropriate form. See Creating the User Signature for details.
• Void: Tells the mobile app to not use any records that are returned in
the server response.
DisplayName The name of the action in the UI.
Icon The name of the image that is used to display the action icon on the UI. If
this attribute is not specified for an action, the action is displayed on the UI
without an icon.
See Icons for the possible values and the corresponding images for the Icon
attribute.
Priority The priority value that defines the position of the action on the screen or the
toolbar relative to other selection actions.
Redirect An indicator of whether the action redirects the user to a container of a
screen. You can use this attribute to do the following:

| Mobile Site Map Reference | 109
Attribute Description
• Allow a redirection defined for the action in Acumatica ERP by setting
the attribute to true.
• Deny a redirection defined for the action in Acumatica ERP by setting
the attribute to false. This is the default setting of the Redirect
attribute.
• Define a new redirection for the action by setting the attribute to true
and specifying the attributes of this tag to set one of the following as
the destination of the redirection:
• RedirectToScreen, to redirect to the primary container of the
specified screen
• RedirectToContainer, to redirect to another container of the
current screen
• RedirectToScreen and RedirectToContainer, to redirect to a
specified container of a specified screen
: See Redirecting to Different Screens and Containers for more
details.
RedirectToContainer The name of the destination container. The name can consist of the
following parts separated by the $ symbol:
• The name of the container
• The display type of the container: List or Form (default)
• The optional name of the additional container whose data is used as a
filter
The mobile site map has to include the metadata for this container.
RedirectToScreen The name of the destination screen. The mobile site map has to include the
metadata for this screen.
SyncLongOperation An indicator of whether the mobile app should wait until the action
is completed if this action is defined as a PXLongRunOperation one
and is executed asynchronously in Acumatica ERP. By default, the
SyncLongOperation attribute is set to false.
Example
In the following example, a new action for deleting selected records is defined.
add selectionAction "Delete" {
icon = "system://Trash"
behavior = Delete
}
type
For attachments, an object that defines a file name extension of the permitted file type.
Attributes
Attribute Description
Extension The file name extension of the permitted file type.

| Mobile Site Map Reference | 110
Example
The following examples defines three types of files that can be attached to the record: JPG, PNG, and
PDF.
attachments {
add type "jpg" {
extension = "jpg"
}
add type "png" {
extension = "png"
}
add type "pdf" {
extension = "pdf"
}
}
Constants
The following types of constants are supported in MSDL.
Type Example
integer 100500
string "Expense Receipts"
boolean true and false
enum hubFolder
Instructions
Format:
# comment
instructionName objectType "objectName" {
attributeName1 = newValue1
attributeName2 = newValue2
...
instructionName1 objectType1 "objectName1" {
...
}
}
MSDL provides the following instructions.
Instruction Description
add Appends the specified object as a child to the object that is referenced in
the outer scope of this instruction.
attachments In a container, switches the MSDL interpreter to the mode of setting the
attachment attributes.
placeAfter In the mobile site map, moves the object that is referenced in the outer
scope of this instruction after the specified object.
placeAt In the mobile site map, moves the object that is referenced in the outer
scope of this instruction to the specified position.
placeBefore In the mobile site map, moves the object that is referenced in the outer
scope of this instruction to the position before the specified object.
remove Removes the specified object from the mobile site map.
sitemap Switches the MSDL interpreter to the mode of editing the main menu of the
mobile site map.

| Mobile Site Map Reference | 111
Instruction Description
selector In a field, switches the MSDL interpreter to the mode of editing the selector
content.
update Switches the MSDL interpreter to the mode of editing the specified object.
add
In the mobile site map of the Acumatica ERP instance, appends the referenced object as a child to the
object that was processed by a previous instruction with an opening brace.
Syntax:
add objectType "objectName"
Parameters:
• objectType: The keyword that specifies one of the object types, as described in Object Types.
• objectName: The string constant that specifies the object name as it is defined in the WSDL
schema. (See Getting the WSDL Schema for details.) If objectType is field, to add to the
container a child field from another container, you specify the value of this parameter in the
following format: ContainerName#FieldName, where ContainerName is the name of the
container (as it is specified in the WSDL schema) that contains the field, and FieldName is the
name of the field in this container.
Example:
Suppose that you need to add a new field to a container that is defined in the mobile site map. We
recommend that you do this as shown in the following example.
update screen "ERP_ScreenID" {
update container "WSDL_ContainerName" {
add field "WSDL_FieldName" {
FieldTagAttribute1 = Value1
FieldTagAttribute2 = Value2
}
}
}
The code above performs the following operations:
1. Finds the screen by the specified name in the mobile site map
2. If the previous operation has succeeded, finds the container with the specified name in the
mobile site map
3. If the previous operation has succeeded, finds the container in the WSDL schema of the form
4. In the WSDL schema, finds the field that has the name specified in the add instruction
5. If the previous operation has succeeded, adds the field to the mobile site map
6. If an assignment command for an attribute of the field is specified for the add instruction within
braces, sets the attribute to the specified value
attachments
In a container in the mobile site map of the Acumatica ERP instance, switches the MSDL interpreter to
the mode in which the attachment attributes can be set.
Syntax:
attachments {}
The braces are mandatory. Within the braces, you can add assignment commands for the attributes of
the instruction.
Attributes:

| Mobile Site Map Reference | 112
Attribute Description
Disabled An indicator of whether attachments are disabled. If its value is true, the
attachments are disabled.
ImageAdjustmentPreset The type of the image adjustment that is processed by the application
for enhancing images taken from the camera of a mobile device. The
only value of this attribute is Receipt, which is an indicator that a special
camera mode is switched on in the Acumatica mobile app. In this mode,
the following enhancements of the image captured by the camera are
preformed automatically:
• The image is cropped based the bounding box of the receipt's detected
edges.
• The image distortion is removed.
• The image is converted into black and white.
• The contrast of the image is maximized.
Name The identifier of the attachments, as found in the WSDL schema.
MaxFileSize The maximum size of an attached file.
MaxImageHeight The maximum height of an attached image (in pixels).
MaxImageWidth The maximum width of an attached image (in pixels).
Example:
Suppose that you need to specify the following requirements related to attachments:
• The attachments of an Acumatica ERP form are allowed in the container.
• The attachments can contain files that have the JPG or PNG extension.
• Image adjustment is not used for an attached file.
You can add the following code within the instruction for the appropriate container.
any instruction for the container {
...
attachments {
disabled = false
add type "jpg"
add type "png"
imageAdjustmentPreset = Receipt
}
}
placeAfter
In the mobile site map, moves the object that is referenced in the outer scope of this instruction
immediately after the specified object. The instruction is used to order child objects within a parent
object of the mobile site map. You cannot use the instruction to move an object from one parent object
to another.
Syntax:
placeAfter objectType "objectName"
Parameters:
• objectType: A keyword that specifies an object type, as described in Object Types.
• objectName: The string constant that specifies the name of the object of the type specified
by the objectType parameter. The object must exist in the instance of the mobile site map in

| Mobile Site Map Reference | 113
the memory of Acumatica ERP server before the MSDL interpreter processes the placeAfter
instruction.
Example:
Suppose that you need to move the EP503010 form shortcut within the ExpenseReceipts folder of the
main menu to the position after the EP301010 form shortcut. You can add the following code within the
sitemap instruction.
update folder "ExpenseReceipts" {
update item "EP503010" {
placeAfter item "EP301010"
}
}
placeAt
In the mobile site map, moves the object that is referenced in the outer scope of this instruction to the
specified position in the same parent object of the mobile site map.
Syntax:
placeAt positionNumber
Parameter:
• positionNumber: The non-negative integer value that specifies the number of the target position
in the parent object.
Example:
Suppose that you need to add a shortcut to the Expense Receipts (EP301010) screen to the first
position in the ExpenseReceipts folder of the main menu and change the display name of the shortcut.
You can add the following code within the sitemap instruction.
update folder "ExpenseReceipts" {
add item "EP301010" {
displayName = "Expense Receipts"
placeAt 0
}
}
placeBefore
In the mobile site map, moves the object that is referenced in the outer scope of this instruction
immediately before the specified object. The instruction is used to order child objects within a parent
object of the mobile site map. You cannot use the instruction to move an object from one parent object
to another.
Syntax:
placeBefore objectType "objectName"
Parameters:
• objectType: A keyword that specifies an object type, as described in Object Types.
• objectName: The string constant that specifies the name of the object of the type specified
by the objectType parameter. The object must exist in the instance of the mobile site map in
the memory of Acumatica ERP server before the MSDL interpreter processes the placeBefore
instruction.
Example:

| Mobile Site Map Reference | 114
Suppose that you need to add the CompanyName field within the ContactSummary container to
the position before the Address group. You can add the following code within an instruction for the
container.
update screen "CR302000" {
update container "ContactSummary" {
...
add group "Address" {...}
...
add field "CompanyName" {
container = "DetailsSummary"
placeBefore group "Address"
}
}
}
remove
In the mobile site map of the Acumatica ERP instance, removes the referenced object, along with any
child objects it has, from the mobile site map.
Syntax:
remove objectType "objectName"
Parameters:
• objectType: A keyword that specifies one of the object types, as described in Object Types.
• objectName: The string constant that specifies the object name as it is defined in the WSDL
schema. (See Getting the WSDL Schema for details.)
Example:
Suppose that you need to remove a field from a container that is defined in the mobile site map. We
recommend that you do this as shown in the following example.
update screen "ERP_ScreenID" {
update container "WSDL_ContainerName" {
remove field "WSDL_FieldName"
}
}
The code above performs the following operations:
1. Finds the screen with the specified name in the mobile site map
2. If the previous operation has succeeded, finds the container with the specified name in the
mobile site map
3. If the previous operation has succeeded, removes the field from the mobile site map
: If the field contains a selector container, the container is also removed from the mobile site map.
sitemap
Switches the MSDL interpreter to editing mode for the main menu of the mobile site map.
Syntax:
sitemap {}
The braces are mandatory. Within the braces, you can add instructions for objects of the main menu of
the mobile site map.
Examples:

| Mobile Site Map Reference | 115
The following code adds the new folder to the main menu, sets the attributes of the folder in the mobile
site map (see folder for details), and adds the shortcut for the Expense Receipts (EP301010) screen
with the specified display name to the folder.
sitemap {
add folder "ExpenseReceipts" {
type = HubFolder
isDefaultFavorite = True
displayName = "Expense Receipts"
icon = "system://NewsPaper"
add item "EP301010" {
displayName = "Expense Receipts"
}
}
The code below updates the ExpenseReceipts folder of the main menu in the following ways:
• Switches the MSDL interpreter to editing mode for the main menu
• Changes the display name of the folder
• Removes the shortcut to the Expense Receipts screen from the folder
• Adds the shortcut to the Expense Receipts screen to the folder with the specified display name
• Switches the MSDL interpreter back to editing mode for the content of the mobile site map
update folder "ExpenseReceipts" {
displayName = "New display name"
remove item "EP301010"
add item "EP503010" {
displayName = "Other screen"
}
}
The code above can be executed because it operates with the objects that are created in the previous
code example.
selector
In a field in the mobile site map of the Acumatica ERP instance, switches the MSDL interpreter to
editing mode for the selector content.
Syntax:
selector {}
The braces are mandatory. Within the braces, you can add assignment commands for attributes of the
container object and instructions for the fields that are used as selector columns.
Example:
Suppose that you need to define for a field a selector container that contains four columns but displays
only three. You can add the following code within an instruction for the field.
any instruction for the field {
selector {
fieldsToShow = 3
add field "BusinessAccount"
add field "Type"
add field "BusinessAccountName"
add field "BAccountID"
}
}
update
In the mobile site map of the Acumatica ERP instance, switches the MSDL interpreter to editing mode
for specified object.

| Mobile Site Map Reference | 116
Syntax:
update objectType "objectName"
Parameters:
• objectType: A keyword that specifies one of the object types, as described in Object Types.
• objectName: The string constant that specifies the object name as it is defined in the WSDL
schema. (See Getting the WSDL Schema for details.)
Example:
Suppose that you need to add a new field to a container of a screen that is defined in the mobile site
map. We recommend that you do this as shown in the following example.
update screen "ERP_ScreenID" {
update container "WSDL_ContainerName" {
add field "WSDL_FieldName" {
...
}
}
}
The code above performs the following operations:
1. Finds the screen with the specified name in the mobile site map
2. If the previous operation has succeeded, finds the container with the specified name in the
mobile site map
3. If the previous operation has succeeded, finds the container in the WSDL schema of the form
4. In the WSDL schema, finds the field with the name specified in the add instruction
5. If the previous operation has succeeded, adds the field to the mobile site map
Error Messages
The MSDL interpreter can work in the following modes:
• Production mode, in which the interpreter ignores most errors while processing the MSDL code,
for greater stability
• Debugging mode, in which the interpreter logs every error and stops executing the MSDL code if
an error occurs
Production mode is used by default; here the MSDL interpreter does not log errors that occur.
The interpreter ignores any MSDL file that contains a syntax error. It also ignores any instruction
that contains a semantic error; if such an instruction contains nested instructions and assignment
commands, the interpreter also ignores them.
To turn on debugging mode, you should turn on the mobileSitemapDebug key by including the following
string in the <appSettings> section of the web.config file, which is located in the website folder:<add
key="mobileSitemapDebug" value="True" />.
If the key is turned on, the MSDL interpreter logs errors and sends the error messages to the mobile
app, which displays these messages on the mobile device.
The error messages are logged in the following format.
path\\fileName:lineNumber errorMessage
The interpreter logs the following types of errors.
Example of Error Message Description
Invalid command 'ad'. The instruction name is invalid.

| Mobile Site Map Reference | 117
Example of Error Message Description
Can't use entity type 'scren' in
current context.
The interpreter detects an unknown object or an attempt to use the
object in the wrong context. The interpreter ignores the instruction
and all the nested commands and instructions.
Invalid argument '1' The instruction contains an invalid type of a parameter.
Invalid argument count The instruction contains the wrong number of parameters. The
interpreter ignores the instruction and all the nested commands
and instructions.
Can't find entity with key
'ExpenseReceipts' in current
context.
The object specified in the instruction (for example, update or
remove) is not found in the mobile site map.
Only one instance of entity type
'sitemap'.
The instruction is trying to add an object that exists in the mobile
site map, and the site map can contain only one such object.
Entity with key 'EP301010'
already exists.
The instruction is trying to add an object that exists in the parent
object.
Can't use attribute 'someAttr' in
current context.
The assignment command is trying to set an attribute that does not
rely on the specified object.
Can't assign value to attribute
'forceRequired'
The assignment command is trying to assign to the attribute a
value of an inappropriate type.
Syntax error: extraneous input
'}'
The interpreter has detected a syntax error in the specified line of
the MSDL code.
XML Tags
: XML tags for customizing the Mobile Site Map is deprecated since Acumatica 2019 R1. Use MSDL instead.
The figure below shows the relationships between tag types in the mobile site map. In the figure, each
line connecting a left tag type and a right tag type indicates that the left tag may contain any number
of right tags. The exception to this rule is the sm:Container tag, which may include only a single
sm:Attachments tag.


| Mobile Site Map Reference | 119
• <sm:Include>
• <sm:Layout>
• <sm:RecordActionLink>
• <sm:Screen>
• <sm:SelectorContainer>
• <sm:Type>
<sm:Action>
The sm:Action tag has the following attributes.
Attribute Description
After
The behavior of the current container after the action is completed. The
value can be one of the following:
• Refresh: An indicator that the current container is refreshed after the
action is completed.
• Close: An indicator that the current container is closed after the action
is completed.
If the Redirect attribute of the sm:Action tag is set to true, the After
attribute of this tag defines more complex behavior of the current container.
See Redirecting to Different Screens and Containers for details.
Behavior
Required. The behavior of the action—which defines how the mobile app
obtains from the server the data resulting from the action and processes
this data. The value can be one of the following:
• Cancel: The action that discards the unsaved changes. You must
declare the action if it is present in the WSDL.
• Create: The action that creates a new data record. If the Redirect
attribute value is true, the action redirects the user to a container
defined on a different screen.
• Delete: The action that deletes the data record.
• Open: The action that opens the data record for editing from a
different screen. If the Redirect attribute value is true, the action
redirects the user to a container defined on a different screen.
• Record: The type of behavior that is a hint for the mobile app to
expect a single record as the server response.
• Save: The action that saves the data record.
• SignReport: An indicator that the mobile app should add the SIGN
action to the container. This action is not implemented in Acumatica
ERP and uses specific capabilities of mobile devices to create the user
signature as an image file. The user can save the signature in the
database of the Acumatica ERP instance as a file attachment for the
appropriate form. See Creating the User Signature for details.
• Void: The type of behavior that is a hint for the mobile app to do not
use any records that are returned in the server response.
| Mobile Site Map Reference | 120
Attribute Description
Context
Required. The context of the action—that is, what the action is performed
on. The value can be one of the following:
• Container: The action that is related to a container and performs
the business logic implemented in Acumatica ERP. Such an action is
displayed only on the list view.
• List: The action that is performed on the data records selected in the
list. Such an action is displayed only on the list view. You can use this
value if the implementation of the action in Acumatica ERP supports
processing of multiple records. Then if the user has selected multiple
records in the list, the action is applied at once to all the rows selected
in the list.
• Record: The action that is performed on the current data record. Such
an action is displayed only on the form view.
• Selection: The action that is performed on the data records selected
in the list. Such an action is displayed only on the list view. If the
user has selected multiple records in the list, the action is applied
successively to each selected record.
DisplayName The name of the action in the UI.
Icon The name of the image that is used to display the action icon on the UI.
This attribute is optional. If this attribute is not specified for an action, the
action is displayed in the UI without an icon. See the possible values and
the corresponding images for the Icon attribute in Icons.
Name The action identifier, as found in the WSDL schema.
Priority The priority value that defines the position of the action on the screen or the
toolbar, depending on the Context value of this tag.
Redirect An indicator of whether the action redirects the user to a container of a
screen. You can use this attribute to do the following:
• Allow a redirection defined for the action in Acumatica ERP by setting
the attribute to true.
• Deny a redirection defined for the action in Acumatica ERP by setting
the attribute to false. This is the default setting of the Redirect
attribute.
• Define a new redirection for the action by setting the attribute to true
and specifying the attributes of this tag to set the following destination
of the redirection:
• RedirectToScreen, to redirect to the primary container of the
specified screen
• RedirectToContainer, to redirect to another container of the
current screen
• RedirectToScreen and RedirectToContainer, to redirect to a
specified container of a specified screen
: See Redirecting to Different Screens and Containers for more
details.

| Mobile Site Map Reference | 121
Attribute Description
RedirectToContainer The name of the destination container. The name can consist of the
following parts separated by the $ sign:
• The name of the container
• The display type of the container: List or Form (default)
• Optional: The name of the additional container whose data is used as
a filter
The mobile site map has to include the metadata for this container.
RedirectToScreen The name of the destination screen. The mobile site map has to include the
metadata for this screen.
SyncLongOperation An indicator of whether the mobile app should wait until the action
is completed if this action is defined as a PXLongRunOperation one
and is executed asynchronously in Acumatica ERP. By default, the
SyncLongOperation attribute is set to false.
<sm:Attachments>
The sm:Attachments tag has the following attributes.
Attribute Description
Disabled An indicator of whether attachments are disabled. If its value is true, the
attachments are disabled.
ImageAdjustmentPreset The type of the image adjustment that is processed by the application for
enhancing images taken from the camera of a mobile device. The only
value of this attribute is Receipt, which is an indicator that a special camera
mode is switched on in the Acumatica mobile application. In this mode,
the following enhancements of the image captured by the camera are
preformed automatically:
• The image is cropped by the bounding box of the detected edges.
• The image distortion is removed.
• The image is converted into black and white.
• The contrast of the image is maximized.
Name The identifier of the attachments, as found in the WSDL schema.
MaxFileSize The maximum size of an attached file.
MaxImageHeight The maximum height of an attached image (in pixels).
MaxImageWidth The maximum width of an attached image (in pixels).
<sm:Attributes>
The sm:Attributes tag has the following attributes.
Attribute Description
From The name of the data view for the grid that contains the entity attributes.
FormPriority The priority value that defines the position of the entity attributes on the
screen.

| Mobile Site Map Reference | 122
Attribute Description
Name The identifier of the attributes, as found in the WSDL schema.
If the sm:Attributes tag is used to map a grid of Acumatica ERP to a form view that displays key-
value pairs, you should also use the following attributes in this tag.
Attribute Description
IDField The identifier of the grid field, as found in the WSDL schema, that specifies
the key field for the key-value pairs. By default, the value is AttributeID.
IDValue The identifier of the grid field, as found in the WSDL schema, that specifies
the value field for the key-value pairs. By default, the value is Value.
OrderField Optional. The grid field identifier, as found in the WSDL schema, that is used
for sorting rows in the grid to display in the form view. By default, the value
is Order.
<sm:Container>
The sm:Container tag has the following attributes.
Attribute Description
AttachmentsControlPriorityThe priority value that defines the position of the attachments in the list.
Attributes An indicator of whether that this container holds entity attributes. If the
indicator value is true, you should not specify the items of the container,
because the container configuration is generated dynamically.
ContainerActionsToExpandThe number of actions with the Context attribute set to Container to be
visible in the toolbar on the list form. The default value depends on the
platform.
DisplayName The name of the container on the UI.
FieldsToShow The number of fields to display in the list.
FormActionsToExpand The number of actions with the Context attribute set to Record to be
visible in the toolbar on the editing form. The default value depends on the
platform.
ListActionsToExpand The number of actions with the Context attribute set to Selection or List
to be visible in the toolbar on the list form when the multiple selection of
records is activated. The default value depends on the platform.
Name The identifier of the container, as found in the WSDL schema.
Type An optional attribute that specifies the type of the container. The only
possible value is SelectionActionList, which is used for an action with the
Context attribute set to List. See <sm:Action> for details.
Visible An indicator of whether the link to the container is visible on the editing
form. This attribute can be applied to a secondary container. By default, the
value is true.
<sm:ContainerLink>
The sm:ContainerLink tag has the following attributes.
Attribute Description
Container The name that is the link to the container. The name is specified in the Name
attribute of the sm:Container tag for the container.
Control The type of control, which is one of the following values:

| Mobile Site Map Reference | 123
Attribute Description
• ListItem: An indicator that the link to the container is displayed
among the form fields according to the value defined in the Priority
attribute of this tag.
• Button: An indicator that the link to the container is displayed in the
action panel according to the value defined in the Priority attribute
of this tag.
Icon The name of the image that is used to display the link when the Control
attribute is set to Button and the link is displayed in the action panel in
the UI. This attribute is optional. If this attribute is not specified for a link,
it is displayed in the UI without an icon. See the possible values and the
corresponding images for the Icon attribute in Icons.
Name The identifier of the link to the container, as found in the WSDL schema.
Priority The priority value that defines the position of the link in the enclosing
container on the form.
ValueField The name of the field whose value is used as the link text. The field must be
declared in the container.
Weight The value that is used to set the width of the link within the UI element line
defined by the <sm:Layout> tag with the Template attribute set to Inline.
The default value is 1.
<sm:Field>
The sm:Field tag has the following attributes.
Attribute Description
Container The name of the container object of the field, as it is specified in the WSDL
schema. This attribute is specified if the field from another container is used
in the container.
DisplayName The name for the field, which by default is automatically set by the system.
However, you can change it.
ForceIsDisabled An indicator of whether the field will be unavailable on the editing form
regardless of the server logic. By default, the field availability depends on
the server logic.
ForceIsVisible An indicator of whether the field is visible on the editing form regardless of
the server logic. By default, the field visibility depends on the server logic.
ForceRequired An indicator of whether the field is mandatory and must be filled on the
screen. If its value is true, the field is mandatory. If its value is false, the
field is not mandatory. If the attribute is not specified, the need to fill the
field is determined by the data obtained from the server.
ForceType The field type that is used by the application instead of the original field
type. The only value of this attribute is String, which is an indicator of
whether the field is visible on the editing form regardless of the server logic.
By default, the field visibility depends on the server logic.
FormPriority The priority value that defines the position of the field on the form.
ListDisplayFormat The format that is used to display the field in the list. The value can be one
of the following:

| Mobile Site Map Reference | 124
Attribute Description
• Value: An indicator that the field is represented only by the field value
in the list.
• CaptionValue: An indicator that the field is represented by the caption
and the value in the list.
ListPriority The priority value that defines the position of the field in the list.
Name The field identifier, as found in the WSDL schema.
PickerType (Applicable to a selector field.) The processing type of the selector field
value. The value can be one of the following:
• Attached: An indicator that the selector is displayed as a pop-up
dialog.
• Detached: An indicator that the selector is displayed as a separate
screen.
• Searchable: An indicator that the mobile app should display the
Search button ( ) right of the field control. If the user enters a text
fragment in the control and clicks the button, the app sends to the
Acumatica ERP server a query to search the records, which contain the
specified fragment in the field value. After the response, the mobile
app opens the selector screen and displays the list of the field values
obtained from the server. The user uses the list to select a value for
the selector control.
SelectorDisplayFormat The selector field format that is used to display the field value. The value
can be one of the following:
• Key: An indicator that the value is represented by the key field of the
selector.
• Description: An indicator that the value is represented by
the value field of the selector. This is the default value of the
SelectorDisplayFormat attribute.
• KeyDescription: An indicator that the value is represented by the
combination of the key and value fields of the selector.
Special
The field type that is used by the mobile app for a special purpose. The
value can be one of the following:
• AllowEdit: (Applicable to a selector field.) An indicator that the app
should display the Edit button ( ) right of the field control. If the
user clicks the button, the mobile app tries to open the data entry
form for the business entity (such as a customer or sales order),
selected in the field. The button appears if the following conditions are
met:
• In the Acumatica ERP form, the edit button is displayed for the
corresponding field control.
• In the mobile app, the data field is not empty and contains an
ID that can be used to select the appropriate data record of the
business entity.

| Mobile Site Map Reference | 125
Attribute Description
• EmailAddress: An indicator that the app should treat this field as an
input box for an email address. It enables auto-complete for email
addresses, and the system displays a list of possible completions as
the user types an email address for a new email activity by using the
on-screen keyboard. The suggested completions are taken from the
system database or from the device's address book. The value is not
supported in iOS apps.
• EmailSend: An indicator that the app should display the Send Email
button ( ) right of the field control. If the user clicks the button, the
mobile app forces the system of the mobile device to create a new
email message and use the field value as the destination address for
the message. In iOS. the Mail app is opened.
• PhoneCall: An indicator that the app should display the Phone Call
button ( ) right of the field control. If the user clicks the button,
the mobile app forces the system of the mobile device to open an
application for voice calls with the phone number specified in the field
control.
• GpsCoords: An indicator that the app should get a user location
and fill the field before sending to the Acumatica ERP server the
data record, which is modified on the screen. If the field value is not
defined, an action mapped on the screen cannot be executed; for
example, the user cannot save a data record, which contains an empty
field with the Special attribute set to GpsCoords.
The location is reported as a string in the following
format: <Latitude>:<Longitude>, for instance,
65.61295166666667:-20.137938333333334.
You can forcibly hide the field by setting the ForceIsVisible attribute
to false, so it is not shown in the user interface, or you can make the
field unavailable for editing by setting the ForceIsDisabled attribute
to true. If the ForceIsVisible and ForceIsDisabled attributes are
not specified, then an appropriate field state will be defined by the
Acumatica ERP server.
• UrlOpen: An indicator that the app should display the Open URL
button ( ) right of the field control. If the user clicks the button,
the mobile app forces the system of the mobile device to launch a
default browser (Safari in iOS) for the external URL specified in the
field control.
The following screenshot shows an example of using the Special attribute
for fields mapped on a screen in the mobile app.

| Mobile Site Map Reference | 126
Attribute Description
Figure: Viewing the fields with the Special attribute in the mobile app
TextType The type of text to be used for the field value. The value can be one of the
following:
• HTML: An indicator that the text can be HTML markup.
• PlainSingleLine: An indicator that the text is displayed on a single line.
• PlainMultiLine: An indicator that the text is displayed on multiple lines.
The look of the input control depends on the platform.
Weight The value that is used to set the width of the field within the UI element line
defined by the <sm:Layout> tag with the Template attribute set to Inline.
The default value is 1.
In the following example, the TotalAmount field takes 2/3 of the total
width, and the Currency field takes 1/3.
<sm:Layout Template="Inline">
<sm:Field Container="ReceiptDetailsExpenseDetails"
Name="TotalAmount" Weight="2"/>
<sm:Field Container="ReceiptDetailsExpenseDetails"
Name="Currency" PickerType="Attached"/>
</sm:Layout>

| Mobile Site Map Reference | 127
<sm:Folder>
The sm:Folder tag has the following attributes.
Attribute Description
DisplayName The name of the folder in the UI.
Icon The name of an image that is used to display the folder icon on the main
menu (and on the sidebar menu, if specified) of a mobile application. This
attribute is optional; if this attribute is not specified for a folder, the folder
is displayed in the UI without an icon. See the possible values and the
corresponding images for the Icon attribute in Icons.
IsDefaultFavorite An indicator of whether a link for the folder is added to the sidebar menu as
a favorite folder. If the attribute is set to true, a link is added to the sidebar
menu. By default, this attribute is set to false.
Name The identifier of the folder, as found in the WSDL schema.
Type The type of the folder (that is, the way it is displayed and used), which is
one of the following values:
• ListFolder: An indicator that the folder contents are displayed as icons.
• HubFolder: An indicator that the folder contents are displayed as
pages that the user navigates by swiping.
<sm:Group>
The sm:Group tag is used to group multiple UI elements on a screen of the mobile app. The tag can
contain the following types of nested tags:
• <sm:Field>
• <sm:Layout>
• <sm:Attributes>
• <sm:RecordActionLink>
For details about the relationships between tag types in the mobile site map, see the diagram in XML
Tags.
Attributes
The sm:Group tag has the following attributes.
Attribute Description
Collapsable
An indicator of whether this group may be collapsed or expanded. If its
value is true, the group can be collapsed or expanded, and you can specify
whether the group is collapsed when the screen is opened by using the
Collapsed attribute. If the value is false, the group is expanded and cannot
be collapsed.
If the Template attribute is set to ExpansionPanel, the value of the attribute
is ignored. Expansion panels are always collapsible.
Collapsed
An indicator of whether this group is collapsed by default. If its value is true,
the group is collapsed when the screen is opened. If the value is false, the
group is expanded when the screen is opened.

| Mobile Site Map Reference | 128
Attribute Description
If Template=Group (or the Template attribute is not set) and
Collapsable=false, the value of the attribute is ignored.
For expansion panels (Template=ExpansionPanel) and collapsible groups
(Template=Group and Collapsable=true), if the value of the attribute is
not specified, the group is collapsed when the screen is opened.
DisplayName
The name of the group in the UI.
If the Template attribute is set to ExpansionPanel, the value of the attribute
is ignored. An expansion panel does not have the name of the group in the
UI.
Field
Obsolete. The name of the field whose value is displayed when the group is
collapsed.
The value of this field is ignored. Expansion panels
(Template=ExpansionPanel) always display the first field (sm:field) or
layout definition (sm:layout) in the group. Other groups (Template=Group)
do not display any fields when the group is collapsed.
FormPriority The priority value that defines the position of the group on the screen.
Name The name of the group. The attribute is optional; however, we recommend
that you specify its value because the value is used as the identifier of the
group and the system tracks changes in the mobile site map by using the
value of this attribute.
Template
The template that is used for the group. The following values can be used
for this attribute:
• ExpansionPanel: An expansion panel, which can be collapsed or
expanded. The collapsed expansion panel displays only the first
field (sm:field) or layout definition (sm:layout) in the group.
Expansion panels does not have the name of the group in the UI.
You can configure how the expansion panel is displayed by using the
Collapsed and FormPriority attributes of the tag.
• Group: A group of UI elements. You can configure how the group is
displayed by using the DisplayName, Collapsable, Collapsed, and
FormPriority attributes of the tag.
If the value of the attribute is not specified, the Group template is used.
<sm:Include>
The sm:Include tag has the following attribute.
Attribute Description
filename The namepath of the file that is included in the mobile site map. You can
include in the mobile site map a metadata file located in any folder within
the website folder. However, we recommend that you place an included file
in the \App_Data\Mobile\includes folder of the website.
<sm:Layout>
The sm:Layout tag is used to arrange multiple UI elements on a screen of the mobile app. The tag can
contain the following types of nested tags:

| Mobile Site Map Reference | 129
• <sm:Field>
• <sm:ContainerLink>
• <sm:RecordActionLink>
• <sm:Layout>
: The sm:Layout tags with the Template attribute set to HeaderSimple or HeaderFirstAttachment
can include nested sm:Layout tags with Template="Inline". The sm:Layout tags for which the
Template attribute is Inline cannot include any nested sm:Layout tags.
For details about the relationships between tag types in the mobile site map, see the diagram in XML
Tags.
Attributes
The sm:Layout tag has the following attributes.
Attribute Description
Name The identifier of the line layout, as found in the WSDL schema.
Template The template that is used to define the layout. The following values can be
used for this attribute:
• HeaderFirstAttachment: An indicator that the mobile app should
arrange the UI elements, which are mapped by the nested tags, in a
group-like header container with an attachment icon on the left. If you
click the attachment icon, you can take a photo and attach the photo
to the screen of the mobile app. The camera behavior is affected by
the attributes of the sm:attachments tag. If the screen of the mobile
app already has attachments, the first attachment thumbnail is shown
instead of the attachment icon.
The tag with the attribute set to HeaderFirstAttachment can include
nested sm:Layout tags with Template="Inline". The tags with
the attribute set to HeaderFirstAttachment cannot be nested in other
sm:Layout tags and can be nested only in sm:Container tags.
• HeaderSimple: An indicator that the mobile app should arrange the
UI elements, which are mapped by the nested tags, in a group-like
header container.
The tag with the attribute set to HeaderSimple can include nested
sm:Layout tags with Template="Inline". The tag with the
attribute set to HeaderSimple cannot be nested in other sm:Layout
tags and can be nested only in sm:Container tags.
• Inline: An indicator that the mobile app should arrange UI elements,
which are mapped by the nested tags, in a line by using the Weight
attributes specified for these elements. If the Weight attribute is not
defined for a nested tag, the mobile app uses 1 as the default value.
The tag with the attribute set to Inline cannot include nested
sm:Layout tags. The tags with the attribute set to Inline can be
nested in other sm:Layout tags.

| Mobile Site Map Reference | 130
Examples
In the following example, the TotalAmount field takes 3/6 of the total width, the Save action link
takes 1/6, and the Currency field takes 2/6.
<sm:Layout Template="Inline">
<sm:Field Container="ReceiptDetailsExpenseDetails" Name="TotalAmount"
Weight="3"/>
<sm:RecordActionLink Name="Save"/>
<sm:Field Container="ReceiptDetailsExpenseDetails" Name="Currency"
PickerType="Attached" Weight="2"/>
</sm:Layout>
The following example shows how nested sm:Layout tags can be used.
<sm:Layout Name="ReceiptHeader" Template="HeaderSimple">
<sm:Layout Name="ReceiptIdLine" Template="Inline">
<sm:Field Name="ReceiptID" ForceIsDisabled="true"/>
<sm:Field Name="Status" ForceIsDisabled="true"/>
</sm:Layout>
</sm:Layout>
<sm:RecordActionLink>
You can use the sm:RecordActionLink tag to remove an action from the screen toolbar and put the
action among the <sm:Field> tags on a data entry form. The action to which this tag refers must be
declared with the same name within the same container by using the <sm:Action> tag.
Attributes
The sm:RecordActionLink tag has the following attributes.
Attribute Description
Name The action identifier, as found in the WSDL schema.
Weight The value that is used to set the width of the link within the UI element line
defined by the <sm:Layout> tag with the Template attribute set to Inline.
The default value is 1.
Example
The following example shows how to use the sm:RecordActionLink tag in the mobile site map.
<sm:Container ...>
...
<sm:RecordActionLink Name="ViewOnMap"/>
...
<sm:Action Behavior="Void" Context="Record" Name="ViewOnMap" Redirect="true"/>
...
</sm:Container>
<sm:Screen>
The sm:Screen tag has the following attributes.
Attribute Description
DisplayName The name of the screen on the UI.
ExpandSelector The name of a selector field from the primary container. An Acumatica ERP
form can contain a selector control that acts like a filter. For example, the
Order Type selector control on the Sales Orders form (SO301000) works
| Mobile Site Map Reference | 131
Attribute Description
as a filter. If the ExpandSelector attribute is specified for a screen, then the
mobile application represents the screen as multiple screens, where each
screen corresponds to a single value of the referenced selector field.
Icon The name of an image that is used to display the screen icon on the main
menu (and on the sidebar menu, if specified) of a mobile application. This
attribute is optional. If this attribute is not specified for a screen, the screen
is displayed in the UI without an icon. See the possible values and the
corresponding images for the Icon attribute in Icons.
Id The screen identifier, such as IN201000. You can find the value to specify
there in the screen URL of the corresponding Acumatica ERP form.
OpenAs The display type of the screen. When the screen is opened from a menu,
this attribute specifies how to open the primary container. Otherwise,
when the screen is opened by a redirection from an action and the
RedirectToContainer attribute of this action does not explicitly specify
how to open the container, then this attribute specifies how to open the
redirected container of the screen. The value can be one of the following:
• List: An indicator that the screen opens as a list.
• Form: An indicator that the screen opens as a form.
Type The type of the screen, which is one of the following values:
• SimpleScreen: An indicator that the screen is a common screen.
• FilterListScreen: An indicator that the screen corresponds to the
Acumatica ERP form based on the FormDetail form template. Such a
screen should include at least two containers. The first container maps
the form area of the form (filter), and the second one maps the grid.
• Report: An indicator that the screen is an Acumatica Report Designer
report.
• Dashboard: An indicator that the screen is a dashboard. A screen of
this type can display the following types of dashboard widgets:
• Chart
• Data Table
• Score Card
• Trend Card
Other widget types will be hidden.
Visible An indicator of the visibility of the screen in the main menu. If the value of
this attribute is true, the screen is visible on the main menu. By default, the
value is true.
<sm:SelectorContainer>
The sm:SelectorContainer tag has same attributes as sm:Container, as well as the following
attributes.
Attribute Description
FieldsToShow The number of columns to display in the selector.
Name The identifier of the selector container, as found in the WSDL schema.
<sm:Type>
The sm:Type tag has the following attribute.

| Mobile Site Map Reference | 132
Attribute Description
Extension The file name extension of the permitted file type.
Icons
In the mobile site map, you can use the Icon attribute to set the icon that is displayed on the UI for the
following MSDL objects:
• containerAction
• listAction
• recordAction
• selectionAction
• folder
• screen
To specify an icon for an MSDL object, use the following format of the attribute value: system://
IconName, where the IconName is one of the following values.
Value Description
Alarm
Albums
AngleDownCircle
AngleLeftCircle
AngleRightCircle
AngleUpCircle
Attention
Bell
Bookmarks
BottomArrow
Box1

| Mobile Site Map Reference | 133
Value Description
Box2
Browser
Calculator
Camera
Cart
Cash
Check
Clock
CloseCircle
Cloud
CloudDownload
CloudUpload
Comment
Compass
Config
CopyFile
Credit
Culture

| Mobile Site Map Reference | 134
Value Description
Date
Display1
Display2
Download
Drawer
Drop
Edit
File
Filter
Flag
Folder
Gleam
Global
Graph
Graph1
Graph2
Graph3
Home

| Mobile Site Map Reference | 135
Value Description
Id
Info
Key
Keypad
LeftArrow
Less
Link
Lock
Mail
MailOpen
MailOpenFile
Map
MapMarker
Menu
Monitor
More
Network
NewsPaper

| Mobile Site Map Reference | 136
Value Description
Next
Note
Note2
Notebook
Paperclip
PaperPlane
Pen
Phone
PhotoGallery
Plane
Plus
Portfolio
Prev
Print
Refresh
RefreshCloud
Repeat
Ribbon
| Mobile Site Map Reference | 137
Value Description
RightArrow
Safe
Search
Server
Share
Shopbag
Signal
Star
Stopwatch
Target
Ticket
Timer
Trash
Umbrella
Unlock
UpArrow
Upload
User

| Mobile Site Map Reference | 138
Value Description
UserFemale
Users
Way
World

| ac.exe MOBILEITEMAP Reference | 139
ac.exe MOBILEITEMAP Reference
The command-line tool (executable name ac.exe) provides multiple parameters and applications.
This topic describes the list of possible parameters and values of ac.exe that can be applied to
mobile site maps. When working with mobile site maps, the first key that you must always use is
MOBILESITEMAP.
: By default, ac.exe is located in the folder on the computer that has Acumatica ERP installed, which is
C:\Program Files (x86)\Acumatica ERP\Data\.
Syntax Description
d[elta] s[cript]
path_to_old_sitemap_folder
path_to_new_sitemap_folder
path_to_msdl_script_file
Compares two mobile site maps and saves an
MSDL script with the delta of these site maps.
d[elta] p[roject]
path_to_old_sitemap_folder
path_to_new_sitemap_folder
path_to_customization_project_file
Compares two mobile site maps and saves the
delta of these site maps to the customization
project.
c[onvert] s[cript]
path_to_sitemap_folder
path_to_msdl_script_file
Converts an XML mobile site map to MSDL format.
c[onvert] p[roject]
path_to_sitemap_folder
path_to_customization_project_file
Converts an XML mobile site map to MSDL format
and saves the result to the specified customization
project.
u[pgrade] s[cript]
path_to_custom_sitemap_folder
path_to_msdl_script_file
Compares an XML mobile site map with the
default mobile site map and saves an MSDL script
with the delta of these site maps.
u[pgrade] p[roject]
path_to_custom_sitemap_folder
path_to_customization_project_file
Compares an XML mobile site map with the
default mobile site map and saves the delta of
these site maps to the customization project.
