
Oracle® HTML DB
2 Day Developer
Release 2.0
B16376-01
July 2005
Oracle HTML DB 2 Day Developer, Release 2.0
B16376-01
Copyright © 2005, Oracle. All rights reserved.
Primary Author: Terri Winters
Contributors: Carl Backstrom, Sharon Kennedy, Sergio Leunissen, Raj Mattamal, and Simon Watt
The Programs (which include both the software and documentation) contain proprietary information; they
are provided under a license agreement containing restrictions on use and disclosure and are also protected
by copyright, patent, and other intellectual and industrial property laws. Reverse engineering, disassembly,
or decompilation of the Programs, except to the extent required to obtain interoperability with other
independently created software or as specified by law, is prohibited.
The information contained in this document is subject to change without notice. If you find any problems in
the documentation, please report them to us in writing. This document is not warranted to be error-free.
Except as may be expressly permitted in your license agreement for these Programs, no part of these
Programs may be reproduced or transmitted in any form or by any means, electronic or mechanical, for any
purpose.
If the Programs are delivered to the United States Government or anyone licensing or using the Programs on
behalf of the United States Government, the following notice is applicable:
U.S. GOVERNMENT RIGHTS Programs, software, databases, and related documentation and technical data
delivered to U.S. Government customers are "commercial computer software" or "commercial technical data"
pursuant to the applicable Federal Acquisition Regulation and agency-specific supplemental regulations. As
such, use, duplication, disclosure, modification, and adaptation of the Programs, including documentation
and technical data, shall be subject to the licensing restrictions set forth in the applicable Oracle license
agreement, and, to the extent applicable, the additional rights set forth in FAR 52.227-19, Commercial
Computer Software—Restricted Rights (June 1987). Oracle Corporation, 500 Oracle Parkway, Redwood City,
CA 94065
The Programs are not intended for use in any nuclear, aviation, mass transit, medical, or other inherently
dangerous applications. It shall be the licensee's responsibility to take all appropriate fail-safe, backup,
redundancy and other measures to ensure the safe use of such applications if the Programs are used for such
purposes, and we disclaim liability for any damages caused by such use of the Programs.
Oracle, JD Edwards, PeopleSoft, and Retek are registered trademarks of Oracle Corporation and/or its
affiliates. Other names may be trademarks of their respective owners.
The Programs may provide links to Web sites and access to content, products, and services from third
parties. Oracle is not responsible for the availability of, or any content provided on, third-party Web sites.
You bear all risks associated with the use of such content. If you choose to purchase any products or services
from a third party, the relationship is directly between you and the third party. Oracle is not responsible for:
(a) the quality of third-party products or services; or (b) fulfilling any of the terms of the agreement with the
third party, including delivery of products or services and warranty obligations related to purchased
products or services. Oracle is not responsible for any loss or damage of any sort that you may incur from
dealing with any third party.

iii
Contents
Send Us Your Comments ........................................................................................................................ ix
Preface ................................................................................................................................................................. xi
Audience....................................................................................................................................................... xi
Documentation Accessibility..................................................................................................................... xi
Related Documents .................................................................................................................................... xii
Conventions ................................................................................................................................................ xii
1 How to Create a Tabular Form
About Sample Application..................................................................................................................... 1-1
Creating a Tabular Form Using a Wizard ............................................................................................ 1-2
Changing Updatable Column Display Type ...................................................................................... 1-4
2 How to Create a Parameterized Report
Sample Report Utilizing a Form Input ................................................................................................ 2-1
About Sample Application..................................................................................................................... 2-2
Creating a New Page................................................................................................................................ 2-3
Creating the Query Region..................................................................................................................... 2-3
Adding an Item......................................................................................................................................... 2-3
Adding a Button to Submit the Page.................................................................................................... 2-4
Run the Page ....................................................................................................................................... 2-4
3 How to Create a Drill Down Report
About Sample Application..................................................................................................................... 3-1
Creating a New Application................................................................................................................... 3-2
Creating Reports for DEMO_ORDERS and DEMO_ORDER_ITEMS ......................................... 3-2
Create a Report for DEMO_ORDERS ............................................................................................. 3-3
Create a Report for DEMO_ORDER_ITEMS ................................................................................. 3-4
Customizing the DEMO_ORDER_ITEMS Report ............................................................................ 3-5
Add an Item to Hold the Value of ORDER_ID.............................................................................. 3-5
Add a Condition................................................................................................................................. 3-6
Modify the Region Title..................................................................................................................... 3-6
Linking the DEMO_ORDERS Report to the DEMO_ORDER_ITEMS Report .......................... 3-6
iv
4 How to Control Form Layout
About Sample Application..................................................................................................................... 4-1
Creating a Table and Data Input Form................................................................................................. 4-2
Create the HT_EMP Table ................................................................................................................ 4-2
Create a New Page Containing a Input Form................................................................................ 4-3
Run the Page ....................................................................................................................................... 4-4
Changing the Appearance of a Page by Altering Region Attributes ............................................. 4-5
Understanding How Item Attributes Effect Page Layout ................................................................ 4-6
Edit Item Attributes ........................................................................................................................... 4-7
Fix Item Alignment............................................................................................................................ 4-8
Adding a Stop and Start HTML Table Item............................................................................ 4-9
Change Label Placement................................................................................................................... 4-9
Change Items to Display-only.......................................................................................................... 4-9
Adding a Region Header and Footer................................................................................................. 4-11
Making a Region Conditional ............................................................................................................ 4-11
Adding Another Region for HTML Text .......................................................................................... 4-12
Changing Item Types ........................................................................................................................... 4-13
Change an Item to a Radio Group................................................................................................ 4-13
Change an Item to a Select List ..................................................................................................... 4-14
Change an Item to a Check Box .................................................................................................... 4-15
About Label Templates ........................................................................................................................ 4-16
Changing Buttons.................................................................................................................................. 4-16
Running the Page for Update ............................................................................................................. 4-16
Making Data Bold ................................................................................................................................ 4-17
5 How to Work with Check Boxes
Accessing Sample Application .............................................................................................................. 5-1
Creating a Single Value Check Box on a Form ................................................................................... 5-2
Change Product Available Radio Group to a Check Box............................................................. 5-2
Alter the Check Box Position............................................................................................................ 5-3
Change Default Check Box Behavior .............................................................................................. 5-4
Add a Computation.................................................................................................................... 5-4
Creating Multi Value Check Box to Filter Content............................................................................ 5-5
Create a Multi Value Check Box ...................................................................................................... 5-5
Alter Check Box Display Values...................................................................................................... 5-6
Change Where the Check Boxes Display........................................................................................ 5-6
Create a Go Button to Submit the Page........................................................................................... 5-7
Adjust Default Check Box Behavior................................................................................................ 5-8
Adding Check Boxes to Each Row in the Report............................................................................... 5-9
Call HTMLDB_ITEM.CHECKBOX ................................................................................................. 5-9
Add a Button to Submit Check Box Array Values..................................................................... 5-10
Add a Process .................................................................................................................................. 5-10
6 How to Implement a Web Service
About Creating Web Service References ............................................................................................. 6-1
Creating a New Application................................................................................................................... 6-2
v
Specifying an Application Proxy Server Address.............................................................................. 6-2
Searching a UDDI Registry for a Business Name.............................................................................. 6-3
Create a Form to Display a Stock Quote......................................................................................... 6-3
Searching a UDDI Registry for a Service Name ................................................................................ 6-4
Create a Form and Report................................................................................................................. 6-5
7 How to Create a Stacked Bar Chart
Accessing Sample Application .............................................................................................................. 7-1
Creating a Stacked Bar Chart ................................................................................................................. 7-2
Adding Additional Series....................................................................................................................... 7-3
Changing the Chart Format.................................................................................................................... 7-5
Viewing the Chart .................................................................................................................................... 7-5
8 How to Upload and Download Files in an Application
Creating an Application .......................................................................................................................... 8-1
Creating an Upload Form ....................................................................................................................... 8-2
Create an HTML Region ................................................................................................................... 8-2
Create an Upload Item ...................................................................................................................... 8-2
Create a Button ................................................................................................................................... 8-3
Creating a Report with Download Links ............................................................................................ 8-3
Create a Report on HTMLDB_APPLICATION_FILES ................................................................ 8-4
Add Link to Download Documents................................................................................................ 8-4
Storing Additional Attributes About the Document ....................................................................... 8-5
Create a Table to Store Document Attributes ................................................................................ 8-5
Create an Item to Capture the Document Subject......................................................................... 8-6
Create a Process to Insert Information............................................................................................ 8-6
Showing Additional Attributes in the Report Region.................................................................. 8-7
Store the Document in a Custom Table .............................................................................................. 8-7
Downloading Documents from the Custom Table ........................................................................... 8-8
9 How to Incorporate JavaScript into an Application
Understanding How to Incorporate JavaScript Functions ............................................................... 9-1
Incorporating JavaScript in the HTML Header Attribute............................................................ 9-1
Including JavaScript in a .js File Referenced by the Page Template........................................... 9-2
About Referencing Items Using JavaScript ........................................................................................ 9-2
Calling JavaScript from a Button .......................................................................................................... 9-3
Creating a Client Side JavaScript Validation...................................................................................... 9-3
Create an Application on the EMP Table ....................................................................................... 9-4
Add a Function to the HTML Header Attribute ........................................................................... 9-5
Edit an Item to Call the Function..................................................................................................... 9-5
Enabling and Disabling Form Elements.............................................................................................. 9-6
Add a Function the HTML Header Attribute................................................................................ 9-6
Edit an Item to Call the Function..................................................................................................... 9-7
Change P2_DEPTNO to a Select List .............................................................................................. 9-7
Create a Call to disFormItems from the Region Footer................................................................ 9-7
Changing the Value of Form Elements ................................................................................................ 9-8
vi
10 How to Build and Deploy an Issue Tracking Application
Business Scenario.................................................................................................................................. 10-1
Planning and Project Analysis ...................................................................................................... 10-2
Necessary Data......................................................................................................................... 10-2
Requested Security .................................................................................................................. 10-2
Data Management Functions ................................................................................................. 10-3
Data Presentation Functions................................................................................................... 10-3
Special Functions...................................................................................................................... 10-3
Designing the Database Objects ........................................................................................................ 10-3
About the Projects Table ................................................................................................................ 10-4
About the People Table .................................................................................................................. 10-4
About the Issues Table ................................................................................................................... 10-5
Implementing Database Objects........................................................................................................ 10-6
Request a New Workspace ............................................................................................................ 10-6
Build the Database Objects ............................................................................................................ 10-7
Viewing Created Database Objects ....................................................................................... 10-8
Loading Demonstration Data.............................................................................................................. 10-8
Load Projects Data .......................................................................................................................... 10-8
Update Dates to Make the Projects Current......................................................................... 10-9
Load People Data .......................................................................................................................... 10-10
Load Issues Data ........................................................................................................................... 10-12
Building a Basic User Interface ........................................................................................................ 10-12
Create the Application.................................................................................................................. 10-12
Add Pages to Maintain Projects ................................................................................................. 10-14
Create Pages for Maintaining Projects................................................................................ 10-15
Refine the Appearance of the Projects Report Page.......................................................... 10-16
Refine the Create/Edit Project Page.................................................................................... 10-17
Add Pages to Track People.......................................................................................................... 10-19
Create Pages for Maintaining People.................................................................................. 10-19
Modify the People Report Page ........................................................................................... 10-20
Refine the Create/Edit People Page.................................................................................... 10-22
Add Pages to Track Issues........................................................................................................... 10-25
Create a Report for HT_ISSUES........................................................................................... 10-25
Refine the Create/Edit Issues Page..................................................................................... 10-26
Refine the Issues Report........................................................................................................ 10-35
Add a Page to Support Assigning Multiple Issues Simultaneously .............................. 10-43
Create Summary Reports............................................................................................................. 10-47
Add a Issue Summary by Project Report ........................................................................... 10-47
Add Resolved by Month Identified .................................................................................... 10-52
Add Target Resolution Dates............................................................................................... 10-54
Add Average Days to Resolve ............................................................................................. 10-56
Add Content to the Home Page.................................................................................................. 10-58
Add a Reports Menu ............................................................................................................. 10-58
Add Maintenance Navigation.............................................................................................. 10-61
Add a New Issues Button..................................................................................................... 10-62
Add Overdue Issues Report................................................................................................. 10-63
Add Unassigned Issues Report............................................................................................ 10-65
vii
Add Recently Opened Issues Report .................................................................................. 10-65
Add Open Issues by Project ................................................................................................. 10-67
Add a Breadcrumb........................................................................................................................ 10-68
Navigate to the Breadcrumbs Page..................................................................................... 10-68
Add Breadcrumb Entries ...................................................................................................... 10-69
Create a Page 0 ....................................................................................................................... 10-71
Create a Region to Contain the Breadcrumb ..................................................................... 10-71
Adding Advanced Features ............................................................................................................... 10-73
Add Support for E-mail Notification ......................................................................................... 10-73
How E-mail Notification Works.......................................................................................... 10-73
Add Notification of New Assignments .............................................................................. 10-74
Add a Notification for Overdue Issues............................................................................... 10-75
Add Application Security ............................................................................................................ 10-78
Restrict Project and People Definition ................................................................................ 10-78
Restrict Issue Modification ................................................................................................... 10-81
Deploying Your Application............................................................................................................. 10-84
Move the Application Definition................................................................................................ 10-85
Export the Application Definition....................................................................................... 10-85
Create the Required Objects to Support the Application................................................. 10-85
Import the Application Definition into the Production Instance.................................... 10-85
Load the Data ......................................................................................................................... 10-86
Alternate Authentication Mechanisms to Consider................................................................. 10-87
Create Users................................................................................................................................... 10-87
Publish the URL............................................................................................................................. 10-87
A DDLs and Scripts for Issue Tracking Application
Create Application Database Objects DDL ....................................................................................... A-1
Create Issues Script................................................................................................................................. A-6
viii

ix
Send Us Your Comments
Oracle HTML DB 2 Day Developer, Release 2.0
B16376-01
Oracle welcomes your comments and suggestions on the quality and usefulness of this
publication. Your input is an important part of the information used for revision.
■ Did you find any errors?
■ Is the information clearly presented?
■ Do you need more information? If so, where?
■ Are the examples correct? Do you need more examples?
■ What features did you like most about this manual?
If you find any errors or have any other suggestions for improvement, please indicate
the title and part number of the documentation and the chapter, section, and page
number (if available). You can send comments to us in the following ways:
■ Electronic mail: [email protected]
■ FAX: (650) 506-7227 Attn: Server Technologies Documentation Manager
■ Postal service:
Oracle Corporation
Oracle Server Technologies Documentation
500 Oracle Parkway, Mailstop 4op11
Redwood Shores, CA 94065
U.S.A.
If you would like a reply, please give your name, address, telephone number, and
electronic mail address (optional).
If you have problems with the software, please contact your local Oracle Support
Services.
x

xi
Preface
Oracle HTML DB 2 Day Developer contains tutorials with step-by-step instructions that
explain how to create a variety application components and complete applications
using the Oracle HTML DB development environment.
This preface contains these topics:
■ Audience
■ Documentation Accessibility
■ Related Documents
■ Conventions
Audience
Oracle HTML DB 2 Day Developer is intended for application developers who are
building database-centric Web applications using Oracle HTML DB, release 1.6. To use
this guide, you need to have a general understanding of Oracle HTML DB release 1.6,
relational database concepts, and the operating system environment under which you
are running Oracle HTML DB.
Documentation Accessibility
Our goal is to make Oracle products, services, and supporting documentation
accessible, with good usability, to the disabled community. To that end, our
documentation includes features that make information available to users of assistive
technology. This documentation is available in HTML format, and contains markup to
facilitate access by the disabled community. Accessibility standards will continue to
evolve over time, and Oracle is actively engaged with other market-leading
technology vendors to address technical obstacles so that our documentation can be
accessible to all of our customers. For more information, visit the Oracle Accessibility
Program Web site at
http://www.oracle.com/accessibility/
Accessibility of Code Examples in Documentation
Screen readers may not always correctly read the code examples in this document. The
conventions for writing code require that closing braces should appear on an
otherwise empty line; however, some screen readers may not always read a line of text
that consists solely of a bracket or brace.
xii
Accessibility of Links to External Web Sites in Documentation
This documentation may contain links to Web sites of other companies or
organizations that Oracle does not own or control. Oracle neither evaluates nor makes
any representations regarding the accessibility of these Web sites.
TTY Access to Oracle Support Services
Oracle provides dedicated Text Telephone (TTY) access to Oracle Support Services
within the United States of America 24 hours a day, seven days a week. For TTY
support, call 800.446.2398.
Related Documents
For more information, see the following documents in the Oracle Database 10g Release
2 (10.2) and Oracle HTML DB Release 2.0 documentation set:
■ Oracle HTML DB User's Guide
■ Oracle Database Concepts
■ Oracle Database Application Developer's Guide - Fundamentals
■ Oracle Database Administrator's Guide
■ Oracle Database SQL Reference
For information about Oracle error messages, see Oracle Database Error Messages.
Oracle error message documentation is available only in HTML. If you only have
access to the Oracle Database 10g Release 2 (10.2) Online Documentation Library, you
can browse the error messages by range. Once you find the specific range, use your
browser's "find in page" feature to locate the specific message. When connected to the
Internet, you can search for a specific error message using the error message search
feature of the Oracle online documentation.
Many books in the documentation set use the sample schemas of the seed database,
which is installed by default when you install Oracle. Refer to Oracle Database Sample
Schemas for information on how these schemas were created and how you can use
them yourself
Printed documentation is available for sale in the Oracle Store at
http://oraclestore.oracle.com/
To download free release notes, installation documentation, white papers, or other
collateral, please visit the Oracle Technology Network (OTN). You must register online
before using OTN; registration is free and can be done at
http://otn.oracle.com/membership/
If you already have a username and password for OTN, then you can go directly to the
documentation section of the OTN Web site at
http://otn.oracle.com/documentation/
Conventions
The following text conventions are used in this document:

xiii
Convention Meaning
boldface Boldface type indicates graphical user interface elements associated
with an action, or terms defined in text or the glossary.
italic Italic type indicates book titles, emphasis, or placeholder variables for
which you supply particular values.
monospace Monospace type indicates commands within a paragraph, URLs, code
in examples, text that appears on the screen, or text that you enter.
xiv

How to Create a Tabular Form 1-1
1
How to Create a Tabular Form
A tabular form enables users to update multiple rows in a table at once using a single
page. You can use the Tabular Form Wizard to create a tabular form that contains a
built-in multiple row update process. This built-in process performs optimistic locking
behind the scenes to maintain the data integrity.
This tutorial explains how to create a tabular form within an existing application and
then how to change one of the updatable columns from a text field to a select list.
This section contains the following topics:
■ About Sample Application
■ Creating a Tabular Form Using a Wizard
■ Changing Updatable Column Display Type
About Sample Application
Oracle HTML DB installs with a number of demonstration applications. In this
exercise you will create a tabular form within the demonstration application, Sample
Application.
To see if Sample Application is installed:
1. Log in to Oracle HTML DB.
2. Click the down arrow on the right side of the Application Builder icon.
3. From the menu, select Demonstrations.
The Demonstration Applications page appears, displaying links to the following
applications:
■ Sample Application offers a working demonstration that highlights basic design
concepts
■ Collection Showcase demonstrates shopping cart concepts
■ Web Services serves an example of how you can use Web Services
■ Presidential Inaugural Addresses demonstrates Oracle Text
4. Locate Sample Application and check the Status column:
a. If the Status column displays Installed, return to the Workspace home page.
b. If the Status column displays Not Installed, select Install in the Action
column.
c. Follow the on-screen instructions.

Creating a Tabular Form Using a Wizard
1-2 Oracle HTML DB 2 Day Developer
Creating a Tabular Form Using a Wizard
The Tabular Form Wizard creates a form to perform update, insert, and delete
operations on multiple rows in a database table. Additionally, the wizard creates a
multiple row update process that checks for MD5 checksum values before doing the
update in order to prevent lost updates. The following exercise creates a tabular form
on the EMP table.
To create a tabular form using the Tabular Form Wizard:
1. Navigate to the Workspace home page.
2. Click the Application Builder icon.
3. Select Sample Application.
4. Click Create Page.
5. For the page type, select Form and click Next.
6. Select Tabular Form and click Next.
7. On Identify Table/View Owner:
a. From Table/View Owner, select the owner of the EMP table.
b. From Allowed Operations, accept the default.
c. Click Next.
8. For Table/View Name, select EMP and click Next.
9. On Identify Columns to Display:
a. For Use User Interface Defaults, accept the default.
b. For Select Columns, press CTRL and select the following columns:
ENAME, JOB, HIREDATE, SAL, COMM
c. Click Next.
10. For Primary Key Column 1, accept the default EMPNO and click Next.
11. For Source Type, accept the default, Existing trigger, and click Next.
12. For Updatable Columns, press CTRL and select the following columns and click
Next:
JOB, HIREDATE, SAL, COMM
13. On Identify Page and Region Attributes:
a. For Page, enter 800.
b. For Page Name, enter Tabular Form on EMP.
c. For Region Title, enter Tabular Form on EMP.
d. Click Next.
14. On Identify Tab, accept the default, Do not use tabs, and click Next.
Note: This exercise limits the number of columns to optimize the
display on-screen. For a real form, you would probably want to
include additional columns.

Creating a Tabular Form Using a Wizard
How to Create a Tabular Form 1-3
15.
On Button Labels:
a. Accept the defaults for the Cancel, Delete, and Add Row buttons.
b. For the Submit button, enter Apply Changes.
c. Click Next.
16. Accept the remaining defaults, click Next, and then click Finish.
Next, run the page to view your new form.
To run the page:
1. Click Run Page.
2. If prompted to enter a username and password:
a. For User Name, enter either demo or admin.
b. For Password, enter the name of the current workspace using all lowercase
letters.
c. Click Login.
d. Navigate to page 800:
– Select Edit Page 1 from the Developer Toolbar.
– In Page, enter 800 and click Go.
– Click the Run Page icon.
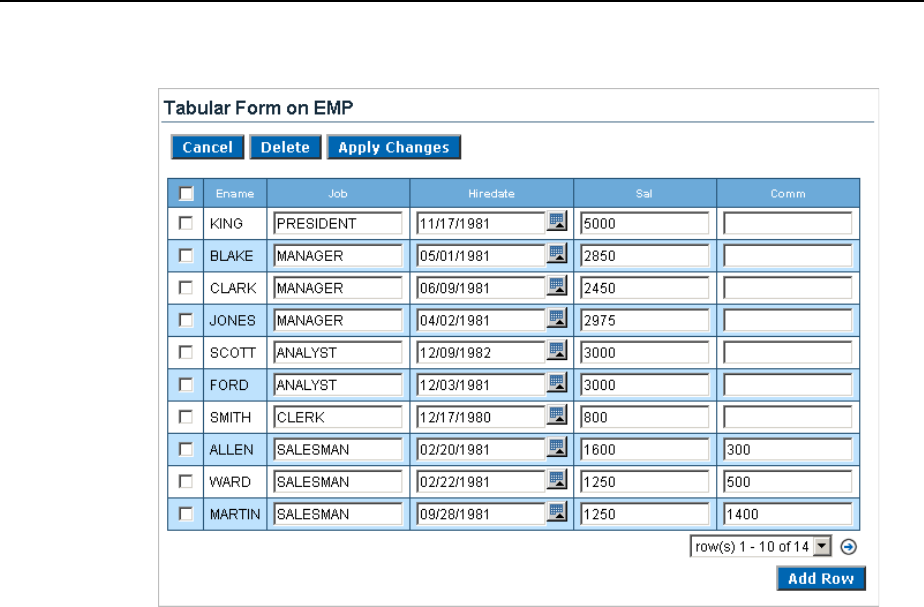
As shown in Figure 1–1, note the tabular form contains four buttons. Cancel, Delete,
and Apply Changes display in the upper right corner and Add Row displays in the
bottom right corner. Additionally, a check box appears to the left of each row enabling
the user to select one row at a time, or a user can select all rows at once by selecting the
check box to the left of the column headings. The check box is used in conjunction with
the Delete button to identify the rows to be deleted.
Changing Updatable Column Display Type
1-4 Oracle HTML DB 2 Day Developer
Figure 1–1 Tabular Form on the EMP Table
Changing Updatable Column Display Type
When the Tabular Form Wizard creates a tabular form, updatable columns display by
default as text fields. You can change this default display by editing report column
attributes.
To change the default display of JOB to a select list:
1. Navigate to the Page Definition for page 800. Select Edit Page 800 from the
Developer Toolbar.
2. Under Regions, click Report next to Tabular Form on EMP.
The Report Attributes page appears.
3. Under Column Attributes, click the Edit icon next to the JOB column.
4. Scroll down to Tabular Form Element. From Display As, select Select List (query
based LOV).
5. Under List of Values, enter the following LOV query:
SELECT DISTINCT job a, job b FROM emp
6. Click Apply Changes.
7. Click the Run Page icon in the upper right corner the page.
As shown in Figure 1–2, notice the Job column now displays as a select list.

Changing Updatable Column Display Type
How to Create a Tabular Form 1-5
Figure 1–2 Job Column Changed to a Select List
Note: Do not modify the select list of a SQL statement of a tabular
form after it has been generated. Doing so can result in a checksum
error when altering data of the form and applying updates.
Consider the following example:
SELECT ename FROM emp;
Note that this should not be altered to:
SELECT lower(ename) FROM emp

Changing Updatable Column Display Type
1-6 Oracle HTML DB 2 Day Developer

How to Create a Parameterized Report 2-1
2
How to Create a Parameterized Report
In an Oracle HTML DB application, a report is the formatted result of a SQL query.
You can generate reports in three ways:
■ Running a built-in wizard
■ Defining a report region based on a SQL query
■ Creating a report region based on a PL/SQL function returning a SQL query
This tutorial illustrates how to create a report in which the results depend on the form
input, or a parameterized report. In this exercise, you create a report region based on a
SQL query which references the value of a form item within the application.
This section contains the following topics:
■ Sample Report Utilizing a Form Input
■ About Sample Application
■ Creating a New Page
■ Creating the Query Region
■ Adding an Item
■ Adding a Button to Submit the Page
Sample Report Utilizing a Form Input
Figure 2–1 on page 2-2 is an example of a form in which the report results are based on
user input. In this example, this user populates the form by making a selection from
the Show list. The easiest way to create this type of report in Oracle HTML DB is to
define a report region based on a SQL query.

About Sample Application
2-2 Oracle HTML DB 2 Day Developer
Figure 2–1 Sample Report
About Sample Application
Oracle HTML DB installs with a number of demonstration applications. In this
exercise you will create a tabular form within the demonstration application, Sample
Application.
To see if Sample Application is installed:
1. Log in to Oracle HTML DB.
2. Click the down arrow on the right side of the Application Builder icon.
3. From the menu, select Demonstrations.
The Demonstration Applications page appears, displaying links to the following
applications:
■ Sample Application offers a working demonstration that highlights basic design
concepts
■ Collection Showcase demonstrates shopping cart concepts
■ Web Services serves an example of how you can use Web Services
■ Presidential Inaugural Addresses demonstrates Oracle Text
4. Locate Sample Application and check the Status column:
a. If the Status column displays Installed, return to the Workspace home page.
b. If the Status column displays Not Installed, select Install in the Action
column.
c. Follow the on-screen instructions.

Adding an Item
How to Create a Parameterized Report 2-3
Creating a New Page
First, you create a new blank page and within Sample Application.
To create a new page:
1. Navigate to the Workspace home page.
2. Click the Application Builder icon.
3. Select Sample Application.
4. Click the Create Page button.
5. On Create Page, select Blank Page and click Next.
6. For Page, enter 700 and click Next.
7. In Name, enter Ordered Products and click Next.
8. For Tabs, accept the default, No, and click Next.
9. Review your selections and click Finish.
10. On the Success Page, click Edit Page.
The Page Definition for page 700 appears.
Creating the Query Region
Next, you need to create a report.
To create a the query region to contain the report:
1. Under Regions, click the Create icon.
2. Select Report and click Next.
3. For Report Implementation, select SQL Report and click Next.
4. For Display Region Attributes:
a. For Title, enter Ordered Products.
b. Accept the remaining default values and click Next.
5. Enter following SQL query:
SELECT p.category,
p.product_name,
i.quantity
FROM demo_product_info p,
demo_order_items i
WHERE p.product_id = i.product_id
AND ( p.category = :P700_SHOW or :P700_SHOW = 'ALL' )
6. Click Create Region.
Adding an Item
The previous SQL query references an item named P700_SHOW.
To create the select list P700_SHOW:
1. Under Items, click the Create icon.
2. For Select Item Type, select Select List and click Next.

Adding a Button to Submit the Page
2-4 Oracle HTML DB 2 Day Developer
3.
For Select List Control Type, accept the default of Select List and click Next.
4. For Item Name, enter P700_SHOW and click Next.
5. On Identify List of Values:
a. For Named LOV, select CATEGORIES.
b. For Null Text, enter:
- All Categories -
c. For Null Value, enter:
ALL
d. Click Next.
6. For Identify Item Attributes, accept the defaults and click Next.
7. Click Create Item.
Adding a Button to Submit the Page
For the report to be driven by the Product Category select list (the form input), you
need to submit the page. To accomplish this, you need add a button.
To add a button to submit the page:
1. Under Buttons, click the Create icon.
2. Select the region Ordered Products and click Next.
3. On Identify Button Position, select Create a button displayed among this region's
items and click Next.
4. For Button Name, enter P700_GO.
5. Click Create Button.
Run the Page
To run the page:
1. Click the Run Page icon.
2. If prompted to enter a username and password:
a. For User Name, enter either demo or admin.
b. For Password, enter the name of the current workspace using all lowercase
letters.
c. Click Login.
3. When the Order Products page appears, select Computer from the Show menu
and click Go.
As shown in Figure 2–2 on page 2-5, notice that making a selection from the Show
menu populates the form.

Adding a Button to Submit the Page
How to Create a Parameterized Report 2-5
Figure 2–2 Form Results Being Populated from a Select List

Adding a Button to Submit the Page
2-6 Oracle HTML DB 2 Day Developer

How to Create a Drill Down Report 3-1
3
How to Create a Drill Down Report
A drill down report is a type of report that displays summary data with links to
related detail data in a second report.
This tutorial describes how to create a report on the DEMO_ORDERS table with links to
drill down detail data in the DEMO_ORDER_ITEMS table. Both tables are installed with
the demonstration application, Sample Application.
This section contains the following topics:
■ About Sample Application
■ Creating a New Application
■ Creating Reports for DEMO_ORDERS and DEMO_ORDER_ITEMS
■ Customizing the DEMO_ORDER_ITEMS Report
■ Linking the DEMO_ORDERS Report to the DEMO_ORDER_ITEMS Report
About Sample Application
Oracle HTML DB installs with a number of demonstration applications. To complete
this exercise you must install the demonstration application, Sample Application.
To see if Sample Application is installed:
1. Log in to Oracle HTML DB.
2. Click the down arrow on the right side of the Application Builder icon.
3. From the menu, select Demonstrations.
The Demonstration Applications page appears, displaying links to the following
applications:
■ Sample Application offers a working demonstration that highlights basic design
concepts
■ Collection Showcase demonstrates shopping cart concepts
■ Web Services serves an example of how you can use Web Services
■ Presidential Inaugural Addresses demonstrates Oracle Text
4. Locate Sample Application and check the Status column:
a. If the Status column displays Installed, return to the Workspace home page.
b. If the Status column displays Not Installed, select Install in the Action
column.

Creating a New Application
3-2 Oracle HTML DB 2 Day Developer
c.
Follow the on-screen instructions.
Creating a New Application
First, create a new application.
To create an application:
1. From the Workspace home page, click the Application Builder icon.
2. From the Application Builder home page, click Create.
3. Select Create Application and click Next.
4. Specify the page name.
a. For Name, enter Drilldown Reports.
b. For Application, accept the default ID.
c. For Create Application, select From scratch.
d. Click Next.
Next, you need to add pages. You have the option of adding a blank page, a
report, a form, a tabular form, or a report and form. For this exercise, you will
add two blank pages.
5. Add the first blank page:
a. Under Select Page Type, select Blank and click Add Page.
The page appears in the list at the top of the page.
b. Select the Name Page 1.
c. In Page Name, enter Orders and click Apply Changes.
6. Add the second blank page:
a. Under Select Page Type, select Blank and click Add Page.
The page appears in the list at the top of the page.
b. Select the Name Page 2.
c. In Page Name, enter Order Items and click Apply Changes.
7. Click Next.
8. For Tabs, accept the default, One Level of Tabs, and click Next.
9. For Copy Shared Components from Another Application, accept the default, No,
and click Next.
10. For Attributes, accept the defaults for Authentication Scheme, Language, and User
Language Preferences Derived From and click Next.
11. For User Interface, select Theme 2 and click Next.
12. Review your selections and click Create.
Creating Reports for DEMO_ORDERS and DEMO_ORDER_ITEMS
Next, you need to create reports for the DEMO_ORDERS and the DEMO_ORDER_ITEMS
tables.
Topics in this section include:

Creating Reports for DEMO_ORDERS and DEMO_ORDER_ITEMS
How to Create a Drill Down Report 3-3
■ Create a Report for DEMO_ORDERS
■ Create a Report for DEMO_ORDER_ITEMS
Create a Report for DEMO_ORDERS
To create a report on the DEMO_ORDERS table:
1. On the Application home page, click Create Page.
2. For the page type, select Report and click Next.
3. For Page, select Wizard Report and click Next.
4. For Page Attributes:
a. For Page, select 1 Orders.
b. In Page Title and Region Title, enter Orders.
c. Click Next.
5. For Tabs, accept the default, Do not use tabs, and click Next.
6. For Tables and Columns:
a. For Table/View Owner, select the appropriate schema.
b. For Table/View, select DEMO_ORDERS.
c. From the Available Columns list, press CTRL and move the following
columns to the Displayed Columns list:
ORDER_ID, ORDER_TOTAL, ORDER_TIMESTAMP
Next, create a join with the DEMO_CUSTOMERS table to display the customer
name.
d. From the Table/View list, select DEMO_CUSTOMERS.
e. From the Available Columns list, select CUST_LAST_NAME and move it to
the Display Columns list.
f. Click Next.
7. For Join Conditions, accept the join by clicking Next.
8. For Report Options, accept the defaults and click Next.
9. Click Create Report Page.
10. Run by page by clicking Run Page. If prompted for a user name and password,
enter your workspace credentials.
As shown in Figure 3–1 on page 3-4, a report on the DEMO_ORDERS table appears.

Creating Reports for DEMO_ORDERS and DEMO_ORDER_ITEMS
3-4 Oracle HTML DB 2 Day Developer
Figure 3–1 Report on DEMO_ORDERS Table
11.
Select Edit Application from the Developer Toolbar to return to Application
Builder.
Create a Report for DEMO_ORDER_ITEMS
To create a report on the DEMO_ORDER_ITEMS table:
1. On the Application home page, click Create Page.
2. For Page, select Report and click Next.
3. On Create Page, select Wizard Report and click Next.
4. For Page Attributes:
a. For Page, select 2 Order Items.
b. In Page Title and Region Title, enter Order Items.
c. Click Next.
5. For Tabs, accept the default Do not use tabs and click Next.
6. For Tables and Columns:
a. For Table/View Owner, select the appropriate schema and click Next.
b. For Table/View, select DEMO_ORDER_ITEMS.
c. From the Available Columns list, press CTRL and move the following
columns to the Displayed Columns list:
ORDER_ITEM_ID, ORDER_ID, UNIT_PRICE, QUANTITY
Next, create a join with the DEMO_PRODUCT_INFO table to display the product
name.
d. For Show Only Related Tables, select No.
e. From the Table/View list, select DEMO_PRODUCT_INFO.
f. From the Available Columns list, select PRODUCT_NAME and move it to the
Display Columns list.
g. Click Next.

Customizing the DEMO_ORDER_ITEMS Report
How to Create a Drill Down Report 3-5
7.
For Join Conditions, accept the join by clicking Next.
8. For Report Options, accept the defaults and click Next.
9. Click Create Report Page.
10. Run by page by clicking Run Page.
As shown inFigure 3–2, a report on the DEMO_ORDER_ITEMS table appears.
Figure 3–2 Report on DEMO_ORDER_ITEMS Table
Customizing the DEMO_ORDER_ITEMS Report
Next, you need to customize the Order Items page. In this exercise, you add an item to
hold the value of the ORDER_ID, add a condition that constrains the report by the
value of ORDER_ID item, and modify the Region Title to note which order is being
viewed.
Topics in this section include:
■ Add an Item to Hold the Value of ORDER_ID
■ Add a Condition
■ Modify the Region Title
Add an Item to Hold the Value of ORDER_ID
To create an item to hold the value of ORDER_ID:
1. Navigate to the Page Definition of page 2 by selecting Edit Page 2 from the
Developer Toolbar.
2. Under Items, click the Create icon.
3. For Item Type, select Hidden and click Next.
4. For Display Position and Name:

Linking the DEMO_ORDERS Report to the DEMO_ORDER_ITEMS Report
3-6 Oracle HTML DB 2 Day Developer
a.
For the Item Name, enter P2_ORDER_ID.
b. For Region, select Order Items.
c. Click Next.
5. Click Create Item.
Add a Condition
To add a condition to the DEMO_ORDER_ITEMS report:
1. Under Regions, select Order Items.
2. Select the Query Definition tab.
3. Click Add/Modify Conditions.
4. On the Conditions page:
a. From the Columns list, select ORDER_ID [DEMO_ORDER_ITEMS].
b. Enter the following in the Conditions field:
= :P2_ORDER_ID
5. Click Apply Changes.
Modify the Region Title
To modify the region title of the DEMO_ORDER_ITEMS report:
1. Under Regions, click Order Items.
2. In Title replace this existing text with the following:
Order Items for Order # &P2_ORDER_ID.
3. Click Apply Changes.
Linking the DEMO_ORDERS Report to the DEMO_ORDER_ITEMS Report
Lastly, you link the DEMO_ORDERS report to the DEMO_ORDER_ITEMS report. To
accomplish this, you edit the attributes of the ORDER_ID column on the DEMO_
ORDERS report and create a link. The link will populate the P2_ORDER_ID hidden
item on page 2 with the clicked ORDER_ID.
To create a link from the ORDER_ID column on the Orders report to the Order Items
report:
1. Navigate to the Page Definition of page 1, Orders. Enter 1 in the Page field and
click Go.
2. Under Regions, select Orders.
3. Click the Report Attributes tab.
4. Click the Edit icon adjacent to ORDER_ID.
5. Scroll down to Column Link:
a. In the Page field, select 2 Order Items.
b. From the Item 1 Name list, select P2_ORDER_ID.
c. From the Item 1 Value list, select #ORDER_ID#.

Linking the DEMO_ORDERS Report to the DEMO_ORDER_ITEMS Report
How to Create a Drill Down Report 3-7
d.
From the Link Text list, select #ORDER_ID#.
6. Click Apply Changes.
7. Click the Run Page icon in the upper right corner of the page.
As shown in Figure 3–3 on page 3-7, you can link to page 2 by clicking on an
Order Id.
Figure 3–3 DEMO_ORDERS Report with LInk to Page 2

Linking the DEMO_ORDERS Report to the DEMO_ORDER_ITEMS Report
3-8 Oracle HTML DB 2 Day Developer

How to Control Form Layout 4-1
4
How to Control Form Layout
Data and form elements in an Oracle HTML DB application are placed on a page using
containers called regions. There are several attributes that control the placement and
positioning of regions on pages. In turn, you control the placement and style of form
elements inside of regions using item attributes.
This tutorial describes how to create a data input form and then change its layout by
changing region and item attributes.
This section contains the following topics:
■ About Sample Application
■ Creating a Table and Data Input Form
■ Changing the Appearance of a Page by Altering Region Attributes
■ Understanding How Item Attributes Effect Page Layout
■ Adding a Region Header and Footer
■ Making a Region Conditional
■ Adding Another Region for HTML Text
■ Changing Item Types
■ About Label Templates
■ Changing Buttons
About Sample Application
Oracle HTML DB installs with a number of demonstration applications. To complete
this exercise you must install the demonstration application, Sample Application.
To see if Sample Application is installed:
1. Log in to Oracle HTML DB.
2. Click the down arrow on the right side of the Application Builder icon.
3. From the menu, select Demonstrations.
The Demonstration Applications page appears, displaying links to the following
applications:
■ Sample Application offers a working demonstration that highlights basic design
concepts
■ Collection Showcase demonstrates shopping cart concepts

Creating a Table and Data Input Form
4-2 Oracle HTML DB 2 Day Developer
■ Web Services serves an example of how you can use Web Services
■ Presidential Inaugural Addresses demonstrates Oracle Text
4. Locate Sample Application and check the Status column:
a. If the Status column displays Installed, return to the Workspace home page.
b. If the Status column displays Not Installed, select Install in the Action
column.
c. Follow the on-screen instructions.
Creating a Table and Data Input Form
The first step in creating a data input form is to create the underlying data objects in
SQL Workshop. In this exercise, you create a table named HT_EMP and then use a
wizard to create a new page.
Topics in this section include:
■ Create the HT_EMP Table
■ Create a New Page Containing a Input Form
■ Run the Page
Create the HT_EMP Table
To create the HT_EMP table and the appropriate associated objects:
1. Click SQL Workshop on the Workspace home page.
2. Click SQL Scripts.
3. When the SQL Scripts Repository appears, click Create.
The Script Editor appears.
4. In Script Name, enter HT_EMP.
5. In the Script Editor, enter the following DDL:
CREATE TABLE ht_emp (
emp_id NUMBER primary key,
emp_first_name VARCHAR2(30) not null,
emp_middle_initial VARCHAR2(1),
emp_last_name VARCHAR2(45) not null,
emp_part_or_full_time VARCHAR2(1) not null check (emp_part_or_full_time in
('P','F')),
emp_salary NUMBER,
emp_dept VARCHAR2(20) check (emp_dept in
('SALES','ACCOUNTING',
'MANUFACTURING','HR')),
emp_hiredate DATE,
emp_manager NUMBER references ht_emp,
emp_special_info VARCHAR2(2000),
emp_telecommute VARCHAR2(1) check (emp_telecommute in ('Y')),
rec_create_date DATE not null,
rec_update_date date)
/
INSERT INTO ht_emp
(emp_id, emp_first_name, emp_middle_initial, emp_last_name, emp_part_or_

Creating a Table and Data Input Form
How to Control Form Layout 4-3
full_time,
emp_salary, emp_dept, emp_hiredate, emp_manager, emp_special_info, emp_
telecommute,
rec_create_date)
VALUES
(1,'Scott','R','Tiger','F',
100000,'SALES',sysdate,null,'cell phone number is xxx.xxx.xxxx
home phone is yyy.yyy.yyyy','Y',
SYSDATE)
/
CREATE SEQUENCE ht_emp_seq
start with 2
/
CREATE OR REPLACE TRIGGER bi_ht_emp
BEFORE INSERT ON ht_emp
FOR EACH ROW
BEGIN
SELECT ht_emp_seq.nextval
INTO :new.emp_id
FROM DUAL;
:new.rec_create_date := SYSDATE;
END;
/
CREATE OR REPLACE TRIGGER bu_ht_emp
BEFORE UPDATE ON ht_emp
FOR EACH ROW
BEGIN
:new.rec_update_date := SYSDATE;
END;
/
6. Click Save.
The script appears in the SQL Scripts Repository.
7. Run the HT_EMP script:
a. Click the Run icon.
b. On the Run Script page, click Run again.
8. View the script results by clicking the View icon.
Red text indicates errors while executing the file.
Create a New Page Containing a Input Form
Next, create a new form using the Form on a Table or View Wizard.
To create a data input form:
1. Navigate to the Workspace home page.
2. Click the Application Builder icon.
3. Select Sample Application.
4. Click Create Page.
5. For Page, select Form and click Next.
6. On Create Page, select Form on a Table or View and click Next.

Creating a Table and Data Input Form
4-4 Oracle HTML DB 2 Day Developer
7.
For Table/View Owner, select the schema owner used to create the HT_EMP table
and click Next.
8. For Table/View Name, select the HT_EMP table and click Next.
9. For Page and Region Attributes:
a. For Page, enter 900.
b. For the Page Name, enter HT_EMP.
c. For the Region Title, enter How to Layout a Form.
d. Click Next.
10. For Tab Option, accept the default, Do not use tabs, and click Next.
11. For Primary Key, accept the default and click Next.
Note that the wizard reads the primary key from the database definition.
12. For Source Type, accept the default Existing Trigger and click Next.
13. For Select Columns, select all columns and click Next.
14. For Process Options, accept the defaults and click Next.
15. For Branching, set all branching to the page 900 (the page you are creating) and
click Next.
Since this page is just for demonstration, you will not be utilizing branching.
16. Click Finish.
17. View the Page Definition by clicking Edit Page.
The Page Definition for page 900 appears.
18. Delete the following validation:
■ Under Page Processing Validations, select P900_REC_CREATE_DATE not
null.
■ Click Delete.
Run the Page
Once you create the HT_EMP table and page 900, the next step is to run the page.
To run the page from the Page Definition:
1. Click the Run Page icon in the upper right corner.
2. If prompted to enter a username and password:
a. For User Name, enter either demo or admin.
b. For Password, enter the name of the current workspace using all lowercase
letters.
c. Click Login.
d. Navigate to page 900:
– Select Edit Page 1 from the Developer Toolbar.
– In Page, enter 900 and click Go.
e. On the Page Definition for page 900, click the Run Page icon in the upper right
corner.

Changing the Appearance of a Page by Altering Region Attributes
How to Control Form Layout 4-5
As shown in Figure 4–1, note that the HT Emp form contains basic employee details
and includes select lists, text areas, and display only items.
Figure 4–1 HT_EMP Form
By default, the Primary Key column does not display since it is assumed that the
primary key is system generated. In reality, the primary key is included in the page,
but appears as a hidden item.
Notice that the page defaults with one item for each row and labels display to the left
of the items. The item labels default to the column names with initial capitalization
and with the underscores (_) replaced with spaces. You can override this default
behavior by configuring user interface defaults for the table.
Also notice that items based on date columns default to include a date picker. Lastly,
notice that the Emp Special Info item was created as a text area because of the size of
the base column. This item type is a better choice for large text items since it allows for
wrapping of input text.
Changing the Appearance of a Page by Altering Region Attributes
You can alter the appearance of a page by changing the region attributes.
To change the region title and other region level attributes:
1. Navigate to the Page Definition for page 900. Click Edit Page 900 on the Developer
Toolbar.
2. Under Regions, select How to Layout a Form.
The Region Definition appears.
3. Change the Title to Employee Info.
4. From Display Point, temporarily move the region by selecting Page Template
Region Position 3.
This moves the region to the right side of the page. The region display points are
determined by the page level template. If you do not select a page level template,

Understanding How Item Attributes Effect Page Layout
4-6 Oracle HTML DB 2 Day Developer
Oracle HTML DB uses the default page level template defined in the current
theme. You can view specific positions by selecting the flashlight icon to the right
of the Display Point list.
Next, temporarily change the region template.
5. From Template select Borderless Region.
6. Click Apply Changes.
7. From the Page Definition, click the Run Page icon in the upper right corner. (See
Figure 4–2.)
Figure 4–2 HT_EMP Form with New Display Point and Template
To return the region template and display point to the original selections:
1. Navigate to the Page Definition for page 900. Click Edit Page 900 on the Developer
Toolbar.
2. Under Regions, select Employee Info.
3. From the Template list, select Form Region.
4. From the Display Point List, select Page Template Body (3. Items above region
content).
5. Click Apply Changes.
Understanding How Item Attributes Effect Page Layout
Item attributes control the display of items on a page. Item attributes determine where
a label displays, how large an item will be as well as whether the item displays next to
or below a previous item. You can change multiple item labels at once on the Page
Items summary page.
Topics in this section include:
■ Edit Item Attributes

Understanding How Item Attributes Effect Page Layout
How to Control Form Layout 4-7
■ Fix Item Alignment
■ Change Label Placement
■ Change Items to Display-only
Edit Item Attributes
To edit item attributes:
1. Navigate to the Page Definition for page 900.
2. On the Page Definition, select the title Items.
The Page Items summary page appears.
You change how a page appears by editing the item attributes. Common item
attribute changes include:
■ Changing item labels by editing the Prompt field.
■ Placing more than one item in certain rows to group like items together. For
example, you could group all items that make up an employee's name.
■ Changing the item width. Many items display better when they have a width
that is less than the maximum. To change the item width, enter a new value in
the Width field.
■ Reordering the items. The initial order of items is based on the order of the
columns in the table on which the region is based. You can reorder items by
changing the sequence. You can reorder items by entering a new value in the
Sequence field.
3. To see the how item attributes affect page layout, make the following changes:
a. Change the values in the Prompt, New Line, and Width fields to match those
in Table 4–1:
b. Click Apply Changes.
Table 4–1 New Prompt, New Line, and Width Field Values
Prompt Field New Line Width
Emp ID Yes 30
First Name Yes 15
Middle Initial No 2
Last Name No 15
Part or Full Time Yes 2
Salary Yes 10
Department Yes 15
Hire Date Yes 10
Manager No 15
Special Information Yes 60
Telecommute Yes 2
Record Create Date Yes 10
Record Update Date Yes 10

Understanding How Item Attributes Effect Page Layout
4-8 Oracle HTML DB 2 Day Developer
c.
Click the Run Page icon. (See Figure 4–3.)
Figure 4–3 HT_EMP After Editing the Prompt, New Line, Width Attributes
Note that some items are pushed too far to the right. This display is caused by the
width of the Special Information item. Oracle HTML DB lays out regions as tables
and of a width of each column is determined by the largest display width of the
items in that column.
Fix Item Alignment
There are several approaches to fixing item alignment:
■ For the items Middle Initial, Last Name and Manager items, set New Field to
equal No.
This places the items directly after the items they follow, but in the same column.
This approach is best used for positioning embedded buttons next to items. Note
that this setting can make text items appear squashed.
■ Change the Column Span field of the Special Information item.
For example, setting the Column Span for the Special Information item to 5 would
enable multiple items to display above and below it. This change causes five items
to display above Special Information (First Name, Middle Initial, and Last Name).
Be aware, however, that using Column Span to fix the display of the name does
not result in a consistent layout. The Manager item would still be in the same
column as Middle Initial. Because the Manager item is larger than Middle Initial,
Last Name would still be pushed too far to the right. To fix this, you could change
the Column Span of the Manager item to 3 so it displays above Special
Information.
■ Reset the column width in the middle of the region by adding an item of type Stop
and Start HTML Table. This forces the close of an HTML table using the
</table> tag and starts a new HTML table. Inserting a Stop and Start HTML
Table item just after the Last Name item, results in an even layout. Note that a Stop
and Start HTML Table item only displays its label. You can prevent the label from
displaying at all by setting it to null. To do this, you simply remove the defaulted
label.

Understanding How Item Attributes Effect Page Layout
How to Control Form Layout 4-9
Adding a Stop and Start HTML Table Item
To add a Stop and Start HTML Table item and reset the column width:
1. Navigate to the Page Definition for page 900. Select Edit Page 900 from the
Developer toolbar.
2. Under Items, click the Create icon.
3. For Item Type, select Stop and start table.
The Create Item Wizard appears.
4. For Display Position and Name:
a. In Sequence, enter 4.5.
b. From Region, select Employee Info.
c. Click Next.
5. On Item Attributes:
a. For Label, remove X by clicking Clear.
b. Accept all other defaults and click Next.
6. Click Create Item.
The Page Definition appears.
7. Edit the column width for Special Information:
a. Click the title Items.
b. For Special Information, change the Column Span to 3 and click Apply
Changes.
8. Click the Run Page icon in the upper right corner.
Change Label Placement
Item labels can display above, below, or to the left of an item. Labels can display left,
right, or center justified. For labels set to left, you can further specify the vertical
alignment options of top, bottom or center. Change the position of the Special
Information label to above the item.
To change the placement of the Special Information label:
1. Navigate to the Page Definition for page 900. Select Edit Page 900 from the
Developer toolbar.
2. Under Items, select item P900_EMP_SPECIAL_INFO.
3. Scroll down to Label.
4. From the Horizontal/Vertical Alignment, select Above.
5. Click Apply Changes.
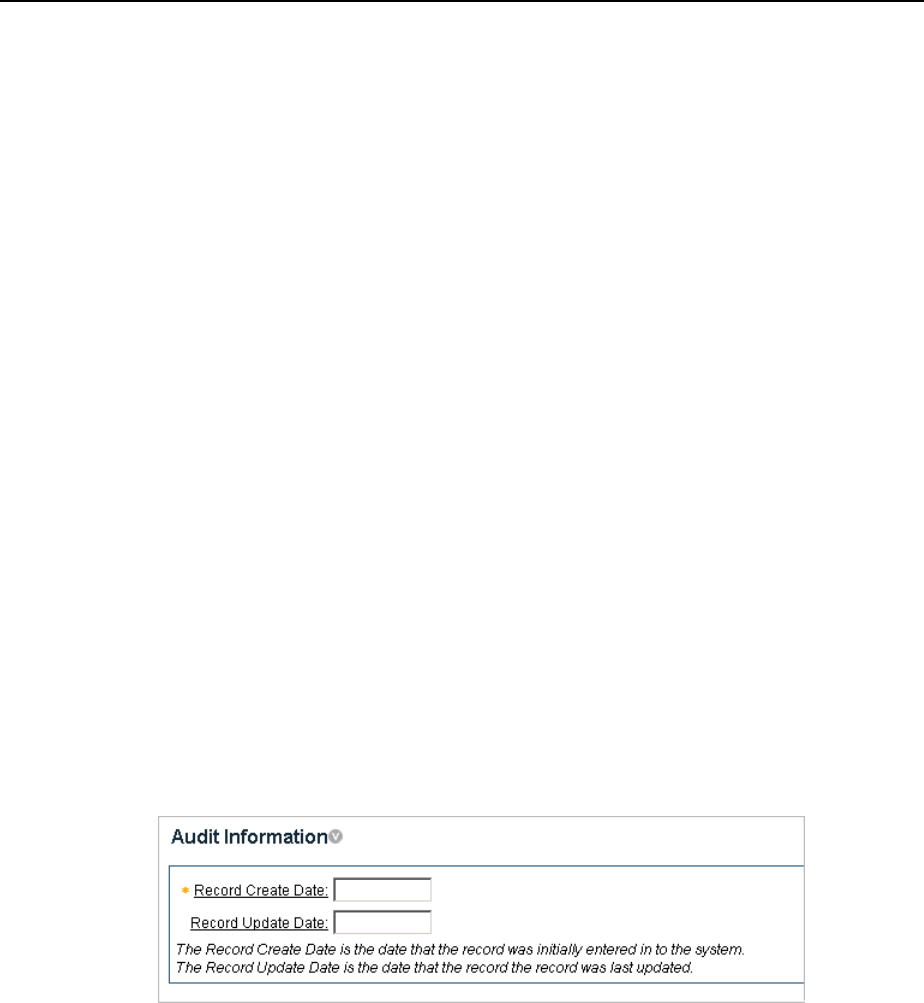
Change Items to Display-only
There are two columns in the HT_EMP table for auditing, Record Create Date and
Record Update Date. Because the values of these columns are set with triggers, these
columns should not be updatable by users. This exercise describes how to make items
display-only and then how to add them to their own region.
To make an item P900_REC_CREATE_DATE display-only:

Understanding How Item Attributes Effect Page Layout
4-10 Oracle HTML DB 2 Day Developer
1.
Navigate to the Page Definition for page 900.
2. Under Items, select the item P900_REC_CREATE_DATE.
3. From Display As, select Text Field (Disabled, saves state).
4. Click Apply Changes.
To make an item P900_REC_UPDATE_DATE display-only:
1. Navigate to the Page Definition for page 900.
2. Under Items, select the item P900_REC_UPDATE_DATE.
3. From Display As, select Text Field (Disabled, saves state).
4. Click Apply Changes.
Next, create a new region and then move the audit items into that region.
To create a new region:
1. Navigate to the Page Definition for page 900.
2. Under Regions, click the Create icon.
3. For the region type, select HTML and click Next.
4. Specify the type of region container. Select HTML and click Next.
5. For the Title, enter Audit Information and click Next.
6. Click Create Region.
To move the items to the new region:
1. Navigate to the Page Definition for page 900.
2. Select the heading Items.
A summary page appears.
3. For P900_REC_CREATE_DATE and P900_REC_UPDATE_DATE:
a. Under Prompt, add a colon to the end of the label name.
b. Under Region, select Audit Information.
c. Click Apply Changes.
Figure 4–4 demonstrates how these items would display in a running page.
Figure 4–4 Audit Information Region
The Hide/Show Region template enables the user to click a plus (+) sign to expand the
contents of the region or click a minus (-) sign to hide the contents. By changing the
region template to Hide/Show Region, users can decide whether they want to see the
Audit Information region.
To change the region template to Hide/Show Region:
Making a Region Conditional
How to Control Form Layout 4-11
1.
Navigate to the Page Definition for page 900. Select Edit Page 900 from the
Developer toolbar.
2. Under Regions, select Audit Information.
3. Scroll down to User Interface
4. From the Template list, select Hide and Show Region from the Template list.
5. Click Apply Changes.
Adding a Region Header and Footer
Regions can have headers and footers. Headers and footers typically contain text or
HTML that displays at either the top or bottom of the region.
To add a region footer:
1. Navigate to the Page Definition for page 900.
2. Under Regions, select Audit Information.
3. Scroll down to Header and Footer.
4. Enter the following in Region Footer:
<i>The Record Create Date is the date that the record was initially entered in
to the system. <br>The Record Update Date is the date that the record the
record was last updated.</i>
5. Click Apply Changes.
6. Run the page by clicking the Run Page icon in the upper right corner.
7. Expand the Audit Information region.
Figure 4–5 Audit Information Region with Footer
As shown in Figure 4–5, the text of the footer is wrapped with the italic HTML tag and
there is an imbedded a break. Without the manual break, the text would take up the
entire width of the region (as defined by region template).
Making a Region Conditional
To make a region conditional you create a display condition for the Audit Information
region so that it only displays if the Employee ID is not null. Since the Employee ID is
set by a trigger, it only exists for records retrieved from the database. You can control
the display of the Audit Information region by using a built-in condition that checks
for the presence of a value for the item containing the Employee ID (that is, P900_
EMP_ID)
To display the Audit Information region conditionally:

Adding Another Region for HTML Text
4-12 Oracle HTML DB 2 Day Developer
1.
Navigate to the Page Definition for page 900. Select Edit Page 900 from the
Developer toolbar.
2. Under Regions, select Audit Information.
3. When the Region Definition appears, scroll down to Conditional Display.
4. Under Conditional Display:
a. From Conditional Display, select Value of Item in Expression 1 is NOT
NULL.
b. In Expression 1, enter:
P900_EMP_ID
5. Click Apply Changes.
Adding Another Region for HTML Text
You have the option of displaying regions in columns as well as in rows. This exercise
explains how to create another region to display hint text to the user.
To create a region to display hint text:
1. Navigate to the Page Definition for page 900.
2. Under Regions, click the Create icon.
3. For the region type, select HTML and click Next.
4. Select the type of HTML region container. Select HTML and click Next.
5. For Display Attributes:
a. In Title, enter Hint.
b. From Region Template, select Sidebar Region.
c. From Display Point, select Page Template Region Position 3.
d. From Column, select 3.
e. Click Next.
6. In Enter HTML Text Region Source, enter the following:
Use this page to enter and<br>
maintain employee information.
7. Click Create Region.
8. Run the page by clicking the Run Page icon. (See Figure 4–6.)

Changing Item Types
How to Control Form Layout 4-13
Figure 4–6 Page 900 with Hint Region
Changing Item Types
This exercise describes how to change item types to make data entry easier for the
user. To change an item type, navigate to the Item attributes page and select another
Display As option.
Topics in this section include:
■ Change an Item to a Radio Group
■ Change an Item to a Select List
■ Change an Item to a Check Box
Change an Item to a Radio Group
Because the Part or Full-time item only has two valid choices, this item is a good
candidate for either a check box or a radio group.
To change the Part or Full-time item to a radio group:
1. Navigate to the Page Definition for page 900. Select Edit Page 900 from the
Developer toolbar.
2. Under Items, select P900_EMP_PART_OR_FULL_TIME.
3. From Display As, select Radiogroup.
4. For Label, remove the label text. (It will be redundant.)
5. Under List of Values, create a static list of values:
a. From Named LOV, select Select Named LOV.
b. In List of values definition, enter:
STATIC:Full-time;F,Part-time;P
This definition will display as two radio buttons with the labels Full-time and
Part-time, but the value that being inserted into the database will be either F or P.
6. Click Apply Changes.
7. Run the page. (See Figure 4–7.)

Changing Item Types
4-14 Oracle HTML DB 2 Day Developer
Figure 4–7 Part or Full-time item Changed to a Radio Group
Notice that Full-time and Part-time displays as radio group that is stacked in one
column. You can have these button display side by side.
To display the Full-time and Part-time radio buttons display side by side:
1. Navigate to the Page Definition for page 900. Select Edit Page 900 from the
Developer toolbar.
2. Under Items, select P900_EMP_PART_OR_FULL_TIME.
3. Scroll down to Lists of Values.
4. In Columns, enter 2.
5. Click Apply Changes.
By changing this setting to match the number of valid values (that is, Full-time and
Part-time), the values display side by side.
Change an Item to a Select List
In the DDL you used to create the HT_EMP table, Department is validated by a check
constraint. You can implement Department as a radio group, a select list, or a Popup
LOV.
To change Department to a select list:
1. Navigate to the Page Definition for page 900.
2. Under Items, select P900_EMP_DEPT.
3. From Display As, select Select List.
The other Select List choices are for either redirecting the user to another page or
URL based on the selection, or submitting the current page which is used when
other information needs to be retrieved based upon the selection in the Select List.
4. Under Lists of Values, create a static list of values:
a. From Named LOV, select Select Named LOV
b. In List of values definition, enter:
STATIC:SALES,ACCOUNTING,MANUFACTURING,HR
c. From Display Null, select Yes.
d. In Null display value, enter:
- No Assignment -

Changing Item Types
How to Control Form Layout 4-15
The last two selections take into account that the EMP_DEPT column can
contain nulls. As a best practice, whenever you implement a select list and
have a column that can be null, you should set Display Null to Yes. Failure to
do so, results in the item defaulting to the first item in the select list.
5. Click Apply Changes.
6. Run the page by clicking the Run Page icon. (See Figure 4–8.)
Figure 4–8 Department Changed to a Select List
Change an Item to a Check Box
The item Telecommute is ideal for a check box. When you change the Display Type,
you can also move it up on the page and place is next to the Full-time and Part-time
radio group.
To change Telcommute to a check box:
1. Navigate to the Page Definition for page 900. Select Edit Page 900 from the
Developer toolbar.
2. Under Items, select P900_EMP_TELECOMMUTE.
3. From Display As, select Checkbox.
4. Under Displayed:
a. In Sequence, enter 1.5.
b. From Begin on New Line, select No
5. Scroll down to List of Values.
6. To have the label precede the check box:
a. From Named LOV, select Select Named LOV
b. In List of values definition, enter:
STATIC:;Y
This displays the check box after the label, but will not display a value
associated with the check box. If the check box is checked, the value passed to
the database will be Y.
7. Click Apply Changes.
8. Run the page by clicking the Run Page icon.

About Label Templates
4-16 Oracle HTML DB 2 Day Developer
About Label Templates
You can control the look of an item label by using a label template. Sample Application
includes the following label templates:
■ No Label
■ Required Label
The Required Label template prepends a red asterisk (*) to the label. You may also
create your own label templates to control the look of labels using different fonts,
borders, backgrounds, and images.
To change to a different label template:
1. Navigate to the Page Definition for page 900.
2. Under Items, select an item name.
3. Scroll down to Label and make a selection from the Template list.
4. Click Apply Changes.
5. Run the page.
Changing Buttons
The wizard that created the form in this tutorial also created buttons. These buttons
display conditionally based upon whether the page is being used to create a new
record (that is P900_EMP_ID equals null), or the page is being used to update an
existing record. These buttons were created as HTML buttons and positioned at the
top of the region.
You can also position buttons at the bottom of the region, to the left or right of the page
title, above the region, below the region, or in any button position defined in the
region template.
To change a button position:
1. Navigate to the Page Definition for page 900.
2. Click the heading Buttons.
3. Make a new selection from the Position column.
4. Click Apply Changes.
5. Run the page.
Buttons can also have templates associated with them to refine how they look.
Running the Page for Update
You can run the page and provide it with an Employee ID to retrieve. Typically, this
would be done with a link from a report page but for this example, run the page and
add ::::P900_EMP_ID:1 to the end of the URL. For example:
http://marvel.oracle.com/pls/otn/f?p=9659:900:1284393467360777225::::P900_EMP_ID:1
This will pass the value 1 to the item P9000_EMP_ID. If you run the page note that
the Delete and Apply Changes buttons now display. The Create button appeared
previously because the page was expecting a new record to be created. Also note a
Record Create Date now appears.

Making Data Bold
How to Control Form Layout 4-17
Making Data Bold
One way to make the information in a region easier to read, is to make the labels (or
the data) more pronounced. You can accomplish this by changing the color, specifying
another font, or using bold. To make a label bold, you could bold the data manually, or
create a new label template. In the latter approach, you would create a new label
template that would wrap the HTML tag for bold around the label and then associate
that template with the items in the Audit Information region.
To make data bold manually:
1. Navigate to the Page Definition.
2. Under Items, select an item name.
3. Scroll down to Element.
4. In HTML Form Element Attributes, type:
class="fielddatabold"
This example references a class in the Cascading Style Sheet associated with this
application.

Making Data Bold
4-18 Oracle HTML DB 2 Day Developer

How to Work with Check Boxes 5-1
5
How to Work with Check Boxes
In Oracle HTML DB, you can create check boxes as form elements, or you can create
check boxes in reports. Check boxes on a form work similarly to lists of values. When
you define an item to be a check box, you need to provide the check box values in the
List of Values section of the Item Attributes page. You define check boxes on a report
using the supplied function HTMLDB_ITEM.CHECKBOX.
This tutorial illustrates the different ways you can create check boxes within the
demonstration application, Sample Application and explains how to reference and
process the values of checked boxes.
This section contains the following topics:
■ Accessing Sample Application
■ Creating a Single Value Check Box on a Form
■ Creating Multi Value Check Box to Filter Content
■ Adding Check Boxes to Each Row in the Report
Accessing Sample Application
To access Sample Application:
1. Log in to Oracle HTML DB.
2. Click the down arrow on the right side of the Application Builder icon.
3. From the menu, select Demonstrations.
The Demonstration Applications page appears.
4. Locate Sample Application and check the Status column:
a. If the Status column displays Installed, click Run in the Action column.
b. If the Status column displays Not Installed, select Install in the Action
column. When the Application Builder home page appears, click the Run icon.
5. When prompted, enter the appropriate username and password and click Login
■ For User Name, enter either demo or admin.
■ For Password, enter the name of the current workspace using all lowercase
letters.
6. Click the Products tab.
7. Click the Edit icon to the left of a product.
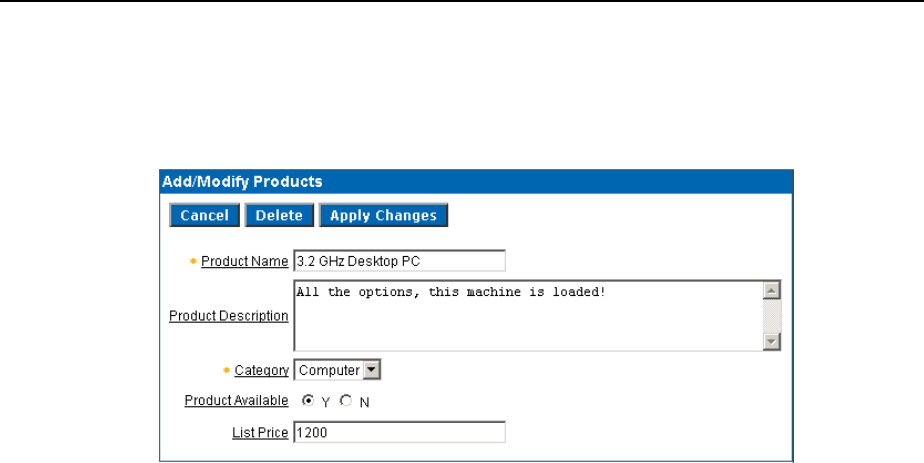
Creating a Single Value Check Box on a Form
5-2 Oracle HTML DB 2 Day Developer
As shown in Figure 5–1 on page 5-2, note that Product Available is a radio group.
In this exercise that follows you will change this item to a check box.
Figure 5–1 Products Available Radio Group
Creating a Single Value Check Box on a Form
In this exercise you change the Product Available radio group to a check box and then
change the position of the label.
Topics in this section include:
■ Change Product Available Radio Group to a Check Box
■ Alter the Check Box Position
■ Change Default Check Box Behavior
Change Product Available Radio Group to a Check Box
To change the Product Available radio group to a check box:
1. Navigate to the Page Definition for page 6. Select Edit Page 6 from the Developer
Toolbar.
2. Under Items, select P6_PRODUCT_AVAIL.
3. From Display As, select Checkbox.
4. Scroll down to List of Values.
5. Under List of Values:
a. From Named LOV, select Select Named LOV.
b. In List of values definition, enter:
STATIC:;Y
In this instance, the display value is null and the return value is Y. If a display
value were provided, it would appear to the left of the check box and could be
used in place of the label.
6. Click Apply Changes.
The Page Definition appears.
7. Run the page by clicking the Run Page icon.

Creating a Single Value Check Box on a Form
How to Work with Check Boxes 5-3
As shown in Figure 5–2, note that the Product Available item now displays as a check
box.
Figure 5–2 Product Available Item as a Check Box
Alter the Check Box Position
Next, you move the check box label to the right side of the check box.
To change the position of the check box label:
1. Navigate to the Page Definition for page 6. Select Edit Page 6 from the Developer
Toolbar.
2. Under Items, select P6_PRODUCT_AVAIL.
3. For Label, delete the text Product Available.
4. Under List of Values, change the List of values definition to:
STATIC:Product Available;Y
5. Click Apply Changes.
6. Run the page by clicking the Run Page icon.
As shown in Figure 5–3, note that the label Product Available now displays to the right
of the check box.
Figure 5–3 Product Available Label Moved to the Right
Removing the label and adding the display value to the LOV causes the HTML DB
engine to render the check box first and then the display value, Product Available.

Creating a Single Value Check Box on a Form
5-4 Oracle HTML DB 2 Day Developer
Change Default Check Box Behavior
In certain circumstances, you may want a check box to be enabled by default. You can
accomplish this by setting the default value attribute of the check box item. One
disadvantage of this approach is that you need to perform some extra steps to disable
it. Because of the way you defined the Product Available check box, it is virtually
impossible to disable it.
Consider the following example:
1. Navigate to the Home page by selecting the Home tab.
2. From the Tasks list, select Add a New Product.
3. On the Add/Modify Product page:
a. Fill in the required fields (fields marked with an asterisk).
b. Disable the Product Available check box.
c. Click Create.
4. Disable the Product Available check box again and click Apply Changes.
The Product Page appears.
5. Select the Edit icon for product you just added.
Notice that the Product Available check box is enabled even though you disabled
it twice when you added the product. This behavior results from the fact:
■ The Product Available check box has a default value of Y.
■ When Product Available is NULL, it defaults to the default value Y which
enables the check box.
Add a Computation
You can alter this behavior by adding a computation that remembers the state of the
check box.
To add a computation that tracks the state of the check box:
1. Navigate to the Page Definition for page 6. Select Edit Page 6 from the Developer
Toolbar.
2. Under Computations, click the Create icon.
3. For Location, select Item on This Page and click Next.
4. For Item:
a. For Compute Item, select P6_PRODUCT_AVAIL.
b. For Computation Point, select After Submit.
c. For Computation Type, select Static Assignment.
d. Click Next.
5. For Computation, enter the following and click Next.
N
Note: Since this item is a check box, the computation needs to be
something other than Y or NULL.

Creating Multi Value Check Box to Filter Content
How to Work with Check Boxes 5-5
Next, create a condition that controls when the computation executes.
6. On Condition:
a. For Condition Type, select Value of Item in Expression 1 is NULL.
b. In Expression 1, enter:
P6_PRODUCT_AVAIL
Because of these settings, this computation will only execute when the value
of the check box item, P6_PRODUCT_AVAIL is NULL.
7. Click Create.
Add another product as you did in the previous procedure. Notice that this time the
Product Available check box is not automatically selected.
Creating Multi Value Check Box to Filter Content
In the next exercise, you create amulti value check box on the Product page. This check
box will enable users to filter the report by selecting a category.
Topics in this section include:
■ Create a Multi Value Check Box
■ Alter Check Box Display Values
■ Change Where the Check Boxes Display
■ Create a Go Button to Submit the Page
■ Adjust Default Check Box Behavior
Create a Multi Value Check Box
To a create muli value check box:
1. Navigate to the Page Definition for page 3.
2. Under Items, click the Create icon.
3. For Item Type, select Check Box and click Next.
4. On Display Position and Name:
a. For Item Name, enter P3_SHOW.
b. For Region, select Products (1) 10.
c. Click Next.
5. For List of Values:
a. For Display Null Option, select No.
b. In List of Values Query, enter:
SELECT distinct category a, category b
FROM demo_product_info
ORDER BY 1
Note that to create a multi value check box, the List of Values query needs to
return more than one row.
c. Click Next.

Creating Multi Value Check Box to Filter Content
5-6 Oracle HTML DB 2 Day Developer
6.
On Item Attributes:
a. For Label, remove the default text by clicking Clear.
b. Click Next.
7. For Source:
a. For Item Source, select Static Assignment.
b. For Item Source Value, enter:
Audio:Computer:Phones:Video
When a multi value check box is submitted, the value of the item is a colon
delimited string of values. Using this string as the source will ensure all boxes
are checked when HTML DB engine renders the page.
c. Click Create Item.
Alter Check Box Display Values
To edit check box display values (or labels) to appear in bold:
1. Navigate to the Page Definition for page 3.
2. Under Items, select P3_SHOW.
3. Scroll down to Element.
4. In Form Element Option Attributes, enter:
class="fielddatabold"
Form Element Option Attributes are used exclusively for check boxes and radio
buttons and control the way the HTML DB engine renders individual options.
5. Click Apply Changes.
Change Where the Check Boxes Display
Next, you edit attributes so that the category check boxes display above the report. To
accomplish this, you need to change the Display Point attribute of the region
associated with P3_SHOW.
To change the display point of the Products region:
1. Navigate to the Page Definition for page 3.
2. Under Region, select Products.
3. From Display Point, select Page Template Body (3. items above region content).
4. Click Apply Changes.
If you ran page 3 now, you would notice the category check boxes display vertically.
Next, you will change the display so the category check boxes display horizontally.
To alter where the category check boxes display:
1. Navigate to the Page Definition for page 3.
2. Under Items, select P3_SHOW.
3. Scroll down to List of Values.
4. In Columns, enter 4.

Creating Multi Value Check Box to Filter Content
How to Work with Check Boxes 5-7
5.
Click Apply Changes.
Create a Go Button to Submit the Page
In order for the report to be driven by the product category check boxes, you need to
submit the page.
To create a button to submit the page:
1. Navigate to the Page Definition for page 3.
2. Under Buttons, click the Create icon.
3. For Button Region, select Products (1) 10 and click Next.
4. For Position, select Create a button displayed among this region's items and click
Next.
5. For Button Attributes:
a. For Button Name, enter P3_GO.
b. In Sequence, enter 40.
c. Click Create Button.
Next, you need to create a branch to tell the HTML DB engine where to go after the
user clicks the Go button.
To create a branch to page 3:
1. Navigate to the Page Definition for page 3.
2. Under Branches, click the Create icon.
3. For Branch Point and Type, accept the defaults and click Next.
4. For Page, select 3 and click Next.
5. Click Create Branch.
In order to generate a report based on the category check box values, you need to
change the report query.
To edit the report query:
1. Under Regions, select Products.
2. Scroll down to Source.
3. In Region Source, change the WHERE clause to read:
WHERE p.image_id = i.image_id (+)
AND instr(':'||:P3_SHOW||':',category) > 0
4. Click Apply Changes.
5. Run the page by clicking the Run Page icon.
As shown in Figure 5–4, notice you can filter the report by selecting a category check
box at the top of the page.

Creating Multi Value Check Box to Filter Content
5-8 Oracle HTML DB 2 Day Developer
Figure 5–4 Product Page with Category Check Boxes and Go Button
Adjust Default Check Box Behavior
Although the category check boxes correctly filter the content on page 3, if you
deselect all the check boxes, notice the report returns all products. This behavior
results from the fact that if a check box has a NULL value (that is, it is deselected), it
defaults to the default value Y. The default value of Y in turn enables the check box.
You can alter this behavior by adding a computation that remembers the state of the
check box.
To add a computation that tracks the state of the check box:
1. Navigate to the Page Definition for page 3.
2. Under Computations, click the Create icon.
3. For Item Location, select Item on This Page and click Next.
4. For Item:
a. For Compute Item, select P3_SHOW
b. For Computation Point, select After Submit.
c. For Computation Type, select Static Assignment.
d. Click Next.
5. For Computation:
a. For Computation:
none(bogus_value)
b. Click Next.
Next, create a condition that controls when the computation executes.
6. On Condition:
a. For Condition Type, select Value of Item in Expression 1 is NULL.
b. In Expression 1, enter:
Note: A static assignment of an item needs to be something other
than Y or NULL.

Adding Check Boxes to Each Row in the Report
How to Work with Check Boxes 5-9
P3_SHOW
As a result of these settings, this computation will only execute when the
value of the check box item, P3_SHOW is NULL.
7. Click Create.
Run the page again and deselect all the category check boxes. Notice that this time the
report contains the expected result (no returned records).
Adding Check Boxes to Each Row in the Report
In the next exercise you add a delete check box to each row in the Products report. To
accomplish this you edit the report query and make a call to HTMLDB_ITEM package.
HTMLDB_ITEM is a supplied package for generating certain form elements
dynamically. In this instance, you use HTMLDB_ITEM.CHECKBOX to generate check
boxes in the Products report. When the page is submitted, the values of the check
boxes are stored in global package arrays. You can reference these values using the
PL/SQL variables HTMLDB_APPLICATION.G_F01 to HTMLDB_APPLICATION.G_F50
based on the p_idx parameter value that was passed in.
Topics in this section include:
■ Call HTMLDB_ITEM.CHECKBOX
■ Add a Button to Submit Check Box Array Values
■ Add a Process
Call HTMLDB_ITEM.CHECKBOX
To edit the query to call HTMLDB_ITEM.CHECKBOX:
1. Navigate to the Page Definition for page 3.
2. Under Regions, click Products.
3. In Region Source, add the new line appearing in bold face to the query.
SELECT p.product_id edit_product, p.product_id view_product_id,
htmldb_item.checkbox(1,p.product_id) del,
p.product_name, p.product_description, p.category, p.product_avail, p.list_
price, '<img src="#OWNER#.custom_image_display?p_image_id=' || nvl(i.image_
id,0) || '"
height="50" width="50" />' img
FROM demo_product_info p, demo_images i
WHERE p.image_id = i.image_id (+)
AND instr(':'||:P3_SHOW||':',category) > 0
HTMLDB_ITEM is an Oracle HTML DB supplied package you can use to generate
certain form elements dynamically. Note the value passed in for p_idx in the
above example is 1. You reference the check box values using the global variable
HTMLDB_APPLICATION.G_F01 later on.
4. Select the Report Attributes tab.
5. Under Column Attributes, locate the Del column.
6. Click the Up arrow until the DEL column is directly beneath VIEW_PRODUCT_ID.
(See Figure 5–5).

Adding Check Boxes to Each Row in the Report
5-10 Oracle HTML DB 2 Day Developer
Figure 5–5 Report Column Attributes Page
7.
Click Apply Changes.
Add a Button to Submit Check Box Array Values
To add a button to submit the check box array values:
1. Navigate to the Page Definition for page 3.
2. Under Buttons, click the Create icon.
3. For Select a region for the button, select Products 1 (10) and click Next.
4. For Position, select, select Create a button in a region position and click Next.
5. For Button Attributes:
a. For Button Name, enter DELETE_PRODUCTS.
b. For Label, enter Delete Products.
c. Click Next.
6. For Button Template, accept the default selection and click Next.
7. For Position, select Top of Region and click Next.
8. For Branch to Page, select 3 Products and click Create Button.
Add a Process
To add a process that executes when the user clicks the Delete Products button:
1. Under Processes, click the Create icon.
2. For Process Type, select PL/SQL and click Next.
3. For Name, enter Delete Products and click Next.
4. Enter the following PL/SQL process and click Next:
FOR i in 1..HTMLDB_APPLICATION.G_F01.count
LOOP
DELETE FROM demo_product_info
WHERE product_id = HTMLDB_APPLICATION.G_F01(i);
END LOOP;
HTMLDB_ITEM is an Oracle HTML DB supplied package you can use to generate
certain form elements dynamically. When a page is submitted, the values of each
column are stored in global package arrays, which you can reference using the
PL/SQL variable HTMLDB_APPLICATION.G_F01 to HTMLDB_APPLICATION.G_
F50. In this exercise, the value passed in for p_idx in EMPNO column is 1, so you

Adding Check Boxes to Each Row in the Report
How to Work with Check Boxes 5-11
reference the EMPNO column values using the global variable HTMLDB_
APPLICATION.G_F01.
5. On Messages:
a. In Success Message, enter:
Product(s) deleted.
b. In Failure Message, enter:
Unable to delete product(s).
c. Click Next.
6. Click Create Process.
If you run the page, the Delete Products button appears above the report. (See
Figure 5–6). To remove a product from the report, select the Del check box and click
Delete Products.
Figure 5–6 Products Report with Delete Products Check Box

Adding Check Boxes to Each Row in the Report
5-12 Oracle HTML DB 2 Day Developer

How to Implement a Web Service 6-1
6
How to Implement a Web Service
Web services enable applications to interact with one another over the Web in a
platform-neutral, language independent environment. In a typical Web services
scenario, a business application sends a request to a service at a given URL by using
the HTTP protocol. The service receives the request, processes it, and returns a
response. You can incorporate calls to external Web services in applications developed
in Oracle HTML DB.
Web services in Oracle HTML DB are based on SOAP (the Simple Object Access
Protocol). SOAP is a World Wide Web Consortium (W3C) standard protocol for
sending and receiving requests and responses across the Internet. SOAP messages can
be sent back and forth between a service provider and a service user in SOAP
envelopes.
This tutorial illustrates how to call a Web service from within an Oracle HTML DB
application.
Topics in this section include:
■ About Creating Web Service References
■ Creating a New Application
■ Specifying an Application Proxy Server Address
■ Searching a UDDI Registry for a Business Name
■ Searching a UDDI Registry for a Service Name
About Creating Web Service References
To utilize Web services in Oracle HTML DB, you create a Web service reference using a
wizard. Each Web service reference is based on a Web Services Description Language
(WSDL) document that describes the target Web service. When you create a Web
service reference, the wizard analyzes the WSDL and collects all the necessary
information to create a valid SOAP message.
Note: The SOAP 1.1 specification is a W3C note. (The W3C XML
Protocol Working Group has been formed to create a standard that
will supersede SOAP.)
For information about Simple Object Access Protocol (SOAP) 1.1 see:
http://www.w3.org/TR/SOAP/

Creating a New Application
6-2 Oracle HTML DB 2 Day Developer
When you create a Web service reference you need to decide how to locate the WSDL.
You can locate a WSDL two ways:
■ By searching a UDDI registry for either a service name or business name.
A Universal Description, Discovery, and Integration (UDDI) registry is a directory
where businesses register their Web services.
■ By entering the URL to the WSDL document.
In this tutorial you will create Web service references by searching a UDDI registry.
Creating a New Application
First, create a new application.
To create an application:
1. Click the Application Builder icon on the workspace home page.
2. When the Application Builder home page appears, click Create.
3. For Method, select Create Application and click Next.
4. For Name:
a. For Name, enter Web Services.
b. For Create Application, select From Scratch.
c. Click Next.
5. Add a blank page:
a. Under Select Page Type, select Blank and click Add Page.
The page appears in the list at the top of the page.
b. Select the Name Page 1.
c. Enter Web Services in Page Name and click Apply Changes.
d. Click Next.
6. For Tabs, accept the default One Level of Tabs and click Next.
7. For Shared Components, accept the default and click Next.
8. For Attributes, accept the default for Authentication Scheme, Language, and User
Language Preferences Derived From and click Next.
9. For User Interface, select Theme 2 and click Next.
10. Review your selections and click Create.
The Application Builder home page appears.
Specifying an Application Proxy Server Address
If your environment requires a proxy server to access the Internet, you must specify a
proxy server address on the Application Attributes page before you can create a Web
service reference.
To specify a proxy address for an application:
1. On the Application Builder home page, click Edit Attributes.
2. Click Edit Standard Attributes.

Searching a UDDI Registry for a Business Name
How to Implement a Web Service 6-3
3.
Under Name, enter the proxy server in Proxy Server.
4. Click Apply Changes.
Searching a UDDI Registry for a Business Name
In this exercise you create a form which displays stock quotes based on a stock symbol
you provide. You will create a Web service reference by searching the UDDI registry
for a business name:
To create a Web service reference by searching for a business name:
1. Navigate to the Application Builder home page.
2. Click Shared Components.
3. Under Logic, select Web Service References.
The Web Service References page appears.
4. Click Create.
5. When prompted whether to search a UDDI registry to find a WSDL, select Yes and
click Next.
6. For UDDI Location, select IBM UDDI and click Next.
7. On Search:
a. For Search Type, select Business Name.
b. In Name, enter:
%xMethods%
c. Click Search.
d. Under Matching Services, select xMethods Delayed Stock Quotes.
e. Click Next.
A summary page appears describing the selected Web service.
8. Review your selection and click Next to continue.
The URL to the WSDL document displays in the WSDL Location field.
9. Click Finish.
Create a Form to Display a Stock Quote
Next, you will create a form to display a stock quote based on the stock symbol you
provide.
To create a form after creating a Web Service Reference:
1. On Web Service Reference Added page, select Create Form on Web Service.
2. On Web Service Reference and Operation:
a. For Web Service Reference, select XMethods Delayed Stock Quotes.
b. For Operation, select getQuote.
c. Click Next.
3. For Page and Region Attributes:
a. In Region Title, enter Get Stock Quote.

Searching a UDDI Registry for a Service Name
6-4 Oracle HTML DB 2 Day Developer
b.
Accept the other defaults.
c. Click Next.
4. For Input Items, accept the defaults and click Next.
5. For Output Items:
a. For Item Label, enter Stock Price.
b. Accept the other defaults.
c. Click Finish.
6. Click Run Page to view the form.
7. On the Log in page, enter the User Name and Password for your workspace and
click Login.
A form resembling Figure 6–1 appears.
Figure 6–1 Get Stock Quote Form
8.
Test the form. In Symbol, enter a stock symbol (such as ORCL) and click Submit.
The associated stock price displays in the Stock Price field.
9. Select Edit Application from the Developer toolbar to return to the Application
Builder home page.
Searching a UDDI Registry for a Service Name
Next, you create a form that displays market futures. In this exercise you create a Web
service reference by search a UDDI registry for a service name. Then, you create a form
and report.
To create a new Web service by searching for a service name:
1. Navigate to the Application Builder home page.
2. Click Shared Components.
The Shared Components page appears.
3. Under Logic, select Web Service References.
The Web Service References page appears.
4. Click Create.
5. When prompted whether to search a UDDI registry to find a WSDL, select Yes and
click Next.
6. For UDDI Location, select XMethods UDDI and click Next.
7. For Search:
a. For Search Type, select Service Name.

Searching a UDDI Registry for a Service Name
How to Implement a Web Service 6-5
b.
In Name, enter xignite and click Search.
This is a search engine for market news.
c. Under Matching Services, select XigniteFutures.
d. Click Next.
A summary page appears describing the selected Web service.
8. Review your selection and click Next to continue.
The WSDL Location field displays the URL to the WSDL document.
9. Click Finish.
The Web service reference, XigniteFutures, is added to the Web Service References
Repository.
Create a Form and Report
Next, you need to create a page that contains a form and report.
To create a form and report after creating a Web Service Reference:
1. On Web Service Reference Added page, select Create Form and Report on Web
Service.
2. For Choose Service and Operation:
a. For Web Service Reference, select XigniteFutures.
b. For Operation, select ListFuturesByExchange.
c. Click Next.
3. For Page and Region Attributes:
a. Change Form Region Title to List Futures By Exchange.
b. Accept the other defaults and click Next.
4. For Input Items:
a. For P2_USERNAME, P2_PASSWORD, P2_TRACER, select No in the Create
column.
b. For P2_EXCHANGE, accept the default Yes in the Create column.
c. Click Next.
5. For Web Service Results:
a. For Temporary Result Set Name (Collection), accept the default.
b. Result Tree to Report On, select Future (tns:Future).
c. Click Next.
6. For Result Parameters to Display, select all the parameters and click Finish.
7. Click Run Page to view the form.
8. If a Log in page appears, enter the User Name and Password for your workspace
and click Login.
A form and report resembling Figure 6–2 on page 6-6 appears. Notice that the List
Futures by Exchange Form on the top of the page contains a data entry field and a
submit button, but the Results Report does not contain any data.
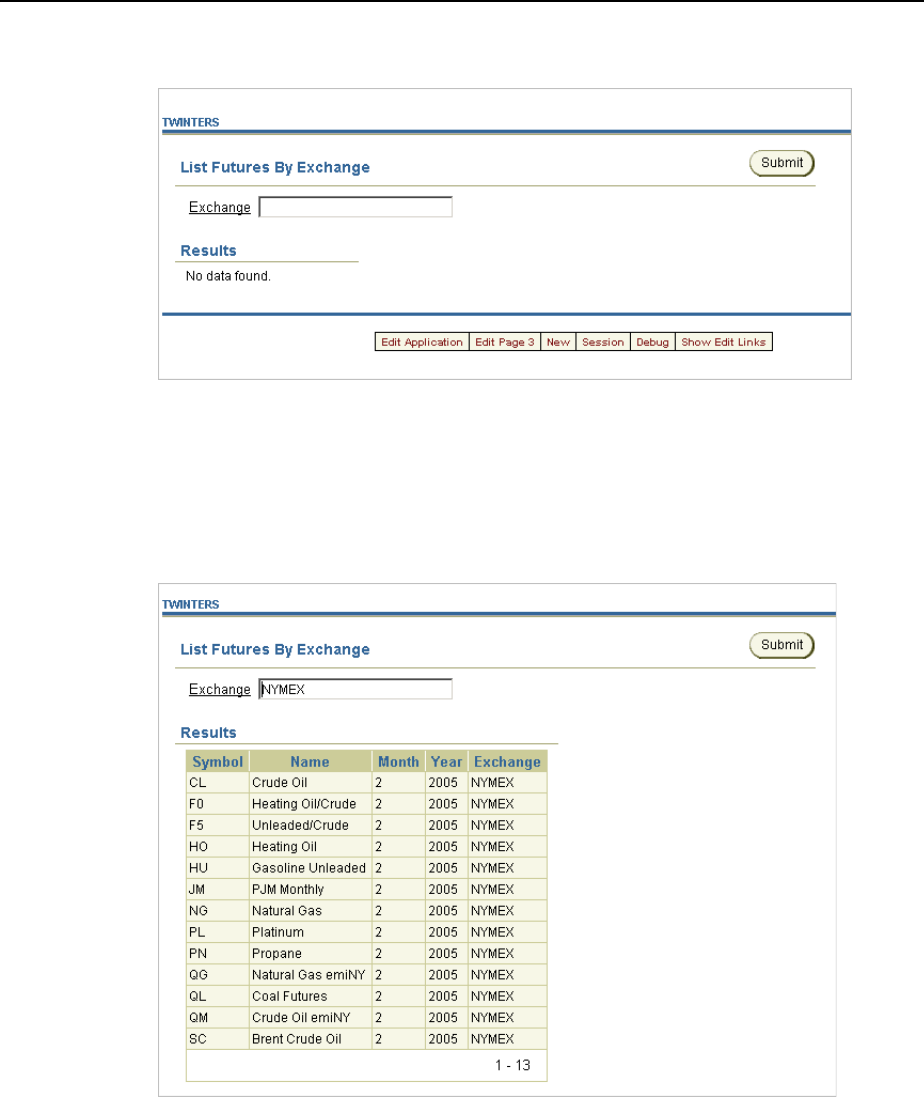
Searching a UDDI Registry for a Service Name
6-6 Oracle HTML DB 2 Day Developer
Figure 6–2 List Futures by Exchange Form and Report without Data
9. Test the form. In Exchange, enter NYMEX and click Submit.
The report at the bottom of the page should resemble Figure 6–3. The report lists
the symbol, name, month, and year of futures from the New York Mercantile
Exchange (NYMEX).
Figure 6–3 List Futures by Exchange Form and Report with Data

How to Create a Stacked Bar Chart 7-1
7
How to Create a Stacked Bar Chart
A stacked bar chart displays the results of multiple queries stacked on top of one
another (either vertically or horizontally). Using a stacked bar chart is an effective way
to communicate the absolute values of data points represented by the segments of each
bar, as well as the total value represented by data points from each series stacked in a
bar.
In Oracle HTML DB, stacked bar chart is only available as an SVG chart. To create a
stacked bar chart, you can create the chart as a stacked bar chart, or you can create a
regular (non-HTML) bar chart and then add queries to it.
This tutorial describes how to create a stacked bar chart using existing data within the
demonstration application, Sample Application.
This section contains the following topics:
■ Accessing Sample Application
■ Creating a Stacked Bar Chart
■ Adding Additional Series
■ Changing the Chart Format
■ Viewing the Chart
Accessing Sample Application
To access Sample Application:
1. Log in to Oracle HTML DB.
2. Click the down arrow on the right side of the Application Builder icon.
3. From the menu, select Demonstrations.
The Demonstration Applications page appears.
4. Locate Sample Application and check the Status column:
a. If the Status column displays Installed, return to the Workspace home page.
b. If the Status column displays Not Installed, select Install in the Action
column.
c. Follow the on-screen instructions.
5. When prompted, enter the appropriate username and password and click Login
■ For User Name, enter either demo or admin.

Creating a Stacked Bar Chart
7-2 Oracle HTML DB 2 Day Developer
■ For Password, enter the name of the current workspace using all lowercase
letters.
Creating a Stacked Bar Chart
To create the initial report, you can either add a region to an existing page and define it
as a stacked bar chart, or you can create a new page. In this exercise, you create a new
page within the Sample Application.
The chart will display the sum by product category for sales from within the Sample
Application. It will contain sales for the twelve months prior to the current month. In
the following exercise, you will create four queries (called series) for each of the
product categories (phones, computers, audio, and video).
To create a new page:
1. Navigate to the Workspace home page.
2. Click the Application Builder icon.
3. Select Sample Application.
4. Click Create Page.
5. Select Chart and click Next.
6. Select Stacked Bar, Vertical and click Next.
7. For Page Attributes:
a. For Page, enter 750.
b. For Page Name, enter Revenue by Category.
c. For Region Name, enter Revenue by Category.
d. Click Next.
8. For Tab Options, accept the default Do not use Tabs and click Next.
9. For Query:
a. For Series Name, enter Phones.
b. In SQL, enter:
SELECT NULL l,
sales_month,
revenue
FROM (
SELECT TO_CHAR(o.order_timestamp,'Mon YYYY') sales_month,
SUM(oi.quantity * oi.unit_price) revenue,
TO_DATE(to_char(o.order_timestamp,'Mon YYYY'),'Mon YYYY') sales_
month_order
FROM DEMO_PRODUCT_INFO p,
DEMO_ORDER_ITEMS oi,
DEMO_ORDERS o
WHERE o.order_timestamp <= (trunc(sysdate,'MON')-1)
AND o.order_timestamp > (trunc(sysdate-365,'MON'))
AND o.order_id = oi.order_id
AND oi.product_id = p.product_id
AND p.category = 'Phones'
GROUP BY TO_CHAR(o.order_timestamp,'Mon YYYY')
ORDER BY sales_month_order
)

Adding Additional Series
How to Create a Stacked Bar Chart 7-3
The syntax for the select of a chart is SELECT link, label, value. You
must have all three and only three items in your select. Because there is no
appropriate page to link to, the link is defined as null.
You cannot have an order by in the select statement for series in a stacked
chart. The information will be displayed in alphabetical order and this does
not work for dates (October displays before September). To get the data to
display in chronological order, you need to order the data inside a nested
select.
c. For When No Data Found Message, enter:
No orders found in the past 12 months.
d. Click Next.
10. Review your selections and click Finish.
Adding Additional Series
Once you have created the new page with a region defining the query, you need to add
the series. In the following exercise, you will add a series for each of the categories of
product in the application (that is, computers, audio, and video). Note you have
already created the phones category.
To add a series for computers category:
1. On the Success Page, select Edit Page.
The Page Definition for page 750 appears.
2. Under Regions, select Chart to the left of Revenue by Category.
Under Chart Series, notice that only one series appears.
3. Add a chart series for Computer. Under Chart Series, click Add Series.
a. For Series Name, enter Computer.
b. In SQL, enter:
SELECT NULL l,
sales_month,
revenue
FROM (
SELECT TO_CHAR(o.order_timestamp,'Mon YYYY') sales_month,
SUM(oi.quantity * oi.unit_price) revenue,
TO_DATE(to_char(o.order_timestamp,'Mon YYYY'),'Mon YYYY') sales_
month_order
FROM DEMO_PRODUCT_INFO p,
DEMO_ORDER_ITEMS oi,
DEMO_ORDERS o
WHERE o.order_timestamp <= (trunc(sysdate,'MON')-1)
AND o.order_timestamp > (trunc(sysdate-365,'MON'))
AND o.order_id = oi.order_id
AND oi.product_id = p.product_id
AND p.category = 'Computer'
GROUP BY TO_CHAR(o.order_timestamp,'Mon YYYY')
ORDER BY sales_month_order
)
Note that this SQL matches the previous series. The only difference is that the
category in the WHERE clause.

Adding Additional Series
7-4 Oracle HTML DB 2 Day Developer
c.
For When No Data Found Message, enter:
No orders found in the past 12 months.
d. Click Apply Changes.
4. Add a chart series for Audio. Under Chart Series, click Add Series.
a. For Series Name, enter Audio.
b. In SQL, enter:
SELECT NULL l,
sales_month,
revenue
FROM (
SELECT TO_CHAR(o.order_timestamp,'Mon YYYY') sales_month,
SUM(oi.quantity * oi.unit_price) revenue,
TO_DATE(to_char(o.order_timestamp,'Mon YYYY'),'Mon YYYY') sales_
month_order
FROM DEMO_PRODUCT_INFO p,
DEMO_ORDER_ITEMS oi,
DEMO_ORDERS o
WHERE o.order_timestamp <= (trunc(sysdate,'MON')-1)
AND o.order_timestamp > (trunc(sysdate-365,'MON'))
AND o.order_id = oi.order_id
AND oi.product_id = p.product_id
AND p.category = 'Audio'
GROUP BY TO_CHAR(o.order_timestamp,'Mon YYYY')
ORDER BY sales_month_order
)
c. For When No Data Found Message, enter:
No orders found in the past 12 months.
d. Click Apply Changes.
5. Add a chart series for Video. Under Chart Series, click Add Series.
a. For Series Name, enter Video.
b. In SQL, enter:
SELECT NULL l,
sales_month,
revenue
FROM (
SELECT TO_CHAR(o.order_timestamp,'Mon YYYY') sales_month,
SUM(oi.quantity * oi.unit_price) revenue,
TO_DATE(to_char(o.order_timestamp,'Mon YYYY'),'Mon YYYY') sales_
month_order
FROM DEMO_PRODUCT_INFO p,
DEMO_ORDER_ITEMS oi,
DEMO_ORDERS o
WHERE o.order_timestamp <= (trunc(sysdate,'MON')-1)
AND o.order_timestamp > (trunc(sysdate-365,'MON'))
AND o.order_id = oi.order_id
AND oi.product_id = p.product_id
AND p.category = 'Video'
GROUP BY TO_CHAR(o.order_timestamp,'Mon YYYY')
ORDER BY sales_month_order
)

Viewing the Chart
How to Create a Stacked Bar Chart 7-5
c.
For When No Data Found Message, enter:
No orders found in the past 12 months.
d. Click Apply Changes.
Changing the Chart Format
Next, you will enhance the appearance of the chart with axis titles by adding a region
footer.
To format the y-axis:
1. Scroll down to Axes Settings.
2. In y-axis Format, enter:
FML999G999G999G999G990
This formats the sales_month column as money, but without displaying the
cents
3. Select the Region Definition tab.
4. Scroll down to Header and Footer.
5. In Region Footer, enter:
Note: This reflects sales for the 12 months prior to the current month.
6. Click Apply Changes.
Viewing the Chart
Now that the chart is complete, you can view it.
To run the chart:
1. Click the Run Page icon in the upper right corner of the page.
2. If you have already run Sample Application in this session, you will be taken to
page 750. Otherwise, enter the appropriate username and password and click
Login
■ For User Name, enter either demo or admin
■ For Password, enter the name of the current workspace using all lowercase
letters
3. Navigate to page 750.
As shown in Figure 7–1 on page 7-6, the Revenue by Category chart appears.

Viewing the Chart
7-6 Oracle HTML DB 2 Day Developer
Figure 7–1 Revenue by Category Bar Chart
Tip: One way to navigate to a new page within a running application
is to change the second parameter (the page identifier) to 750. For
example, you would change:
http://htmldb.oraclecorp.com/pls/htmldb/f?p=2046:1: ...
to
http://htmldb.oraclecorp.com/pls/htmldb/f?p=2046:750: ...

How to Upload and Download Files in an Application 8-1
8
How to Upload and Download Files in an
Application
Oracle HTML DB applications may include the ability to upload and download files
stored in the database. This tutorial illustrates how to create a form and report with
links for file upload and download, how to create and populate a table to store
additional attributes about the documents, and finally how to create the mechanism to
download the document in your custom table.
This section contains the following topics:
■ Creating an Application
■ Creating an Upload Form
■ Creating a Report with Download Links
■ Storing Additional Attributes About the Document
■ Store the Document in a Custom Table
■ Downloading Documents from the Custom Table
Creating an Application
First, create a new application using the Create Application Wizard with the
assumption you will include an upload form on page 2.
To create an application using the Create Application Wizard:
1. Click the Application Builder icon on the Workspace home page.
2. Click Create.
3. For Method, select Create Application and click Next.
4. For Name:
a. For Name, enter Download App.
b. For Create Application, select From Scratch.
c. Click Next.
5. Add a blank page:
a. Under Select Page Type, select Blank and click Add Page.
The page appears in the list at the top of the page.
b. Click Next.

Creating an Upload Form
8-2 Oracle HTML DB 2 Day Developer
6.
For Tabs, select No Tabs and click Next.
7. For Shared Components, accept the defaults and click Next.
8. For Attributes, accept the defaults for Authentication Scheme, Language, and User
Language Preferences Derived From and click Next.
9. For User Interface, select Theme 2 and click Next.
10. Click Create.
Creating an Upload Form
Once you create an application, the next step is to create a form to upload documents.
In the following exercise you create a form in an HTML region that contains a file
upload item and a button. The button submits the page and returns the user to the
same page.
Topics in this section include:
■ Create an HTML Region
■ Create an Upload Item
■ Create a Button
Create an HTML Region
To create an HTML region:
1. Navigate to the Page Definition for page 1.
2. Under Regions, click the Create icon.
3. For Region, select HTML and click Next.
4. Select a type of HTML region container. Select HTML again and click Next.
5. For Title, enter Submit File and click Next.
6. Accept the remaining defaults and click Create Region.
Create an Upload Item
To create a file upload item:
1. Navigate to the Page Definition for page 1.
2. Under Items, click the Create icon.
3. For Item Type, select File Browse and click Next.
4. For Display Position and Name:
a. For Item Name, enter P1_FILE_NAME.
b. For Region, select Submit File.
c. Click Next.
5. Accept the remaining defaults and click Next.
6. Click Create Item.

Creating a Report with Download Links
How to Upload and Download Files in an Application 8-3
Create a Button
To create a button:
1. Under Buttons, click the Create icon.
2. For Button Region, select Submit File (1) 1 and click Next.
3. For Button Position, select Create a button in a region position and click Next.
4. On Button Attributes:
a. For Button Name, enter Submit.
b. Accept the remaining defaults.
c. Click Next.
5. For Button Template, accept the default and click Next.
6. On Display Properties, accept the defaults and click Next.
7. On Branching:
a. In Branch to Page, select Page 1.
b. Click Create Button.
8. Run the page by clicking the Run Page icon.
9. When prompted for a user name and password:
a. For User Name, enter the name of your workspace
b. For Password, enter the password for your workspace
c. Click Login.
When you run the page, it should look similar Figure 8–1.
Figure 8–1 Submit File Form
Creating a Report with Download Links
Once you create the form to upload documents, the next step is to create a report on
the document table that contains links to download documents. When you use the file
upload item type, the files you upload are stored in a table called wwv_flow_file_
objects$. Every workspace has access to this table through a view called HTMLDB_
APPLICATION_FILES.
Topics in this section include:
■ Create a Report on HTMLDB_APPLICATION_FILES

Creating a Report with Download Links
8-4 Oracle HTML DB 2 Day Developer
■ Add Link to Download Documents
Create a Report on HTMLDB_APPLICATION_FILES
To create a report on HTMLDB_APPLICATION_FILES:
1. Navigate to the Page Definition for page 1.
2. Under Regions, click the Create icon.
3. For Region, select Report and click Next.
4. For Report Implementation, select SQL Report and click Next.
5. For Title, enter Uploaded Files and click Next.
6. On Source, enter the following SQL query:
SELECT id,name FROM HTMLDB_APPLICATION_FILES
7. Click Create Region.
8. Run the page.
As shown in Figure 8–2, the report you just created shows all documents that have
been uploaded. Next, you provide a link to download the document.
Figure 8–2 Uploaded Files Report
Add Link to Download Documents
To provide a link to download the documents in the report:
1. Navigate to the Page Definition for page 1.
2. Under Regions, click Report adjacent to Uploaded Files.
3. Under Column Attributes, click the Edit icon next to the ID column.
4. Scroll down to Column Link. Under Column Link:
a. In the Link Text field, enter:
download

Storing Additional Attributes About the Document
How to Upload and Download Files in an Application 8-5
b.
From Target, select URL.
c. In the URL field, enter the following:
p?n=#ID#
#ID# passes the value contained in the column where ID is the column alias.
5. Click Apply Changes.
When you run the page, it should look similar to Figure 8–3.
Figure 8–3 Uploaded Files Report with Download Links
Storing Additional Attributes About the Document
Next, you create another table to store additional information about the documents
that are uploaded. In this exercise you:
■ Add an item to the upload form to capture the information
■ Add a process to insert this information along with the name of the file
■ Alter the SQL Report of uploaded files to join to the table containing the additional
information
Topics in this section include:
■ Create a Table to Store Document Attributes
■ Create an Item to Capture the Document Subject
■ Create a Process to Insert Information
■ Showing Additional Attributes in the Report Region
Create a Table to Store Document Attributes
To create the table to store additional information about uploaded files:
1. Navigate to the Workspace home page.
2. Click the SQL Workshop icon.

Storing Additional Attributes About the Document
8-6 Oracle HTML DB 2 Day Developer
3.
Click SQL Commands.
4. In the SQL Command Processor, enter:
CREATE TABLE file_subjects(name VARCHAR2(4000), subject VARCHAR2(4000) );
5. Click Run.
Create an Item to Capture the Document Subject
To create an item to capture the subject of the document:
1. Navigate to the Workspace home page.
2. Click the Application Builder icon.
3. Select Download App.
4. Navigate to the Page Definition for page 1.
5. Under Items, click the Create icon.
6. For Item Type, select Tex t and click Next.
7. For Text Control Display Type, select Text Field and click Next.
8. For Display Position and Name:
a. For Item Name, enter P1_SUBJECT.
b. From Region, select Uploaded Files.
c. Accept the remaining defaults and click Next.
9. For Item Attributes:
a. In the Label field, enter Subject.
b. Accept the remaining defaults.
c. Click Next.
10. Click Create Item.
Create a Process to Insert Information
To create a process to insert the subject information into the new table:
1. Navigate to the Page Definition for page 1.
2. Under Page Processing, Processes, click the Create icon.
3. For Process Type, select PL/SQL and click Next.
4. For Process Attributes:
a. For Name, enter Insert.
b. From Point, select On Submit - After Computations and Validations.
c. For Type, select PL/SQL anonymous block.
d. Click Next.
5. In Enter PL/SQL Page Process, enter the following PL/SQL process:
INSERT INTO file_subjects(name, subject) VALUES(:P1_FILE_NAME,:P1_SUBJECT);
6. Click Next.

Store the Document in a Custom Table
How to Upload and Download Files in an Application 8-7
7.
For Messages:
a. In Success Message, enter:
Subject inserted
b. In Failure Message enter:
Error inserting subject
c. Click Next.
8. From When Button Pressed, select SUBMIT.
9. Click Create Process.
Showing Additional Attributes in the Report Region
To alter the SQL Report region to join to the additional attributes table:
1. Under Regions, select Uploaded Files.
2. Replace the Region Source with the following:
SELECT w.id,w.name,s.subject
FROM HTMLDB_APPLICATION_FILES w,file_subjects s
WHERE w.name = s.name
3. Click Apply Changes.
Run the page. As shown in Figure 8–4, the Uploaded Files report now contains a
Subject column.
Figure 8–4 Uploaded Files Report with Subject Column
Store the Document in a Custom Table
In certain cases, you may want to store uploaded documents in a table owned by your
schema. For example, if you want to create an Oracle Text Index on uploaded
documents, you need to store the documents in a custom table.
To store documents in your custom table:
■ Add a column of type BLOB to hold the document
■ Alter the process to insert documents into the custom table
To add a BLOB column to the file_subjects table:
1. Navigate to the Workspace home page.
2. Click the SQL Workshop icon.
3. Click SQL Commands.
4. Enter the following SQL statement:

Downloading Documents from the Custom Table
8-8 Oracle HTML DB 2 Day Developer
ALTER TABLE file_subjects ADD(id number,blob_content BLOB,mime_type
varchar2(4000) );
5. Click Run.
To alter the process to insert documents into the file_subjects table:
1. Navigate to the Workspace home page.
2. Click the Application Builder icon.
3. Select Download App.
4. Navigate to the Page Definition for page 1.
5. Under Processes, select Insert.
6. Under source, replace the process with the following:
IF ( :P2_FILE_NAME is not null ) THEN
INSERT INTO file_subjects(id,NAME, SUBJECT, BLOB_CONTENT, MIME_TYPE)
SELECT ID,:P2_FILE_NAME,:P2_SUBJECT,blob_content,mime_type
FROM HTMLDB_APPLICATION_FILES WHERE name = :P2_FILE_NAME;
DELETE from HTMLDB_APPLICATION_FILES WHERE name = :P2_FILE_NAME;
END IF;
7. Click Apply Changes.
Downloading Documents from the Custom Table
Now that documents are being stored in a custom table, you need to provide a way to
download them. You do this by creating a procedure and granting execute on that
procedure to the pseudo user HTMLDB_PUBLIC_USER.
To accomplish this you need to change:
■ The SQL report region to no longer join to the HTMLDB_APPLICATION_FILES
view
■ The URL supplied for the ID column in the SQL report to execute the new
procedure instead of executing the p procedure
To create a procedure to download documents from the file_subjects table and
grant execute to public:
1. Navigate to the Workspace home page.
2. Click the SQL Workshop icon.
3. Click SQL Commands.
4. Enter the following SQL statement:
CREATE OR REPLACE PROCEDURE download_my_file(p_file in number) AS
v_mime VARCHAR2(48);
v_length NUMBER;
v_file_name VARCHAR2(2000);
Lob_loc BLOB;
BEGIN
SELECT MIME_TYPE, BLOB_CONTENT, name,DBMS_LOB.GETLENGTH(blob_content)
INTO v_mime,lob_loc,v_file_name,v_length
FROM file_subjects
WHERE id = p_file;
--
-- set up HTTP header

Downloading Documents from the Custom Table
How to Upload and Download Files in an Application 8-9
--
-- use an NVL around the mime type and
-- if it is a null set it to application/octect
-- application/octect may launch a download window from
windows
owa_util.mime_header( nvl(v_mime,'application/octet'),
FALSE );
-- set the size so the browser knows how much to download
htp.p('Content-length: ' || v_length);
-- the filename will be used by the browser if the users does a
save as
htp.p('Content-Disposition: attachment; filename="'||substr(v_
file_name,instr(v_file_name,'/')+1)|| '"');
-- close the headers
owa_util.http_header_close;
-- download the BLOB
wpg_docload.download_file( Lob_loc );
end download_my_file;
/
5. Click Run.
6. Enter the following SQL statement:
GRANT EXECUTE ON download_my_file TO PUBLIC
/
7. Click Run.
To change the SQL report region to no longer join with the HTMLDB_APPLICATION_
FILES view:
1. Navigate to the Page Definition of page 1.
2. Under Regions, select Uploaded Files.
3. Replace the Region Source with the following:
SELECT s.id,s.name,s.subject FROM file_subjects s
4. Click Apply Changes.
To change the download link to use the new download procedure:
1. Navigate to the Page Definition of page 2.
2. Under Regions, click Report adjacent to Uploaded Files.
3. Next to the ID column, click the Edit icon.
4. Scroll down to the Column Link region.
5. Replace the existing URL with the following:
#OWNER#.download_my_file?p_file=#ID#
In this URL:
– #OWNER# is the parsing schema of the current application.
– download_my_file is the new procedure you just created.
– You are passing in the value of the column ID to the parameter p_file.
6. Click Apply Changes.

Downloading Documents from the Custom Table
8-10 Oracle HTML DB 2 Day Developer

How to Incorporate JavaScript into an Application 9-1
9
How to Incorporate JavaScript into an
Application
Adding JavaScript to a Web applications is a great way to add features that mimic
those found client/server applications without sacrificing all of the benefits of Web
deployment. Oracle HTML DB includes multiple built-in interfaces especially
designed for adding JavaScript.
Remember that JavaScript is not appropriate for data intensive validations. For
example, to verify that a name is contained within a large database table, you would
need to pull down every record to the client, creating a huge HTML document. In
general, complex operations are much better suited for server-side HTML DB
validations instead of JavaScript.
This tutorial describes some usage scenarios for JavaScript and includes details about
how to implement them in your application.
This section contains the following topics:
■ Understanding How to Incorporate JavaScript Functions
■ About Referencing Items Using JavaScript
■ Calling JavaScript from a Button
■ Creating a Client Side JavaScript Validation
■ Enabling and Disabling Form Elements
■ Changing the Value of Form Elements
Understanding How to Incorporate JavaScript Functions
There are two primary places to include JavaScript functions:
■ In the HTML Header attribute of the page
■ In a .js file in the page template.
Incorporating JavaScript in the HTML Header Attribute
One way to include JavaScript into your application is add it to the HTML Header
attribute of the page. This is a good approach for functions that are specific to a page
as well as a convenient way to test a function before you include it in the .js file.
You can add JavaScript functions to a page by entering the code into the HTML
Header attribute on the Page Attributes page.
To add JavaScript code in the HTML Header attribute:

About Referencing Items Using JavaScript
9-2 Oracle HTML DB 2 Day Developer
1.
Click the Application Builder icon on the Workspace home page.
2. Select an application.
3. Select a page.
4. Click Edit Attributes.
5. Scroll down HTML Header.
6. Enter code into HTML Header and click Apply Changes.
For example, adding the following would test a function accessible from anywhere on
the current page.
<script language="JavaScript1.1" type="text/javascript">
function test(){
alert('This is a test.');
}
</script>
Including JavaScript in a .js File Referenced by the Page Template
In Oracle HTML DB you can reference a .js file in the page template. This approach
makes all the JavaScript in that file accessible to the application. This is the most
efficient approach since a .js file loads on the first page view of your application and
is then cached by the browser.
The following demonstrates how to include a .js file in the header section of a page
template.
<!DOCTYPE html PUBLIC "-//W3C//DTD HTML 4.01 Transitional//EN">
<html>
<head>
<title>#TITLE#</title>
#HEAD#
<script src="#APP_IMAGES#custom.js" type="text/javascript"></script>
</head>
<body #ONLOAD#>#FORM_OPEN#
About Referencing Items Using JavaScript
When you reference an item, the best approach is to reference by ID. If you view the
HTML source of an Oracle HTML DB page in a Web browser, you would notice that
all items have an ID attribute. This ID corresponds to the name of the item, not the
item label. For example, if you create an item with the name P1_FIRST_NAME and a
label of First Name, the ID will be P1_FIRST_NAME.
Knowing the item ID enables you to use the JavaScript function getElementById to
get and set item attributes and values. The following example demonstrates how to
reference an item by ID and display its value in an alert box.
<script language="JavaScript1.1" type="text/javascript">
function firstName(){
alert('First Name is ' + document.getElementById('P1_FIRST_NAME').value );
}
// or a more generic version would be
See Also: ""Customizing Templates" in Oracle HTML DB User’s
Guide

Creating a Client Side JavaScript Validation
How to Incorporate JavaScript into an Application 9-3
function displayValue(id){
alert('The Value is ' + document.getElementById(id).value );
}
</script>
// Then add the following to the "Form Element Attributes" Attribute of the
item:
onChange="javascript:displayValue('P1_FIRST_NAME');"
Calling JavaScript from a Button
Calling a JavaScript from a button is a great way to confirm a request. Oracle HTML
DB uses this technique for the delete operation of most objects. For example, when you
delete a button, a JavaScript message appears asking you to confirm your request.
Consider the following example:
<script language="JavaScript1.1" type="text/javascript">
function deleteConfirm(msg)
{
var confDel = msg;
if(confDel ==null)
confDel= confirm("Would you like to perform this delete action?");
else
confDel= confirm(msg);
if (confDel== true)
doSubmit('Delete');
}
</script>
This example creates a function to confirm a delete action and then calls that function
from a button. Note that the function optionally submits the page and sets the value of
the internal variable :REQUEST to Delete, thus performing the delete using a process
that conditionally executes based on the value of request.
Note that when you create the button you would need to select Action Redirect to
URL without submitting page. Then, you would specify a URL target such as the
following:
javascript:confirmDelete('Would you like to perform this delete action?');
Creating a Client Side JavaScript Validation
Client side validations give immediate feedback to users using a form. One very
common JavaScript validation is field not null. For example, you can create a function
in the HTML Header attribute of a page and then call that function from an item.
Creating this type of JavaScript validation involves the following steps:
■ Create a new application on the EMP table.
■ Create an item on page 1 called P1_ENAME that has a label of Employee Name.
■ Add a function to the HTML Header attribute on page 3
■ Edit the P3_ENAME item on page 3 to call the function
Topics in this section include:
■ Create an Application on the EMP Table

Creating a Client Side JavaScript Validation
9-4 Oracle HTML DB 2 Day Developer
■ Add a Function to the HTML Header Attribute
■ Edit an Item to Call the Function
Create an Application on the EMP Table
To create a new application on the EMP table:
1. Click the Application Builder icon on the Workspace home page.
2. Click Create.
3. For Method, select Create Application.
4. For Name:
a. In Name, enter a name that describes the application.
b. For Create Application, select From scratch.
c. Click Next.
5. Add a blank page, containing a report:
a. Under Select Page Type, select Report and Form.
b. From Table or View, select EMP.
c. Select Include Analysis Pages.
d. Click Add Page.
6. Configure Analysis Pages:
a. For Summarize by Column, press CTRL and select the columns JOB, MGR,
and DEPTNO and click Next.
b. On Aggregate by Column, select SAL and COMM and click Next.
c. For Chart Type, select Pie and click Next.
d. Review your selections and click Add Analysis Pages.
The new pages appears in the list at the top of the page.
e. Click Next.
7. For Tabs, select One Level of Tabs and click Next.
8. For Shared Components, accept the default, No, and click Next.
9. For Attributes, accept the defaults for Authentication Scheme, Language, and User
Language Preferences Derived From and click Next.
10. For User Interface, select a theme and click Next.
11. Click Create.
To view the application:
1. Click Run Application.
2. When prompted for a user name and password:
■ For User Name, enter the name of your workspace
■ For Password, enter the password for your workspace
The application contains the following pages:
■ a standard report

Creating a Client Side JavaScript Validation
How to Incorporate JavaScript into an Application 9-5
■ an insert form
■ an update form
■ a success form (indicates when a record is successfully inserted)
■ an analysis menu page
■ analysis reports
■ analysis charts
■ a login page
3. Select Edit Application from the Developer Toolbar.
Add a Function to the HTML Header Attribute
To add a function to the HTML Header attribute on page 2:
1. Navigate to the Page Definition for page 2, the Amp insert form.
2. Under Regions, select EMP.
3. Change Title to Insert Form and click Apply Changes.
4. Click Edit Attributes.
The Edit Page attributes page appears.
5. Scroll down to HTML Header.
6. In HTML Header, enter the following:
<script language="JavaScript1.1" type="text/javascript">
function notNull(object){
if(object.value=="")
alert('This field must contain a value.');
}
</script>
7. Click Apply Changes.
Edit an Item to Call the Function
The next step is to edit the P2_ENAME item and add code to the HTML Form Element
Attributes attribute to call the function.
To edit the P2_ENAME item to call the function:
1. Navigate to the Page Definition for page 2, Insert Form.
2. Under Items, select P2_ENAME.
3. Scroll down to Element.
4. In HTML Form Element Attributes, enter the following:
onBlur="javascript:notNull(this);"
5. Click Apply Changes.
6. Run the page. If you position the cursor in the Ename field and click Create, the
following message appears:
This field must contain a value.

Enabling and Disabling Form Elements
9-6 Oracle HTML DB 2 Day Developer
Enabling and Disabling Form Elements
While Oracle HTML DB enables you to conditionally display a page item, it is
important to note that a page must be submitted for any changes on the page to be
evaluated. The following example demonstrates how to use JavaScript to disable a
form element based on the value of another form element.
First, you write a function and place it in the HTML Header attribute of the page
containing your update form. Second, you call the function from an item on the page.
The following example demonstrates how to add a JavaScript function to prevent
users from adding commissions to employees who are not in the Sales Department
(deptno = 30).
Topics in this section include:
■ Add a Function the HTML Header Attribute
■ Edit an Item to Call the Function
■ Change P2_DEPTNO to a Select List
■ Create a Call to disFormItems from the Region Footer
Add a Function the HTML Header Attribute
To add a function to the HTML Header attribute on page 2:
1. Navigate to the Page Definition for page 2.
2. On the Page Definition, click Edit Attributes.
The Page Attributes appear.
3. Scroll down to HTML Header.
4. In HTML Header, enter the following:
<script language="JavaScript1.1" type="text/javascript">
// This function takes in:
// 1. A string expression to evaluate. For example:
// 'document.getElementById(\'P2_DEPTNO\').value==\'0\'
// Notice the quotes are escaped using a "\"
// 2. One or more arguments which are item ID's as strings. For example:
// ...,'P2_ENAME','P2_SAL'...);
// Notice the ID's are the item names, NOT item labels
function
disFormItems(testString,item1,item2,item3,item4,item5,item6,item7,item8,item9,i
tem10){
if(theTest){
for(var i=1;i<12;i++){
if (arguments[i]){
disItem = document.getElementById(arguments[i]);
disItem.style.background = '#cccccc';
disItem.disabled = true;
}
}
}
else{
for(var i=1;i<12;i++){
if (arguments[i]){
disItem = document.getElementById(arguments[i]);

Enabling and Disabling Form Elements
How to Incorporate JavaScript into an Application 9-7
disItem.disabled = false;
disItem.style.background = '#ffffff';
}
}
}
}
</script>
5. Click Apply Changes.
Edit an Item to Call the Function
The next step is to edit the P2_DEPTNO item and add code to the HTML Form Element
Attributes attribute to call the function.
To edit the P2_DEPTNO item to call the function:
1. Navigate to the Page Definition for page 2.
2. Under Items, select P2_DEPTNO.
3. Scroll down to Element.
4. In HTML Form Element Attributes, enter the following:
onChange="javascript:disFormItems('document.getElementById(\'P2_
DEPTNO\').value!=\'30\'','P2_COMM');"
5. Click Apply Changes.
Change P2_DEPTNO to a Select List
To change the P2_DEPTNO to display as a select list:
1. Navigate to the Page Definition for page 2.
2. Under Items, select P2_DEPTNO.
3. Under Display As, select Select List.
4. Scroll down to List of Values.
5. Under List of Values:
a. From Display Null, select No.
b. In List of Values definition, enter:
SELECT dname, deptno FROM dept
6. Click Apply Changes.
Create a Call to disFormItems from the Region Footer
Finally, you need to create a call to the disFormItems function after the page is
rendered to disable P2_COMM if the selected employee is not a SALES representative. A
good place to make this call would be from the Region Footer of the region which
contains the items.
To disable P2_COMM when the page is first loaded:
1. Navigate to the Page Definition for page 2.
2. Under Regions, select Insert Form.

Changing the Value of Form Elements
9-8 Oracle HTML DB 2 Day Developer
3.
Scroll down to Header and Footer.
4. In Region Footer, enter the following:
<script language="JavaScript1.1" type="text/javascript">
// This code calls the function when the page loads, thus setting the items
state correctly.
disFormItems('document.getElementById(\'P2_DEPTNO\').value!=\'30\'','P2_
COMM');
</script>
5. Click Apply Changes.
6. Run the page by clicking the Run Page icon.
Figure Figure 9–1 demonstrates the completed form.
Figure 9–1 Completed Form
Changing the Value of Form Elements
In the following example, there are four text boxes in a region. The fourth text box
contains the sum of the other three. To calculate this sum you will add a JavaScript
function to the HTML Header attribute and then call that function from the first three
items
To call the function from the first three items:
1. Navigate to the appropriate Page Definition.
2. On the Page Definition, click Edit Attributes.
The Page Attributes appear.
3. In HTML Header, enter the following:
<script language="JavaScript1.1" type="text/javascript">
function sumItems(){
function getVal(item){
if(document.getElementById(item).value != "")
return parseFloat(document.getElementById(item).value);
else
return 0;
}
document.getElementById('P1_TOTAL').value =
getVal('P1_ONE') + getVal('P1_TWO') + getVal('P1_THREE');
}

Changing the Value of Form Elements
How to Incorporate JavaScript into an Application 9-9
</script>
4. Click Apply Changes.
To call the function from all three items:
1. Navigate to the appropriate Page Definition.
2. For each item:
a. Select the item name.
b. Scroll down to Element.
c. In HTML Form Element Attributes, enter:
onChange="javascript:sumItems();"
d. Click Apply Changes.

Changing the Value of Form Elements
9-10 Oracle HTML DB 2 Day Developer

How to Build and Deploy an Issue Tracking Application 10-1
10
How to Build and Deploy an Issue Tracking
Application
Storing information in an Oracle database organizes it into tables that group similar
information together and removes redundancies. Using the Oracle HTML DB
development environment, you can quickly build an application that enables a user to
view and update information stored in an Oracle Database.
This tutorial describes how to use Oracle HTML DB to create and deploy an
application that tracks the assignment, status, and progress of issues related to a
project.
Topics in this section include:
■ Business Scenario
■ Designing the Database Objects
■ Implementing Database Objects
■ Loading Demonstration Data
■ Building a Basic User Interface
■ Adding Advanced Features
■ Deploying Your Application
Business Scenario
Effective project management is the key to completing any project on time and within
budget. Within every project there are always multiple issues that need to be tracked,
prioritized, and dealt with.
The MRVL Company has several projects that must be completed on time for the
company to be profitable. Missing deadlines for any of the projects will cause the
company to lose money. The project leads are tracking issues in several different ways.
Some individuals are manually tracking issues in notebooks, others are tracking issues
in text documents, and other managers are using spreadsheets.
By creating a hosted application in Oracle HTML DB, each project lead can easily
record and track issues in one central location. Not only will everyone have access to
just the data they need, but having the data stored in one location, will make it easier
for management to determine if any critical issues are not being addressed.

Business Scenario
10-2 Oracle HTML DB 2 Day Developer
Planning and Project Analysis
Before any beginning development on an application, you first need to define
requirements that describe what the application does. Once defined, you can turn
these requirements into a database design and an outline that describes how the user
interface accepts and presents data.
For this business scenario, the project leads establish requirements that define what
information needs to be tracked, how security will work, what data management
functions will be included, and how data will be presented to users.
Topics in this section include:
■ Necessary Data
■ Requested Security
■ Data Management Functions
■ Data Presentation Functions
■ Special Functions
Necessary Data
Currently, each project lead tracks information slightly differently. Together, everyone
agrees that the application should include the following information:
■ Summary of the issue
■ Detailed description of the issue
■ Who identified the issue
■ The date the issue was identified
■ Which project the issue is related to
■ Who the issue is assigned to
■ A current status of the issue
■ Priority of the issue
■ Target resolution date
■ Actual resolution date
■ Progress report
■ Resolution summary
Requested Security
Because the project leads were concerned about everyone having access to all the
information, they agree upon the following access rules:
■ Each team member and project lead is only assigned to one project at a time
■ Each team member and project lead must be assigned to a project
■ Managers are never assigned to a specific project
■ Only managers can define and maintain projects and people
■ Everyone can enter new issues
■ Once assigned, only the person assigned or a project lead can change data about
the issue

Designing the Database Objects
How to Build and Deploy an Issue Tracking Application 10-3
■ Management needs views that summarize the data without access to specific issue
details
Data Management Functions
Next, the project leads determine how information will be entered into the system. In
this case, users must be able to:
■ Create issues
■ Assign issues
■ Edit issues
■ Create projects
■ Maintain projects
■ Create people
■ Maintain people information
■ Maintain project assignments
Data Presentation Functions
Once the data is entered into the application, users will need to view the data. The
team decides they initially need to be able to view the following:
■ All issues by project
■ Open issues by project
■ Overdue issues, by project and for all
■ Recently opened issues
■ Unassigned issues
■ Summary of issues by project, for managers
■ Resolved issues by month identified
■ Issue resolution dates displayed on a calendar
■ Days to Resolve Issues by person
Special Functions
Finally, the project leads determine the application must support the following special
functions:
■ Notify people when an issue is assigned to them
■ Notify the project lead when any issue becomes overdue
Designing the Database Objects
Once you have defined the database object requirements, the next step is to turn these
requirements in a database design and an outline that describes how the user interface
accepts and presents data. In this step you need to think about how information
should be organized in the tables in the underlying database. Given the requirements
described "Planning and Project Analysis" on page 10-2, for this project you need to
create three tables:
■ Projects tracks all current projects

Designing the Database Objects
10-4 Oracle HTML DB 2 Day Developer
■ People contains information about who can be assigned to handle issues
■ Issues tracks all the information about an issue, including the project to which it
is related and the person assigned to rectify the issue
Be aware that you will also need create additional database objects, such as sequences
and triggers, to support the tables. System generated primary keys will be used for all
tables so that all the data can be edited without needing to implement a cascade
update.
Topics in this section include:
■ About the Projects Table
■ About the People Table
■ About the Issues Table
About the Projects Table
Each project must have a name and include a project start date as well as the projected
end date. These dates will be used to help determine if any outstanding issues are
jeopardizing the end date. Table 10–1 describes the columns to be included in the
Projects table.
About the People Table
Each person will have a defined name and role. Project leads and team members will
also have an assigned project. To tie the current user to their role within the
organization, e-mail addresses will be used for user names.
Table 10–2 on page 10-5 describes the columns that will be included in the People
table.
Table 10–1 Project Table Details
Column Name Type Size Not Null? Constraints Description
project_id integer n/a Yes Primary key A unique numeric
identification number for each
project.
Populated by a sequence using
a trigger.
project_name varchar2 100 Yes Unique key A unique alphanumeric name
for the project.
start_date date n/a Yes None The project start date.
target_end_date date n/a Yes None The targeted project end date.
actual_end_date date n/a No None The actual end date.

Designing the Database Objects
How to Build and Deploy an Issue Tracking Application 10-5
About the Issues Table
When the project leads defined their application requirements, they determined they
needed to track specific issues assigned to a specific person. Issues will be included as
a columns along with additional columns to provide an audit trail. The audit trail will
track who created the issue, when it was created, as well as who last modified the
issue and on what date that modification was made.
Table 10–3 describes the columns to be included in the Issues table.
Table 10–2 People Table Details
Column Name Type Size Not Null? Constraints Description
person_id integer n/a Yes Primary key A numeric ID that identifies
each user.
Populated by a sequence
using a trigger.
person_name varchar2 100 Yes Unique key A unique name that
identifies each user.
person_email varchar2 100 Yes None User e-mail address.
person_role varchar2 7 Yes Check
constraint
The role assigned to each
user.
Note: For the purposes of this exercise, this application has been
simplified. People data is usually much more elaborate and is often
pulled from a corporate Human Resource system. Also, people
typically work on more than one project at a time. If the roles that are
assigned to a person need to be dynamic, you would implement roles
as a separate table with a foreign key back to the people table.
Table 10–3 Issue Table Details
Column Name Type Size Not Null? Constraints Description
issue_id integer n/a Yes primary key A unique numeric ID
that identifies an issue.
Populated by a sequence
using a trigger
issue_summary varchar2 200 Yes None A brief summary of the
issue.
issue_description varchar2 2000 No None A detailed description of
the issue.
identified_by integer n/a Yes foreign key to People The user who identifies
the issue.
identified_date date n/a Yes None The date the issue was
identified
related_project integer n/a Yes foreign key to Projects Projects related to the
issue.
assigned_to integer n/a No foreign key to People The person who owns
this issue.
Implementing Database Objects
10-6 Oracle HTML DB 2 Day Developer
Implementing Database Objects
This first step in building an application is to create the database objects in the
underlying database. You create database objects within a user account in the Oracle
database. To create this application, you need to request a new workspace within the
Oracle HTML DB development environment. An administrator creates a workspace
within an initial schema that will house the application objects.
Topics in this section include:
■ Request a New Workspace
■ Build the Database Objects
Request a New Workspace
To request a workspace:
1. In a Web browser, navigate to the Oracle HTML DB Login page. To log in to the
Oracle supported site of Oracle HTML DB development, go to:
http://htmldb.oracle.com/
status varchar2 8 Yes check constraint The issue status.
Automatically set to
Open when new and set
to Closed when actual
resolution date entered
priority varchar2 6 No check constraint The priority of the issue.
target_resolution_date date n/a No None The target resolution
date.
progress varchar2 2000 No None The progress of the issue.
actual_resolution_date date n/a No None Actual resolution date of
the issue.
resolution_summary varchar2 2000 No None Resolution summary.
created_date date n/a Yes None Populated by a trigger.
created_by varchar2 60 Yes None User who create this
issue.
last_modified_date date n/a No None Populated by a trigger.
Note: A real-world application might need more extensive auditing.
For example, you might need to track each change to the data rather
than just the last change. Tracking each change to the data would
require an additional table, linked to the issues table. If the valid
priorities assigned to issues needed to be dynamic, you would need to
add a separate table with a foreign key back to the issues table.
Note: If you have a local installation of Oracle HTML DB, you may
skip this section and use and existing workspace.
Table 10–3 (Cont.) Issue Table Details
Column Name Type Size Not Null? Constraints Description

Implementing Database Objects
How to Build and Deploy an Issue Tracking Application 10-7
The Login page appears.
2. Under Tasks, click Request a Workspace.
3. Click Continue and follow the on-screen instructions.
You will be notified through e-mail when your request has been approved and
your workspace has been provisioned.
Build the Database Objects
There are several ways to create objects in Oracle HTML DB. You can:
■ Create an Object in Object Browser. Use Object Browser to create tables, views,
indexes, sequences, types, packages, procedures, functions, triggers database links,
materialized views, and synonyms. A wizard walks you through the choices
necessary to create the selected database object. To create an object in Object
Browser, navigate to Object Browser and click Create.
■ Execute commands in SQL Command Processor. Run SQL commands by typing
or pasting them into the SQL Command Processor. To access SQL Command
Processor, click SQL Workshop on Workspace home page and then select SQL
Commands.
■ Upload a script. Upload and script that contains all the necessary create object
statements to the SQL Script Repository. To upload a script, click SQL Workshop
on Workspace home page, select SQL Scripts, and then click Upload.
■ Create script online. Create a script online in the Script Repository. This is the
method you will use to create the database objects for this exercise. To create a
script online, click the SQL Workshop icon on Workspace home page, select SQL
Scripts, and then click Create.
To build database objects by creating a script:
1. Log in to Oracle HTML DB.
2. Click the SQL Workshop icon on the Workspace home page.
3. Click SQL Scripts.
4. Click Create.
5. In the Script Editor:
a. For Script Name, enter DDL for Issue Management Application.
b. In Script, copy and paste the DDL (data definition language) in "Create
Application Database Objects DDL" on page A-1.
c. Click Save.
To run the DDL for Issue Management Application script:
1. On the SQL Scripts page, select the DDL for Issue Management Application icon.
The Script Editor appears.
2. Click Run.
A summary page appears.
3. Click Run again.

Loading Demonstration Data
10-8 Oracle HTML DB 2 Day Developer
Viewing Created Database Objects
You can view database objects using Object Browser.
To view database objects in SQL Workshop:
1. Click the SQL Workshop tab.
2. Click Object Browser.
3. From the Object list on left side of the page, select Tab le s.
4. Under Database Browser, click Tab le s .
5. To view the details of a specific object (HT_ISSUES, HT_PEOPLE, or HT_
PROJECTS), simply select it.
Loading Demonstration Data
Once you have created all the necessary database objects, the next step is to load data
into the tables. You can manually load data using the import functionality available in
SQL Workshop. In the following exercise, you will use SQL Workshop to load
demonstration data.
Look at the DDL you copied from "Create Application Database Objects DDL" on
page A-1. Notice that the sequences used for the primary keys start at 40 in order to
leave room for the demonstration data. Because the before insert triggers are coded so
that the sequence is only accessed if a primary key value is not provided, they will not
needed to be disabled in order for you to load data.
Topics in this section include:
■ Load Projects Data
■ Load People Data
■ Load Issues Data
Load Projects Data
To import data into the Projects table:
1. Select the SQL Workshop tab.
2. Click SQL Scripts.
3. Click Create.
4. In the Script Editor:
a. For Script Name, enter Load Project Data.
b. In Script, copy and paste the following:
INSERT INTO ht_projects
(project_id, project_name, start_date, target_end_date)
values
(1, 'Internal Infrastructure', sysdate-150, sysdate-30)
/
INSERT INTO ht_projects
(project_id, project_name, start_date, target_end_date)
values
(2, 'New Payroll Rollout', sysdate-150, sysdate+15)
/
INSERT INTO ht_projects
(project_id, project_name, start_date, target_end_date)

Loading Demonstration Data
How to Build and Deploy an Issue Tracking Application 10-9
values
(3, 'Email Integration', sysdate-120, sysdate-60)
/
INSERT INTO ht_projects
(project_id, project_name, start_date, target_end_date)
values
(4, 'Public Website Operational', sysdate-60, sysdate+30)
/
insert into ht_projects
(project_id, project_name, start_date, target_end_date)
values
(5, 'Employee Satisfaction Survey', sysdate-30, sysdate+60)
/
c. Click Save.
5. On the SQL Scripts page, select the Load Project Data icon.
6. Click Run.
A summary page appears.
7. Click Run again.
Update Dates to Make the Projects Current
Although you have created the Projects, the dates need to be updated to make the
projects current. To accomplish this, you run another script.
To update the project dates and make the projects current:
1. Select the SQL Workshop tab.
2. Click SQL Scripts.
3. Click Create.
4. In the Script Editor:
a. For Script Name, enter Update Project Dates.
b. In Script, copy and paste the following:
UPDATE ht_projects
SET start_date = sysdate-150,
target_end_date = sysdate-30
WHERE project_id = 1
/
UPDATE ht_projects
SET start_date = sysdate-150,
target_end_date = sysdate+15
WHERE project_id = 2
/
UPDATE ht_projects
SET start_date = sysdate-120,
target_end_date = sysdate-60
WHERE project_id = 3
/
UPDATE ht_projects
SET start_date = sysdate-60,
target_end_date = sysdate+30
WHERE project_id = 4
/
UPDATE ht_projects

Loading Demonstration Data
10-10 Oracle HTML DB 2 Day Developer
SET start_date = sysdate-30,
target_end_date = sysdate+60
WHERE project_id = 5
/
c. Click Save.
5. On the SQL Scripts page, select the Update Project Dates icon.
6. Click Run.
A summary page appears.
7. Click Run again.
Load People Data
Once you have loaded data into the Project table, you can load People data. Because of
foreign keys in the Projects table, People data must be loaded after Project data. You
will load data into the People table by creating and running a script in SQL Workshop.
To load data into the People table:
1. Select the SQL Workshop tab.
2. Click SQL Scripts.
3. Click Create.
4. In the Script Editor:
a. For Script Name, enter Load People Data.
b. In Script, copy and paste the following:
INSERT INTO ht_people
(person_id, person_name, person_email, person_role, assigned_project)
VALUES
(1, 'Joe Cerno', 'joe.cerno@mrvl-bademail.com', 'CEO', null)
/
INSERT INTO ht_people
(person_id, person_name, person_email, person_role, assigned_project)
VALUES
(2, 'Kim Roberts', 'kim.roberts@mrvl-bademail.com', 'Manager', null)
/
INSERT INTO ht_people
(person_id, person_name, person_email, person_role, assigned_project)
VALUES
(3, 'Tom Suess', 'tom.suess@mrvl-bademail.com', 'Manager', null)
/
INSERT INTO ht_people
(person_id, person_name, person_email, person_role, assigned_project)
VALUES
(4, 'Al Bines', 'al.bines@mrvl-bademail.com', 'Lead', 1)
/
INSERT INTO ht_people
(person_id, person_name, person_email, person_role, assigned_project)
VALUES
(5, 'Carla Downing', 'carla.dow[email protected]', 'Lead', 2)
/
INSERT INTO ht_people
(person_id, person_name, person_email, person_role, assigned_project)
VALUES
(6, 'Evan Fanner', 'evan.fanner@mrvl-bademail.com', 'Lead', 3)

Loading Demonstration Data
How to Build and Deploy an Issue Tracking Application 10-11
/
INSERT INTO ht_people
(person_id, person_name, person_email, person_role, assigned_project)
values
(7, 'George Hurst', 'george.hur[email protected]', 'Lead', 4)
/
INSERT INTO ht_people
(person_id, person_name, person_email, person_role, assigned_project)
VALUES
(8, 'Irene Jones', 'irene.jones@mrvl-bademail.com', 'Lead', 5)
/
INSERT INTO ht_people
(person_id, person_name, person_email, person_role, assigned_project)
VALUES
(9, 'Karen London', 'karen.lond[email protected]', 'Member', 1)
/
INSERT INTO ht_people
(person_id, person_name, person_email, person_role, assigned_project)
values
(10, 'Mark Nile', 'mark.nile@mrvl-bademail.com', 'Member', 1)
/
INSERT INTO ht_people
(person_id, person_name, person_email, person_role, assigned_project)
VALUES
(11, 'Jane Kerry', 'jane.kerry@mrvl-bademail.com', 'Member', 5)
/
INSERT INTO ht_people
(person_id, person_name, person_email, person_role, assigned_project)
VALUES
(12, 'Olive Pope', 'olive.pope@mrvl-bademail.com', 'Member', 2)
/
INSERT INTO ht_people
(person_id, person_name, person_email, person_role, assigned_project)
VALUES
(13, 'Russ Sanders', 'russ.sand[email protected]', 'Member', 3)
/
INSERT INTO ht_people
(person_id, person_name, person_email, person_role, assigned_project)
VALUES
(14, 'Tucker Uberton', 'tucker.[email protected]m', 'Member',
3)
/
INSERT INTO ht_people
(person_id, person_name, person_email, person_role, assigned_project)
VALUES
(15, 'Vicky Williams', 'vicky.[email protected]om', 'Member',
4)
/
INSERT INTO ht_people
(person_id, person_name, person_email, person_role, assigned_project)
VALUES
(16, 'Scott Tiger', 'scott.tig[email protected]', 'Member', 4)
/
INSERT INTO ht_people
(person_id, person_name, person_email, person_role, assigned_project)
VALUES
(17, 'Yvonne Zeiring', 'yvonee[email protected]om', 'Member',
4)
/

Building a Basic User Interface
10-12 Oracle HTML DB 2 Day Developer
c.
Click Save.
5. On the SQL Scripts page, select the Load People Data icon.
6. Click Run.
A summary page appears.
7. Click Run again.
Load Issues Data
The last data you need to load is the Issues data. As with People data, you will create
and run a script to populate the Issues table.
To load data into the Issues table:
1. Select the SQL Workshop tab.
2. Click SQL Scripts.
3. Click Create.
4. In the Script Editor:
a. For Script Name, enter Load Issue Data.
b. In Script, copy and paste the script in "Create Issues Script" on page A-1.
c. Click Save.
5. On the SQL Scripts page, select the Load Issue Data icon.
6. Click Run.
A summary page appears.
7. Click Run again.
Building a Basic User Interface
Once you have created the objects that support your application and have loaded the
demonstration data, the next step is to create a user interface. In this exercise, you use
the Create Application Wizard in Application Builder to create an application and then
the pages that support the data management and data presentation functions
described in "Planning and Project Analysis" on page 10-2.
Topics in this section include:
■ Create the Application
■ Add Pages to Maintain Projects
■ Add Pages to Track People
■ Add Pages to Track Issues
■ Create Summary Reports
■ Add Content to the Home Page
■ Add a Breadcrumb
Create the Application
You can use the Create Application Wizard to create an application that contains pages
that enables users to view a report on and create data for selected tables within a

Building a Basic User Interface
How to Build and Deploy an Issue Tracking Application 10-13
schema. Alternatively, you can create an application first and then add pages to it.
Since the application requirements include customized overview pages, for this
exercise you will use latter approach.
To create the application manually:
1. Navigate to the Workspace home page.
2. Click the Application Builder icon.
3. Click Create.
4. For Method, select Create Application.
5. For Name:
a. In Name, enter a Issue Tracker.
b. For Create Application, select From scratch.
c. Click Next.
6. Add a blank page:
a. Under Select Page Type, select Blank.
b. Click Add Page.
c. Click Next.
7. For Tabs, select No Tabs and click Next.
8. For Shared Components, accept the defaults and click Next.
9. For Attributes, accept the defaults for Authentication Scheme, Language, and User
Language Preferences Derived From and click Next.
10. For User Interface, select Theme 10 and click Next.
11. Click Create.
To view the application:
1. Click the Run Application icon on the Applications home page.
2. When prompted, enter your workspace username and password and click Login.
This authentication is part of the default security of any newly created application.
As shown in Figure 10–1, the home page appears.
Building a Basic User Interface
10-14 Oracle HTML DB 2 Day Developer
Figure 10–1 Issue Tracking Application Home Page
Although the page has no content, notice that the Create Application Wizard
created the following items:
■ Navigation Links - A navigation bar entry displays in the upper right of the
page. Logout enables the user to log out of the application.
■ Developer Links - The Developer Toolbar appears at the bottom of the page.
These links only display if you are logged in as a developer. Regular users,
those who only have access to run the application, will not see these links.
From left to right, the Developer Toolbar contains the following links:
– Edit Application - Edit the application by linking to the Application
Builder home page.
–Edit Page 1 - Edit the current running page. This link takes you to Page
Definition for the current page.
–Create - Add a new component to the current page.
– Session - Open a new page containing session details for the current page.
–Debug - Display the current page in debug mode.
– Show Edit Links - Displays edit links next to each object on the page that
can be edited. Each edit link resembles two colons (::) and appears to the
right of navigation bar items, tabs, region titles, buttons, and items.
Clicking a edit link displays another window in which to edit the object.
3. Click Edit Application on the Developer Toolbar to return to Application Builder
home page. Notice that the Create Application Wizard also created a Login page.
Once you have created the basic application structure, the next step is to create
individual pages.
Add Pages to Maintain Projects
First, you need to create pages that enable users to view and add data to tables. To
accomplish this, you will use the Form on a Table with Report Wizard. This wizard

Building a Basic User Interface
How to Build and Deploy an Issue Tracking Application 10-15
creates a report page and maintenance page for each table the start with HT_
PROJECTS.
Topics in this section include:
■ Create Pages for Maintaining Projects
■ Refine the Appearance of the Projects Report Page
■ Refine the Create/Edit Project Page
Create Pages for Maintaining Projects
To create pages for maintaining HT_PROJECTS table:
1. On the Application Builder home page, click Create Page.
2. Select Form and click Next.
3. Select Form on a Table with Report and click Next.
4. For Table/View Owner, select the appropriate schema and click Next.
5. For Table/View Name, select HT_PROJECTS and click Next.
6. For Define Reports Page:
a. For Page, enter 2.
b. For Page Name and Region Title, enter Projects.
c. Click Next.
7. For Tab Options, accept the default selection Do not use tabs and click Next.
8. For Select Column(s), select every column except PROJECT_ID and click Next.
Note that Project Name is unique and identifies the project. The ID was added to
simplify the foreign key and enable cascading updates.
9. For Edit Link Image, select the third option (the word Edit in blue with a white
background) and click Next.
10. For Define Form Page:
a. For Page, enter 3.
b. For Page Name and Region Title, enter Create/Edit Project.
c. Click Next.
11. For Tab Options, accept the default Do not use tabs and click Next.
12. For Primary Key, accept the default PROJECT_ID and click Next.
13. For Source Type, accept the default Existing Trigger and click Next.
14. For Select Column(s), selected all columns and click Next.
15. Under Identify Process Options, accept the defaults for Insert, Update and Delete,
and click Next.
16. Review your selections and click Finish.
To preview your page, click Run Page. As shown in Figure 10–2 on page 10-5, the
newly created report displays the demo data.

Building a Basic User Interface
10-16 Oracle HTML DB 2 Day Developer
Figure 10–2 Projects Page
Click the Edit icon to view an existing row or click the Create button to create a new
record. If you click the Edit icon to the left of Employee Satisfaction Survey, a form
resembling Figure 10–3 appears.
Figure 10–3 Create/Edit Project Form
Refine the Appearance of the Projects Report Page
You can change the appearance of the Projects report page by adding a format mask to
the dates.
To add a format mask to the dates on the Create/Edit Project page:
1. Navigate to the Page Definition for page 2, Projects. Select Edit Page 2 from the
Developer Toolbar.
2. Under Regions, select Report adjacent to Projects.
3. Edit the format for the START_DATE:
a. Click the Edit icon the left of START_DATE.
The Column Attributes page appears.
b. For Number/Date Format, enter DD-MON-YYYY.
4. Edit the format for the TARGET_END_DATE:
a. Click the Next button (>) at the top of the page to navigate to the next Report
Item.
The Column Attributes page appears.
b. For Number/Date Format, enter DD-MON-YYYY.
5. Edit the format for the ACTUAL_END_DATE:
a. Click the Next button (>) at the top of the page to navigate to the next Report
Item.

Building a Basic User Interface
How to Build and Deploy an Issue Tracking Application 10-17
The Column Attributes page appears.
b. For Number/Date Format, enter DD-MON-YYYY.
6. Click Apply Changes.
The Report Attributes page appears.
7. For PROJECT_ID, delete the Heading Edit.
8. For the START_DATE, TARGET_END_DATE and ACTUAL_END_DATE
columns, select center for Column Alignment and Heading Alignment.
9. To enable column heading sorting, check Sort for all columns except PROJECT_ID.
10. For PROJECT_NAME, select 1 for Sort Sequence.
This selection specifies PROJECT_NAME as the default column to sort on. Note
this functionality can overridden by any user selections.
11. Scroll down to Sorting. For Ascending and Descending Image, select the light gray
arrow.
12. Under Messages, enter the following in When No Data Found Message:
No Projects found.
13. Click Apply Changes.
To view your changes, click the Run icon in the upper right of the page. As shown in
Figure 10–4, note the addition of a sort control on the Project Name column and the
format of the dates in the Start Date and Target End Date columns.
Figure 10–4 Projects Page with Sort Control
Refine the Create/Edit Project Page
Next, you will customize the Create/Edit Project page to make the Project Name field
larger, the date fields smaller, change the date picker type and add a format mask for
dates, and add validations that check if the target and actual end dates are after the
start date.
To make the Project Name field larger and the date fields smaller:
1. Navigate to the Page Definition for Page 3, Create/Edit Project.
a. From the Developer toolbar, select Edit Application.
b. Select Create/Edit Project.
2. Under Items, select the heading Items.
3. Scroll to the right and locate the Width column:

Building a Basic User Interface
10-18 Oracle HTML DB 2 Day Developer
a.
For Project Name, enter 60.
b. For Start Date, enter 12.
c. For Target End Date, enter 12.
d. For Actual End Date, enter 12.
e. Click Apply Changes.
4. Click the Edit Page icon in the upper right corner of the page to return to the Page
Definition.
To change the date picker type and add a format mask for dates:
1. Edit the item P3_START_DATE.
a. Under Items, select P3_START_DATE.
b. Under Identification, for Display As select Date Picker (DD-MON-YYYY).
c. Click Apply Changes.
Edit the item P3_TARGET_END_DATE.
a. Under Items, select P3_TARGET_END_DATE.
b. Under Identification, for Display As select Date Picker (DD-MON-YYYY).
c. Click Apply Changes.
Edit the item P3_ACTUAL_END_DATE.
a. Under Items, select P3_ACTUAL_END_DATE.
b. Under Identification, for Display As select Date Picker (DD-MON-YYYY).
c. Click Apply Changes.
To add validations to check if the target and actual end dates are after the start date:
1. Under the Validations section, click the Create icon.
2. For Identify the validation level, accept the default Item level validation and click
Next.
3. For Item, select Create/Edit Project: 40. P3_TARGET_END_DATE (Target End
Date) and click Next.
4. For Select a validation method, select PL/SQL and click Next.
5. Specify the type of validation you want to create. Accept the default PL/SQL
Expression and click Next.
6. For Validation Name, enter TARGET_AFTER_START and click Next.
7. On Identify Validation and Error Message:
a. For Validation, enter:
to_date(:P3_ACTUAL_END_DATE,'DD-MON-YYYY') >= to_date(:P3_START_
DATE,'DD-MON-YYYY')
b. For Error Message, enter:
Actual End Date must be same or after Start Date.
c. Click Next.
8. For Conditions:

Building a Basic User Interface
How to Build and Deploy an Issue Tracking Application 10-19
a.
For Condition Type, select the shortcut link [item not null].
Selecting this shortcut link selects Value of Item in Expression 1 is NOT
NULL from the Condition Type list.
b. For Expression 1, enter:
P3_ACTUAL_END_DATE.
This selection ensures that this validation will only execute if the user enters
an Actual End Date.
c. Click Create.
To view your changes, click the Run Page icon in the upper right of the page. (See
Figure 10–5.)
Figure 10–5 Modified Create/Edit Project
Add Pages to Track People
Once the initial Projects pages are complete, you create pages for maintaining people.
Topics in this section include:
■ Create Pages for Maintaining People
■ Modify the People Report Page
■ Refine the Create/Edit People Page
Create Pages for Maintaining People
To create pages for maintaining the HT_PEOPLE table:
1. Return to the Application home page.
2. Click Create Page.
3. Select Form and click Next.
4. Select Form on a Table with Report and click Next.
5. For Table/View Owner, select the appropriate schema and click Next.
6. For Table/View Name, select HT_PEOPLE and click Next.
7. For Define Report Attributes:
a. For Page, enter 4.
b. For Page Name and Region Title, enter People.
c. Click Next.
8. For Tab Option s , accept the default Do not use tabs and click Next.

Building a Basic User Interface
10-20 Oracle HTML DB 2 Day Developer
9.
For Select Column(s), select all columns except PERSON_ID and click Next.
10. For Edit Link Image, select the third option (the word Edit in blue with a white
background) and click Next.
11. For Define Form Page:
a. For Page, enter 5.
b. For Page Name and Region Title, enter Create/Edit Person.
Information.
c. Click Next.
12. For Tab Options, accept the default Do not use tabs and click Next.
13. For Primary Key, accept the default PERSON_ID and click Next.
14. Specify the source for the primary key columns. Accept the default Existing
Tr ig g er and click Next.
15. For Select Column(s), select all the columns and click Next.
16. For Insert, Update and Delete, accept the defaults and click Next.
17. Review your selections and click Finish.
To preview your page, select Run Page. As shown in Figure 10–6 on page 10-20, notice
the newly created report displays the demo data.
Figure 10–6 People Page
To preview the page for adding or editing people, click the Edit button in the far left
column.
Modify the People Report Page
Next, you will alter the People Report by changing the query to include a join to the
Projects table and modify the headings.
To change the query to include a join to the Projects table:

Building a Basic User Interface
How to Build and Deploy an Issue Tracking Application 10-21
1.
Navigate to the Page Definition for page 4, People.
2. Under Regions, select People.
3. Scroll down to Source.
4. In Region Source, enter:
SELECT a."PERSON_ID",
a."PERSON_NAME",
a."PERSON_EMAIL",
a."PERSON_ROLE",
b."PROJECT_NAME"
FROM "#OWNER#"."HT_PEOPLE" a,
"#OWNER#"."HT_PROJECTS" b
WHERE a.assigned_project = b.project_id (+)
Note that the outer join is necessary because the project assignment is optional.
5. Select the Report Attributes tab.
a. For PERSON_ID, remove the Heading Edit.
b. For PERSON_NAME, change Heading to Name.
c. For PERSON_EMAIL, change Heading to Email.
d. For PERSON_ROLE, change Heading to Role.
e. For PROJECT_NAME, change Heading to Assigned Project and select
left for Heading Align.
6. Enable column heading sorting by selecting Sort for all columns except PERSON_
ID.
7. For PERSON_NAME, select 1 for Sort Sequence.
This selection specifies PERSON_NAME as the default column to sort on. Note
this functionality can overridden by user selections.
8. Scroll down to Sorting. For Ascending and Descending Image, select the light gray
arrow.
9. Under Messages, enter the following in When No Data Found Message:
No people found.
10. Click Apply Changes.
To view your changes, click the Run Page icon in the upper right of the page. As
shown in Figure 10–7, note the addition of a sort control on the Name column.

Building a Basic User Interface
10-22 Oracle HTML DB 2 Day Developer
Figure 10–7 Revised People Page
Refine the Create/Edit People Page
Next, you will customize the Create/Edit People page by adding lists of values to
make it easier for users to select a Role or Assigned Project.
Add Lists of Values To add a list of values for Projects:
1. Navigate to the Page Definition for page 5, Create/Edit Person.
2. Under Shared Components, locate the Lists of Values section and click the Create
icon.
3. For Create List of Values, accept the default From Scratch and click Next.
4. For Name and Type:
a. For Name, enter PROJECTS.
b. For Type:, select Dynamic.
c. Click Next.
5. In Query, enter:
SELECT project_name d, project_id v
FROM ht_projects
ORDER BY d
6. Click Create List of Values.
To add a list of values for Roles:
1. Under Shared Components, locate the Lists of Values section and click the Create
icon.
2. For Create List of Values, accept the default From Scratch and click Next.
3. For Name and Type:
a. For Name, enter ROLES.

Building a Basic User Interface
How to Build and Deploy an Issue Tracking Application 10-23
b.
For Type:, select Static
c. Click Next.
4. Enter the display value and return value pairs shown in Table 10–4:
5. Click Create List of Values.
6. Return to the Page Definition for Page 5. Click the Edit Page icon in the upper
right corner.
Edit Display Attributes To edit display attributes for P5_PERSON_ROLE:
1. Under Items, select P5_PERSON_ROLE.
2. Under Name, select Radiogroup from the Display As list.
3. Scroll down to Label.
4. Edit Label to be Role.
5. Under Element, enter the following in Form Element Option Attribute:
class="instructiontext"
This specifies that the text associated with each radio group option is the same size
as other items on the page.
6. Scroll down to List of Values.
7. From the Named LOV list, select ROLES.
8. Click Apply Changes.
To edit display attributes for P5_ASSIGNED_PROJECT:
1. Under Items, select P5_ASSIGNED_PROJECT.
2. Under Name, select Select List from the Display As list.
3. Scroll down to List of Values.
4. Under List of Values:
a. From the Named LOV list, select PROJECTS.
Next, specify that the underlying column is not mandatory.
b. For Null display value, enter:
- None -
5. Click Apply Changes.
To alter the display of fields and field labels:
1. Click the heading Items.
Table 10–4 Display Value and Return Value pairs
Display Value Return Value
CEO CEO
Manager Manager
Lead Lead
Member Member

Building a Basic User Interface
10-24 Oracle HTML DB 2 Day Developer
2.
For P5_PERSON_NAME:
a. For Prompt, enter Name.
b. For Width, enter 60.
3. For P5_PERSON_EMAIL:
a. For Prompt, enter Email Address.
b. For Width, enter 60.
4. Click Apply Changes.
5. Click the Edit Page icon in the upper right corner to return to the Page Definition
for Page 5.
Create a Validation The wizard created not null validations for Name, Email and Role.
You must manually create another validation to ensure that Leads and Members have
an assigned project while the CEO and Managers do not. As a best practice, it is
generally best to use built-in validation types since they are faster. However, for this
compound type of validation, you will write a PL/SQL validation.
To add validations to ensure the correct people are assigned projects:
1. Under the Validations section, click the Create icon.
2. On Identify Validation Type, accept the default Item level validation and click
Next.
3. For Item, select Create/Edit Person Information: 50. P5_ASSIGNED_PROJECT
(Assigned Project) and click Next.
4. For Validation Method, select PL/SQL and click Next.
5. Specify the type of PL/SQL validation you want to create. Accept the default
PL/SQL Expression and click Next.
6. For Validation Name, enter PROJECT_MAND_FOR_LEADER_AND_MEMBER and
click Next.
7. On Identify Validation and Error Message:
a. For Validation, enter:
(:P5_PERSON_ROLE IN ('CEO','Manager') AND
:P5_ASSIGNED_PROJECT = '%'||'null%') OR
(:P5_PERSON_ROLE IN ('Lead','Member') AND
:P5_ASSIGNED_PROJECT != '%'||'null%')
Oracle HTML DB passes nulls as %null%. It also replaces %null% with a null
when it processes data so to keep it in the validation, you need to break the
string apart so that it is not recognized and replaced.
b. For Error Message, enter:
Leads and Members must have an Assigned Project. CEO and Managers cannot
have an Assigned Project.
c. Click Next.
8. Click Create.
To view your changes, click the Run Page icon in the upper right of the page. (See
Figure 10–8.)

Building a Basic User Interface
How to Build and Deploy an Issue Tracking Application 10-25
Figure 10–8 Revised Create/Edit Person Information Form
Try entering some records to test the validation. Try to enter a CEO with a project and
then try to enter a Lead without a project. Both cases will fail and display the error
message you defined.
Add Pages to Track Issues
Lastly, you need to create pages for HT_ISSUES. This application needs multiple
views on Issues. You can create these views as one, more complex reports or as
separate reports. For this exercise you will be creating the complex report. This report
will have an Issues maintenance form. You will then link this maintenance form in
multiple places. Ultimately, the Issues report will display Issues by the person who
identified the issue, project, assigned person, status, or priority.
Topics in this section include:
■ Create a Report for HT_ISSUES
■ Refine the Create/Edit Issues Page
■ Refine the Issues Report
■ Add a Page to Support Assigning Multiple Issues Simultaneously
Create a Report for HT_ISSUES
To create a report for maintaining HT_ISSUES:
1. Return to the Application home page.
2. Click Create Page.
3. Select Form and click Next.
4. Select Form on a Table with Report and click Next.
5. For Table/View Owner, select the appropriate schema and click Next.
6. For Table/View Name, select HT_ISSUES and click Next.
7. For Page and Region Attributes:
a. For Page, enter 6.
b. For Page Name and Region Title, enter Issues.
c. Click Next.
8. For Tab Options, accept the default Do not use tabs and click Next.
9. For Select Column(s), select the following and click Next:

Building a Basic User Interface
10-26 Oracle HTML DB 2 Day Developer
■ ISSUE_SUMMARY
■ IDENTIFIED_BY
■ RELATED_PROJECT
■ ASSIGNED_TO
■ STATUS
■ PRIORITY
■ TARGET_RESOLUTION_DATE
■ ACTUAL_RESOLUTION_DATE
10. For Edit Link Image, select the third option (the word Edit in blue with a white
background) and click Next.
11. For Define Form Page:
a. For Page, enter 7.
b. For Page Name and Region Title, enter Create/Edit Issues.
c. Click Next.
12. For Tab Options, accept the default Do not use tabs and click Next.
13. For Primary Key, accept the default ISSUE_ID and click Next.
14. Define the source for the primary key columns. Accept the default Existing
Tr ig g er and click Next.
15. For Select Column(s), select all the columns and click Next.
16. For Insert, Update and Delete, accept the default value Yes and click Next.
17. Review your selections and click Finish.
Refine the Create/Edit Issues Page
When you refine the Create/Edit Page you will:
■ Add lists of values to make it easier for users to select foreign key columns
■ Organize and clean up items
■ Change the display of audit columns
■ Add a button to make data entry faster
Add Lists of Values Next, you need to add lists of values for Status, Priorities, and
People.
To add a list of values for Status:
1. Navigate to the Page Definition for page 7.
2. Under the Lists of Values section and click the Create icon.
3. For Create List of Values, accept the default From Scratch and click Next.
4. On Create List of Values (LOV):
a. For Name, enter STATUS.
b. For Type, select Static.
c. Click Next.

Building a Basic User Interface
How to Build and Deploy an Issue Tracking Application 10-27
5.
Enter the Display Value and Return Value pairs shown in Table 10–5:
6. Click Create List of Values.
To add a list of values for Priorities:
1. Return to the Page Definition for Page 7. Click the Edit Page icon in the upper
right corner.
2. Under the Lists of Values section and click the Create icon.
3. For Create List of Values, accept the default From Scratch and click Next.
4. On Create List of Values (LOV):
a. For Name, enter PRIORITIES.
b. For Type, select Static and click Next.
5. Enter the Display Value and Return Value pairs shown in Table 10–6.
6. Click Create List of Values.
To add a list of values for People:
1. Return to the Page Definition for Page 7. Click the Edit Page icon in the upper
right corner.
2. Under the Lists of Values section and click the Create icon.
3. For Create List of Values, accept the default From Scratch and click Next.
4. On Create List of Values (LOV):
a. For Name, enter PEOPLE.
b. For Type, select Dynamic and click Next.
5. In Query enter:
SELECT person_name d, person_id v
FROM ht_people
ORDER BY 1
6. Click Created List of Values.
Edit Specific Items Next, you edit individual items.
Table 10–5 Display Value and Return Value Pairs
Display Value Return Value
Open Open
On-Hold On-Hold
Closed Closed
Table 10–6 Display Value and Return Value Pairs
Display Value Return Value
High High
Medium Medium
Low Low

Building a Basic User Interface
10-28 Oracle HTML DB 2 Day Developer
To edit P7_IDENTIFIED_BY:
1. Return to the Page Definition for Page 7. Click the Edit Page icon in the upper
right corner.
2. Under Items, select P7_IDENTIFIED_BY.
3. Under Name, select Select List from the Display As list.
4. Scroll down to List of Values:
a. For Named LOV, select PEOPLE.
b. For Display Null, select Yes. The base column is mandatory but you do not
want the first name in the list becoming the default value.
c. For Null display value, enter:
- Select Person -
5. Click the Next button (>) at the top of the page to navigate to the next item.
To edit P7_IDENTIFIED_DATE:
1. Navigate to P7_IDENTIFIED_DATE.
2. Under Name, for select Date Picker (DD-MON-YYYY) from the Display As list.
3. Scroll down to Default:
a. For Default Value, enter:
to_char(sysdate,'DD-MON-YYYY')
b. For Default Value Type, select PL/SQL Expression.
4. Click the Next button (>) at the top of the page to navigate to the next item.
To edit P7_RELATED_PROJECT:
1. Navigate to P7_RELATED_PROJECT.
2. Under Identification, for select Select List from the Display As list.
3. Scroll down to List of Values:
a. For Named LOV, select PEOPLE.
b. For Display Null, select Yes.
c. For Null display value, enter:
- Select Person -
4. Click the Next button (>) at the top of the page to navigate to P7_STATUS.
To edit P7_STATUS:
1. Navigate to P7_STATUS.
2. Under Identification, for select Radiogroup from the Display As list.
3. In Label, enter:
Status:
4. Scroll down to Element. Enter the following in the Form Element Option
Attributes:
class="instructiontext"

Building a Basic User Interface
How to Build and Deploy an Issue Tracking Application 10-29
5.
Scroll down to Default. In Default Value, enter Open.
6. Scroll down to List of Values:
a. For Named LOV, select STATUS.
b. For Columns, enter 3.
This selection enables the three valid values to display side by side.
7. Click the Next button (>) at the top of the page to navigate to P7_PRIORITY.
To edit P7_PRIORITY:
1. Navigate to P7_PRIORITY.
2. Under Name, for select Radiogroup from the Display As list.
3. In Label, enter:
Priority:
4. Scroll down to Element. Enter the following in the Form Element Option
Attributes:
class="instructiontext"
5. Scroll down to Default. In Default value, enter Open.
6. Scroll down to List of Values:
a. For Named LOV, select PRIORITIES.
b. For Display Null, select Yes.
c. For Columns, enter 4.
This selection reflects that fact there are three valid values plus the null value.
d. For Null display value, enter None.
7. Click the Next button (>) at the top of the page to navigate to the next item.
To edit P7_TARGET_RESOLUTION_DATE:
1. Navigate to P7_TARGET_RESOLUTION_DATE.
2. Under Name, for select Date Picker (DD-MON-YYYY) from the Display As list.
3. Click the Next button (>) at the top of the page to navigate to P7_ACTUAL_
RESOLUTION_DATE.
To edit P7_ACTUAL_RESOLUTION_DATE:
1. Navigate to P7_ACTUAL_RESOLUTION_DATE.
2. Under Name, for select Date Picker (DD-MON-YYYY) from the Display As list.
3. Click Apply Changes.
Create Regions to Group Items Currently all items are grouped into one large region.
Displaying items in logical groups will make data entry easier for users. Next, you will
create four new regions named Buttons, Identification, Progress, Resolution, and
Auditing.
To create new regions to group items:
1. Under Regions, click the Create icon.
2. Select Multiple HTML.

Building a Basic User Interface
10-30 Oracle HTML DB 2 Day Developer
3.
For the first row:
■ For Sequence, enter 5.
■ For Title, enter Buttons.
■ For Template, select Button Region without Title.
4. For the second row, in Title enter Progress.
5. For the third row, in Title enter Resolution.
6. For the fourth row, in Title enter Audit Information.
7. Click Create Region(s).
Now that the new regions exist, rename the first region, Create/Edit Issues:
1. Under Regions, select Create/Edit Issue.
2. In Title, enter:.
Issue Identification
3. Click Apply Changes.
Move Items to the Appropriate Regions Next, move each item to the appropriate region.
Note that you will also need to modify some item widths.
To move items to the appropriate regions:
1. Under Items, select the Items heading.
2. Under Region, select Progress for the following items:
■ P7_ASSIGNED_TO
■ P7_STATUS
■ P7_PRIORITY
■ P7_TARGET_RESOLUTION_DATE
■ P7_PROGRESS
3. Under Region, select Resolution for the following items:
■ P7_ACTUAL_RESOLUTION_DATE
■ P7_RESOLUTION_SUMMARY
4. Under Region, select Audit Information for the following items:
■ P7_CREATED_DATE
■ P7_CREATED_BY
■ P7_LAST_MODIFIED_DATE
■ P7_LAST_MODIFIED_BY
5. For P7_ISSUE_SUMMARY, enter 60 for Width.
6. For P7_IDENTIFIED_DATE, enter 12 for Width.
7. For P7_TARGET_RESOLUTION_DATE, enter 12 for Width.
8. For P7_ACTUAL_RESOLUTION_DATE, enter 12 for Width.
9. Click Apply Changes.
10. Click the Edit Page icon in the upper right to return the Page Definition of Page 7.

Building a Basic User Interface
How to Build and Deploy an Issue Tracking Application 10-31
To move buttons to the Button region:
1. Return to the Page Definition for Page 7.
2. Under the Buttons section, click the Buttons heading.
3. Under Region for all buttons, select Buttons.
4. Click Apply Changes.
5. Click the Edit Page icon in the upper right to return the Page Definition of Page 7.
Change the Display of Audit Columns Because the Audit columns should be viewable but
not editable, you need to make them display only. In the following exercise, you create
a condition for the Audit Information region. As a result, the Audit Information region
will display when a user edits an existing issue, but will not appear when a user
creates a new issue.
To create a condition for the Audit Information region.
1. On the Page Definition of Page 7, select the Audit Information region.
2. Scroll down to Conditional Display.
3. From Condition Type, select Value of Item in Expression 1 is NOT NULL.
4. In Expression 1, enter P7_ISSUE_ID.
5. Click Apply Changes.
Next, change the audit columns to display only.
To edit P7_CREATED_DATE:
1. Under Items, select P7_CREATED_DATE.
2. Under Name, select Display as Text (saves state) from the Display As list.
3. Scroll down to Label:
a. For Label, enter:
Created Date:
b. For Template, select Optional Label with Help.
c. For HTML Table Cell Attributes, enter:
class="instructiontext"
4. Under Source, enter the following in Format Mask:
DD-MON-YYYY
5. Click the Next button (>) at the top of the page to navigate to the next item.
To edit P7_CREATED_BY:
1. Under Name, select Display as Text (saves state) from the Display As list.
2. Scroll down to Label:
a. For Label, enter:
Created By:
b. For Template, select Optional Label with Help.
c. For HTML Table Cell Attributes, enter:

Building a Basic User Interface
10-32 Oracle HTML DB 2 Day Developer
class="instructiontext"
3. Click the Next button (>) at the top of the page to navigate to the next item.
To edit P7_LAST_MODIFIED_DATE:
1. Under Name, select Display as Text (saves state) from the Display As list.
2. Scroll down to Label:
a. For Label, enter:
Last Modified Date:
b. For Template, select Optional Label with Help.
c. For HTML Table Cell Attributes, enter:
class="instructiontext"
3. Under Source, for Format Mask, enter:
DD-MON-YYYY
4. Click the Next button (>) at the top of the page to navigate to the next item.
To edit P7_LAST_MODIFIED_BY:
1. Under Name, select Display as Text (saves state) from the Display As list.
2. Scroll down to Label:
a. For Label, enter:
Last Modified By:
b. For Template, select Optional Label with Help.
c. For HTML Table Cell Attributes, enter:
class="instructiontext"
3. Click Apply Changes.
Remove Unnecessary Validations The wizard created not null validations for Issue
Summary, Identified By, Related Project, Status, Created Date, and Created By. Since
the Audit columns are set by a trigger, you need to remove these validations.
To remove not null validations:
1. Under Validations, select P7_CREATED_DATE not null.
2. Click Delete.
3. Click OK to confirm your selection.
4. Under Validations, select P7_CREATED_BY not null.
5. Click Delete.
6. Click OK to confirm your selection.
Return the User to the Calling Page Because this Create/Edit page will be called from
several places, when users finish with the display they should return to the calling
page. To accomplish this, you create an item and change the branch on this page.
Every time this page is called, the item must be set with the number of the calling
page.

Building a Basic User Interface
How to Build and Deploy an Issue Tracking Application 10-33
To create a hidden item:
1. Under Items, click the Create icon.
2. For Select Item Type, select Hidden and click Next.
3. For Display Position and Name:
a. For Item Name, enter:
P7_PREV_PAGE
b. For Region, select Issue Identification.
c. Click Next.
4. Click Create Item.
Next, edit the Cancel button.
5. Under Buttons, select Cancel.
6. Scroll down to Optional URL Redirect.
7. In Page, enter:
&P7_PREV_PAGE.
Note the period at the end.
8. Click Apply Changes.
Next, edit the branch.
9. Under Branches, select the After Processing branch.
10. Under Action, enter the following in Page:
&P7_PREV_PAGE.
11. Click Apply Changes.
Add Functionality to Support Adding Multiple Issues Sequentially Next, you will add
functionality that will enable users to add more than one issue at time. To accomplish
this, you will first add a new button and then a new branch.
To add a new button:
1. Under the Buttons section, click the Copy icon.
2. Under Name, select CREATE.
3. For Target Page, accept the default 7 and click Next.
4. For Button Name, enter CREATE_AGAIN.
5. For Label, enter Create and Create Another.
6. Click Copy Button.
Functionally, the Copy Button currently works the same as the CREATE button. Next,
create a branch that keeps the user on the create page.
Note that this branch will also reset P7_PREV_PAGE because the value of that item
will be lost when the cache of the page is cleared. The sequence of this new branch will
be 0. That will make it fire before the default branch but only when the Create and
Create Another button is used.
To create a branch that keeps the user on the create page:

Building a Basic User Interface
10-34 Oracle HTML DB 2 Day Developer
1.
Under Branches, click the Create icon.
2. For Point and Type, accept the defaults and click Next.
3. For Target:
a. For Page, enter 7.
b. For Clear Cache, enter 7.
c. For Set these items, enter:
P7_PREV_PAGE
d. For With these values, enter:
&P7_PREV_PAGE.
e. Click Next.
4. For Branch Conditions:
a. For Sequence, enter 0.
b. For When Button Pressed, select CREATE_AGAIN.
5. Click Create Branch.
6. Under Branches, select the newly created branch.
7. Under Branch Action, select include process success message.
8. Click Apply Changes.
To see the changes, click the Run Page icon. (See Figure 10–9.)

Building a Basic User Interface
How to Build and Deploy an Issue Tracking Application 10-35
Figure 10–9 Create/Edit Issues Form
The branch you just created is looking for a value in P7_PREV_PAGE. Since the
page was not called from another page, the value has not been set. You will fix that
next.
Refine the Issues Report
Next, you will refine the Issues report page to support dynamic modification of the
query. To accomplish this, you must:
■ Move the Create button to a new region and edit the label
■ Create new items that will enable the user to restrict the query
■ Add a WHERE clause to reference those new items
■ Alter the report column attributes to display each person’s name and the project
■ Modify headings
Move Create Button to a New Region To create a new region of the Create button:
1. Navigate to the Page Definition for page 6, Issues.
2. Under Regions, click the Create icon.
3. Select HTML and click Next.
4. Specify the type of HTML region container you want to create. Select HTML and
click Next.
5. For Display Attributes:
a. For Title, enter Buttons.

Building a Basic User Interface
10-36 Oracle HTML DB 2 Day Developer
b.
For Region Template, select Button Region without Title.
c. For Display Point, select Page Template Body (2. items below region
content).
d. Click Next.
6. Click Create Region.
To move the Create button to the Buttons region:
1. Under Buttons, select the CREATE button.
2. In Text Label, enter:
Add a New Issue
3. From Display in Region, select Buttons.
4. Scroll down to Optional URL Redirect:
a. For Set These Items, enter:
P7_PREV_PAGE
b. For With These Values, enter 6.
5. Click Apply Changes.
Alter the Query and Display Next, alter the query to display the actual values for people
and projects instead of the ID and then clean up the report display.
To edit column attributes for ISSUE_ID:
1. Under the Regions section, select Report adjacent to Issues.
2. Click the Edit Icon to the left of ISSUE_ID.
3. Scroll down to Column Link.
a. For Item 2, for Name enter:
P7_PREV_PAGE
b. For Item 2, for Value enter 6.
4. Click Apply Changes.
To edit column attributes for IDENTIFIED_BY, RELATED_PROJECT and ASSIGNED_
TO:
1. Click the Edit Icon to the left of IDENTIFIED_BY.
2. Scroll down to Tabular Form Element. From the Display As list, select Display as
Text (based on LOV, does not save state).
3. Scroll down to List of Values. For Named LOV, select PEOPLE.
4. Return to the top of the page and click the Next (>) icon.
The Column Attributes page for RELATED_PROJECT appears.
5. Scroll down to Tabular Form Element. From the Display As list, select Display as
Text (based on LOV, does not save state).
6. Scroll down to List of Values:
a. For Named LOV, select PROJECTS.
b. For Display Null, select Yes.

Building a Basic User Interface
How to Build and Deploy an Issue Tracking Application 10-37
c.
In Null Text, enter a hyphen (-).
7. Return to the top of the page and click the Next (>) icon.
The Column Attributes page for ASSIGNED_TO appears.
8. Scroll down to Tabular Form Element. From the Display As list, select Display as
Text (based on LOV, does not save state).
9. Scroll down to List of Values:
a. For Named LOV, select PEOPLE.
b. For Display Null, select Yes.
c. In Null Text, enter a hyphen (-).
10. Click Apply Changes.
Next, you will customize how the report displays by changing report attributes.
To alter the report display:
1. For ISSUE_ID, delete the Heading Edit.
2. For ISSUE_SUMMARY, change Heading to Summary.
3. For TARGET_RESOLUTION_DATE:
a. Force the heading to wrap. In Heading, enter:
Target<br>Resolution<br>Date
b. For Column Align., select center.
c. For Heading Align. select center.
4. For all columns except ISSUE_ID, check Sort.
5. For ISSUE_SUMMARY, select 1 for Sort Sequence.
6. Scroll down to Layout and Pagination:
a. For Show Null Values as, enter a hyphen (-).
b. For Number of Rows, enter 5.
7. Under Sorting, select the light gray arrow for Ascending and Descending Image.
8. Under Messages, enter the following in When No Data Found Message:
No issues found.
9. Click Apply Changes.
Add Support of Filtering Although the report now displays nicely, it does not support
filtering by the end user. To add this functionality, you will first create items that will
enable the user to set values to query against. You will store these new items in a new
region which will display above the report.
To create a new region:
1. Under Regions, click the Create icon.
2. Select HTML and click Next.
3. Select the type of HTML region container you want to create. Select HTML and
click Next.
4. For Display Attributes:

Building a Basic User Interface
10-38 Oracle HTML DB 2 Day Developer
a.
For Title, enter Issue Report Parameters.
b. For Region Template, select accept the default of Reports Region.
c. For Sequence, enter 5.
d. Click Next.
5. Click Create Region.
Next, create the items.
To create the item for Identified By:
1. Under Items, click the Create icon.
2. For Select Item Type, select Select List and click Next.
3. For Select List Control Type, accept the default selection Select List and click Next.
4. On Identify Item Name and Display Position:
a. For Item Name, enter P6_IDENTIFIED_BY.
b. For Region, select Issue Report Parameters.
c. Click Next.
5. On Identify List of Values:
a. For Named LOV, select PEOPLE.
b. For Null Text, enter:
- All -
c. For Null Value, enter:
-1
d. Click Next.
6. For Item Attributes, accept the defaults and click Next.
7. For Default, enter:
-1
8. Click Create Item.
To create an item for Assigned To.
1. Under Items, click the Create icon.
2. For Select Item Type, select Select List and click Next.
3. For Select List Control Type, accept the default selection Select List and click Next.
4. For Display Position and Name:
a. For Item Name, enter P6_ASSIGNED_TO.
b. For Region, select Issue Report Parameters.
c. Click Next.
5. On Identify List of Values:
a. For Named LOV, select PEOPLE.
b. For Null Text, enter:

Building a Basic User Interface
How to Build and Deploy an Issue Tracking Application 10-39
- All -
c. For Null Value, enter:
-1
d. Click Next.
6. For Item Attributes, accept the defaults and click Next.
7. For Default, enter:
-1
8. Click Create Item.
To create an item for Status.
1. Under Items, click the Create icon.
2. For Select Item Type, select Select List and click Next.
3. For Select List Control Type, accept the default selection Select List and click Next.
4. On Identify Item Name and Display Position:
a. For Item Name, enter P6_STATUS.
b. For Region, select Issue Report Parameters.
c. Click Next.
5. On Identify List of Values:
a. For Named LOV, select STATUS.
b. For Null Text, enter:
- All -
c. For Null Value, enter:
-1
d. Click Next.
6. For Item Attributes, accept the defaults and click Next.
7. For Default, enter:
-1
8. Click Create Item.
To create an item for Priority.
1. Under Items, click the Create icon.
2. For Select Item Type, select Select List and click Next.
3. For Select List Control Type, accept the default selection Select List and click Next.
4. On Identify Item Name and Display Position:
a. For Item Name, enter P6_PRIORITY.
b. For Region, select Issue Report Parameters.
c. Click Next.
5. On List of Values:

Building a Basic User Interface
10-40 Oracle HTML DB 2 Day Developer
a.
For Named LOV, select PRIORITIES.
b. For Null Text, enter:
- All -
c. For Null Value, enter:
-1
d. Click Next.
6. For Identify Item Attributes, accept the defaults and click Next.
7. For Default, enter:
-1
8. Click Create Item.
To create an item for Related Project.
1. Under Items, click the Create icon.
2. For Select Item Type, select Select List and click Next.
3. For Select List Control Type, accept the default selection Select List and click Next.
4. On Identify Item Name and Display Position:
a. For Item Name, enter P6_RELATED_PROJECT.
b. For Region, select Issue Report Parameters.
c. Click Next.
5. On Identify List of Values:
a. For Named LOV, select PRIORITIES.
b. For Null Text, enter:
- All -
c. For Null Value, enter:
-1
d. Click Next.
6. For Identify Item Attributes, accept the defaults and click Next.
7. For Default, enter:
-1
8. Click Create Item.
Next, create a Go button. This button will enable the user to execute the query once
they select report parameters. Buttons can be created in region positions or displayed
among items. For this exercise, the Go button will display just to the right of the last
report parameter so you will create it among the region's items.
To create Go button:
1. Under Buttons, click the Create icon.
2. For Select a region for the button, select Issue Report Parameters and click Next.

Building a Basic User Interface
How to Build and Deploy an Issue Tracking Application 10-41
3.
For Position, select Create a button displayed among this region's items and click
Next.
4. For Button Name, enter P6_GO.
5. For Button Style, select Template Based Button.
6. For Templat e, select Button.
7. Click Create Button.
Currently the items display stacked on top of one another. To use space more
efficiently, change the position of P6_RELATED_PROJECT, P6_STATUS, and P6_
PRIORITY so they display next to each other. Place P6_RELATED_PROJECT, P6_
STATUS on the first line and P6_PRIORITY on the second line.
To change the position of 6_RELATED_PROJECT, P6_STATUS, and P6_PRIORITY:
1. Under the Items section, click the heading Items.
2. For P6_RELATED_PROJECT, P6_STATUS, and P6_PRIORITY, select No for New
Line.
3. Click Apply Changes.
4. Click the Edit Page icon in the upper right corner to return to the Page Definition
for page 6.
Next, you need to modify the report to react to the parameters. To accomplish this, you
need to modify the WHERE clause of the query. One approach would be add the
following WHERE clause. For example:
WHERE (IDENTIFIED_BY = :P6_IDENTIFIED_BY OR
:P6_IDENTIFIED_BY = '-1')
AND (RELATED_PROJECT = :P6_RELATED_PROJECT OR
:P6_RELATED_PROJECT = '-1')
AND (ASSIGNED_TO = :P6_ASSIGNED_TO OR
:P6_ASSIGNED_TO = '-1')
AND (STATUS = :P6_STATUS OR
:P6_STATUS = '-1')
AND (PRIORITY = :P6_PRIORITY OR
:P6_PRIORITIY = '-1')
Although this is a valid approach, the query will execute faster if you generate it with
the WHERE clause that needs it. To accomplish this, turn the Issues region into a
PL/SQL Function Body Returning a SQL Query.
To turn the Issues region into a PL/SQL Function Body Returning a SQL Query:
1. Under Regions, select Issues.
2. For Type, select SQL Query (Pl/Sql Function Body Returning Sql Query).
3. For Region Source, enter the following:
DECLARE
q VARCHAR2(32767); -- query
w VARCHAR2(4000) ; -- where clause
we VARCHAR2(1) := 'N'; -- identifies if where clause exists
BEGIN
q := 'SELECT "ISSUE_ID", '||
' "ISSUE_SUMMARY", '||
' "IDENTIFIED_BY", '||

Building a Basic User Interface
10-42 Oracle HTML DB 2 Day Developer
' "RELATED_PROJECT", '||
' "ASSIGNED_TO", '||
' "STATUS", '||
' "PRIORITY", '||
' "TARGET_RESOLUTION_DATE", '||
' "ACTUAL_RESOLUTION_DATE" '||
' FROM "#OWNER#"."HT_ISSUES" ';
IF :P6_IDENTIFIED_BY != '-1'
THEN
w := ' IDENTIFIED_BY = :P6_IDENTIFIED_BY ';
we := 'Y';
END IF;
IF :P6_RELATED_PROJECT != '-1'
THEN
IF we = 'Y'
THEN
w := w || ' AND RELATED_PROJECT = :P6_RELATED_PROJECT ';
ELSE
w := ' RELATED_PROJECT = :P6_RELATED_PROJECT ';
we := 'Y';
END IF;
END IF;
IF :P6_ASSIGNED_TO != '-1'
THEN
IF we = 'Y'
THEN
w := w || ' AND ASSIGNED_TO = :P6_ASSIGNED_TO ';
ELSE
w := ' ASSIGNED_TO = :P6_ASSIGNED_TO ';
we := 'Y';
END IF;
END IF;
IF :P6_STATUS != '-1'
THEN
IF we = 'Y'
THEN
w := w || ' AND STATUS = :P6_STATUS ';
ELSE
w := ' STATUS = :P6_STATUS ';
we := 'Y';
END IF;
END IF;
IF :P6_PRIORITY != '-1'
THEN
IF we = 'Y'
THEN
w := w || ' AND PRIORITY = :P6_PRIORITY ';
ELSE
w := ' PRIORITY = :P6_PRIORITY ';
we := 'Y';
END IF;
END IF;
IF we = 'Y'

Building a Basic User Interface
How to Build and Deploy an Issue Tracking Application 10-43
THEN q := q || ' WHERE '|| w;
END IF;
RETURN q;
END;
4. Click Apply Changes.
Note that this function first sets the variable q to the original SELECT statement. It
then builds WHERE clause (w) composed of just the variables set by the user. If any
variables have been set, it appends the WHERE clause to the original SELECT and
passes that new SELECT to the database.
The report is now complete. Click the Run Page icon. (See Figure 10–10).
Figure 10–10 Issues Report
To change the report parameters, make new selections under Issue Report Parameters
and click Go.
Add a Page to Support Assigning Multiple Issues Simultaneously
Currently, you can assign an issue by editing it. Next, you will add a new page that
will enable users to assign multiple issues at once and modify the Related Project,
Status, and Priority.
Create a Tabular Form To add a new page to support assigning multiple issues:
1. Navigate to the Application home page.
2. Click Create Page.

Building a Basic User Interface
10-44 Oracle HTML DB 2 Day Developer
3.
Select Form and click Next.
4. Select Tabular Form and click Next.
5. For Table/View Owner, select the appropriate schema.
Since the purpose of this form is to enable users to assign issues, it is assumed they
will only update existing records, not create or delete issues.
6. To enforce this assumption, select Update Only from the Allowed Operations list
and click Next.
7. For Table/View Name, select HT_ISSUES and click Next.
8. For Displayed Columns, select the following columns and click Next:
■ ISSUE_SUMMARY
■ IDENTIFIED_BY
■ IDENTIFIED_DATE
■ RELATED_PROJECT
■ ASSIGNED_TO
■ STATUS
■ PRIORITY
9. For Primary Key, accept the default ISSUE_ID and click Next.
10. For Primary Key Source, accept the default Existing trigger and click Next.
11. For Updatable Columns, select the following and click Next:
■ RELATED_PROJECT
■ ASSIGNED_TO
■ STATUS
■ PRIORITY
12. For Page and Region Attributes:
a. For Page, enter 8.
b. For Page Name, enter Assign Issues.
c. For Region Title, enter Assign Issues.
d. Click Next.
13. For Tab Options, accept the default Do not use tabs and click Next.
14. On Button Labels:
a. For Cancel Button Label, accept the default.
b. For Submit Button Label, enter Apply Changes.
c. Click Next.
15. For Branching, accept the defaults and click Next.
16. Review your selections and click Finish.
Add Lists of Values Once you have created the initial tabular form, you need to add lists
of values to make it easier to select issues. Additionally, you need to restrict the query
to only display unassigned issues.

Building a Basic User Interface
How to Build and Deploy an Issue Tracking Application 10-45
To add lists of values:
1. From the Success page, select Edit Page.
The Page Definition for page 8, Assign Issues, appears.
2. Under Regions, select Assign Issues.
3. In Region Source, enter the following:
SELECT "ISSUE_ID",
"ISSUE_SUMMARY",
"IDENTIFIED_BY",
"IDENTIFIED_DATE",
"RELATED_PROJECT",
"ASSIGNED_TO",
"STATUS",
"PRIORITY"
FROM "#OWNER#"."HT_ISSUES"
WHERE assigned_to IS NULL
To edit report attributes:
1. Select the Report Attributes tab.
2. Under Report Column Attributes:
a. For ISSUE_SUMMARY, edit the existing Heading to read:
Summary
b. For all columns except ISSUE_ID, select Sort.
c. For IDENTIFIED_DATE, for Sort Sequence, select 1.
3. Click the Edit icon to the left of IDENTIFIED_BY and edit the following attributes:
a. Scroll down to Tabular Form Element. From the Display As list, select Display
as Text (based on LOV, does not save state).
b. Scroll down to List of Values. From Named LOV list, select PEOPLE.
c. Click the Next button (>) at the top of the page to navigate to the next column.
4. Edit the following attributes for IDENTIFIED_DATE:
a. Under Column Formatting, enter DD-MON-YYYY in Number/Date Format.
b. Click the Next button (>) at the top of the page to navigate to the next column.
5. Edit the following attributes for RELATED_PROJECT:
a. Scroll down to Tabular Form Element. From Display As, select Select List
(Named LOV).
b. Scroll down to List of Values. From the Named LOV list, select PROJECTS.
c. Click the Next button (>) at the top of the page to navigate to the next column.
6. Edit the following attributes for ASSIGNED_TO:
a. Scroll down to Tabular Form Element. From Display As, select Select List
(Named LOV).
b. Scroll down to List of Values:
– From the Named LOV list, select PEOPLE.
– For Display Null, select Yes.

Building a Basic User Interface
10-46 Oracle HTML DB 2 Day Developer
– For Null Text, enter a hyphen (-).
c. Click the Next button (>) at the top of the page to navigate to the next column.
7. Edit the following attributes for STATUS:
a. Scroll down to Tabular Form Element. From Display As, select Select List
(Named LOV).
b. Scroll down to List of Values. From the Named LOV lists, select STATUS.
c. Click the Next button (>) at the top of the page to navigate to the next column.
8. Edit the following attributes for PRIORITY:
a. Scroll down to Tabular Form Element. From Display As, select Select List
(Named LOV).
b. Scroll down to List of Values:
– From Named LOV, select PRIORITIES.
– For Display Null, select Yes.
– For Null Text, enter a hyphen (-).
c. Click Apply Changes.
The Report Attributes page appears.
9. Scroll down to Sorting. Under Ascending and Descending Image, select the light
gray arrow.
10. Under Messages, enter the following in When No Data Found Message:
No Unassigned Issues.
11. Click Apply Changes.
The wizard created an unnecessary Cancel button.
To delete the Cancel button:
1. On the Page Definition for page 8, select the CANCEL button.
2. Click Delete.
3. Click OK to confirm your selection.
The tabular form is now complete. To view the new form, click the Run Page icon. (See
Figure 10–11 on page 10-47.)

Building a Basic User Interface
How to Build and Deploy an Issue Tracking Application 10-47
Figure 10–11 Assign Issues
To assign an issue, make a selection from the Assigned To list and click Apply
Changes. Notice that once an issue has been assigned, the issue no longer displays.
Create Summary Reports
Lastly, you will add four summary reports.
Topics in this section include:
■ Add a Issue Summary by Project Report
■ Add Resolved by Month Identified
■ Add Target Resolution Dates
■ Add Average Days to Resolve
Add a Issue Summary by Project Report
The Issue Summary report enable users to select a project and then see a summary of
issues related to that project. This report includes the following summary information:
■ Date first issue identified
■ Date last issue closed
■ Total number of issues
■ Number of issues by status
■ Number of open issues by priority
■ Assignments by status
To create this report, you will code the information in two SQL statements. The first
statement gathers information having a a singular result and the second statement
gathers information having multiple results.
To add an Issue Summary by Project report:
1. Navigate to the Application home page.

Building a Basic User Interface
10-48 Oracle HTML DB 2 Day Developer
2.
Click Create Page.
3. Select Report and click Next.
4. Select SQL Report and click Next.
5. On Page Attributes:
a. For Page, enter 9.
b. For Page Name, enter Issue Summary by Project.
c. Click Next.
6. For Tab Options, accept the default Do not use tabs and click Next.
7. Enter the following SQL SELECT statement and click Next:
SELECT MIN(identified_date) first_identified,
MAX(actual_resolution_date) last_closed,
COUNT(issue_id) total_issues,
SUM(DECODE(status,'Open',1,0)) open_issues,
SUM(DECODE(status,'On-Hold',1,0)) onhold_issues,
SUM(DECODE(status,'Closed',1,0)) closed_issues,
SUM(DECODE(status,
'Open',decode(priority,null,1,0),
0)) open_no_prior,
SUM(DECODE(status,
'Open',decode(priority,'High',1,0),
0)) open_high_prior,
SUM(DECODE(status,
'Open',decode(priority,'Medium',1,0),
0)) open_medium_prior,
SUM(DECODE(status,
'Open',decode(priority,'Low',1,0),
0)) open_low_prior
FROM ht_issues
WHERE related_project = :P9_PROJECT
8. For Report Attributes:
a. For Report Template, select default: vertical report, look 1 (include null
columns).
b. For Region Name, enter Issue Summary by Project.
c. Click Next.
9. Review your selections and click Finish.
Now that you have the first query, you need to edit the headings and create the item to
control the related project. First, create a region to display above the report and that
will contain the Project parameter.
Create a New Region To create a new region to display above the report:
1. From the Success page, click Edit Page.
The Page Definition for page 9, Issue Summary by Project appears.
2. Under Regions, click the Create icon.
3. Select HTML and click Next.
4. Select the type of HTML region container you want to create. Select HTML and
click Next.

Building a Basic User Interface
How to Build and Deploy an Issue Tracking Application 10-49
5.
For Display Attributes:
a. For Title, enter Issue Summary Report Parameters.
b. For Display Point, select Page Template Body (2. items below region
content).
c. For Sequence, enter 5.
d. Click Next.
6. Click Create Region.
Create the Project Item To create the Project item:
1. Under Items, click the Create icon.
2. For Select Item Type, select Select List and click Next.
3. For Select List Control Type, accept the default Select List and click Next.
4. On Display Position and Name:
a. For Item Name, enter P9_PROJECT.
b. For Region, select Issue Summary Report Parameters.
c. Click Next.
5. On Identify List of Values:
a. For Named LOV, select PROJECTS.
b. For Null Text, enter:
- Select -
c. For Null Value, enter -1.
d. Click Next.
6. On Identify Item Attributes, accept the defaults and click Next.
7. For Default, enter -1.
8. Click Create Item.
Create a Go Button To create a Go button to execute the query:
1. Under Buttons, click the Create icon.
2. For Button Region, select Issue Summary Report Parameters and click Next.
3. For Position, select Create a button displayed among this region's items and click
Next.
4. On Button Attributes:
a. For Button Name, enter P9_GO.
b. For Button Style, select Template Based Button.
c. For Template, select Button.
5. Click Create Button.
Edit Headings and Report Settings Next, you need to edit the headings and report setting
for the report region. You also need to set the report regions to conditionally display
when the user has selected a project.

Building a Basic User Interface
10-50 Oracle HTML DB 2 Day Developer
To edit the headings and report settings:
1. Under Regions, select Report adjacent to Issue Summary by Project.
2. For Headings Type, select Custom.
3. Under Report Column Attributes:
a. Change the Heading for FIRST_IDENTIFIED to:
First Issue Identified:
b. Change the Heading for LAST_CLOSED to:
Last Issue Closed:
c. Change the Heading for TOTAL_ISSUES to:
Total Issues:
d. Change the Heading for OPEN_ISSUES to:
Open Issues:
e. Change the Heading for ONHOLD_ISSUES to:
On-Hold Issues:
f. Change the Heading for CLOSED_ISSUES to:
Closed Issues:
g. Change the Heading for OPEN_NO_PRIOR to:
Open Issues with No Priority:
h. Change the Heading for OPEN_HIGH_PRIOR:
Open Issues of High Priority:
i. Change the Heading for OPEN_MEDIUM_PRIOR to:
Open Issues of Medium Priority:
j. Change the Heading for OPEN_LOW_PRIOR:
Open Issues of Low Priority:
4. Scroll down to Layout and Pagination:
a. For Show Null Values as, enter a hyphen (-).
b. For Pagination Scheme, select - No Pagination Selected -.
5. Select the Region Definition tab at the top of the page.
a. Scroll down to Conditional Display.
b. For Condition Type, select Value of Item in Expression 1 Is NOT Contained
within Colon Delimited List in Expression 2.
c. In Expression 1, enter P9_PROJECT.
d. For Expression 2, enter -1.
6. Click Apply Changes.

Building a Basic User Interface
How to Build and Deploy an Issue Tracking Application 10-51
Create a Query to Retrieve Assignments To create a query to retrieve assignments by
status.
1. Under Regions, click the Create icon.
2. Select Report and click Next.
3. For Report Implementation, select SQL Report and click Next.
4. On Display Attributes:
a. For Title, enter Assignments by Status.
b. For Column, select 2.
c. Click Next.
5. For Source:
a. In Enter SQL Query, enter:
SELECT p.person_name,
i.status,
COUNT(i.issue_id) issues
FROM ht_issues i,
ht_people p
WHERE i.related_project = :P9_PROJECT
AND i.assigned_to = p.person_id
GROUP BY person_name, status
b. For Rows Per Page, enter 20.
c. For Break Columns, select Column 1.
d. Click Next.
6. For Conditional Display:
a. From Condition Type, select Value of Item in Expression 1 Is NOT Contained
within Colon Delimited List in Expression 2.
b. In Expression 1 enter:
P9_PROJECT
c. For Expression 2 enter -1.
7. Click Create Region.
To edit headings and report settings:
1. Under Regions, select Report adjacent to Assignments by Status.
2. For Headings Type, select Custom.
3. For PERSON_NAME, change Heading to Assigned To.
4. Scroll down to Layout and Pagination. From Pagination Scheme, select Row
Ranges 1-15 16-30 in select list.
5. Under Messages, enter the following in When No Data Found Message:
No Issues found.
6. Click Apply Changes.
To see your newly created report, click the Run Page icon. Note that initially no data
displays since no project is selected. Select a project. Your report should resemble
Figure 10–12.

Building a Basic User Interface
10-52 Oracle HTML DB 2 Day Developer
Figure 10–12 Issue Summary by Project Report
Add Resolved by Month Identified
The Resolved by Month Identified report is a line chart. This report first calculates the
number of days it took to resolve each closed issue, averaged by the month the issue
was identified, and finally displayed by the month.
To add a Resolved by Month Identified report:
1. Navigate to the Application home page.
2. Click Create Page.
3. Select Chart and click Next.
4. Select Line and click Next.
5. For Page Attributes:
a. For Page, enter 10.
b. For Page Name and Region Name, enter Resolved by Month
Identified.
c. Click Next.
6. For Tab (Optional), accept the default Do not use tabs and click Next.
7. For Query:
a. For Series Name, enter Resolved.
b. In SQL, enter:
SELECT NULL l,
TO_CHAR(identified_date,'Mon YYYY') month,
AVG(actual_resolution_date-identified_date) days
FROM ht_issues
WHERE status = 'Closed'
GROUP BY TO_CHAR(identified_date,'Mon YYYY')

Building a Basic User Interface
How to Build and Deploy an Issue Tracking Application 10-53
Note that this query has no link (that is, the l column). It extracts the month
from the identified date so that the data can be grouped by month. Lastly, it
calculates the average number of days it took for the issues to be closed that
were identified in that month.
c. For When No Data Found Message, enter:
No Closed Issues found.
8. Click Next.
9. Review your selections and click Finish.
Next, add a correct axis label and turn off the Chart Title and legend.
To edit the chart:
1. From the Success page, select Edit Page.
The Page Definition for page 10, Resolved by Month Identified, appears.
2. Under Regions, select Chart adjacent to Resolved by Month Identified.
3. Under Chart Settings:
a. For Chart Height, enter 300.
b. Disable Show Legend.
4. Under the Axes Setting section:
a. For X Axis Title, enter Date Identified.
b. For Y Axis Title, enter Days to Resolve.
5. Click Apply Changes.
To view your newly created line chart, click the Run Page icon. Your line chart should
resemble Figure 10–13.
Figure 10–13 Resolved by Month Identified Line Chart

Building a Basic User Interface
10-54 Oracle HTML DB 2 Day Developer
Add Target Resolution Dates
The Target Resolution Dates report is a calendar which displays issues that have not
yet closed and the assigned person on the day that corresponds to the issue target
resolution date.
Create a Calendar To create a calendar of target resolution dates:
1. Navigate to the Application home page.
2. Click Create Page.
3. Select Calendar and click Next.
4. Select SQL Calendar and click Next.
5. For Page Attributes:
a. For Page, enter 11.
b. For Page Name and Region Name, enter Target Resolution Dates.
c. Click Next.
6. For Tab Options, accept the default Do not use tabs and click Next.
7. For Enter SQL Query, enter the following and click Next:
SELECT I.TARGET_RESOLUTION_DATE,
I.ISSUE_SUMMARY ||
' ('||nvl(P.PERSON_NAME,'Unassigned') ||') ' disp,
I.ISSUE_ID
FROM HT_ISSUES I,
HT_PEOPLE P
WHERE I.ASSIGNED_TO = P.PERSON_ID (+)
AND (I.RELATED_PROJECT = :P11_PROJECT OR
:P11_PROJECT = '-1')
AND I.STATUS != 'Closed'
Note that:
■ The target_resolution_date is the date on which the issue will display
■ The issue_summary is concatenated with the person assigned
■ The issue_id will not display, but will be used to create a link to enable the
user to view and edit the issue
8. On Identify Calendar Columns:
a. For Date Column, select TARGET_RESOLUTION_DATE.
b. For Display Column, select DISP.
c. Click Next.
9. Review your selections and click Finish.
Add an Item to Support Project Look Up To enable the user to look up one project or all
projects, you need to add an item.
To add an item to support project look up:
1. From the Success page, select Edit Page.
The Page Definition for page 11, Target Resolution Dates, appears.

Building a Basic User Interface
How to Build and Deploy an Issue Tracking Application 10-55
2.
Under Items, click the Create icon.
3. For Select Item Type, select Select List and click Next.
4. For Select List Control Type, accept the default of Select List and click Next.
5. For Item Name, enter P11_PROJECT and click Next.
6. For List of Values:
a. For Named LOV, select PROJECTS.
b. For Null Text, enter:
- All Projects -
c. For Null Value, enter:
-1
d. Click Next.
7. For Item Attributes, accept the defaults and click Next.
8. For Default, enter:
-1
9. Click Create Item.
Create a Go Button To create a Go button to execute the query:
1. Under Buttons, click the Create icon.
2. For Button Region, select Target Resolution Dates and click Next.
3. For Postilion, select Create a button displayed among this region's items and
click Next.
4. For Button Attributes:
a. For Button Name, enter P11_GO.
b. For Button Style, select Template Based Button.
c. For Template, select Button.
5. Click Create Button.
Modify Calendar Attributes Lastly, you need to modify the Calendar Attributes to add
link support for viewing and editing the displayed issues. To accomplish this, you
need to call page 7, View/Edit Issues, clear any data from the page and pass in the
current issue ID along with the fact that page 11 was the calling page. Then, you need
to add a note that displays when the query excludes Closed issues.
To modify the Calendar Attributes:
1. Under Regions, select CAL to the left of Target Resolution Dates.
2. Scroll down to Column Link:
a. For Page, enter 7.
b. For Clear Cache, enter 7.
c. For Set these items, enter:
P7_ISSUE_ID,P7_PREV_PAGE

Building a Basic User Interface
10-56 Oracle HTML DB 2 Day Developer
d.
For With these values, enter:
#ISSUE_ID#,11
3. Select the Region Definition tab.
4. Scroll down to Header and Footer Text.
5. Enter the following in Region Footer:
This excludes Closed issues.
6. Click Apply Changes.
To see your newly created calendar, click the Run Page icon. Your report should
resemble Figure 10–14 on page 10-56. Note that you can click the text displayed for an
issue to display the Edit Issue page. To return to the calendar, click Cancel.
Figure 10–14 Target Resolution Dates Report
Add Average Days to Resolve
The Average Days to Resolve report is a bar chart that calculates the number of days it
takes to resolve each closed issue and then averages that number that by assigned
person.
To add the Average Days to Resolve report:
1. Navigate to the Application home page.

Building a Basic User Interface
How to Build and Deploy an Issue Tracking Application 10-57
2.
Click Create Page.
3. Select Chart and click Next.
4. Select Bar (HTML) and click Next.
5. On Identify Page Attributes:
a. For Page, enter 12.
b. For Page Name, enter Average Days to Resolve.
c. For Region Name, enter Average Days to Resolve.
d. Click Next.
6. For Tab (Optional), accept the default Do not use tabs and click Next.
7. On Identify Chart Attributes:
a. In Chart SQL, enter:
SELECT NULL l,
NVL(p.person_name,'None Assigned') person,
AVG(i.actual_resolution_date-i.identified_date) days
FROM ht_issues i,
ht_people p
WHERE i.assigned_to = p.person_id (+)
AND i.status = 'Closed'
GROUP BY p.person_name
In the above SELECT statement:
– The first item selected is the link. Because this report will not link to any
other page, NULL was selected.
– The second item is the person’s name, or None Assigned if assigned_
to is NULL.
– The third item selected is the average number of days it took for that
person to resolve all their issues so the issues have a status of closed.
b. For Include in summary, select only Number of data points. Deselect all other
options.
c. Click Next.
8. Review your selections and click Finish.
To view your newly created bar chart, select Run Page. Your report should resemble
Figure 10–15.

Building a Basic User Interface
10-58 Oracle HTML DB 2 Day Developer
Figure 10–15 Average Days to Resolve Report
Add Content to the Home Page
Now that you have completed all the detail pages, next you need to add content to the
home page and tie all the pages together. In this section, you modify the home page to
display the following information:
■ A menu of all available reports
■ Navigation to the maintenance pages
■ A button to Add a New Issue
■ Overdue Issues
■ Recently Opened Issues
■ Open Issues by Project as a chart
■ Unassigned Issues
Topics in this section include:
■ Add a Reports Menu
■ Add Maintenance Navigation
■ Add a New Issues Button
■ Add Overdue Issues Report
■ Add Unassigned Issues Report
■ Add Recently Opened Issues Report
■ Add Open Issues by Project
Add a Reports Menu
First, you add a menu implemented as a list.
To add a menu:

Building a Basic User Interface
How to Build and Deploy an Issue Tracking Application 10-59
1.
Navigate to the Application home page.
2. Select Shared Components.
3. Under Navigation, select Lists.
4. Click Create.
5. For Name, enter Main Menu.
6. For List Template, select Vertical Sidebar List.
7. Click Create.
Create List Entries Now that the list has been created, you add list items to it. You need
to add one list item for each report page.
To add a list item for Assign Issues:
1. Click Create List Entry.
2. For List Entry Label, enter Assign Issues.
3. Under Target:
a. For Page, select 8.
b. Select reset pagination for this page.
4. Click Create.
Now you will create four more list items, one for each of the other reports in your
application.
To add list items for each of the other reports in your application:
1. Click Create List Entry.
2. To define list item attributes for Issues:
a. For Sequence, enter 20.
b. For List Entry Label, enter Issues.
c. Under the Target section:
– For Page, select 6.
– Select reset pagination for this page.
– For Clear Cache, enter 6.
This clears any selections for page 6 from the session state.
3. Click Create and Create Another.
4. To define list item attributes for Issue Summary:
a. For Sequence, enter 30.
b. For List Entry Label, enter Issue Summary by Project.
c. Under the Target section:
– For Page, select 9.
– Select reset pagination for this page.
– For Clear Cache, enter 9.
5. Click Create and Create Another.

Building a Basic User Interface
10-60 Oracle HTML DB 2 Day Developer
6.
To define list item attributes for Resolved by Month Identified:
a. For Sequence, enter 40.
b. For List Entry Label, enter Resolved by Month Identified (chart).
c. Under the Target section, select 10 for Page.
7. Click Create and Create Another.
8. To define list item attributes for Target Resolution Dates:
a. For List, select Main Menu.
b. For Sequence, enter 50.
c. For List Entry Label, enter Target Resolution Dates (calendar).
d. Under the Target section:
– For Page, select 11.
– Select reset pagination for this page.
9. Click Create and Create Another.
10. To define list item attributes for Average Days to Resolve:
a. For Sequence, enter 60.
b. For List Entry Label, enter Average Days to Resolve (chart).
c. Under Target, select 12 for Page.
11. Click Create.
Include the List on the Home Page Now that the list is created, you need to include it on
the home page. To display the list in the left margin, you need to change the page
template to one that supports the appropriate region position.
To change the page template on the home page:
1. Click the Edit Page icon.
The Page Definition for page 12, Average Days to Resolve, appears.
2. In the Page field, enter 1 and click Go.
3. Click Edit Attributes.
4. Locate Display Attributes.
5. From the Page Template list, select No Tabs with Sidebar.
6. Click Apply Changes.
Next, create a region to contain your menu.
To create a a new region:
1. Under Regions, click the Create icon.
2. Select List and click Next.
3. For Display Attributes:
a. For Title, enter Menu.
b. For Region Template, select No Template.
c. For Display Point, select Page Template Region Position 2 (or select the quick
link [Pos. 2].

Building a Basic User Interface
How to Build and Deploy an Issue Tracking Application 10-61
d.
Click Next.
4. For List, select Main Menu.
5. Click Create List Region.
Add Maintenance Navigation
Next, you will add maintenance navigation as a list. This list will display just below
the reports in the left margin.
1. Navigate to the Application home page.
2. Click Shared Components.
3. Under Navigation, select Lists.
4. Click Create.
5. For Name, enter Maintenance.
6. For List Template, select Vertical Sidebar List.
7. Click Create.
Next, create three list items. The first list item acts as a separator between the two
navigation regions. The other two enable users to view people and projects.
To add list items:
1. Click Create List Entry.
2. To define list item attributes for the first list item:
a. For List Entry Label, enter:
b. Under Target, select 1 for Page.
3. Click Create and Create Another.
4. To define list item attributes for Projects:
a. For Sequence, enter 20.
b. For List Entry Label, enter:
Projects
c. Under Target:
– For Page, select 2.
– Check reset pagination for this page.
5. Click Create and Create Another.
6. To define list item attributes for People:
a. For Sequence, enter 30.
b. For List Entry Label, enter:
People
c. Under Target:
– For Page, select 4.
– Check reset pagination for this page.

Building a Basic User Interface
10-62 Oracle HTML DB 2 Day Developer
7.
Click Create.
To create a region to display the new list.
1. Click the Edit Page icon.
2. Under Regions, click the Create icon.
3. Select List and click Next.
4. For Display Attributes:
a. For Title, enter Maintenance.
b. For Region Template, select No Template.
c. For Display Point, select Page Template Region Position 2 (or select the quick
link [Pos. 2].
d. Click Next.
5. For List, select Maintenance.
6. Click Create List Region.
Add a New Issues Button
Next, you create a button to navigate the user to page 7, Create/Edit Issue.
To create a region to contain the button:
1. Under Regions, click the Create icon.
2. Select HTML and click Next.
3. Select the type of HTML region container you want to create. Select HTML and
click Next.
4. For Display Attributes:
a. For Title, enter Buttons.
b. For Region Template, select No Template.
c. For Display Point, select Page Template Region Position 1 (or select the quick
link [Pos. 1].
d. Click Next.
5. Click Create Region.
To add a button:
1. Under Buttons, click the Create icon.
2. For Region, select Buttons and click Next.
3. For Button Position, accept the default Create a button in a region position and
click Next.
4. For Button Attributes:
a. For Button Name, enter ADD.
b. For Label, enter:
Add a New Issue
c. For Action, select Redirect to URL without submitting page.
d. Click Next.

Building a Basic User Interface
How to Build and Deploy an Issue Tracking Application 10-63
5.
For Button Template, select Button and click Next.
6. For Position, select Top of Region and click Next.
On the Branching page, you need to call the correct page, clear the cache, and
specify that the Create and Cancel buttons returns the user to the home page.
7. On Branching:
a. For Page, select 7.
b. For Clear Cache, enter 7.
c. For Set these items, enter:
P7_PREV_PAGE
d. For With these values, enter 1.
8. Click Create Button.
Add Overdue Issues Report
Next, add some content to the home page. In this exercise you add a report to display
overdue issues. The query for this report retrieves all unclosed issues with a past target
resolution date.
To add a report to display overdue issues:
1. Under Regions, click the Create icon.
2. Select Report and click Next.
3. For Report Implementation, select SQL Report and click Next.
4. For Display Attributes, enter Overdue Issues for Title and click Next.
5. For Enter SQL Query, enter:
SELECT i.issue_id,
i.priority,
i.issue_summary,
p.person_name assignee,
i.target_resolution_date,
r.project_name
FROM ht_issues i,
ht_people p,
ht_projects r
WHERE i.assigned_to = p.person_id (+)
AND i.related_project = r.project_id
AND i.target_resolution_date < sysdate
AND i.status != 'Closed'
The outer join is necessary because the assignment is optional.
6. Click Create Region.
Now that the region has been created, you need to edit the headings and turn the
summary into a link to display the issue details.
To edit the column headings:
1. Under Regions, select Report to the left of Overdue Issues.
2. For Headings Type, select Custom.
3. For ISSUE_ID, remove the Heading.

Building a Basic User Interface
10-64 Oracle HTML DB 2 Day Developer
4.
For ISSUE_SUMMARY, edit the Heading to read:
Summary
5. For ASSIGNEE, change the Heading to:
Assigned To
6. For TARGET_RESOLUTION_DATE:
a. For Heading, enter:
Target<br>Resolution<br>Date
b. For Column Align, select center.
c. For Heading Align, select center.
7. For ISSUE_ID, deselest Show.
This enables the query to pass in the link, but not display it.
8. Select Sort for all columns except ISSUE_ID.
9. For TARGET_RESOLUTION_DATE, select 1 for Sort Sequence.
10. For ISSUE_SUMMARY, select 2 for Sort Sequence.
To edit column attributes for ISSUE_SUMMARY:
1. Click the Edit icon to the left of ISSUE_SUMMARY.
2. Scroll down to Column Link:
a. For Link Text, use the quick link of [Icon 3].
b. For Page, select 7.
c. For Clear Cache, select 7.
d. For Item 1, enter the Name:
P7_ISSUE_ID
e. For Item 1, enter the Value:
#ISSUE_ID#
f. For Item 2, enter the Name:
P7_PREV_PAGE
g. For Item 2, enter the Value:
1
3. Click Apply Changes.
To select layout and pagination attributes:
1. Scroll down to Layout and Pagination:
a. For Pagination Scheme, select Search Engine 1,2,3,4 (set based pagination).
b. For Number of Rows, enter 5.
2. Under Sorting, select the light gray arrow for Ascending and Descending Image.
3. Under the Messages section, enter the following in When No Data Found
Message:

Building a Basic User Interface
How to Build and Deploy an Issue Tracking Application 10-65
No Overdue Issues.
4. Click Apply Changes.
Add Unassigned Issues Report
The next report you add displays unassigned, open issues. This report is very similar
to Overdue Issues. Rather than creating it manually, you will copy the Overdue Issues
report and modify it.
To create the Unassigned Issues report by copying an existing report:
1. Under Regions, click the Copy icon.
2. Under Name, select Overdue Issues.
3. For To Page, accept the default 1 and click Next.
4. For Region Name, enter Unassigned Issues.
5. Click Copy Region.
To modify the query and edit the report region:
1. Under the Regions section, select Unassigned Issues.
2. For Region Source, enter:
SELECT i.issue_id,
i.priority,
i.issue_summary,
i.target_resolution_date,
r.project_name,
p.person_name identifiee
FROM ht_issues i,
ht_people p,
ht_projects r
WHERE i.assigned_to IS NULL
AND i.status != 'Closed'
AND i.related_project = r.project_id
AND i.identified_by = p.person_id
3. Select the Report Attributes tab.
Note that previously defined columns have retained their modified attributes.
4. For IDENTIFIEE, enter the following Heading:
Identified By
5. Under Messages, enter the following in When No Data Found Message:
No Unassigned Issues.
6. Click Apply Changes.
Add Recently Opened Issues Report
Lastly, you will add a report of recently opened issues. The underlying query displays
the five most recently opened issues. As in the existing exercise, you will copy an
existing report and modify it.
To create a report of recently opened issues by copying an existing report:
1. Under Regions, click the Copy icon.

Building a Basic User Interface
10-66 Oracle HTML DB 2 Day Developer
2.
Under Name, select Unassigned Issues.
3. For To Page, accept the default 1 and click Next.
4. For Region Name, enter Recently Opened Issues.
5. Click Copy Region.
To modify the query and edit the report region:
1. Under Regions, click the Report to the left of Recently Opened Issues.
2. For all columns:
a. Disable sorting by deselecting Sort.
b. Set Sequence to -.
3. Select the Region Definition tab.
4. For Region Source, enter:
SELECT issue_id,
priority,
issue_summary,
assignee,
target_resolution_date,
project_name,
identifiee
FROM
(
SELECT i.issue_id,
i.priority,
i.issue_summary,
p.person_name assignee,
i.target_resolution_date,
r.project_name,
p2.person_name identifiee
FROM ht_issues i,
ht_people p,
ht_people p2,
ht_projects r
WHERE i.assigned_to = p.person_id (+)
AND i.related_project = r.project_id
AND i.identified_by = p2.person_id
AND i.created_date > (sysdate - 7)
ORDER BY i.created_date desc
)
WHERE rownum < 6
5. Select the Report Attributes tab.
6. For ASSIGNEE, click the gray up arrow to the right of the Edit column until
ASSIGNEE is just after ISSUE_SUMMARY.
7. For ASSIGNEE, change Heading to:
Assigned To
8. Scroll down to Layout and Pagination section. From the Pagination Scheme list,
select - No Pagination Selected -.
9. Under the Messages section, enter the following in When No Data Found
Message:
No Recently Opened Issues.

Building a Basic User Interface
How to Build and Deploy an Issue Tracking Application 10-67
10.
Click Apply Changes.
Add Open Issues by Project
Next, add a pie chart displaying Open Issues by Project.
To add a pie chart:
1. Under Regions, click the Create icon.
2. Select Chart and click Next.
3. Select Pie and click Next.
4. For Title, enter Open Issues by Project and click Next.
5. For Enter SVG Chart SQL Query, enter:
SELECT NULL LINK,
NVL(r.project_name,'No Project') label,
COUNT(r.project_name) value
FROM ht_issues i,
ht_projects r
WHERE i.status = 'Open'
AND i.related_project = r.project_id
GROUP BY NULL, r.project_name
ORDER BY r.project_name
Note that this query does not include a link, the label is the Project Name, and
the value calculated and used for the pie chart is the total number of open issues
by project.
6. Click Create Region.
To edit the chart.
1. Under Regions, select Chart to the left of Open Issues by Project.
2. For Chart Width, enter 500.
3. For Chart Height, enter 200.
4. For Chart Title, remove the title.
5. Under Chart Query, enter the following in When No Data Found Message:
No Open Issues.
6. Under Font Settings, for Legend select 14 for the Font Size.
7. Click Apply Changes.
To view the revised page, click the Run Page icon. Your home page should resemble
Figure 10–16.

Building a Basic User Interface
10-68 Oracle HTML DB 2 Day Developer
Figure 10–16 Revised Home Page
Add a Breadcrumb
In the previous exercise, you created menus on the home page to enable users to
navigate to various pages within your application. Next, you need to provide users
with a way to navigate to the home page. You can accomplish by utilizing
breadcrumb. When you created your application, the wizard automatically created a
breadcrumb.
In the next exercise, you add breadcrumb entries and then include that breadcrumb
within a region on page 0. Adding components to page 0 makes them display on all
pages with an application.
Topics in this section include:
■ Navigate to the Breadcrumbs Page
■ Add Breadcrumb Entries
■ Create a Page 0
■ Create a Region to Contain the Breadcrumb
Navigate to the Breadcrumbs Page
To navigate to the Breadcrumbs page:
1. Navigate to the Application home page.
2. Click Shared Components.
3. Under Navigation, select Breadcrumbs.
4. Select the breadcrumb, Breadcrumb.

Building a Basic User Interface
How to Build and Deploy an Issue Tracking Application 10-69
Add Breadcrumb Entries
Next, add breadcrumb entries.
To edit the existing breadcrumb entry for page 1:
1. Under Breadcrumb Entries, click Page 1.
2. Under Breadcrumb, enter 1 in Page.
3. For Short Name, enter Home.
4. Under Target, enter 1 in Page.
5. Click Create.
To create a breadcrumb entry for page 2:
1. Click Create Breadcrumb Entry.
2. Under Breadcrumb, enter 2 in Page.
3. Under Entry:
a. For Parent Entry, select Home.
b. For Short Name, enter Projects.
4. Under Target, enter 2 in Page.
5. Click Create.
To create a breadcrumb entry for page 3:
1. Click Create Breadcrumb Entry.
2. Under Breadcrumb, enter 3 in Page.
3. Under Entry:
a. For Parent Entry, select Projects.
b. For Short Name, enter Create/Edit Projects.
4. Under Target, enter 3 in Page.
5. Click Create.
To create a breadcrumb entry for page 4:
1. Click Create Breadcrumb Entry.
2. Under Breadcrumb enter 4 in Page.
3. Under Entry:
a. For Parent Entry, select Home.
b. For Short Name, enter People.
4. Under Target, enter 4 in Page.
5. Click Create.
To create a breadcrumb entry for page 5:
1. Click Create Breadcrumb Entry.
2. Under Breadcrumb enter 5 in Page.
3. Under Entry:
a. For Parent Entry, select People.

Building a Basic User Interface
10-70 Oracle HTML DB 2 Day Developer
b.
For Short Name, enter Create/Edit Person Information.
4. Under Target, enter 5 in Page.
5. Click Create.
To create a breadcrumb entry for page 6:
1. Click Create Menu Option.
2. Under Breadcrumb enter 6 in Page.
3. Under Entry:
a. For Parent Entry, select Home.
b. For Short Name, enter Issues.
4. Under Target, enter 6 in Page.
5. Click Create.
To create a breadcrumb entry for page 7:
1. Click Create Breadcrumb Entry.
2. Under Breadcrumb enter 7 in Page.
3. Under Entry:
a. For Parent Entry, select Home.
b. For Short Name, enter Create/Edit Issue.
4. Under Target, enter 7 in Page.
5. Click Create.
To create a breadcrumb entry for page 8:
1. Click Create Menu Option.
2. Under Breadcrumb enter 8 in Page.
3. Under Entry:
a. For Parent Entry, select Home.
b. For Short Name, enter Assign Issues.
4. Under Target, enter 8 in Page.
5. Click Create.
To create a breadcrumb entry for page 9:
1. Click Create Breadcrumb Entry.
2. Under Breadcrumb enter 9 in Page.
3. For Entry:
a. For Parent Entry, select Home.
b. For Short Name, enter Issue Summary by Project.
4. Under Target, enter 9 in Page.
5. Click Create.
To create a breadcrumb entry for page 10:
1. Click Create Breadcrumb Entry.

Building a Basic User Interface
How to Build and Deploy an Issue Tracking Application 10-71
2.
Under Breadcrumb enter 10 in Page.
3. Under Menu Option:
a. For Parent Entry, select Home.
b. For Short Name, enter Resolved by Month Identified.
4. Under Target, enter 10 in Page.
5. Click Create.
To create a breadcrumb entry option for page 11:
1. Click Create Breadcrumb Entry.
2. Under Breadcrumb enter 11 in Page.
3. Under Entry:
a. For Parent Entry, select Home.
b. For Short Name, enter Target Resolution Dates.
4. Under Target, enter 11 in Page.
5. Click Create.
To create a breadcrumb entry for page 12:
1. Click Create Breadcrumb Entry.
2. Under Breadcrumb, enter 12 in Page.
3. Under Entry:
a. For Parent Entry, select Home.
b. For Short Name, enter Average Days to Resolve.
4. Under Target, enter 12 in Page.
5. Click Create.
Create a Page 0
Now that the breadcrumb exists, you need to create page 0 and then create a region to
contain your Breadcrumb menu.
To create page 0:
1. Navigate to the Application home page.
2. Click Create Page.
3. Select Blank Page and click Next.
4. For Page, enter 0 and click Next.
5. For Name, enter Breadcrumbs and click Next.
6. On Identify Tabs, accept the default No and click Next.
7. Review your selections and click Finish.
Create a Region to Contain the Breadcrumb
To create a region to contain your breadcrumb:
1. From the Success page, select Edit Page.
The Page Definition for page 0 appears.

Building a Basic User Interface
10-72 Oracle HTML DB 2 Day Developer
2.
Under Regions, click the Create icon.
3. For Select a common region type, select Breadcrumb and click Next.
4. For Breadcrumb Container Region:
a. For Title, enter Breadcrumbs.
b. For Region Template, select No Template.
c. For Display Point, select Page Template Region Position 1.
This selection displays the breadcrumb above all other content on the page.
d. Click Next.
5. For Breadcrumb:
a. For Breadcrumb, select Breadcrumb.
b. For Menu Template, select Breadcrumb Menu.
c. Click Next.
6. For Breadcrumb Entry, accept the defaults and click Next.
7. Click Finish.
Return to the home page by clicking Edit Page. When the Page Definition for page 0
appears, click the Next Page icon (>). The Page Definition for page 1 appears. To see
your completed home page, click the Run Page icon. Your home page should resemble
Figure 10–17.
Figure 10–17 Revised Home Page with Breadcrumb Menu

Adding Advanced Features
How to Build and Deploy an Issue Tracking Application 10-73
Notice the Breadcrumb in the top bar. Click one of the items on the Maintenance menu
on the left side of the page. Notice how the breadcrumb menu changes.and watch the
breadcrumb change.
At this stage your application is fully functional, but is missing the security and email
notification. Those topics will be discussed in the next section.
Adding Advanced Features
Once your application is fully functional you can focus on adding advanced features
outlined during the planning and project analysis phase.
Topics in this section include:
■ Add Support for E-mail Notification
■ Add Application Security
Add Support for E-mail Notification
The planning and project analysis phase produced two e-mail requirements:
■ Notify people when an issue is assigned to them
■ Notify the project lead when any issue becomes overdue
Topics in this section include:
■ How E-mail Notification Works
■ Add Notification of New Assignments
■ Add a Notification for Overdue Issues
How E-mail Notification Works
To send mail from within an Oracle HTML DB application, you create a PL/SQL
process that calls the supplied HTMLDB_MAIL package.
E-mail is not sent immediately from Oracle HTML DB, but is stored in a temporary
queue until a DBMS_JOB pushes the queue. The DBMS_JOB utilizes two preferences
named SMTP_HOST_ADDRESS and SMTP_HOST_PORT to send mail in the queue. By
default, these preferences are set to localhost and 25.
If the server where Oracle HTML DB is installed is not configured for SMTP services,
you will need to change the SMTP_HOST_ADDRESS preference. Check with your
Oracle HTML DB administrator to make sure the instance you are using is properly
configured to send e-mail.
The following is a description of the SEND procedure of the HTMLDB_MAIL package.
PROCEDURE SEND
Argument Name Type In/Out Default?
------------------------------ ----------------------- ------ --------
P_TO VARCHAR2 IN
P_FROM VARCHAR2 IN
P_BODY VARCHAR2 IN
P_BODY_HTML VARCHAR2 IN DEFAULT
P_SUBJ VARCHAR2 IN DEFAULT
P_CC VARCHAR2 IN DEFAULT
P_BCC VARCHAR2 IN DEFAULT

Adding Advanced Features
10-74 Oracle HTML DB 2 Day Developer
Add Notification of New Assignments
First, you will add a notification to a person when he or she has a new assignment. An
assignment can be made or changed from two different pages
■ Create/Edit Issue
■ Assign Issues.
On the Create/Edit Issue page, you can store the initial values and then check them
against any changes to see if an assignment has been made or changed. Because
Assign Issues is a tabular form, there is no way to check the old values against the new
values. For that reason, the best way to implement the notification is with a before
insert and update trigger on HT_ISSUES. You can create this trigger programmatically
using SQL Workshop.
To create a before insert and update trigger on HT_ISSUES:
1. Navigate to the Workspace home page.
2. Click SQL Workshop.
3. Click Object Browser.
4. Click Create.
5. For Select the type of database object you want to create, select Tr ig ge r and click
Next.
6. For Name:
a. For Schema, select the appropriate schema and click Next.
b. For Table Name, select HT_ISSUES and click Next.
7. For Action, keep the default of Create Trigger and click Next.
8. For Define:
a. For Trigger Name, enter BIU_HT_ISSUES_NOTIFY_ASSIGNEE.
b. For Firing Point, select AFTER.
c. For Options, select insert, update.
d. For Trigger Body, enter:
IF (INSERTING AND
:new.assigned_to IS NOT NULL)
OR
(UPDATING AND
(:old.assigned_to IS NULL OR
:new.assigned_to != :old.assigned_to) AND
:new.assigned_to IS NOT NULL)
THEN
FOR c1 IN
(SELECT person_name, person_email
FROM ht_people
WHERE person_id = :new.assigned_to)
LOOP
Note: The trigger you are about to create sends e-mails. If you plan
on using this application, change the p_to and p_from to your own
e-mail address so that you do not create e-mails with invalid
addresses each time you assign or reassign an issue.

Adding Advanced Features
How to Build and Deploy an Issue Tracking Application 10-75
IF c1.person_email IS NOT NULL
THEN
FOR c2 IN
(SELECT project_name
FROM ht_projects
WHERE project_id = :new.related_project)
LOOP
HTMLDB_MAIL.SEND(
p_to => c1.person_email,
p_from => c1.person_email,
p_body =>
'You have been assigned a new issue. '||
'The details are below. ' ||chr(10)||
chr(10)||
' Project: '|| c2.project_name ||chr(10)||
' Summary: '||:new.issue_summary ||chr(10)||
' Status: '||:new.status ||chr(10)||
'Priority: '||nvl(:new.priority,'-'),
p_subj => 'New Issue Assignment');
END LOOP;
END IF;
END LOOP;
END IF;
e. Click Next.
9. To review the code, expand the SQL icon.
10. Click Finish.
Add a Notification for Overdue Issues
The second email notification notifies the project lead whenever an issue becomes
overdue. An issue becomes overdue when the target resolution date has passed, but
the issue is not yet closed. Because there is no human interaction to determine if an
issues overdue, you cannot check for it on a page or in a trigger.
The best way to check for overdue issues is to write a package that queries the HT_
ISSUES table. If it finds any overdue issues, the package will initiate an email to the
Project Lead. This procedure will check for issues by project so that the project lead
will receive just one email with all overdue issues rather than an email for each issue.
The package will be called once a day by a dbms_job.
You can use the Create Object function as follows:
■ Create the package and package body from within the SQL Workshop
■ Use SQL Command Processor to run the create commands
For this exercise, you will use SQL Command Processor.
To create the package:
Note: If you plan on using this application, you should either disable
this trigger or change the p_to and p_from to your own e-mail
address so that you do not create e-mails with invalid addresses each
time you assign or reassign an issue.

Adding Advanced Features
10-76 Oracle HTML DB 2 Day Developer
1.
Navigate to the SQL Workshop home page.
2. Select SQL Commands.
3. For Schema, select the appropriate schema.
4. For Enter a SQL or PL/SQL Statement enter:
CREATE OR REPLACE package ht_check_overdue_issues
AS
PROCEDURE email_overdue;
END;
/
5. Click Run.
To create the package body:
1. Navigate to the SQL Workshop home page.
2. Select SQL Command Processor.
3. For Schema, select the appropriate schema.
4. In Enter a SQL or PL/SQL Statement, enter the following:
CREATE OR REPLACE PACKAGE BODY ht_check_overdue_issues
AS
PROCEDURE email_overdue
IS
l_msg_body varchar2(32000) := null;
l_count number := 0;
BEGIN
FOR c1 IN
(SELECT pr.project_id,
pr.project_name,
pe.person_name,
pe.person_email
FROM ht_projects pr,
ht_people pe
WHERE pr.project_id = pe.assigned_project
AND pe.person_role = 'Lead')
LOOP
FOR c2 IN
(SELECT i.target_resolution_date,
i.issue_summary,
p.person_name,
i.status,
i.priority
FROM ht_issues i,
ht_people p
WHERE i.assigned_to = p.person_id (+)
AND i.related_project = c1.project_id
AND i.target_resolution_date < SYSDATE
AND i.status != 'Closed'
ORDER BY i.target_resolution_date, i.issue_summary)
LOOP
IF l_count = 0
THEN
l_msg_body :=
'As of today, the following issues '||
'are overdue:'||chr(10)||

Adding Advanced Features
How to Build and Deploy an Issue Tracking Application 10-77
chr(10)||
' Project: '|| c1.project_name ||chr(10)||
chr(10)||
' Target: '||c2.target_resolution_date ||chr(10)||
' Summary: '||c2.issue_summary ||chr(10)||
' Status: '||c2.status ||chr(10)||
' Priority: '||c2.priority ||chr(10)||
'Assigned to: '||c2.person_name;
ELSE
l_msg_body := l_msg_body ||chr(10)||
chr(10)||
' Target: '||c2.target_resolution_date ||chr(10)||
' Summary: '||c2.issue_summary ||chr(10)||
' Status: '||c2.status ||chr(10)||
' Priority: '||c2.priority ||chr(10)||
'Assigned to: '||c2.person_name;
END IF;
l_count := l_count + 1;
END LOOP;
IF l_msg_body IS NOT NULL
THEN
HTMLDB_MAIL.SEND(
p_to => c1.person_email,
p_from => c1.person_email,
p_body => l_msg_body,
p_subj => 'Overdue Issues for Project '||
c1.project_name);
END IF;
l_count := 0;
END LOOP;
END email_overdue;
END ht_check_overdue_issues;
/
5. Click Run.
To create the DBMS_JOB:
1. Navigate to the SQL Workshop home page.
2. Select SQL Commands.
3. For Schema, select the appropriate schema.
4. In Enter a SQL or PL/SQL Statement, enter the following:
DECLARE
jobno number;
BEGIN
DBMS_JOB.SUBMIT(
job => jobno,
Note: This job generates e-mail. Do not execute the following script
if you running on a hosted Oracle HTML DB instance. If you are
running Oracle HTML DB instance locally and want to test this script,
update the demonstration data to include valid e-mail addresses.

Adding Advanced Features
10-78 Oracle HTML DB 2 Day Developer
what => 'BEGIN
ht_check_overdue_issues.email_overdue;
END;',
next_date => SYSDATE,
interval => 'TRUNC(SYSDATE)+(25/24)'
);
COMMIT;
END;
/
5. Click Run.
This dbms_job executes just after midnight each day.
Add Application Security
The planning and project analysis phase produced two security requirements:
■ Only the CEO and Managers can define and maintain projects and people
■ Once assigned, only the person assigned or a project lead can change data about
the issue
Within Oracle HTML DB, you can define authorization schemes. Authorization
controls user access to specific controls or components based on user privileges. Once
defined, you can associate an authorization scheme with any page, region or item to
restrict access. Each authorization schema is run only when needed and is defined to
validate either once for each page view or once for each session.
Topics in this section include:
■ Restrict Project and People Definition
■ Restrict Issue Modification
Restrict Project and People Definition
The first requirement states only the CEO and Managers may define and maintain
projects and people. To address this requirement you will:
■ Create an authorization scheme to check the current user's role
■ Associate the authorization scheme with the items on the Projects and People
report that navigate to the Create/Edit pages
■ Associate the authorization scheme with the Create/Edit pages themselves so that
a user cannot bypass the security by manually editing the URL to the target page.
To reference the current user, use the session variable :APP_USER. This will be
compared with the person's email address (which is the same as their Oracle HTML
Note: If you plan on using this application, change either the p_to
and p_from in the ht_check_overdue_issues package body to
your own email address, or do not create the dbms_job. Running the
code as written results in the creation of email with invalid addresses
that will sit in mail queue.
See Also: Send email from HTML DB applications How To on OTN at:
http://www.oracle.com/technology/products/database/htmldb
/howtos/index.html

Adding Advanced Features
How to Build and Deploy an Issue Tracking Application 10-79
DB user name). Whenever coding this type of security, you should always code in a
user that can pass all security. You will find this user very useful for development and
testing. If you do not take this approach, you will not be able to access the restricted
pages unless you define yourself as the CEO or Manager.
Create the Authorization Scheme To create the authorization scheme:
1. Navigate to the Workspace home page.
2. Click Application Builder.
3. Select the Issue Tracker application.
4. Click Shared Components.
5. Under Security, select Authorization Schemes.
6. Click Create.
7. For Create Authorization Scheme, accept the default From Scratch and click Next.
8. Under Authorization Scheme Identification, enter the following in Name:
USER_CEO_OR_MANAGER
9. Under Authorization Scheme:
a. For Scheme Type, select Exists SQL Query.
b. In Expression 1, enter:
SELECT '1'
FROM ht_people
WHERE (upper(person_email) = UPPER(:APP_USER) AND
person_role IN ('CEO','Manager'))
OR (UPPER(:APP_USER) = 'HOWTO')
c. For Identify error message displayed when scheme violated, enter:
You are not authorized to access this function.
10. Scroll down to Evaluation Point. For Validate authorization scheme, select Once
per session.
This selection is sufficient in this instance since the assigned role will not typically
change within a given session.
11. Click Create.
Next, you need to associate the authorization scheme with the appropriate objects.
Associate Objects on the Projects Report To associate the authorization scheme with the
Projects report:
1. Click the Edit Page icon.
2. In Page, enter 2 and click Go.
The Page Definition for page 2, Projects, appears.
3. Under Regions, select Report to the left of Projects.
4. Click the Edit icon to the left of PROJECT_ID.
5. Under Authorization, select the Authorization Scheme USER_CEO_OR_
MANAGER.
6. Click Apply Changes.

Adding Advanced Features
10-80 Oracle HTML DB 2 Day Developer
7.
Click Cancel.
To associate the authorization scheme with the Create button on the Projects report:
1. Navigate to the Page Definition for page 2.
2. Under Button, select Create.
3. Under Authorization, select the Authorization Scheme USER_CEO_OR_
MANAGER.
4. Click Apply Changes.
Associate Objects with the Create/Edit Report To associate the authorization scheme with
the Create/Edit Project page:
1. Navigate to page 3 by clicking the Next Page (>) icon.
The Page Definition for page 3, Create/Edit Project, appears.
2. Click Edit Attributes.
3. Scroll down to Security.
4. Select the Authorization Scheme USER_CEO_OR_MANAGER.
5. Click Apply Changes.
Associate Objects with the People Report To associate the authorization scheme with the
People report.
1. Navigate to page 4 by clicking the Next Page (>) icon.
The Page Definition for page 4, People, appears.
2. Under Regions, select Report to the left of People.
3. Click the Edit icon to the left of PERSON_ID.
4. Under Authorization, select the Authorization Scheme USER_CEO_OR_
MANAGER.
5. Click Apply Changes.
6. Click Cancel.
To associate the authorization scheme with the Create button on the People report:
1. Navigate to the Page Definition for page 5.
2. Under Buttons, select Create.
3. Under Authorization, select the Authorization Scheme USER_CEO_OR_
MANAGER.
4. Click Apply Changes.
To associate the authorization scheme with the Create/Edit Person Information page:
1. Navigate to page 5.
The Page Definition for page 5, Create/Edit Person Information, appears.
2. Click Edit Attributes.
3. Scroll down to Security.
4. Select the Authorization Scheme USER_CEO_OR_MANAGER.
5. Click Apply Changes.

Adding Advanced Features
How to Build and Deploy an Issue Tracking Application 10-81
You can test this creating a user with the username of HOWTO. The HOWTO user
should be able to see the edit link. Then, create another user, HOWTO2. This user
should not be able to see the link.
Restrict Issue Modification
The second requirement states that once an issue has been assigned, only the person
assigned (or a project lead) can change data about the issue. This requirement is a little
trickier since it changes for every issue.
Currently, there are two pages that enable users to modify an issue, the Create/Edit
Issue page and the Assign Issues page. On the Assign Issues page, the only issues that
display are those that are unassigned. Since the issues are unassigned, security is not
necessary.
There are many places that a user can navigate to edit an issue:
■ Three regions on the home page display issues or have edit links
■ The Issues report has links to edit each issue
■ The Target Resolution Dates report enables users to select an issue to edit.
Although other users are not allowed to change the data, you do want to enable users
to view all the detailed data about an issue so that they can view the progress and
resolution. Given this requirement, the best approach would be to create an
authorization scheme that will be evaluated once for each page view.
The authorization scheme will be associated with both the Apply Changes and Delete
buttons on the Create/Edit Issue page. This way, unauthorized users can view all the
details, but if they do change something, they have no way of saving that change.
For added security, you will also associate the authorization scheme with the process
that performs the insert, update and delete on HT_ISSUES. This protects your
application against someone changing the URL to call the Apply Changes process. To
let users know why they are not able to make changes, you will add an HTML region
which will display an explanation when the authorization fails. The SQL for this
scheme will be specific to the Create/Edit Issues page because it needs to reference P7_
ISSUE_ID. It will need to retrieve data from the database because at the time it will be
evaluated, the necessary data will not be available in the session state. The only item
that will be available will be P7_ISSUE_ID because it will be passed by the link.
Create the Authorization Scheme To create the authorization scheme:
1. Navigate to the Application home page.
2. Select Shared Components.
3. Under Security, select Authorization Schemes.
4. Click Create.
5. For Creation Method, accept the default From Scratch and click Next.
6. Under Authorization Scheme Identification, enter the following in Name:
P7_ASSIGNED_OR_PROJECT_LEAD
7. Under Authorization Scheme:
a. For Scheme Type, select PL/SQL Function Returning Boolean.
b. For Expression 1, enter:
See Also: "Create Users" on page 10-87

Adding Advanced Features
10-82 Oracle HTML DB 2 Day Developer
DECLARE
l_related_project integer;
l_assigned_to integer;
l_person_id integer;
l_person_role varchar2(7);
l_assigned_project integer;
BEGIN
-- User is HOWTO or new Issue
IF :APP_USER = 'HOWTO' or
:P7_ISSUE_ID IS NULL
THEN RETURN TRUE;
END IF;
FOR c1 IN (SELECT related_project,
assigned_to
FROM ht_issues
WHERE issue_id = :P7_ISSUE_ID)
LOOP
l_related_project := c1.related_project;
l_assigned_to := c1.assigned_to;
END LOOP;
-- Issue not yet assigned
IF l_assigned_to IS NULL
THEN RETURN TRUE;
END IF;
FOR c2 IN (SELECT person_id,
person_role,
assigned_project
FROM ht_people
WHERE upper(person_email) = upper(:APP_USER))
LOOP
l_person_id := c2.person_id;
l_person_role := c2.person_role;
l_assigned_project := c2.assigned_project;
END LOOP;
-- User is lead of related project
IF l_person_role = 'Lead' and
l_assigned_project = l_related_project
THEN RETURN TRUE;
-- User is assigned to issue
ELSIF l_assigned_to = l_person_id
THEN RETURN TRUE;
ELSE
RETURN FALSE;
END IF;
END;
c. For Identify error message displayed when scheme violated, enter:
This issue is not assigned to you, nor are you the Project Lead. Therefore
you are not authorized to modify the data.
8. Scroll down to Evaluation Point. For Validate authorization scheme, select Once
per page view.
This selection is necessary since each issue may have a different result.

Adding Advanced Features
How to Build and Deploy an Issue Tracking Application 10-83
9.
Click Create.
Now you need to associate the authorization scheme with the appropriate objects on
the Create/Edit Issue page.
Associate Objects with the Create Edit Issues Report To associate the authorization scheme
with buttons and processes:
1. Navigate to Application home page.
2. Select page 7 - Create/Edit Issues.
3. Under Buttons, select DELETE.
a. Under Authorization, select the Authorization Scheme P7_ASSIGNED_OR_
PROJECT_LEAD.
b. Click Apply Changes.
4. Under Buttons, select SAVE.
a. Under Authorization, select the Authorization Scheme P7_ASSIGNED_OR_
PROJECT_LEAD.
b. Click Apply Changes.
5. Under Processes, select Process Row of HT_ISSUES.
a. Under Authorization, select the Authorization Scheme P7_ASSIGNED_OR_
PROJECT_LEAD.
b. Click Apply Changes.
Create an HTML Region Lastly, create a new region to display an explanation when the
authorization fails
To create a new region:
1. Under Regions, click the Create icon.
2. For Select a common region type, accept the default HTML and click Next.
3. On Region Type, select HTML and click Next.
4. For Display Attributes:
a. For Title, enter Not Authorized.
b. For Display Point, select Page Template Body (2. items below region
content).
c. Click Next.
5. For Enter HTML Text Region Source, enter the following and click Next:
You are not authorized to modify the data for this issue because<br>you are not
the Project Lead nor is the issue assigned to you.
6. For Authorization Scheme, select {Not}P7_ASSIGNED_OR_PROJECT_LEAD.
This will make the region only display when the Authorization Scheme fails.
7. Click Create Region.
Figure 10–18 displays the Create/Edit Issue page being run by a person for whom the
Authorization fails. Notice a new region displays at the top of the page and that the
only button being displayed is Cancel.

Deploying Your Application
10-84 Oracle HTML DB 2 Day Developer
Figure 10–18 New Region Displaying Authorization Failure
A more elegant solution to this security requirement would be to create a different
page for viewing the details of an issue. You would need to have a procedure that
would take in the issue_id and current user and pass back a flag for view only or edit.
Then you could dynamically build the link for all the reports to call either the View
page or the Edit page based upon a call to that procedure. You would still want to
protect against someone accessing the edit page without using a link so you would
also check permission before firing the insert, update and delete process.
Deploying Your Application
Now that your application is complete, the next step is to deploy it. Typically,
developers create applications on one server and deploy it on another. Although this
approach is not required, it enables you to resolve bugs without impacting the
production instance.
Topics in this section include:
■ Move the Application Definition
■ Alternate Authentication Mechanisms to Consider
■ Create Users
■ Publish the URL
Note: To deploy an application on another server, you need to install
and configure another Oracle HTML DB instance.

Deploying Your Application
How to Build and Deploy an Issue Tracking Application 10-85
Move the Application Definition
The definition for your application lives within the Oracle database. The application
definition includes everything that makes up the application, including the templates,
but it does not include database object definitions or the underlying data. To move an
application to another Oracle HTML DB instance, you must export the application
definition from your development server and import it into your production server.
Topics in this section include:
■ Export the Application Definition
■ Create the Required Objects to Support the Application
■ Import the Application Definition into the Production Instance
■ Load the Data
Export the Application Definition
To export the application definition from your development server:
1. Navigate to the Workspace home page.
2. Click the Application Builder icon.
3. Select the application you want to export.
4. Click the Export/Import icon and then Export.
5. For Application, select the application created in this exercise.
6. Click Export Application.
7. When prompted, click to Save the file.
8. Specify a location on your local hard drive and click Save.
Create the Required Objects to Support the Application
On your production instance, you need to create the objects necessary to support the
application. Log in to the production instance and follow the directions in "Build the
Database Objects" on page 10-7.
Import the Application Definition into the Production Instance
Login to the production instance of Oracle HTML DB:
1. Navigate to the Workspace home page.
2. Click the Application Builder icon.
3. Select the application you want to export.
4. Click the Export/Import icon and then Import.
5. On Import File:
a. For Import File, click the Browse button and locate your exported file.
b. For File Type, select Application/Page Export.
c. For File Character Set, accept the default and click Next.
Note: Although the supporting objects do not need to exist for you
to import the application definition, be aware you cannot test the code
until they exist.

Deploying Your Application
10-86 Oracle HTML DB 2 Day Developer
Once the success message appears, the next step is to install the file.
6. Click Install.
7. On Application Install:
a. For Parse As Schema, select the schema on your production server that
contains your application objects.
b. For Build Status, you select Run and Build Application.
This option enables other users to run the application and enables you to log
in and change the code if necessary. Alternatively, you can select Run
Application Only. Be aware that if you select this option you will not be able
to access the source code for the application.
c. For Install As Application, you can select:
– Reuse Application ID from Export File - Only select this option if the
application ID is not being used on the production instance.
– Auto Assign New Application ID - Select this option to assign a new
application ID.
– Change Application ID - Select this option to change the existing
application ID. If you select this option, you will be prompted to enter a
new application ID.
When you install an application having the same ID as an existing applica-
tion in the current workspace, the existing application is deleted and then
the new application is installed. If you attempt to install an application
having the same ID as an existing application in a different workspace, an
error message appears.
If all statements are successful the install commits and becomes perma-
nent. If any errors are encountered, the install is rolled back, resulting in
no permanent changes.
d. Click Install Application.
If the install is successful, the Post-App Install Utility Options page appears. From
here, you can select one of the following:
■ Select Run Application to see application running
■ Select Edit Application Attributes to view the application definition within
Oracle HTML DB
Load the Data
The next step in deploying your application would be to load the data. At a minimum,
you would need to populate the project and people tables.
Note there are various mechanisms you could use to accomplish this task, including:
■ Use the application itself to create data.
■ Use the Data Loader to load data copied from a spreadsheet.
■ Use the SQL Workshop and run scripts to create data.
■ If you have data existing already within an Oracle database, use either
export/import to move data between machines or use SQL to retrieve and
transform existing data and load it into the application tables.
See Also: "Loading Demonstration Data" on page 10-8

Deploying Your Application
How to Build and Deploy an Issue Tracking Application 10-87
Alternate Authentication Mechanisms to Consider
When the application login page calls the Oracle HTML DB login API with a username
and password, the HTML DB engine calls the credentials verification method specified
in the application's current authentication scheme. You have three choices as to how
credentials are verified from within the login API:
■ Implement the method yourself as a PL/SQL function returning Boolean and put
it in your application's schema.
■ Use the built-in LDAP authentication method, which checks username and
password against the LDAP directory that you specify.
■ Use the built-in Oracle HTML DB authentication method, which checks the
username and password against the Oracle HTML DB account repository.
Your application is currently using the built-in Oracle HTML DB. It is also possible to
use an external authentication service such Oracle Application Server Single Sign-On.
Be aware, however, that Oracle HTML DB redirects to these services instead of
showing a login page.
Create Users
In order for your application to be accessible, you need to create users. If you are still
using Oracle HTML DB authentication, the simplest way to create users it to access the
Manage Users page within the workspace that owns the application. Note that you
will need to have been granted Administration rights for the workspace in order to
access this page.
To create a new user:
1. Navigate to the Workspace home page and click the Administration icon.
2. Click Manage HTML DB Users.
3. Select Create Developer.
4. Under User Identification, enter the required information. If you are using Oracle
HTML DB authentication, make User Name and Email Address identical.
Developer Privileges enable the user to run the application but not access the
Application Builder.
5. Under Developer Privileges:
a. For User is a developer, select No.
b. For User is an administrator, select No.
6. Click Create or Create and Create Another.
Publish the URL
Now that you have deployed your application, loaded data, and created users, you
can publish your production URL.
See Also: Using Oracle AS Single Sign-On with HTML DB Applications
and Changing Authentication Methods How To documents on OTN:
http://www.oracle.com/technology/products/database/htmldb
/howtos/index.html

Deploying Your Application
10-88 Oracle HTML DB 2 Day Developer
You can determine the URL to your application by positioning the mouse over the
Run icon on the Application home page. The URL displays in the status bar at the
bottom of the page.
The Run icon gets its value from the Home link attribute on the Edit Security
Attributes page. This link is only referenced by this icon and by applications that do
not use the Oracle HTML DB Login API. Consider the following example:
http://htmldb.oracle.com/pls/otn/f?p=11563:1:3397731373043366363
Where:
■ htmldb.oracle.com is the URL of the server
■ pls is the indicator to use the mod_plsql cartridge
■ otn is the data access descriptor (DAD) name
■ f?p= is a prefix used by Oracle HTML DB
■ 11563 is application being called
■ 1 is the page within the application to be displayed
■ 3397731373043366363 is the session number
To run this example application, you would use the URL:
http://htmldb.oracle.com/pls/otn/f?p=11563:1
When each user logs in, he or she will receive an unique session number.
As you may recall, you created the Issue Tracker application using the Create
Application wizard. This wizard creates a process on the Login page (page 101) that
controls authentication. The contents of the process are:
WWV_FLOW_CUSTOM_AUTH_STD.LOGIN(
P_UNAME => :P101_USERNAME,
P_PASSWORD => :P101_PASSWORD,
P_SESSION_ID => :FLOW_SESSION,
P_FLOW_PAGE => :APP_ID||':1'
);
Note that the Page is hard coded into this process. Because of this, the page you pass
in the URL is overwritten and does not need to be included. You can access the
application by using the following URL:
http://htmldb.oracle.com/pls/otn/f?p=11563:1
As you can see from the example used, the URL has no meaning and can be rather
long. The host name can be changed to make it more symbolic. You can also configure
Apache to rewrite your URL so that you can publish an abbreviated format and a URL
that would be more intuitive to your users. See your Apache documentation for
details.

DDLs and Scripts for Issue Tracking Application A-1
A
DDLs and Scripts for Issue Tracking
Application
This appendix contains DDLs (data definition language) and scripts necessary to
complete "How to Build and Deploy an Issue Tracking Application" on page 10-1.
This section contains the following topics:
■ Create Application Database Objects DDL
■ Create Issues Script
Create Application Database Objects DDL
The following DDL (data definition language) create all the required database objects
for the issue tracking application in
--
-- This DDL creates all the database objects used by the
-- Issue Management Application featured in
-- the Oracle HTML DB Development Document
--
-- HT_PROJECTS
--
-- The HT_PROJECTS DDL:
-- + creates the projects table with the necessary columns,
-- including a new column for a system generated primary key
-- + declares the new primary key
-- + implements the real primary key, project name, as a unique key
-- + implements a sequence to generate project id
-- + assigns the sequence to populate the project id
-- whenever a new record is created
-- + declares table and column comments
--
CREATE TABLE ht_projects (
project_id INTEGER NOT NULL,
project_name VARCHAR2(100) NOT NULL,
start_date DATE NOT NULL,
target_end_date DATE NOT NULL,
actual_end_date DATE

Create Application Database Objects DDL
A-2 Oracle HTML DB 2 Day Developer
)
/
ALTER table ht_projects
ADD CONSTRAINT ht_projects_pk
PRIMARY KEY (project_id)
/
ALTER TABLE ht_projects
ADD CONSTRAINT ht_projects_uk
UNIQUE (project_name)
/
CREATE SEQUENCE ht_projects_seq
INCREMENT BY 1
START WITH 40
/
CREATE OR REPLACE TRIGGER bi_ht_projects
BEFORE INSERT ON ht_projects
FOR EACH ROW
BEGIN
IF :new.project_id is null
THEN SELECT ht_projects_seq.nextval
INTO :new.project_id
FROM DUAL;
END IF;
END;
/
COMMENT ON table ht_projects IS
'All projects currently underway.'
/
COMMENT ON column ht_projects.project_id IS
'The system generated unique identifier for the project.'
/
COMMENT ON column ht_projects.project_name IS
'The unique name of the project.'
/
COMMENT ON column ht_projects.start_date IS
'The start date of the project.'
/
COMMENT ON column ht_projects.target_end_date IS
'The targeted end date of the project.'
/
COMMENT ON column ht_projects.actual_end_date IS
'The actual end date of the project.'
/
--
-- HT_PEOPLE
--
-- The HT_PEOPLE DDL:
-- + creates the people table with the necessary columns,
-- including a new column for a system generated primary key
-- + declares the new primary key
-- + implements the real primary key, person name, as a unique key
-- + implements a check constraint to validate the roles that people
-- can be assigned
-- + implements a foreign key to validate that people are assigned to
-- valid projects
-- + implements a check constraint to enforce that all project leads
-- and team members are assigned to projects

Create Application Database Objects DDL
DDLs and Scripts for Issue Tracking Application A-3
-- + implements a sequence to generate person id
-- + assigns the sequence to populate the person id whenever a
-- new record is created
-- + declares table and column comments
--
CREATE TABLE ht_people (
person_id INTEGER NOT NULL,
person_name VARCHAR2(100) NOT NULL,
person_email VARCHAR2(100) NOT NULL,
person_role VARCHAR2(7) NOT NULL,
assigned_project INTEGER
)
/
ALTER TABLE ht_people
ADD CONSTRAINT ht_people_pk
PRIMARY KEY (person_id)
/
ALTER TABLE ht_people
ADD CONSTRAINT ht_people_uk
UNIQUE (person_name)
/
ALTER TABLE ht_people
ADD CONSTRAINT ht_people_role_cc
CHECK (person_role in ('CEO','Manager','Lead','Member'))
/
ALTER TABLE ht_people
ADD CONSTRAINT ht_people_project_fk
FOREIGN KEY (assigned_project)
REFERENCES ht_projects
/
ALTER TABLE ht_people
ADD CONSTRAINT ht_people_assignment_cc
CHECK ( (person_role in ('Lead','Member') and assigned_project is not null)
or (person_role in ('CEO','Manager') and assigned_project is null) )
/
CREATE SEQUENCE ht_people_seq
INCREMENT BY 1
START WITH 40
/
CREATE OR REPLACE TRIGGER bi_ht_people
BEFORE INSERT on ht_people
FOR EACH ROW
BEGIN
IF :new.person_id IS NULL
THEN SELECT ht_people_seq.nextval
INTO :new.person_id
FROM DUAL;
END IF;
END;
/
COMMENT ON table ht_people IS
'All people within the company.'
/
COMMENT ON column ht_people.person_id IS
'The system generated unique identifier for the person.'
/
COMMENT ON column ht_people.person_name IS

Create Application Database Objects DDL
A-4 Oracle HTML DB 2 Day Developer
'The unique name of the person.'
/
COMMENT ON column ht_people.person_role IS
'The role the person plays within the company.'
/
COMMENT ON column ht_people.assigned_project IS
'The project that the person is currently assigned to.'
/
--
-- HT_ISSUES
--
-- The HT_ISSUES DDL:
-- + creates the table with the necessary columns, including a new column
-- for a system generated primary key
-- + declares the new primary key
-- + implements a foreign key to validate that the issue is identified by a
-- valid person
-- + implements a foreign key to validate that the issue is assigned to a
-- valid person
-- + implements a foreign key to validate that the issue is associated with
-- a valid project
-- + implements a check constraint to validate the status that is assigned
-- to the issue
-- + implements a check constraint to validate the priority that is assigned
-- to the issue
-- + implements a sequence to generate issue id
-- + assigns the sequence to populate the issue id and the creation date
-- whenever a new record is created, records the user creating the
-- row and also assigns status of 'Open' if no status is provided
-- + records the current date and the user whenever an issue is edited and
-- sets the status to 'Closed' if an ACTUAL_RESOLUTION_DATE is
-- provided
-- + declares table and column comments
--
create table ht_issues (
issue_id INTEGER not null,
issue_summary VARCHAR2(200) not null,
issue_description VARCHAR2(2000),
identified_by INTEGER NOT NULL,
identified_date DATE not null,
related_project INTEGER not null,
assigned_to INTEGER,
status VARCHAR2(8) not null,
priority VARCHAR2(6),
target_resolution_date DATE,
progress VARCHAR2(2000),
actual_resolution_date DATE,
resolution_summary VARCHAR2(2000),
created_date DATE not null,
created_by VARCHAR2(60) not null,
last_modified_date DATE,
last_modified_by VARCHAR2(60)
)
/
ALTER TABLE ht_issues
ADD CONSTRAINT ht_issues_pk
PRIMARY KEY (issue_id)
/

Create Application Database Objects DDL
DDLs and Scripts for Issue Tracking Application A-5
ALTER TABLE ht_issues
ADD CONSTRAINT ht_issues_identified_by_fk
FOREIGN KEY (identified_by)
REFERENCES ht_people
/
ALTER TABLE ht_issues
ADD CONSTRAINT ht_issues_assigned_to_fk
FOREIGN KEY (assigned_to)
REFERENCES ht_people
/
ALTER TABLE ht_issues
ADD CONSTRAINT ht_issues_project_fk
FOREIGN KEY (related_project)
REFERENCES ht_projects
/
ALTER TABLE ht_issues
ADD CONSTRAINT ht_issues_status_cc
CHECK (status in ('Open','On-Hold','Closed'))
/
ALTER TABLE ht_issues
ADD CONSTRAINT ht_issues_priority_cc
CHECK (priority in ('High','Medium','Low'))
/
CREATE SEQUENCE ht_issues_seq
INCREMENT BY 1
START WITH 40
/
CREATE OR REPLACE TRIGGER bi_ht_issues
BEFORE INSERT on ht_issues
FOR EACH ROW
BEGIN
IF :new.issue_id IS NULL
THEN SELECT ht_issues_seq.nextval
INTO :new.issue_id
FROM DUAL;
END IF;
IF :new.status IS NULL
THEN :new.status := 'Open';
END IF;
:new.created_date := sysdate;
:new.created_by := nvl(wwv_flow.g_user,user);
END;
/
CREATE OR REPLACE TRIGGER bu_ht_issues
BEFORE UPDATE ON ht_issues
FOR EACH ROW
BEGIN
IF :new.actual_resolution_date IS NOT NULL
THEN :new.status := 'Closed';
END IF;
:new.last_modified_date := sysdate;
:new.last_modified_by := nvl(wwv_flow.g_user,user);
END;
/
COMMENT ON table ht_issues IS
'All issues related to the projects being undertaken by the company.'

Create Issues Script
A-6 Oracle HTML DB 2 Day Developer
/
COMMENT ON column ht_issues.issue_id IS
'The system generated unique identifier for the issue.'
/
COMMENT ON column ht_issues.issue_summary IS
'A brief summary of the issue.'
/
COMMENT ON column ht_issues.issue_description IS
'A full description of the issue.'
/
COMMENT ON column ht_issues.identified_by IS
'The person who identified the issue.'
/
COMMENT ON column ht_issues.identified_date IS
'The date the issue was identified.'
/
COMMENT ON column ht_issues.related_project IS
'The project that the issue is related to.'
/
COMMENT ON column ht_issues.assigned_to IS
'The person that the issue is assigned to.'
/
COMMENT ON column ht_issues.status IS
'The current status of the issue.'
/
COMMENT ON column ht_issues.priority IS
'The priority of the issue. How important it is to get resolved.'
/
COMMENT ON column ht_issues.target_resolution_date IS
'The date on which the issue is planned to be resolved.'
/
COMMENT ON column ht_issues.actual_resolution_date IS
'The date the issue was actually resolved.'
/
COMMENT ON column ht_issues.progress IS
'Any progress notes on the issue resolution.'
/
COMMENT ON column ht_issues.resolution_summary IS
'The description of the resolution of the issue.'
/
COMMENT ON column ht_issues.created_date IS
'Audit Column: Date the record was created.'
/
COMMENT ON column ht_issues.created_by IS
'Audit Column: The user who created the record.'
/
COMMENT ON column ht_issues.last_modified_date IS
'Audit Column: Date the record was last modified.'
/
COMMENT ON column ht_issues.last_modified_by IS
'Audit Column: The user who last modified the record.'
/
Create Issues Script
The following script populates Issues table for the issue tracking application.
--
-- Email Integration Issues

Create Issues Script
DDLs and Scripts for Issue Tracking Application A-7
--
INSERT INTO ht_issues
(issue_id, issue_summary, issue_description,
identified_by, identified_date,
related_project, assigned_to, status, priority, target_resolution_date,
progress, actual_resolution_date, resolution_summary)
VALUES
(1, 'Midwest call center servers have no failover due to Conn Creek plant
fire','',
6, sysdate-80,
3, 6, 'Closed', 'Medium', sysdate-73,
'Making steady progress.', sysdate-73, '')
/
INSERT INTO ht_issues
(issue_id, issue_summary, issue_description,
identified_by, identified_date,
related_project, assigned_to, status, priority, target_resolution_date,
progress, actual_resolution_date, resolution_summary)
VALUES
(2, 'Timezone ambiguity in some EMEA regions is delaying bulk forwarding to
mirror sites','',
6, sysdate-100,
3, 14, 'Open', 'Low', sysdate-80,
'','','')
/
INSERT INTO ht_issues
(issue_id, issue_summary, issue_description,
identified_by, identified_date,
related_project, assigned_to, status, priority, target_resolution_date,
progress, actual_resolution_date, resolution_summary)
VALUES
(3, 'Some vendor proposals lack selective archiving and region-keyed
retrieval sections','',
6, sysdate-110,
3, 13, 'Closed', 'Medium', sysdate-90,
'', sysdate-95, '')
/
INSERT INTO ht_issues
(issue_id, issue_summary, issue_description,
identified_by, identified_date,
related_project, assigned_to, status, priority, target_resolution_date,
progress, actual_resolution_date, resolution_summary)
VALUES
(4, 'Client software licenses expire for Bangalore call center before
cutover','',
1, sysdate-70,
3, 6, 'Closed', 'High', sysdate-60,
'',sysdate-66,'Worked with HW, applied patch set.')
/
INSERT INTO ht_issues
(issue_id, issue_summary, issue_description,
identified_by, identified_date,
related_project, assigned_to, status, priority, target_resolution_date,
progress, actual_resolution_date, resolution_summary)
VALUES
(5, 'Holiday coverage for DC1 and DC3 not allowed under union contract, per
acting steward at branch 745','',
1, sysdate-100,
3, 13, 'Closed', 'High', sysdate-90,
'',sysdate-95, 'Worked with HW, applied patch set.')

Create Issues Script
A-8 Oracle HTML DB 2 Day Developer
/
--
-- Employee Satisfaction Survey Issues
--
INSERT INTO ht_issues
(issue_id, issue_summary, issue_description,
identified_by, identified_date,
related_project, assigned_to, status, priority, target_resolution_date,
progress, actual_resolution_date, resolution_summary)
VALUES
(6, 'Review rollout schedule with HR VPs/Directors','',
8, sysdate-30,
5, null, 'Closed', 'Medium', sysdate-15,
'',sysdate-20,'')
/
INSERT INTO ht_issues
(issue_id, issue_summary, issue_description,
identified_by, identified_date,
related_project, assigned_to, status, priority, target_resolution_date,
progress, actual_resolution_date, resolution_summary)
VALUES
(7, 'Distribute translated categories and questions for non-English regions
to regional team leads','',
8, sysdate-2,
5, 8, 'Open', 'Medium', sysdate+10,
'currently beta testing new look and feel','','')
/
INSERT INTO ht_issues
(issue_id, issue_summary, issue_description,
identified_by, identified_date,
related_project, assigned_to, status, priority, target_resolution_date,
progress, actual_resolution_date, resolution_summary)
VALUES
(8, 'Provide survey FAQs to online newsletter group','',
1, sysdate-10,
5, 11, 'Open', 'Medium', sysdate+20,
'','','')
/
INSERT INTO ht_issues
(issue_id, issue_summary, issue_description,
identified_by, identified_date,
related_project, assigned_to, status, priority, target_resolution_date,
progress, actual_resolution_date, resolution_summary)
VALUES
(9, 'Need better definition of terms like work group, department, and
organization for categories F, H, and M-W','',
1, sysdate-8,
5, null, 'Open', 'Low', sysdate+15,
'','','')
/
INSERT INTO ht_issues
(issue_id, issue_summary, issue_description,
identified_by, identified_date,
related_project, assigned_to, status, priority, target_resolution_date,
progress, actual_resolution_date, resolution_summary)
VALUES
(10, 'Legal has asked for better definitions on healthcare categories for
Canadian provincial regs compliance','',
1, sysdate-10,
5, 11, 'Closed', 'Medium', sysdate+20,

Create Issues Script
DDLs and Scripts for Issue Tracking Application A-9
'',sysdate-1,'')
/
INSERT INTO ht_issues
(issue_id, issue_summary, issue_description,
identified_by, identified_date,
related_project, assigned_to, status, priority, target_resolution_date,
progress, actual_resolution_date, resolution_summary)
VALUES
(11, 'Action plan review dates conflict with effectivity of organizational
consolidations for Great Lakes region','',
1, sysdate-9,
5, 11, 'Open', 'Medium', sysdate+45,
'','','')
/
INSERT INTO ht_issues
(issue_id, issue_summary, issue_description,
identified_by, identified_date,
related_project, assigned_to, status, priority, target_resolution_date,
progress, actual_resolution_date, resolution_summary)
VALUES
(12, 'Survey administration consulting firm requires indemnification release
letter from HR SVP','',
1, sysdate-30,
5, 11, 'Closed', 'Low', sysdate-15,
'', sysdate-17, '')
/
--
-- Internal Infrastructure Issues
--
INSERT INTO ht_issues
(issue_id, issue_summary, issue_description,
identified_by, identified_date,
related_project, assigned_to, status, priority, target_resolution_date,
progress, actual_resolution_date, resolution_summary)
VALUES
(13, 'Facilities, Safety health-check reports must be signed off before
capital asset justification can be approved','',
4, sysdate-145,
1, 4, 'Closed', 'Medium', sysdate-100,
'',sysdate-110,'')
/
INSERT INTO ht_issues
(issue_id, issue_summary, issue_description,
identified_by, identified_date,
related_project, assigned_to, status, priority, target_resolution_date,
progress, actual_resolution_date, resolution_summary)
VALUES
(14, 'Cooling and Power requirements exceed 90% headroom limit -- variance
from Corporate requested','',
4, sysdate-45,
1, 9, 'Closed', 'High', sysdate-30,
'',sysdate-35,'')
/
INSERT INTO ht_issues
(issue_id, issue_summary, issue_description,
identified_by, identified_date,
related_project, assigned_to, status, priority, target_resolution_date,
progress, actual_resolution_date, resolution_summary)
VALUES
(15, 'Local regulations prevent Federal contracts compliance on section

Create Issues Script
A-10 Oracle HTML DB 2 Day Developer
3567.106B','',
4, sysdate-90,
1, 10, 'Closed', 'High', sysdate-82,
'',sysdate-85,'')
/
INSERT INTO ht_issues
(issue_id, issue_summary, issue_description,
identified_by, identified_date,
related_project, assigned_to, status, priority, target_resolution_date,
progress, actual_resolution_date, resolution_summary)
VALUES
(16, 'Emergency Response plan failed county inspector''s review at buildings
2 and 5','',
4, sysdate-35,
1, null, 'Open', 'High', sysdate-5,
'','','')
/
--
-- New Payroll Rollout Issues
--
INSERT INTO ht_issues
(issue_id, issue_summary, issue_description,
identified_by, identified_date,
related_project, assigned_to, status, priority, target_resolution_date,
progress, actual_resolution_date, resolution_summary)
VALUES
(17, 'Training for call center 1st and 2nd lines must be staggered across
shifts','',
5, sysdate-8,
2, 5, 'Closed', 'Medium', sysdate+10,
'',sysdate-1,'')
/
INSERT INTO ht_issues
(issue_id, issue_summary, issue_description,
identified_by, identified_date,
related_project, assigned_to, status, priority, target_resolution_date,
progress, actual_resolution_date, resolution_summary)
VALUES
(18, 'Semi-monthly ISIS feed exceeds bandwidth of Mississauga backup
site','',
5, sysdate-100,
2, 12, 'On-Hold', 'Medium', sysdate-30,
'pending info from supplier','','')
/
INSERT INTO ht_issues
(issue_id, issue_summary, issue_description,
identified_by, identified_date,
related_project, assigned_to, status, priority, target_resolution_date,
progress, actual_resolution_date, resolution_summary)
VALUES
(19, 'Expat exception reports must be hand-reconciled until auto-post
phaseout complete','',
5, sysdate-17,
2, 12, 'Closed', 'High', sysdate+4,
'',sysdate-4,'')
/
INSERT INTO ht_issues
(issue_id, issue_summary, issue_description,
identified_by, identified_date,
related_project, assigned_to, status, priority, target_resolution_date,

Create Issues Script
DDLs and Scripts for Issue Tracking Application A-11
progress, actual_resolution_date, resolution_summary)
VALUES
(20, 'Multi-region batch trial run schedule and staffing plan due to
directors by end of phase review','',
5, sysdate,
2, null, 'Open', 'High', sysdate+15,
'','','')
/
INSERT INTO ht_issues
(issue_id, issue_summary, issue_description,
identified_by, identified_date,
related_project, assigned_to, status, priority, target_resolution_date,
progress, actual_resolution_date, resolution_summary)
VALUES
(21, 'Auditors'' signoff requires full CSB compliance report','',
5, sysdate-21,
2, 5, 'Open', 'High', sysdate-7,
'','','')
/
--
-- Public Website Operational Issues
--
INSERT INTO ht_issues
(issue_id, issue_summary, issue_description,
identified_by, identified_date,
related_project, assigned_to, status, priority, target_resolution_date,
progress, actual_resolution_date, resolution_summary)
VALUES
(22, 'Review security architecture plan with consultant','',
1, sysdate-60,
4, 7, 'Closed', 'High', sysdate-45,
'',sysdate-40,'')
/
INSERT INTO ht_issues
(issue_id, issue_summary, issue_description,
identified_by, identified_date,
related_project, assigned_to, status, priority, target_resolution_date,
progress, actual_resolution_date, resolution_summary)
VALUES
(23, 'Evaluate vendor load balancing proposals against capital budget','',
7, sysdate-50,
4, 7, 'Closed', 'High', sysdate-45,
'',sysdate-43,'')
/
INSERT INTO ht_issues
(issue_id, issue_summary, issue_description,
identified_by, identified_date,
related_project, assigned_to, status, priority, target_resolution_date,
progress, actual_resolution_date, resolution_summary)
VALUES
(24, 'Some preferred domain names are unavailable in registry','',
7, sysdate-55,
4, 15, 'Closed', 'Medium', sysdate-45,
'',sysdate-50,'')
/
INSERT INTO ht_issues
(issue_id, issue_summary, issue_description,
identified_by, identified_date,
related_project, assigned_to, status, priority, target_resolution_date,
progress, actual_resolution_date, resolution_summary)

Create Issues Script
A-12 Oracle HTML DB 2 Day Developer
VALUES
(25, 'Establish grid management capacity-expansion policies with ASP','',
7, sysdate-20,
4, 16, 'Open', 'Medium', sysdate-5,
'','','')
/
INSERT INTO ht_issues
(issue_id, issue_summary, issue_description,
identified_by, identified_date,
related_project, assigned_to, status, priority, target_resolution_date,
progress, actual_resolution_date, resolution_summary)
VALUES
(26, 'Access through proxy servers blocks some usage tracking tools','',
7, sysdate-10,
4, 15, 'Closed', 'High', sysdate-5,
'',sysdate-1,'')
/
INSERT INTO ht_issues
(issue_id, issue_summary, issue_description,
identified_by, identified_date,
related_project, assigned_to, status, priority, target_resolution_date,
progress, actual_resolution_date, resolution_summary)
VALUES
(27, 'Phase I stress testing cannot use production network','',
7, sysdate-11,
4, 17, 'Open', 'High', sysdate,
'','','')
/
INSERT INTO ht_issues
(issue_id, issue_summary, issue_description,
identified_by, identified_date,
related_project, assigned_to, status, priority, target_resolution_date,
progress, actual_resolution_date, resolution_summary)
VALUES
(28, 'DoD clients must have secure port and must be blocked from others','',
7, sysdate-20,
4, 17, 'On-Hold', 'High', sysdate,
'Waiting on Security Consultant, this may drag on.','','')
/
