
instrumentation and software for research
MPC2XL
DATA TRANSFER UTILITY FOR MED-PC
®
USERS
SOF-731
USER’S MANUAL
DOC-036
Rev. 2.4
Copyright © 2012
All Rights Reserved
Med Associates Inc.
P.O. Box 319
St. Albans, Vermont 05478
Phone: 802.527.2343
Fax: 802.527.5095
www.med-associates.com
MED ASSOC I ATES INC. SOF- 7 31, M PC2XL
- ii -
notes
MED ASSOC I ATES INC. SOF- 7 31, M PC2XL
- iii -
TABLE OF CONTENTS
Chapter 1 | Introduction ................................................................................................. 1
Overview ................................................................................................................... 1
General Computer Environment .............................................................................. 1
Chapter 2 | Profile Overview .......................................................................................... 2
Table Profiles ............................................................................................................ 2
Row Profiles.............................................................................................................. 3
Record Profile ........................................................................................................ 3
Freestyle Table Profile .......................................................................................... 3
Chapter 3 | Creating and Editing Row Profiles ............................................................. 5
Creating a Row Profile ............................................................................................. 5
Customizing a Row Profile....................................................................................... 9
Deleting Columns .................................................................................................. 9
Editing Row 1 – Column Labels .......................................................................... 10
Editing Row 2 – Variables and Formulas ........................................................... 10
Tips on Transferring Row Data .............................................................................. 12
Other Editing Functions and Features .................................................................. 13
Setting Defaults with Command Line Parameters ................................................ 14
Steps for Setting Up Shortcuts with Command Line Parameters ....................... 14
Suggestions for Using MPC2XL ............................................................................ 15
Chapter 4 | Creating and Editing Table Profiles ......................................................... 17
Freestyle Tables ..................................................................................................... 17
Table Style Tables .................................................................................................. 20
Column Titles ....................................................................................................... 21
1
st
Column Element ............................................................................................. 21
Increment ............................................................................................................. 21
Last Column Element .......................................................................................... 21
Additional Considerations .................................................................................. 22
Record Style Tables ............................................................................................... 22
Adding and Deleting Header Rows, Blank Rows and Table Rows ...................... 23
Automatically Inserting A Trial Number ................................................................ 23
MED ASSOC I ATES INC. SOF- 7 31, M PC2XL
- iv -
Enabling/Disabling Popup Hints ............................................................................ 23
Selecting the Correct Output Target ..................................................................... 23
Explicitly Supported Applications ...................................................................... 23
Transferring Data to Unsupported Applications ............................................... 23
Chapter 5 | Frequently Asked Questions .................................................................... 25
Appendix A | Installing MPC2XL .................................................................................. 27
Appendix B | Contact Information ............................................................................... 28
MED ASSOC I ATES INC. SOF- 7 31, M PC2XL
- 1 -
DOC-036 Rev 2.4 Copyright © 2012
MED Associates, Inc.
CHAPTER 1 | INTRODUCTION
Overview
The purpose of this program is to create a fast and easy system for transferring the
contents of MED-PC
®
data files to Microsoft Excel
®
spreadsheets, Quattro Pro and
Access. Additionally, programs are supported by virtue of their ability to utilize
embedded Excel spreadsheets, read comma-separated files (CSV) or past data from the
Windows clipboard. Most users find MPC2XL to be most flexible when used with Exc el
or Quattro Pro. All examples within this manual are with reference to Excel, but the
techniques will work equally well with Quattro Pro.
The system is based on creating a “profile” or template for the layout of the
spreadsheet. After a profile is created and saved it may then be used to automatically
transfer data. The creation of profiles is highly automated, yet very flexible. No
programming is required. Any MED-PC data file may be transferred to Excel, regardless
of the file naming scheme or the internal file format.
General Computer Environment
MPC2XL is compatible with Windows 95 or higher. Any computer suitable for this
environment will also support MPC2XL. Direct transfer to Excel requires Excel 97 or
higher; however transfers to other versions of Excel or other spreadsheet programs can
be made via the clipboard.

MED ASSOC I ATES INC. SOF- 7 31, M PC2XL
- 2 -
DOC-036 Rev 2.4 Copyright © 2012
MED Associates, Inc.
CHAPTER 2 | PROFILE OVERVIEW
There are two basic types of profiles that may be created row profiles and table profiles.
Row profiles organize data from a session into a singe spreadsheet ro w; table profiles
create multiple rows and columns.
Table Profiles
Table profiles may be used in a variety of ways to transfer data in a tabular format to
Excel. Table profiles provide a great deal of flexibility, but are not created automatically
from sample MED-PC
®
data files in the same fashion as row profiles. There are three
basic types of tables that can be created using the table editor; freestyle table, table
style table, and record style table.
The table profile was designed to present trial-oriented data along with session
identifying information. Clicking the Create Table button (Figure 2.2) creates this type
of table. Session identifiers, as well as data, may be placed in the “Header Titles” and
“Header Elements” rows. “Header Titles” may bear the same name as a data element or
they may be different.
A key aspect of data tables is the ability to systematically extract data from an array
variable without the need to explicitly type in every data element that should appear in
the table. This facility is ideal for creating tables displaying the results of trial -oriented
sessions. Figure 2.1 displays data from a “delayed non-match to sample” protocol. This
hypothetical session consists of five trials. For each trial, eight entries were made into
array “A”: the trial number, trial duration, delay value, response tags, counts and
latencies.
Figure 2.1 - Example Table Style Table
MED ASSOC I ATES INC. SOF- 7 31, M PC2XL
- 3 -
DOC-036 Rev 2.4 Copyright © 2012
MED Associates, Inc.
Row Profiles
Row profiles transfer data to Excel on a row-by-row basis. Every session that is
transferred to Excel becomes a row in the spreadsheet. Excel spreadsheets are limited
to 256 columns, but the number of rows is practically unlimited. The profile generator,
which may be easily edited as needed, automatically creates a sample profile. This
format is useful for organizing data from many sessions so that the summary statistics
may be organized for analysis. Formulas for the summary statistics may be placed
directly in the profile so the results are present the instant the data are transferred.
Record Profile
Record tables are designed to transfer trial-oriented data to Excel with adequate
descriptive information in each row so that the data in each row stands as an
independent record. For example, including subject and date information in each row
with trial data allows one to sort or analyze all of the data for an entire experiment by
these elements, perhaps broken down by ranges of dates or by subject subgroups. The
key to producing this type of data structure is to place session identifiers, such as
“Subject”, in the first few columns of the table, leaving the “Increment” and “Last
Column Element” fields blank. The remaining columns contain data elements for each
trial, resulting in the identifier and data information being present in each row. This
creates a database-like spreadsheet that allows one to ask very detailed questions about
trial or event oriented data. The details for creating the trial-oriented data table are the
same as for the table profile. By transferring data only (without headers) after the first
data file, and entire experiment may be analyzed using this method.
Freestyle Table Profile
The simplest table is a “Freestyle” report, which is created by clicking the Create
Freestyle button (Figure 2.2), which creates a blank table. The right click menu may be
used to paste special identifiers into the table. There are two types of identifiers. One
type corresponds directly to data retrieved from MED-PC
®
data files. This includes the
box and subject numbers and the year in which the session was started. The second
type of identifier begins with an exclamation point and is constructed by MPC2XL from
other identifiers. For example, !StartDate and !EndDate combine the year, month and
day into a single number expressed in YYMMDD (or YYYYMMDD) format. For example,
July 3, 2009 would be expressed as either 090703 or 20090703 depending upon whether
the MSN code used to generate the data file contained the Y2KCOMPLIANT directive.
The !CondensedStartTime and !CondensedEndTime functions create a single number
reflecting HHMMSS. For example, 10:14:32 would be expressed as 101432.

MED ASSOC I ATES INC. SOF- 7 31, M PC2XL
- 4 -
DOC-036 Rev 2.4 Copyright © 2012
MED Associates, Inc.
Figure 2.2 – Edit Table Profiles Screen
Descriptive labels are not automatically entered for identifiers. This allows the user to
place a descriptive label (or even no label) wherever desired. Figure 2.3 is an example
of a spreadsheet created with the freestyle profile.
Figure 2.3 - Example Freestyle Table

MED ASSOC I ATES INC. SOF- 7 31, M PC2XL
- 5 -
DOC-036 Rev 2.4 Copyright © 2012
MED Associates, Inc.
CHAPTER 3 | CREATING AND EDITING ROW PROFILES
Creating a Row Profile
This section explains the creation of a row profile, then how to use the row profile to
transfer data. For this example, an Excel spreadsheet is used; however, it will work
equally well with other output targets. To change the output target, select File | Output
Target, then make a selection. If the desired target is not on the list, select clipboard.
See Figure 3.1.
Figure 3.1 - Output Target Menu
1. Print a copy of the MED-PC
®
procedure that has generated the data that will be
analyzed and review the comments section to determine which variables were used
for data of interest. For this example, the procedure FR10.MPC has been supplied.
2. Open the MPC2XL application.
3. Click on the Edit Row Profiles tab.
Figure 3.2 - Edit Row Profiles Tab

MED ASSOC I ATES INC. SOF- 7 31, M PC2XL
- 6 -
DOC-036 Rev 2.4 Copyright © 2012
MED Associates, Inc.
4. Click the Create button and select a data file for the sample profile. For this
example, open !SAMPLE.01 as shown in Figure 3.3 to produce the “spreadsheet”
shown in Figure 3.4. If this window does not open full size, it may be stretched using
the standard click-and-drag method.
Figure 3.3 - Row Profile Data File Selection
Figure 3.4 - Row Profile "Spreadsheet"
5. Notice that every variable in the data file is represented on the screen, as well as the
following header information:
Subject
Startdate (year, month and day that the session was initiated)
Starttime (hours, minutes and seconds when the session was initiated)
Experiment
Group
Box

MED ASSOC I ATES INC. SOF- 7 31, M PC2XL
- 7 -
DOC-036 Rev 2.4 Copyright © 2012
MED Associates, Inc.
Comment (blank if no comment was entered during the session)
Every simple variable and array element written to the data file.
6. To use this profile as is, click Save and name the profile. For this example, name the
file sample1. A file extension will automatically be assigned and listed under Profile
Editor (Figure 3.5).
Figure 3.5 - Row File Extension
7. Click File | Output Target and verify that Excel is selected. Open Excel and position
the mouse cursor on the cell that will be the upper left corner of the block of data
being transferred. In this case, click in the cell name A1 (see Figure 3.6).
8. Return to MPC2XL and click the Transfer Data tab. In the “Transfer” box, check the
Column Labels and Data options, as shown in Figure 3.7. Then click the Select
button in the “Row Transfer” box and select the profile saved in Step 6. Finally, click
the “Transfer” button and select !SAMPLE.01, the data file used in Step 4 to create
the profile.
Figure 3.6 - Cell Selection

MED ASSOC I ATES INC. SOF- 7 31, M PC2XL
- 8 -
DOC-036 Rev 2.4 Copyright © 2012
MED Associates, Inc.
Figure 3.7 - Transfer Selections
9. Return to the Excel spreadsheet. It should appear as in Figure 3.8, with the column
labels and data. The next time data is transferred, simply “Select” the p rofile and
click “Transfer”, using the profile that has been created. It is possible to transfer
only data by leaving the “Column Labels” box unchecked. For example, once again
click in the cell that will be the starting position of the data (Figure 3.9). Transfer the
data only by unchecking the Column Labels option in Figure 3.7. Transfer the data
from file !SAMPLE.02 to produce the results shown in Figure 3.10.
Figure 3.8 - Row Profile Excel Spreadsheet
Figure 3.9 - No Column Labels Cell Selection

MED ASSOC I ATES INC. SOF- 7 31, M PC2XL
- 9 -
DOC-036 Rev 2.4 Copyright © 2012
MED Associates, Inc.
Figure 3.10 - Row Profile Spreadsheet without Column Labels
Customizing a Row Profile
The following steps allow the user to customize the profile. Begin by selecting the Edit
Row Profiles tab in MPC2XL and then opening the profile SAMPLE1, if not already open.
Note that the upper left-most cell should read “Edit Mode”. If not, it may be clicked at
this time to enter the edit mode. Perform an or all of the following steps:
Deleting Columns
In most cases, not all columns are needed. For this example, delete some of the header
information, such as StartDate, StartTime, Experiment, Group, Box and Comment and
the zero value variables “B” and “C”. To delete a column, highlight any cell in the
column and right click to reveal the menu shown in Figure 3.11. Select Delete Columns
and enter the number of columns to delete. For example, enter 3 to delete the current
column plus the two columns to the right. The profile should now appear as shown in
Figure 3.12.
Figure 3.11 - Column Edit Menu and Number of Columns to Delete
Figure 3.12 - Modified Profile
NOTE: Large data arrays may result in the editor displaying more than 256 colum ns.
The “Delete Multiple Columns” command should be used to delete columns in
this situation. It is also possible to transfer data to a vertical column, greatly

MED ASSOC I ATES INC. SOF- 7 31, M PC2XL
- 10 -
DOC-036 Rev 2.4 Copyright © 2012
MED Associates, Inc.
expanding the number of elements that the spreadsheet can hold. Select the
“Orientation” style desired, as shown in Figure 3.13
Figure 3.13 - Orientation Selection
Editing Row 1 – Column Labels
The first row of the spreadsheet is defined as the Column Label row. It cont ains generic,
descriptive labels for header and variable information. These labels will be transferred
to the spreadsheet if “Transfer Labels” is selected; however, they do not control the
transfer of data. These labels may be edited. For example, change “A” to Response, “D”
to Reward, and “T” to time as shown in Figure 3.14.
Figure 3.14 - Renamed Profile Labels
Editing Row 2 – Variables and Formulas
The second row of the spreadsheet is defined as the Element Name row. It contains the
variable names, formulae and functions that affect data to be transferred. Variables are
specified by name, A, B, C, etc., while array elements are specified by the array name
and subscript, A(0), A(1), A(2), etc.
In this example the values of variables A,D and T are displayed in columns 2, 3 and 4
respectively. By using the information from the procedure that created the !SAMPLE.01
file, we were able to label these columns. This example will change the zero value
variable Z to response rate in responses/minute.
Columns may be added by right clicking on any cell. The new column(s) will be inserted
to the left. Cell contents may be moved using the “click and drag” method or by right
clicking on the column whose contents will be moved and selecting “Cut”, then right
clicking on the column to the right of where the contents will be added and select

MED ASSOC I ATES INC. SOF- 7 31, M PC2XL
- 11 -
DOC-036 Rev 2.4 Copyright © 2012
MED Associates, Inc.
“Paste.” Keep in mind that column 1 is equivalent to column A on the spreadsheet and
that the row containing data is row 2 in the spreadsheet.
Response rate (in minutes) can be calculated by taking 60 times the response count,
divided by the session time (in seconds). Using the standard A1 reference style, the
formula would look like =60*B2/D2, where the response count is in column B and the
session time is in column D. This method is effective if each file contains only one set of
datum, but if the sample file contains data from five animals, then the R1C1 reference
style must be used in Excel, where R = ROW, C = COLUMN and the number in [ ]’s
represents the position of the cell containing the formula. Refer to the Excel help topics
for more information on this feature. To activate this feature select Tools | Options |
General, then be sure that R1C1 reference style is selected, see Figure 3.15.
Figure 3.15 - Selecting R1C1 Reference Style
Using this format the response rate in minutes now becomes =60*RC[-3]/RC[-1]. Place
this formula in Row 2, Column 5. Complete this task by changing the label in Row 1,
Column 5 from “Z” to “Rate” and click the “Update” button to transfer the formula to
Row 3. The profile should now be identical to Figure 3.16.
The bottom row contains data from the sample data file. The only purpose of the third
row is to help recognize the contents of the variables contained in the second row. Now
save the changes. A new profile name may be assigned or the profile may be
overwritten to the SAMPLE1 file. The data may now be transferred. The transferred
data should resemble Figure 3.17. Refer to the Tips on Transferring Row Data section
of this manual for transferring additional blocks of data.
Figure 3.16 - Formula

MED ASSOC I ATES INC. SOF- 7 31, M PC2XL
- 12 -
DOC-036 Rev 2.4 Copyright © 2012
MED Associates, Inc.
Figure 3.17 - Spreadsheet with Formula
Tips on Transferring Row Data
1. Check Column Labels if the columns labels should be transferred to the spreadsheet.
This is normally done only when setting up a new sheet. Labels are typically put in
the first row and it is generally not advisable to put multiple rows of labels in a row -
oriented spreadsheet. This option is not selected by default.
Figure 3.18 - Transfer Panel
2. Check Data if the actual data should be transferred. This option is selected by
default. To add data to the spreadsheet, uncheck Column Labels so that only Data is
selected, and make sure the first cell to be used for the next block of data is
selected. This could be the first row below the first block of data or the first column
to the right of the first block of data.
3. Click the Transfer button and select one or more data files to transfer to Excel. Note
that noncontiguous files in the dialog may be selected by holding the Ctrl key while
clicking on the desired files. A contiguous range of files may be selected by holding
the Shift key while clicking on the first and last files. The data will be transferred
after clicking the OK button of the file dialog.
4. The Orientation panel controls whether the data is transferred as rows or as
columns. Although the row editor displays profiles as rows, it is also possible to
transfer data in columns just by selecting Vertical (Columns). If 256 or more
columns per row are being transferred, then it is advisable to transfer data in the
default horizontal format due to the limitations of Excel.

MED ASSOC I ATES INC. SOF- 7 31, M PC2XL
- 13 -
DOC-036 Rev 2.4 Copyright © 2012
MED Associates, Inc.
Figure 3.19 - Orientation Panel
5. Command line parameters may be used in conjunction with shortcuts to MPC2XL to
specify default profile names and data directories. This may simplify the use of
MPC2XL for technicians.
Other Editing Functions a nd Features
1. The width of columns may be adjusted to facilitate editing of long labels and
formulae by positioning the cursor between two columns in the gray row labeled
“Column” and then dragging the mouse while holding down the left mouse button.
This will have no effect on the resulting output.
2. Columns may be moved by positioning the cursor on the column row in the center of
a column heading and dragging the mouse while holding down the left mouse
button. Release the button when the column is in the desired position.
3. The “Column Label” row contains arbitrary descriptive labels. These labels may be
transferred to the spreadsheet if desired, but they do not control the flow of data
from data files into the spreadsheet.
4. The “Element Name” row controls the transfer of data. In addition to special
identifiers, variable and array elements may be specified in this row. Variables are
specified by their name, while array elements are specified by the array name and
subscript.
5. Many spreadsheets are limited to 256 columns, but the number of rows is practically
unlimited. If more than 256 columns are present in the row profile when you
attempt to save it, a dialog box will appear suggesting that the number of columns in
the profile be reduced. This warning may be ignored if the data will be transferred in
columns. See the note under “Deleting Columns.”
6. The transfer process is extremely fault tolerant. For example, it is acceptable to
include variables in a row profile that may or may not be present in data files that
are transferred with the profile. If a profile requests a variable that is not present in
a particular data file, the resulting spreadsheet row will just contain the name of the
requested variable, rather than a value for the variable.
7. The table and profile editors operate in two modes – “Edit Mode” and “Selection
Mode”. These modes determine whether the mouse may be used to select multiple

MED ASSOC I ATES INC. SOF- 7 31, M PC2XL
- 14 -
DOC-036 Rev 2.4 Copyright © 2012
MED Associates, Inc.
cells for cut, copy and paste operations. The mode is displayed in red text in the
upper-left corner of the grid. Clicking on the corner cell toggles the mode. Cell
entries can only be edited when the grid is in Edit Mode. To copy a range of cells,
place the grid in Selection Mode, then drag the mouse while holding the left mouse
button to highlight multiple cells. After a range of cells has been selected, cut, copy
and paste functions may be accessed from the Edit submenu of the right-click menu.
Figure 3.20 - Edit Mode and Selection Mode
Setting Defaults with Command Line Parameters
A very convenient way to use MPC2XL is to create multiple shortcuts to then program
and edit the properties of each shortcut to pass command line parameters to MPC2XL.
MPC2XL accepts command line parameters specifying a default row profile, a default
table profile, and a default data directory. This will help technicians to use MPC2XL
efficiently and accurately. It is especially convenient to create a separate shortcut for
each experiment or type of analysis.
Steps for Setting Up Shortcuts with Command Line Parameters
1. Create a shortcut to MPC2XL. This may be done by finding MPC2XL in Windows
Explorer, then right clicking on MPC2XL and selecting “Create Shortcut” from the
popup menu.
2. Drag the shortcut to the desktop.
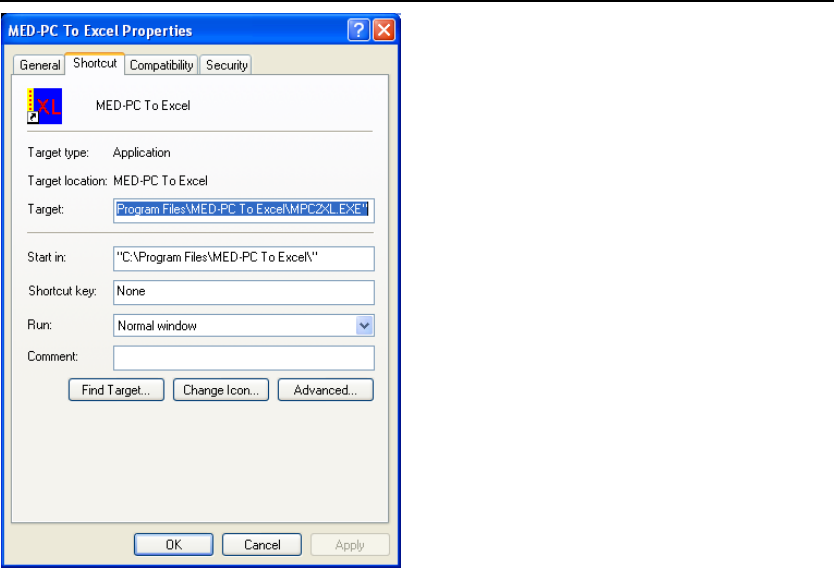
3. Right click on the shortcut and select Properties. Select the Shortcut tab as shown in
Figure 3.1
MED ASSOC I ATES INC. SOF- 7 31, M PC2XL
- 15 -
DOC-036 Rev 2.4 Copyright © 2012
MED Associates, Inc.
Figure 3.21 - Editing a Shortcut
4. Edit the Target field to add a complete path to a row and/or table profile that should
be automatically selected on the “Transfer Data” tab of MPC2XL. Be sure to include
drive, directory, filename and file extensions. For example, SAMPLE1.MRP and
TABLE1.MTP could be specified by amending the “Target” entry to read:
C:\MPC2XL\MPC2XL.EXE C:\MPC2XL\SAMPLE1.MRP C:\MPC2XL\TABLE1.MTP
Note that MPC2XL will recognize row profiles versus table profiles on the basis of their
extensions. The order in which they appear does not matter, and it is acceptable to
specify just one. However, the path to MPC2XL must be specified before any profiles.
Click Apply to make the changes.
A default data directory may be specified by editing the Start in field. If the data for the
experiment is kept in “C:\MPC2XL”, then edit the field accordingly.
Suggestions for Using MPC2XL
1. If large amounts of event data are being collected (e.g., the time of occurrences of
every response), consider also collecting summary data. Then set up separate
profiles to transfer the summary data and event data into Excel. The summary data
may be conveniently managed in a row-oriented profile, whereas a table profile or
record-oriented profile could be used to manage the event data.

MED ASSOC I ATES INC. SOF- 7 31, M PC2XL
- 16 -
DOC-036 Rev 2.4 Copyright © 2012
MED Associates, Inc.
2. Consider collecting data for an entire experiment and for all subjects on a single
spreadsheet page. Coupled with features such as sorting, pivot tables and
autofilters, this approach allows the user to analyze data in a very flexible fashion.
HINT: MPC2XL provides extensive popup hints that change as the cursor is moved
about the application. These hints may be toggled on and off by clicking File
| Preferences | Display Hints (Figure 3.22).
Figure 3.22 - Display Hints Option

MED ASSOC I ATES INC. SOF- 7 31, M PC2XL
- 17 -
DOC-036 Rev 2.4 Copyright © 2012
MED Associates, Inc.
CHAPTER 4 | CREATING AND EDITING TABLE PROFILES
Table profiles may be used in a variety of ways to transfer data in a tabular format.
Table profiles provide a great deal of flexibility, but are not created automatically from
MED-PC data files in the same fashion as row profiles. There are three basic types of
tables, Freestyle, Table Style and Record Style, which can be created using the table
editor (contained in the “Edit Table Profiles” tab).
Freestyle Tables
This is the simplest table to create. A Freestyle Table is created by clicking the Create
Freestyle button (see Figure 4.1). The right mouse button may then be used to insert
identifiers. Note that descriptive labels are not automatically entered for identifiers.
This allows the user to place descriptive labels (or no label) wherever desired. The
following example assumes that the section on Creating and Editing Row Profiles has
already been read and that the basic tools of MPC2XL are already understood. It also
assumes that Excel will accept RC formula notation.
1. Launch MPC2XL; click on the Edit Table Profiles tab at the top of the form and then
the Create Freestyle button on the bottom row of the form. The blank form in
Figure 4.1 should now be displayed.
Figure 4.1 - Blank Freestyle Table
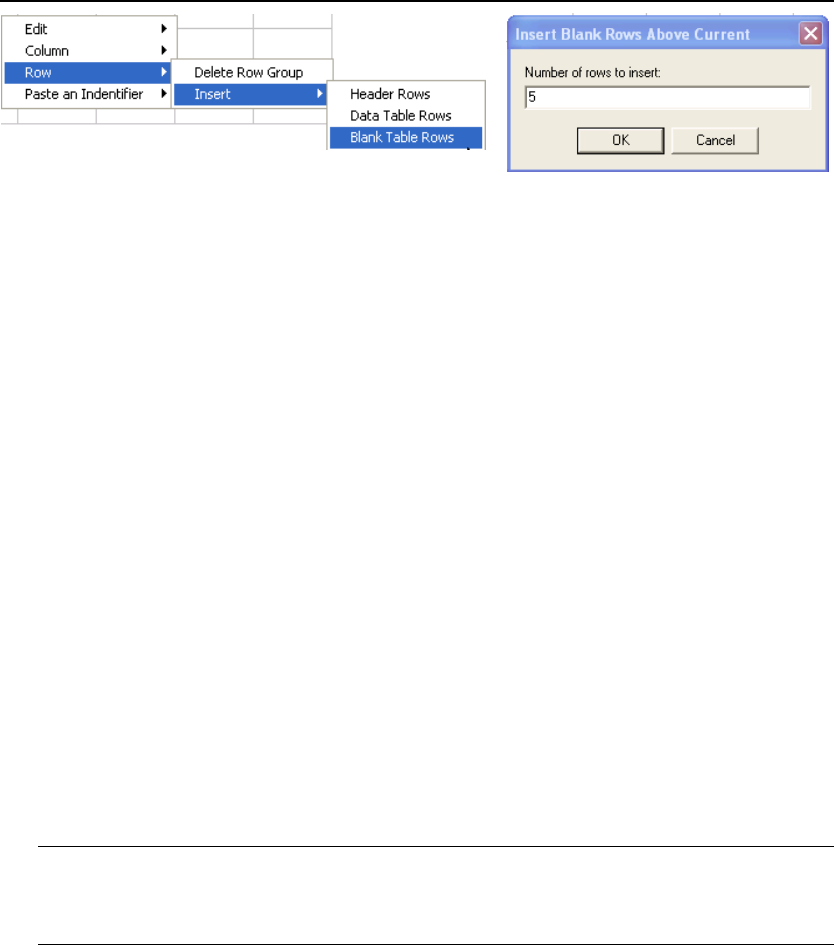
2. Click Cell R1C1 and right click Row | Insert | Blank Table Rows | Number of Rows to
Insert, as shown in Figure 4.2, to add 5 rows to the blank sheet.
MED ASSOC I ATES INC. SOF- 7 31, M PC2XL
- 18 -
DOC-036 Rev 2.4 Copyright © 2012
MED Associates, Inc.
Figure 4.2 - Inserting Blank Rows
Place the following labels in the first Column:
Row 1: Start Date:
Row 2: Start Time:
Row 3: Subject ID:
Row 4: Comments:
Row 5: Leave Blank
Row 6: Response Count:
Row 7: Session Time:
Row 8: Response Rate:
Place the following Identifiers (right click | Paste an Identifier) in Column 2:
Row 1: Condensed Start Date (choose either format)
Row 2: Condensed Start Time (choose either format)
Row 3: Subject
Row 4: Comment
Type in the following Variables and formulas as indicated:
Row 6, Column 2: A
Row 7, Column 2: =RC{1}/60
Row 7, Column 3: T
NOTE: Because the data file contains time in seconds the report should show
minutes, the variable value was placed in Column 3 (which can be hidden in Excel
if desired) and the formula for time in minutes was placed in Column 2.
Row 8, Column 2: =R[-2]C/R[-1]C

MED ASSOC I ATES INC. SOF- 7 31, M PC2XL
- 19 -
DOC-036 Rev 2.4 Copyright © 2012
MED Associates, Inc.
The complete profiles should look similar to Figure 4.3. Save this profile as table1.
Figure 4.3 - Freestyle Table Profile
3. Click the Transfer Data tab at the top of the page. Under Table Transfer, click the
Select button and click on Table1.mtp. Click the Transfer button and select the
sample.01 file. Clicking Open automatically initiates the data transfer process.
4. Return to the Excel spreadsheet to review a sample report similar to that shown in
Figure 4.4.
Figure 4.4 - Sample Freestyle Spreadsheet

MED ASSOC I ATES INC. SOF- 7 31, M PC2XL
- 20 -
DOC-036 Rev 2.4 Copyright © 2012
MED Associates, Inc.
Table Style Tables
The table style profiles, like the freestyle table, require that the user define each cell;
however, it has more structure to it than the freestyle. This style of table was designed
to present trial-oriented data along with session identifying information. Create this
type of table by clicking the Edit Tables tab at the top of the MPC2XL form and the
Create Table button at the bottom of the form to produce a blank form similar to the
one shown in Figure 4.5.
Figure 4.5 - Blank Table Style Table
In contrast to the freestyle row, which doesn’t have a label in the left column,
descriptive labels in the “Header Titles” row may bear the same name as a data element.
Right click the first cell in the “Header Titles” row and select Paste an Identifier, then
click the identifier to insert, for example Condensed Start Date. Note that this selection
allows the user to select a date format. Once selected, the start date title appears in
the title row and the data element in the “Header Elements” row. The title may be
edited if desired. In the example, a space was added between “Start” and “Date”. User
defined titles may also be entered in the “Header Titles” row with the appropriate
variable name for the formula placed in the “Header Elements” row just below the titles.
Free form data may also be added just below the Header Elements by inserting “Blank
Rows”. This is done by right clicking the black row, then selecting Row | Insert | Blank
Table Rows.
A key aspect of data tables is the ability to systematically extract data from an array
without the need to explicitly type in every data element that should appear in th e
table. This facility is ideal for creating tables displaying the results of trial-oriented
sessions. A sample profile has been provided. Click on Open then highlight Table2.mtp,
then click Open again to view the sample profile shown in Figure 4.6. This table was
created to extract data from a delayed non-match to sample experiment. The MSN
procedure that produced this file was written to place 11 data elements in array “A” for
each trial. If fifty trials (instead of five in the file !sample.04) were present, one would
have initially enter as many as 550 elements in a freestyle table. A trial -oriented table
uses the “Column Titles”, “1st Column Element”, “Increment”, and “Last Column
Element” rows, which function together to create the data table.

MED ASSOC I ATES INC. SOF- 7 31, M PC2XL
- 21 -
DOC-036 Rev 2.4 Copyright © 2012
MED Associates, Inc.
Figure 4.6 - Example Table Style Table
Column Titles
Identical to the Freestyle Table. Enter titles that are appropriate for each column. In
the example, Trial Number, Trial Duration, and Delay (sec) have been entered for the
first three columns.
1
st
Column Element
Enter the first element to begin selecting from. In this example, this is element (0);
however, it may be any legal element defined in the MSN procedure. Also notice that in
column 2 the elements do not appear to have any particular order. Although not shown,
elements could come from different arrays.
Increment
The number of elements for each trail or data block. In the example, the MSN
procedure saved 11 elements per trial, elements 0-10 for trial 1, elements 11-21 for trial
2, etc. This increment size will be the same for all elements from the same array. Note,
that is not the number of elements to transfer. In the example, elements 8,9 and 10
from each block were not used.
Last Column Element
The last element that may be selected. If an array is only used for “common” data, then
the easiest entry is the last element as defined by the DIM statement in the MSN
procedure. In the example, 500 has been used for columns 1 and 2. The last element
may also be precisely defined as in the remaining columns.
Transferring data using the “table” profile is the same as transferring row data. If
changes were made to this profile, click Save. Next click the Transfer Data tab at the
top of the MPC2XL form. In the Table Transfer section of the form, “No Profile
Assigned” or “C:\MPC2XL1\Table2.MRP” should appear. If “No Profile Assigned”
appears, click Select and open profile Table2.MRP. Next check both the “Column
Labels” and “Data” boxes. Make sure cell R1C1 is selected on a clean spreadsheet, then
click Transfer, and open the data file !Sample.04 to produce Figure 4.7.

MED ASSOC I ATES INC. SOF- 7 31, M PC2XL
- 22 -
DOC-036 Rev 2.4 Copyright © 2012
MED Associates, Inc.
Figure 4.7 - Table Style Table
Additional Considerations
1. The data for different columns may be contained in more than one array.
2. The data may begin somewhere in the middle of the array.
3. Fixed information may be placed into the table by leaving the “Increment” and “Last
Column Element” fields empty then placing an entry in the “1
st
Column Element”
field. For example, a formula could be placed in the “1
st
Column Element” field that
manipulates other data in the row.
4. It is not a problem if the entries for various columns generate differing numbers of
table entries; the table will be dimensioned to accommodate the largest data
request and blank cells will be outputted as necessary. For example, one column
could generate 3 rows, whereas another could require 10. In this case, a tabl e with
10 rows would be created.
Record Style Tables
The record style profile, like the freestyle and table style, requires that the user defines
each cell. It is designed to transfer trial-oriented data without any descriptive labels.
The details for creating the trial-oriented data table are the same as described for the
table style profile. The purpose of the record table is to create data rows containing
only data, without any headers. One use for this format is to create database -like
spreadsheets that allow one to ask very detailed questions about trial- or event-oriented
data. The basic concept is to create a row for each trial, subject, experiment, etc. and to
include adequate descriptive information in each row so that the data in each row
stands as an independent record. For example, including subject and date information
in each row allows one to sort or analyze all of the data for an entire experiment by trail
number, perhaps broken down by ranges of dates or by subject. The key to producin g
this type of data structure is to place session identifiers, such as “Subject”, in the “1
st
Column Element” cell and to leave the “increment” and “Last Column Element” fields
blank. Combined with array information in other columns, this will result in t he subject
number being placed in each row.

MED ASSOC I ATES INC. SOF- 7 31, M PC2XL
- 23 -
DOC-036 Rev 2.4 Copyright © 2012
MED Associates, Inc.
NOTE: The Column Labels and Data Transfer option should only be selected the first
time that data is transferred to a given sheet. This will ensure that only data
are transferred once a header row has been placed in the spreadsheet.
Adding and Deleting Header Rows, Blank Rows and Table Rows
The three table formats that have been discussed above may all be customized through
the use of the right mouse button menu. For example, more than one data table may
appear in a profile by using the Row | Insert | Data Table Rows menu selection. In a
similar manner, blank rows or free form data may be added by inserting a blank row and
editing as desired. The order in which various types of rows are included are irreleva nt
– MPC2XL will faithfully produce a table.
Automatically Inserting A Trial Number
“!RowNumber” is an identifier from the right mouse menu only when editing a Table
profile. This identifier inserts a number corresponding to the row of the current set of
table rows that is being created. A typical use for this function is to automatically insert
trial number when displaying trial-oriented data. This function is ignored if it is
manually inserted into a row profile.
Enabling/Disabling Popup Hints
MPC2XL provides extensive popup hints that change as the cursor is moved about the
application. These hints may be toggled on and off by clicking Edit | Preferences |
Display Hints menu selection.
Selecting the Correct Output Target
Explicitly Supported Applications
Excel, Quattro Pro, SPSS and Access are explicitly supported by MPC2XL. To transfer
data to the programs, pull down the File | Output Target menu selection and select the
appropriate application. Data for these applications are automatically inserted
wherever the cursor is located. When using MPC2XL with SPSS, data may only be
transferred using Row Oriented Profiles. This is because SPSS expects the user to
explicitly define the variable type (text, integer, etc.) that each column will contain.
Transferring Data to Unsupported Applications
Method 1: Pasting Data from the Windows Clipboard.
Data may be transferred to some unsupported application by selecting the “Clipboard”
option under the File | Output Target menu. When this application is selected, data are
placed on the Windows clipboard. Use the unsupported application’s Edit | Paste
command to paste the data from the clipboard into the application. This method works
with Sigmaplot 4.0.
MED ASSOC I ATES INC. SOF- 7 31, M PC2XL
- 24 -
DOC-036 Rev 2.4 Copyright © 2012
MED Associates, Inc.
Method 2: Save the data as a Comma Separated File (CSV).
Many applications are capable of importing data files that have been saved in CSV
format. Determine whether or not the application supports this format by using File |
Open and browsing through the list of file formats appearing in the drop down box of
file formats. To transfer data to a CSV file, select “CSV File” from the File | Output
Target menu. Next the user will be prompted to enter a filename for the CSV file
whenever a file is transferred. Note that appending data to CSV files is not support ed;
use a new filename if the existing CSV file should not be overwritten. In practice, this
should now be a difficulty because it is best to save the data in the target application’s
file format after importing data with its CSV option.
Method 3: Transfer the Data to Excel and the Open the Spreadsheet in the Desired
Application.
Many applications, such as Sigmaplot, are capable of opening or embedding Excel
spreadsheets. It may be possible to transfer the data to an Excel spreadsheet, save the
spreadsheet and then open it in the desired application. A variation or this approach is
to transfer the data to Excel and the use Excel’s File | Save As command to save the
spreadsheet in a format that the target application is capable of importing. Excel is
capable of saving data in a variety of formats, including DIF, WKS and DBF.
MED ASSOC I ATES INC. SOF- 7 31, M PC2XL
- 25 -
DOC-036 Rev 2.4 Copyright © 2012
MED Associates, Inc.
CHAPTER 5 | FREQUENTLY ASKED QUESTIONS
Does MPC2XL support all MED-PC data formats?
Yes, however the stripped without identifiers format is generally not recommended
because the internal structure does not provide information about the names of the
variables and arrays it uses.
Can data files contain more than one session or sessions with different formats?
Yes, however this can lead to errors in data collection. MPC2XL transfers all data for
which matches can be found between the profile and the file. Because of this we
recommend a single file for each subject, for each session.
What happens if my data contains more than one session and the data is from
different experiments with different data structures?
MPC2XL will transfer all of the data to the extent that matches can be found between
data elements requested in the profile and the data actually found in the data files. No
particular harm will occur in this situation, but you may end up transferring data from
the sessions that are unrelated to the experiment for which the profile was created. It
might be tempting to conclude that MPC2XL should have been designed to skip sessions
for which a reasonable match between the profile and the data file cannot be found.
However, this strategy was not implemented because it would have severely reduced
the overall power of MPC2XL. The advantage to having a “fuzzy” system is that it is very
fault-tolerant and allows one to make changes to the data structure of an experiment as
the experiment evolves, without necessarily forcing the creation of a new profile.
How do I handle large amounts of data?
If you are collecting large amounts of event data (e.g., the time of occurrence of every
response), consider also collecting summary data. Then set up separate profiles to
transfer the summary data and event data into Excel. The summary data could be
conveniently managed in a row-oriented profile, whereas a table profile or record-
oriented profile could be used to manage event data.
Can an entire experiment be placed in a single spreadsheet?
Yes, collecting data for all subjects in an entire experiment on a single spreadsheet page,
coupled with features such as sorting, pivot tables and AutoFilters, generall y allow one
to analyze data in a very flexible fashion.
This manual covers the requirements of a compatible computer, installing software, and
the on-screen features of MPC2XL. If any questions arise that are not answered by this
manual or by the on-screen help menus supplied with this software, please feel free to
contact MED Associates.
MED ASSOC I ATES INC. SOF- 7 31, M PC2XL
- 26 -
DOC-036 Rev 2.4 Copyright © 2012
MED Associates, Inc.
My data is collected using the “Stripped format, all data are output one datum per
line”, as selected in WMPCINST. Why does MPC2XL misname my variables and arrays?
This file format is absolute and its use is discouraged. The internal structure of this
format does not provide information about the names of variables and arrays; it only
indicates the presence of arrays of particular sizes. MPC2XL deals with the ambiguity by
assigning letters of the alphabet sequentially to data found in stripped data files.
Letters of the alphabet are first assigned to variables and then to arrays. For example, if
the file indicates that there are 24 simple variables and 2 arrays, the variables will be
assigned in order from “A” to “X” while arrays will be arbitrarily assigned to Y() and Z().
These assignments will match the actual data file only if the MSN program actually
defined to arrays as “Y” and “Z” via LIST or DIM statements. If the MSN arrays were
named C() and G(), variables A and B would be the only variables properly identified by
MPC2XL. Variable D would be identified as C, E as D, F as E, H as F, I as G, etc., while
array C would be identified as Y() and array G would be named Z() by MPC2XL.
Because of the obvious confusion that could result using a stripped format, it is strongly
recommended that the other stripped file formats or the annotated format be used.
The “Stripped with Variable Identification” is probably the most efficient and powerful
format with all necessary information stored in the most compact file. The Annotated
format is the easiest to read with a text editor such as Notepad.

MED ASSOC I ATES INC. SOF- 7 31, M PC2XL
- 27 -
DOC-036 Rev 2.4 Copyright © 2012
MED Associates, Inc.
APPENDIX A | INSTALLING MPC2XL
MPC2XL installation is quick and easy. Before beginning the installation, phone, fax or
e-mail Med Associates with the registration information in order to receive the software
installation password. This password will be necessary during the installation process.
Begin installation by placing the MPC2XL CD into the CD-ROM drive. The screen shown
in Figure A.1 will appear. Click Install MED-PC to Excel and the screen shown in Figure
A.2 will appear.
Figure A.1 – MPC2XL Main Screen
Click Install to begin installation. Follow the steps to complete the installation, entering
the desired User Name, Company Name and Password when prompted. When
installation is complete, the screen shown in Figure A.3 will appear.
Figure A.2 – Installation Wizard
Click Finish to close this screen. A desktop shortcut to MPC2XL was created during
installation and may now be used to open the application.

MED ASSOC I ATES INC. SOF- 7 31, M PC2XL
- 28 -
DOC-036 Rev 2.4 Copyright © 2012
MED Associates, Inc.
Figure A.3 - Installation Complete
APPENDIX B | CONTACT INFORMATION
Please contact MED Associates, Inc. for information regarding any of our products.
Visit our website at www.med-associates.com for contact information.
For technical questions, email support@med-associates.com.
