
1
EMAIL ENCRYPTION INSTRUCTIONS – TO BE SENT AS AN ATTACHMENT WITH THE
DESIGNATED SCHEDULING GROUP EMAIL TO REPRESENTATIVES
References & Guides
Encrypted Email Procedures
For your convenience, we have included the following instructions to send emails with sensitive
documentation or messages containing personally identifiable information (e.g., SSNs, EIN, etc.)
securely to an SSA email address. If you utilize an alternate secure email method of
transmission, we recommend contacting the recipient to confirm receipt.
To Encrypt a File using WinZip
1. Save the file to your hard drive.
2. Open Windows Explorer and locate the file.
3. Right click on the file.
4. Select “WinZip” and then “Add to Zip File.”
2
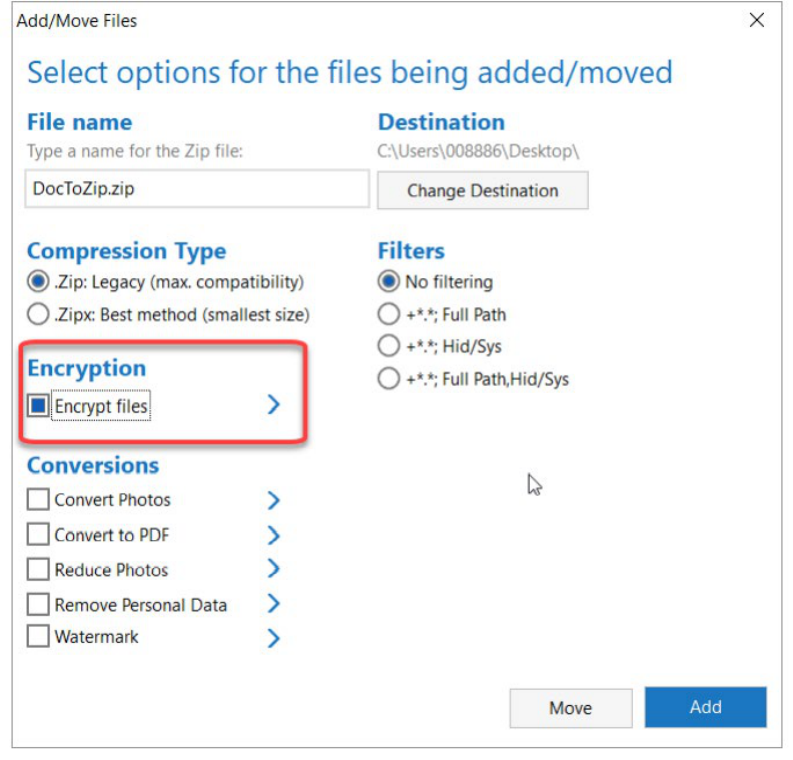
5. An Add box pops up. Near the bottom of the box you will see an “Options” area.
6. Turn on the check box for “Encryption.”
7. Expand the arrow next to “Encryption.”

3
8. Select the 256-Bit AES and click “OK”
9. Verify the correct File Name and Destination, then click “ADD”

4
10. Click “OK” to a caution box if it appears
11. Enter a password composed of letters, numbers, and special characters (minimum 8 characters
– maximum 64) and click “OK”
12. A “completion box” will be displayed, click “OK” to close WinZip
13. In your email client, compose the desired email and attach the encrypted zip file and send as
normal.
CAUTION: do not include the password in the email. See next section
14. Delete both the encrypted Zip file and the original unencrypted file if no longer needed.
Providing the Recipient with the Password
In a SEPARATE email, send the password to the recipients of the email prior to or after
sending the encrypted file. You must NEVER send the password in the same email message
to which you attached the encrypted file.

5
Alternate Encryption Methods
Microsoft Office
Word, PowerPoint, Excel
Adobe Acrobat Pro DC
PDF
1. Click the File tab.
2. Click Info.
3. Click Protect Document.
4. Click Encrypt with Password.
5. In the Encrypt Document box, type a
password, and then click OK.
6. In the Confirm Password box, type the
password again, and then click OK.
7. Attach the encrypted document to the
email and click Send.
8. Communicate the password separately,
per the instructions above
1. Click the Tools tab.
2. Click Protect.
3. On the Protect bar at the top of the document,
click Encrypt with Password.
4. If a warning box appears, click YES.
5. In the Password Security – Settings box, click
Require a password to open the document.
6. In the Document Open Password field, type a
password.
7. Ensure that the Encryption Level in the Options
field notes 128-bit AES or 256-bit AES.
8. Click OK.
9. In the Confirm Document Open Password box,
type the password again and click OK.
10. Attach the encrypted document to the email and
click Send.
11. Communicate the password separately, per the
instructions above
