
Technical white paper
HP Security Manager
Using Microsoft® SQL Server with
Network Service or with another
account and database encryption
Table of Contents
Overview................................................................................................................................................ 2
Introduction........................................................................................................................................... 3
SQL Permissions.................................................................................................................................. 3
Creating an SQL Database .............................................................................................................................................................4
Upgrading a SQL Database ............................................................................................................................................................5
Using a remote SQL Database ......................................................................................................................................................5
Less Elevated Privileges .................................................................................................................... 6
Migrating the Security Manager Database ................................................................................... 8
Running Security Manager service under (local) user account ............................................... 10
Running HPSM application pool under (local) user ..................................................................... 11
Sharing Same SQL with Web Jetadmin ........................................................................................ 15
Using a Different Database Name ................................................................................................. 15
Using a Different Port ....................................................................................................................... 16
Summary of Options for Remote Database ................................................................................ 16
New Install, Remote Database, Rights to Create a Remote Database ...................................................................... 17
New Install, Remote Database, No Rights to Create a Remote Database ............................................................... 17
Upgrade, Remote Database, Rights to Update a Remote Database .......................................................................... 18
Troubleshooting Database and SQL issues ................................................................................ 19
Database Encryption ........................................................................................................................ 25
SQL AlwaysOn .................................................................................................................................... 27
Failover ................................................................................................................................................ 28
SQL Scripts ......................................................................................................................................... 28
Installing a DB with an SQL account ......................................................................................................................................... 30
Connecting to the DB with an SQL account .......................................................................................................................... 30
Appendix A Other HP Security Manager Whitepapers and Manuals ..................................... 32
Overview
HP Security Manager requires a Microsoft SQL Server database to maintain a fleet of devices for
security compliance. If desired, Security Manager can install and use a new MS SQL instance and
database running under Microsoft SQL Express. However, it may be more convenient for Security
Manager to use an existing full Microsoft SQL Server instance for performance benefits or to
appease company policies.
Fortunately, Security Manager can be configured to use SQL Server instead of SQL Express
either on the same machine or a remote machine. This document describes the various SQL
options and how to configure Security Manager to use a database other than the default SQL
Express database that it offers to install.
While Security Manager tests only the two most recent SQL versions at the time of release, there
should be no issues using older or newer SQL versions as Security Manager uses basic calls into
the SQL database and is not using SQL features that require later versions. Backward and
forward compatibility should be present, there just is no capacity to test the multitude of SQL
versions offered over the years.
The same holds true for the many special features offered by the various versions on SQL Server
such as AlwaysOn and client/server encryption. There are entirely too many to test, but you will
find most will function fine with any client including Security Manager.
The AlwaysOn feature has been minimally tested and found to work well. It provides high-
availability failover and disaster recovery. See the chapter near the end of this document for
more details.
3
Introduction
Whether using local or remote SQL Server, Express or Full, the rules are the same. In every case,
Security Manager needs access to a SQL server instance. It can either create a new database,
upgrade an existing database, or attach to an existing database, depending upon the situation
and the user rights.
If Security Manager is instructed to install SQL Express on the local machine, a SQL instance and
database for Security Manager will be created by the Security Manager installer.
If Security Manager is pointed to a remote SQL server and instance during installation, proper
rights must be present for the user running the installation to be able to create or update a SQL
database wherever SQL server may reside, or username and password must be provided for the
SQL database. Proper rights must also exist on the remote database itself for the user which the
Security Manager service runs under to be able to read from and write to the database.
KEY POINT: Just to reiterate, for installing and upgrading Security Manager, the user who is
logged into the machine and running the installer executable must have proper rights on the SQL
server to either create a database or update an existing database. The installer only runs SQL
scripts to create or alter a database, and naturally any user running those commands needs to
have proper SQL rights.
In this case, it is the Windows user who is running the installer. If this user does not have those
rights, then the username and password of a different user can be provided during installation.
For normal operation of Security Manager after installation, the user running the Security
Manager service (default as Network Service) needs to have permissions to at least read and
write to the database (explained later).
Each Security Manager installation must point to its own unique database, multiple installations
cannot share a database. Several techniques are available to allow Security Manager to
install/use a SQL database in any location.
Both a named and default instance are supported when instructing Security Manager to use a
remote SQL Server database.
SQL Permissions
There are three scenarios where Security Manager will interact with Microsoft SQL:
• Creating a database during installation of Security Manager.
• Upgrading a database during upgrading of Security Manager from one version to another.
• Running Security Manager to manage security features on a fleet of devices.
Each scenario requires a separate set of SQL rights for potentially different users.
• Create Database – A Windows user running the installer executable needs rights to the
database (sysadmin preferred).
• Upgrade Database – A Windows user running the installer executable to upgrade versions
needs DBO rights to perform potential commands on the database such as insert, update,
alter, create table.
• Run Security Manager – The Windows account that runs the Security Manager service
(default of Network Service) needs DBO rights to perform operations such as reading and
writing.
NOTE: Below is an explanation of how to run with less rights or a different account, if
desired.
Creating an SQL Database
If Security Manager is instructed to create a database during installation, SQL commands are
performed to create the database and its necessary tables.
For the Security Manager installer to be able to create a SQL database, the credentials of the
user running the Security Manager installer need to have at least Database Create rights on the
SQL instance (sysadmin preferred).
If a local database is desired, since the user running the Security Manager installer is likely a
member of the Admin group of the local machine, proper rights will be present to create a SQL
database.
However, if a remote database is desired, such as on a remote SQL Server farm, it is unlikely that
the SQL database administrator (DBA) will provide sysadmin or even Create Database rights for
the user running the Security Manager installer. If this is the case, options to create the database
include:
• SQL DBA runs the Security Manager installer on the remote SQL server and instructs it to
create database only which will create a database and all necessary tables.
• SQL DBA uses the batch script from the InstallSqlScripts.zip (which is installed in the root
directory of security manager) and runs it to create the database and all necessary
tables.
• SQL DBA logs into the Security Manager machine, performs the install, and instructs the
installer to create the database and all necessary tables on the remote server\instance.
• SQL DBA provides temporary sysadmin rights to the Windows user running the installer
until it completes creating the database and necessary tables.
5
Upgrading a SQL Database
When attempting to upgrade Security Manager from one version to another, it is highly likely that
new columns have been added to tables or new tables have been created to represent new
features.
SQL commands such as insert, update, alter, create table may be used to upgrade the database,
and these commands require elevated rights on the Security Manager database for the Windows
user running the installer and issuing the commands. DBO rights for the Windows user running
the upgrade will suffice to allow for these commands to be performed.
If a local database is desired, since the user running the Security Manager installer is likely a
member of the Admin group of the local machine, proper rights will be present to upgrade the SQL
database. However, if a remote database is desired, DBO rights will be necessary for the
Windows user running the upgrade. If allowing such rights on a permanent basis is an issue,
options to upgrade the database include:
• SQL DBA provides temporary DBO rights on the Security Manager database for the
Windows user running the upgrade until it completes.
• SQL DBA logs into the Security Manager machine and performs the upgrade, allowing it to
upgrade the database.
• SQL DBA obtains a SQL script and runs it to upgrade the database and all necessary
tables.
Using a remote SQL Database
When the database has been created and Security Manager is trying to use it, the credentials of
the user running the Security Manager service will need DBO rights on the database.
By default, Security Manager runs under Network Service, but the Security Manager service
identifies itself as a network service only locally. Remotely, Security Manager identifies itself as
Domain\Machine$ when Windows Authentication (Integrated Security) is used.
In this case, use SQL Management Studio to create a new login under Security, Logins and make
sure the Domain\Machine$ account (where Machine$ is the name of the Security Manager
machine followed by a dollar sign) has DBO rights on the Security Manager database under User
Mapping.
NOTE: If it is desired to use a Windows User account instead of a Windows Machine account, the
properties of the Security Manager service and IIS need to be changed from Network Service to
the Windows User account. When performed, Security Manager identifies itself to the remote
SQL Server as the Windows User account. Therefore, make sure the Windows User account has
DBO rights on the database.

Directories on the Security Manager machine where Security Manager files reside must have Full
Control rights for that user account as well.
SQL Server 2012 by default may not include Network Service as a default login. To rectify the
situation, use Microsoft SQL Server Management Studio to add the service name to the logins for
this database instance. You can then ensure the login for Network Service has DBO rights on the
HP Security Manager database.
Less Elevated Privileges
DBO rights merely provide complete control over a single database. Providing DBO rights on the
Security Manager database does not provide access to any other databases nor does it allow
any administrative tasks on the SQL instance. It just allows Security Manager to perform tasks on
the one database it uses.
There still may be cases where it is against company policy to assign elevated rights such as DBO
rights on ANY database that is contained on the company SQL farm. It is possible to run HP
7
Security Manager on just read/write rights on the database after making a configuration file
change. Navigate to the following folder location on the Security Manager server:
Program Files (x86)\HP Security Manager\HPSM_Service.exe.config
Open the HPSM_Service.exe.config file in a text editor and locate the following entry:
<add key="shrinkDB" value="true" />
Change the “true” value to “false” so that it looks like this:
<add key="shrinkDB" value="false" />
Save the file, keeping the extension intact. Restart the HP Security Manager service.
Starting with Security Manager 3.0 that uses a web interface, the IIS application pool for HPSM
also logs into the SQL database, and it too will need to disable attempting to perform a shrinkDB
command otherwise it too will fail with less than DBO rights.
Therefore, navigate to the following folder location on the Security Manager server:
Program Files (x86)\HP Security Manager\WebApp\Web.config
Open the Web.config file in a text editor and locate the following entry:
<add key="shrinkDB" value="true" />
Change the “true” value to “false” so that it looks like this:
<add key="shrinkDB" value="false" />
Save the file, keeping the extension intact. Refresh the HPSM application pool and restart the
HPSM site.
The DBO privilege can be removed/unchecked and the db_datareader and db_datawriter
privileges can be added/checked in addition to public rights.
The Security Manager service should still be able to connect to the database and perform read
and write functions, as necessary. Automatic shrinking of the database and log files to maintain
file size will now have to be performed by the database administrator on a manual basis as
Security Manager will no longer be performing this task.
Elevated rights will still need to be provided by the user running installs/upgrades though. It may
be possible to piece meal rights to simulate most of what DBO provides, but it certainly easier to
just assign DBO rights for upgrades.
Migrating the Security Manager Database
If Security Manager was installed using a local SQL instance and database, but it is desired to use
a remote SQL instance and database instead without losing any of the work performed on the
local installation, the local Security Manager database can be migrated to the remote SQL server
instance if desired using either of the following techniques:
• Backup/Restore Database – Use SQL Server Management Studio to backup/restore the
Security Manager database. Stop the Security Manager service before manipulating
databases in SQL Server Management Studio. Now the local database can be backed up
using SQL Server Management Studio and subsequently restored on the remote SQL
instance.
• Copy/Attach Database - Stop the Security Manager service, manually copy the database
files from the local location to the remote SQL server. If you are unsure where the
database files are located, check the properties of the SQL service for the instance, it will
indicate the file path to the database. Typically, the directory will appear as such:
C:\Program Files (x86)\Microsoft SQL Server\MSSQLxx_xx.SQLEXPRESS\Data
By default, the database files for Security Manager are HPIPSC.mdf and HPIPSC_log.ldf. Copy
these files to the remote instance of SQL. SQL Server Management Studio can be used to login to
the remote instance and attach the Security Manager database to the instance.
Once the database has been restored on the remote instance, Security Manager needs to be
instructed to use the new remote database. The easiest technique is to uninstall/reinstall Security
Manager and select the to connect to an existing database, pointing to the remote
server\instance. When the uninstaller asks if you want to save the local database, you can keep it
as a failsafe in case something was not performed correctly in the remote restoration.
An alternate method, although more error prone, is to edit a configuration file that dictates where
the database resides that Security Manager uses, then restart the Security Manager service.
Since editing configuration files can be risky, it is recommended to perform the uninstall/reinstall
technique since that ensures the configuration file has the proper entries. However, if it is desired
to edit a configuration file, edit the following files:
C:\Program Files (x86)\HP Security Manager\HPSM_Service.exe.config
C:\Program Files (x86)\HP Security Manager\WebApp\Web.config

9
Edit ALL lines referencing the existing SQL server\instance to now include the server\instance of
the remote SQL server. For example, here is a sample of several entries containing SQL
server\instance that would need to be changed:
<appSettings>
<add key="dbConnection" value="Server=(local)\EXP2014;initial
catalog=HPIPSC;Integrated Security=SSPI" />
<add key="dbMasterConnection"
value="Server=(local)\EXP2014;initial catalog=master;Integrated Security=SSPI" />
<ForceUpdateSettingsSection>
<add key="dbConnection" value="Server=(local)\EXP2014;initial
catalog=HPIPSC;Integrated Security=SSPI" />
<add key="dbMasterConnection"
value="Server=(local)\EXP2014;initial catalog=master;Integrated Security=SSPI" />
<hibernate-configuration xmlns="urn:nhibernate-configuration-2.2">
<!-- <property
name="connection.connection_string">Server=(local)\EXP2014;initial
catalog=HPIPSC;Integrated Security=SSPI</property> -->
<!-- <property
name="connection.connection_string">Server=(local);initial
catalog=HPIPSC;Integrated Security=SSPI</property> -->
<property
name="connection.connection_string">Server=(local)\EXP2014;initial
catalog=HPIPSC;Integrated Security=SSPI</property>
In this example, replace “(local)\EXP2014” with the correct name of the remote server\instance.
Make sure to change ALL lines where the local server\instance is referenced with the new
server\instance name.
A third option that does not involve migrating the actual database is just to export the device list
and policies in Security Manager, install a fresh installation of Security Manager pointing to a new
remote database, then import the device list and policies.
Really all that is lost in this scenario is the remediation history and any credentials that were
saved in the database for the devices to be used for future communications to those devices. If
the same credentials are being used for the fleet, right-click the All Devices Group to type the
credentials one time. This applies them to each device in the database for use in future
communications to the devices.
Running Security Manager service under (local) user
account
The Security Manager service runs under Network Service, a predefined low privilege local
service account used by the service control manager. It has minimum privileges on the local
computer and acts as the computer on the network.
Since it manifests itself remotely on the network as the machine account, some database
administrators will not allow a machine account to have DBO rights on a database since there is
no password authentication.
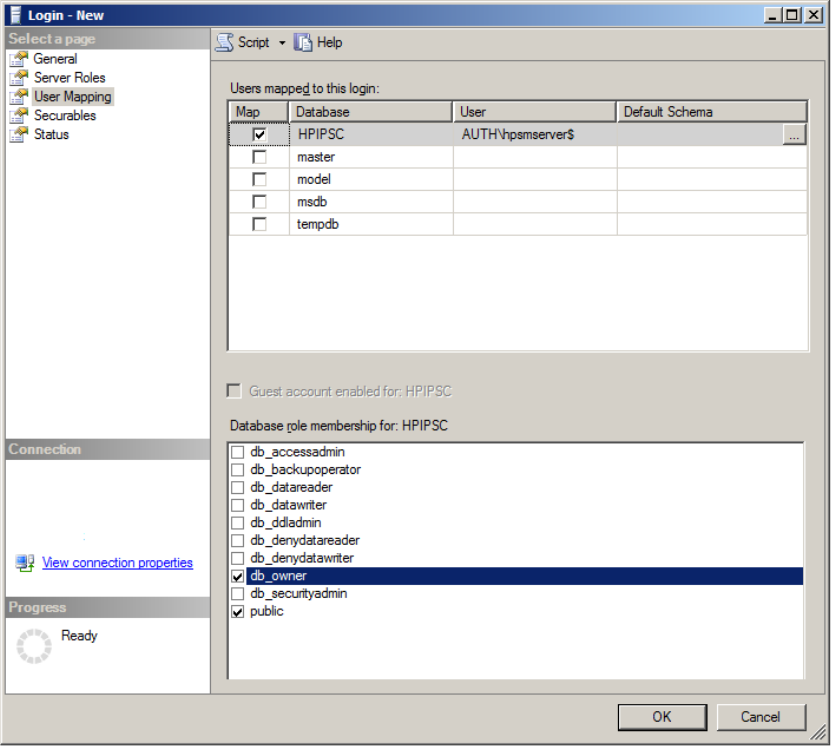
If so, it is possible to allow Security Manager to use a remote database by allowing a domain user
account, or “service account,” to have DBO rights on the database. Merely add a new login for the
service account and assign it DBO rights to the HPIPSC database. The following diagram shows
how Network Service for the HPSM server is provided DBO access to the database by assigning
the machine account DBO rights.

11
The Security Manager service on the Security Manager machine also must be instructed to run
under this same service account. Restart the Security Manager service after the change is made.
Running HPSM application pool under (local) user
The HPSM application pool in IIS needs also to be changed to the service account for the web
interface to be able to access the remote database. This is done by clicking on Application Pools
in the left- hand pane. All application pools are displayed in the main content pane, right-click the
one called HPSM , and click Advanced Settings.

Select the Identity list item under Process Model and click the ellipsis (the button with the three
dots).

13
Select the Custom account radio button and enter the service account that has DBO rights on the
database.
Recycle the HPSM application pool site by clicking on the Recycle link in the right-hand pane.
The files that Security Manager uses on the Security Manager machine in the following
directories need to be assigned permissions of Full Control for the service account. Read and
Execute rights may suffice, but Full Control guarantees no issues for the following file locations.
HPSM 3.7 and newer:
C:\Program Files (x86)\HP Security Manager
C:\ProgramData\HP\HPSM
Older HPSM versions:
C:\Program Files (x86)\HP JetAdvantage Security Manager
C:\ProgramData\HP\HP Print License Service
NOTE: After Security Manager upgrades to a latest version, the accounts that the HPSM service
and the IIS Application Pool run under are set back to default of Network Service. You will have to
change them back to the service account if they had previously been changed before upgrade.
The typical use case is to use this same service account when logging into the Security Manager
server so when upgrades are performed, the service account already has DBO rights on the
database to properly upgrade the tables.
This implies that the service account will also be a member of the local administrators’ group on
the Security Manager server to run the installer. Or during the installation of Security Manager the
username and password of the account accessing the database will have to be provided.
If the service account is NOT a member of the local administrators’ group on the Security
Manager server, additional steps are required to ensure the service account can access the
service control manager just as Network Service could.
If these additional steps are not taken, a 503 error will be seen when attempting to launch
Security Manager.
The HPSM_web.log and the Windows Event Viewer will contain errors indicating there are not
sufficient rights to access service control manager:
<Data>HP Security Manager: Unexpected Error Initializing - Shutting
down: System.InvalidOperationException: Cannot open Service Control
Manager on computer '.'. This operation might require other
privileges. ---> System.ComponentModel.Win32Exception: Access is
denied --- End of inner exception stack trace --- at
System.ServiceProcess.ServiceController.GetDataBaseHandleWithAccess(St
ring machineName, Int32 serviceControlManaqerAccess) at
System.ServiceProcess.ServiceController.GetDataBaseHandleWithEnumerate
Access(String machineName) at
System.ServiceProcess.ServiceController.GetServicesOfType(String
machineName, Int32 serviceType) at
System.ServiceProcess.ServiceController.GetServices() at
LocksmithBusinessLogic.BizLogicMgr.ValidateProductAndDB() at
LocksmithBusinessLogic.BizLogicMgr.Init()</Data>
By default, non-administrators cannot remotely access the service control manager.
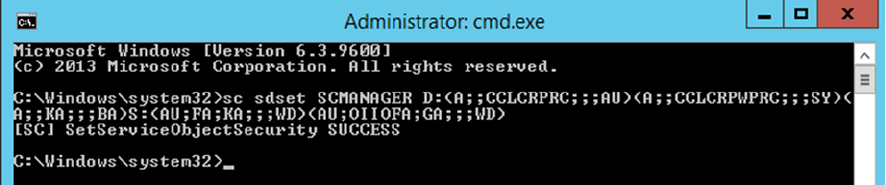
To assign the rights needed for a non-admin account to access the service account for Security
Manager, run the following from command prompt (in c:\windows\system32):
sc sdset SCMANAGER
D:(A;;CCLCRPRC;;;AU)(A;;CCLCRPWPRC;;;SY)(A;;KA;;;BA)S:(AU;FA;KA;;;WD)(AU;OIIOFA;GA;;;WD)
If successful, the line ‘[SC] SetServiceObjectSecurity SUCCESS’ is displayed.
Now make sure the service account is a member of the local IIS_USRS group.
After making these changes, restart the Security Manager service, recycle HPSM application
pool, and now launch Security Manager.
15
Sharing Same SQL with Web Jetadmin
Just like HP Web Jetadmin, Security Manager offers to install the Express version of SQL for
customers who do not have an existing SQL installation to use. If Security Manager is being
installed in an environment where HP Web Jetadmin is already installed and managing the fleet,
there is a SQL database in use for Web Jetadmin, either locally to the Web Jetadmin server or
remotely on a SQL server farm.
There is no reason that Security Manager cannot share the same SQL instance as HP Web
Jetadmin. The two products would not be sharing databases, those would be unique for each
product, but the two databases can exist under the same SQL instance. The Security Manager
installer makes it easy to point to an existing SQL server\instance.
Both Web Jetadmin and Security Manager can also be installed on the same server if desired and
share the same SQL instance. Web Jetadmin has the potential to use many more server
resources depending upon the number of devices it is managing and how it is being utilized, and it
may prefer to be standalone for that reason. However, Security Manager uses much less
resources and has no issue sharing a server with a Web Jetadmin installation. The two products
are similar in port requirements, so firewalls are likely already set up for both products.
Using a Different Database Name
HP Security Manager uses by default a database named HPIPSC, and starting in version 3.3, it is
configurable in the installer. Older versions of Security Manager do not allow the database name
to be changed in the installer. For these older versions, the server and instance are configurable
during installation but not the database name. However, the database name is specified in two
configuration files as part of the SQL connection string:
C:\Program Files (x86)\HP Security Manager\HPSM_Service.exe.config
C:\Program Files (x86)\HP Security Manager\WebApp\Web.config
Each line referencing the SQL server connection string includes a “catalog” reference which is
the database name:
<add key="dbConnection" value="Server=(local)\FULL2012;initial
catalog=HPIPSC;Integrated Security=SSPI" />
Make sure to change all lines where the SQL server\instance is referenced with the new database
name.
Technically the name of the database could be changed in these config files and the service
restarted, and if the database names match the product seems to run fine. However, when a
Security Manager upgrade is performed to HPSM 3.3 or older, the installer (and SQL scripts) will
be looking at the old database named HPIPSC and will attempt to modify that database name. The
database would have to be renamed back to HPIPSC before performing the upgrade. Therefore, it
was highly recommended in the past to keep the database name of HPIPSC.
From Security Manager 3.4 onwards, the upgrade process (installer and the install scripts) can
also process custom database names. If you have a desire to run two separate Security Manager
installations, it is recommended to use a unique instance for each Security Manager installation.
Of course, you cannot have two databases of the same name under the same instance, which is
why the recommendation is to use a different instance for each Security Manager installation.
Thus, each installation can use a database named HPIPSC if they reside under unique instances.
It might be two named instances, or it could be one default instance and one named instance. It
does not matter as long as the instances are unique.
Using a Different Port
HP Security Manager uses by default TCP Port 1433 to connect to a MS SQL server and instance.
If company policy prohibits the use of this port and requires a different port, merely add the
desired port in the connection string either in the installer UI when entering the server/instance
information or in the configuration files mentioned above.
The port should be added immediately after the server FQDN separated by a comma as such:
SQL server FQDN,port\instance
For example, to use a SQL server named SQLserver, an instance named sql2012full, and a port of
1434:
<add key="dbConnection"
value="Server=SQLserver,1434\sql2012full;initial
catalog=HPIPSC;Integrated Security=SSPI" />
<add key="dbMasterConnection"
value="Server=SQLserver,1434\sql2012full;initial
catalog=master;Integrated Security=SSPI" />
In the installer UI enter: SQLserver,1434\sql2012full
Summary of Options for Remote Database
The following scenarios summarize the steps involved to install or connect to a remote Security
Manager database. The scenarios include a new install or an upgrade, both with and without
elevated rights on the remote SQL instance. To create a database, sysadmin rights are preferred,
but Create Database rights are sufficient.
17
For an upgrade of the database, DBO rights are preferred. By default, Security Manager runs
under Network Service, which means the Security Manager machine account (machine$) needs
to have DBO rights on a remote SQL database. If a machine account is prohibited, a Windows
user account can be granted DBO rights instead, but directories on the Security Manager
machine must have Full Control rights for that user account as well.
New Install, Remote Database, Rights to Create a Remote
Database
Select Full Install, Create a New or Upgrade an Existing Database, enter remote SQL server and
instance (server\instance). Use SQL Management Studio to ensure the user the Security
Manager service runs under has DBO rights. Restart the Security Manager service.
New Install, Remote Database, No Rights to Create a Remote
Database
Option 1 - Have the SQL DBA create the Security Manager database on the remote SQL server by
running the Security Manager installer on the SQL Server and choosing Database Only. Use SQL
Management Studio to ensure the user the Security Manager service runs under has DBO rights.
Run the Security Manager installer again and select the to use an existing database, pointing to
the remote server\instance location.
Option 2 - Run Security Manager installer on Security Manager machine and select Full Install.
After the installation completes, copy, or backup/restore the local Express Security Manager
database to the remote SQL instance. Use SQL Management Studio to ensure the user the
Security Manager service runs under has DBO rights. Run the Security Manager installer again
and select option 3 to use an existing database, pointing to the remote server\instance location.
Option 3 – Run the installer and extract the InstallSqlScripts.zip. These scripts can be run on the
remote SQL server by the SQL DBA to create a usable Security Manager database on the desired
SQL instance (see Readme_InstallSqlScripts.txt which is included in the zip file for instructions on
running the script). Use SQL Management Studio to ensure the user the Security Manager service
runs under has DBO rights. Run the Security Manager installer again and select the option to use
an existing database, pointing to the remote server\instance location.
Option 4 – Have the SQL DBA assign temporary rights to the Windows user running the
installation just long enough to complete the installation and create the database. Run the
Security Manager installer and select the option to create a database, pointing to the remote
server\instance location. Use SQL Management Studio to ensure the user the Security Manager
service runs under has DBO rights.
Option 5 – Have the SQL DBA perform the installation using his/her Windows account that has
permissions to update the database. Run the Security Manager installer and select the option to
Create a New or Upgrade an Existing Database, pointing to the remote server\instance location.
Use SQL Management Studio to ensure the user the Security Manager service runs under has
DBO rights.
Upgrade, Remote Database, Rights to Update a Remote Database
Select Full Install, Create a New or Upgrade an Existing Database, enter remote SQL server and
instance (server\instance). The database will be updated properly to run the new version.
Upgrade, Remote Database, No Rights to Update a Remote Database
Option 1 – Have the SQL DBA assign temporary rights to the Windows user running the upgrade
just long enough to complete the installation and update the database.
Option 2 – Run a SQL script on the remote SQL server by the SQL DBA to update the Security
Manager database on the desired SQL instance (see end of this document for instructions on
obtaining and running the script).
Option 3 – Have the SQL DBA perform the upgrade using his/her Windows account that has
permissions to update the database. Run the Security Manager installer and select option 2 to
Create a New or Upgrade an Existing Database, pointing to the remote server\instance location.
Use SQL Management Studio to ensure the user the Security Manager service runs under has
DBO rights.

19
Troubleshooting Database and SQL issues
The first sign of trouble if something goes wrong might be an error as such on older Security
Manager versions when launching Security Manager:
Newer browser-based versions of Security Manager may display an error as such:
Usually when such a SQL connection error occurs, the Security Manager service will also stop.
Clues can be found in the log files found under:
C:\Program Files (x86)\HP Security Manager\log
Open the HPSM_Service.log file in an editor and look for errors indicating the database cannot be
opened:

In this example, the log file confirms that Windows Authentication is attempting to login the user
the Security Manager runs under into the correct remote server\instance name but is being
rejected. In this case the Security Manager machine account (jmetz2$, for example ) did not have
DBO rights to use the database. Use SQL Management Studio to confirm the user running the
Security Manager service has DBO rights.
The most common upgrade issue occurs when Security Manager gets upgraded but the
database does not, perhaps because of permissions of the user running the upgrade. In such a
scenario, the services log file will be littered with errors indicating certain tables and/or columns
in tables are missing. If this occurs, use the SQL scripts discussed later in this document to
upgrade the database manually (with a user running the script who has permissions to upgrade
the database).
After the database is upgraded and matches the Security Manager version, a restart of the
Security Manager service will allow Security Manager to correctly connect to the database. Also,
make sure the Security Manager service was restarted after making the changes to the
database rights.
After an upgrade, when the Security Manager service starts up, it first checks the Product ID of
the specific Security Manager version against a value in the dbo.MetaDataTable in the database.
Dbo.MetaDataTable is a table used to distinguish between two different products that could be
using the database such as Security Manager and the HP Printer Security Plug-in.
Security Manager expects the GUID in this table to be a certain value for this version of Security
Manager. If for some reason the SQL scripts did not or could not upgrade the value in the table, or
if the table does not exist, an error appears in the service log as such:
2019-01-16 13:02:31,722 INFO Service[5] - BizLogicMgr.IsValidProductDB - productId 3E90D780-
8D8F-40F2-BA4F-DCCAE7A9E0EB metaData.ID75C77ED5-438D-42F4-B17C-D0766EAFC594
The logging usually stops here as the Security Manager service stops.
21
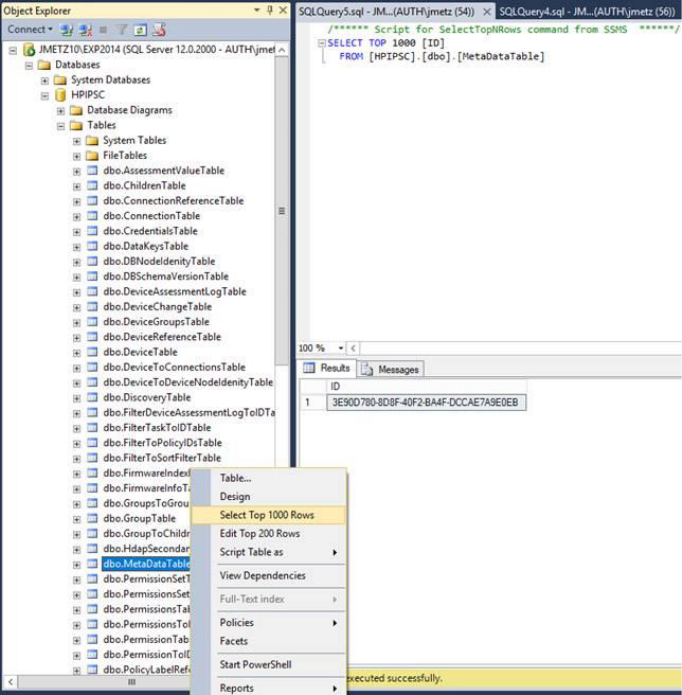
To solve this, the table needs to have a matching GUID with the Product ID. There are several
ways to accomplish this in SQL Server Management Studio. See the snapshot of the
dbo.MetaDataTable with the correct value for Security Manager v.3.2.1 on the next page:
There is a SQL script found under the Program Files (x86)\HP Security Manager folder named
InstantSQLScripts.zip that when unzipped contains scripts that can be used to update the table.
Unzip that InstallSqlScripts.zip file, a file named SMMetaDataInsert.sql is present.
Double-click on it while Management Studio is open and looking at HPIPSC database, it should
populate the screen with all the commands from the script as shown below. This script drops the
table, recreates it blank, then inserts the value.

Click Execute in the menu above it and the script should run. It will look like below if it runs
successfully, otherwise errors will appear if something cannot be done.
If for some reason it cannot be run and/or errors, try inserting dbo in front of MetaDataTable in
the “create table” statement like this: “create table dbo.MetaDataTable” then execute it again.
If SQL still is not playing nicely, just manually copy and paste the value into the table might if
possible.

23
Right- click on dbo.MetaDataTable , select “Edit Top 200 Rows” that brings up the grid below, then
copy the correct GUID into clipboard and paste here in the table, replacing the old entry:
When pasted, click outside of the row, on the NULL value below it, to save the change. Restart the
Security Manager service. If this was the only problem, Security Manager should launch. However,
the fact that this table did not get created/updated could be just the first problem of many others
that did not get updated correctly because of improper SQL rights of the user running the
installer/scripts. If so, the service log will now move past the metadata error and other errors will
appear indicating missing tables, columns, etc.
Below is the SMMetaDataInsert.sql script if needed. It drops existing table, creates new table, and
adds the ''3E90D780-8D8F-40F2-BA4F-DCCAE7A9E0EB'' row into that table. Then Security
Manager v.3.2.1 looks for this ''3E90D780-8D8F-40F2-BA4F-DCCAE7A9E0EB'' entry.
If table is not there, or this entry is not there, or another entry is there with it, log files will usually
indicate what it does not like and the service stops.
USE HPIPSC
if exists (select * from dbo.sysobjects where id = object_id(N'MetaDataTable') and
OBJECTPROPERTY(id, N'IsUserTable') = 1)
BEGIN
DECLARE @SQL NVARCHAR(MAX) = N'';
SET @SQL += N'
DROP TABLE MetaDataTable'
PRINT @SQL
EXECUTE(@SQL)
END;
GO
BEGIN
DECLARE @SQL NVARCHAR(MAX) = N'';
SET @SQL += N'
create table MetaDataTable ( ID NVARCHAR(255) not null )'
PRINT @SQL
EXECUTE(@SQL)
END;
GO
IF EXISTS(SELECT 1 FROM INFORMATION_SCHEMA.COLUMNS WHERE TABLE_NAME =
'MetaDataTable' AND COLUMN_NAME = 'ID')
BEGIN
DECLARE @SQL NVARCHAR(MAX) = N'';
SET @SQL += N'
INSERT INTO MetaDataTable( ID ) values (''3E90D780-8D8F-40F2-BA4F-DCCAE7A9E0EB'')'
PRINT @SQL
EXECUTE(@SQL)
END;
GO
25
Other troubleshooting steps for SQL issues include:
Ensure the HPSM_Service.exe.config file contains the correct entries:
• The server or instance name is not correct. Double-check the spelling of each.
If network related issues are preventing the connection to the remote instance, common
troubleshooting steps include:
• Fully qualify the remote SQL server name in the configuration file if name resolution issues
are present or use the IP address instead of the hostname.
• TCP/IP must be enabled on the remote SQL server instance. Use SQL Server
Configuration Manager to confirm.
• Check firewall settings to ensure the port that is used for the remote connection is open.
The default port is 1433.
• SQL Server may default to using a dynamic port. Either configure to use a fixed port or
start the SQL Browser service to allow for remote connections.
• Use SQL Management Studio and/or Windows ODBC to connect to the remote SQL
server/instance from the same machine as Security Manager to at least prove a Windows
user account can access the server/instance from the Security Manager machine.
• If the HPSM_Service.log indicates table columns are missing, the database may not have
been upgraded due to insufficient rights by the user running the upgrade. This scenario is
described earlier in this document with steps on how to uninstall/reinstall to rectify.
• The database tables should always begin with dbo as the schema i.e. dbo.DeviceTable. If
some of the tables begin with a Windows username as the schema, it is likely that the user
who upgraded or created the database was a member of a Windows group when
assigned SQL rights. The default schema for a user can be defined by using the
DEFAULT_SCHEMA option of CREATE USER or ALTER USER. If no default schema is
defined for a user account, SQL Server will assume dbo is the default schema.
IMPORTANT NOTE: If the user is authenticated by SQL Server as a member of a group in
the Windows operating system, no default schema will be associated with the user. If the
user creates an object, a new schema will be created and named the same as the user,
and the object will be associated with that user schema. The fix to this scenario is to either
rename the schema in the affected tables to indicate dbo, or better yet, assign a default
schema of dbo to the Windows group to which the user belongs.
Database Encryption
All the data that Security Manager stores in the SQL database, whether local or remote, is
protected against unwanted access by Microsoft Windows credentials. As an additional method
of security for protecting the most critical data, Security Manager will always encrypt the
following types of entries in the database:
• All credentials that are stored per device to be used for communications to the device
• All policy settings, which may or may not include credentials
Security Manager uses an AES algorithm for FIPS compliance to protect the data in the database.
If desired, the entire database can be setup to be encrypted by the SQL administrator using SQL
tools.
Sensitive data is encrypted before it is sent to the SQL database to protect against
eavesdropping on the network. If desired, the transmission of all data from the Security Manager
server to the SQL database can be encrypted using SSL\TLS. The SQL instance can be setup to
force encryption from all connecting clients, and certificates can be installed on both the server
and client to ensure trust and encryption.
The SQL Server connection is encrypted only when the server is set up to dictate it. The .Net client
code that Security Manager uses to connect to the SQL database will follow whatever the server
wants to do. Security Manager will not know or care that the data is being encrypted during
transmission. Default is not encrypted, but a DBA can certainly force encryption on the SQL
server side and install a certificate. The client has its own certificate, and an SSL/TLS handshake
occurs between the operating system on the HPSM server and the SQL server to determine the
protocol to use.
There are numerous documents on the Microsoft support web site describing issues that can be
encountered trying to force only TLS 1.2 and how to resolve them. Some older SQL versions
required TLS 1.0 while others require certain patches to be applied to disable TLS 1.0. Security
Manager controls none of the handshaking between the HPSM server and the SQL server to
determine the protocol to use for encryption.
A .NET Framework data provider is used for connecting to a database, executing commands, and
retrieving results. Security Manager uses the System.Data.SqlClient.SqlConnection class
(SQLClient provider) for when it accesses tables of data for the client (i.e., device lists,
recommendations for reports, etc.). The identity of the service is used as the basic credential to
access the database.
There is nothing in this class that allows us to configure the encryption level of the database
connection. NHibernate is used for accessing the contents of policies, tasks, etc. Again, the
SSL/TLS negotiation occurs on the operating system level, not in Security Manager. NHibernate is
an object-relational mapping (ORM) solution for the Microsoft .NET platform. It provides a
framework for mapping an object-oriented domain model to a traditional relational database.
During installation, InstallShield is configured to install ODBC drivers, and SQL queries are
executed over ODBC drivers to connect to a remote SQL server\instance. By default, SQL server
does not support TLS 1.2 and requires patches to support it. The same holds true for clients
accessing a remote SQL server, they must be patched to support TLS 1.2. Without proper patches
on both server and client side, it may appear that the Security Manager installer requires TLS 1.0,
but that is not true. TLS 1.2 will be negotiated between the ODBC client and the remote SQL server
if patches have been applied to support TLS 1.2.

27
Security Manager has no control over the TLS negotiation, it is strictly between the operating
system on the Security Manager server and the remote SQL server. The third option to Connect
to an Existing SQL server Database does not attempt to make any connection to a remote SQL
server\instance. This alleviates having to make sure the account running the Security Manager
installer has at least public rights on the remote instance. It also eliminates having to worry about
TLS versions during installation.
SQL AlwaysOn
SQL Server AlwaysOn provides a high-availability and Disaster-recovery solution for SQL Server.
It makes use of existing SQL Server features, particularly Failover Clustering, and provides new
capabilities such as availability groups. AlwaysOn Availability Groups allow you to fail over a
group.
of databases as a single entity. An Availability Group Listener is a Virtual Server Name that
applications connect to. From the applications point of view, it does not matter where the
Availability Database is active and available for use. The AAGL consists of:
• Virtual Network Name (VNN)
• Listener Port
• One or more Virtual IP Addresses (VIPs)
For clients to connect, you can either set up a connection string for your AAGL or connect directly
to your SQL Server Instance. However, a direct connection does not give the failover support for
which this technology has been built.
For Security Manager, you can use the Availability Groups listener name in the connection string
used to connect to the sever\instance. The easiest technique is to modify the connection string in
the following files:
C:\Program Files (x86)\HP Security Manager\HPSM_Service.exe.config
C:\Program Files (x86)\HP Security Manager\WebApp\Web.config
Make sure to change all lines where the SQL server\instance is referenced. Change the portion
that references the server\instance to just reference the Availability Groups Listener. For
example, here is a sample of a connection string that points to a listener named “sqlgroup”:
<add key="dbConnection" value="Server=sqlgroup;initial
catalog=HPIPSC;Integrated Security=SSPI" />
<add key="dbMasterConnection" value="Server=sqlgroup;initial
catalog=master;Integrated Security=SSPI" />
Restart the Security Manager service and recycle the HPSM application pool after saving the
edited files, and Security Manager should connect to the Availability Group that contains the
Security Manager databases. If the primary replica instance is suddenly stopped, the database
from a secondary replica instance will be used in its place.
Failover
While SQL AlwaysOn provides high-availability or failover for the Security Manager database,
what about cases where the Security Manager server is no longer available? How can you ensure
another installation of Security Manager is up and running as quickly as possible to minimize
downtime?
The biggest challenge presented for failover of the Security Manager server is the licenses that
are installed and node-locked to the Security Manager server. All the devices, groups, policies,
schedules, remediation data over time, etc. are stored in the database. Therefore, if the database
is always available, Security Manager can also be made to be available in a quick manner by
installing Security Manager on a new machine and instructing it to use the existing database.
Older versions of Security Manager “locked” the database to the original Security Manager
machine, but now there is no longer a lock.
The user running the Security Manager service (default Network Service which manifests itself
remotely as the machine account) still needs DBO rights on the database to use it, but it is not
locked to a specific Security Manager machine.
If the new Security Manager server uses the same hostname as the old Security Manager server,
SQL rights on the database can remain as is if SQL is assigning the machine account to have
DBO rights.
Also, if Instant On is being used to discover devices, announcements would still be sent to the
hostname of the original Security Manager server which has not changed.
To move the licenses from one Security Manager machine to another, merely browse to the
licensing web site where the licenses were obtained originally and re-host them to a new mac
address.
SQL Scripts
When the Security Manager installer is instructed to Create a New or Upgrade an Existing
Database, it runs a series of SQL scripts in the background to create or upgrade SQL tables in a
database. As discussed in this document, different rights are required for the user running the
installer to be able to either create a new database or upgrade tables in an existing database.
There may be cases where it is easier just to provide these SQL scripts to an SQL database
administrator who has all the necessary rights to either create a new or upgrade an existing
database; then, when installing Security Manager, select the third option to Use an Existing
Database since the scripts run by the DBA already upgraded the database.

29
The other option is for the DBA to run the Security Manager installer and select DB Only, but most
if not all prefer not to run installers on the SQL server and like to run scripts to see what they do by
examining them before executing.
SQL scripts are included in the HP Security Manager folder under program Files (x86) after
installation. The file is named InstallSQLScripts.zip and contains a set of files as such when
unzipped:
The InstallOrUpgradeDB.bat file calls a series of SQL script files (.sql) that progressively upgrade
the database schema for each release of Security Manager.
The file Readme_InstallSqlScripts.txt explains the usage and syntax of the sql scripts.
NOTE: “.\” means “this server.” Starting in Security Manager v3.4, since it supports database
names other than HPIPSC during install, the database name is now mandatory when running the
script. You will see an execution of various scripts to install or upgrade the HPIPSC database:

The .bat file can be run on a remote machine or from the SQL server, but the machine would have
to understand the “sqlcmd” SQL file to execute the scripts. Any machine where SQL had been
installed (or SQL Tools) would suffice as it would know how to run “sqlcmd.”
Log files are created in the folder where the scripts reside. The log files capture any errors
encountered running the scripts.
Installing a DB with an SQL account
HPSM 3.12 added a new installation script: InstallOrUpgradeDBsqluser.bat. This script is also
bundled in the InstallSqlScripts.zip file. With this script a DB can be created or upgraded using
SQL authentication. The Readme_InstallSqlScripts explains the usage of this script. Or simple
run the script from the command line and you will see examples of the syntax and it’s usage.
Connecting to the DB with an SQL account
The HPSM installer can only connect to a DB using windows authentication. Thus if SQL
authentication is needed, you have to create/update a database with the SQL scripts. When
installing HPSM use option 3 in the installer as this will only create the connection strings in the
HPSM_Service.exe.config file and Web.config file.

31
After installation has been completed you will have to change manually the configuration files in
order to use a SQL account to access the database. See the section:
Configure an SQL user account to access the database
in the HPSM Install and Setup Guide.

Appendix A Other HP Security Manager Whitepapers and Manuals
There are a lot of whitepapers/manuals available for HP Security Manager.
The view them, go to the HP Security Manager Support page and select Setup & User Guides.
The following list of documents is available on the support page:
• Instant-On Security and Auto-Group Remediation (white paper)
• Automatic Email notification for remediation tasks and policy changes (white paper)
• Certificate Management (white paper)
• Credential Management (white paper)
• Device Discovery, Determining Device Details and Exporting Devices (whitepaper)
• Installation and Setup Guide
• Manage devices with HP FutureSmart 4.5 Firmware
• Policy Editor Settings including supported devices feature table (white paper)
• Release Notes with Ports (white paper)
• Reporting, Email Alert Subscriptions & Remediation Summary, Auditing & Syslog Functionality
(white paper)
• Securing the HP Security Manager (white paper)
• Sizing and Performance (white paper)
• Troubleshooting Issues (white paper)
• User Guide
• Using licenses (white paper)
• Using Microsoft® SQL Server (white paper)
The section Software on the bottom of the HP Security Manager Support page contains the
following information:
• Supported device features matrix (.xls)

33
Screenshot of the software section:
The section Product Specifications on the left site of the HP Security Manager Support page
contains the following information:
• Supported printers and devices
© Copyright 2024 HP Development Company, L.P. The information contained herein is subject to change without notice. The only
warranties for HP products and services are set forth in the express warranty statements accompanying such products and
services. Nothing herein should be construed as constituting an additional warranty. HP shall not be liable for technical or editorial
errors or omissions contained herein.
Microsoft and Windows are either registered trademarks or trademarks of Microsoft Corporation in the United States and/or other
countries.
c04635799ENW, Rev.25, Aug 2024
