
Documentation:Educational Pro
WordPress Theme
Install Educational Pro WordPress Theme within a few
minutes.
Educational Pro is a simple, clean, responsive and user-friendly education
WordPress theme specially designed for university, school, college or other
educational institutions. The Educational theme has powerful theme
customization options such as custom header settings, logo, custom menu,
custom post types(services,testimonials,galleries,events,courses), social
icons, featured slider, courses and more. It makes your website more
engaging and informative.
Required plugins:-
1. Contact Form 7(https://wordpress.org/plugins/contact-form-7/)
2. Newsletter(https://wordpress.org/plugins/newsletter/)

3. One Click Demo Import
(https://wordpress.org/plugins/one-click-demo-import/)
Educational Pro documentation: How to start?
This documentation will show you step by step how to complete the basic configuration of
Educational Pro.It is important that you follow these steps carefully because some steps build
up on each other and that will help you a great deal to set up your website properly:
1. How to set up a static front page in WordPress?
2. How to upload, install and activate Educational Pro?
3. What is page and how to create it?
4. What is category and how to create it?
5. How to create menus?
6. How & where to place widgets on your website?
7. How to create posts?
8. How to add logo, header image and site title/tagline?
9. How to adjust options & layout?
10. How to add google map in contact page?
1 – How to set up a static front page in WordPress?
In order to create a Educational Pro like front page like shown in the theme demos for
Educational Pro,
● First to create new page named Home(or else) .
● Select Homepage template for your just newly created page under Page Attributes on
the right side.
● Finally, publish this page.
● Second, go to Settings => Reading in your WordPress dashboard.
● Select A static page and select your just created new page Home as Front page
.
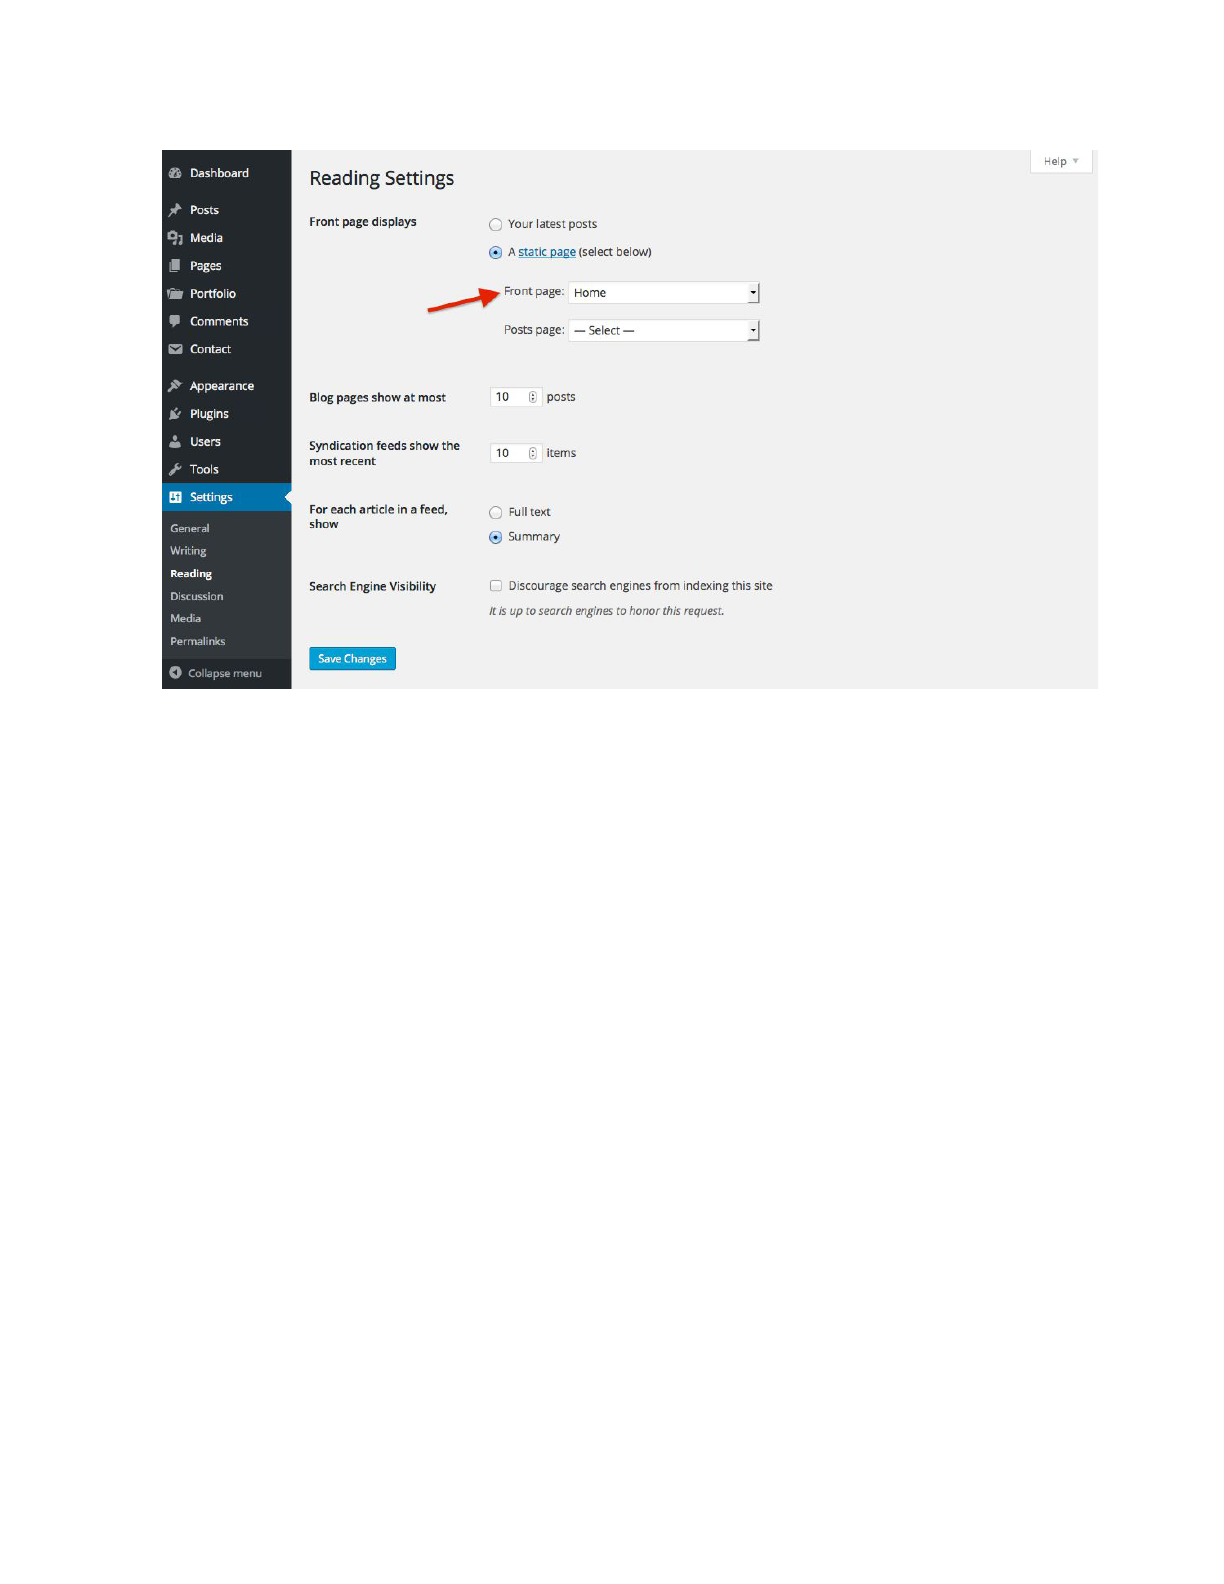
● Note:- Don’t forget to save your changes
2 – How to upload, install and activate Educational Pro?
From WordPress Dashboard
● Login to Wordpress admin panel
● Go to > Appearance > Themes
● Click in add New >Upload educational-pro.zip file > Install Now
● Activate the theme
After installing the theme, now you can customize your website as per your preference.
3 –What is page and how to create it?
Pages are static and are not listed by date. Pages do not use tags or categories. An about page
is the classic example. Pages can be displayed in the sidebar using the Pages widget, and
some themes display pages in the navigation at the top of the site.
-To create page
● Go to dashboard
● Click in Pages > Add New > Follow instructions as below
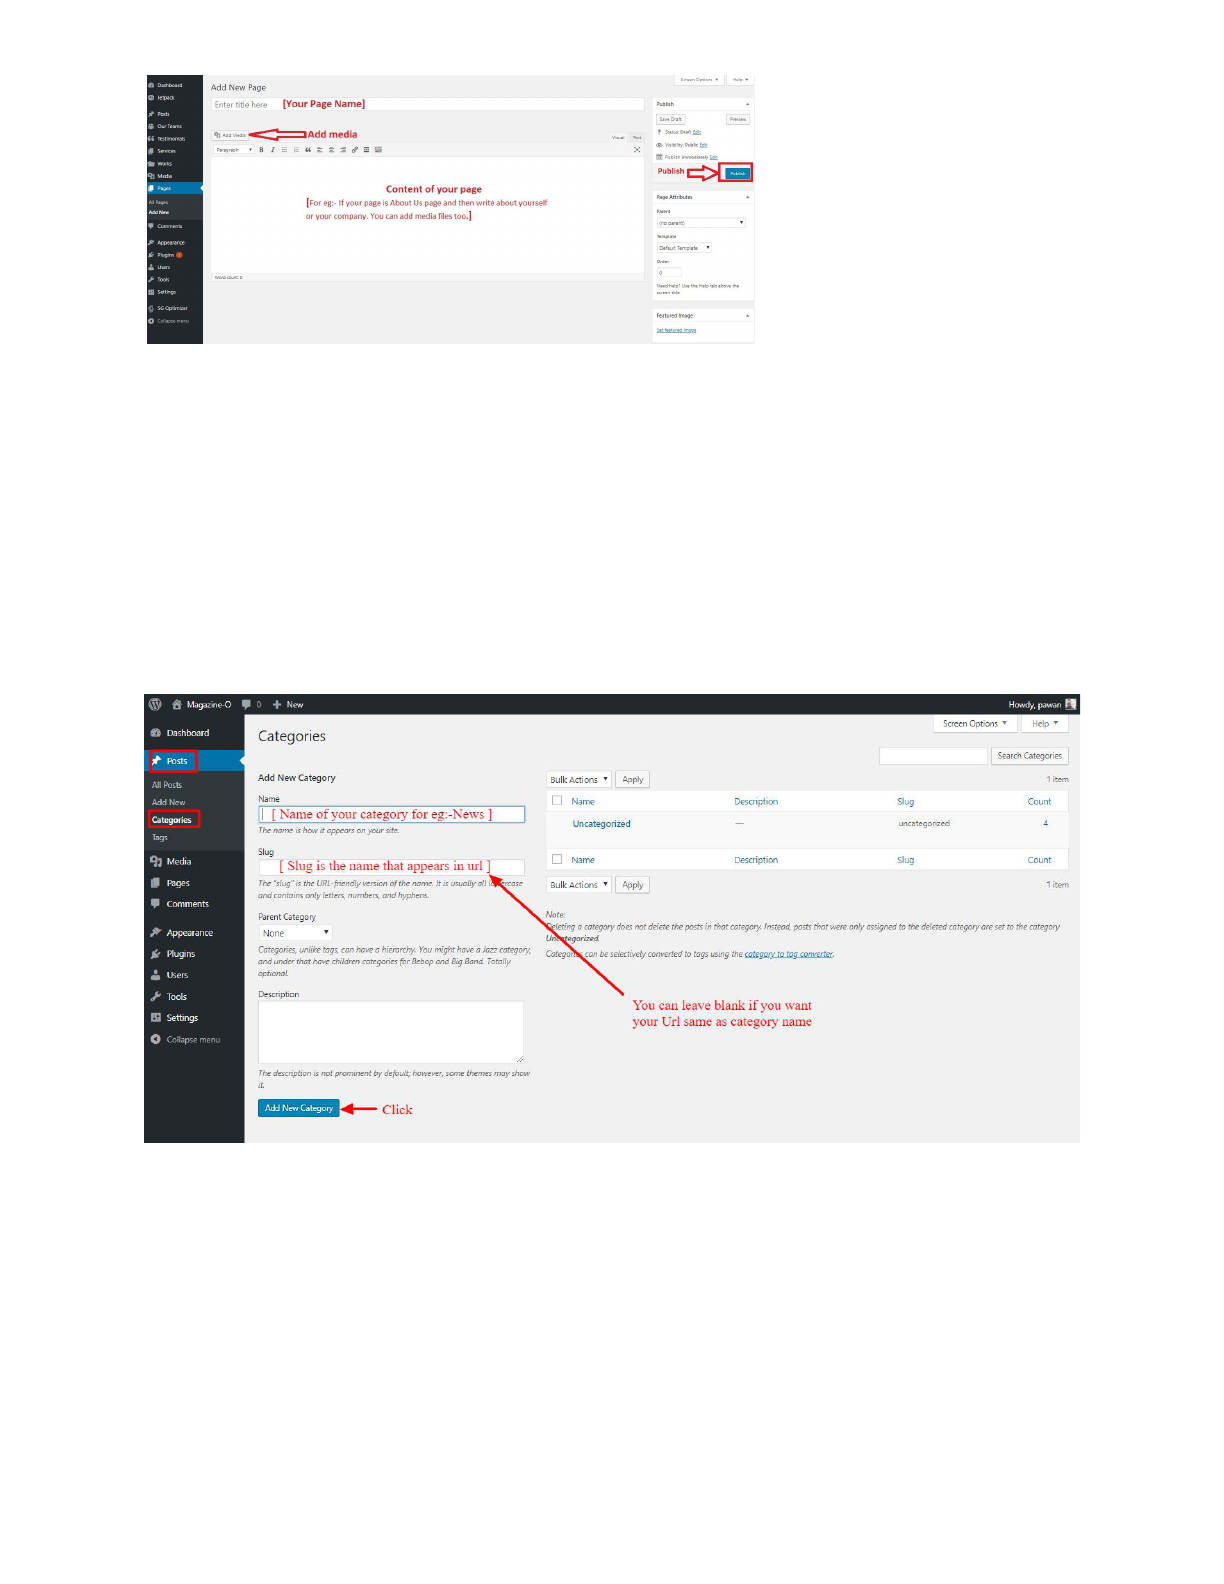
● After adding all content, you can publish your page and create necessary pages by
same method.
4 – What is category and how to create it?
Categories provide a helpful way to group related posts together, and to quickly tell readers
what a post is about. Categories also make it easier for people to find your content. Categories
are similar to, put broader than,tags.
How to create categories
● Go to dashboard
● Click in Posts > Categories
● You can put your own slug too, most of the time it is left blank which means name of the
category itself will be its slug.
● [ For eg. yoursite.com/category/category_name]
● You can put description if you want.
● Now after adding category, your category will appear in right side of the post page.
● You can add more categories in same manner.

5 – How to create menus?
This theme comes with only one menu locations.Primary
You can create menus in two ways.
● Appearance=>Customize=>Menus=>Create New Menu
● Appearance => Menus(We RECOMMENDED this Option for creating menus.)
● Create New Menu [You need to create only one menu]
● Give name of the menu[For eg. Primary Menu] > Create Menu

6 - How & where to place widgets on your website?
In this important step, we will show you where and how to place widgets. You can place widgets
either through two ways:-
● Appearance => Widgets(We RECOMMENDED this Option for widget add in widget area.)
● Appearance => Customize => Widgets
Note:- Widgets can be placed simply via drag and drop, so just pull your favored widget to the
widget area you like.
Here you can see the Available widgets areas of Educational Pro WordPress Theme.


7 - How to create posts?
Now after all set, you can start writing your post. Follow these steps
● Go to dashboard > Posts > Add New
● Finally, click in publish Button. You can preview your post before actually publish it just
make sure everything is ok. If you have not completed writing your post then you can
save it as draft.
● Finally, click in publish Button. You can preview your post before actually publish it just
make sure everything is ok. If you have not completed writing your post then you can
save it as draft.
8- How to add logo, header image and site title/tagline?
With Educational Pro,you may customize your header in many different ways. To upload a
full-width header image, go to Appearance => Customize =>Header Settings = > Header
Image in your WordPress dashboard. Header Image Also used for breadcrumbs background
image.
To upload a logo and display/hide the site title and tagline, you can navigate to Appearance =>
Customize => General Settings => Site Identity and apply your changes based on your
personal.

9- How to adjust options & layout?
After you have carefully followed the previous steps, you have successfully completed the basic
configuration of the theme. You can now further customize and manage the appearance of your
website via the extensive options panel of Educational Pro.
Please navigate to Appearance => Customize in your WordPress Dashboard to see the
Frontpage Ordering, General Settings, Header Settings, Frontpage Settings, Footer
Settings and Page Template Settings panel within the WordPress customizer.
9.1 - Frontpage Ordering
To reordering section just by drag and drop customizer section. Follow these
steps:-
● Go to Dashboard ,Appearance => Customize => Frontpage Ordering

● Drag or Drop the section element to reorder.
9.2 - General Settings
In General Settings, we have following sections:-
To Setting this options, follow these steps:-
● Go to Dashboard, Appearance => Customize => General Settings
● Open each section and start to set content and filled up fields as per your requirement.
9.2.1 Site Identity
Go to 8- How to add logo and site title/tagline?
9.2.2 Colors
This theme gives you only two color options.
● Primary Theme Color
● Secondary Theme Color
● Footer bg Color
● Header Text Color
● Background Color
To setting colors of theme, Go to Dashboard
● Appearance => Customize => General Settings => Colors
● Finally, click on publish button.

9.2.3 Background Image
To Setting background image of theme. Follow these steps:-
● Go to Dashboard , Appearance => Customize => General Settings => Background
Image
● Finally, click on publish button.
9.2.4 - Select Font for Theme
This themes give you unlimited Google font(more than 600+).
To setting Font of theme, Go to Dashboard
● Appearance => Customize => General Settings => Select Font For Theme
● Finally, click on publish button.

9.3 - Header Settings
In Header Settings, we have following sections:-
To Setting this options, follow these steps:-
● Go to Dashboard, Appearance => Customize => Header Settings
● Open each section and start to set content and filled up fields as per your requirement.
9.3.1 Top Header Section
To Setting Top Header left items of theme. Follow these steps:-
● Go to Dashboard , Appearance => Customize => Header Settings => Top Header
Section
● Finally, click on publish button.

9.3.2 Header Image
Got to 8- How to add logo, header image and site title/tagline?
9.4 - Frontpage Settings
In Frontpage Settings, we have following sections:-
To Setting this options, follow these steps:-
● Go to Dashboard, Appearance => Customize => Frontpage Settings
● Open each section and start to set content and filled up fields as per your requirement.

9.4.1 Slider Section
To Setting Frontpage slider section of theme. Follow these steps:-
● Go to Dashboard , Appearance => Customize => Frontpage Settings => Slider
Section
● Finally, click on publish button.

9.4.2 Service Section
To Setting Frontpage Service section of theme. Follow these steps:-
● Go to Dashboard , Appearance => Customize => Frontpage Settings => Service
Section
● Finally, click on publish button.
9.4.3 About Section
To Setting Front Page About section of theme. Follow these steps:-
● Go to Dashboard , Appearance => Customize => Frontpage Settings => About
Section
● Finally, click on publish button.

9.4.4 Course Section
To Setting Frontpage Course section of theme. Follow these steps:-
● Go to Dashboard , Appearance => Customize => Frontpage Settings => Course
Section
● Finally, click on publish button.
9.4.5 Counter Section
To Setting Frontpage Counter section of theme. Follow these steps:-
● Go to Dashboard , Appearance => Customize => Frontpage Settings => Counter
Section

● Finally, click on publish button.
9.4.6 Events Section
To Setting Frontpage Events section of theme. Follow these steps:-
● Go to Dashboard , Appearance => Customize => Frontpage Settings => Events
Section
● Finally, click on publish button.
9.4.7 Testimonials Section
To Setting Frontpage Testimonials section of theme. Follow these steps:-
● Go to Dashboard , Appearance => Customize => Frontpage Settings =>
Testimonials Section

● Finally, click on publish button.
9.4.8 Blog Section
To Setting Frontpage Blog section of theme. Follow these steps:-
● Go to Dashboard , Appearance => Customize => Frontpage Settings => Blog
Section
● Finally, click on publish button.
9.5 - Footer Settings
In Footer Settings, we have following sections:-
To Setting this options, follow these steps:-
● Go to Dashboard, Appearance => Customize => Footer Settings
● Open each section and start to set content and filled up fields as per your requirement.
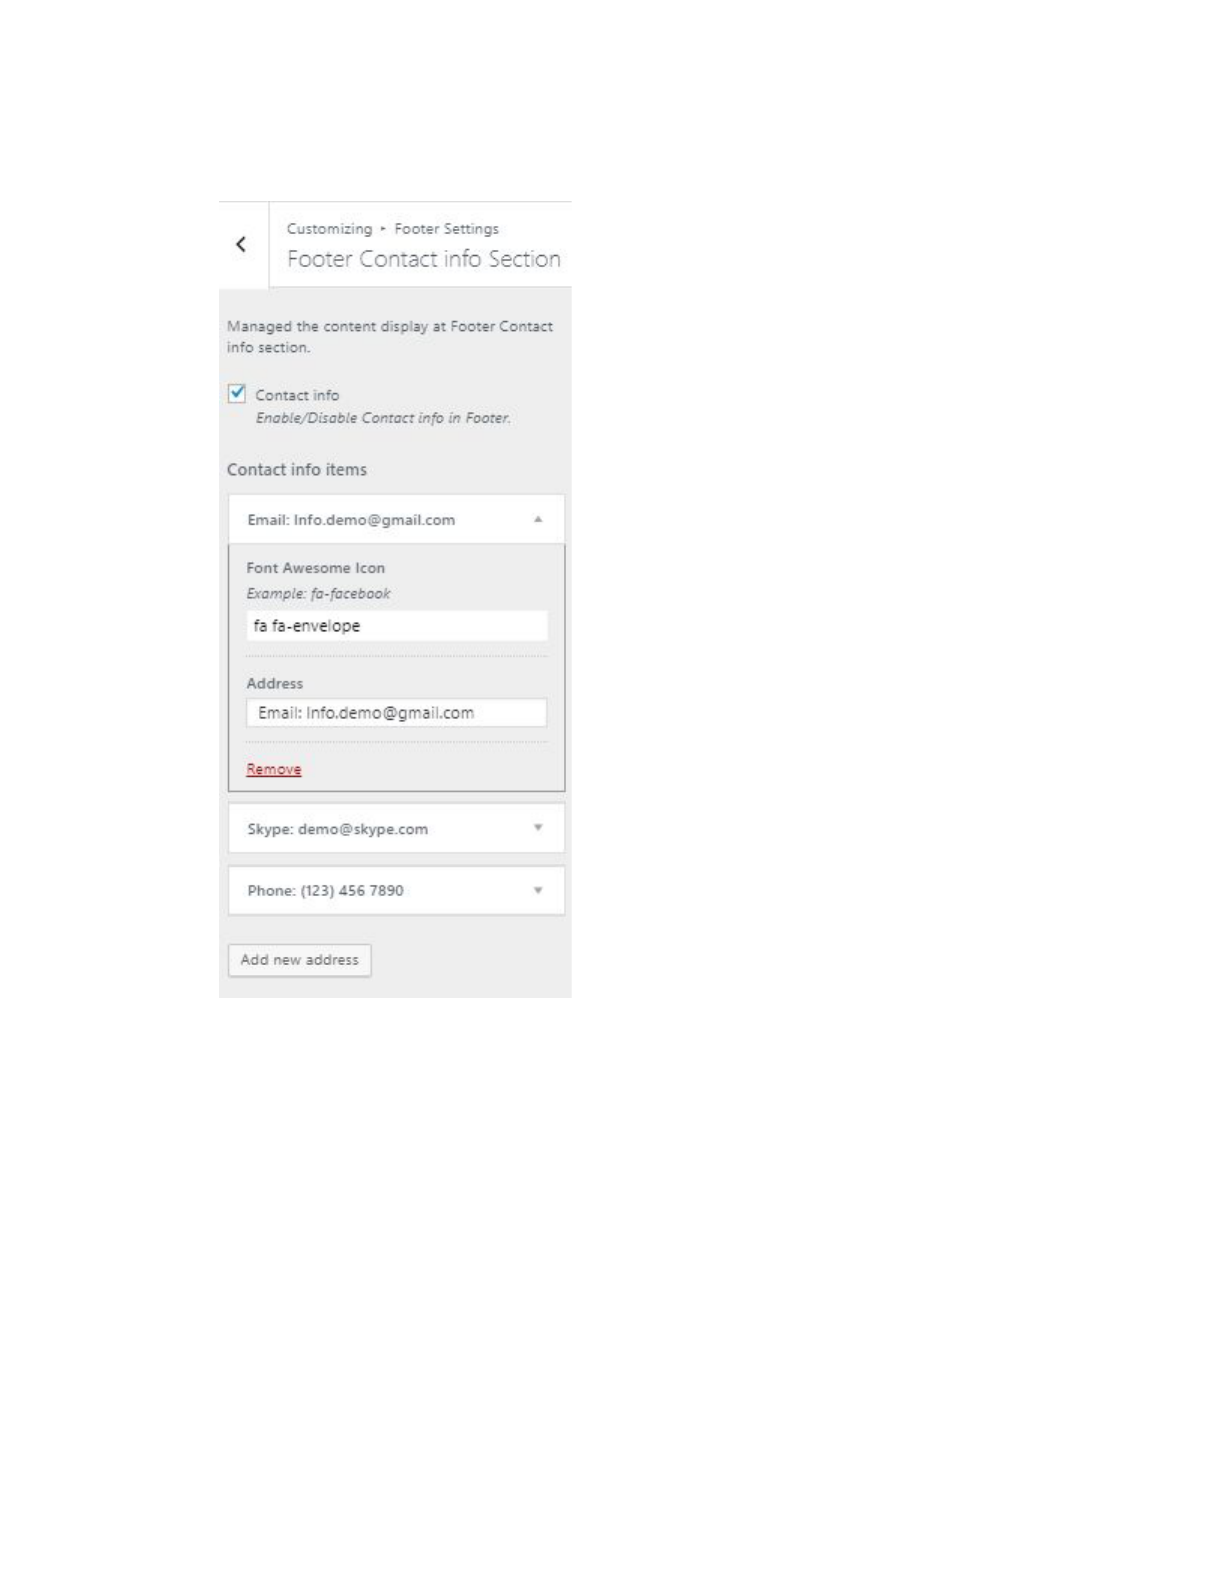
9.5.1 Footer Contact info Section
To Setting Footer Contact info section of theme. Follow these steps:-
● Go to Dashboard , Appearance => Customize => Footer Settings => Footer
Contact info Section
● Finally, click on publish button.

9.5.2 Footer Social Media Section
To Setting Footer Social Media section of theme. Follow these steps:-
● Go to Dashboard , Appearance => Customize => Footer Settings => Footer Social
Media Section
● Finally, click on publish button.
9.6 - Page Template Settings
In Page Template Settings, we have following sections:-
To Setting this options, follow these steps:-
● Go to Dashboard, Appearance => Customize => Page Template Settings
● Open each section and start to set content and filled up fields as per your requirement

9.6.1 Contact Page
To Setting Contact Page of theme. Follow these steps:-
● Go to Dashboard , Appearance => Customize => Page Template Settings =>
Contact Page
● Finally, click on publish button.
10- How to add google map in contact page?
To add google map in contact section, Follow these steps:-
I. Go to https://www.google.com/maps.
II. Type address on search bar

III. Click on SHARE button.
IV. Copy html on click Copy HTML.

V. Go to Dashboard, Appearance => Widgets.
VI. Drag and drop Custom HTML Widget in Google map widgets area.

VII. After that, paste copied html of step IV. in content field of Custom HTML
widget
VIII. Finally, Click save button.
