
dox42 GmbH | Vegagasse 5/2, A-1190 Vienna
IBAN: AT571420020010936536 | BIC: BAWAATWW | Handelsgericht Wien | FN: 393153 t | UID: ATU67845433
Version 2.1

Page 2 (of 30)
Content
1
Introduction ___________________________________________________________________________________ 3
2
Using the dox42 Custom Connector Method 1 (import via Github) ______________________________ 4
2.1 Security 5
2.2 Definition and Test – Check Policy 7
2.3 Sharing is Caring 8
2.4 dox42 Custom Connector Example Flow 8
3
Using the Custom Connector Method 2 (create from scratch) _________________________________ 11
4
Using the dox42 Premium Connector, Method 1 _______________________________________________ 17
4.1 Generating the ID Token 18
4.2 Setting up an Azure Key Vault 18
4.3 Configuring the Flow 19
5
Using the dox42 Premium Connector, Method 2 _______________________________________________ 26
5.1 Generating the Access Token 27
5.2 Configuring the Flow 28
6
Running the Flow _____________________________________________________________________________ 30

Page 3 (of 30)
1 Introduction
The dox42 Power Automate Premium Connector provides a connection to the very extensive dox42
REST API and allows you to automatically generate documents in a flow with data from all sources
like D365, SharePoint or others. You can also use it from Azure Logic Apps and Power Apps. The
connector is available as a Premium Connector or alternatively as a Custom Connector, which can be
imported via GitHub or created yourself. The authentication is token based and using the Premium
Connector the authentication happens outside the connector and we need to create Access/ID tokens
within our Flows. With the Custom Connector the authentication happens within the connector, and
you add all necessary Azure Active Directory information to the Security tab of your connector.
To use dox42 from Power Automate, you also need a dox42 Server/dox42 Online license. For
authentication purposes, you will need to register your dox42 Server or dox42 Online license as an
application in Azure Active Directory. You can find more information on your dox42 Online
configuration and set-up here. If you do not have your licenses yet or would like to get a free trial email
us at [email protected]om.

Page 4 (of 30)
2 Using the dox42 Custom Connector
Method 1 (import via Github)
Alternatively to using the dox42 Premium Connector, you can generate your documents from
Microsoft Power Automate Flows via our custom connector. The main difference is that within the
custom connector you add the authentication method within the Security tab of the connector, not in
each Flow separately. This is the most time efficient way of building your dox42 Power Automate
Flows, hence we recommend this method.
To trigger the dox42 Server from the dox42 custom connector, you need to import the dox42 custom
connector from GitHub. It can be found in “certified connectors” in the “master” branch:
Now you will see the dox42 connector in your list of custom connectors.
Next you need to add your dox42 Online tenant Name (or dox42 On-premise server) to this custom
connector:

Page 5 (of 30)
2.1 Security
In the Security Tab select “OAuth 2.0” and “Azure Active Directory”

Page 6 (of 30)
Enter your App ID of your dox42 (Online) Server App registration from Azure Active Directory (see also
dox42 AAD chapters in SharePoint and D365 CE documentation), the Client Secret and the Resource
URL of the SharePoint Online.
For the Scope please enter https://YourTenant.SharePoint.com/AllSites.Write or
https://YourTenant.SharePoint.com/AllSites.Read for the tenant where you store your templates.
In the last field “Redirect URL” you receive a custom redirect URL for each dox42 Custom connector.
Copy it and add it as a Web Redirect URL to your dox42 (Online) Server App registration in Azure
Active Directory AAD Admin Center (next to all other Web Redirect URIs that you’ve configured for
dox42 Online:

Page 7 (of 30)
2.2 Definition and Test – Check Policy
Since we have already configured the dox42 connector, this step is not necessary, though please
double check if a policy is added to the connector.
In case there is none, please add the following:
You can copy the URL template here:
https://@headers('domainname')/dox42RestService.ashx?@queryParameters('querystring')

Page 8 (of 30)
2.3 Sharing is Caring
Select the dox42 custom connector in the custom connectors list and share it with the people of your
organization who should be able to use it. If you do not share, nobody but yourself will be able to use
the custom connector.
2.4 dox42 Custom Connector Example Flow
Both “domainname” and “querystring” can be retrieved from the dox42 Server Designer (Version
1.0.1.4 and later) like this:
Page 9 (of 30)
Configure a working config in the dox42 Server Designer and navigate to “REST URL and Query String
for dox42 Apps” in the “dox42 Power Automate Connector Parameters” you will find the correct
parameters for the dox42 connector. “Name Space” represents the “domainname” parameter and
“Query” the “querystring” parameter.
Now you can run your dox42 server call in Power Automate using the dox42 custom connector.
2.4.1 dox42 Custom Connector Example Flow with POST
Call
You can also use your dox42 custom connector to run POST calls. This can be useful if you send data
via a Request Body. Choose the option of a POST Request in your Flow and add the Request Body
portion of your call in the “Request Body” field, instead of the Query Portion field.
Here is an example:

Page 10 (of 30)

Page 11 (of 30)
3 Using the Custom Connector Method 2
(create from scratch)
As an alternative to the dox42 Custom Connector which you import via github, you can create a
custom connector from scratch yourself:
Create from blank, and enter the URL of your dox42 Server or dox42 Online tenant:

Page 12 (of 30)
3.1.1 Security
In the Security Tab select “OAuth 2.0” and “Azure Active Directory”

Page 13 (of 30)
Enter your App ID of your dox42 (Online) Server App registration from Azure Active Directory (see also
dox42 AAD documentations), the Client Secret and the Resource URL of the SharePoint Online Tenant.
For the Scope please enter https://YourTenant.SharePoint.com/AllSites.Write or
https://YourTenant.SharePoint.com/AllSites.Read for the tenant where you store your templates.
In the last field “Redirect URL” you receive a custom redirect URL for each dox42 Custom connector.
Copy it and add it as a Web Redirect URL to your dox42 (Online) Server App registration in Azure
Active Directory AAD Admin Center (next to all other Web Redirect URIs that you’ve configured for
dox42 Online:

Page 14 (of 30)
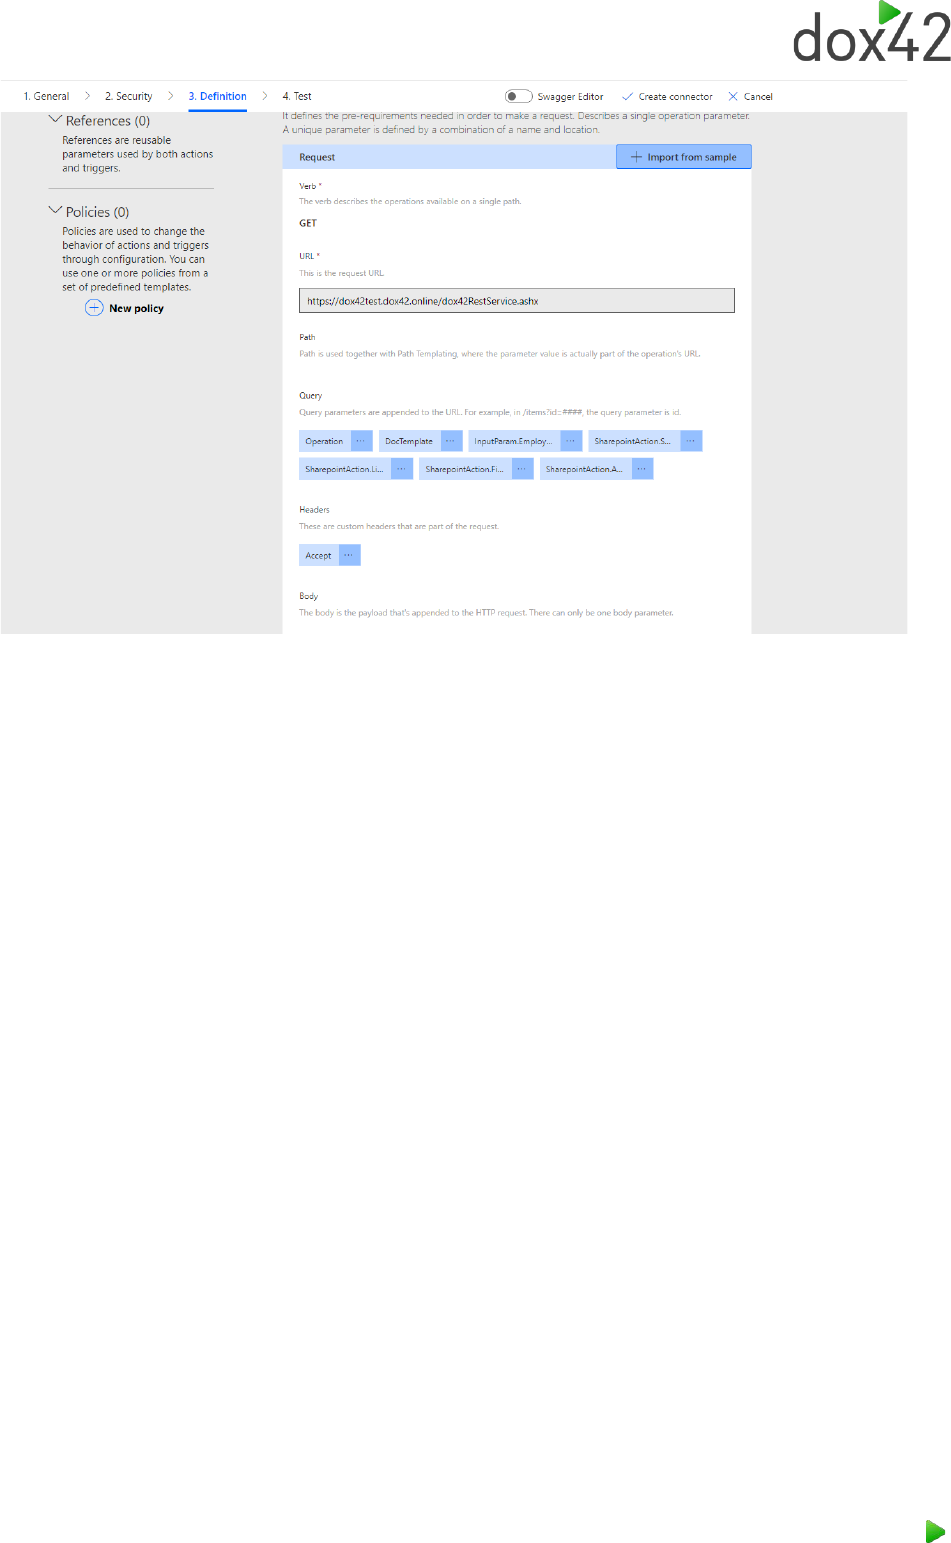
3.1.2 Definition and Test
To configure the dox42 Call in the Definition tab. Please create a dox42 REST link using the dox42
Server Designer and import it “Import from sample” in the Definition tab.
The MS Power Automate Connector will automatically recognize the parameters. You may define
default values for these parameters. We would recommend to do so, as it will make testing a lot more
convenient.
Page 15 (of 30)
In the Test tab you can create a connection and test your connector.
3.1.3 Sharing is caring
Select your custom connector in the custom connectors list and share it with the people of your
organization who should be able to use it. If you don’t do so, nobody but yourself will be able to use
your connector.

Page 16 (of 30)
3.1.4 Your first MS Flow or Logic App with dox42
You can now create MS Flows using your custom connector.
Page 17 (of 30)
4 Using the dox42 Premium Connector,
Method 1
We will build a flow that generates a bearer access token and executes a dox42 service call.

Page 18 (of 30)
4.1 Generating the ID Token
In order to generate a valid access or ID token, we have to send a request to Microsoft’s token API
(https://login.microsoftonline.com/<Tenant-ID>/oauth2/v2.0/token). In this example we will be using
a client secret and username and password to get an ID token, since we will be working with
SharePoint, which does not accept access tokens generated with a client secret. The parameters
needed for this are as follows:
grant_type
Should be password
client_id
Your Client ID
client_secret
Client secret created in Azure AD
scope
For example, a SharePoint scope:
yourcompany.sharepoint.com/.default
username
Microsoft username
password
Microsoft password
To get a client secret go to your dox42 App you have registered beforehand in Azure Active Directory
admin center. Go to Certificate & secrets → Client secrets → New client secret
To get the client ID and tenant ID go to the Azure AD overview of your application. You will find the
application ID (client ID) and tenant ID there.
We highly recommend using Azure Key Vault or similar services to encrypt secrets and passwords in
your flow.
4.2 Setting up an Azure Key Vault
To create an Azure key vault, you can refer to these articles:
https://blog.pragmaticworks.com/azure-active-directory-and-resource-groups
https://azuredevopslabs.com/labs/vstsextend/azurekeyvault/ (Task 2)

Page 19 (of 30)
Once you have created an Azure key vault navigate to “Secrets” and Generate/Import a new secret
Simply enter the credentials and press “Create” (bottom left of window).
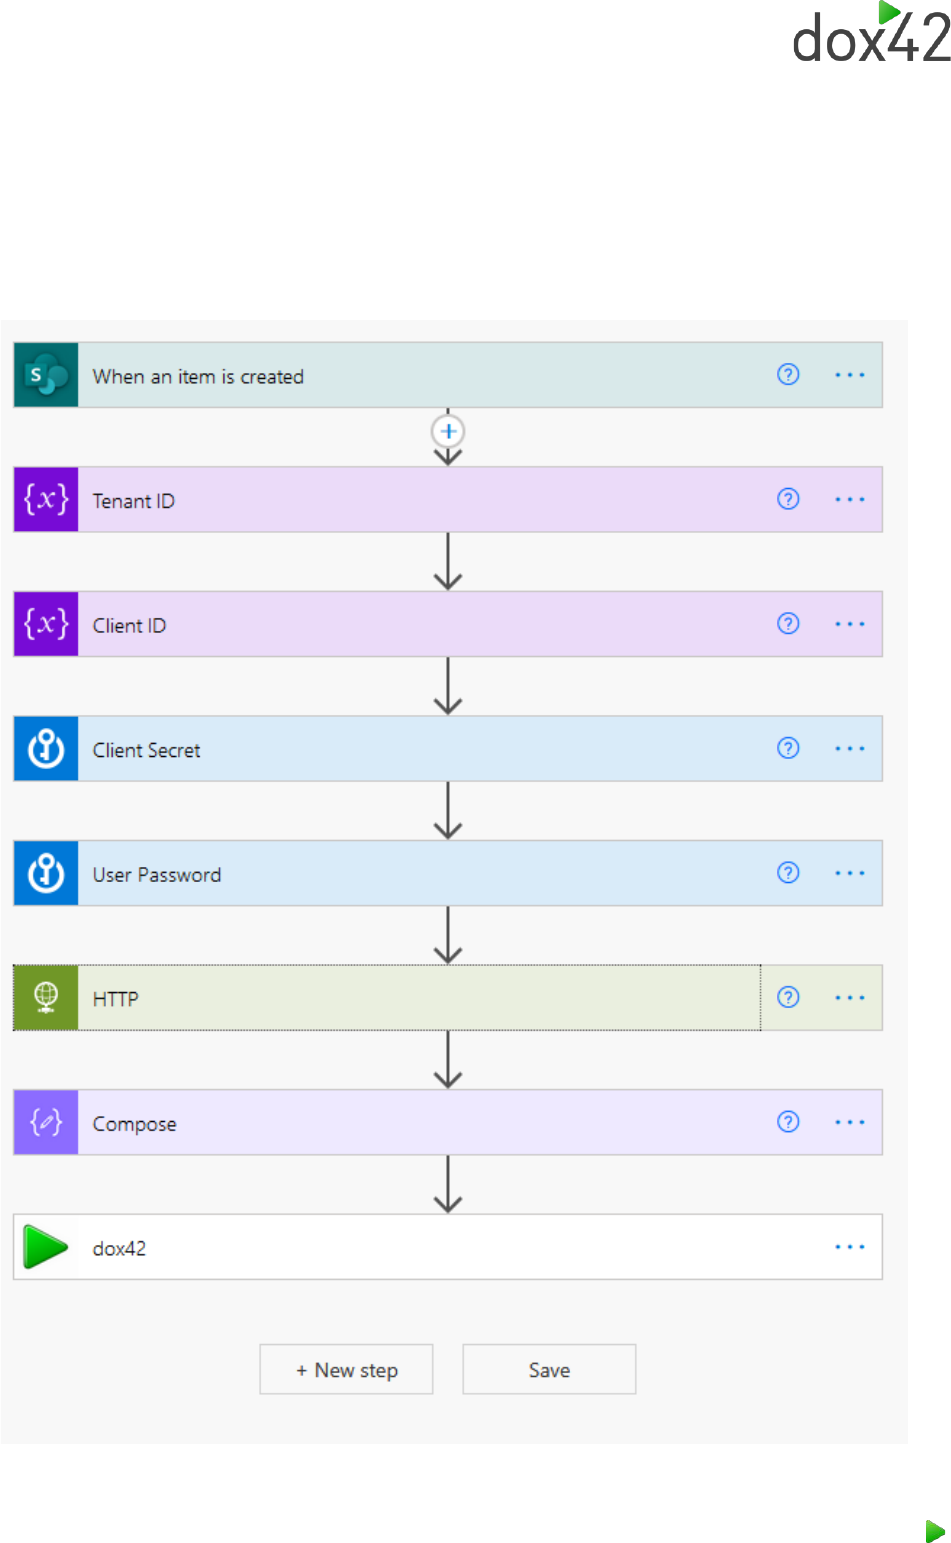
4.3 Configuring the Flow
Now that we have the necessary HTTP request parameters with values, we can start to implement
them in the flow. You have already seen the finished flow in the first illustration of this documentation,
now we will look at each component in detail.
First of all, we need a trigger to start the flow. Any trigger will suffice, in the example we use a simple
SharePoint trigger that triggers the flow as soon as a file is created in the target Folder.

Page 20 (of 30)
Next, we highly recommend using variables in your flow. In this example client ID and tenant ID are
saved as variables, since they are not as sensitive as other credentials, but you can also save those in
your Azure key vault.
Next, we need to retrieve the credentials from the Azure key vault. To achieve this, add a new Action
then search for Azure Key Vault and choose Get secret.
If you get an invalid connection as soon as you add the Azure key vault action, open the Connections
list in a new browser tab. You can find said list here:

Page 21 (of 30)
Next open the faulty connection and do the steps illustrated below:

Page 22 (of 30)
Clicking Update password will pop-up a Microsoft authentication window.
After that the connection should be successful.
In the flow, click the connection again to get it working.
It is highly recommended to enable the Secure Outputs option. To do this click the three dots and click
settings, there you can enable secure outputs. This will hide the secrets in flow runs.

Page 23 (of 30)
Next we need to set up the HTTP request to generate an ID token. For that create a HTTP action:
As you can see, the variables and secrets from the key vault are used for the HTTP request.
Additionally, you have to define the content-type in the header with the value application/x-www-
form-urlencoded.
We recommend also enabling secure outputs in the HTTP action to hide the access token.
Next, create a Compose action and enter the following expression: outputs('HTTP').body?['id_token']

Page 24 (of 30)
Finally, we will configure the dox42 premium connector. An important piece of information to know
before getting started is that the dox42 premium connector relies on external means of
authentication, but still has to have an authentication type according to the connector certification
rules. That means that the connection to the connector is obsolete, and the Bearer Access Token
parameter shall be left empty, since it is overwritten anyways. So, build your connection like this:

Page 25 (of 30)
Both “domainname” and “querystring” can be retrieved from the dox42 Server Designer (Version
1.0.1.4 and later) like this:
Configure a working config in the server designer and navigate to “REST URL and Query String for
dox42 Apps” in the “dox42 Power Automate Connector Parameters” you will find the correct
parameters for the dox42 connector. “Name Space” represents the “domainname” parameter and
“Query” the “querystring” parameter.
For the Bearer Access Token parameter, use the Outputs of the compose action.
Now you have a proper setup to run dox42 server calls in your Power Automate flows with the new
dox42 premium connector.
Page 26 (of 30)
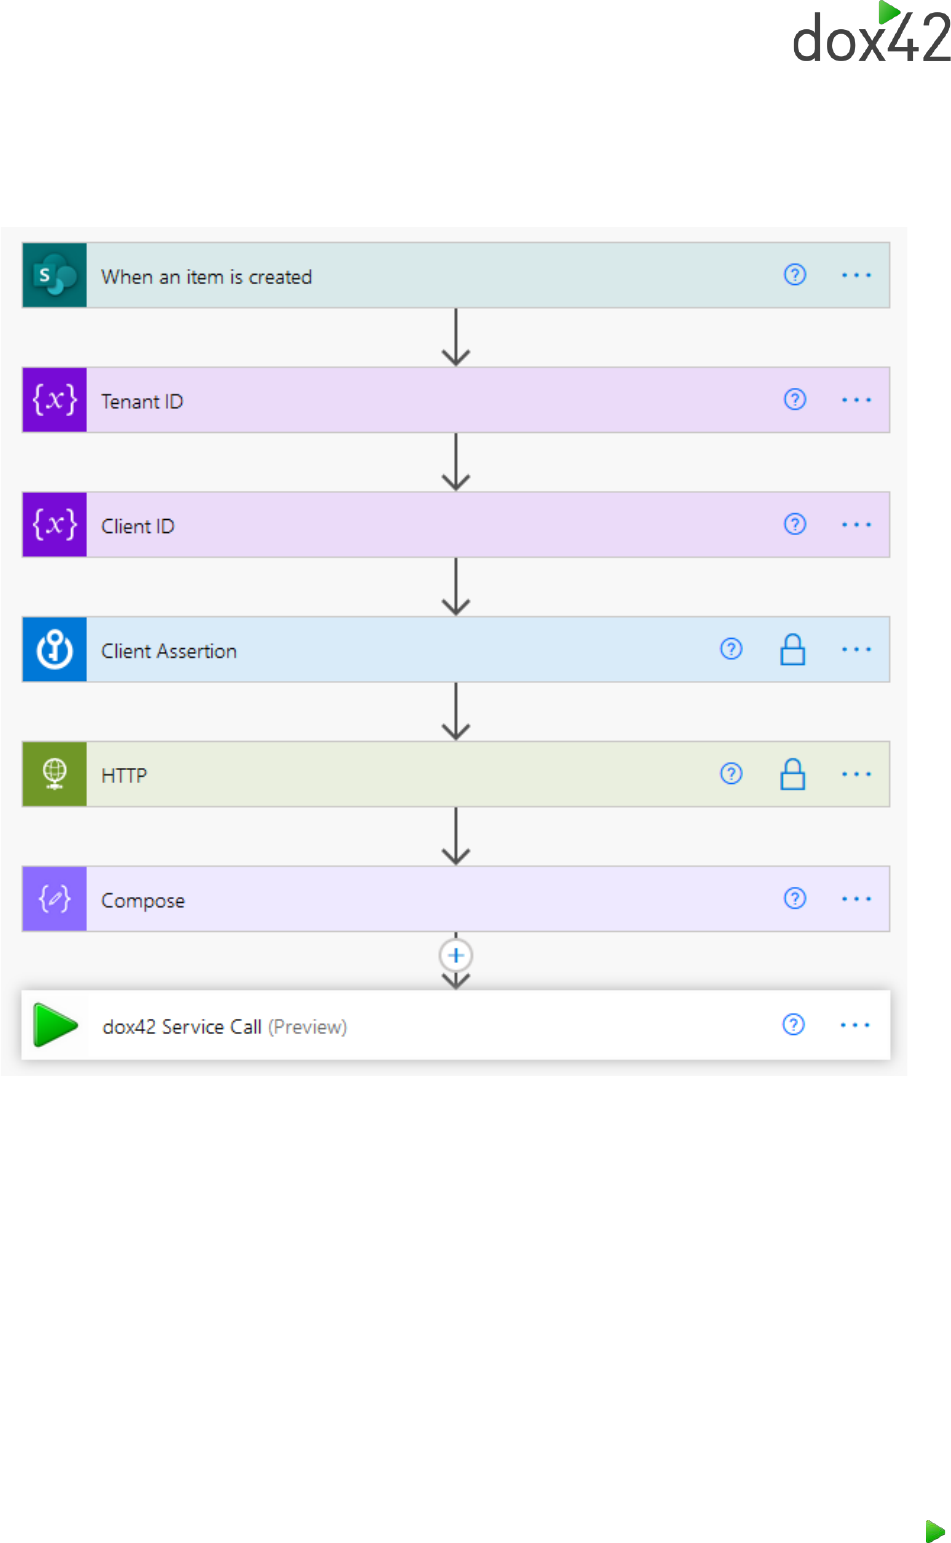
5 Using the dox42 Premium Connector,
Method 2
If you wish to work with access tokens instead of ID tokens and also need access to a SharePoint, you
cannot use a client secret for authentication. The correct way to achieve this is via certificate.
Method 2 will describe the process of uploading certificates to Azure AD and retrieving a client
assertion for the token generation. If, however, you do not work with SharePoint but rather with other
services that accept client secrets as means of authentication you can replace the client_assertion
parameter shown later with client_secret.

Page 27 (of 30)
5.1 Generating the Access Token
In order to generate a valid access or ID token, we have to send a request to Microsoft’s token API
(https://login.microsoftonline.com/<Tenant-ID>/oauth2/v2.0/token). This method will use a certificate
for the Azure AD access token generation. The parameters needed for this are as follows:
grant_type
Should be client_credentials
client_id
Your Client ID
client_assertion
A JWT token signed with a certificate
scope
For example, a SharePoint scope:
yourcompany.sharepoint.com/.default
client_assertion_type
Should be urn:ietf:params:oauth:client-
assertion-type:jwt-bearer
To get the client ID and tenant ID refer to method 1.
Firstly, upload the certificate file you want to use for generating the access token to Azure AD. To
Achieve this, simply navigate to “Certificates & secrets” in your Azure AD app and upload a new
certificate there.
Now, generating a client assertion is quite tricky, therefore Server Designer version 1.0.1.6 or later
offers the possibility to generate client assertions from normal and password protected certificate
files.
After that, navigate to “Client Assertion Generator” and import your public and private key certificate
files, or complete certificate file, alongside your tenant and client ID and press generate. Now you have
a working client assertion that you can save to Azure key vault as explained in method one.
If you wish to do this step without the Server Designer you can refer to this article especially:
https://docs.microsoft.com/en-us/azure/architecture/multitenant-identity/client-assertion
Again, we highly recommend using Azure Key Vault or similar services to encrypt secrets and
passwords in your flow.

Page 28 (of 30)
5.2 Configuring the Flow
For the majority of the steps, especially Azure key vault, you can refer to method one.
Get the client assertion from Azure key vault.
Again, the variables and secrets from the key vault are used for the HTTP request. Additionally, you
have to define the content-type in the header with the value application/x-www-form-urlencoded.

Page 29 (of 30)
To retrieve the access token from the HTTP call, enter this expression:
outputs('HTTP').body?['access_token']
The dox42 service call action is the same for this method.
Page 30 (of 30)
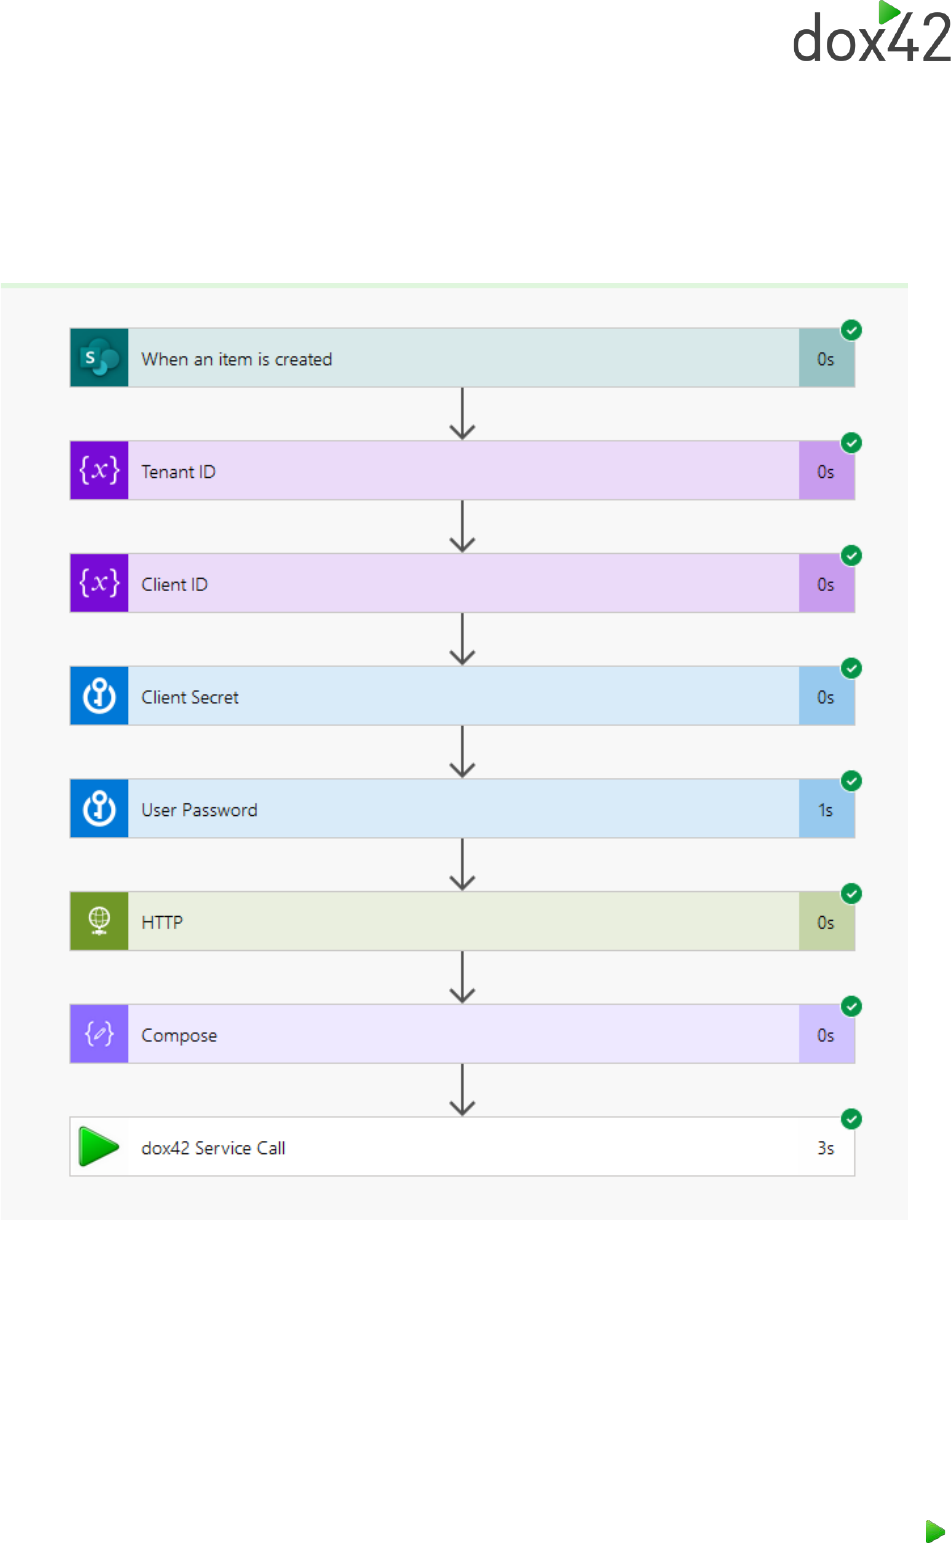
6 Running the Flow
To run the flow we just created, save the flow, and click test. Next, you have to manually trigger the
flow the first time. In the case of the flow example in the screenshot below an item has to be created
in the target SharePoint list to trigger it. After doing that, the flow will start and will generate your
desired document for you.
Congratulations, you have built your first flow using the dox42 premium connector!
Good luck and may the Flow be with you.
