
1
Fyndiq Prestashop Module
User guide. Version 2.0
Introduction 2
Fyndiq Merchant Support 2
Prerequisites 2
Seller account 3
Create the account 4
Your company 4
Contact information 4
Your webshop on Fyndiq 4
Your account information 4
Create an API token version 2 5
Installation and configuration 6
Installation 6
Configuration 6
Multistore Configuration 6
Connecting the Module 7
Settings 7
Create products 8
General requirements 8
Create a product 8
Information 9
Price settings 10
Associations (Categories) 10
Quantities 10
Images 10
Save the product 11
Export products to Fyndiq 12
Merchant Pages 13
Create test order 13
Import and handle orders 15
Activate account 16

2
Introduction
This document is intended for you as a merchant to quickly get started with the Fyndiq
Prestashop Module. It contains step by step instructions for installing and setting up the
module and how to use it.
Fyndiq Merchant Support
For any questions, problems or suggestions regarding your Seller Account or the Fyndiq
Magento Extension, please contact our team as follows.
For questions regarding selling on Fyndiq, please contact us on: [email protected]
For technical questions regarding the API, please contact us on: i[email protected]
Prerequisites
This document assumes that the following conditions are met before installing the extension:
● Prestashop 1.4 or above
● PHP 5.2 or above
● MySQL 5.0 or later
● Proper access to the Prestashop installation is available, so the plugin can be installed
● A merchant account has been created on Fyndiq
● An API V2 token has been created for that account on the Fyndiq Merchant Pages
Please note: Kindly inform Fyndiq Seller Support that you start integrating with the Magento
Extension. Every Seller Account will stay in test mode until products have been uploaded and at
least one test order has been made (and both checked successfully). Seller Support will activate
your account for sales afterwards.

3
Seller account
The first step to start using the Fyndiq marketplace is to set up a seller account. You can do so
at this page: https://fyndiq.se/merchant/create_account/

4
Create the account
The form for creating your account is in English, the fields marked by * are mandatory and
described below:
Your company
● Name of company
● VAT registration number
● Company address
Contact information
● First name
● Family name
● Phone number
● Email address
Your webshop on Fyndiq
● Webshop name on Fyndiq
● Telephone support
● Return address
● Webshop return country
● Preferred language
● How did you heard about us?
Your account information
● User name
● Password
● Password again for verification
You do not commit to anything by creating an account.

5
Create an API token version 2
The API token is used for verification between your ecommerce platform and Fyndiq. You
create the token when you are logged in at the merchant page at:
https://fyndiq.se/merchant/
Go to Settings and in the sub menu API. Click the button labelled “Create an API v2 Token”.
Make sure to use the API v2 Token as marked in the image below.
When the token is created, you can see it under “Current API Token”. It is then used together
with the username you chose when creating the account as API credentials.
Note that your username is also visible under API Username.

6
Installation and configuration
All files needed for the installation of the extension can be found on our developer pages
together with this User Guide and Installation Instructions:
Installation
http://developers.fyndiq.com/fyndiq-prestashop-module/
See installation instructions.
Configuration
Multistore Configuration
PrestaShop supports multistore configuration, which has impact on the export of your products
to Fyndiq. We recommend that you assign your root category for each of your stores available
so that the products are exported to the proper feed. Please see the PrestaShop
documentation for reference on how to set this up.

7
Connecting the Module
Before you can start using the Fyndiq PrestaShop Module, it has to be connected to the Fyndiq
API with your Username and API Token as described in the previous section. This only has to be
done once, when you first enter the module. The settings will be automatically saved for later
use.
On the settings page, please enter the following data:
● Username - the username of your Fyndiq Merchant Account
● APIv2 Token - the API Token generated in your Fyndiq Seller Account
Settings
In the following page Settings you can specify general settings regarding the Fyndiq
PrestaShop Module like following:

8
● Percentage in numbers only
the discount set on all products by default. This can also be individually set on the
product later on.
● Lowest quantity to send to Fyndiq
To avoid bad stock you have the possibility to define a different minimum stock level
than 1, which is particularly of interest for Multishop-users.
● Description to use
Determine which PrestaShop database value will be used for product descriptions on
Fyndiq. This can be different depending on how your are using your PrestaShop
system.
● Import state and Done state
The desired status values for imported and completed orders. Please adjust those
values, if needed for your specific workflows. What the states are and how to use them
is not within the scope of this document.
To continue, please click:
Create products
General requirements
The following requirements must be met for your PrestaShop products to be available in the
Fyndiq PrestaShop module:
● Must be a Standard product.
● Must have a unique SKU (reference code).
● Must have a valid tax class.
● Must have a valid base image of at least 200x200 pixels.
● Must be enabled.
● Must be assigned to a category.
● Must have a description which is at least ten characters in length.
● Must have a name which is at least five characters in length.
Create a product
To create a product you simply need to click add a new product button at the top right corner
of your Prestashop admin:

9
To better understand the process of creating a product, below is a walkthrough of the
necessary steps for creating a product. You can find more information regarding product
creation from Prestashop support pages.
Information
● Product type must be set to Standard.
● The name filled in must contain at least 5 characters and the description at least 10
characters.
● Reference Code must be entered and will be used as unique identifier of your product.
● Save the product so you can continue with other product settings.

10
Price settings
Navigate to the price settings on the left hand menu.
Prices can be set with decimals separated by period (.).
Your products must have a proper TAX rule. All prices are set including taxes. This can be
changed or updated if you go to Create a new tax link.
Associations (Categories)
Each product has to have a category assigned. Depending on where in the category structure
the product should belong, click the checkboxes.
Quantities
Needs to be a value greater than zero.
Please note that it has to be a value bigger than the value you set in Lowest quantity to send to
Fyndiq in the general module settings.
Images
In order for a product to be uploaded to Fyndiq it requires to have at least one image assigned
to the product. Navigate to Images settings in the menu on the left hand side. Please note that
the minimum size of an image must be at least 200 x 200 pixels.

11
All products must have a Base Image assigned. To assign a proper base image to a product,
please select the Cover Image field for the main product image.
Save the product
You can save the product and the different settings as you create the product by clicking on the
Save (or Save and stay) button at the bottom of the settings.

12
Export products to Fyndiq
To start uploading products to Fyndiq, please go to Modules and Services > Fyndiq in your
PrestaShop Admin.
You can find three resources on main view of the Fyndiq PrestaShop Module. Products, Orders
and Account settings.
By default, the main view of the module will show products from all categories; 50 products per
page. To start uploading products to Fyndiq, simply select the checkbox to the left of the
product image or use the checkbox in the product list header to select all with just one click.
Then click the Send to Fyndiq button to add the selected products to the export.
Please note: As described above only products that hit the required facts as described in
General Requirements will be exported.
To remove products from Fyndiq simply select the products you want to remove and press the
Remove from Fyndiq button.
Your product upload will be processed by Fyndiq at least once per hour, so it may take some
time until the products are showing on your Fyndiq Account.

13
You can see the current status for each of your products by checking the status color:
● Green - The product is currently available for sale on Fyndiq.
● Red - The product is currently not selected for upload to Fyndiq.
● Orange - The product is pending currently either waiting for upload or removal from
Fyndiq or it is currently sold out.
You can update the status for all products by pressing the Update status button.
To filter products by specific categories, simply click on the local PrestaShop categories you
wish to filter. As explained above, the connection between categories and products depends on
which categories you have selected for a product. If there are products that are not shown in
the correct category, always check which category they are connected to.
Please note: there is no possibility to map your webshop categories to Fyndiqs in Prestashop.
You need to assign the categories directly in Fyndiq Admin.
Merchant Pages
You find your merchant page where you created your API Token, https://fyndiq.se/merchant/,
login with the credentials you created in the beginning.
Click on Products to verify if your products are uploaded:
Create test order
To create a test order and make sure everything works choose a product, select “Create test
orders for test feed” in the drop down menu and click Go.

14
Enter an amount and select the product, then click Create. You will return to the product page
and see a message stating your order were a success.
Return to your Prestashop Admin Panel and follow the next chapter to make sure your test
order is imported.
Please note: Test orders can only be created as long as your account is in test mode.
15
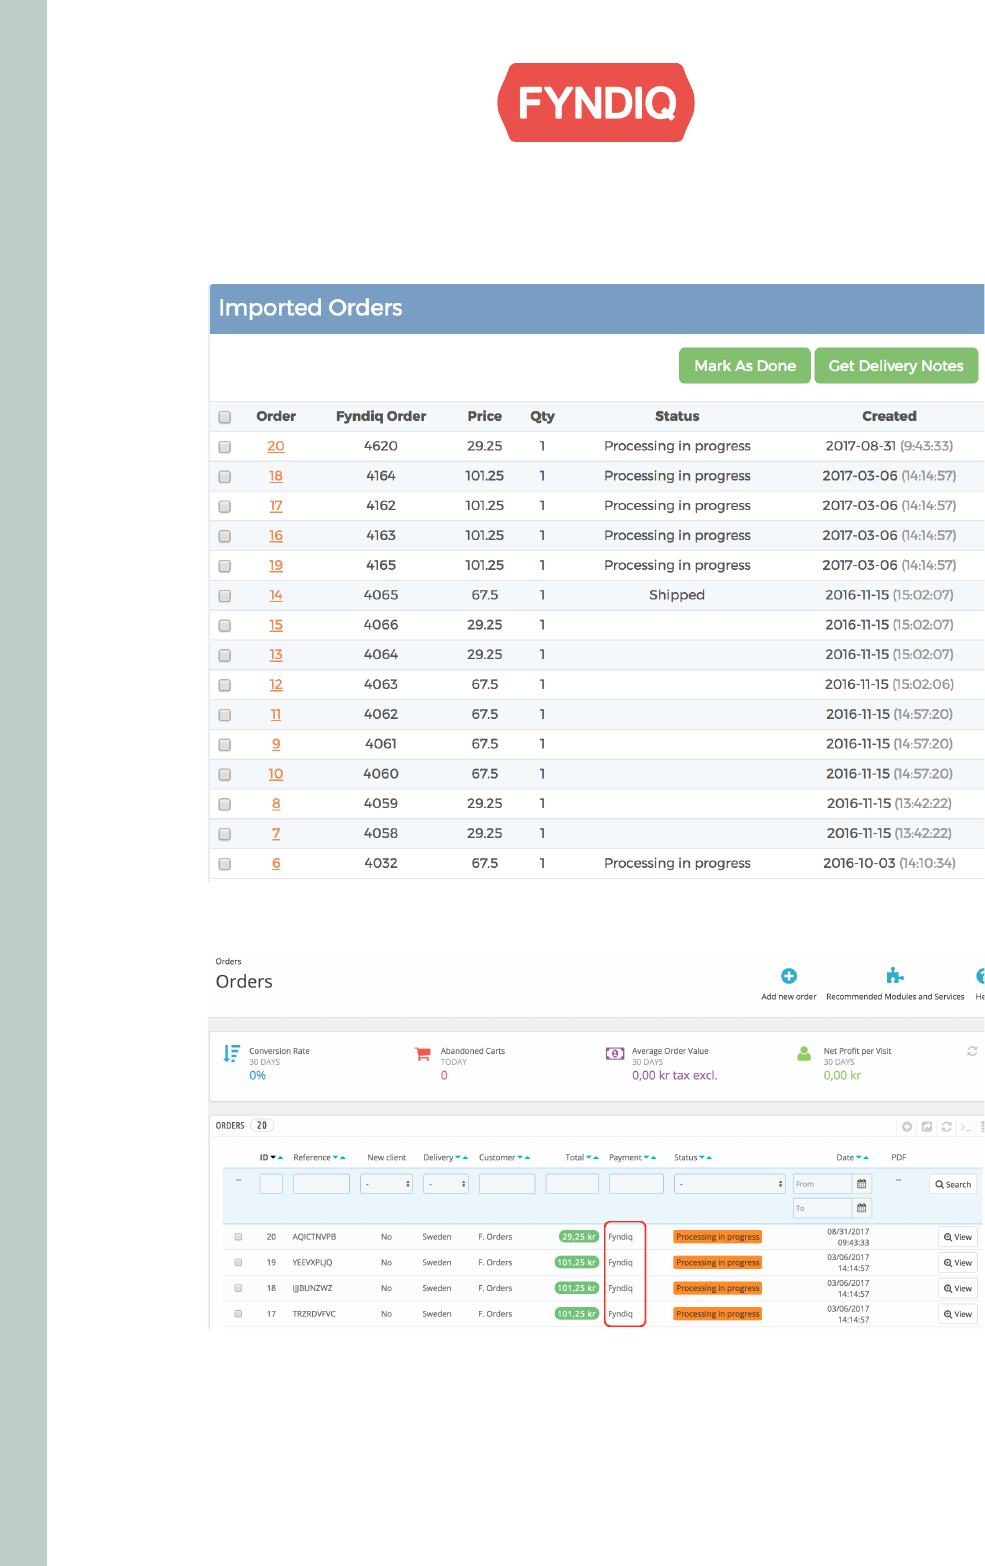
Import and handle orders
Orders you receive on Fyndiq are by default automatically imported into your PrestaShop
installation. They will then be shown in your Fyndiq PrestaShop Module orders view.
They will also showing in your default PrestaShop orders list.
You can always force an order import in the PrestaShop Fyndiq Module by clicking the Import
Orders button in the Imported Orders tab.

16
To mark orders that you have processed simply mark the checkbox to the left of the Order
column and click on the Mark as done button. Either click the checkbox on top to select all or
select individual orders on the order row to do so. The Status for those orders will then be set as
Shipped (or as whatever you defined it in the general settings) in the Fyndiq module.
The same goes for Get Delivery Notes. Select the individual orders or select all to show the
delivery notes that need to be printed and click on the Get Delivery Note button.
Clicking on the order id opens the PrestaShop order details view.
Activate account
When everything works as expected you have to activate your account to be able to start
selling your products on Fyndiq.
Please remember: Your Fyndiq account will stay in test mode until your first product upload and
a test order have been completed.
Please contact our support for account activation or whenever questions or problems come
up.. See Fyndiq Merchant Support on page two for contact information.
