
Fitting instructions
February 2019
Chain Operated Roman Blind System
Silent Gliss
®
2304 / 2305
EN
Page 1 of 12
EN

EN
Page 2 of 12
Contents
1 General Overview............................................................................................................................................................................3
1.1 User information............................................................................................................................................................3
1.2 Intended use / Guarantee ..............................................................................................................................................3
1.3 Other applicable documents ..........................................................................................................................................3
1.4 Safety instructions.........................................................................................................................................................3
1.5 Maintenance, inspection and repair tips..........................................................................................................................3
2 Transportation, Storage ...................................................................................................................................................................3
2.1 Transportation...............................................................................................................................................................3
2.2 Storage.........................................................................................................................................................................3
3 Installation ....................................................................................................................................................................................3
3.1 Installation instructions, aids and personal protection ......................................................................................................3
3.2 Motorisation..................................................................................................................................................................3
3.3 Unpacking ....................................................................................................................................................................3
3.4 System handling ...........................................................................................................................................................4
3.5 Overhead and wall installation........................................................................................................................................4
4 Maintenance ..................................................................................................................................................................................4
4.1 Repairs / Inspection.......................................................................................................................................................4
4.2 Cleaning.......................................................................................................................................................................4
4.3 Care hints for fabrics.....................................................................................................................................................4
4.4 Disposal .......................................................................................................................................................................4
5 EU Conformity.................................................................................................................................................................................4
6 Fitting ....................................................................................................................................................................................5
6.1 (A) 2304 / 2305 (ceiling fix) ...........................................................................................................................................5
6.2 (B) 2304 / 2305 (wall fix)...............................................................................................................................................6
7 Roman Blind Child Safety Parts - Assembly Instructions ....................................................................................................................7
7.1 Soft Fold Eyelets............................................................................................................................................................7
7.2 Hard Fold Eyelets ..........................................................................................................................................................7
7.3 Breakaway Bottom Ring Assembly (hard and soft fold blinds) ...........................................................................................7
8 Roman Blind Chain Shortening Instructions.......................................................................................................................................8
9 Child Safety....................................................................................................................................................................................9
9.1 2304/5 (breakaway) ....................................................................................................................................................9
9.2 2304/5 (non breakaway)............................................................................................................................................10

1 General Overview
1.1 User information
The Operating and Installation Instructions help to acquaint you
with the product and its possible applications. They contain
important tips to support the correct and safe operation of the
product. Please retain a copy of this manual.
It is to be read, understood and adhered to by each person who
works with or on the system in the following tasks: installation,
operation, maintenance and cleaning, troubleshooting.
This manual does not replace your personal responsibility as
fitter or operator.
1.2 Intended use / Guarantee
The product is intended for use exclusively in accordance with
these specifications and this manual, i.e. for:
Internal shading of
windows (no outdoor installation)
.
A dierent use or use beyond this scope is not considered intended
use. The manufacturer / supplier is not liable for any resulting
damage. Non-compliance releases Silent Gliss from its liability.
The guarantee excludes faults that are not attributable to material
or fabrication faults, but have arisen as a result of incorrect
operation by the purchaser or improper care or other personal
negligence. Troubleshooting measures falling outside of the
guarantee will be carried out by Silent Gliss or another appropriate
retailer at the cost of the purchaser.
1.3 Other applicable documents
Every product supplied includes documents that are a component
part of the operating and installation instructions:
safety
instructions, scale drawing, installation instructions
.
1.4 Safety instructions
The relevant safety laws in the country of operation must be
adhered to.
The following tips or symbols are used throughout:
Warning - risk of injury! Highlights possible
hazards from mechanical workings which could lead
to injury or even death.
Use eye protection! Eye protections must be worn
during all drilling work.
General warning sign!
Highlights general information.
The product may be installed only in a faultless condition (no
transportation damage, etc.) and only as intended, in awareness
of safety and hazards and in accordance with all tips in this
manual.
Faults that could impair safety and functionality must be repaired.
The user (end customer) must have read and understood the
operating instructions after installation and operational start-up are
completed.
1.5 Maintenance, inspection and repair tips
Work must only be carried out by qualified
specialists.
2 Transportation, Storage
2.1 Transportation
The product may be transported only in suitable and
sucient protective packaging (manufacturer’s
packaging).
Curved products (rails, etc.) require wooden crating.
Waste and packaging material is to be disposed of in line with local
regulations.
Keep packaging material out of the reach of children. Packing
sheets, Styrofoam pieces and other small parts can be dangerous
for children to play with.
2.2 Storage
Products and their accessories are to be stored in
suitable packaging in dust-free spaces with normal
humidity.
3 Installation
3.1 Installation instructions, aids and personal protection
Local safety regulations must be observed during
installation of the product (stable ladders, etc.).
Warning! (if applicable)
Young children can be strangled by loops in pull
cords, chains, tapes and inner cords that operate the
product. To avoid strangulation and entanglement,
keep cords out of the reach of young children. Cords
may become wrapped around a child’s neck. Move
beds, cots and furniture away from window covering
cords. Do not tie cords together. Make sure cords do
not twist and create a loop.
3.2 Motorisation
Electrical installation must be carried out by a
certified electrician in accordance with the legal
regulations and standards of the relevant country.
3.3 Unpacking
Unpack components carefully
Waste and packaging material is to be disposed of
in line with local regulations. Keep packaging
material out of the reach of children. Packing sheets,
Styrofoam pieces and other small parts can be dangerous for
children to play with. Check delivery items against delivery note.
EN
Page 3 of 12

3.4 System handling
Please note the following during unpacking and
installation: a) do not cause contamination from
unwashed hands.
b) do not allow moisture to get on the fabric. c) avoid
causing kinks and snags (e.g. by dragging over surfaces and
edges).
3.5 Overhead and wall installation
During installation, window handles and other
protruding items and fittings must not impair the
function of the product. The fixing material should be
chosen to suit the background. The fitter is
responsible for selecting the correct fixing materials.
Check: Raise and lower blind and check correct winding and
square hanging of the fabric.
4 Maintenance
4.1 Repairs / Inspection
Any repair work required by the system may only be
carried out by authorised specialists.
Only original replacement parts may be used for
repairs.
4.2 Cleaning
The product and its components, such as mouldings
end caps, etc., must not be treated with aggressive
cleaning products. It is best cleaned with a slightly
damp cloth.
For heavier soiling, warm water with a neutral, non-abrasive
cleaning product (pH-neutral domestic washing-up liquid) may be
used.
4.3 Care hints for fabrics
Washable! Do not tumble dry
Do not iron! Do not dry clean!
Do not bleach!
4.4 Disposal
The product must be disposed of in line with local
waste disposal regulations for industrial waste.
5 EU Conformity
EU conformity has been certified. This documentation can be
requested from Silent Gliss.
EN
Page 4 of 12

60-80 cm
60-80 cm
X cm
2302
3
1
2
6 Fitting
6.1 (A) 2304 / 2305 (ceiling fix)
EN
Page 5 of 12
5
1
2 3
4

click
2302
60-80 cm
60-80 cm
EN
Page 6 of 12
6.2 (B) 2304 / 2305 (wall fix)
1
2 3
4
11200-11205 11210-11215
16
62
16
29
EN
Page 7 of 12
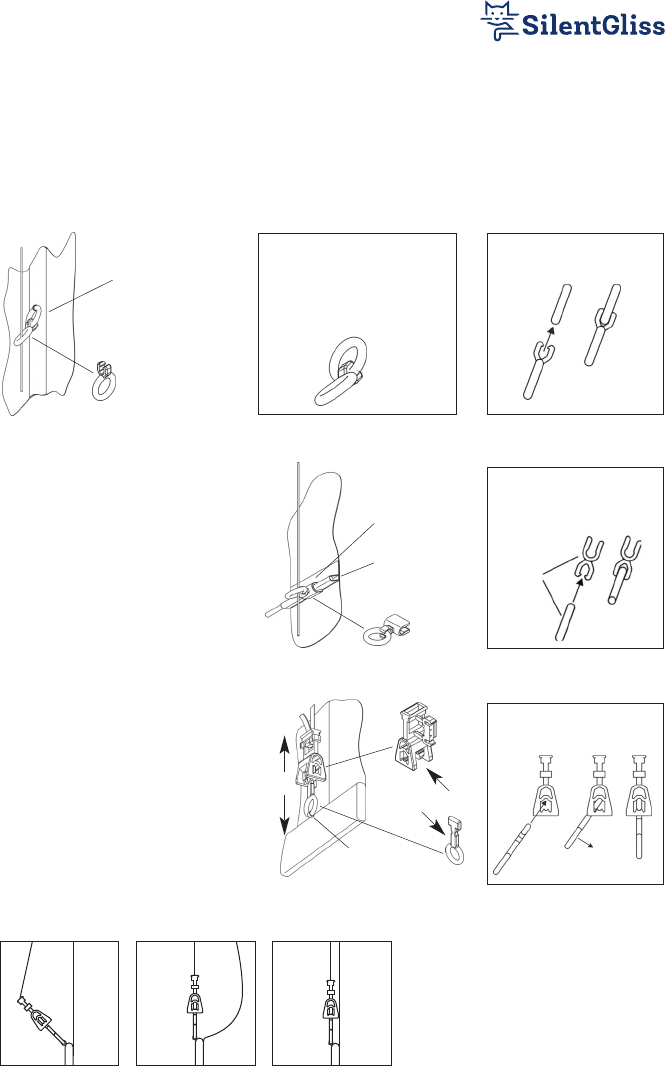
7 Roman Blind Child Safety Parts - Assembly Instructions
Please find below sewing instructions for the new Silent Gliss Roman blind child safety parts. These can only be used with Silent Gliss
Roman blind headrail systems. The safety eyelet and bottom ring assemblies must be used in conjunction with each other.
7.1 Soft Fold Eyelets
You need either the Breakaway Ring Tape (part 0879) or a quantity of Breakaway Ring Sets (Part 0878). The safety sets will arrive in two
parts and you will need to join the rings together during the makeup process.
Breakaway
Ring Tape
(0879)
Clip the
breakaway ring
to the ring
attached to the
tape.
Note: When using the Breakaway
Ring Set 0878 you will need to sew
the standard ring directly to the
fabric and then attach the
breakaway ring.
Set 0878
Eyelet Assembly
7.3 Breakaway Bottom Ring Assembly
(hard and soft fold blinds)
You need the Breakaway Bottom Ring (part 0877)
which works with both tape and cord, part per lift
cord/tape. It will arrive in two parts which will need
to be joined together during the makeup process. It
is 50mm high and will need to be accommodated
in your fold spacing.
7.2 Hard Fold Eyelets
You need the Breakaway Rod Cover (part 3069) and
a cross rod (part 2135). An optional part is the rod
tape (part 2136).
Breakaway Rod Cover
Function
Latch Assembly
3069
2136
2135
3069
Set 0877
Direct sewed
on latch
50mm
Warning please note : The lift tape of cord
should be taut against the rear of the fabric
when the blind is in the fully lowered position.
The tapes and cord should always be central
within the 0877 breakaway device.

EN
Page 8 of 12
8 Roman Blind Chain Shortening Instructions for metal chain
Note - The distance from the floor to the bottom of the chain
must be at least 1.5 m
Note - The Safety Retainer 10400 should be installed at the
maximum distance from the operating mechanism to prevent
the looped chain becoming slack.
The Roman Blind mechanism is supplied ready assembled,
complete with operating chain loop and Safety Retainer 10400
- a specialised tool is required if the chain requires shortening -
SG 0600 joining pliers - if the system requires a longer chain it
will need to be returned to the supplier/factory for a new chain.
Step 2 - Place bead end into slotted end of 0600 joining
plier jaw - apply pressure to pliers and split bead - discard
bead and leave complete bead link stalk exposed only -
remove chain from plier jaw.
Step 4 - Place bead from
the end of chain just cut in
the slotted end of the 0600
joining plier jaw - apply
pressure to open the bead
leaving in place so the
gap/split is large enough to
drop the bead link stalk can
be inserted from the
opposite end of the chain.
Step 1 - Cut chain with pliers.
Step 3 - Now reduce chain by the amount calculated earlier
from the other end of the free chain
Step 5 - Place split bead into the closing cup position within
the 0600 pliers and hold in place with the split exposed
supported by the pliers - now drop the bead link stalk from
the other end of the chain in to the partially open bead apply
pressure and close the bead around the stalk ensuring the
end of the stalk is captive - rotate the bead and repeat the
closing process with the pliers several times to keep the
shape of the joined bead - the chain loop is now complete.
Step 6 - Fit Safety Retainer.
Firstly determine the amount of chain to be removed to shorten the chain loop, this can be calculated as follows - Part 1) Measure the
distance from the installation height to the floor and deduct 1.50 m, Part 2) Measure the current chain loop on the head rail, deduct the
distance measured in Part 2 from the distance measured in Part 1 - the difference between the two then needs to be doubled as this is the
amount of chain to be removed from the loop.
0600 Joining Pliers

EN
Page 9 of 12
9 Child Safety
9.1 2304/5 (breakaway)
Floor
600 mm
minimum

EN
Page 10 of 12
9.2 2304/5 (non breakaway)
Warning!
Young children can be strangled by loops in pull cords, chains, tapes and inner
cords that operate the product. To avoid strangulation and entanglement, keep
cords out of the reach of young children. Cords may become wrapped around
a child’s neck. Move beds, cots and furniture away from window covering cords.
Do not tie cords together. Make sure cords do not twist and create a loop.
Children can strangle if this safety device is not installed. Always use this device
to keep cords and chains out of reach of children.
Fixing instruction for the device
This retaining device should be installed at the maximum distance possible
from the control mechanism to prevent the looped pull cord(s) becoming slack.
Floor
min. 150 cm
1 2
3 4

EN
Page 11 of 12

EN
Page 12 of 12
www.silentgliss.co.uk
