Version 8
USER GUIDE

TABLE OF CONTENTS
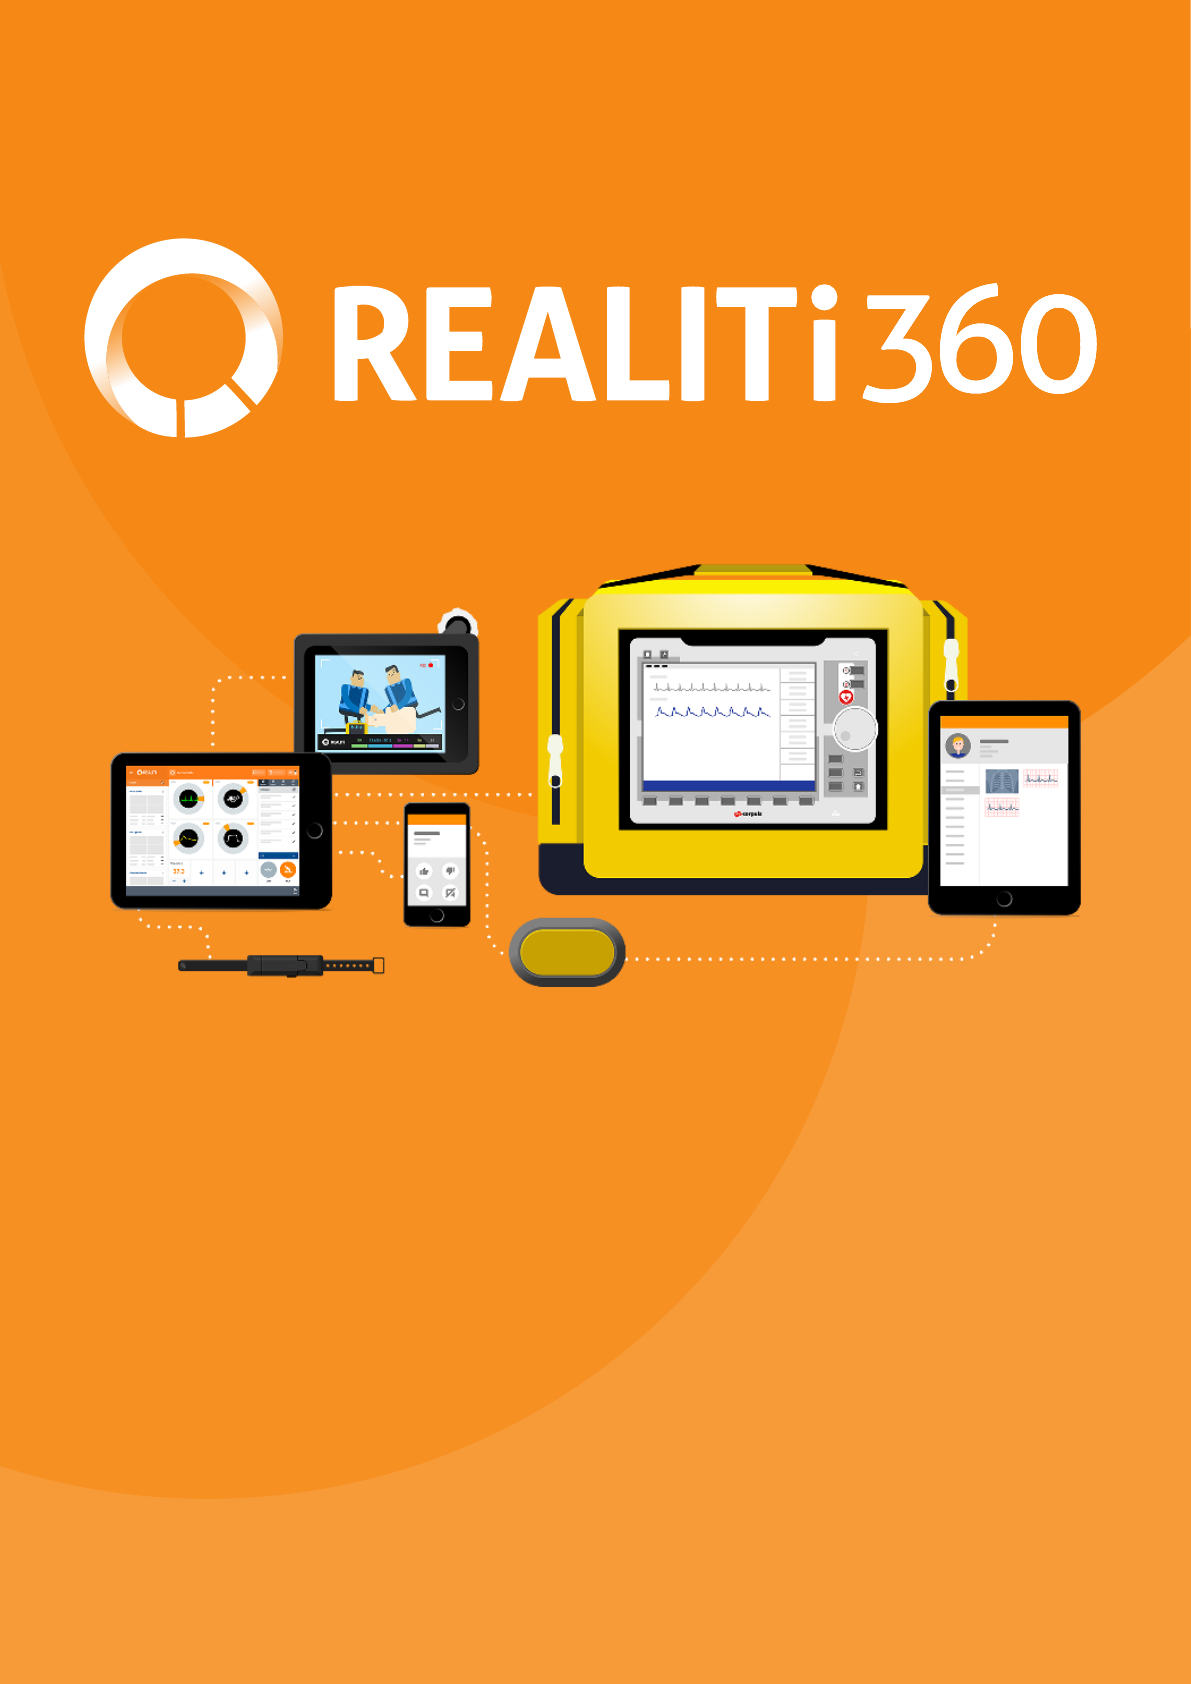
1. REALITi360 Ecosystem 1
1.1. Basic Kit 1
1.2. CPR-Feedback Module 1
1.3. Video-Feedback Module 2
2. Getting started 3
2.1. Create a Wi-Fi network 3
2.2. iPad connectivity 3
3. Updating REALITi360 4
4. Operating the Controller 4
4.1. Overview of the screen 5
4.2. Basic functions 5
4.2.1. Cardiac features 5
4.2.2. Respiratory/EtCO2 features 7
4.2.3. Blood pressure features 8
4.2.4. SpO2 features 8
4.3. Checklist/Sound/Media/Lab 8
4.3.1. Validation of expected actions 9
4.3.2. Sounds features 9
4.3.3. Media features 10
4.3.4. Lab features 11
4.4. CPR and Pacing 11
4.4.1. Pacing features 11
4.4.2. CPR features 12
4.4.2.1. CPR without CPR sensor 12
4.4.2.2. CPR with CPR sensor 13
4.4.2.2.1. Connecting the sensor 13
4.4.2.2.2. Renaming the sensor 14
4.4.2.2.3. Calibrating the sensor 14
4.5. Lower function banner 15
4.5.1. Time 15
4.5.2. Alarms 15
4.5.3. Flags 15
4.5.4. Start/Stop/Pause 15
4.5.5. Virtual time 15
4.5.6. Trend function 15
4.5.7. Preview 16
4.6. Additional features 16
4.7. System features 17
4.7.1. Monitor features 17
4.7.2. Connections features 17
5. How to use scenarios 17
5.1. Create scenarios 17
5.2. Delete, copy & share scenarios 18
5.3. Import scenarios 19
5.3.1. By mail 19
5.3.2. Directly from another iPad 19
5.4. How to use scenarios 19
5.4.1. Choosing a scenario 19
5.4.2. Navigation in a scenario 20
5.4.3. Scenario editing 20
6.Usingthedebriengfunction 20
6.1. Overview of the results 20
6.2. Controlling video playback 20
6.3. Timeline 20
6.4. Review 21
7. Using the Patient-Chart 21
7.1. Viewing documents 21
8. Using the Video-Feedback Module 22
8.1. Hardware set-up 22
8.2. AppleTV installation 22
8.3. How to use the video function 22
8.3.1. Recording a training session 22
8.3.2. Visualization of the simulation 22
9. Training Management System (TMS) 23
9.1. Scenarios 23
9.1.1. Deleting a scenario 23
9.1.2. Review of the report 24
9.1.3. PDF simulation report 25
9.2. Student management 25
9.3. Launchpad 26
9.4. Options 26
10. User license updating 26
10.1. Access the COMMUNITi 26
10.2. Activation of a license 27
10.3. License release 28
10.4. Exiting COMMUNITi 28
11. Advanced settings 28
11.1. Controller-/Video-/Chart-Tablet 28
11.2. Monitor-Tablet 29
11.2.1. General settings 29
11.2.2. Premium screens 29

1. REALITi360 Ecosystem
Our REALITi360 system consists of a basic kit and optional modules.
1.1. Basic Kit
The basic (or standard) kit consists of the following components:
the iSimulate-Hardcase
a monitor tablet (Apple iPad Pro / 12.9’’ / 64GB / Wi-Fi)
a controller tablet (Apple iPad / 10.2’’ / 32GB / Wi-Fi)
a set of cables and electrodes for adults:
» 12 lead ECG trunk cable
» 3 lead ECG cable
» 7 lead ECG cable for 12 lead ECG
» SpO2 sensor
»
» EtCO2 sensor
»
» self-adhesive ECG electrodes
a Wi-Fi router
a protective case for the controller tablet (with 360° swivel)
an external battery/powerbank
all necessary chargers and cables
a protective cover/carry bag
1.2. CPR-Feedback Module
This optional module can be used to extend the capability of your REALITi System even
more by providing in-depth and comprehensive integration of CPR into your training.
It consists of:
two CPR sensors
two corresponding USB charging cables
» a sternal pad to be placed on a manikin
» two wrist bracelets to be worn by the trainees
» a bracket to be placed inside the manikins chest
a storage/protection case
1
1.3. Video-Feedback Module
This optional module extends the capability of your REALITi System by providing the possi-
It consists of:
a camera tablet (Apple iPad / 10.2’’ / 128GB / Wi-Fi)
a Padcaster frame
a Tripod
a wide-angle lens for use with Padcaster
an active, unidirectional microphone for use with Padcaster
all corresponding chargers and cables
a video-streaming device (AppleTV)
the needed HDMI cable
an external battery/powerbank
Video-Feedback in use
2

2. GETTING STARTED
2.1. Create a Wi-Fi network
You will receive your whole REALITi-Kit with the iPads as well as the router already
1. Turn on the Wi-Fi router by either plugging in the AC adapter or the external battery/
powerbank with a USB to USB-C cable.
IMPORTANT
Please use the powerbank that is already part of your kit. If you want to use your own or a se-
cond one, please pay attention to the power output capabilities - if they’re too low the router
will indicate an «Adapter Error».
2.
2.2. iPad connectivity
Once the Wi-Fi network is active, turn the monitor- and the controller-tablet on, they will
automatically connect to the network you just created.
Start the REALITi application - - on both devices and select:
On the CONTROLLER, press at the bottom of the screen.
Select the corresponding monitor based on the color-code of your system. If the monitor
doesn’t show up in the list, please check that both devices are connected to the same
(color-coded) REALITi Wi-Fi network*.
Once selected, the controller will automatically switch to the scenario selection interface:
- on the MONITOR tablet
- on the CONTROLLER tablet
This message is normal when not connected to the internet.
With REALITi you’re independent of internet-connection, so just start your training and don’t worry!
3

IMPORTANT
The most common cause of connection issues is due to the fact that the iPads are connected to
If you want to change to an external network temporarily, remember to make the device
«forget» said network by going to:
SETTINGS > WI-FI > CONNECTION NAME > ‘FORGET THIS NETWORK’
3. UPDATING REALITi360
In order to improve and expand the functionality and user experience, your application will be
updated regularly. Once an update has been released, you’ll receive a message - when a major
update is necessary, we will contact you via e-mail as well.
To complete the update, you can either
connect the iPads to a Wi-Fi with internet access, or
connect the REALITi Wi-Fi router to your standard internet router
via ethernet cable (RJ45)
1. Open the Apple App-Store on the CONTROLLER tablet and go to the «Updates» tab.
2. In case of an available update, it will be displayed in this list.
3. Download and install it.
4. Switch back to the REALITi network and make the iPad «forget» the network used for updating.
5. Repeat for all tablets on your system.
After the update is completed on all devices, you can start the REALITi360 app again.
When downloading the REALITi application, you may need to enter the password linked to the “[email protected]”-
account that was provided to you after purchase.
We recommend that the password is changed according to the policies of your organisation.
4. OPERATING THE CONTROLLER
You can control all of your system entirely using only one iPad - which makes its capabilities and therefore
handling very comprehensive. To get started, it is absolutely essential that the CONTROLLER is connected to the
MONITOR in the same Wi-Fi network.
Once you’ve chosen what scenario you want to start with, you’ll be forwarded to the initial control interface.
4

4.1. Overview of the screen
Ñ Section 1: Loading and scenario management
Ñ Section 2: Control of physiological parameters including SpO, EtCO and invasive
blood pressure
Ñ Section 3: Checklist, sounds, media, labs
Ñ Section 4: CPR and pacing management
Ñ Section 5: Lower function banner
4.2. Basic functions
You can modify the vital parameters as well as the appearances of ECG traces, SpO, EtCO
and blood pressure wave forms (in section 2 of the image - ‘4.1. Overview of the screen’).
4.2.1. Cardiac features
at the bottom right of the screen.
Hide or show all cardiac parameters by pressing . This allows you to simulate
the connection of cables at the start of your training.
Touch the waveform image in the center of the dial to change the waveform.
Select the desired category and hit to transmit it to the monitor.
5

Press the icon to access the dynamic 12-channel ECG settings. You
can choose which leads should be displayed by activating/deactivating
This feature is only available on monitors that support 12-lead capability.
To access the advanced cardiac features, press :
In this selection you can
D add PVC’s/PAC’s/PJC’s
D add electrical interferences/artifacts
D add Sinus Arrhythmia (SA)
D dampen the plethysmography curve
D vary the Stroke Volume Variation (SVV)
D and synchronize the QRS with ventilation.
6

4.2.2. Respiratory/EtCO
2
features
You can change the parameters of the respiratory rate as well as the EtCO
2
value.
Change the breath rate by switching to RR and then turning the
selctor wheel to the required value.
Show/hide the curve on the monitor by pressing .
Change the value of EtCO
2
by setting the switch to ETCO
2
and turning the dial to
the desired value.
2
curve by pressing the center of the dial to display the
curve selection window.
Hit after every change you make to transmit the
information to the monitor.
To access the advanced features, press :
You can
D preserve the EtCO
2
value during CPR.
7
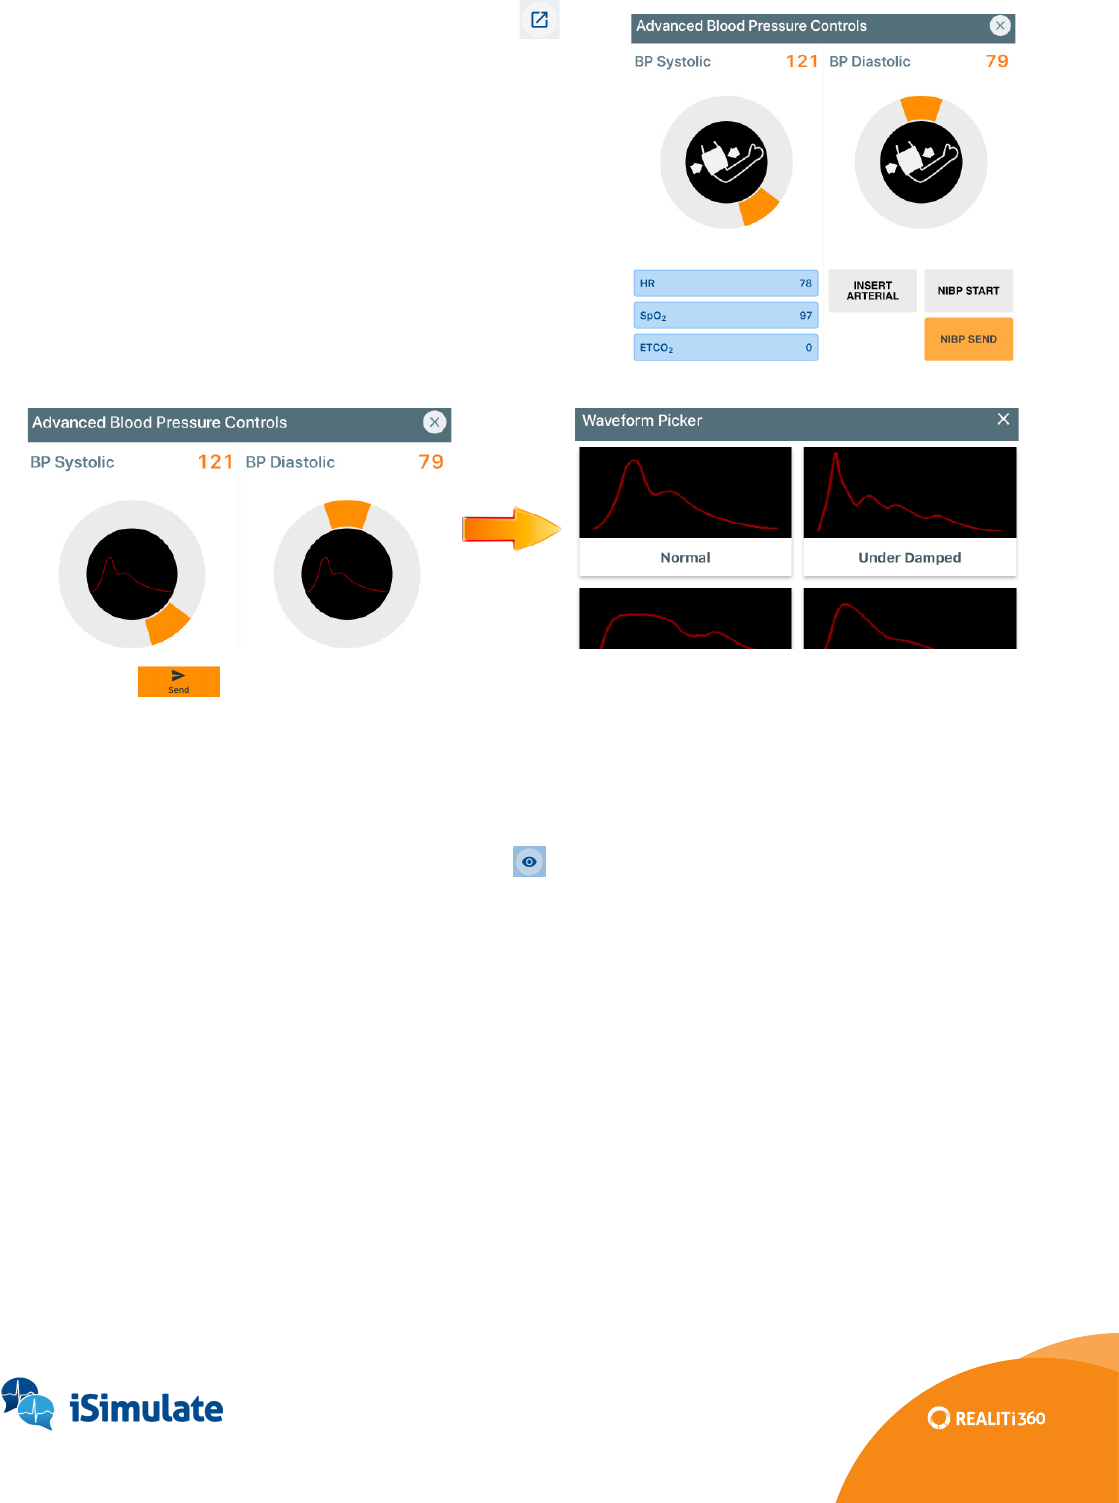
4.2.3. Blood pressure features
Turning the selector dial will change the blood pressure according to your desired
output.
To access the advanced features, press :
You can
D modify the systolic/diastolic pressure
separately
D start NIBP measurement via the controller
or send it immediately
D display the invasive arterial pressure curve
- where you can, once again, choose
in the middle of the dial
Hit after every change to transmit it to the monitor.
4.2.4. SpO
2
features
2
saturation.
Show/hide the curve by pressing . Using this feature, you can simulate the
time it takes to connect cabling during the initial phase of the simulation.
2
curve by pressing the center of the dial to display the
curve selection window.
4.3. Checklist/Sound/Media/Lab
‘4.1. Overview of the screen’):
Validation of expected actions (Checklist)
Monitor sound adjustments/audio and auscultatory sounds
Media (X-ray images, CT scans incl. your own added images)
Laboratory results
8

4.3.1. Validation of expected actions
Use this feature to validate the actions and performance of your trainees by
incorporating your own evaluation program into your scenario.
Use:
Ñ Yes/no validation (performed/not performed)
Ñ Score evaluation (0-10, user set)
How to create a new item in the checklist:
access the «Checklist» tab, press and then
set the type of evaluation:
Ñ Check: validate via yes/no (and choose if critical/non-critical)
Ñ Graded: validate via rating (and set your own range of points)
Press «UPDATE»
holding
You can also delete them by pressing the icon on the left.
Once you’ve made all desired changes, simply exit the edit mode by pressing .
4.3.2. Sounds features
This tab allows you to adjust or mute the volume of the monitor alarms and heartbeat
Management of the monitor volume:
To change the monitor volume, slide the cursor accordingly.
To mute all sounds, press .
To mute only the alarms, press .
To mute only the sound of the heartbeat, press .
IMPORTANT
In addition to the sound settings through the REALITi application on the controller tablet, the
sound output remains connected to the settings on the monitor tablet.
If there is no sound, please make sure that the monitor is not in silent mode.
Access the sound library:
Select the desired category:
Ñ Questions
Ñ Conversations
Ñ Responses
Ñ Bodily noises
Ñ Medical sounds
Ñ User recordings
9

Record your own sounds:
1. Press the microphone button .
2. The «New Recording» window appears.
3. Press to start recording.
4. To pause, press and to stop .
5. After that, press «SAVE» and your recording will be available under
«User recordings» in the future.
6. If you want to delete them later, just press while you are in the
user recordings list.
The sound is played via the speaker of the controller tablet. You can also connect the iPad to the audio system of
your training environment or to an external device.
4.3.3. Media features
This tab allows you to send radiological images (CT, X-ray, Ultra Sound etc.) to the mo-
nitor tablet. If you use the patient-chart tablet too, the images will be simultaneously
transmitted to it as well - which makes it possible to create a ‘clinical information
system’ for the simulated patient.
To add images to your scenario, press the edit icon ( ) which makes the media selec-
tion window appear.
1. Select the desired category:
» Images or
» Imported Media (import your own by pressing )
2. Choose the desired picture - it appears in the list to the right.
3. .
To transmit the image to the monitor tablet, use the «Show on Monitor» switch below.
Tap on the thumbnail of the image to display it on the monitor.
To delete a picture, access the edit mode via the icon and choose in the list.
10

4.3.4. Lab features
This tab allows you to incorporate laboratory results into your training, for even more
in-depth simulation.
To import lab results:
1. Go to the «Labs» tab on the right of the screen.
2. Press to access the lab results screen.
3. Choose the section you need and change the values accordingly.
4. When all parameters are adjusted to your liking, hit «UPDATE».
5. Exit by pressing .
To transmit the results to the patient chart tablet, press . If you wish to delete them,
go into edit mode, press
IMPORTANT
The “Labs” function requires an additional iPad to be used as the patient chart monitor.
(Please refer to section 7)
4.4. CPR and Pacing
CPR and Pacing features are also supported by REALITi. Use te corresponding pacer-feature,
which is dependent on the screen you are using.
4.4.1. Pacing features
Press in the CPR section of the controller to display the pacing menu. Here you can
adjust the threshold and capture for the pacer.
Use the corresponding feature of the monitor, which is dependent on the screen you
are using. Here as an example for the Corpuls C3:
11

1. Press the «Pacer» button (1) on the monitor tablet, the intensity/frequency
window pops up.
2. Select either «Intens» or «Freq» using the buttons on the bottom of the device
(2).
3. Adjust the selected value using the selector dial to the right (3). You can always
adjust the frequency or intensity during the pacing.
4.
display (4).
5. You can pause the pacer at any time by pressing «Pause» (5).
4.4.2. CPR features
You have two possible options to conduct CPR training - either with the corresponding
CPR sensor or without.
4.4.2.1. CPR without CPR sensor
When trainees begin CPR, press the button - the icon will change to
red .
controller by tapping on the wave on the right of the screen.
12

Preserve the display of EtCO2 by selecting the option in the advanced section.
(Please refer to section 4.2.2.)
When CPR is stopped, press to display the underlying ECG.
CPR” in the CPR section - refer to ‘4.1. Overview of the screen’.)
4.4.2.2. CPR with CPR sensor
4.4.2.2.1. Connecting the sensor
1. Switch on the CPR sensor by pressing the button on the side of the device.
2. Swipe inward from the right edge of the screen of the monitor tablet to display
the sensor connection window:
3. Press «Scan for CPR band» and the available sensor(s) will appear in the list.
All sensors must begin with ‘CPR’ to be visible, if it’s not found select
«Show All BT Devices».
4. Select the sensor you want to use and press «Connect». The connection is
.
5. Tap outside the connection window on the monitor to close it.
13

4.4.2.2.2. Renaming the CPR sensor
blue’, ‘CPR-red’ and so on. The name needs to start with ‘CPR’ to be visible to the monitor.
1. Connect and choose the sensor you want to rename.
2.
3. Press «Rename».
4.4.2.2.3. Calibrating the CPR sensor
When using the CPR sensor inside a manikin, you may need to calibrate the CPR sensor to
allow for chest variances.
1. Connect and choose the sensor you want to calibrate.
2. Select «CPR Module in Manikin» and it will show the calibration screen.
You can calibrate using one or two sensors.
For single sensor calibration:
1. Place the mounting bracket inside of the manikin as close to the center of the chest
as possible and insert the CPR sensor.
2. Prepare the manikin for CPR.
3. Press «Single-Band Calibration» and «Start Calibration»
4. Compress the chest to the recommended depth.
5. When complete, press «Set Sensitivity».
For dual sensor calibration:
1. Place one sensor inside the manikin.
2. Place the second sensor in the CPR pad.
3. Select «Dual-Band Calibration» and follow the process as above.
14

4.5. Lower function banner
4.5.1. Time
The chronograph tells you how long the scenario has been running. When you stop the
scenario it resets to zero.
4.5.2. Alarm
time when creating the scenario (please refer to chapter 5.1.).
4.5.3. Flag
You have the option to use a preset comment or intergrate your own text.
To mark an event:
1. Press the button.
2.
3.
4.5.4. Start/Stop/Pause
Allows you to start, stop and pause the scenario.
4.5.5. Virtual time
With this slider the time can be advanced during the scenario. The time will also be
deducted from the remaining time under «Alarm». Can be used, for example, when
you want to count down time if the trainee verbalizes a time-cosuming action without
being able to perform it.
4.5.6. Trend function
It allows you to trend the change of a physiological parameter over a given time.
To use this function:
1. Select the desired time it should take to change the vitals using the «+» and «-».
It ranges from 10 seconds up to 15 minutes.
2.
next 5 minutes)
3. Press to activate the trend.
You will get visual feedback via a blue line slowly circling around the center of the
parameter you chose to manipulate. That way you can follow the progress of the
trending changes.
To stop the trending process, press and hold .
15

4.5.7. Preview
tablet. The appearance of this preview screen cannot be changed.
To return to the REALITi controller screen, press «Close Preview».
4.6. Additional features
It is possible to display additional physiological values. By default only the temperature
option is present on the controller display.
To display the parameter, simply press it - which makes the greyed-out window turn white
and the setting will be displayed on the monitor.
To add additional parameters:
1.
2. Choose the needed data (ICP, CVP, MV, PAP, Glucose, Tidal Volume and more)
and the corresponding value.
3. Display it to the screen by pressing on it.
To delete it, press the «X» in the top right corner, to hide it, simply tap on it again.
Please be aware that additional parameters display is not possible (or only in part) in all premium screens. The
generic iSimulate ALSi screen allows all parameters to be displayed.
16

4.7. System features
4.7.1. Monitor features -
This menu allows you
Ñ to start the monitor (should the trainee not do so) by
using the «Power On» button.
Ñ to change the appearance of the screen by pressing on
the monitor icon and selecting your desired monitor.
Ñ to show the ventilator (WORK IN PROGRESS).
4.7.2. Connections features -
This menu
Ñ displays the battery level of the connected tablets.
Ñ indicates the number of controller tablets connected to
the monitor.
Ñ activates/deactivates the recording function of the
video tablet.
Ñ allows you to adjust the digital zoom level of the video
tablet.
5. HOW TO USE SCENARIOS
5.1. Create scenarios
To access, press the icon at the top left of the screen to display the scenario menu.
1. Choose «New Scenario» - you will be forwarded to the
initial control screen without any values.
2. Tap on the symbol to access the scenario overview
time, monitor type, patient information (sex, age,
condition etc.) and even a whole self-written story to
17

By choosing
( ) or a text box ( ).
Text box:
If chosen, the «New Text Box» window appears:
1. Enter the desired text in the box.
2. Choose if the text should be displayed on the monitor, if yes
then if in fullscreen or not, and for how long.
3. Decide how long the transition to the next step should take,
i. e. how long the text should be on the screen.
4. .
Action step:
If chosen, the «New Event» window appears:
1. Enter the name of the step.
2.
by pressing .
3. Set the parameters with the dials.
4. Select the waveforms and desired additional details.
5. Add checklists, media, labs.
6. .
Work your way through the whole scenario by adding steps as you see
5.2. Delete, copy and share scenarios
In REALITi360 it is possible to organise your scenarios into directories, duplicate scenarios
or share them with other users.
Open the main menu ( ) and press to display the scenario library:
There you can
Ñ create, delete or rename folders
Ñ delete scenarios
Ñ share scenarios
18

5.3. Import scenarios
You can also import scenarios that others have created.
To do that
1. either start the app fresh or «Exit to Menu» under .
2. Once you are in the main menu, open the Community via .
3. Enter your login details, select the «Scenarios» tab on the left and download the
scenario you want to use from the list available.
4. The scenario is saved into your scenario library - to organize them, please refer to
‘5.2. Deleting, copying and sharing scenarios’.
5.3.1. By mail
Ensure that the email has been received in the iPad’s ‘Mail’ application.
1.
scenario-icon.
2. In the now appearing window you can select to copy the scenario to REALITi.
3. You’ll receive feedback on screen when the scenario was imported
succesfully.
5.3.2. Directly from another iPad
Please make sure that both iPads are connected to the same Wi-Fi network.
1. Open the REALITi360 and select the «Control» mode on both tablets.
2. On the main screen, press to display the menu and get to the scenario
overview by choosing .
3. Select on both iPads to start synchronisation mode (the top bar will turn
orange to indicate that).
4. On the sending iPad tap on the selected scenario - a «Sending Data» window
pops up.
5.
6. After a few seconds, the scenario will be loaded and ready for future use.
5.4. How to use scenarios
Once created or imported, the scenarios are ready to use for your training.
5.4.1. Choosing a scenario
1. Open the app and choose «Controller»
2. Enter student information (optional)
3. Choose a scenario from the list
4. You can always reaccess the scenario list by using when in the main controller
screen.
19

5.4.2. Navigation in a scenario
When creating a scenario, it’s possible to either create
conditional steps to move to the next one, or to do it manually.
To switch from one step to the other, simply tap on the step you
want to go to. The active step is always highlighted by a blue
blackground.
5.4.3. Scenario editing
To edit an existing scenario, press to display your options.
You can:
Ñ add steps to the scenario by pressing .
Ñ duplicate a step of the scenario by pressing and
selecting the step you want to have duplicated.
Ñ move the steps by pressing and holding while moving
the element.
6. USING THE DEBRIEFING FUNCTION
mode is automatically entered when a scenario is stopped.
1. At the end of the simulation, press .
2.
3.
6.1. Overview of the results
results obtained according to expected actions you
have set up in the scenario (please refer to chapter
4.3.1.).
6.2. Controlling video playback
(Please refer to chapter 8.3.3.)
6.3. Timeline
Shows the vital parameters as well as important events
over the course of the training:
The green curve shows the heart rate.
The blue curve shows the trend in systolic / the white curve in diastolic blood
pressure.
The yellow curve shows SpO.
The purple curve shows the trend of EtCO.
20

6.4. Review
Below the timeline all validated expected actions, evaluations or tags are chronologically
playback from there as well.
iSimulate TMS (please refer to Chapter 9).
7. USING THE PATIENT-CHART
On an iPad Pro 12.9” you can select between:
D Monitor (Staging)
D Control
D Chart
D Camera
On an iPad 9.7” or 10.2”:
D Control
D Chart
D Camera
On an iPhone:
D REALITi Engage
To use the «Chart» function you need to have an additional iPad. All types are compatible with this feature.
7.1. Viewing documents
1. Open REALITi360 and select the «Chart» mode.
2. Connect to the corresponding monitor.
3. The chart screen appears, patient information is automatically updated.
4. On the left side of the screen there are three categories
(Documents, Media, Lab Results).
5. When a document (ECG, X-ray, CT, labs) is sent to the chart from the controller, it
shows up highlighted.
6. Simply press the desired document to view.
21

8. USING THE VIDEO-FEEDBACK MODULE
The video functions require the activation of the Video-Feedback software option for your REALITi system as well
as the acquisition of the corresponding Video-Feedback hardware.
8.1. Hardware set-up
The Video-Feedback module relies on the use of the recommended iPad video hardware -
Padcaster.
1. Insert the iPad into the mounting frame - the
camera lens should align with the
corresponding holes.
2. Carefully screw in the wide-angle lens into
the mounting frame.
3. Connect the adapter for the microphone and
(if used) the external speaker. The cable has
icons for microphone and speaker.
4. Fix the microphone to the Padcaster and
connect to the adapter.
5. Set up the tripod as needed.
6. Turn on the microphone, the iPad and the
speaker.
8.2. AppleTV installation
Connect the supplied HDMI cable to the display or projector you want to use for viewing
the stream. Plug in the power cable and wait for it to start.
8.3. How to use the video function
Please make sure that the camera iPad is connected to the Wi-Fi network of your REALITi system.
8.3.1. Recording a training session
1. Turn on the iPad camera and open the REALITi360 app.
2. Select the Camera function and connect to the corresponding monitor.
3. The real-time video display is visible on the screen. Find the right angle and view
for your video using the tripod.
4. Recording will start and stop corresponding to the scenario via the Controller.
8.3.2. Visualisation of the simulation
Thanks to AppleTV you can broadcast the video live - including the vital parameters
and the waveforms shown.
Swipe inward from the upper right corner of the screen on the video tablet and choose
«Screen Mirroring». Select your AppleTV to start the broadcast.
To stop, proceed in the same way by de-selecting AppleTV.
22

8.3.3.Videodebrieng
Once the simulation is complete and the scenario is stopped via the Controller tablet,
the camera screen turns black.
1. To play the video on an external screen or projector, please refer to chapter 8.3.2.
2. The review window appears on the Controller (please refer to chapter 6.3.).
3. Pressing starts the review.
4. Playback will start at the beginning of the scenario - you are able to scroll
through the timeline to go to the desired sequences as well as pausing or
stopping the video.
5.
training.
9. TRAINING MANAGEMENT SYSTEM (TMS)
The iSimulate TMS allows you to access a detailed and complete report for each training. With
this individualised document it will be easier for you to establish a follow-up for each trainee.
1. At the end of the simulation, press «STOP» in the lower banner of the REALITi Controller.
2.
3. The review screen appears (please refer to chapter 6.3.) - press at the top left of the
screen.
4. Select , and once on the home page select .
IMPORTANT
In order to get an individualized report, the trainee’s name and details must be entered upon
scenario selection.
On the lower function banner:
9.1. Scenarios
review or delete them.
9.1.1. Deleting a scenario
On the main page, swipe the chosen scenario from right to left to display the «Delete»
icon.
23

9.1.2. Review of the report
Select the scenario you want to review by tapping on the corresponding line.
The report is displayed by default on the «Overview» page.
Please refer to chapter 6.1. for information on the correspondence and dependency
Summary of cardiopulmonary resuscitation (CPR):
24

Summary of events and assessments:
Functions of the lower banner:
Delete: allows you to delete the report being viewed.
Rename: allows you to rename the scenario.
De-Identify: allows you to anonymise the scenario (the name will be deleted).
Video:
PDF: creates a report in .pdf format.
9.1.3. PDF simulation report
You can send the report to an email address or via AirDrop. Press
and select the method you need.
Ensure that there is an internet connection for the tablet. You might have to change networks for that.
(Please refer to chapter 2.2).
9.2. Student management
Access the student management system by pressing in the lower function
further details and can also transfer them to the Launchpad.
IMPORTANT
The student management function does not allow to modify the student information.
The initial information must therefore be rigorous and detailed (chapter 5.6.1).
25

9.3. Launchpad
This tab allows you to start a simulation directly from this section without having to re-
enter the student’s information.
By pressing the icon, the following window appears:
1. Select the trainees you want and add them to the
Launchpad.
2. Choose the student and scenario you want to train with
3. The Controller will automatically open the chosen
scenario’s screen.
9.4. Options
In this menu you can customise the reports by inserting your organisation’s logo.
1. Select in the lower banner.
2. Select your logo from the library of the tablet.
10. USER LICENSE UPDATING
The REALITi license is activated by iSimulate. Each license is assigned to a single REALITi package. The license
number is to be entered on the iPad Pro of the Monitor only. You must be connected to the internet to activate
your license.
Before starting the licensing process, you must be in possession of your login details to access
purchased your REALITi system.
10.1. Access the COMMUNITi
1. Open the REALITi application.
2. Select “Community” on the home screen of your
monitor tablet.
3. Enter your login details.
4. The iSimulate-Online page appears.
26

When you forget your password, you can request to send it to the email address of your iSimulate Online account.
10.2. Activating a license
Once connected to iSimulate-Online, select the «Provisioning» option to display a list of
your licenses.
1. Choose to open the «New License Claim» window.
2.
on the case.
3. Enter the serial number of the iPad:
Go to the iPad-Settings > General > About
Either copy it or write it down
4. Press to claim your license.
27

10.3. License release
the old iPad before assigning it to the new one.
Once connected to iSimulate-Online, select the «Provisioning» option to display your
licenses.
10.4. Exiting COMMUNITi
Quit iSimulate-Online by double-tapping the REALITi logo
You will be returned to the main screen.
11. ADVANCED SETTINGS
parameters. This section is intended for experienced users who have perfect knowledge of the
use of REALITi.
11.1. Controller-/Video-/Chart-Tablet
Go to the iPad-Settings and select REALITi from the list on the left.
Ensure that access to Bluetooth, Microphone and Camera are on.
opening REALITi:
Ñ Menu - displays the home page allowing you to choose functions
Ñ Control - Controller mode
Ñ Chart - Patient-Chart mode
Ñ Camera - Camera mode
Ñ Staging/Monitor - are only possible on the iPad Pro 12.9” monitor tablet
«Camera» allows you to adjust the recording quality of the camera iPad.
The «Language» option lets you select the default language of the REALITi app.
28

11.2. Monitor-Tablet
Open REALITi and then, on the main screen, select the «Settings» option:
1. The «Privacy - Open Settings App» opens the advanced privacy settings in the
iPad settings menu.
2. For option «Start this device as» please refer to chapter 11.1. above.
3.
monitor tablet.
Depending on your license and the «Premium» screens to which you have access, some settings might not be
active.
11.2.1. General settings
You can
D enabled/disable the ability to use a second iPad to simulate a second monitor (copy of
D copy the default scenarios when starting REALITi360.
D enable the display of a pop-up indicating the functions that are not implemented in your
system.
D choose whether or not the 12 lead ECG is immediately displayed without any
manipulation on the monitor.
D enable curve smoothing.
D
D enable the memorisation of the last frequency value during pacing.
D activate the memorisation of the last intensity used during pacing.
D set a default frequency when pacing is activated.
D set a default electrical current when pacing is activated.
D set the duration of the cardiac massage period between two analyses in AED mode.
D enable monitor screen sharing.
D set the monitor screen sharing port (default: 8080).
11.2.2. Premium screens
For example the voice prompts while in AED mode.
29
