
Travel@SLAC
1 | P a g e
L a s t u p d a t e d J u l y 1 3 , 2 0 1 7
Creating an Expense
Report (Detailed)
Creating an Expense Report (Detailed)
Objective: In this section we will go over the steps in detail on how to create an Expense Report
1. Hover over the + New button near the top of the screen, and select Start a Report.
OR click on Expense at the top of the screen. This will take you to a screen with your active
expense reports shown. You can then click Create New Report in order to create a new report.
OR, you can also create a new expense report through your request form. Click on Requests at
the top left of the screen and locate your approved request. You will see a column on the right of
the screen labeled Action, with the option Expense available. Clicking on that will take you to the
Create a New Expense Report page, but will have completed step 3 for you already (selecting a
request form).

Travel@SLAC
2 | P a g e
L a s t u p d a t e d J u l y 1 3 , 2 0 1 7
Creating an Expense
Report (Detailed)
2. You will now be on the Create a New Expense Report page. Complete all the fields.
Required fields are marked in red. A summary of the fields is as follows:
i. Policy: Required. This is where you select whether your trip was pre-approved or not.
a. Select Pre Approved Trip policy if you have a domestic, a foreign, or a combined
trip. The Pre Approved Trip policy would require you to have submitted a request
prior to creating an expense report.
ii. Report/Trip Name: The title of your trip. You can name your trip however you like. You
can also use the same name that you used for the request.
iii. Report/Trip Start and End Date: The dates when you started and ended your travel.
These dates should coincide with the dates of the corresponding approved request.
iv. Trip Type: State whether your trip was domestic or foreign. Keep in mind that any trip that
requires leaving the country is considered foreign. Trip types Relocation, Visitor, and Other
Reimbursement should not be selected under the Pre Approved Trip policy.
v. Business Purpose/Comment: Any additional information you think is important.
vi. Project, activity, WBS, and Fund: Fill in your project number and then proceed with the
rest of the dropdowns. Concur will help narrow down the selections for the remaining
dropdowns.
vii. Location and org: These fields will be pre-populated for you.
3. Add a request to your expense report by clicking Add in the Requests tab.

Travel@SLAC
3 | P a g e
L a s t u p d a t e d J u l y 1 3 , 2 0 1 7
Creating an Expense
Report (Detailed)
4. Find your submitted request from the list, select it and click Add to add it the expense report.
Once it is added, to remove it, select it and click Remove.
5. Click the Next button at the bottom of the page to continue.
Note: If you had reached this page through your previous request, it will already be added under
the Requests tab.
Note: Make sure you have a request associated with every Pre approved Trip expense report.
You will not be able to proceed without an approved request.
6. A popup will appear that will ask if you will be claiming Meals & Incidentals. Choose the
appropriate response to continue.

Travel@SLAC
4 | P a g e
L a s t u p d a t e d J u l y 1 3 , 2 0 1 7
Creating an Expense
Report (Detailed)
Note: The Travel Allowances page is where you will enter the itinerary for your trip.
Note: For the Departure itinerary, enter your business destination in the Arrival City field. This will
determine which per diems will be used in your expense report so it is important to keep this in
mind.
7. Fill out the required fields marked in red and click Save.
8. Click Next at the bottom right of the popup to continue.

Travel@SLAC
5 | P a g e
L a s t u p d a t e d J u l y 1 3 , 2 0 1 7
Creating an Expense
Report (Detailed)
9. Available Itineraries is used if you have a saved itinerary from a previous trip that you want to
reuse instead of creating a new one. If you are already satisfied with your itinerary, don’t do
anything.
10. To add an existing itinerary, select it from the Available Itineraries section, click the Assign button
and Next at the bottom of the page to continue.
11. On the Expenses & Adjustments page you can mark if any of your meals were provided to you or
if your trip was over 30 days. The Allowance amount will be adjusted based on your selections.

Travel@SLAC
6 | P a g e
L a s t u p d a t e d J u l y 1 3 , 2 0 1 7
Creating an Expense
Report (Detailed)
12. Click the Create Expenses button to continue.
13. You will be brought to the page where you can begin submitting your actual expenses. The
screen is broken up into two sides. On the left will be the expenses you are submitting. If you said
yes to claim Meals and Incidentals earlier, you will see that your expense list already has the
M&IE expenses listed. As you begin adding new expenses, they will be added to this list.
14. To add new expenses, click on any of the expense listed in the right hand side of the screen OR
search for a specific expense type using the search filter at the top of the tab. This will narrow
down the available expenses to only show those that match your search.

Travel@SLAC
7 | P a g e
L a s t u p d a t e d J u l y 1 3 , 2 0 1 7
Creating an Expense
Report (Detailed)
15. For each expense selected, complete all the fields (required fields are marked in red).
Note: Make sure to select Personal Card/Cash as the Payment Type when you paid for
expenses out of your pocket and are claiming reimbursement.
16. The expense categories to select from are as follows:
i. Trip Expenses: This includes most of the basic travel expenses you will be dealing with,
including lodging and M&IE.
ii. Transportation: This is where you will add in all of your actual transportation expenses,
as well as any associated fees with the transportation, such as parking or baggage fees.
iii. Other: This is the grab bag of expenses that don’t fit in the other categories. This is where
you would enter your registration fee if you went to a conference.
iv. Personal Car Mileage: Note that this is only for miles driven in your personal car, not
miles driven in a rental car or travelled by taxi, etc.
Travel@SLAC
8 | P a g e
L a s t u p d a t e d J u l y 1 3 , 2 0 1 7
Creating an Expense
Report (Detailed)
17. The following expense types require additional steps such as itemization, allocation or have
additional fields that need to be filled out :
i. Lodging: Requires itemization and special attention to the Travel Allowance checkbox.
Refer to the Itemizing Lodging Expense Quick Guide for detailed steps on how to itemize
your lodging and learn more about the Travel Allowance checkbox.
ii. Airfare:
a. Check the Ticket Re-Used from Cancelled Trip checkbox when you use a credit for
a previously cancelled flight to purchase airfare. You will be asked to attach the
itinerary for the original airfare as well as proof of payment.
b. Check the Claiming airfare for a cancelled Trip checkbox to claim airfare
reimbursement for a cancelled trip.
iii. Training/Registration: Requires itemization and allocation of fees going to STAP funds to
the correct Project Activity Code. Refer to the Creating an Expense Report for Registration
Fees Charged to STAP Quick Guide for detailed steps on how to itemize and allocate your
registration fees.
iv. Personal Car Mileage: Concur has a Mileage Calculator tool to automatically calculate
the amount to claim for your personal miles. Refer to the Entering Personal Car Mileage
Quick Guide for detailed steps on how to use this tool.
Note: For the majority of expenses, and for any expense over $75, you will need to have a receipt
in order to submit your report. You can attach your receipts as you add your expense or wait until
you finish adding all the expenses to see which ones require a receipt.
Note: This orange icon will appear on the left hand side of each expense that requires a
receipt. This icon will turn blue once you attach the receipt.
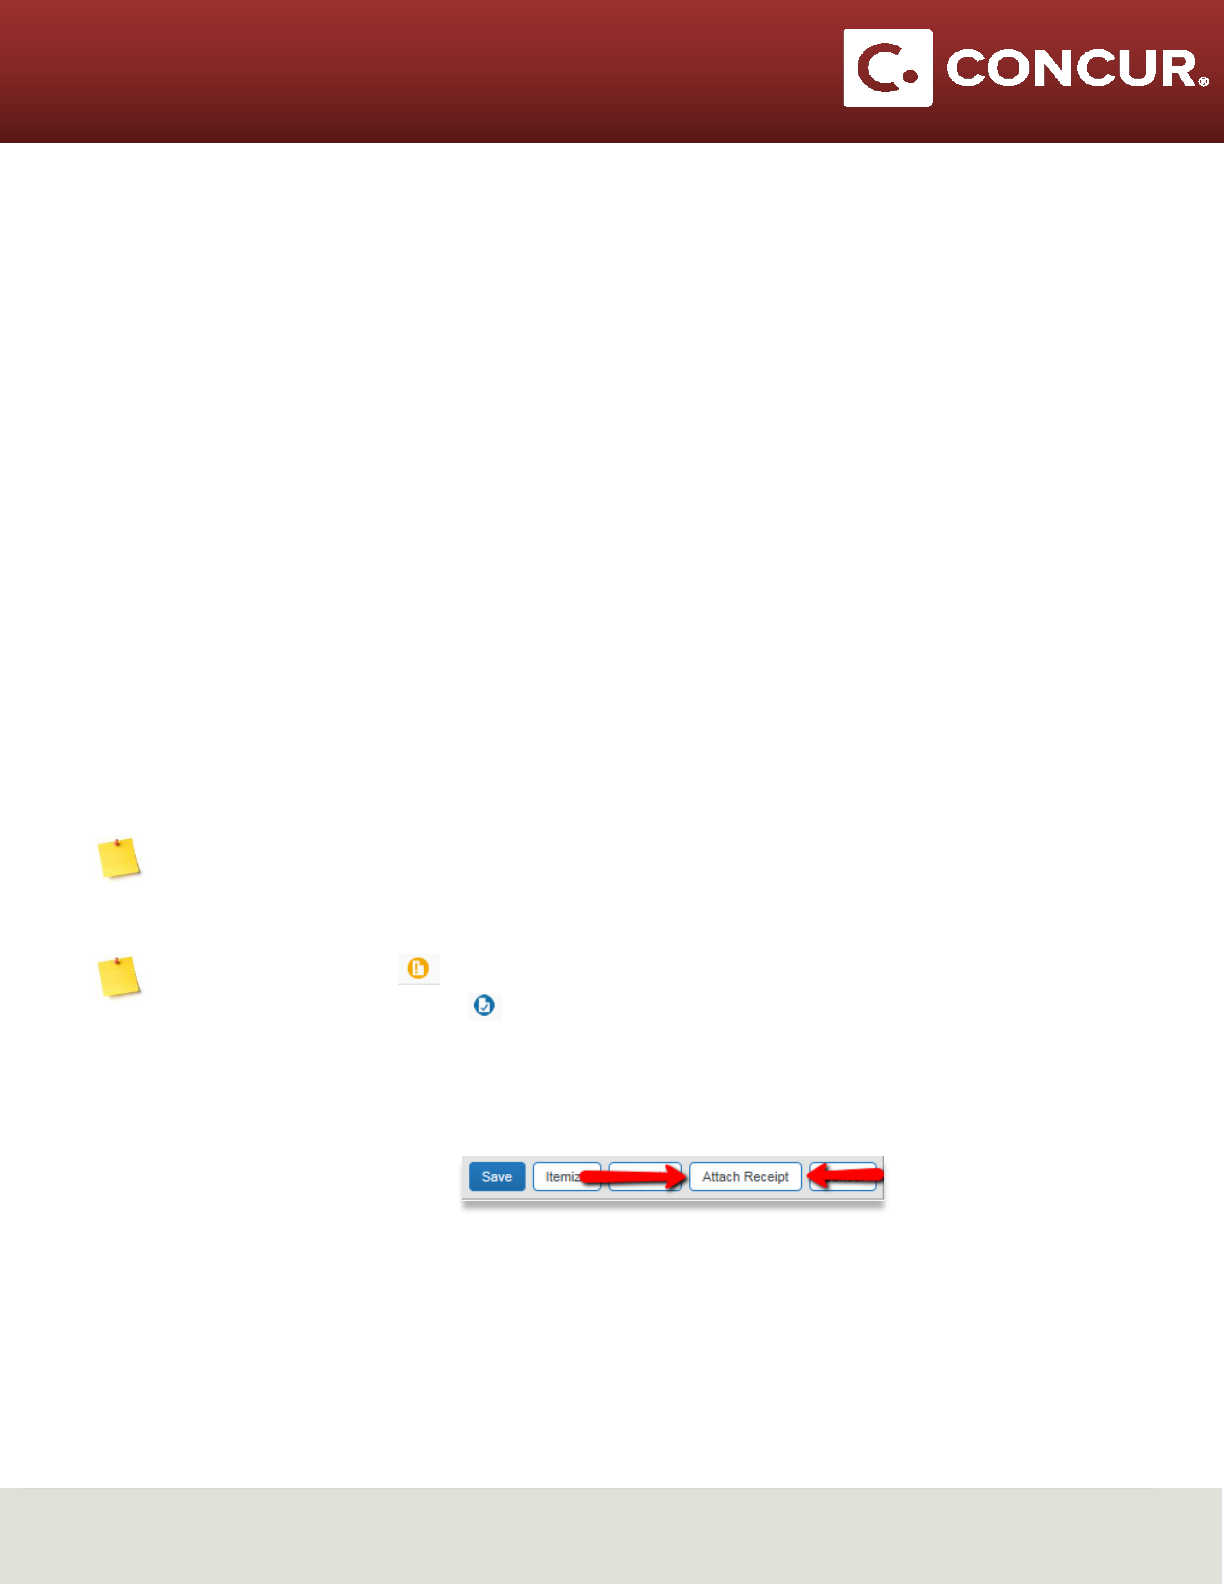
18. To add a receipt to your expense, select the expense related to your receipt and click the Attach
Receipt button at the bottom right of the page.

Travel@SLAC
9 | P a g e
L a s t u p d a t e d J u l y 1 3 , 2 0 1 7
Creating an Expense
Report (Detailed)
19. You will then be given the option to either upload a file from your computer or to select a
previously uploaded receipt. Uploading your receipt or selecting your receipt image will allow you
to click the Attach button next to the option you selected.
20. The receipt will be attached to your expense. The Receipt Image tab will appear, select that tab
to see the image of your attached receipt.
21. Go back to the Expense tab and click the Save button on the lower right hand side.

Travel@SLAC
10 | P a g e
L a s t u p d a t e d J u l y 1 3 , 2 0 1 7
Creating an Expense
Report (Detailed)
22. After clicking Save, the expenses will appear on the left hand side of the screen
23. Repeat steps 14 – 20 until all expenses are entered.
24. Click Submit Report at the top right hand side of the page to submit your report.
25. Read over the agreement, and then click Accept & Submit.
