Welcome to AccountsFlow, Fintech to
QuickBooks Invoice Integration!
Easy Steps Quick-Start Guide
Let’s get started…
Login into your account by selecting the login
button on our website:
https://fintech.accountsflow.com/
Once logged in – Connect to QuickBooks
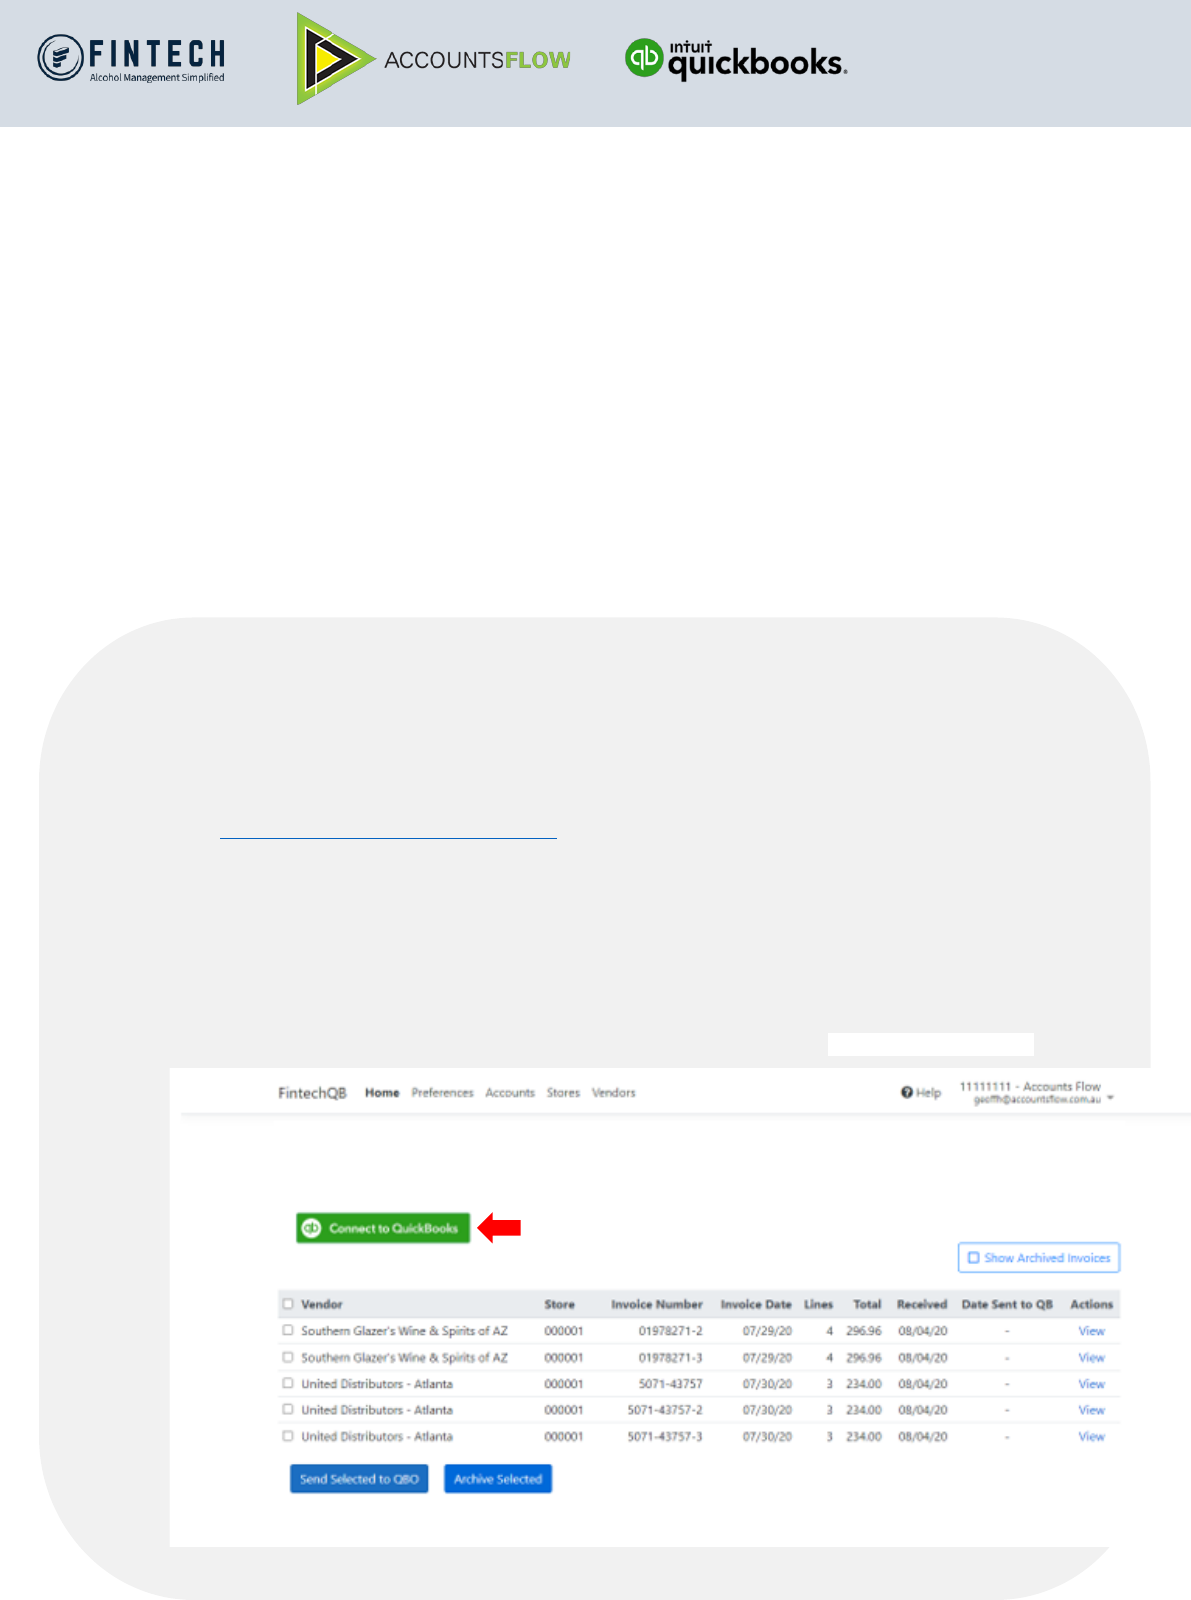
When you log into AccountsFlow you will
be at the ‘Home Page’ Click the ‘Connect to
QuickBooks’ Green Button.

You will be directed to your QuickBooks login page.
Note: that neither Fintech nor AccountsFlow receives your login credentials from
QuickBooks. You can revoke the app’s ability to send data to your QuickBooks
account at any time in the ‘My Apps’ section of QuickBooks Online.

Once you’ve signed in, you will be prompted to select your
company and connect to the AccountsFlow app.
1. If you have multiple companies set up in QuickBooks, select the appropriate
one and click ‘Next’.
2. You will be prompted to connect to the AccountsFlow Fintech App.
3. Click the ‘Connect’ button and you will be brought back to the AccountsFlow
app to complete your setup.
Congratulations, you’ve now connected your QuickBooks to AccountsFlow!

Now that you’ve connected QuickBooks to AccountsFlow
You will give the system some basic instructions so it will deliver your invoice
data exactly where you want it to go in QuickBooks
Preferences:
1. Exporting invoice data to ‘Bills’ or ‘Expenses’.
2. Exporting invoice data as ‘Category Details’ or ‘Item Details’.
Note: The system defaults to ‘Bills’ and ‘Category Details’ so you can skip this section if you want to keep these
settings.
Changing invoice data to export to ‘Expenses’.
Click on click here
below.

Export Invoices As: Select ‘Expenses’.
Payment Account: Select which account the payment was made from.
Payment Method: This is optional and can be left as (None). Otherwise select from the dropdown list.
This will take you back to the main ‘Preferences’ page to select ‘Category Details’ or ‘Item Details’.

Select either Category details or Item details.
Note: Category details is the default setting and is recommended.
Select – Next Step: Configure Accounts >>

Accounts:
Which Expense Accounts for your Purchases (typically these will be Cost of Goods Sold Accounts)
Note: the same account may be used for all categories if that is your accounting process.
Select which default Expense Account from the drop-down screens
Select – Next Step: Configure Stores >>

Stores:
Match the Fintech Store ID with the appropriate Class/Location in your QuickBooks.
Note: If you do not use QuickBooks class or location tracking you do not need to set any of these fields
Select – Next Step: Configure Vendors >>

Vendors:
Match the Vendors coming from Fintech to your QuickBooks Vendors
Note: Also Select “Auto-Send” for each Vendor
This will then enable the system to automatically send future invoices into
QuickBooks and remove the need to manually select them from the home
screen and request they get sent through.
That’s it, you’ve completed the setup!

Ok, I’ve done the setup, now what?
You will want to send any existing invoices through to QuickBooks.
In many instances, you will have some invoices already available from Fintech. As you’ve
just done the setup, AccountsFlow wasn’t ready to send them through when they arrived.
However, you can easily and quickly send them through now that your setup is complete.
Click on the Home Tab – Now select the invoices you wish to send to QuickBooks.
1. You can send each one by clicking “send” to the right.
2. You can tick the box next to Vendor at the top left and it will select all invoices
to send.
3. Or just tick the boxes against each invoice to send. Once selected just click on
the “Send Selected to QBO” button at the bottom.
Warning - Clicking will disconnect your QuickBooks account and prevent
any invoices from being sent through.

Your Invoices are now loaded in QuickBooks
Note: Going forward, you will not have to do the steps above as your invoices will now be
sent automatically to QuickBooks. If you do add a new Vendor from Fintech, you can
quickly add them to the setup by following the steps above that pertain to Vendors.
When you log into QuickBooks, you will notice all your invoices have loaded.
By selecting an invoice, you will see all line items listed.